SID SMAP2 User manual


Lire ce manuel avec attention avant d’utiliser l’appareil pour en assurer un bon usage en toute sécu-
rité. Garder ce manuel précieusement pour pouvoir vous y référer plus tard/
Read this manual carefully before using the appliance to make sure that it is used properly and in
complete safety. Keep this manual in a safe place for future reference/
Dieses Handbuch vor Gebrauch des Geräts bitte aufmerksam durchlesen, um eine sichere Nutzung
zu gewährleisten. Das Handbuch gut aufbewahren, falls Sie es später erneut benötigen/
Leer este manual con atención antes de utilizar el aparato para asegurar su correcto uso y seguridad.
Conservar el manual para poder consultarlo cuando sea necesario.
- Ne pas essayer d’installer l’appareil vous-même à moins que vous ne soyez
un technicien compétent. Cela pourrait affecter son bon fonctionnemen et donc
la sécurité
Un branchement électrique incorrect peut provoquer une électrocution ou
un court-circuit
- Ne pas enlever le capot lorsque le produit est branché
-Ne pas utiliser l’appareil dans un environnement humide, par exemple
près d’une baignoire ou d’une douche où il pourrairt être l’objet d’éclaboussures
directes ou dans des endroits à fortes condensations.
Cela pourrait entrainer un dysfonctionnement de l’appareil et un choc électrique.
Vous pourriez vous blesser ou provoquer un court-circuit, un incendie.
pourrait entrer à l’intérieur et provoquer un court circuit ou une électrocution
-Ne pas brancher d’autres appareils sur la même ligne.
Utiliser un autre appareil sur la même ligne pourrait provoquer un échauffement
de la prise et un incendie.
Vous pourriez vous électrocuter
-Ne pas laisser les enfants se suspendre à l’appareil,
celui-ci pourrait se détacher de son support
- Versuchen Sie nicht, das Gerät selbst zu installieren, es sei denn, Sie sind selbst
ein Fachmann. Sonst könnte der ordentliche Betrieb und damit die Sicherheit
beeinträchtigt werden.
-
nommen werden.
Falls der elektrische Anschluss unsachgemäß gelegt wird, kann es zu einem
Stromschlag oder Kurzschluss kommen.
- Solange das Produkt angeschlossen ist, darf die Schutzhaube nicht abgenommen
werden.
- Das Gerät darf nicht in einem Feuchtbereich verwendet werden, z. B. in der Nähe
einer Badewanne oder Dusche, wo es direkt von Spritzwasser getroffen werden
könnte, oder in Räumen mit starker Kondenswasserbildung.
Ansonsten könnte es zu Betriebsstörungen am Gerät und Stromschlaggefahr
kommen.
- Das Gerät nicht ohne triftigen Grund zerlegen; keine Änderung einbringen.
Sie könnten sich sonst verletzen oder einen Kurzschluss oder Brand auslösen.
Gerät eindringen und so einen Kurzschluss oder Stromschlag auslösen könnte.
- Keine weiteren Geräte an denselben Stromkreis anschließen.
Bei Gebrauch eines weiteren Geräts auf demselben Stromkreis kann sich die
Steckdose erhitzen und ein Brand entstehen.
- Zum Kontrollieren und Reinigen das Gerät vorher abklemmen.
Vorsicht, Stromschlaggefahr!
- Kindern ist zu verbieten, sich vom Gerät herabhängen zu lassen, da es sonst aus
seiner Halterung gerissen werden könnte.
Si vous ne faites pas un bon usage de cet appareil ou ne suivez pas les
précautions en matière de sécurité, vous pourriez vous blesser gravement.
Falls Sie dieses Gerät unsachgemäß betreiben oder die Vorbeugungsregeln
für die Sicherheit missachten, können Sie sich schwer verletzen.
Fr
De
technician. Doing so may affect its operation and safety.
Incorrect electrical connection can result in electrocution or short circuits.
- Never take off the cover when the appliance is connected.
- Do not use the appliance in humid atmospheres, for example close to a bath or a
shower, where it may be splashed, or in places exposed to severe condensation.
This may cause the appliance to malfunction and result in electric shock.
- Do not disassemble the appliance without good reason and do not make any
changes to it.
enter the appliance, resulting in a short circuit or electrocution.
- Do not connect any other appliances on the same line.
- Disconnect the appliance before inspecting or cleaning it.
- Do not allow children to hang from the appliance, as it may become detached
from its support.
-No intente instalar el aparato por su cuenta a menos de que usted sea un profe-
sional de la materia. Esto podría afectar al funcionamiento del aparato y por tanto
a su seguridad.
conexión de un cable podría provocar una electrocución o un corto-circuito.
-No quitar la carcasa cuando el producto esté conectado.
-No utilizar el producto en ambientes húmedos, por ejemplo cerca de una bañera
o de una ducha o podría estar expuesto a salpicaduras directas, ni en lugares con
fuertes condensaciones de agua. Esto podría acarrear una disfunción del aparato
y un choque eléctrico.
dañarlo, provocar un corto-circuito o un incendio.
penetrar al interior y provocar un corto-circuito o una electrocución.
-No enchufar otros aparatos en la misma línea eléctrica. Conectar otro aparato en
la misma línea eléctrica podría provocar un sobrecalentamiento del enchufe y un
incendio.
-Desconectar el aparato antes de inspeccionarlo o limpiarlo. Usted se podría
electrocutar.
-No dejar a los niños subirse al aparato. Su soporte podría soltarse.
If you misue this appliance or do not take the safety precautions, you may
be seriously injured.
Si el aparato no se utiliza correctamente o no se tienen en cuenta las pre-
cauciones en materia de seguridad podrían causarse daños graves.
EN
Es
1

www.jvd.fr
LE CONFORT A PORTEE DE MAIN
I
II
III
IV
V
IV
REGLAGE DE LA VITESSE D’AIR
CARACTERISTIQUES TECHNIQUES
ADJUSTING THE AIR SPEED
USE
MAINTENANCE AND CLEANING
TECHNICAL CHARACTERISTICS
EINSTELLUNG LUFTGESCHWINDIGKEIT
BENUTZUNG
PFLEGE UND REINIGUNG
WARNLEUCHTEN
INSTALACIÓN
UTILIZACIÓN
CARACTERÍSTICAS TÉCNICAS
3
10
11
12
14
14
INHALT / ÍNDICE
Fr
I
I
I
II
II
II
III
III
III
IV
IV
IV
V
V
V
IV
IV
IV
3
10
11
12
14
14
3
10
11
12
14
14
3
10
11
12
14
14
En
De
Es
2

I
ATTENTION
- Ne pas essayer d’installer l’appareil vous-même à moins que vous ne soyez
un technicien compétent. Cela pourrait affecter son bon fonctionnement et donc
la sécurité.
-Ne pas faire l’installation de l’appareil pendant qu’il est branché
Précaution avant l’installation de l’appareil
N’installez pas cet appareil dans des endroits présentant les caractères suivants :
-Quand la température est inférieure à – 10° ou supérieure à + 40°C
-Là où l’appareil peut entrer en contact direct avec de l’eau
-Dans les endroits à forte condensation
-Dans les endroits où des gaz corrosifs ou neutres sont présents
-A moins de 20 m ou à plus de 2000 m du niveau de la mer
Information préalable à l’ installation
-Utilisez un courant monophasé alternatif de 220V-240V / 50 Hz
-Utilisez un cable d’alimentation avec des conducteurs de section de 2,5 mm²
-Evitez les endroits où une porte pourraient heurter l’appareil.
-Anticiper la position de l’arriver du câble d’alimentation,
-Connaître préalablement les dimensions et l’encobrement du produit installé
CAUTION
technician. Doing so may affect its operation and safety.
- Do not installed the appliance when it is connected.
Precautions before installing the appliance
Do not install the appliance in places with the following characteristics:
- Temperature lower than –10° or higher than +40°C.
- Places where the appliance may come into direct contact with water.
- Places exposed to severe condensation.
- Places where corrosive or neutral gases are present.
- At less than 20m or more than 2000m above sea level.
Information for installation
- Use a monophase AC current of 220V-240V / 50 Hz.
- Use a power supply cable with conductors with a cross-section of 2.5mm².
- Avoid places where the appliance could be hit by a door.
- Allow for the power supply cable inlet.
- Find out the dimensions and space requirements of the product before installing.
Fr En
ACHTUNG!
- Versuchen Sie nicht, das Gerät selbst zu installieren, es sei denn, Sie sind selbst ein
Fachmann. Sonst könnte der ordentliche Betrieb und damit die Sicherheit beein-
trächtigt werden.
- Das Gerät darf während des Installierens nicht angeschlossen sein.
- Das Gerät an einer ausreichend tragfähigen Unterlage befestigen.
Sicherheitsvorkehrung vor der Geräteinstallation
- Temperaturen unter – 10° oder über + 40° C.
- Gefahr der direkten Berührung des Geräts mit Wasser.
- Bereiche, die starker Kondenswasserbildung ausgesetzt sind.
- Bereiche, die ätzenden oder neutralen Gasen ausgesetzt sind.
- Weniger als 20 m bzw. mehr als 2000 m über dem Meeresspiegel.
Voraussetzungen für die Installation
- Netzanschluss an Einphasen-Wechselstrom 220V-240V / 50 Hz.
- Anschluss über ein Netzkabel mit Leiterquerschnitt 2,5 mm².
- Lassen Sie beidseitig mindestens 15 cm Platz frei, um den Zutritt zu den Filtern zu
gewährleisten.
- Vermeiden Sie Einbauorte, an denen eine Tür an das Gerät anschlagen könnte.
- Zur Gerätebefestigung eine absolut gerade Wand wählen.
- Die Kabeleintrittsposition berücksichtigen.
- Die Abmessungen und der Raumbedarf des installierten Produkts müssen im voraus
bekannt sein.
ATENCIÓN
-No intente instalar el aparato por su cuenta a menos de que usted sea un técnico pro-
fesional. Esto podría afectar al funcionamiento del aparato y por tanto a su seguridad.
-No hacer la instalación del producto estando conectado.
Precauciones antes de la instalación del aparato
No instalar este aparato en los lugares que presenten las siguientes características:
-Cuando la temperatura es inferior a -10º ó superior a + 40º
-En un lugar donde el aparato pueda entrar en contacto con el agua
-Lugares con mucha condensación de agua
-Lugares donde haya gases corrosivos o neutros
-A menos de 20 m o a más de 2000 m del nivel del mar
Información previa a la instalación
-Usar una corriente alterna de 220V-240V/50Hz
-Utilizar un cable de alimentación mínimo de 2,5 mm2 de sección
-Dejar al menos 15 cm de espacio en uno de los dos lados para poder acceder a los
-Evitar los lugares donde una puerta pueda chocar con el aparato y dañarlo
-Prever la toma de entrada del cable de alimentación
-Conocer previamente las dimensiones y volumen del producto instalado.
De Es
3

www.jvd.fr
LE CONFORT A PORTEE DE MAIN
Dimensions / Dimensions / Abmessungen / Dimensiones
Encombrement et contraintes d’installation /
Space requirements and installation constraints /
Raumbedarf und Installationsvoraussetzungen /
Volumen y obligaciones de instalación
Zone d’arrivée électrique/
Electric inlet zone/
Eintrittsstelle Stromkabel/
Entrada de alimentación eléctrica
Plate for wall attachment/
Befestigungsblech an der Wand/
Soporte de sujeción mural
Vue de face / Front view
Vorderansicht / Vista Frontal
Espace d’arrivée éléctrique/
Electrical inlet zone/
Eintrittsstelle Stromkabel/
Zona de la alimentación eléctrica
4

Procédure d’installation / Installation procedure
Installationsanweisung / Procedimiento de instalación
1
2
Fr
En
De
Es
Fr
En
De
Es
Fixation de la tôle murale d’accroche:
Fixer la tôle murale à la hauteur souhaitée
(la hauteur préconisée se situe entre 90 et 110 cm)
Prévoir la sortie du cable du mur adaptée à la hauteur de
l’installation
dans la partie basse de l’appareil
(Gabarit de perçage p6 )
Attaching the metal wall support plate:
Mount the wall support plate at the required height. The recommended
height is between 90 and 110cm.
Provide a wall cable outlet that is adapted to the height of the appliance.
Prepare the attachment holes in the lower part of the appliance (drilling
template on Page 6).
Befestigung der Wandhalterung:
Das Befestigungsblech auf der gewünschten Höhe anbringen. Die emp-
fohlene Höhe beträgt 90 bis 110 cm.
Die Austrittsstelle des Kabels aus der Wand richtet sich nach der Installa-
tionshöhe.
Die Befestigungsbohrungen im unteren Gerätebereich vorbereiten (Bohr-
schablone S. 6).
Fijación del soporte de sujeción mural
Fijar el soporte de sujeción mural en la altura deseada (la altura prestable-
cida se sitúa entre 90 y 100 cm)
Prever la salida del cable de pared adaptándola a la altura de la instalación
deseada.
perforación. Ver pg 6)
Préparation de l’appareil
Démontage du réservoir:
Tirer vers l’avant le résevoir
Retirer le capot :
Le capot n’est pas livré vissé
Retirer le capot par un mouvement de translation vers l’avant
Preparing the appliance
Removing the tank:
Insert the key in the hole under the appliance.
Pull the tank forwards.
Remove the cover.
The cover is not screwed in place when delivered.
Remove the cover by pulling forwards.
Vorbereitung des Geräts
Abbau der Wanne:
Den Schlüssel in das Loch unter dem Gerät einstecken.
Die Wanne nach vorn herausziehen.
Die Schutzhaube abnehmen:
Die Schutzhaube wird lose mitgeliefert.
Die Schutzhaube nach vorn abziehen.
Preparación del aparato
Sacar el depósito de agua:
Tirar del depósito hacia delante
Quitar la carcasa:
Quitar la carcasa con un movimiento
de traslación hacia delante.
1
1
1
1
1
1
1
1
3
3
3
3
2
2
2
2
2
2
2
2
3
3
3
3
90 - 110 cm
5
3
12
3

www.jvd.fr
LE CONFORT A PORTEE DE MAIN
3
4
Fr
En
De
Es
Fr
En
De
Es
Montage de l’appareil au mur
Fixer le bas du produit
Mounting the appliance on the wall
Pass the power supply cable through the hole and towards the front.
Mount the appliance on the support plate.
Secure the base of the product.
Befestigung des Geräts an der Wand
Die Klasse-II-Abdeckung öffnen.
Das Netzkabel durch die Öffnung nach vorn durchstecken.
Das Gerät auf dem Halterungsblech anbringen.
Das Produkt unten befestigen.
Fijación del aparato en la pared
Abrir la tapa clase II
Colocar el aparato en el soporte de sujeción mural
Fijar la parte baja del producto
Connexion au bornier
Installation et vissage du serre cable
Connection to the terminal strip
Install and tighten the cable clamp.
Adjust the length of the power supply wires.
Connect the two power supply wires to the terminal strip.
Anschluss an die Klemmleiste
Einsetzen und Verschraubung der Kabelschelle.
Die Anschlussdrähte ablängen.
Anschluss der beiden Drähte an die Klemmleiste.
Conexión a la toma eléctrica
Instalación y conexión de los cables.
Ajustar la longitud de los cables de alimentación
Empalme de los dos cables de alimentación a la toma eléctrica.
1
1
1
1
1
1
1
1
2
2
2
2
2
2
2
2
3
3
3
3
4
4
4
4
1
2
6

160 mm
Gabarit de Perçage / Drilling template
Bohrschablone / Tamaño de perforación
7
Vue de face / Front view
Vorderansicht / Vista Frontal
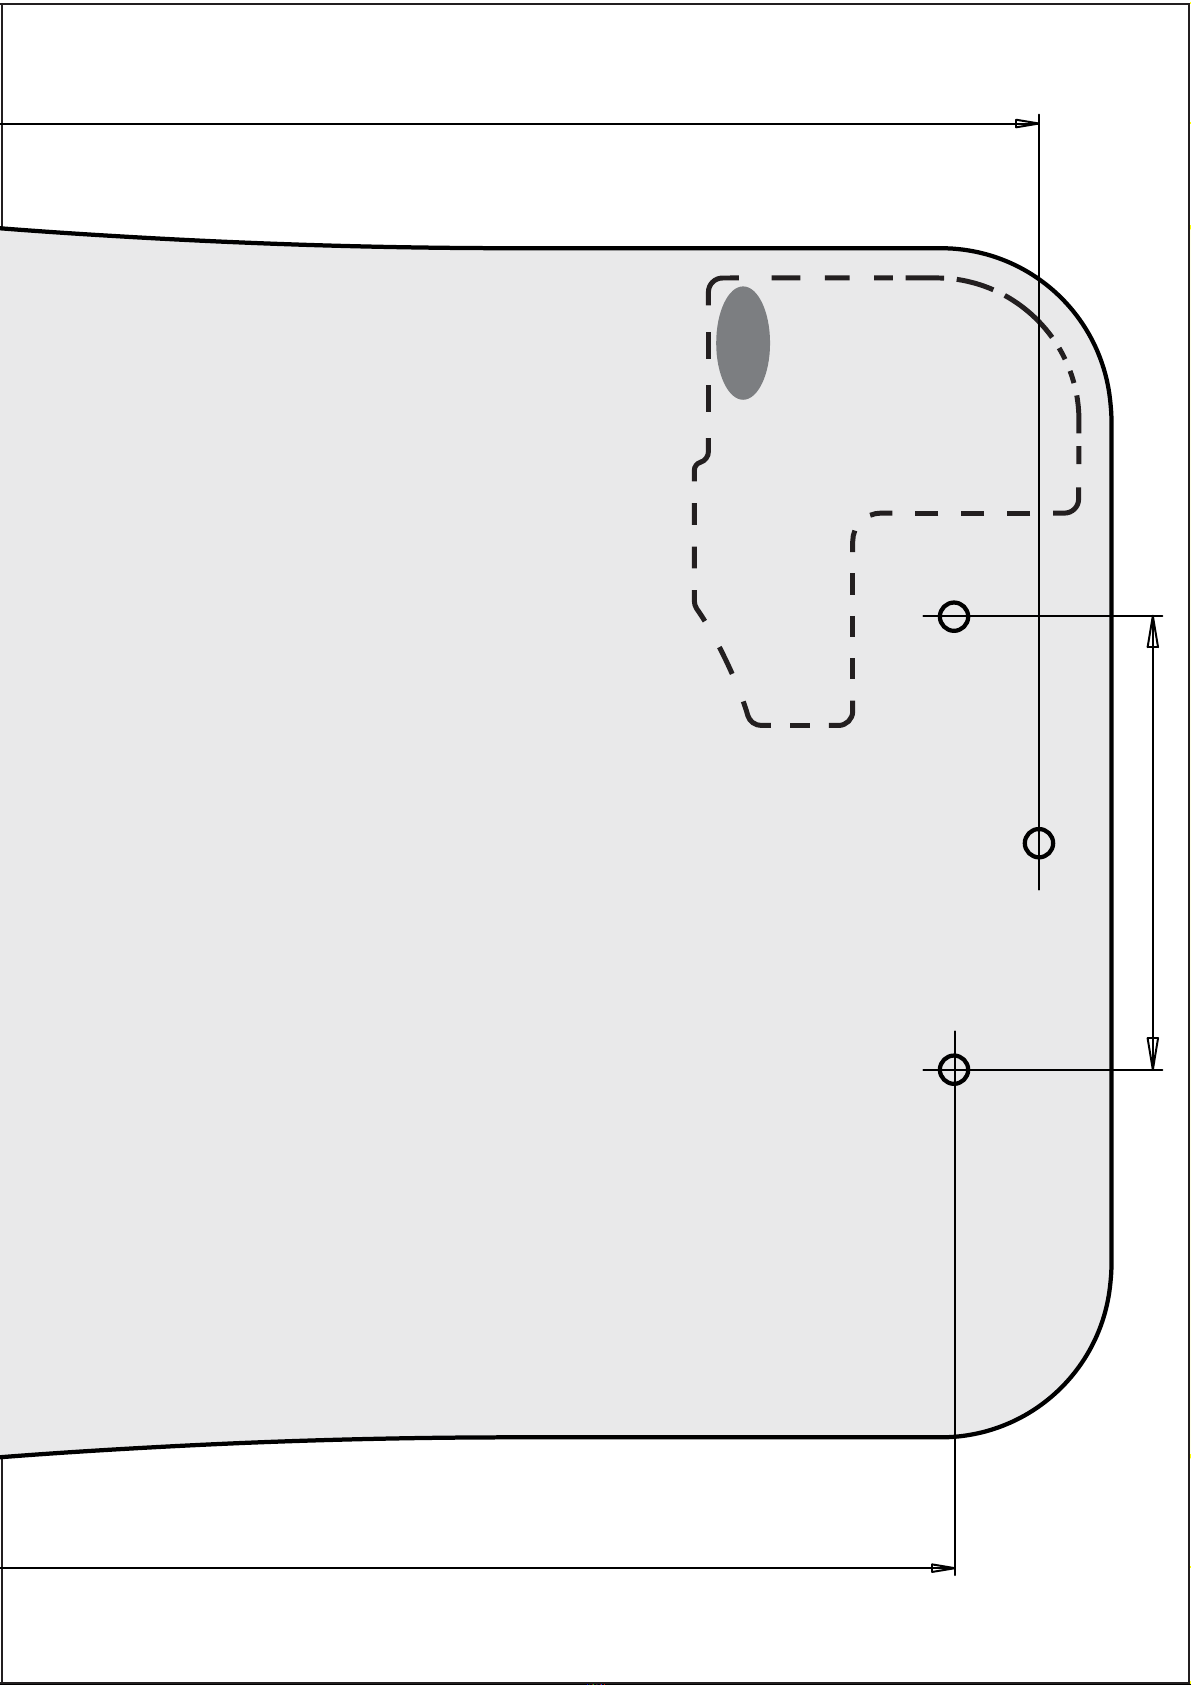
315 mm
80 mm
300 mm
8
ECHELLE 1 / SCALE 1
MASSSTAB 1:1 / ESCALA 1
Sortie de câble / Cable outlet
Kabelaustritt / Salida del cable
REGLAGE VITESSE D’AIR/
ADJUSTING THE AIR SPEED/
EINSTELLUNG DER LUFTGESCHWINDIGKEIT/
5Fr
En
De
Es
Fin de l’installation
Refermer le capotage classe II
Remonter le capot
Vissage des 4 vis
Remettre le réservoir
End of the installation
Close the class II cover.
Install the cover.
Tighten the four screws.
Install the tank.
Installation beenden
Die Klasse-II-Abdeckung wieder schließen.
Die Schutzhaube wieder anbringen.
Die 4 Schrauben einschrauben.
Die Wanne wieder anbringen.
Fin de la instalación
Cerrar la tapa clase II
Poner la carcasa
Enroscar los 4 tornillos
Volver a meter el depósito de agua
r
1
1
1
1
2
2
2
2
3
3
3
3
Fr
En
De
Es
Il est possible d’ajuster la vitesse d’air à l’aide d’un tourne vis
Veillez à bien harmoniser les 2 fentes du haut et du bas
The air speed can be adjusted using a screwdriver.
Carefully align the two upper and lower slits.
Die Luftgeschwindigkeit lässt sich mit einem Schraubendreher einstellen.
Achten Sie darauf, dass die beiden Schlitze oben und unten richtig übereinanderliegen.
Zum Erhöhen bzw. Verlangsamen der Strömung je nach dem zu- bzw.
aufschrauben.
Se puede ajustar la velocidad del aire con la ayuda de un destornillador
Comprobar que la velocidad, procedente tanto de la parte de arriba como
de abajo sea acorde.
9

1
2
3
BENUTZUNG / UTILIZACIÓN
www.jvd.fr
LE CONFORT A PORTEE DE MAIN
1
2
3
Fr
Fr
Fr
En
En
En
De
Es
De
Es
De
Es
Tendez les deux mains et insérez les
dans l’anneau .
Celui-ci se déclenchera automatiquement
Retirez lentement les mains
qui est sur votre peau
Retirez complètement les mains.
Le processus prend environ 10 à 15 secondes
L’appareil s’arrête automatiquement
Place both hands inside the ring.
The drier starts automatically.
Slowly remove both hands
off your skin.
Completely remove your hands.
This takes between 10 and 15 seconds.
The appliance stops automatically.
Die Hände nach vorn strecken und in den Ring einführen.
Das Gerät springt automatisch an.
Extender las dos manos e insertarlas en la elipse del aparato.
El aparato se pondrá en marcha automáticamente
Ziehen Sie die Hände nach und nach heraus,
während die Luftströmung das Wasser
auf Ihrer Haut fortbläst.
Retirar lentamente las manos mientras
está sobre su piel
Ziehen Sie die Hände vollkommen heraus.
Der Gesamtablauf dauert ca. 10 bis 15 Sekunden.
Das Gerät schaltet sich von selbst aus.
Retirar completamente las manos.
El proceso dura unos 10-15 segundos.
El aparato se detiene automáticamente
10
1
2
3
4
5
Fr
Fr
Fr
Fr
Fr
En
En
En
En
En
De
De
De
De
De
Es
Es
Es
Es
Es
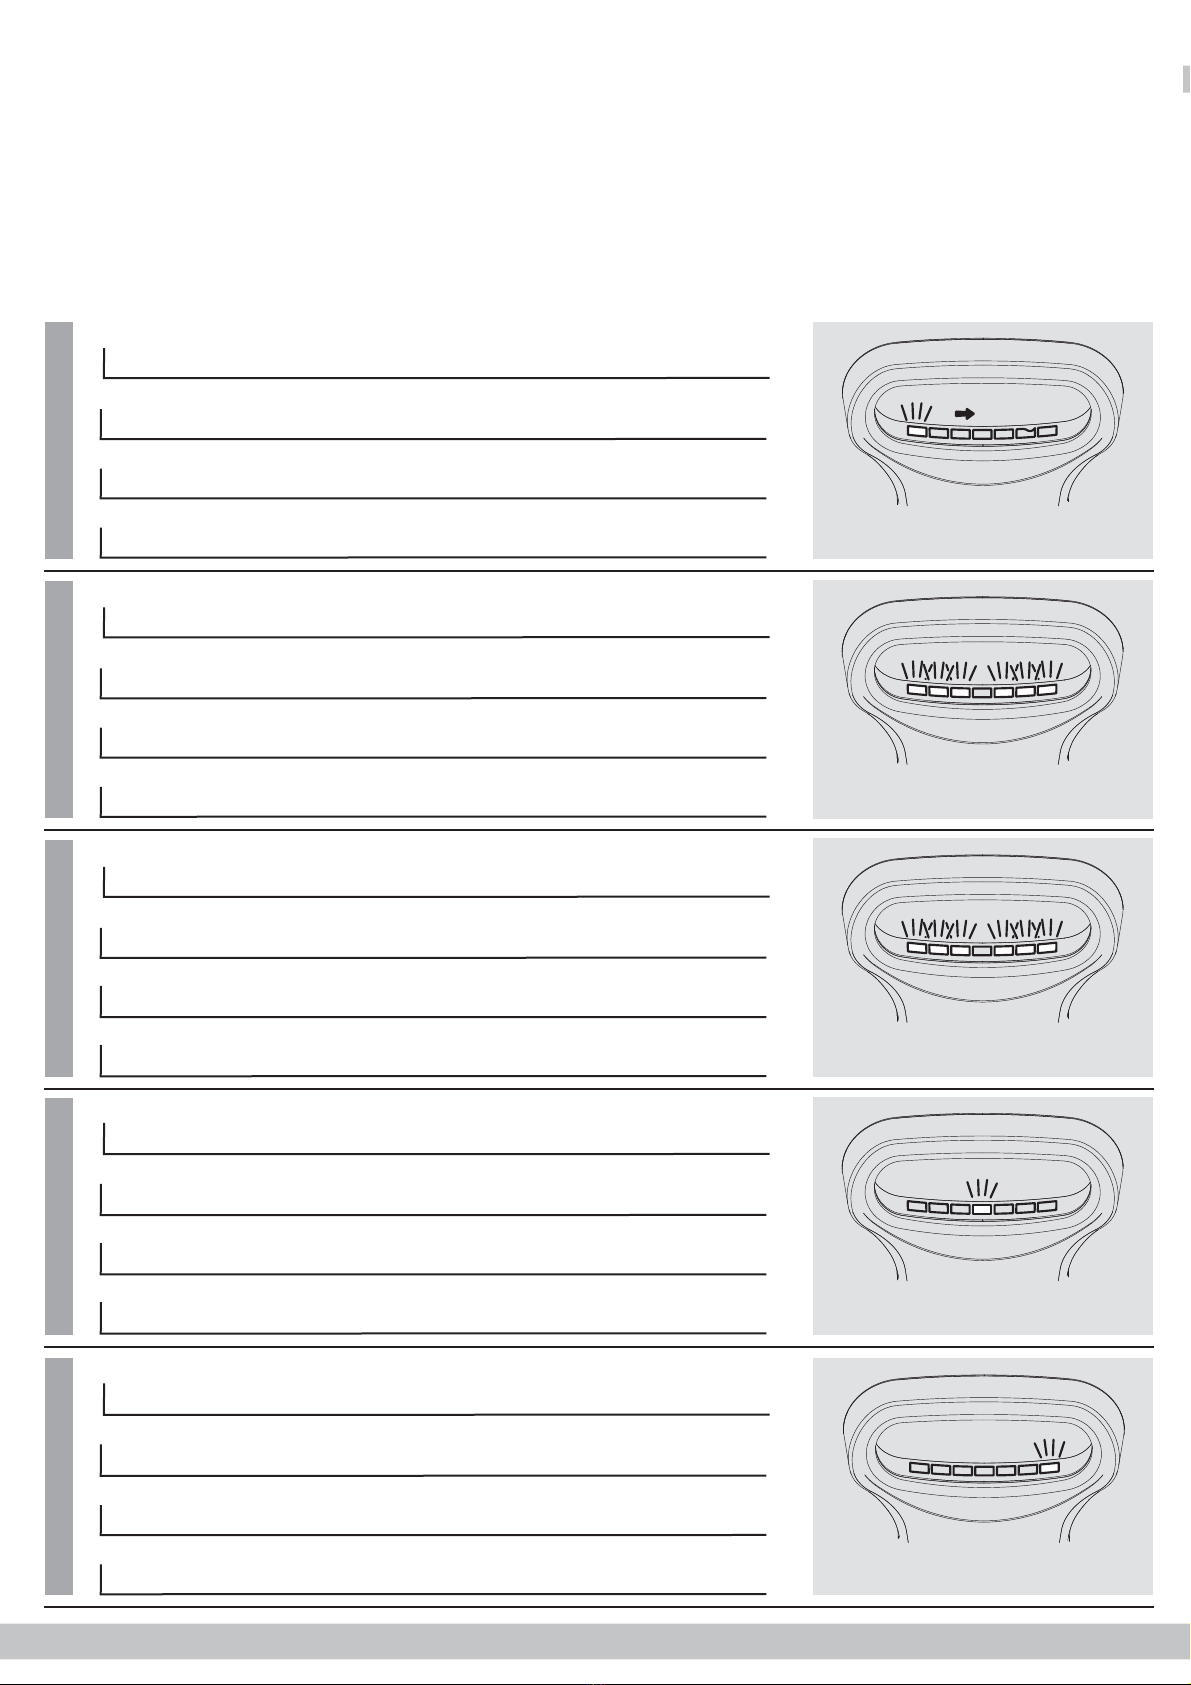
Initialisation de la carte électronique :
Au début de la mise sous tension pendant 10 s le cheminement des led témoigne de l’initialisation du système de
détection. Ne pas utiliser le produit pendant cette période
Etat de veille :
Le produit est prêt les leds témoignent de l’état de veille elles s’allument en continue
En fonctionement :
Les mains sont détectées l’ensemble des leds clignote et s'arrête au bout de 10 s
Signal que le réservoir est plein :
Une led rouge s’allume au milieu, il faut vider le réservoir
En cas de probleme de detection :
droite. Au bout de 15 cycles répétés , le moteur est coupé, la LED clignote lentement. Débrancher l’appareil
Initialisation of the PCB.
For 10 seconds after the appliance is switched on, the status of the LEDs indicates that the detection system is
being initialised. Do not use the appliance during this period.
Standby:
The product is ready when the LEDs indicate that it is in standby mode by continuously shining
Operation:
Tank full:
When the red LED in the middle comes on, the tank needs to be emptied.
Detection problem:
Initialisierung der Elektronikkarte:
Beim Einschalten zeigt die Leuchtsequenz der LEDs während 10 Sekunden die Initialisierung des Gebersystems
an. Das Produkt darf während dieses Ablaufs nicht benutzt werden.
Standby-Betrieb:
Das Produkt ist zur Anwendung verfügbar
In Betrieb:
Wenn das Gerät eingeschaltet ist, werden die Hände sichtbar - automatisch gehen Lichtsignale des gesamten
LED -Systems an und schalten sich automatisch nach 10 Sekunden wieder aus.
Meldung, dass die Wanne voll ist:
In der Mitte leuchtet eine rote LED. Die Wanne muss geleert werden.
Bei Problemen mit der Erkennung:
Nach 60 s ununterbrochener Erkennung wird der Motor 60 s gestoppt. Die LED außen rechts geht in schnelles Blinklicht über.
Nach 15-facher Wiederholung des Zyklus wird der Motor abgeschaltet, die LED blinkt langsam. Das Gerät abklemmen.
Puesta en marcha del circuito electrónico o placa base
Cuando se enciende el aparato se produce la activación de los testigos luminosos durante 10 segundos, lo que
indica la iniciación del sistema de detección. No utilizar el aparato durante esta etapa.
Fase previa al funcionamiento
El aparato está listo. Los testigos luminosos indican esta fase cuando parpadean en continuo.
En funcionamiento
El aparato detecta las manos a la vez que los testigos luminosos parpadean y se detienen al cabo de 10s.
Señal de que el depósito de agua está lleno
Una luz roja se enciende en el medio de la elipse. Hay que vaciar el depósito de agua.
En caso de problema de detección: Al cabo de 60s de detección continua, el motor se detendrá
automáticamente durante 60s y el led situado en el extremo derecha parpadeará rápidamente. Al cabo de 15 repeti-
ciones de esta operación, el motor se apagará y los testigos luminosos parpadearán lentamente. Desconectar el aparato.
- Lorsque le produit est mis sous tensions des leds temoins situées dans l’anneau témoigne du bon fonctionement. S’il n’y a pas de retour lumineux , le produit est hors tension
- When the product is switched on, the indicators LEDs in the ring indicate that it is working properly. If the lights are off, the appliance is off too.
- Beim Einschalten des Produkts wird die Betriebsbereitschaft anhand von LED-Anzeigen im Ring angezeigt. Falls keine Leuchtmeldung erscheint, hat das Produkt keinen elektrischen Anschluss.
- Cuando el producto se enciende, los testigos o leds luminosos situados dentro de la elipse demuestran su buen funcionamiento. Si no aparecen los testigos luminosos, el producto no está correctamente enchufado
11
on-off

ENTRETIEN / MAINTENANCE
www.jvd.fr
LE CONFORT A PORTEE DE MAIN
3Fr
En
De
Es
Vidange et nettoyage du réservoir
Videz et nettoyez le réservoir de récupération d’eau avant qu’il ne soit plein (au
moins une fois par semaine) pour éviter les mauvaises odeurs.
si cette opération n’est pas faite régulièrement une led rouge signale
que le réservoir est plein
Tirer vers l’avant le résevoir
Enlever le couvercle
Vider le reservoir
Nettoyer le réservoir (ne pas hésiter à utiliser des produits nettoyants)
Refermer le couvercle
Remettre le réservoir à sa place
Emptying and cleaning the tank
Empty and clean the water recovery tank before it is full (at least once a week) to
avoid foul smells.
If the tank is not regularly emptied and cleaned, a red LED indicates
that the tank is full.
To remove the tank, insert the key in the hole under the appliance.
Pull the tank forwards.
Remove the cover.
Empty the tank.
Clean the tank (you can use cleaning products).
Close the cover.
Install the tank.
Entleerung und Reinigung der Wanne
Entleeren und reinigen Sie die Wassersammelwanne, bevor sie überläuft (min-
destens einmal pro Woche). So werden unangenehme Gerüche verhindert.
Falls der Vorgang nicht bereits regelmäßig vorgenommen wird, zeigt eine rote
LED an, dass die Wanne voll ist.
Zum Abbau der Wanne den Schlüssel in das Loch unter dem Gerät einstecken.
Die Wanne nach vorn herausziehen.
Den Deckel abnehmen.
Die Wanne entleeren.
Die Wanne reinigen (auch gern mit Reinigungsmitteln).
Den Deckel wieder schließen.
Die Wanne wieder einsetzen.
Vaciado y limpieza del depósito
Vaciar y limpiar el depósito de agua antes de que esté completamente lleno (al
menos una vez por semana) para evitar malos olores. Si esta operación no se
hace regularmente una luz roja aparecerá indicando que el depósito de agua
está lleno
aparato y tirar del depósito hacia delante.
Quitar la tapadera
Vaciar el depósito
Limpiar el depósito (se pueden utilizar productos de limpieza)
Cerrar la tapadera
Volver a introducir el depósito en el aparato
12
3
4
56
7
1
1
1
1
3
3
3
3
4
4
4
4
5
5
5
5
6
6
6
6
7
7
7
7
2
2
2
2
12
2Fr
En
De
Es
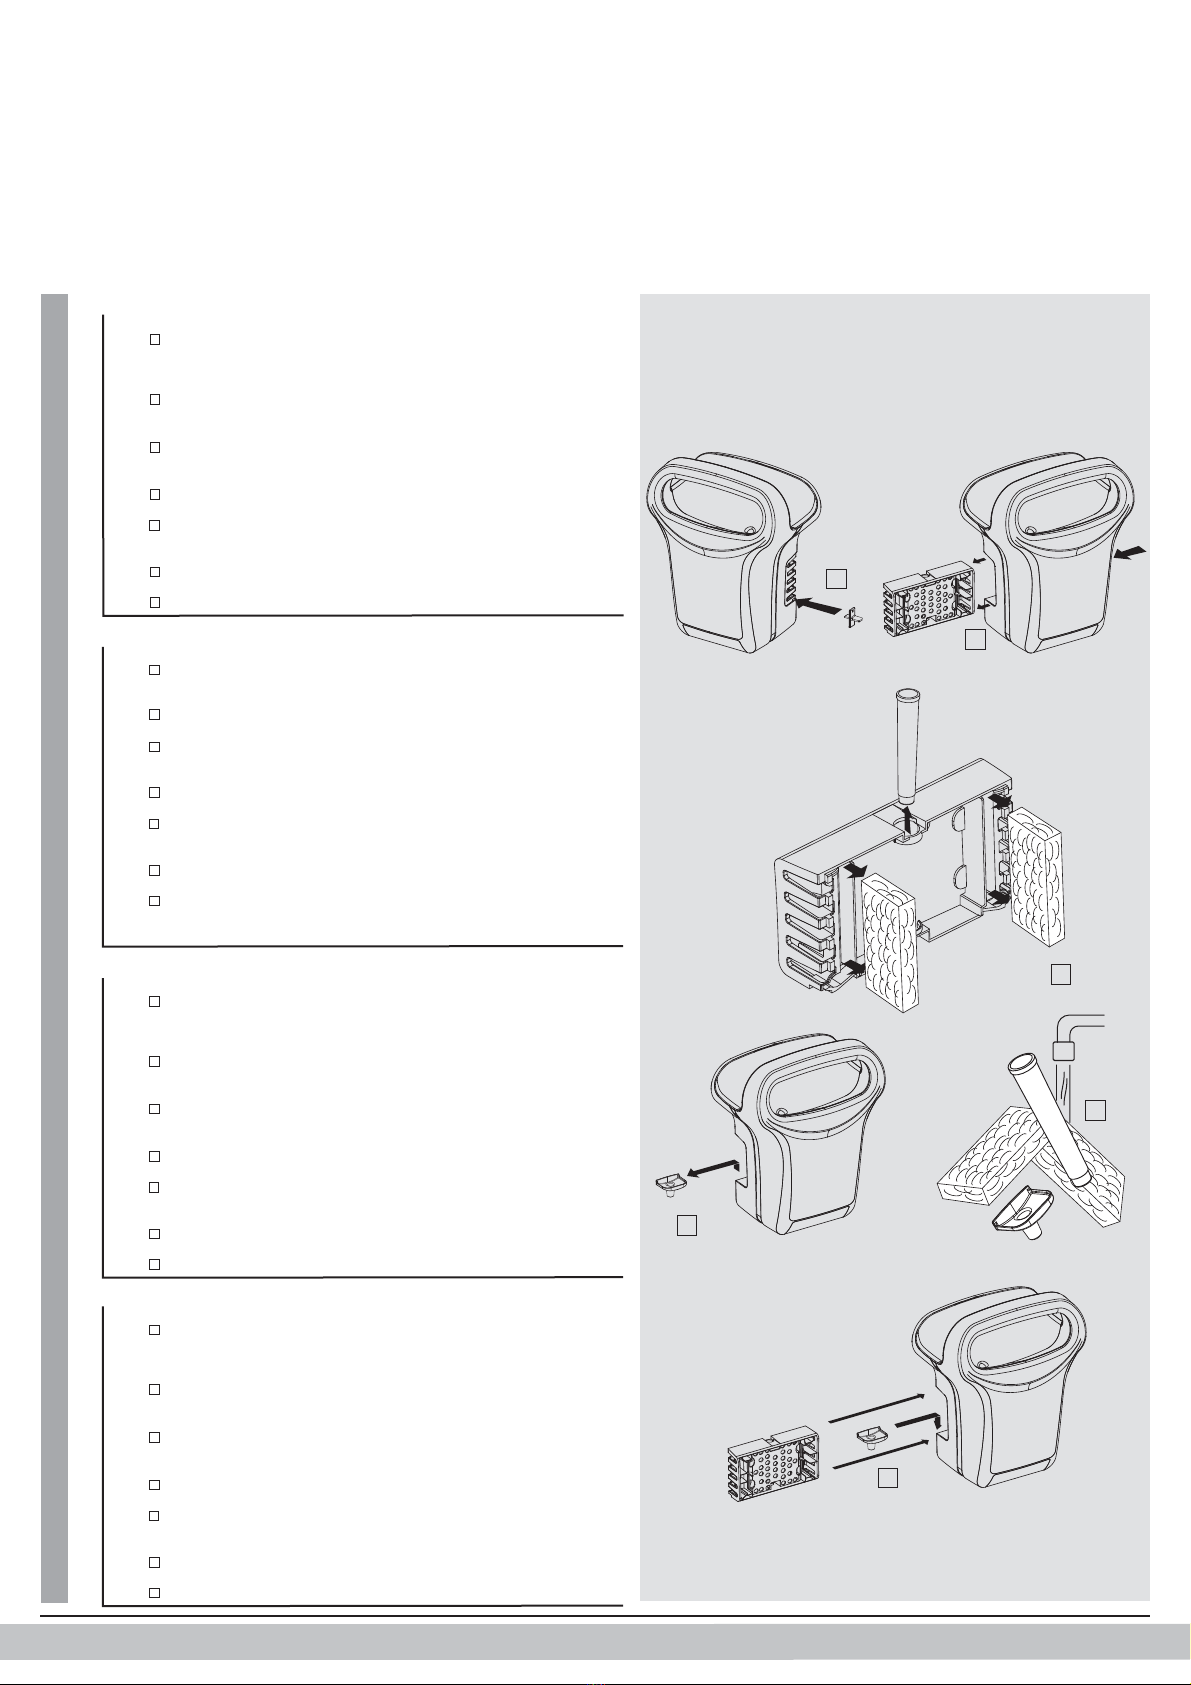
Entretien du module arrière
Le module arrière est un support technique par lequel se fait l’aspiration de l’air
d’acheminement de l’eau récupérée
prévus sur les 2 côtés
Lorsque la clé est installée, pousser sur le module pour le faire coulisser et
le sortir sur le côté opposé
Avant de remettre le module, accéder au petit entonnoir de liason situé entre le
Nettoyer les 3 éléments et les remettre dans le module
Remonter entonnoir et le module
Maintenance of the rear module
Air is drawn in through the rear module.
Remove the rear module by inserting the key in one of the holes on either side.
With the key inserted, slide the module by pushing and extract it from the
opposite side.
Before installing the module, clean the small connecting funnel located under the
module's housing, between the tank and the tube.
Clean the three parts and return them to the module.
Install the funnel and the module.
Instandhaltung des hinteren Moduls
Das hintere Modul ist eine technische Halterung, über die die Luft angesogen wird.
gesammeltes Wasser zu reinigen.
Zum Abbau des hinteren Moduls den Schlüssel in eins der beiden seitlich hierfür
vorgesehenen Löcher einstecken.
Nach Einstecken des Schlüssels das Modul durch Drücken zur entgegengesetz-
ten Seite hin schieben und abnehmen.
Die beiden Filter und das Rohr abnehmen.
Vor dem Wiedereinbau des Moduls den kleinen Verbindungstrichter zwischen
dem Rohr und der Wanne reinigen (unter der Modulaufnahme).
Die drei Komponenten reinigen und wieder ins Modul einsetzen.
Trichter und Modul wieder montieren.
Mantenimiento del módulo trasero
El módulo trasero es un soporte técnico a través del cual se efectúa la aspira-
circuito de recogida de agua
-
trados y ubicados en ambos lados del aparato.
Cuando se ha insertado la llave, presionar el módulo para deslizarlo por el lado
opuesto.
Antes de volver a introducir el módulo, limpiar el pequeño embudo de ligación
situado entre el tubo y el depósito de agua (debajo del módulo)
Limpiar los tres elementos y volver a meterlos en el módulo
Volver a poner el pequeño embudo y el módulo
1
1
1
1
3
3
3
3
4
4
4
4
5
5
5
5
6
6
6
6
7
7
7
7
2
2
2
2
1
2
3
4
5
4
13
CARACTERISTQUES / CHARACTERISTICS
KENNDATEN / CARACTERÍSTICAS
www.jvd.fr
LE CONFORT A PORTEE DE MAIN
Fr
De
En
Es
Temps de séchage : moins de 20 s
( Tout séchage varie selon le degré d’hygrométrie, latempéra-
ture d’ambiance et la surface à sécher)
Tension d’allimentaion : 220-240 V - Fréquence : 50-60 Hz
Produit de Classe II - IP 44
Sécurité électronique en cas de dysfonctionnement
Vitesse d’air ajustable : 600 Km/h maxi (voir chapitre VI)
Puissance nominale : 1200 W (pas de résistance chanffante)
Moteur Brush
Système de détection capacitif
Capacité du réservoir: 600 ml
Niveau sonore : 80 dBA
2 Filtres à air latéraux accessibles pour un nettoyage facile
Poid total de l’appareil : 7 Kg
Drying time: less than 20 seconds
(the drying time depends on the humidity, the ambient tempe-
rature and the surface area to be dried)
Supply voltage: 220-240 V - Frequency: 50-60 Hz
Class II - IP 44 product
Electronic safety device in event of malfunction
Adjustable air speed: 600 km/h max. (see chapter VI)
Nominal power: 1,200 W (no heating resistor)
Brush motor
Capacitive detection system
Capacity of the tank: 600 ml
Noise level: 80 dBA
Toral weight: 7 kg
Trockenzeit: unter 20 s
(Die Trockenzeit hängt von der Luftfeuchtigkeit, der Raumtem-
peratur und der zu trocknenden Fläche ab.)
Netzspannung: 220-240 V - Frequenz: 50-60 Hz
Schutzklasse II - IP 44
Elektronische Sicherheitsvorrichtung bei Funktionsstörungen
Einstellbare Luftgeschwindigkeit: max. 600 km/h (s. Kapitel VI)
Nennleistung: 1200 W (kein Heizwiderstand)
Schleifmotor
Kapazitives Sensorsystem
Fassungsvermögen der Wanne: 600 ml
Wanne und Filter schlüsselgesichert
Schallpegel: 80 dBA
"#
Gesamtgerätegewicht: 7 kg
Tiempo de secado: menos de 20s
(Todo secado varía según el grado de higrometría, la tempera-
$%
Tensión de alimentación: 220-240 V - Frecuencia: 50-60 Hz
Producto clase II - IP44
Seguridad electrónica en caso de disfunción
Velocidad del aire ajustable: 600km/h max (ver capítulo IV)
Potencia nominal: 1200 W (sin resistencia de calor)
Motor Brush / Nivel sonoro: 80 dBA
Sistema de detección capacitivo
Capacidad del depósito de agua: 600 ml
&'
*+$
correcta limpieza
Peso total del aparato: 7kg
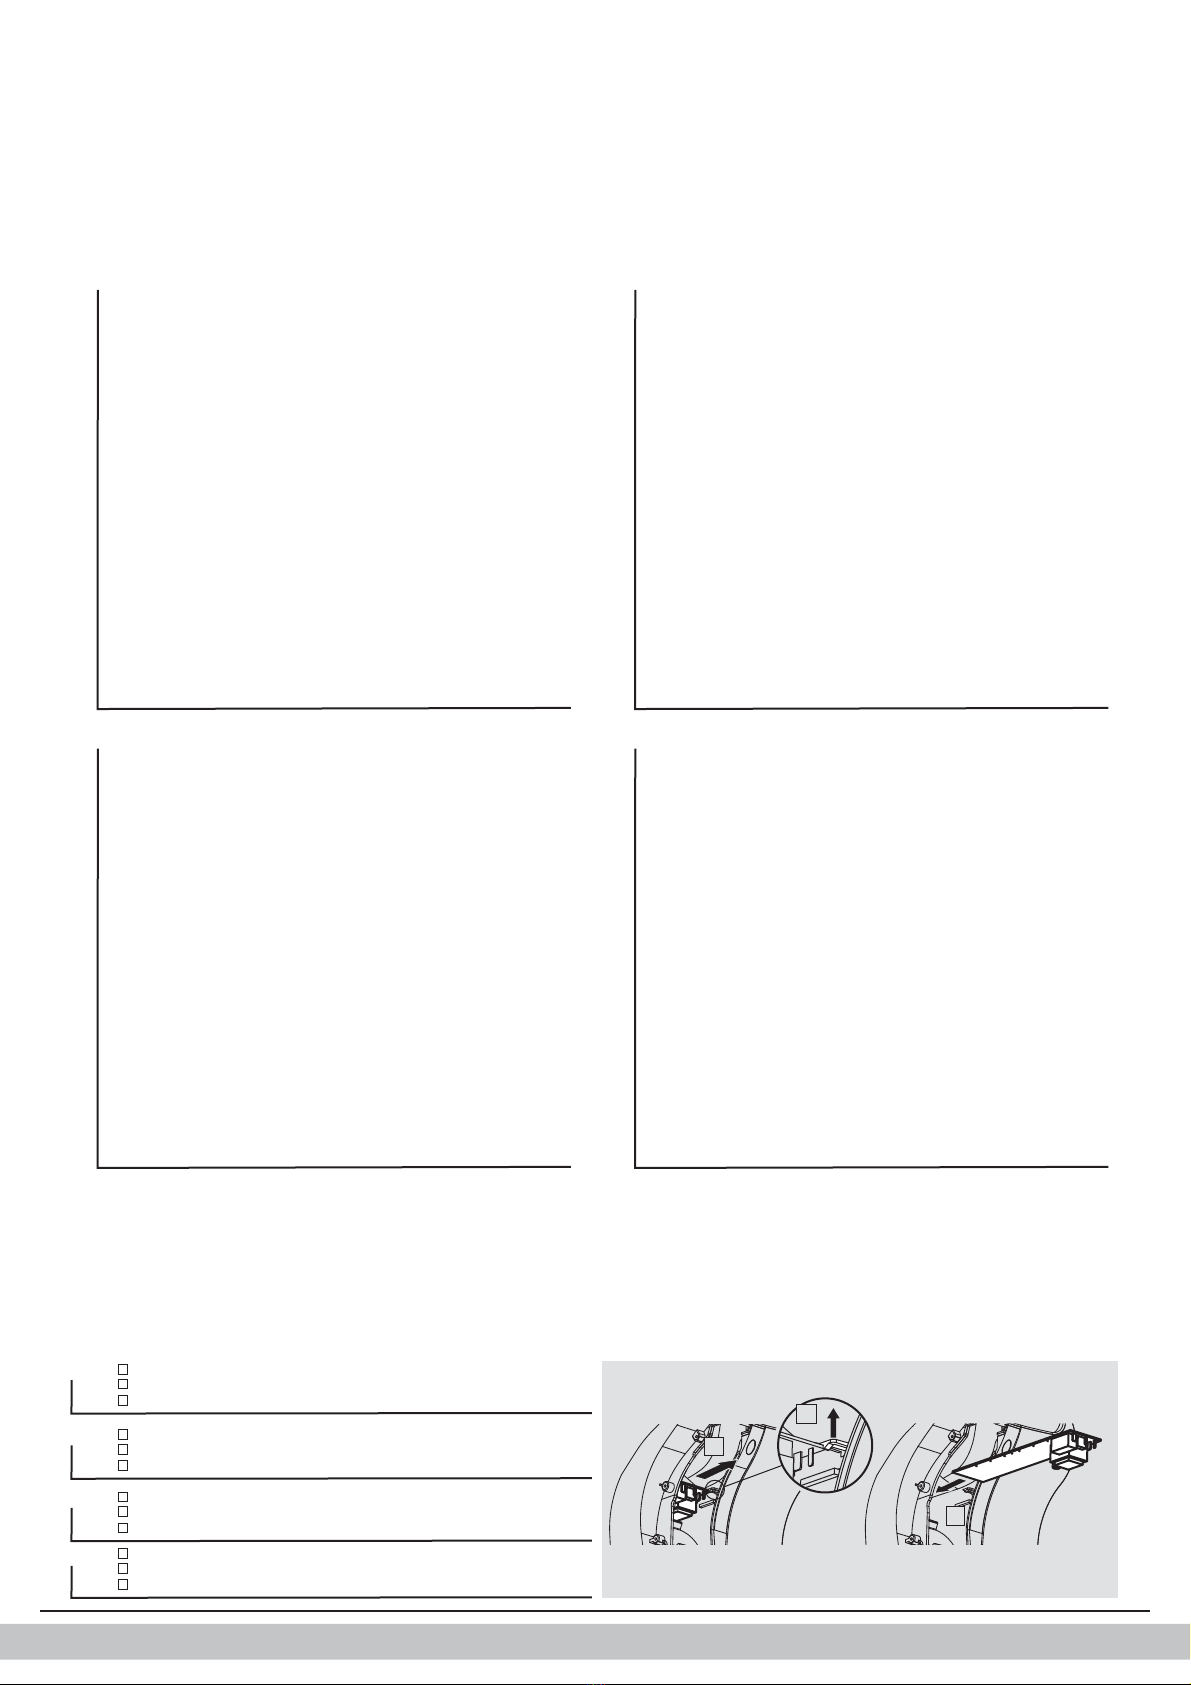
REPLACING THE PCB/
2
3
1
Fr
En
De
Es
Sortir la carte electronique en la coulissant vers la droite
Faire coulisser la nouvelle carte et la reconnecter
Disconnect the electric wires and release the PCB using a clip.
Extract the PCB by sliding it to the right.
Slide in and connect the new PCB.
Die elektrischen Leitungen abklemmen und die Klammer an der elektronischen Karte lösen.
Die elektronische Karte nach rechts schieben, um sie herauszunehmen.
Die neue Karte einschieben und anschließen.
Desconectar los cables eléctricos y sacar el circuito electrónico con la ayuda de un clip
Sacar el circuito electrónico deslizándolo hacia la derecha
Introducir el nuevo circuito electrónico y conectarlo
1
1
1
1
2
2
2
2
3
3
3
3
14

SAV : +33 (0)2 40 75 96 30
JVD, 3 rue des Brêches, 44400 REZE France, Tél : +33 (0)2 40 75 98 20
Table of contents
Popular Dryer manuals by other brands

Electrolux
Electrolux EIMGD60J Specifications

GE
GE GTD45GASJ Dimensions and installation information

Wella
Wella Visionair M50 operating instructions

AUSTRAL CLOTHES HOISTS
AUSTRAL CLOTHES HOISTS ADD-A-LINE installation instructions

Shackways
Shackways Nail Dryer quick start guide

Whirlpool
Whirlpool LGR4634JQ0 installation instructions


