SIGURO SGR-BO-L350B User manual

EN INSTRUCTION MANUAL
DE BEDIENUNGSANLEITUNG
IO-CBI-2363 / 8512665
(08.2021 / v1)
SGR-BO-L350B
SGR-BO-L350S
MENU

2
DEAR CUSTOMER,
The oven is exceptionally easy to use and extremely ecient. After reading the instruction
manual, operating the oven will be easy.
Before being packaged and leaving the manufacturer, the oven was thoroughly checked with
regard to safety and functionality.
Before using the appliance, please read the instruction manual carefully.
By following these instructions carefully you will be able to avoid any problems in using the
appliance.
It is important to keep the instruction manual and store it in a safe place so that it can be
consulted at any time.
It is necessary to follow the instructions in the manual carefully in order to avoid possible
accidents.
Caution!
Do not use the oven until you have read this instruction manual.
The oven is intended for household use only.
The manufacturer reserves the right to introduce changes which do not aect the
operation of the appliance.

3
Safety instructions ................................................................................................................ 4
Description of the appliance ................................................................................................. 8
Installation .......................................................................................................................... 10
Operation............................................................................................................................ 12
Baking in the oven – practical hints.................................................................................... 19
Test dishes...........................................................................................................................23
Cleaning and maintenance.............................................................................................. ...24
Technical data..................................................................................................................... 30
TABLE OF CONTENTS

4
SAFETY INSTRUCTIONS
Warning: The appliance and its accessible parts become hot
during use. Care should be taken to avoid touching heating
elements. Children less than 8 years of age shall be kept
away unless continuously supervised.
This appliance can be used by children aged from 8 years
and above and persons with reduced physical, sensory or
mental capabilities or lack of experience and knowledge if
they have been given supervision or instruction concerning
use of the appliance in a safe way and understand the ha-
zards involved. Children shall not play with the appliance.
Cleaning and user maintenance shall not be made by chil-
dren without supervision.
During use the appliance becomes hot. Care should be taken
to avoid touching heating elements inside the oven.
Accessible parts may become hot during use. Young children
should be kept away.
Warning: Do not use harsh abrasive cleaners or sharp metal
scrapers to clean the oven door glass since they can scratch
the surface, which may result in shattering of the glass.
Warning: Ensure that the appliance is switched o before
replacing the lamp to avoid the possibillity of electric shock.
You should not use steam cleaning devices to clean the
appliance.

5
SAFETY INSTRUCTIONS
● Ensure that small items of household equipment, including connection leads, do
not touch the hot oven as the insulation material of this equipment is usually not
resistant to high temperatures.
● Do not leave the oven unattended when frying. Oils and fats may catch re due
to overheating or boiling over.
● Do not put pans weighing over 15 kg on the opened door of the oven.
● Do not use harsh cleaning agents or sharp metal objects to clean the door as they
can scratch the surface, which could then result in the glass cracking.
● Do not use the oven in the event of a technical fault. Any faults must be xed by
an appropriately qualied and authorised person.
● In the event of any incident caused by a technical fault, disconnect the power and
report the fault to the service centre to be repaired.
● The rules and provisions contained in this instruction manual should be strictly
observed. Do not allow anybody who is not familiar with the contents of this instruc-
tion manual to operate the oven.
● The appliance has been designed only for cooking. Any other use (for example
for heating) does not comply with its operating prole and may cause danger.
During the pyrolytic oven cleaning process the oven cham-
ber can reach a very high temperature. Consequently, the
appliance outer surfaces can heat up more than usual, so
keep children away at all times.
Danger of burns! Hot steam may escape when you open the
oven door. Be careful when you open the oven door during
or after cooking. Do NOT lean over the door when you open
it. Please note that depending on the temperature the steam
can be invisible.

6
HOW TO SAVE ENERGY
Using energy in a respon-
sible way not only saves
money but also helps the
environment. So let’s save
energy! And this is how you
can do it:
●Do not uncover the pan too often
(a watched pot never boils!).
Do not open the oven door unnecessarily
often.
● Only use the oven when cooking larger
dishes.
Meat of up to 1 kg can be prepared more
economically in a pan on the cooker hob.
●Make use of residual heat from the
oven.
If the cooking time is greater than 40 minutes
switch o the oven 10 minutes before the
end time.
Important! When using the timer,
set appropriately shorter cooking
times according to the dish being
prepared.
●Make sure the oven door is properly
closed.
Heat can leak through spillages on the door
seals. Clean up any spillages immediately.
●Do not install the cooker in the direct
vicinity of refrigerators/freezers.
Otherwise energy consumption increases
unnecessarily.
7
During transportation, protec-
tive packaging was used to
protect the appliance against
any damage. After unpack-
ing, please dispose of all
elements of packaging in a
way that will not cause dam-
age to the environment.
All materials used for packaging the appli-
ance are environmentally friendly; they are
100% recyclable and are marked with the
appropriate symbol.
Caution! During unpacking, the packag-
ing materials (polythene bags, polystyrene
pieces, etc.) should be kept out of reach of
children.
UNPACKING DISPOSAL OF THE APPLIANCE
Old appliances should not sim-
ply be disposed of with normal
household waste, but should
be delivered to a collection and
recycling centre for electric and
electronic equipment. A symbol
shown on the product, the
instruction manual or the packaging shows
that it is suitable for recycling.
Materials used inside the appliance are
recyclable and are labelled with information
concerning this. By recycling materials or
other parts from used devices you are making
a signicant contribution to the protection of
our environment.
Information on appropriate disposal centres
for used devices can be provided by your
local authority.

8
MENU
DESCRIPTION OF THE APPLIANCE
Oven function
selector knob
Temperature adjust-
ment knob
Temperatureregulator
signal light L
Cooker operation
signal light R
Electronic
programmer

*optional
9
SPECIFICATIONS OF THE APPLIANCE
Cooker ttings:
Baking tray* Grill grate
(drying rack)
Roasting tray*
Sideracks
10
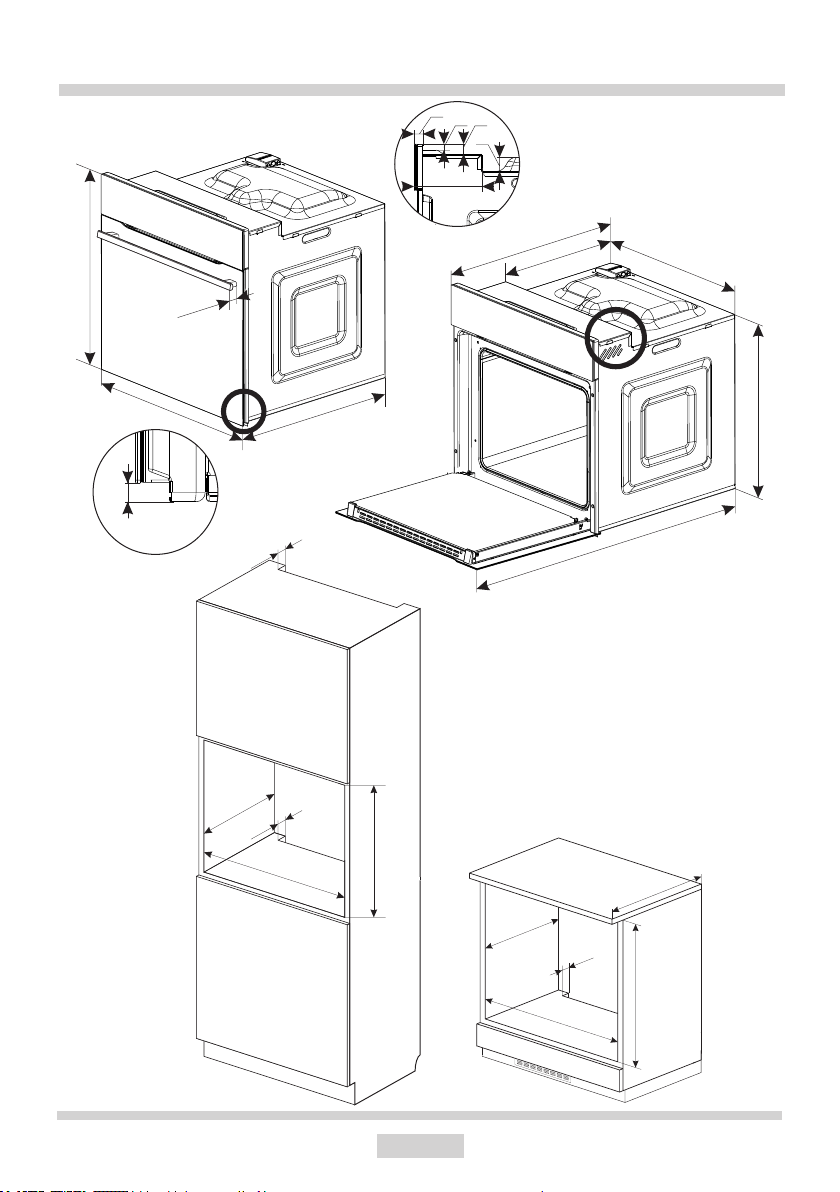
INSTALLATION
Installing the oven
● The kitchen area should be dry and aired
and equipped with ecient ventillation.
When installing the oven, easy access to
all control elements should be ensured.
● This is a Y–type design built–in oven,
which means that its back wall and one
side wall can be placed next to a high
piece of furniture or a wall. Coating or
veneer used on tted furniture must be
applied with a heat–resistant adhesive
(100°C). This prevents surface deforma-
tion or detachment of the coating.
● Hoods should be installed according to
the manufacturer’s instructions.
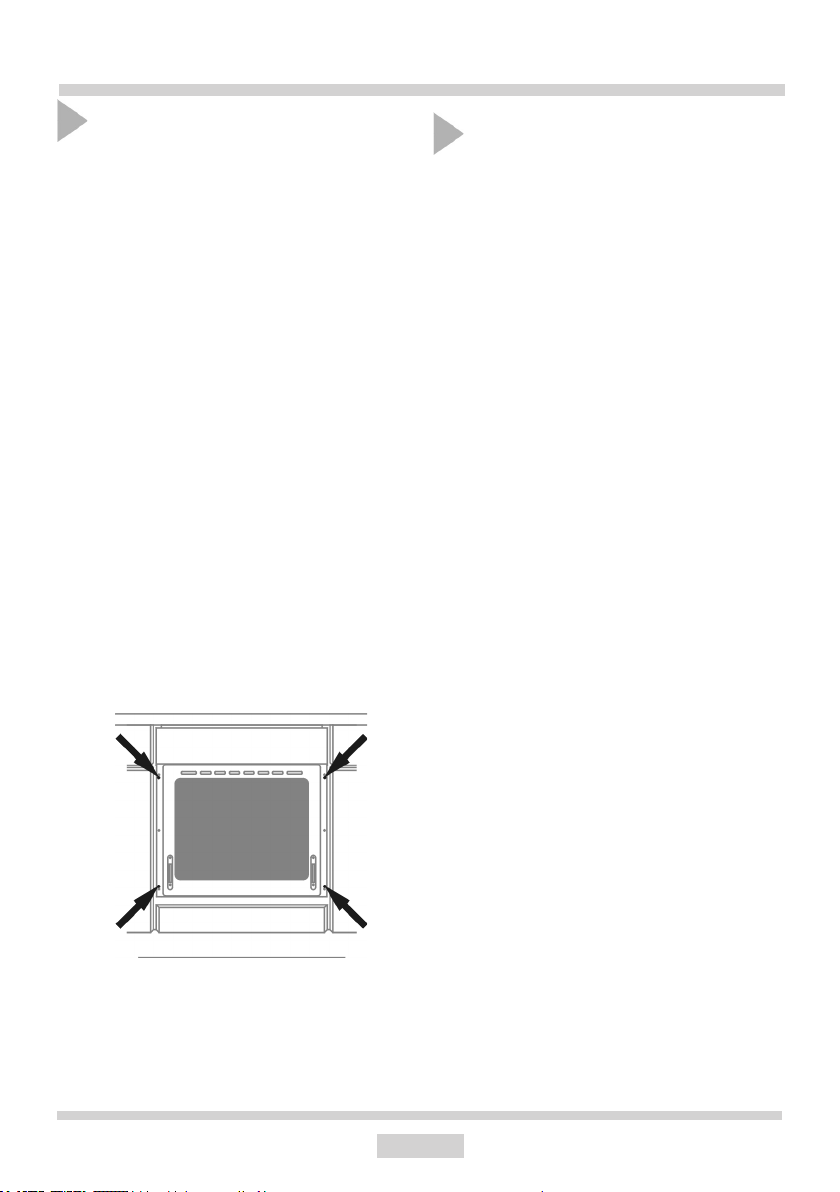
● Make an opening with the dimensions
given in the diagram for the oven to be
tted.
● Make sure the mains plug is disconnected
and then connect the oven to the mains
supply.
● Insert the oven completely into the open-
ing without allowing the four screws in the
places shown in the diagram to fall out.
● The oven is manufactured to work with
a one-phase alternating current (230V
1N~50 Hz) and is equipped with a 3 x 1,5
mm2connection lead of 1.5 mm length
with a plug including a protection contact.
● A connection socket for electricity supply
should be equipped with a protection
pin and may not be located above the
cooker. After the cooker is positioned, it is
necessary to make the connection socket
accessible to the user.
● Before connecting the oven to the socket,
check if:
- the fuse and electricity supply are able to
withstand the cooker load,
- the electricity supply is equipped with an
ecacious ground system which meets
the requirements of current standards
and provisions,
- the plug is within easy reach.
Electrical connection
Important!
If the xed power supply cable is damaged,
it should be replaced at the manufacturer
or at an authorized servicing outlet, or by a
qualied person to avoid danger.
11
INSTALLATION
600
595
40
40
560
40
560
560
560
600
525
544
570
~1004
16 26
23
180
37
595
max 50
595
570
3
390

12
OPERATION
Before using the oven for the rst time
Remove packaging, clean the interior of
the oven and the hob.
Take out and wash the oven ttings with
warm water and a little washing–up liquid.
Switch on the ventillation in the room or
open a window.
Heat the oven (to a temperature of 250°C,
for approx. 30 min.), remove any stains
and wash carefully; the heating zones
of the hob should be heated for around
4 min. without a pan.
Important!
To clean the oven, only use a cloth
well rang out with warm water to
which a little washing-up liquid has
been added.
The electronic prgrammer Ts is
equipped with electronic sensors which
are switched on by touching or press-
ing the sensor surface for at least one
second.
Each sensor reaction is conrmed by
the beep.Keep the sensor surface clean
at all times.
Important!
In ovens equipped with the electronic
programmer Ts, the time “0.00” will
start ashing in the display eld upon
connection to the power supply.
The programmer should be set with
the current time. (See Electronic
programmer ). If the current time
is not set operation of the oven is
impossible.
13
OPERATION
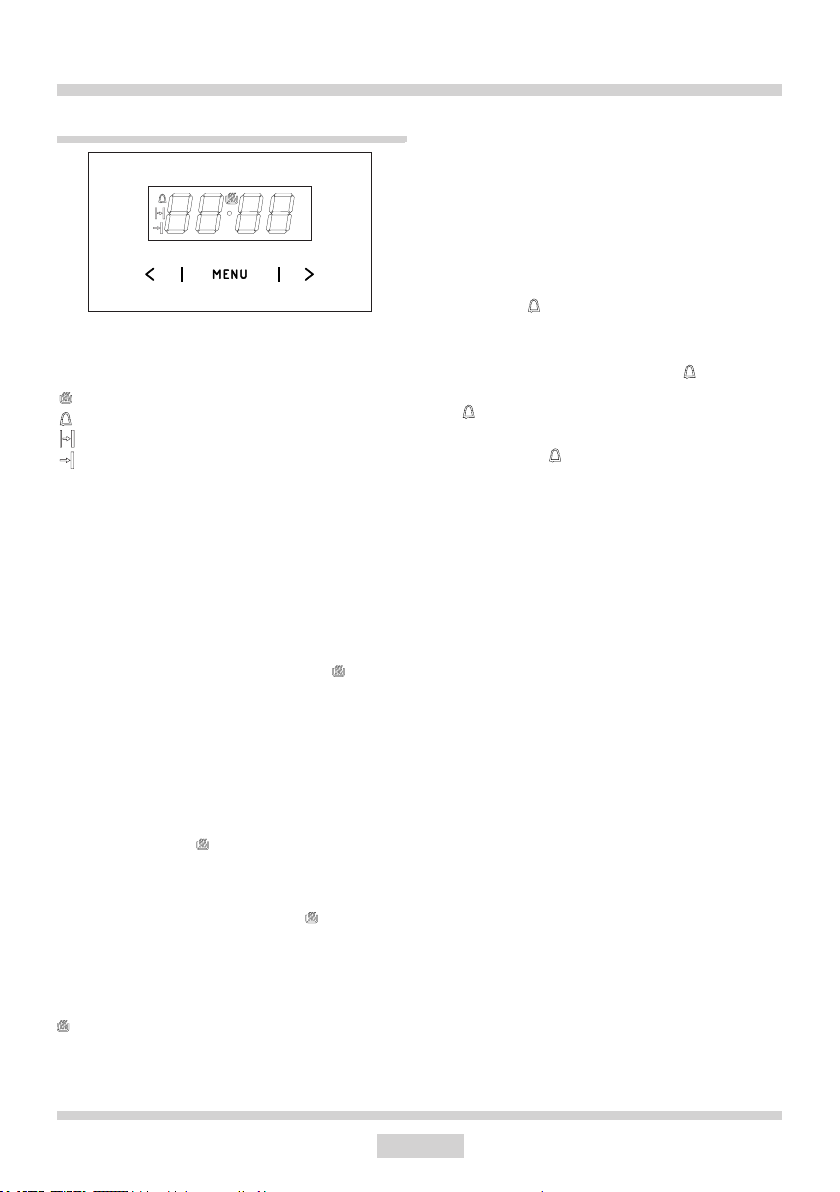
Electronic programmer
Set current time
When the appliance is plugged into the elec-
trical mains supply, or when power is restored
after power outage, the digital display will
show ashing 0.00.
MENU — select the mode of operation
>— higher setting sensor
<— lower setting sensor
— appliance on indicator
— Kitchen timer
— Duration
— End Time
l Touch and hold MENU ((or simultaneously
touch </ >)until you will see on the
display and the dot below the symbol is
ashing,
l Touch </ >within 7 seconds to set the
current time.
To store the new time setting, wait approxi-
mately 7 seconds after time has been set.
The dot below the symbol will stop ashing.
You can adjust the time later. To do this touch
< /> simultaneously and adjust the current
time while the dot below the symbol is
ashing.
Note:
The oven can be turned on when you see the
symbol on the display.
Kitchen Timer
You can active the Kitchen Timer at any time,
regardless of the status of other functions.
The Kitchen Timer can be set from 1 minute
up to 23 hours and 59 minutes.
To set the Kitchen Timer:
l touch MENU, then the display will show
blinking :
l use the </ >, sensors to set the Kitchen
Timer. The display will show the set time
and Kitchen Timer symbol . Once the
set time elapses, alarm sounds and the
icon ashes,
l Touch and hold </ >or MENU to mute the
alarm. The will be o and the display will
show the current time after approximately
7 seconds.
Note!
If no button is touched, alarm will turn o
automatically after approximately 7 minutes.
14
OPERATION
Timed operation
To set the appliance to switch o after a
specic duration:
l set the function selector knob and the
temperature selector knob to your pre-
ferred settings,
l Touch MENU repeatedly until the display
shows dur (duration) briey and the
symbol will be ashing,
l set the desired duration from 1 minute to
10 hours using the
</ >sensors.
The set duration will be memorised after
about 7 seconds. The display will show the
current time and the symbol.
Once the duration time has elapsed the
oven will turn o automatically. You will hear
an alarm and the and symbols will be
ashing,
l Set the oven function selector knob and
the temperature selector knob in o posi-
tion.,
l Touch and hold </ >or MENU to mute the
alarm. The and will be o and the
display will show the current time after
approximately 7 seconds.
Delayed timed operation
In order to set the appliance to switch o at a
specic time after a set Duration has elapsed,
set the Duration and the End Time:
l Touch MENU repeatedly until the display
shows dur (duration) briey and the
symbol will be ashing,
l set the desired duration from 1 minute to
10 hours using the
</ >sensors,
l Touch MENU repeatedly until the display
shows End briey and the symbol will
be ashing,
l set the End Time using the </ >, sensors,
a maximum of 23 hours and 59 minutes
ahead,
l set the function selector knob and the
temperature selector knob to preferred
settings. The and functions are now
active. The appliance will switch on at
End Time minus Duration (i.e. if the set
Duration is 1 hour and the set End Time
is 14:00, the appliance will automatically
switch on at 13:00).
Once the Duration time has elapsed the oven
will turn o automatically. You will hear an
alarm and the and will be ashing,
l Set the oven function selector knob and
the temperature selector knob in o posi-
tion.,
l Touch and hold </ >or MENU to mute the
alarm. The and will be o and the
display will show the current time after
approximately 7 seconds.

15
OPERATION
Cancel settings
Timer and delayed timed function settings
may be cancelled at any time.
Cancel automatic function settings:
l simultaneously touch the </ >, sensors
Cancel timer settings:
l Touch the MENU sensor to select the
Kitchen Timer,
l simultaneously touch the </ >sensors
Change the beep tone
You can change the beep tones as follows:
l simultaneously touch the </ >, sensors
l Touch MENU repeatedly to select the ton
(tone). The display will be ashing:
l Use the </ >sensors to select your pre-
ferred tone:
Use >to select the setting 1 to 3
Use <to select the setting 3 to 1
Adjust display brightness
You can adjust display brightness 1 to 9,
where 1 is the darkest and 9 is the brightest.
The brightness setting applies to an inac-
tive control panel, i.e. when no controls are
touched for 7 seconds.
You can adjust display brightness as follows:
l Simultaneously touch the </ >sensors,
l Touch MENU repeatedly to select the bri
(brightness) setting — the settings can
be accessed in sequence ton (tone) and
bri (brightness).
l Use the </ >sensors to select your pre-
ferred brightness:
Use >to select the setting 1 to 9
Use <to select the setting 9 to 1
Note:
The display is at its brightest setting when
active, i.e. a control was touched within the
last 7 seconds.
Night Mode
The display is dimmed during the night hours
22:00 — 06:00.

16
OPERATION
The oven can be switched o by setting both
of these knobs to the position “l”/“0”.
Caution!
When selecting any heating func-
tion (switching a heater on etc.) the
oven will only be switched on after
the temperature has ben set by the
temperature regulator knob.
0 Oven is o
Roaster on.
Roasting is used for cooking of small
portions of meat: steaks, schnitzel,
sh, toasts, Frankfurter sausages,
(thickness of roasted dish should not
exceed 2-3 cm and should be turned
over during roasting).
Fan and combined grill on
When the knob is turned to this posi-
tion, the oven activates the combined
grill and fan function. In practice, this
function allows the grilling process to
be speeded up and an improvement
in the taste of the dish. You should
only use the grill with the oven door
shut.
Enhanced roaster (super roaster)
In this setting both roaster and top
heater are on. This increases tem-
perature in the top part of the oven’s
interior, which makes it suitable for
browning and roasting of larger por-
tions of food.
Rapid Preheating
Ring heater and roaster on. Use to
preheat the oven.
Bottom heater on
When the knob is set to this position
the oven is heated using only the
bottom heater. Baking of cakes from
the bottom until done (moist cakes
with fruit stung).
The oven can be heated up using the bottom
and top heaters, the grill or the ultra-fan he-
ater. Operation of the oven is controlled by
the oven function knob – to set a required
function you should turn the knob to the se-
lected position, and the temperature regulator
knob – to set a required function you should
turn the knob to the selected position.
Oven functions and operation.
Oven with automatic air circu-
lation (including a fan and ring
heater)
Defrosting
Only fan is on and all heaters are o.
0
5050
100
150
200
250

17
OPERATION
Top and bottom heaters on
Set the knob in this position for co-
nventional baking. This setting is ideal
for baking cakes, meat, sh, bread
and pizza (it is necessary to preheat
the oven and use a baking tray) on
one oven level.
Top heater, bottom heater and fan
are on.
This knob setting is most suitable
for baking cakes. Convection baking
(recommended for baking).
When the functions have been
selected but the temperature knob is
set to zero only the fan will be on. With
this function you can cool the dish or
the oven chamber.
Convection with ring heating ele-
ment
Setting the knob in this position allows
the oven to be heated up by a heating
element with air circulation forced by a
rotating fan tted in the central part of
the back wall of the of and chamber.
Lower baking temperatures than in
the conventional oven can be used.
Heating the oven up in this manner
ensures uniform heat circulation aro-
und the dish being cooked in the oven.
Convection with ring heating ele-
ment and bottom heater on
With this setting the convection fan
and bottom heater are on, which in-
creases the temperature at the bottom
of the cooked dish. Intense heat from
the bottom, moist cakes, pizza.
Independent oven lighting
Set the knob in this position to light up
the oven interior.
Eco fan assisted heating
This is an optimised heating function
designed to save energy when pre-
paring food. At this knob position, the
oven lighting is o.
Switching on the oven is indicated by two
signal lights, R, L, turning on. The Rlight
turned on means the oven is working. If the L
light goes out, it means the oven has reached
the set temperature. If a recipe recommends
placing dishes in a warmed-up oven, this
should be not done before the Llight goes out
for the rst time. When baking, the Llight will
temporarily come on and go out (to maintain
the temperature inside the oven). The Rsig-
nal light may also turn on at the knob position
of “oven chamber lighting”.

18
OPERATION
Use of the grill
Warning!
When using function grill it is rec-
ommended that the oven door is
closed.
When the grill is in use accessible
parts can become hot.
It is best to keep children away from
the oven.
The grilling process operates through infrared
rays emitted onto the dish by the incandes-
cent grill heater.
In order to switch on the grill you need to:
lSet the oven knob to the position marked
grill,
lHeat the oven for approx. 5 minutes (with
the oven door shut).
lInsert a tray with a dish onto the appropri-
ate cooking level; and if you are grilling
on the grate insert a tray for dripping on
the level immediately below (under the
grate).
lClose the oven door.
For grilling with the function grill and
combined grill the temperature must be
set to 250ºC, but for the function fan and
grill it must be set to a maximum of 190ºC.

19
BAKING IN THE OVEN – PRACTICAL HINTS
Baking
●we recommend using the baking trays which were provided with your cooker;
●it is also possible to bake in cake tins and trays bought elsewhere which should be
put on the drying rack; for baking it is better to use black trays which conduct heat
better and shorten the baking time;
●shapes and trays with bright or shiny surfaces are not recommended when using the
conventional heating method (top and bottom heaters), use of such tins can result in
undercooking the base of cakes;
●when using the ultra-fan function it is not necessary to initially heat up the oven
chamber, for other types of heating you should warm up the oven chamber before
the cake is inserted;
●before the cake is taken out of the oven, check if it is ready using a wooden stick (if
the cake is ready the stick should come out dry and clean after being inserted into
the cake);
● after switching o the oven it is advisable to leave the cake inside for about 5 min.;
●temperatures for baking with the ultra-fan function are usually around 20 – 30 degrees
lower than in normal baking (using top and bottom heaters);
●the baking parameters given in Table are approximate and can be corrected based
on your own experience and cooking preferences;
● if information given in recipe books is signicantly dierent from the values included
in this instruction manual, please apply the instructions from the manual.
Roasting meat
●cook meat weighing over 1 kg in the oven, but smaller pieces should be cooked on
the gas burners.
●use heatproof ovenware for roasting, with handles that are also resistant to high
temperatures;
●when roasting on the drying rack or the grate we recommend that you place a baking
tray with a small amount of water on the lowest level of the oven;
●it is advisable to turn the meat over at least once during the roasting time and during
roasting you should also baste the meat with its juices or with hot salty water – do
not pour cold water over the meat.

20
BAKING IN THE OVEN – PRACTICAL HINTS
Type
of
dish
Oven
functions
Temperature
(0C)
Level Time
in minutes
Sponge cake 180 - 200 2 - 3 50 - 70
Yeast cake/
Pound cake 180 - 200 2 50 - 70
Fish 190 - 210 2 - 3 45 - 60
Beef 200 - 220 2 90 - 120
Pork 200 - 220 2 90 - 160
Chicken 180 - 200 2 80 - 100
ECO Fan Heater
l ECO Fan Heater is an optimised heating function designed to save energy when
preparing food.
lYou cannot reduce the cooking time by setting a higher temperature; preheating
the oven is not recommended.
lDo not change the temperature setting and do not open the oven door during
cooking.
Recommended setting for ECO Fan Heater
This manual suits for next models
1
Table of contents
Languages:
Other SIGURO Oven manuals


