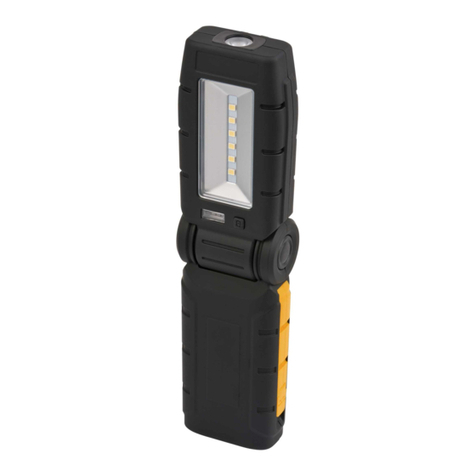
SIL KIDS FLAME TORCH User manual

kids flame torch
• User manual
• Gebruikershandleiding
• Guide d’utilisation
• Bedienungsanleitung

Step 1
Stap 1, Étape 1, Schritt 1
Step 3
Stap 3, Étape 3, Schritt 3
Step 2
Stap 2, Étape 2, Schritt 2
Step 4
Stap 4, Étape 4, Schritt 4
a
a
c
b
ba
c
c
b
Drill 5 mm Ph 1
Ph 0
Ph 0
Ph 1
Drill 5 mm

Functions
Light settings
1. Dimmed flame
2. Dimmed steady light
3. Full flame
4. Full steady light
5. Off
Auto On
When the torch is removed from the holder,
it will turn On to light setting 1.
Technical specification
Product size:
LED
- Warm white 2000Kelvin, 33PCS.
- Dimmed steady light ~12 lumen ~24 hours
- Full steady light ~55 lumen ~4 hours.
Battery: 3.2V 1500mAh 18650 li-ion
Holder & Charger
- ~1,5m USB black PVC cable
- incl. mounting screw and plug
Color & Material:
- Torch: Black matte, PC
- Flame: White matte, PP
- Wall mount: Black matte, ABS
Manual
Kids Flame Torch
036.23.001
Parts
1x flame torch, 1x holder, 2x screws, 2x plugs
Warnings
- Before use, remove the
“Try me” button by pulling
the wires out.
- Do not cut the wires but
remove completely.
- Installation should be done by an adult.
Installation
See images on page 2
Tools needed:
- Philips screwdrivers Ph1, Ph0
- Drilling machine, drill size 5 mm
Step 1 - Open
a) Unscrew the small screw.
b, c) Get the wall mount from the holder.
Step 2 - Mark
Choose a location and mark the 2 holes.
Step 3 - Drill and Fix
a) Drill holes in the wall on the marked spot.
b) For brick walls: insert the wall plugs.
c) Fix the wall mount with the screws.
Step 4 - Assemble
a, b) Place the holder on the wall mount.
c) Fix the holder with the small screw.
Step 5 - Charge
Plug in the USB cable of the holder.
Place the flame torch into the holder.
EN English
23,5 cm
8,3 cm

Functies
Licht instellingen
1. Gedimde vlam
2. Gedimd constant licht
3. Volle vlam
4. Volledig constant licht
5. Uit
Auto aan
Wanneer de zaklamp uit de houder wordt
gehaald, gaat deze aan op lichtstand 1.
Technische specificatie:
Product grootte
LED
- Warm wit 2000 Kelvin, 33x.
- Gedimd constant licht ~12 lumen ~24 uur.
- Vol constant licht ~55 lumen ~4 uur.
Batterij: 3.2V 1500mAh 18650 li-ion
Houder & oplader
- ~1,5 m USB zwarte PVC-kabel
- incl. montageschroef en plug
Kleur & Materiaal
- Fakkel: Zwart mat, PC
- Vlam: Wit mat, PP
- Wandmontage: Zwart mat, ABS
Handleiding
Kids Flame Torch
036.23.001
Onderdelen
1x fakkel, 1x houder, 2x schroeven, 2x pluggen
Waarschuwingen
- Verwijder voor gebruik de
“Try me”-knop door de
draden eruit te trekken.
- Knip de draden niet door,
maar verwijder ze volledig.
- Installatie dient door een volwassene te
worden gedaan.
Installatie,
Zie afbeeldingen pagina 2
Gereedschap nodig:
- Philips schroevendraaier. Ph1, Ph0
- Boormachine, boormaat 5
Stap 1 - Openen
a) Draai de kleine schroef los.
b, c) Haal de muurbevestiging uit de houder.
Stap 2 - Markeer
Kies een plek en markeer de 2 gaten.
Stap 3 - Boren en repareren
a) Boor de gaten in de muur.
b) Voor bakstenen muren: plaats de pluggen.
c) Schroef de muurbevestiging aan de muur.
Stap 4 - Monteren
a, b) Plaats de houder op de muurbevestiging.
c) Bevestig de houder met de kleine schroef.
Stap 5 - Opladen
Sluit de USB-kabel van de houder aan.
Plaats de fakkel in de houder.
Nederlands
23,5 cm
8,3 cm
NL

Guide d’installation
Torche à flamme pour enfants
036.23.001
Pièces
1x torche à flamme, 1x support, 2xvis,
2xchevilles
Avertissements
- Avant utilisation, retirez le
bouton “Try me” en
tirant sur les fils.
- Ne coupez pas les fils mais
retirez-les complètement.
- L’installation doit être effectuée par un
adulte.
Installation
Voir les images à la page2
Outils requis :
- Tournevis Philips Ph1, Ph0
- Perceuse, foret taille 5
Étape 1 - Overture
a) Dévissez la petite vis.
b) et c) Retirez la fixation murale du support.
Étape 2 - Marquage
Choisissez l’emplacement et marquez les
2orifices.
Étape 3 - Perçage et fixation
a) Percez les orifices dans le mur au niveau des
marquages.
b) Dans le cas d’un mur en briques, insérez les
chevilles murales.
c) Placez les fixations murales ainsi que les vis.
Étape 4 - Montage
a) et b) Placez le support sur la fixation murale.
c) Fixez le support à l’aide de la petite vis.
Étape 5 - Charger
Branchez le câble USB du support.
Placez la torche à flamme sur le support.
Fonctions
Paramètres d’éclairage
1. Flamme tamisée
2. Lumière tamisée continue
3. Pleine flamme
4. Pleine lumière continue
5. Position éteinte
Éclairage automatique
En retirant la torche de son support, elle s’al-
lume et se règle sur le paramètre1.
Spécifications techniques
Dimensions du produit :
LED :
- Lumière blanche et chaude
2000kelvins,
33PCS
- Lumière tamisée continue
12lumens, 24heures.
- Pleine lumière continue
55lumens, 4heures.
Batterie : 3.2 V, 1 500 mAh, 18 650 li-ion
Chargeur de la fixation murale:
- avec câble USB en PVC noir de 1,5m
- vis de montage et cache compris
Couleurs et matériaux:
- Torche: Noir mat, PC
- Flamme: Blanc mat, PP
- Fixation murale: Noir mat, ABS
Francais
23,5 cm
8,3 cm
FR

Schritt 5 - Aufladen
Stecken Sie das USB-Kabel in den Halter.
Platzieren Sie die Fackel im Halter.
Funktionen
Lichteinstellungen
1. Gedimmte Flamme
2. Gedimmtes stetiges Licht
3. Volle Flamme
4. Volles stetiges Licht
5. Aus
Auto-Ein
Wenn die Fackel aus dem Halter entfernt wird,
schaltet sie sich mit Lichteinstellung 1 ein.
Technische Daten
Produktabmessungen:
LED:
- Warmweiß, 1500 Kelvin, 33 Stück
- Gedimmtes stetiges Licht - 12 Lumen 24
Stunden.
- Volles stetiges Licht - 55 Lumen 4 Stunden.
Akku: 3,2 V, 1500 mAh, 18650 Lithium-Ionen
Wandhalterung-Ladegerät:
- mit schwarzem USB-PVC-Kabel, 1,5 m
- Inkl. Montageschraube und Dübel
Farbe und Material:
- Fackel: Mattes Schwarz, PC
- Flamme: Mattes Weiß, PP
- Wandhalterung: Mattes Schwarz, ABS
Anleitung
Kinderfackel
036.23.001
Artikel
1x Fackel, 1x Halter, 2x Schraube, 2x Dübel
Warnhinweise
- Entfernen Sie vor der
Verwendung die „Try me“-
Taste, indem Sie die Drähte
herausziehen.
- Schneiden Sie die Drähte
nicht ab, sondern entfernen
Sie diese vollständig.
- Die Installation muss von einem
Erwachsenen durchgeführt werden.
Installation
Siehe Abbildungen auf Seite 2
Benötigte Werkzeuge:
- Philips-Schraubendreher Ph1, Ph0
- Bohrmaschine, Bohrer Größe 5
Schritt 1 - Öffnen
a) Lösen Sie die kleine Schraube.
b, c) Entfernen Sie die Wandhalterung vom
Halter.
Schritt 2 - Markieren
Wählen Sie die Position und markieren Sie die
beiden Löcher.
Schritt 3 - Bohren und befestigen
a) Bohren Sie an den markierten Stellen
Löcher in die Wand.
b) Bei Ziegelwänden: Setzen Sie Dübel ein.
c) Befestigen Sie die Wandhalterung mit den
Schrauben.
Schritt 4 - Montieren
a, b) Platzieren Sie den Halter an der
Wandhalterung.
c) Befestigen Sie den Halter mit der kleinen
Schraube.
Deutsch
23,5 cm
8,3 cm
DE

The crossed-out wheeled bin symbol
indicates that when this product reaches
the end of its useful life to please hand it in
for recycling in accordance with local
environmental regulations for waste
disposal.
Het symbool van de doorgekruiste
afvalcontainer geeft aan dat wanneer dit
product het einde van zijn levensduur
bereikt, u het naar een recyclingcentrum
moet brengen in overeenstemming
met de lokale milieuwetgeving voor
afvalverwerking.
Le symbole de la poubelle à roulettes barré
d’une croix indique que lorsque ce produit
arrive en fin de vie, vous devez l’apporter
au centre de recyclage conformément à
la législation environnementale locale en
matière d’élimination des déchets.
Das Symbol der durchgestrichenen
Abfalltonne mit Rädern zeigt an,
dass dieses Produkt am Ende seiner
Einsatzzeit entsprechend den lokalen
Umweltvorschriften zur Abfallentsorgung
dem Recycling zugeführt werden muss.
This manual suits for next models
1
Table of contents
Languages:

