SilverBac SB-700-C User manual

1SILVERBAC WOOD PELLET GRILL OPERATION MANUAL
Operators
Manual
GR-500-A
Operation
Manual
SB-700-C
Wood
PELLET Grill
SAFETY NOTICE: FOR OUTDOOR USE ONLY!
WARNING: Electric shock can kill or result in serious injury. Precautions should
always be followed to reduce the risk of fire, electric shock, and injury.
SAFETY PRECAUTIONS
SAVE THIS MANUAL FOR FUTURE USE
GrillaGrills.com R10232019

SILVERBAC WOOD PELLET GRILL OPERATION MANUAL2
True story: Two men on a fishing trip, chowin’ down at camp on a plate of ribs. One looks over
at the grill (he’s the industrial designer) and says, “Why do all those grills look the same, big ole
barrel cut in half?” The other, a metalsmith by trade, answers, “Because we haven’t built one.”
That’s when the lightbulb went off. Why not design and build a smoker-grill that stands apart,
literally, from the crowd? Hundreds of design hours later, the Grilla was born.
Fast forward a few successful years: same two guys, same idea. Only this time, bring a rock-
solid, proven smoker-grill to the market using the same streamlined business model that delivers
savings to the consumer. Design the grill to efficiently feed you and your friends or the entire
neighborhood. Make it easy to use and good looking. Hundreds of design hours later, the
Silverbac was born.
Just like a silverback is the proven and respected leader in a family of mountain gorillas, so too
is Silverbac the patriarch of the Grilla family of smoker-grills. No confusing Silverbac with any of
these flimsy me-too grills. Been there, done that.
All Grilla products, including pellets, sauces and accessories, are available direct to the hungry
consumer. No fat in this business model, just pure value meal after delicious meal. Not bad for
two fishing buddies. Enjoy!
OUR
STORY

3SILVERBAC WOOD PELLET GRILL OPERATION MANUAL
failure to follow this operational manual
in its entirety will void all warranties.
TABLE OF CONTENTS
i n t r o d u c t i o n
o p e r a t i o n
Safety Information
About Your New Silverbac
Assembly
Silverbac 101: How to Operate Your Silverbac
Getting Started
Operating Your Silverbac
Controller Operation
Maintenance and Care
Approved Fuel: Food Grade Wood Pellets
Parts Diagram
Troubleshooting and FAQ
Limited Warranty Information
4
5
6
11
12
14
15
16
17
18

SILVERBAC WOOD PELLET GRILL OPERATION MANUAL4
SAFETY INFORMATION
• The unit is for outdoor use only. Never use the
Silverbac in an enclosed area.
• For safe assembly, use at least two people to
unpack and assemble the grill.
• Keep young children and pets away from the grill
while it’s in use.
• Always use heat-resistant hand wear when
touching or handling the grill while it’s in use.
• Keep the grill at least two feet away from any
combustible surface.
• Never use ammable liquids such as gasoline,
charcoal lighter uid, kerosene, or similar liquids to
start or freshen the re in your grill. Keep all such
liquids well away from the unit while it is in use.
• Clean the grill on a regular basis. Clean the
unit’s drip tray and ensure that the grease drain
is able to function properly (i.e., not on an uphill
slope on a deck or patio). Should a grease fire
occur, turn the grill off, unplug it, and then close
the lid until the fire extinguishes.
• Never place flammable items in the grill’s
storage area.
• Install the service access panels (under the
grill’s pre-installed shelf and on the rear) before
plugging the unit in. Always keep the unit’s
shelf-side louvers clear of any obstructions.
• Never put your hand in the pellet hopper or
attempt to service any part of your Silverbac
while the unit is plugged in.
• Check your Silverbac for re pot obstructions
occasionally. This will help maintain proper airow.
• Position your grill on level ground. The grill
should be kept as level as possible so that the
grease flows into the trough and out into the can
and also to ensure that the sensor reads grease
catch evenly, as hot air displaced to one side or
the other will cause irregular operation.
• Never move the unit while it is hot and/or in
operation. Make sure the fire is completely
out and that the grill is completely cold before
being transported.
• Never move the Silverbac when the pellet hopper
is full. The unit can be become top-heavy and
may tip over if moved.
• Clean temperature sensor occasionaly to ensure
proper temperature readput.
It’s important that you read all of the safety information in this manual before operating
your new Silverbac grill.
Congratulations on your purchase of a Silverbac grill! Used and cared for properly, this grill will give you
years of enjoyment and trouble-free operation. Before assembling and using your new grill, please review the
information in this manual thoroughly. In it, you’ll find many useful tips to help maximize your Silverbac’s long
list of benefits and features.
Your Silverbac is much more than just a traditional grill. In fact, you can cook almost anything on this grill. Try
pizza, marinated vegetables, casseroles, or bread — or, stick to the basics like steaks, roasts, hams, pork
chops or tenderloins, wild game, and poultry.
Using advanced technology, the unit adjusts the rate at which pellets are introduced into the fire pot in order
to keep the temperature consistent and predictable. Because of this, the Silverbac is the easiest and most
convenient way to grill, cook, bake, slow smoke and roast food while also adding flavors that can only be
generated by a wood fire. Set your grill’s temperature and let it do the rest.
Thank you for choosing a Silverbac Grill!

5SILVERBAC WOOD PELLET GRILL OPERATION MANUAL
Your Silverbac grill is state-of-the-art and built with
many innovative features, including:
• Smart Grill Controller
• Automatic lighting feature
• 180°F to 500°F in 5-degree increments
Exterior
• High-temperature durable textured powder coat.
• 20-pound hopper capacity.
Interior
• 696-sq. in. cooking area: 507-sq. in. area
in the lower rack and 189-sq. in. area in the
upper rack. Tall enough area for turkeys or
beer can chickens.
• Grill grates made from ¼-inch stainless steel rod.
Construction Features
• Seams are welded, powder coated, and caulked
for triple redundant weather protection.
• Modular construction allows for individual
component replacement. Component access
panels for easy repairs.
Carton Contents
During shipping, some movement of parts and
components may have taken place. Visually inspect
all of the contents before assembling and inspect
the entire grill once you remove it from the shipping
carton. Be cautious of any sharp surfaces and use
gloves during assembly. Never plug the grill in until
it’s completely assembled and ready to use.
• 1– pre-assembled grill body
• 2– stainless steel cooking grates
• 1– flame deflector
• 1– drip pan
• 1– drip grease can holder
• 1– base cabinet
• 1– chimney assembly
• 1– hardware package:
Base left side/left plate
Base right side/right plate
Base back/back plate
Base left door + handle
Base right door + handle
Handle for lid (x1)
Base front–top brace
Phillips-head Bolt ¼"–20 (x19)
Phillips-head screwdriver
Open end wrenches (x2)
About your new silverbac

SILVERBAC WOOD PELLET GRILL OPERATION MANUAL6
ASSEMBLY
Hopper / Burner Assembly:
Body Frame Assembly:
19
44
46
50
41
56
45
28
31
32
33
36
13
30
26
20
42
474837
38
39
40
49
43
23
22
24
29
35
25
27
34
21

7SILVERBAC WOOD PELLET GRILL OPERATION MANUAL
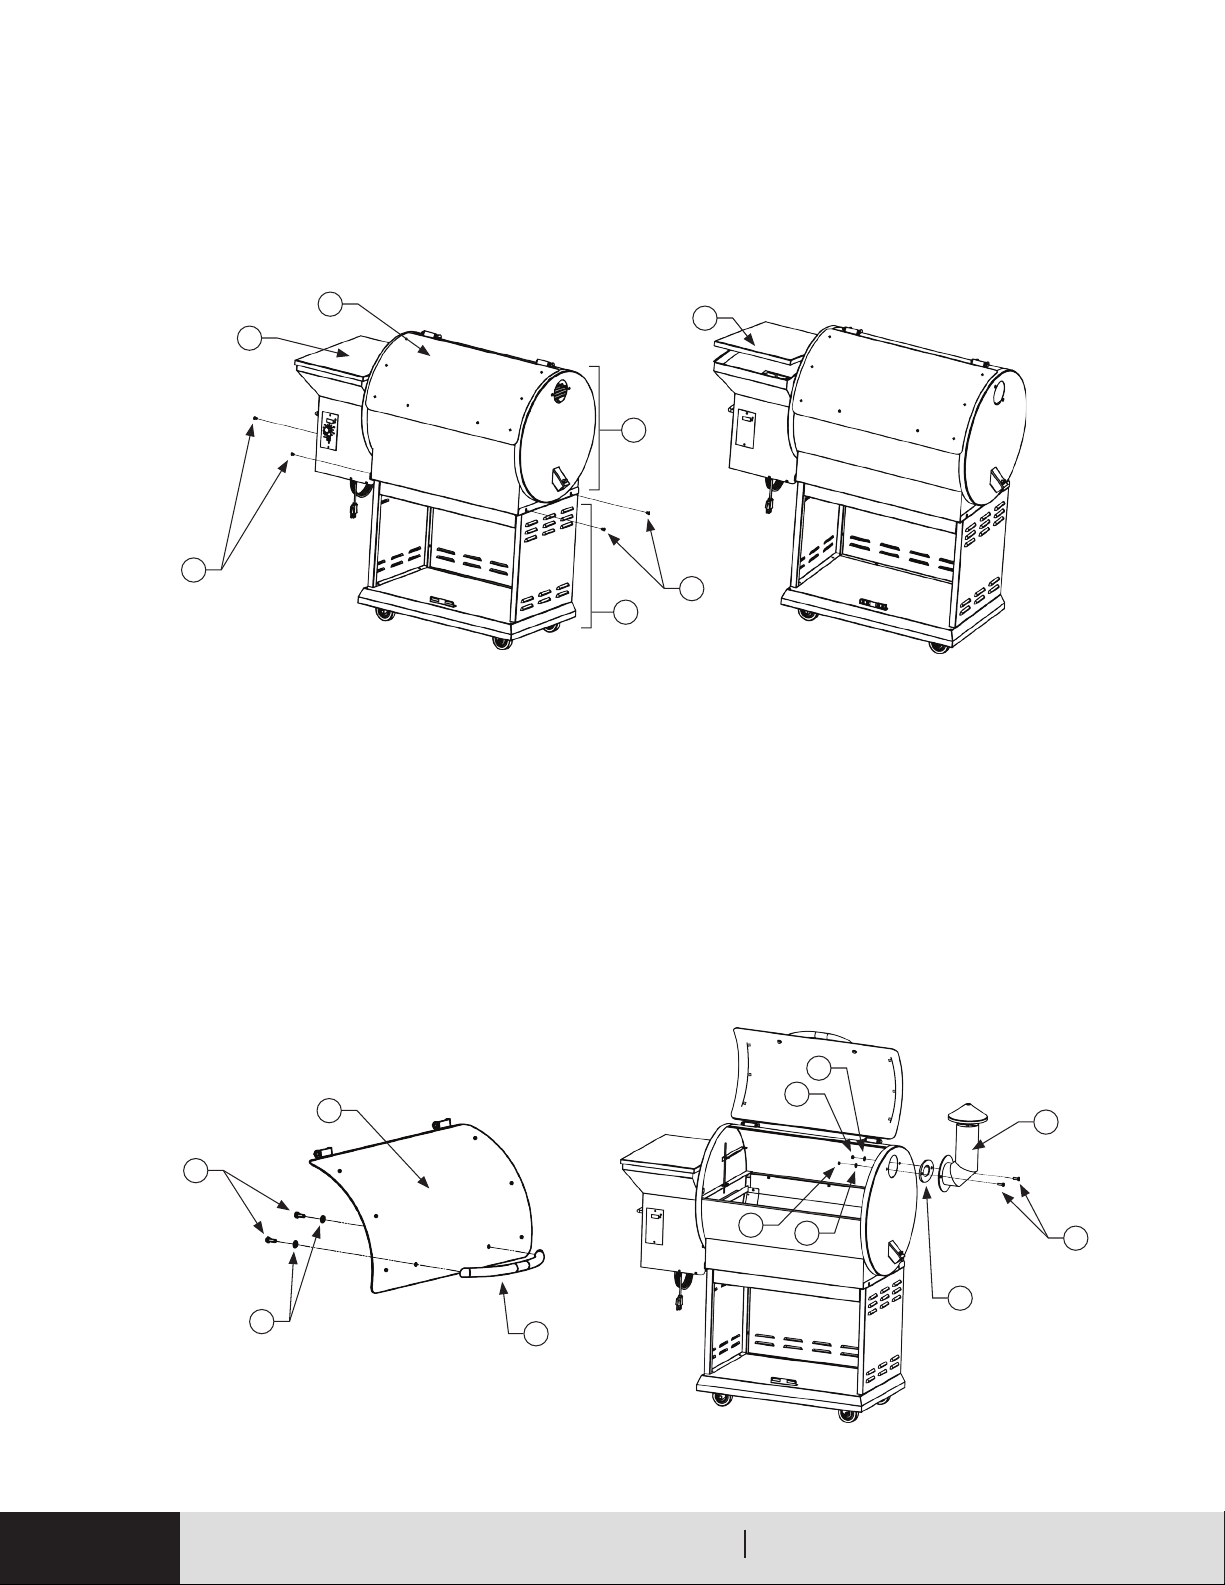
STEP 1 – Mounting the Body Frame
1. Secure Left Plate (40) on the Platform (50) with ¼-20* ½ Bolt (52). As shown in FIG 1.
2. Secure Right Plate (45) on the Platform (50) with ¼-20* ½ Bolt (52). As shown in FIG 2.
3. Secure Back Plate (44) on the Platform (50) with ¼-20* ½ Bolt (52) and link with Left Plate (40) and Right
Plate (45). As shown in FIG 3.
4. Locate the Beam (42) between Left Plate (40) and Right Plate (45) with ¼-20* ½Bolt (52). As shown in FIG 4.
STEP 2 – Positioning the Chamber on the Body Frame
Uplift the Chamber (1) on the Body Frame (4). Make sure that the Chamber (1) is between the left and right plate of the
Frame (4). Align the chamber holes with the plate holes and secure with ¼-20* ½ Bolt (52). As shown in FIG 5.
FIG 1
FIG 3
FIG 2
FIG 4
40
50 50 44
40
40
44
42
45
52
52
50
40
45
45
50
52
52 52
52
52
ASSEMBLY (cont.)
SILVERBAC WOOD PELLET GRILL OPERATION MANUAL8
STEP 3 – Attaching the Chamber Door Handle
Penetrate ¼-20*½ Hexagon Bolt (53) through (Ø18*Ø6.5*2.0mm) Washer (54) and Lid (9) directly to the
Handle (12) and tighten up. Do not overtighten the bolt. As shown in FIG 7.
STEP 4 – Attaching the Smoke Stack and Chimney Cap
1. Align the holes in the Smoke Stack (15) with the holes in the Smoke Stack Gasket (16), which fits
between right end of the Grill and the Smoke Stack Gasket (16). Insert the ¼-20* ½ Hexagon Bolts
through the holes in the Smoke Stack (15) and the Smoke Stack Gasket (16).
2. Place a (Ø18*Ø6.5*2.0mm) Washer (54) on each bolt and secure with ¼-20 Hexagon Nut (55).
As shown in FIG 8.
FIG 5
FIG 7
FIG 6
FIG 8
3
9
55
54
54
55
53
54
9
19
52
12
16
15
53
52
ASSEMBLY (cont.)
1
4

9SILVERBAC WOOD PELLET GRILL OPERATION MANUAL
FIG 9
38
47
5
54
54
53
53
ASSEMBLY (cont.)
STEP 5 – Positioning the Door Handle
Align the holes in the Left Door (38) with the holes in the Handle (47). Place a (Ø18*Ø6.5*2.0mm)
Washer (54) on each ¼-20* ½ Hexagon Bolt (53) and tighten with Wrench. Repeat the former step to
assemble the Right Door (46). As shown in FIG 9.
STEP 6 – Positioning the Door
1. Take the Right Door (46) with handle assemble. First insert the Bottom Pivot (37) into the small hole on Platform
(50). Then pull down the pivot until the upper end is aligned with top edge of the door. Then align the pivot
with the upper hole and pull up the pivot secure the door.
2. Repeat Step 1 to secure the Left Door (38). Make a proper adjustment until the doors can be rmly closed. As
shown in FIG10.
STEP 7 – Positioning the Heat Baffle
Position the Heat Bae (5) on the locating brackets, which is on the inside walls of the grill. The notched legs should be
facing downward. Move to the right to lock. As shown in FIG 11, FIG 12.
FIG 11 FIG 12
FIG 10
50
37
45
46
56

SILVERBAC WOOD PELLET GRILL OPERATION MANUAL10
6
8
ASSEMBLY (cont.)
STEP 8 – Positioning the Grease Tray
Position the Heat Bae (6) over the Firepot. The notched legs of the Heat Bae should be facing downward and to
the right to t onto the locating brackets so that the grease can ow into the Grease Drain Tube. As shown in FIG 14.
STEP 9 – Positioning the Cooking Grates
Position the Cooking Grates (6–7) as shown in FIG 15.
STEP 10 – Hang on the Grease Catch
Locate the Grease Drain Tube which is on the right side of the chamber, then hang the Grease Catch (17) on the
hook. As shown in FIG 16.
FIG 13
FIG 15
FIG 14
FIG 16
6
7
17

11SILVERBAC WOOD PELLET GRILL OPERATION MANUAL
Start up: How to Operate
Your Silverbac
ATTENTION PLEASE READ BEFORE TURNING ON YOUR GRILL!ATTENTION PLEASE READ BEFORE TURNING ON YOUR GRILL!
Startup:
You will need to season and preload your Silverbac before you cook on it for the rst time:
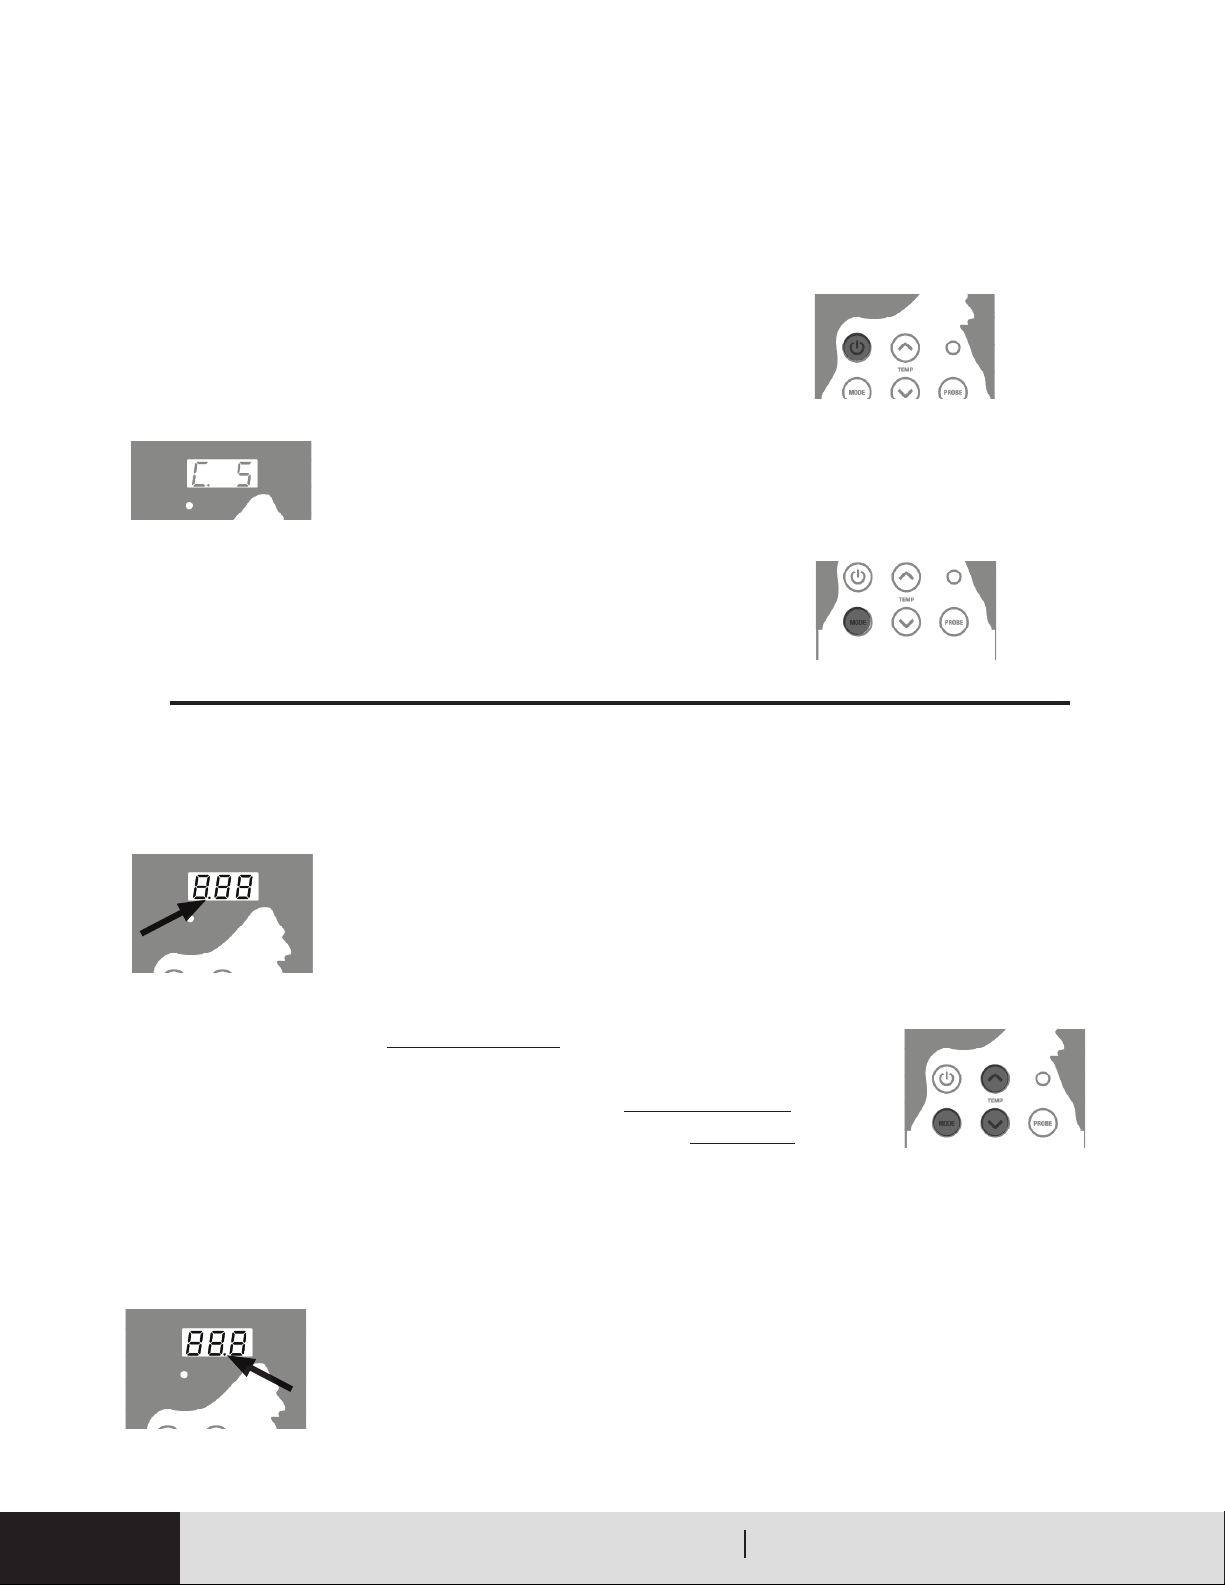
7-Segment Display
Power Indicator
Power Button
Mode Button
Mode Indicator
Probe Input
Probe Button
Temperature Control
Displays temperature & board
control modes 1 & 2
Decimal points on the display
shows which mode you are in.
Meat probe port.
Temporarily displays the actual
temperature of your meat.
Increase/decrease temperature.
Hold for 2 seconds to quickly jump
between temps.
Red "OFF" Green "ON"
AC Power to the unit. Hold
2-seconds to shut down grill
Switches mode.
1. Remove grill internal components exposing burn pot.
2. Fill hopper with quality food grade pellets and turn on your grill.
3. Listen/look for pellets to drop into the burn pot, this should take anywhere from 2-4 minutes.
4. Turn your grill o, replace internal components and turn grill back on and set your temperature to 400°F for 45 minutes.
Step down temperature to 225 before tuning o grill. *This will burn o any oils leftover from manufacturing.
5. Once re starts and temp begins to rise close lid. You are now ready to cook!
See flipside for Standard & Alpha Mode Operation.
*Note: There is roughly a 15-20 minute stabilzation*Note: There is roughly a 15-20 minute stabilzation
period which must be completed before it will startperiod which must be completed before it will start
making corrections to get to the desired setting. It ismaking corrections to get to the desired setting. It is
recommended you leave the lid shut during this period.recommended you leave the lid shut during this period.
1. Ensure hopper has pellets.
2. Turn grill on and set desired temperature.
3. Open lid and close once fire has started and
temperature begins to rise.
SILVERBAC WOOD PELLET GRILL OPERATION MANUAL12
Standard & Dual Mode
Operation
When powering off the grill, the grill will show "C 5" on the display. This is showing you the
grill is in cool down mode for 5 minutes, it will then shut off after 5 minutes.
To switch between modes, simply hold the mode button down. You will
see the decimal in the display switch from left to right. Left is Mode 1, right
is mode 2. If the grill loses power, it will default to mode 1 set at 250°F.
Press the power button to turn the grill on. To turn the grill off, the
power button must be pressed and held for 2 seconds.
PRECISION TEMP CONTROLLER
Mode 1 is the PID mode on the alpha controller. This will hold steadier temps and a more stable
re. This mode operates o of a feed rate that the user can adjust (although most will not need to).
If you nd the grill is consistently running hotter than your set point you can lower the feed rate. If
it's running consistently colder than your set point you can raise the feed rate. Always make small
adjustments when tuning your grill.
To adjust the feed rate press the MODE, UP and DOWN arrow buttons at the same time for about
2 seconds. After doing this the display will stop showing a temperature readout and will show
you what the current feed rate is instead. You can then use the Up and Down arrows to raise
and lower the feed rate. Once you have the desired feed rate, press the mode button to save the
selection.
Mode 1
Mode 2 does not operate o a minimum feed rate and therefore there are no settings to adjust.
Mode 2 allows the grill some exibility in temperature control to allow the creation of more
smoke. This results in a swing of around 10-15°F. Simply set your temperature, and let it ride.
MORE SWING, MORE SMOKE
Mode 2

13SILVERBAC WOOD PELLET GRILL OPERATION MANUAL
Shutdown Sequence
When power button is pressed for 2 seconds:
ErL (low temp) Code
ErH (high temp) Code
FHi (food high) Code
Additional Information
• Auger turns off.
• Fan continues to run for 5 minutes.
• Board displays C5, C4, C3, C2, C1 (minutes) then
goes blank.
• Grill temp was below 150°F for more than 10 minutes.
• Grill temp reached 615°F.
• Food probe is above 225°F. Removing probe from socket returns board to normal read out.
Ignition Sequence
When power button is pressed:
• Igniter turns on and runs for 4 minutes. At 4
minutes if temp is above 150°F, it turns off. If
temp is below 150°F after 4 minutes, it stays on
for 4 more minutes (8 total) then turns off.
• Auger turns on at 100% during the ignition stage
then goes to normal temperature
control operation.
• Fan turns continuously.
• Board displays current temperature. If below
110°F (likely), the display will be flashing until
above 110°F. It has 10 minutes (ERL requirement)
to get above this or it initiates ERL code.
Follow these operating instructions exactly as stated to ensure safe and reliable operation. Carefully read this manual.
wa r n i n g:Do not attempt to move Chimp while running.

SILVERBAC WOOD PELLET GRILL OPERATION MANUAL14
Maintenance and care
Here are some maintenance and cleaning tips to help keep your Silverbac running and operating smoothly.
It may be helpful to refer to the “Parts Diagram” in this Operation Manual to locate the parts on your grill
discussed below. Your Silverbac can run efficiently for extended periods of time at different heat output levels,
as long as the wood pellet supply is uninterrupted and timely cleaning and maintenance is performed.
• Always make sure your Silverbac is off and cold before performing any maintenance or cleaning.
• Use a wire brush to clean your cooking grates after each use.
• Cover your drip tray with aluminum foil, and then change the foil frequently. This is the simplest way to
maintain your drip pan. Ensure foil is wrapped tightly around the grease tray.
• If you have used a low-and-slow method that has caused the accumulation of grease on the aluminum
foil, be sure to change it before cooking at high temperatures (or risk causing a grease fire).
• After every fifth bag of wood pellets, clean the ash from the interior of your grill, empty hopper and
vacuum out debris (a shop vacuum cleaner is the perfect tool for this job).
• Clean inner temperature probe.
• Don’t ever use wet pellets in your grill as they will swell and jam your Silverbac’s auger.
• Once the grill is completely cooled, clean its outside with automotive wax, per the product’s directions.
• Use a mild soap and water to clean the grill’s powder-coated parts.
• Use a soft cloth and stainless steel polish to clean any of the grill’s stainless steel parts.
For more Silverbac Maintenance and Care information visit GrillaGrills.com

15SILVERBAC WOOD PELLET GRILL OPERATION MANUAL
APPROVED FUEL: wood pellets
Silverbac is only approved for burning barbecue wood pellets. Wood pellets are small in size,
and generate about 8,200 BTUs per pound with very little ash and moisture content.
There are more than 125 active pellet mill operations in the United States and Canada, producing millions of
pounds of pellets each year.
General specications for barbecue pellets are:
There are dierent avors of wood pellets for your Silverbac.
Here is a table of wood pellet avor suggestions and what they go best with:
Mesquite Flavoring:
Mesquite, which means “the honey tree," gives a delicate, subtle, sweet flavor to grilled foods. It is
especially good with poultry and seafood.
Hickory Flavoring:
Hickory intensifies the flavor of food with a robust, tangy taste that is better suited to red meat than to
poultry or fish.
Apple or Fruitwoods Flavoring:
Apple or fruitwoods, many from orchards destroyed by re or old age, are a big hit. Like its mesquite counterpart,
the heaviest branches of the apple tree are heated to kill insects, then chipped, made into pellets and packaged
for retail. Apple (or any fruitwood) adds a smoky, mild sweetness to everything you cook and is highly
recommended for any baking.
Alder Flavoring:
Popular in the Northwest United States, alder produces a mild taste suited for salmon and other fish.
• 100% hardwood
• 1” long or less in length
• ¼“ diameter
• Less then 2% ash content
• Less then 2% fines
• Under 10% moisture content
• Approx. 8,200 BTUs per lb
• About 40 lbs per cubic ft. density
Beef Chicken Fish Turkey Pork Lamb Bualo Baking
Mesquite x x x x x
Hickory x x x x x
Apple x x x x
Alderxxxxxxxx
SILVERBAC WOOD PELLET GRILL OPERATION MANUAL16
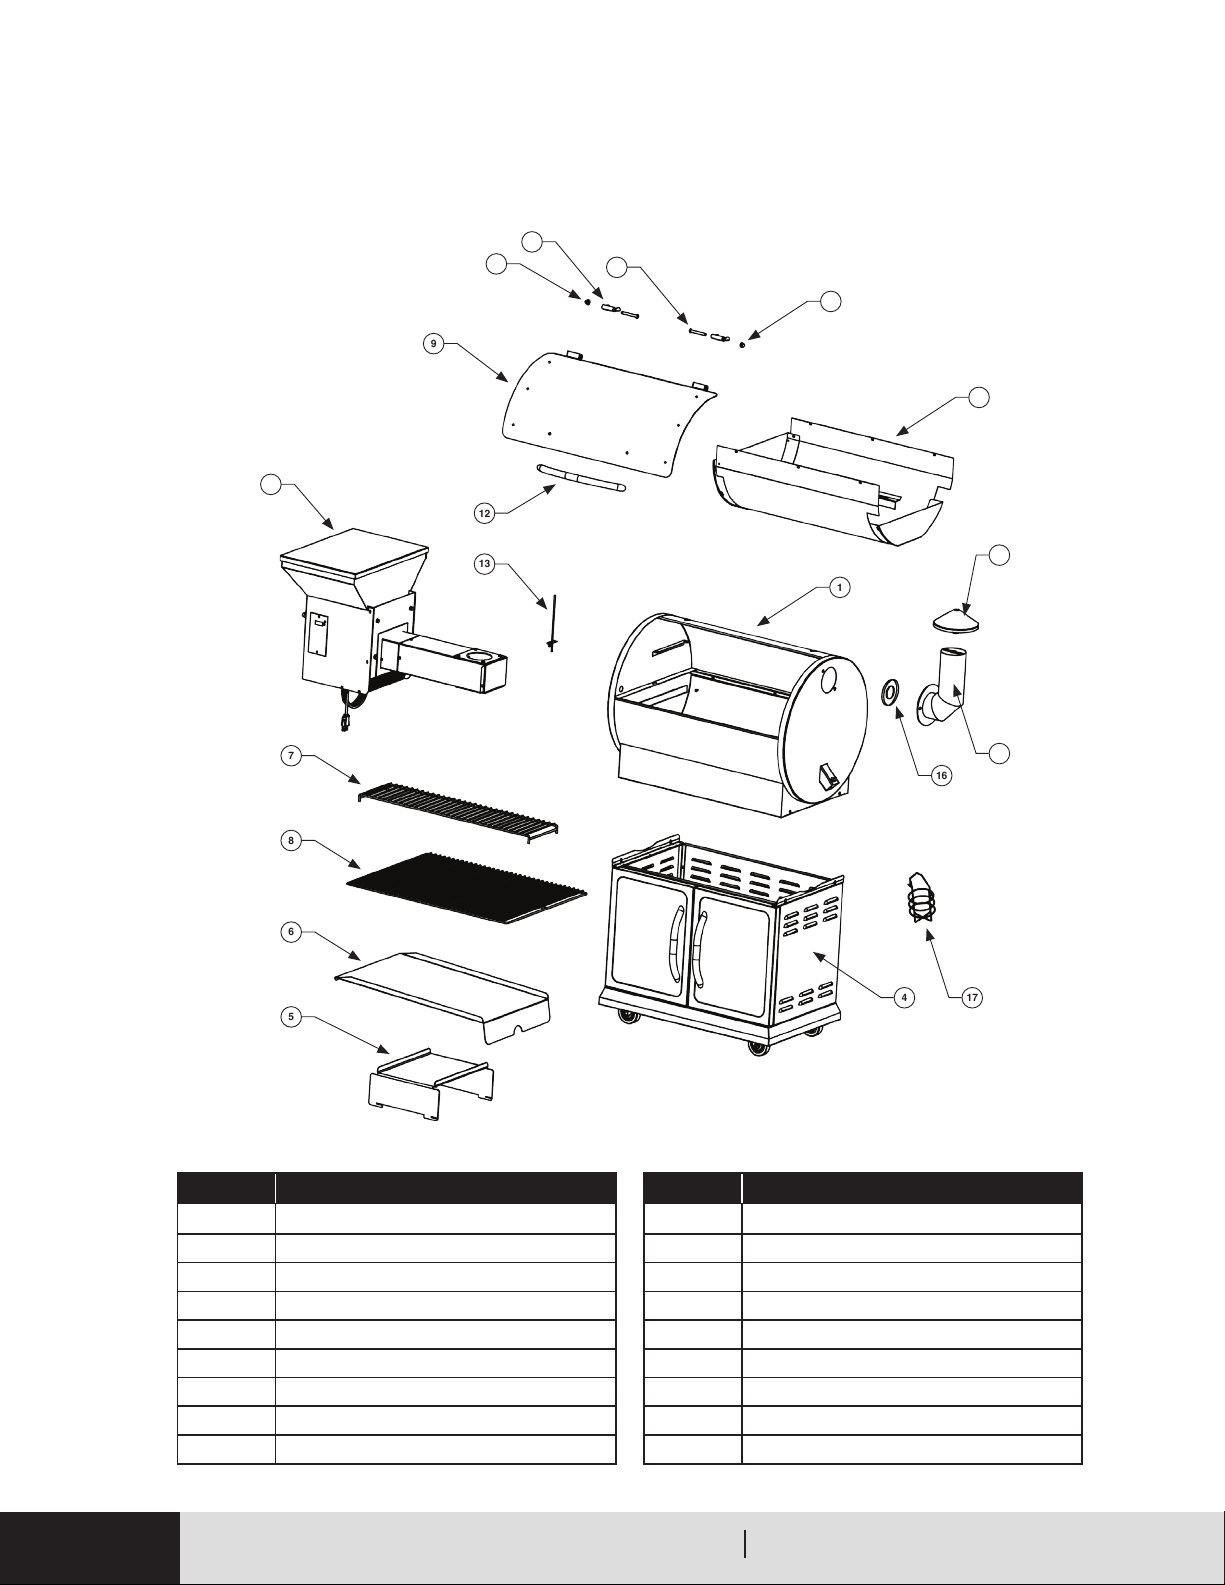
PARTS DIAGRAM
18
10
9
12
13
3
7
8
6
5
11
18
2
14
15
16
174
1
ITEM DESCRIPTION
1 Grill Chamber Assembly
2 Thermal Bae
3 Hopper Assembly
4 Body Frame
5 Heat Bae
6 Grease Drain Pan
7 Upper Cooking Grate
8 Lower Cooking Grate
9 Lid
ITEM DESCRIPTION
10 Hinge Assy
11 Bolt
12 Lid Handle
13 RTD
14 Chimney Cap Assembly
15 Smoke Stack Assembly
16 Smoke Stack Gasket
17 Grease Catch Holder
18 Cap Nuts

17SILVERBAC WOOD PELLET GRILL OPERATION MANUAL
TROUBLESHOOTING and faq
The Silverbac is very trouble-free in operation when
properly maintained and quality fuel is used. If the
Silverbac fails to operate properly, use the following
to troubleshoot.
Why won’t my Silverbac light?
Where do I get parts for my Silverbac?
1. Check outlet and verify Control Panel is
powering up.
2. Make sure green LED light is on. This ensures outlet
is good and fuse on the board is good. If not,
check outlet and unplug grill and check fuse.
3. Turn Silverbac “O."
4. Remove Lower Cooking Grate (8), Grease Pan (6),
and Heat Bae (5).
5. Clean area of burned and unburned pellets.
6. Turn Silverbac “On."
7. Verify Auger begins to turn and fuel is dropping
into Fire Pot. If Auger is not turning see
previous section.
8. If Auger is turning but pellets are not coming out
ensure there are pellets in the Hopper if it ran
empty or this is the rst time for use, it will be
necessary to prime the Auger. This will ensure
pellets are at the end of the tube and will begin
dropping once unit is turned on.
9. Igniter should begin to turn red within
1 to 2 minutes.
1. Verify pellets are in the Hopper.
2. If this is the initial firing or the Silverbac has run
out of pellets, allow sufficient time for the pellets
to travel from the Hopper to the Fire Pot (may
take up to 5 minutes).
3. Once pellets begin to drop, turn the
Silverbac “Off” and then back “On” to
re-start Ignition Mode.
4. Ensure the Auger is turning by removing the Lower
Cooking Grate(8), Grease Pan (6) and Heat
Bae (5), and visually checking the Auger.
5. If Auger is not turning check fuse on back of
controller and replace as necessary. If good,
contact Grilla Grills or visit our website to view
support videos.
Be sure to be ready with your name, phone number,
address, Silverbac model number and serial number,
along with the part identication number from the
“Parts Diagram” on page 16.
c au t i o n :Never squirt gel on a
burning or hot fire.
c au t i o n :During troubleshooting some
components are hot. Allow unit adequate time to
cool. Use gloves as needed.
Pellets are not being delivered into the
Fire Pot – why?
For more Silverbac Troubleshooting information visit GrillaGrills.com

SILVERBAC WOOD PELLET GRILL OPERATION MANUAL18
LIMITED WARRANTY INFO
LIMITED LIFETIME WARRANTY
This limited warranty covers the Silverbac Grill by Grilla Grills manufactured by Fahrenheit Technologies, Inc. The
Silverbac Grill has a 4-year limited warranty from the date of purchase by the original owner against defects in the
material and workmanship when subjected to normal residential use. Limited warranty does not apply to paint, grill
cover, or damage caused from corrosion.
Conditions of Limited Warranty
• During the term of the limited warranty, Grilla Grills' obligations shall be limited to replacement of covered,
failed components. Grilla Grills will repair or replace parts returned to Grilla Grills, freight prepaid, if
the part(s) are found by Grilla Grills to be defective upon examination. Grilla Grills shall not be liable for
transportation charges, labor costs, or export duties.
• Grilla Grills takes every precaution to utilize materials that retard rust, including the use of high-tempera-
ture paint where advisable. Even with these safeguards, the protective coating can be compromised by
various substances and conditions beyond Grilla Grills’ control. High temperatures, excessive humidity,
chlorine, industrial fumes, fertilizers, lawn pesticides, and salt are some of the substances that can affect
paint and metal coatings. For these reasons, the limited warranties DO NOT COVER RUST OR OXIDA-
TION.
• The warranty is based on residential use. Warranty coverage does not apply to products used in
commercial applications.
Exceptions to the Limited Warranty
There is no written or implied performance warranty on Grilla Grills, as the manufacturer has no control over the
installation, operations, cleaning, maintenance, or the type of fuel burned. This limited warranty will not apply, nor
will Grilla Grills assume responsibility if your product has not been installed, operated, cleaned and maintained
in strict accordance with the manufacturer’s instructions. The warranty does not cover damage or breakage due
to misuse, improper handling, or modications. NEITHER THE MANUFACTURER NOR THE SUPPLIERS TO THE
PURCHASER ACCEPTS RESPONSIBILITY, LEGAL OR OTHERWISE, FOR THE INCIDENTAL OR CONSEQUENTIAL
DAMAGE TO THE PROPERTY OR PERSONS RESULTING FROM THE USE OF THIS PRODUCT. ANY WARRANTY
IMPLIED BY LAW, INCLUDING BUT NOT LIMITED TO IMPLIED WARRANTIES OF MERCHANTABILITY OR FIT-
NESS, SHALL BE LIMITED TO ONE (1) YEAR FROM THE DATE OF ORIGINAL PURCHASE. WHETHER A CLAIM
IS MADE AGAINST THE MANUFACTURER BASED ON THE BREACH OF THIS WARRANTY OR ANY OTHER
TYPE OF WARRANTY EXPRESSED OR IMPLIED BY LAW, MANUFACTURER SHALL IN NO EVENT BE LIABLE FOR
ANY SPECIAL, INDIRECT, CONSEQUENTIAL OR OTHER DAMAGES OF ANY NATURE WHATSOEVER IN
EXCESS OF THE ORIGINAL PURCHASE PRICE OF THIS PRODUCT. ALL WARRANTIES BY MANUFACTURER ARE
SET FORTH HEREIN, AND NO CLAIM SHALL BE MADE AGAINST MANUFACTURER ON ANY ORAL WARRAN-
TY OR REPRESENTATION. Some states do not allow the exclusion or limitation of incidental or consequential
damages, or limitations of implied warranties, so the limitations or exclusions set forth in this limited warranty
may not apply to you. This limited warranty gives you specific legal rights and you may have other rights,
which vary from state to state.
fa h r e n h e i t t e c h n o l o g i e s ,i n c .
Fahrenheit Technologies, Inc. extends a limited warranty for its products as described on this page.

19SILVERBAC WOOD PELLET GRILL OPERATION MANUAL
The limited warranty for four (4) years is in lieu of all other warranties expressed or implied, at law or otherwise,
and Grilla Grills does not authorize any person or representative to assume for Grilla Grills any obligation or
liability in connection with the sale of this product. This means that no warranties, either expressed or implied,
are extended to persons who purchase the product from anyone other than Grilla Grills or an authorized Grilla
Grills Distributor.
Procedure for Warranty Service
Call Grilla Grills at 616–392–7410 for repair or replacement of your covered parts. Be prepared to furnish the
following information:
• Purchaser’s name, model and serial number of grill and date of purchase.
• An accurate description of the problem.
LIMITED WARRANTY INFO (cont.)

SILVERBAC WOOD PELLET GRILL OPERATION MANUAL20
save this manual for future use
VER 110917
Table of contents
Other SilverBac Grill manuals

Popular Grill manuals by other brands

EXPERT GRILL
EXPERT GRILL XG10-108-002-01 owner's manual

Banquet Barbecues
Banquet Barbecues Rio Crystal quick guide

Brinkmann
Brinkmann Grill Zone 6355-T owner's manual

Bifinett
Bifinett KH 1141 operating instructions

OOGarden
OOGarden 0077-0049 Instructions for care and use

Magma
Magma Delmar DM10-016NG owner's manual


