Simon Gault GBQ550 User manual

Operating Instructions
6 Burner BBQ
With Side / Rear Burner
And Rotisserie
Model: GBQ550

BBQ
Please read these instructions & user manual carefully.
oTake extra care when unpacking and assembling your Goldair BBQ. Some
edges may be sharp from the manufacturing process and may result in cuts if
not handled with care.
oBefore attempting to assemble your Goldair BBQ, ensure all parts are correct
and contained within the box as per the components list.
oGoldair suggests laying out all components on a large flat surface and
removing any plastic or protective material before assembling your BBQ.
oIf your BBQ has lockable castors ensure these are locked before attempting
to assemble otherwise the BBQ may move during assembling resulting in
injury.
oDo not dispose of packaging until completely satisfied with assembly of your
BBQ
Please refer to your user manual for operating instructions, further information or
trouble shooting before you call the Customer Service number listed within the
user manual.
If your BBQ has any Stainless Steel please note the following:
Note: Stainless Steel will rust.
Failure to store with a BBQ cover, and to clean & maintain your BBQ regularly
will result in Stainless Steel ‘tea staining’ & rusting. Consequently it will not be
covered by the warranty.
Goldair recommends the use of stainless steel protectors & cleaners to also pro-
long the life of your BBQ.
Please refer to your user manual.
Note: Lift the BBQ off the packaging before assembling the side tables.
Use 2 people to lift the BBQ. Lift using the cut out handles on the sides of
the BBQ.
Read Me First Page 1
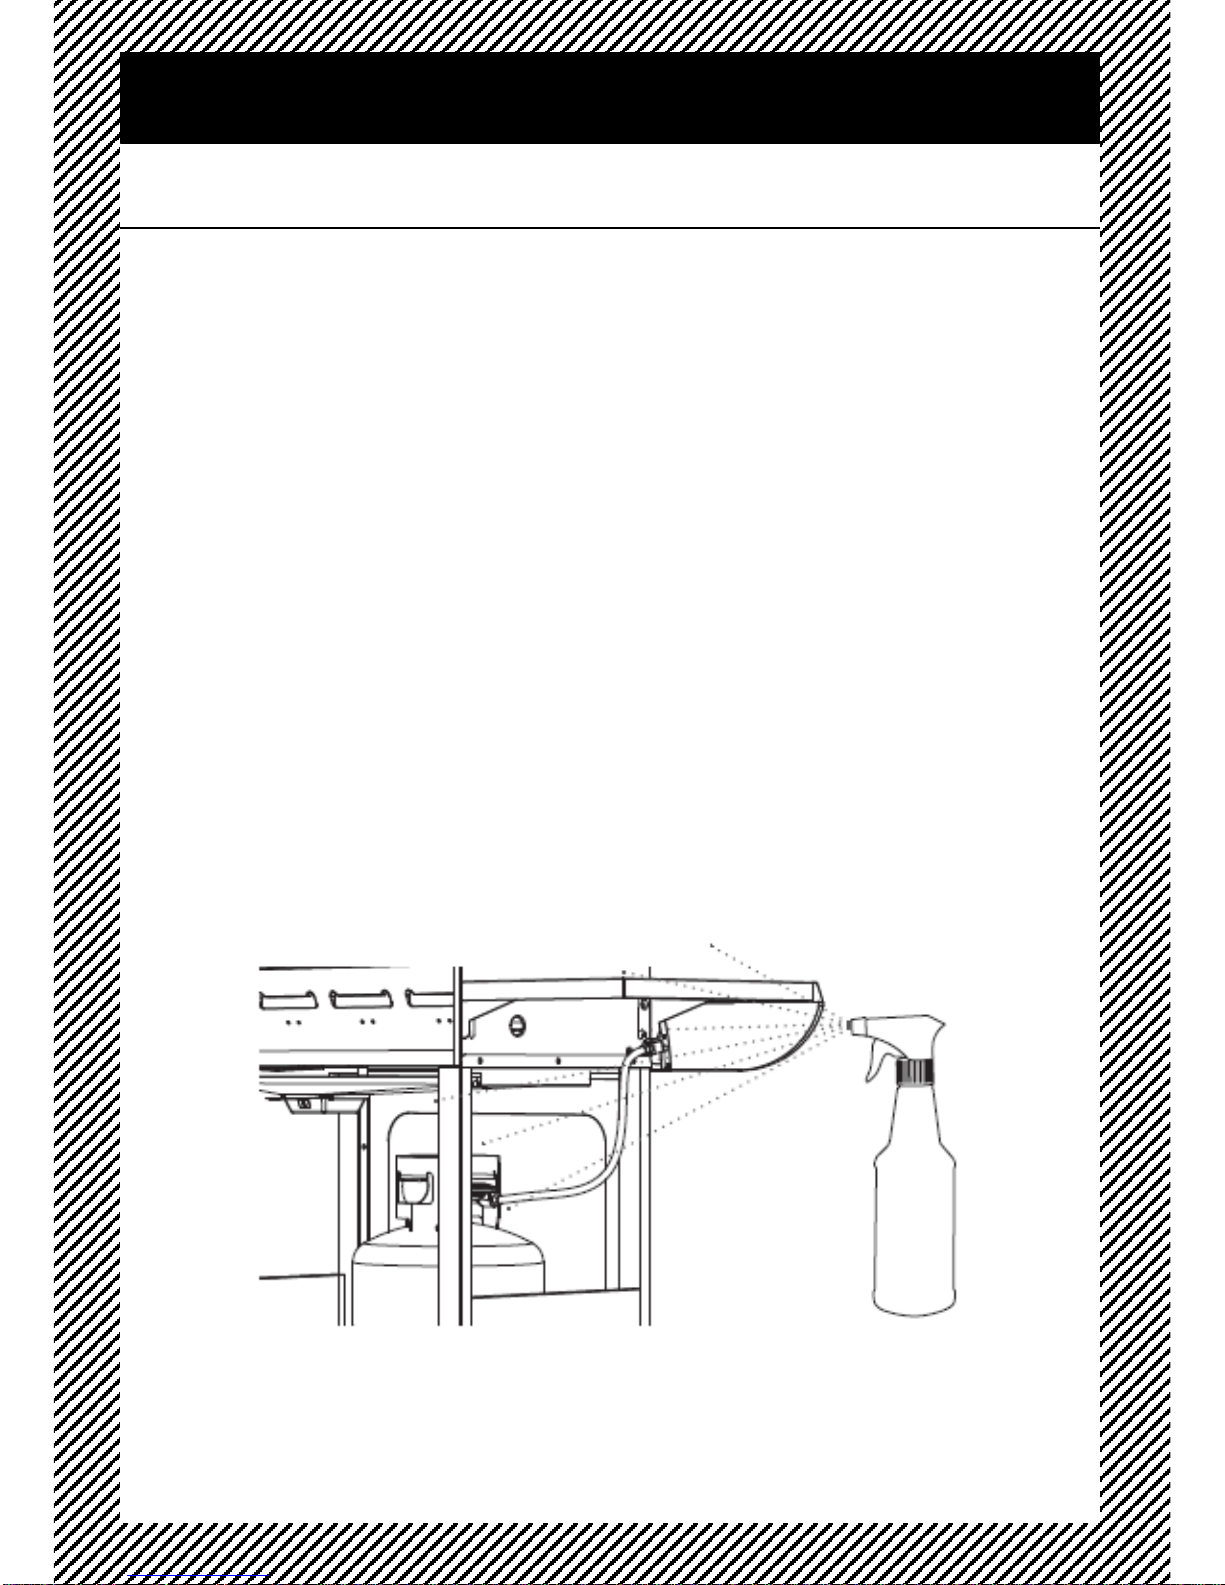
GAS LEAK TESTING
It is important that you leak test the BBQ before first use and every time the gas
cylinder is refilled and reconnected to the BBQ.
To complete a Leak Test:
•Make sure all the control knobs are OFF.
•In a small container, mix up a solution of water and detergent/soap.
Mix the solution well (about the same concentration as washing up water).
•Turn the cylinder ON by rotating the knob to the open position.
•Using a brush or spray bottle apply the soap solution to the gas line and each
join in the gas line including:
•The gas connection at the inlet of the BBQ
•All gas hose connections
•The gas connection at the gas cylinder
•If bubbles appear, there is agas leak.
•If the leak is at the connection, re-tighten and re-seal.
•If the leak is anywhere else or you cannot resolve the leak by tightening the
connection DO NOT PROCEED.
•Replace gas hose and regulator.
•Replacement hose and regulators can be purchased from your local BBQ
retail specialist
Read Me First Page 2

Safety Guide
•Do not operate this BBQ before reading the instruction booklet
•Do not place articles on or against this BBQ
•Do not use or store flammable or combustible materials, chemicals or spray
aerosols near your BBQ
•Do not operate this BBQ indoors; the BBQ is for outdoor use only
•Do not obstruct any ventilation of the BBQ
•Do not light or operate with cover on
•Never store a spare LPG cylinder under or near your BBQ. This could cause
excess pressure to be expelled through the relief valve resulting in fire,
explosion, or severe personal injury including death
•LPG gas is heavier than air and will collect in low areas, proper ventilation is
extremely important
•Keep the ventilation opening of the LPG cylinder enclosure free and clear from
obstruction and debris
•Do not insert any foreign objects into the valve outlet. Damage may result,
causing a leak, possible explosion, fire, severe bodily harm or death
•Children and adults should be alerted to the hazards of high surface
temperature, burns and clothing ignition
•Never leave children unattended in the area where the BBQ is being used.
•Do not store items of interest to children around, below or in the shelf of the
BBQ
•Never allow children to sit or stand on any part of the BBQ
•Some users prefer cooking on Hotplates. You must always have at least 1 Grill
plate to ensure adequate air flow. Fully covering your BBQ will create a safety
hazard.
Page 3
Safety Guide
Always choose a safe location for the BBQ, keeping in mind the safety
precautions outlined. Ensure all packaging has been removed from the
unit before use.
NOTE
This BBQ shall only be used in an above
ground open air situation with natural
ventilation, without stagnant areas, where
gas leakage and products of combustion are
rapidly dispersed by wind and natural
convection.
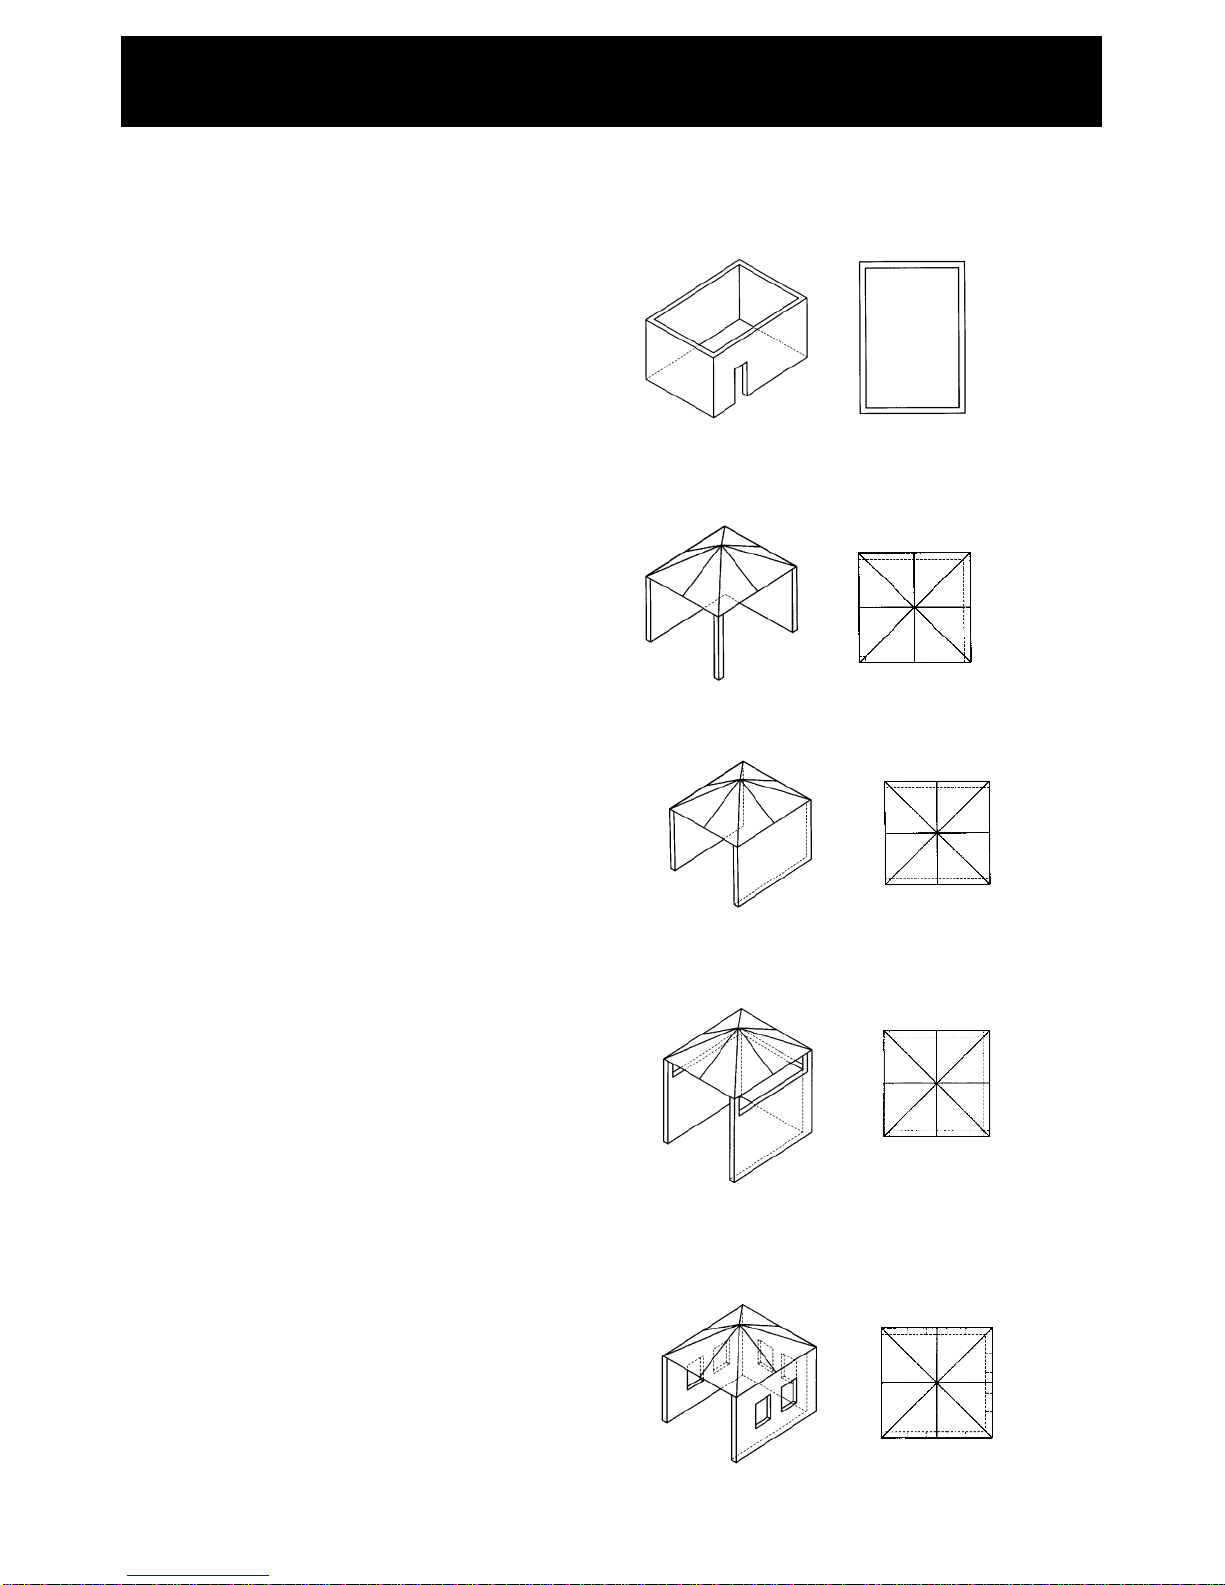
Any enclosure in which the BBQ is used
shall comply with one of the following:
An enclosure with walls on all sides, but at
least one permanent opening at ground level
and no overhead cover. (Refer to Figure 1).
Within a partial enclosure that includes an
overhead cover and no more than two walls.
(Refer to Figure 2 and Figure 3).
Within a partial enclosure that includes an
overhead cover and more than two walls, the
following shall apply:
•At least 25%of the total wall area is
completely open, (refer to Figure 4), and
•At least 30%of the remaining wall area is
open and unrestricted, (refer to Figure 5)
In the case of balconies, at least 20%of the
total wall area shall be and remain open and
unrestricted.
Figure 1 - Enclosure with walls on all sides but
no overhead cover
Figure 2 - Partial Enclosure with overhead cover
and no more than two walls
Figure 3 - Partial Enclosure with overhead cover
and no more than two walls
Figure 4 - Open side at least 25%of total wall
area.
30%or more in total of the remaining wall area is
open and unrestricted.
Figure 5 - Open side at least 25%of total wall
area.30%or more in total of the remaining wall
area is open and unrestricted.
Page 4
Safety Guide
A strong gas smell or hissing sound of escaping gas indicates a serious problem with the
BBQ or LPG cylinder. Failure to immediately follow the steps listed below could result in
a fire or explosion that could cause serious injury, death or property damage.
•Shut off gas supply at cylinder
•Turn the control knobs of the BBQ to the off position
•Extinguish any open flame
•Open the BBQ hood
•Get away from the LPG cylinder
•Do not try and fix the problem yourself
•If gas odour continues or you cannot extinguish fire, call fire brigade
To prevent fire and smoke damage, remove all packaging material before operating
BBQ.
HOSE ASSEMBLY AND SAFETY
Aleak test (Procedure located on Page 2 of this manual) must be carried out prior to using
the BBQ for the first time and each time the gas cylinder is refilled, or each time the gas
hose and gas regulator have been disconnected. Check all gas hose and line
connections for damage, cuts or cracks each time you use the BBQ.
If the hose shows signs of deterioration or damage, complete a leak test to identify any
leaks and if required replace the hose.
The hose must remain free of kinks and sharp bends. Never puncture or put stress on
the hose or fittings. Hose connection is located at the lower front area on the right side
wall of the main body of the BBQ.
Replacement hose and regulators can be purchased from your local BBQ retail
specialist. Leak Test procedure is located on Page 2 of this manual.
BURNERS
The location of the tube burner to the jet is vital for safe operation. Check to assure the
jets are inside the burner tubes before using the gas BBQ
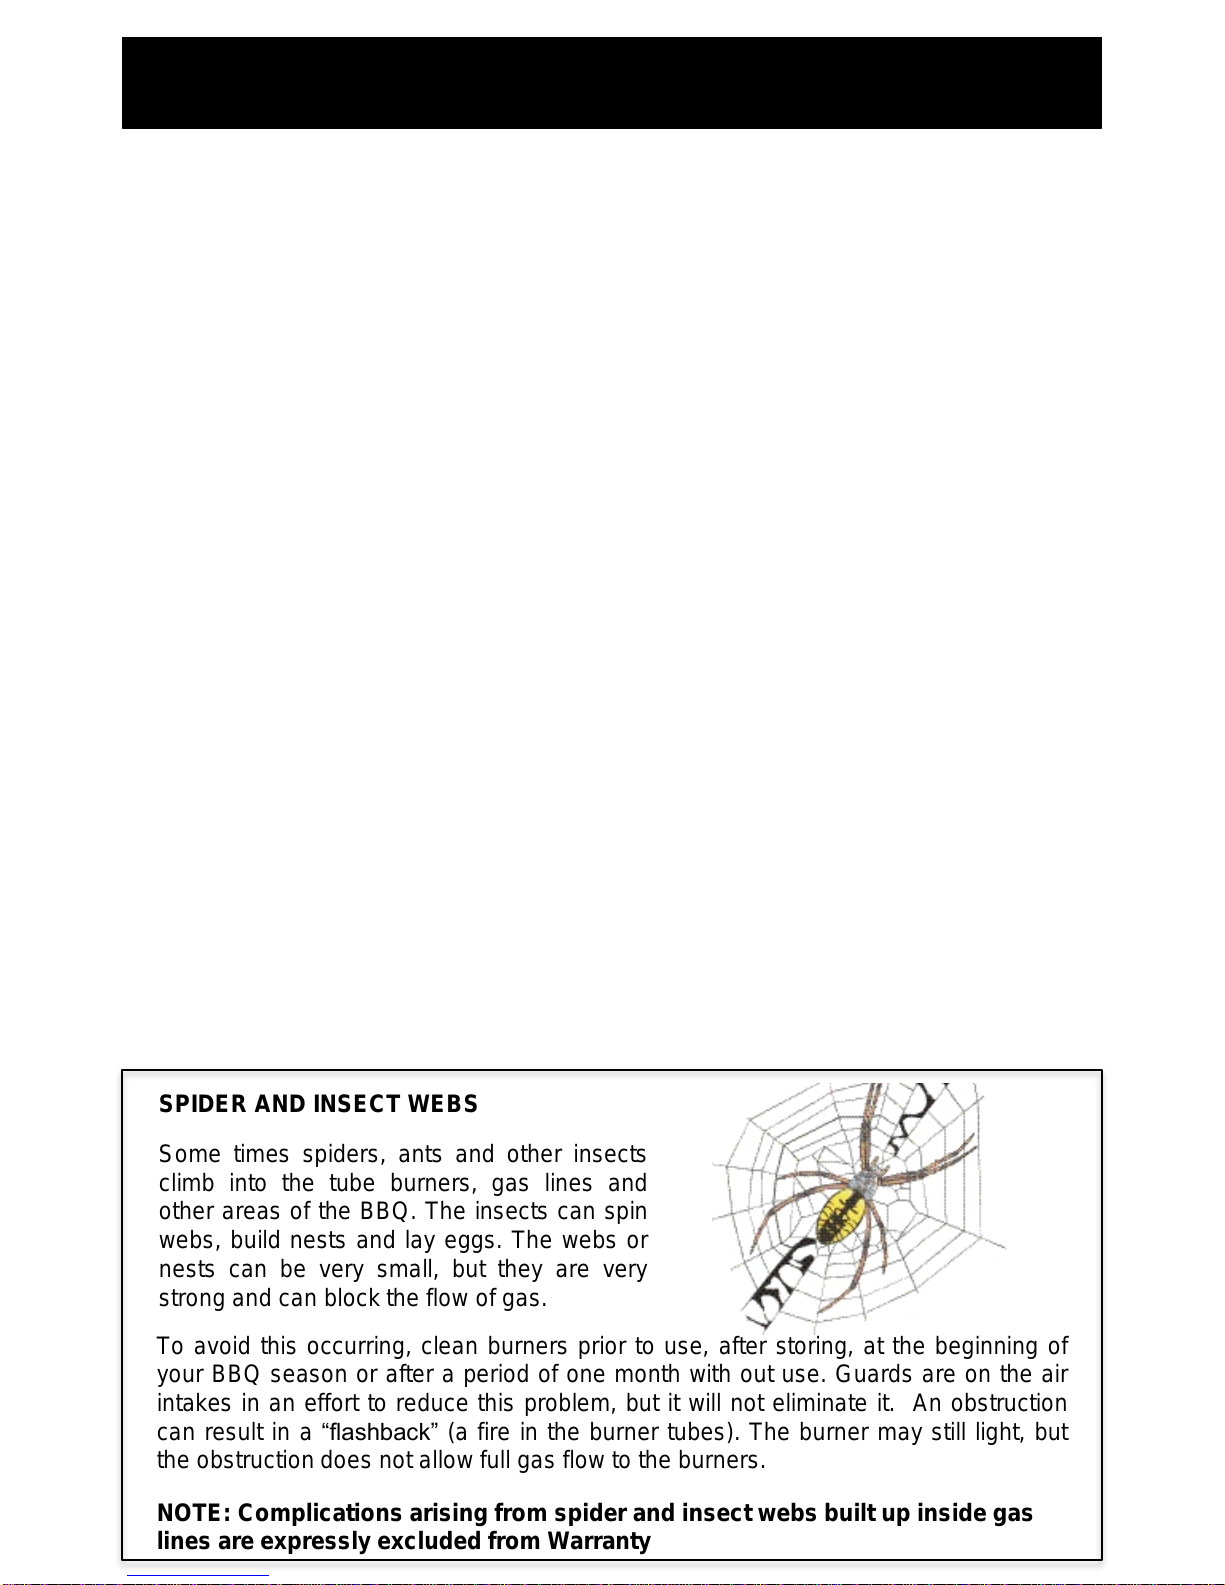
SPIDER AND INSECT WEBS
Some times spiders, ants and other insects
climb into the tube burners, gas lines and
other areas of the BBQ. The insects can spin
webs, build nests and lay eggs. The webs or
nests can be very small, but they are very
strong and can block the flow of gas.
NOTE: Complications arising from spider and insect webs built up inside gas
lines are expressly excluded from Warranty
To avoid this occurring, clean burners prior to use, after storing, at the beginning of
your BBQ season or after a period of one month with out use. Guards are on the air
intakes in an effort to reduce this problem, but it will not eliminate it.An obstruction
can result in a“flashback” (a fire in the burner tubes). The burner may still light, but
the obstruction does not allow full gas flow to the burners.
Page 5

GAS CYLINDER INFORMATION
1. This BBQ is designed to be used with a gas cylinder not exceeding 9KG.
2. The gas cylinder supply valve must be turned off when the BBQ is not in use.
3. Gas cylinders must be stored outdoors, out of reach of children and must not be
stored in abuilding, garage or any other enclosed area.
4. The gas cylinder used must incorporate a safety collar to protect the valve assembly.
5. Never store a spare cylinder under the BBQ shelves or inside the trolley housing. Any
LPG cylinder not attached to the BBQ for use should be stored outdoors and well
away from the BBQ.
IMPORTANT
1. When disconnecting and removing the gas cylinder for the purpose of refilling, always
follow these procedures.
2. Ensure that all gas control valves on the BBQ and the gas cylinder are turned off
before disconnecting the regulator from the cylinder.
3. Do not smoke or use a naked flame near the BBQ or gas cylinder while disconnecting
the gas line between the BBQ and gas cylinder.
4. Remove the gas cylinder from the enclosure before disconnecting the regulator from
the BBQ.
5. Tighten all connections before placing the gas cylinder back in to place.
6. The gas leak testing procedure should be conducted every time the gas cylinder is
refilled and reconnected to the BBQ prior to using the BBQ (Procedure located on
Page 2 of this manual).
Safety Guide
For safe use of your BBQ and to avoid serious injury:
DO NOT let children operate or play near the BBQ.
KEEP BBQ area clear and free from materials that burn.
DO NOT block holes in bottom or back of BBQ.
Check burner flames regularly.
Use BBQ in well-ventilated space. NEVER use in enclosed spaces such as a carport,
garage, porch, covered patio, etc.
DO NOT use charcoal or ceramic briquettes in agas BBQ.
Warning
Page 6

REGULATOR CONNECTION
1. Check that all control knobs are in the ‘Off’ position.
2. Make sure the cylinder valve is off.
3. Remove the protective cap from the cylinder, if present.
4. Leak test the connection with a soapy water solution (Procedure located on Page 2
of this manual)
NOTE
1. Never use a rusty or dented gas cylinder with a damaged gas valve
2. Never fill the gas cylinder beyond 80% capacity
3. Always have the gas cylinder filled by an authorized LPG supplier
4. If you have any questions concerning assembly or operation, consult your dealer or
LPG Gas Company.
5. When used always place the BBQ and cylinder on flat level ground.
6. You will need to have the LPG cylinder serviced or replaced every ten years. The date
of the last service should be stamped on the neck of the bottle.
7. Always use a spanner to tighten all gas fittings.
Safety Guide Page 7

•Do not leave food unattended on the BBQ.
•In case of a fat fire turn gas off at cylinder immediately.
•Particular care must be taken when removing the fat drip tray. Hot fat can cause
serious burn injuries.
•Proper clearance from combustible materials must be maintained at all times. The
minimum clearances is as follows: Side: 700mm Rear: 700mm Ceiling: 1500mm
•Turn off all gas valves including cylinder after use.
•Do not allow build up of unburned gas.
•Cool the BBQ before replacing the lid or cover
•Accessible parts maybe very hot. Always keep children away from the BBQ
•Always wear protective gloves when handling hot components
•Never lean over BBQ when lighting
•Never use BBQ with any cover on
•Never dismantle control valves
•Never modify the construction of the BBQ or the size of any burner, injector orifice or
any other components. This will void your Warranty.
•Never move the BBQ during use
•The use of unauthorised parts will void your Warranty and can create an unsafe
environment and conditions of use.
•Never use charcoal or any other solid fuel in this BBQ
•Never disconnect any gas fittings while the BBQ is in use.
•In the event that a burner goes out and gas escapes, turn off the burner knobs, open
the BBQ hood fully and let it air out. Wait 5 minutes before attempting to relight the
BBQ.
•Never let clothing, pot holders or other flammable materials come in contact with or
close to any grill, burner or hot surface until it has cooled. Fabric may ignite and
result in personal injury. Certain materials or items, when stored under or near the
BBQ, will be subjected to radiant heat and could be seriously damaged.
•Clothing or other combustible materials should not be hung from the BBQ, or placed
on or near the BBQ. Combustible materials are considered to be wood, compressed
paper, plant fibres, plastic or other materials capable of being ignited and burned
Safety Guide Page 8
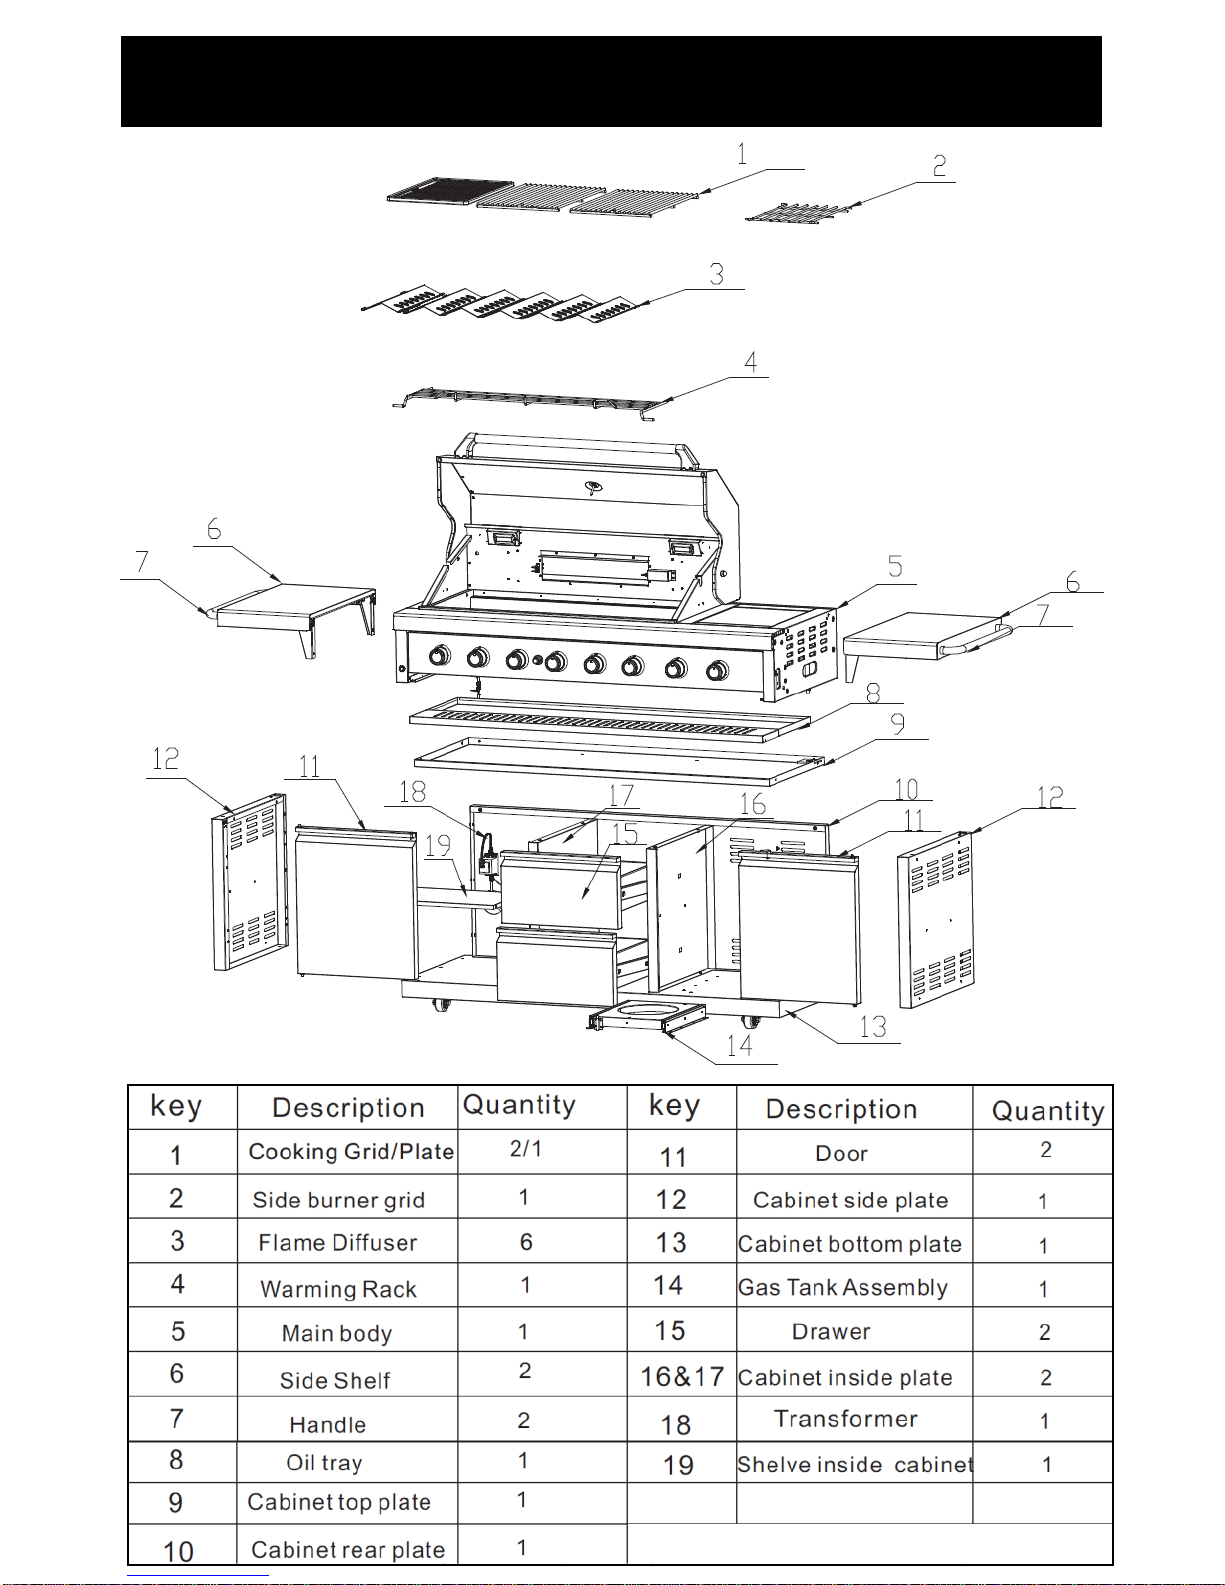
Parts Diagram Page 9
Parts Diagram Page 10
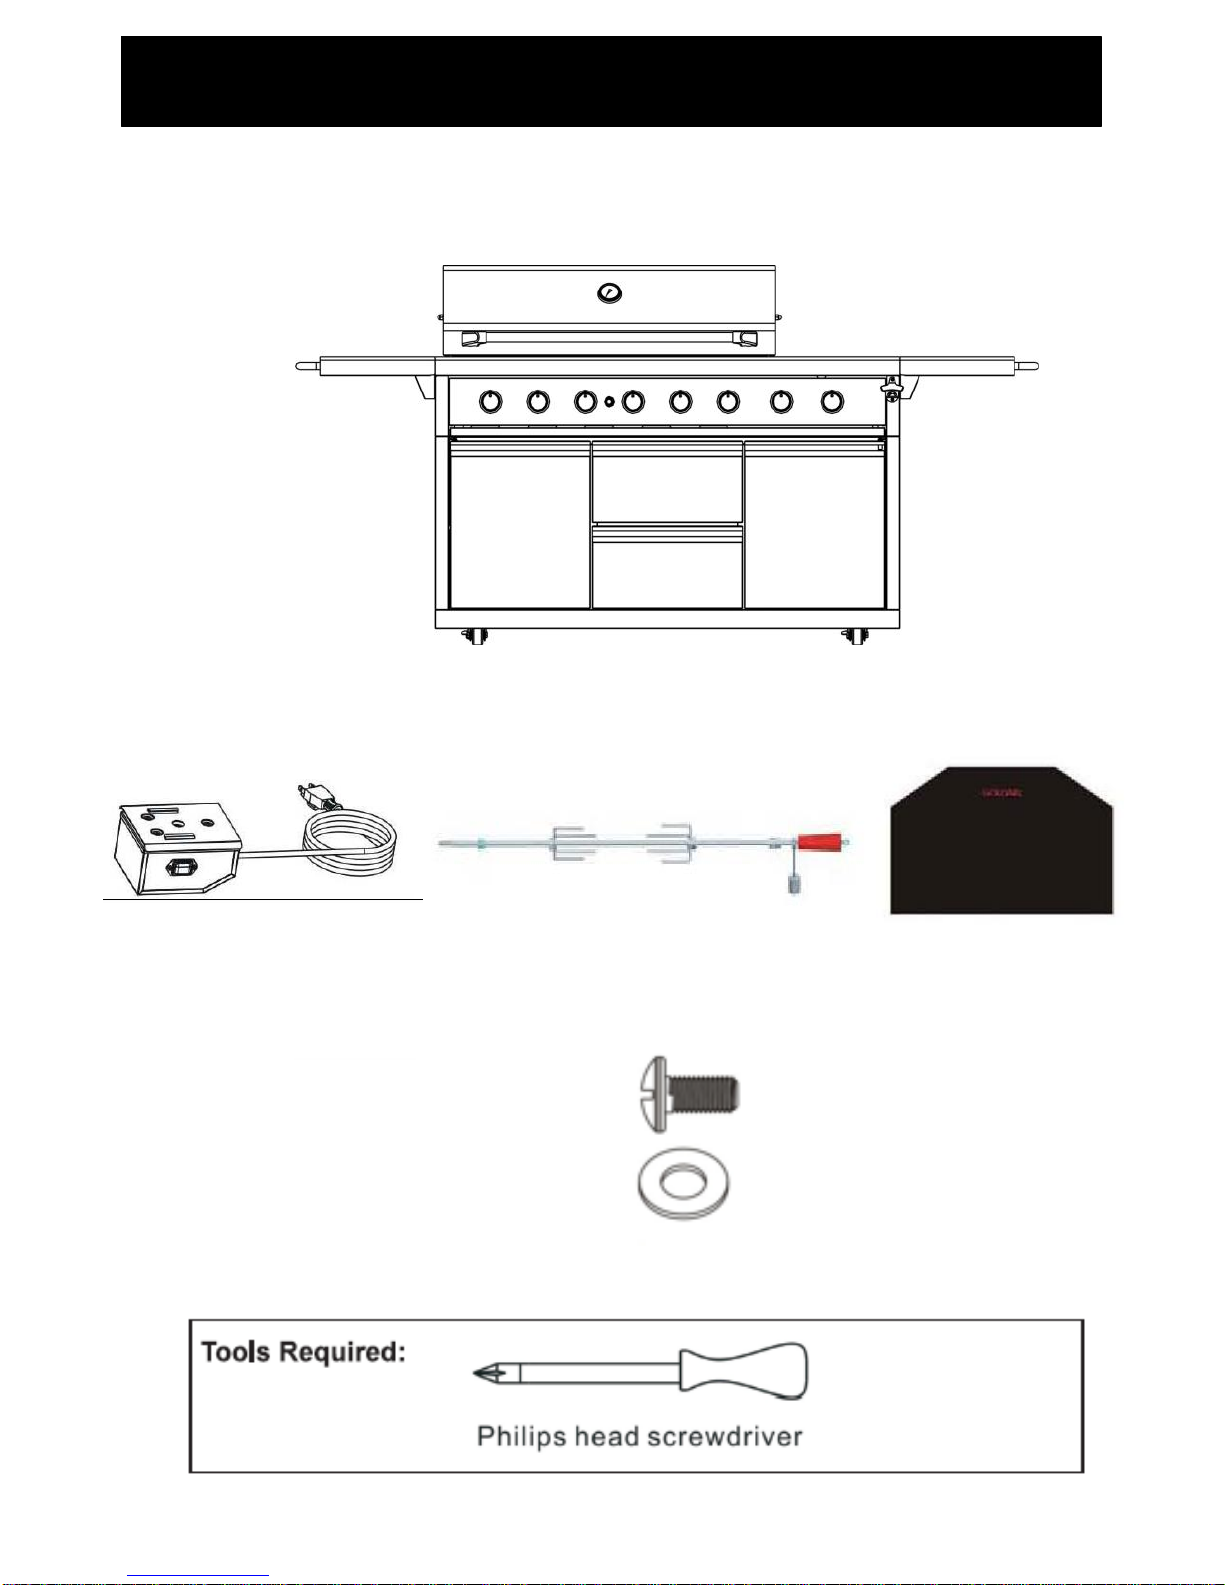
Rotisserie Motor x 1
Main Body x 1
Rotisserie Rod and Forks x 1 BBQ Cover x 1
M6 x 12
Washer x 4
Screw Pack
(NOT INCLUDED)
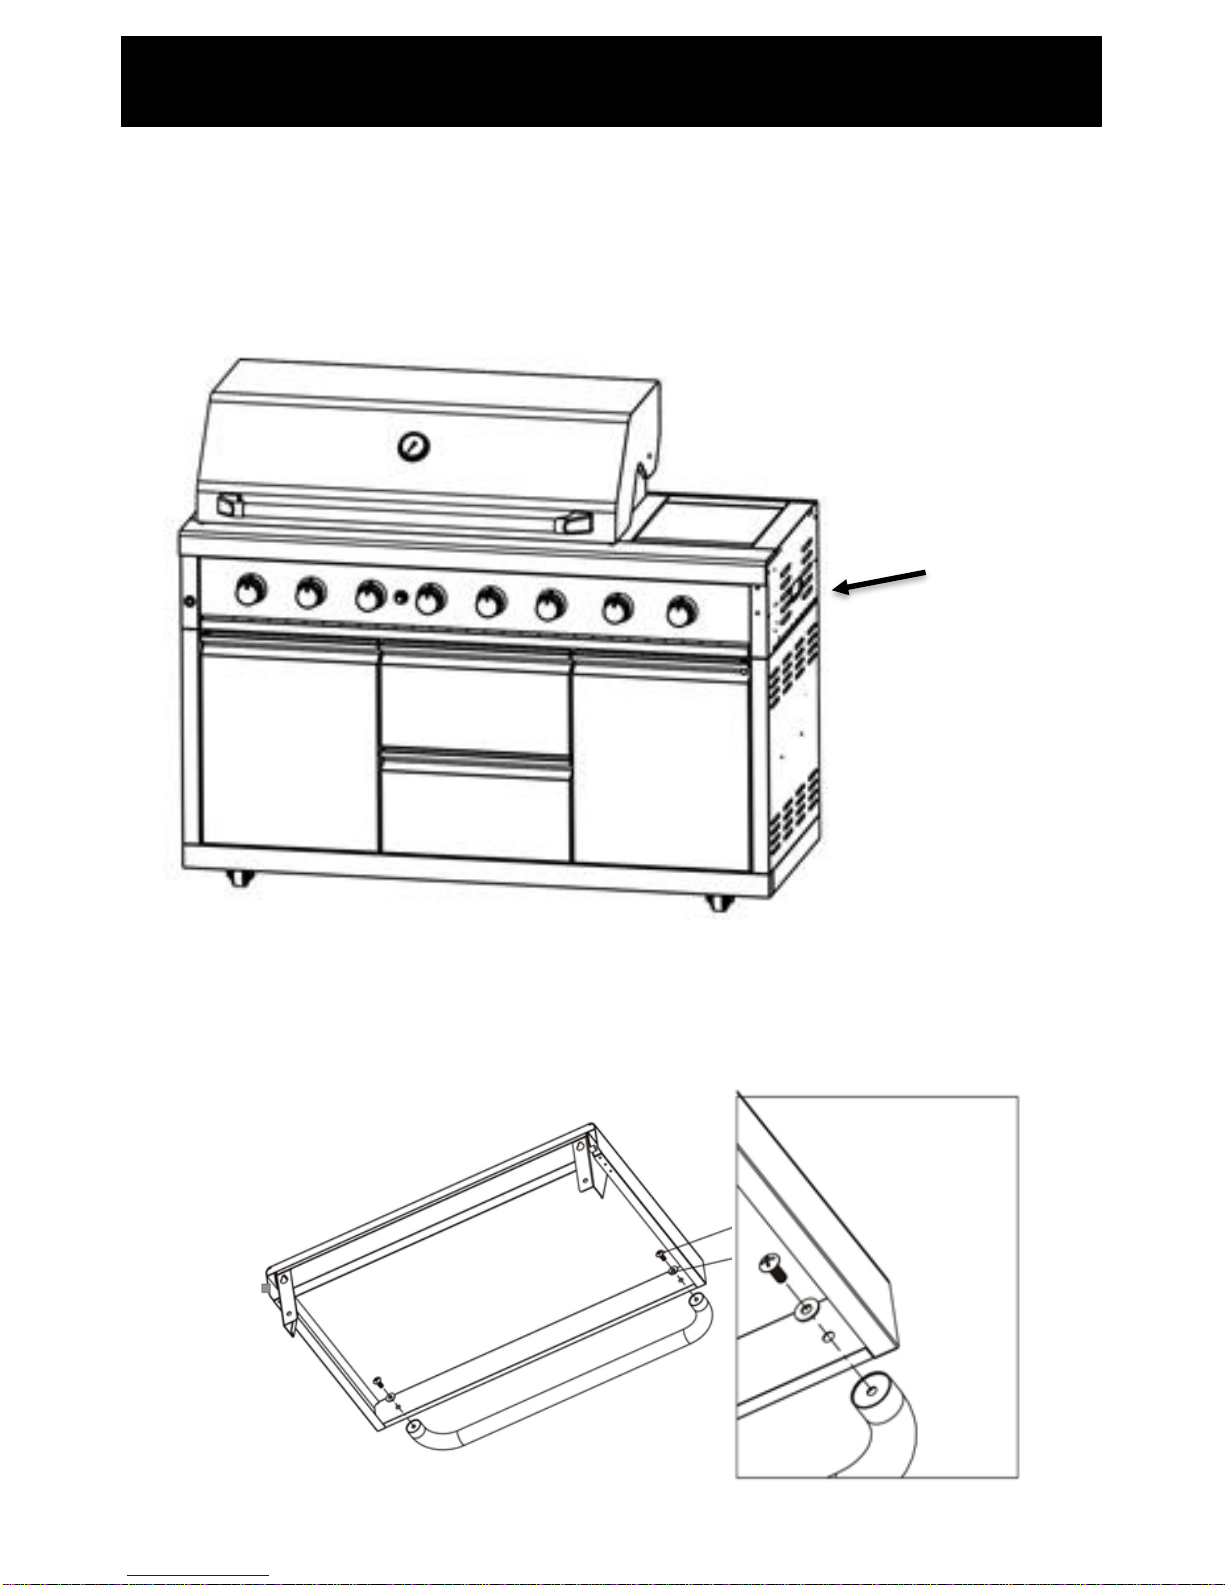
Assembly Procedure Page 12
Note:
Lift the BBQ off the packaging before assembling the side tables.
Use 2 people to lift the BBQ.
Lift using the cut out handles on the sides of the BBQ.
Step 1.
Attach the side handles to the side tables using 2 x M6 screws and washers for each handle.
Cut-out
handle
on sides
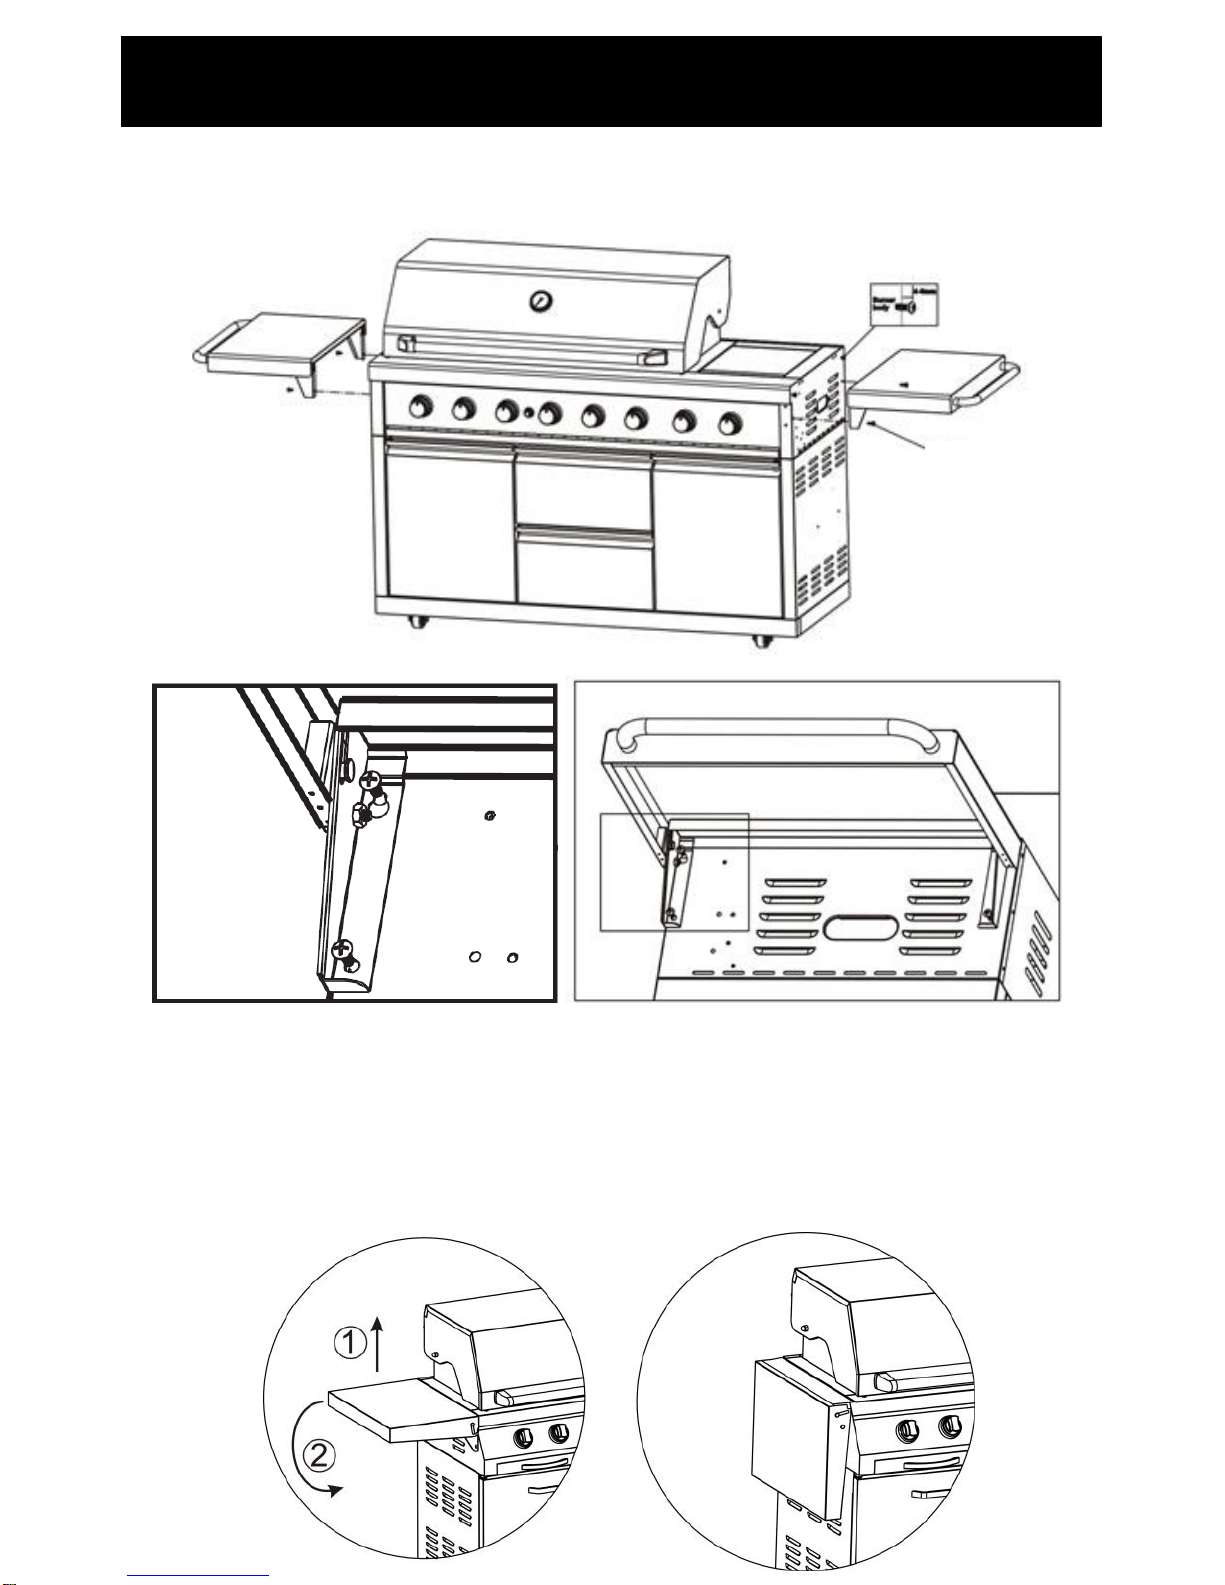
Assembly Procedure Page 13
Note:
Side Shelves can be folded up and down for ease of storage after being assembled as per Step 1
Step 2.
Attach the side tables using the 4 x M6 screws provided for each side table.
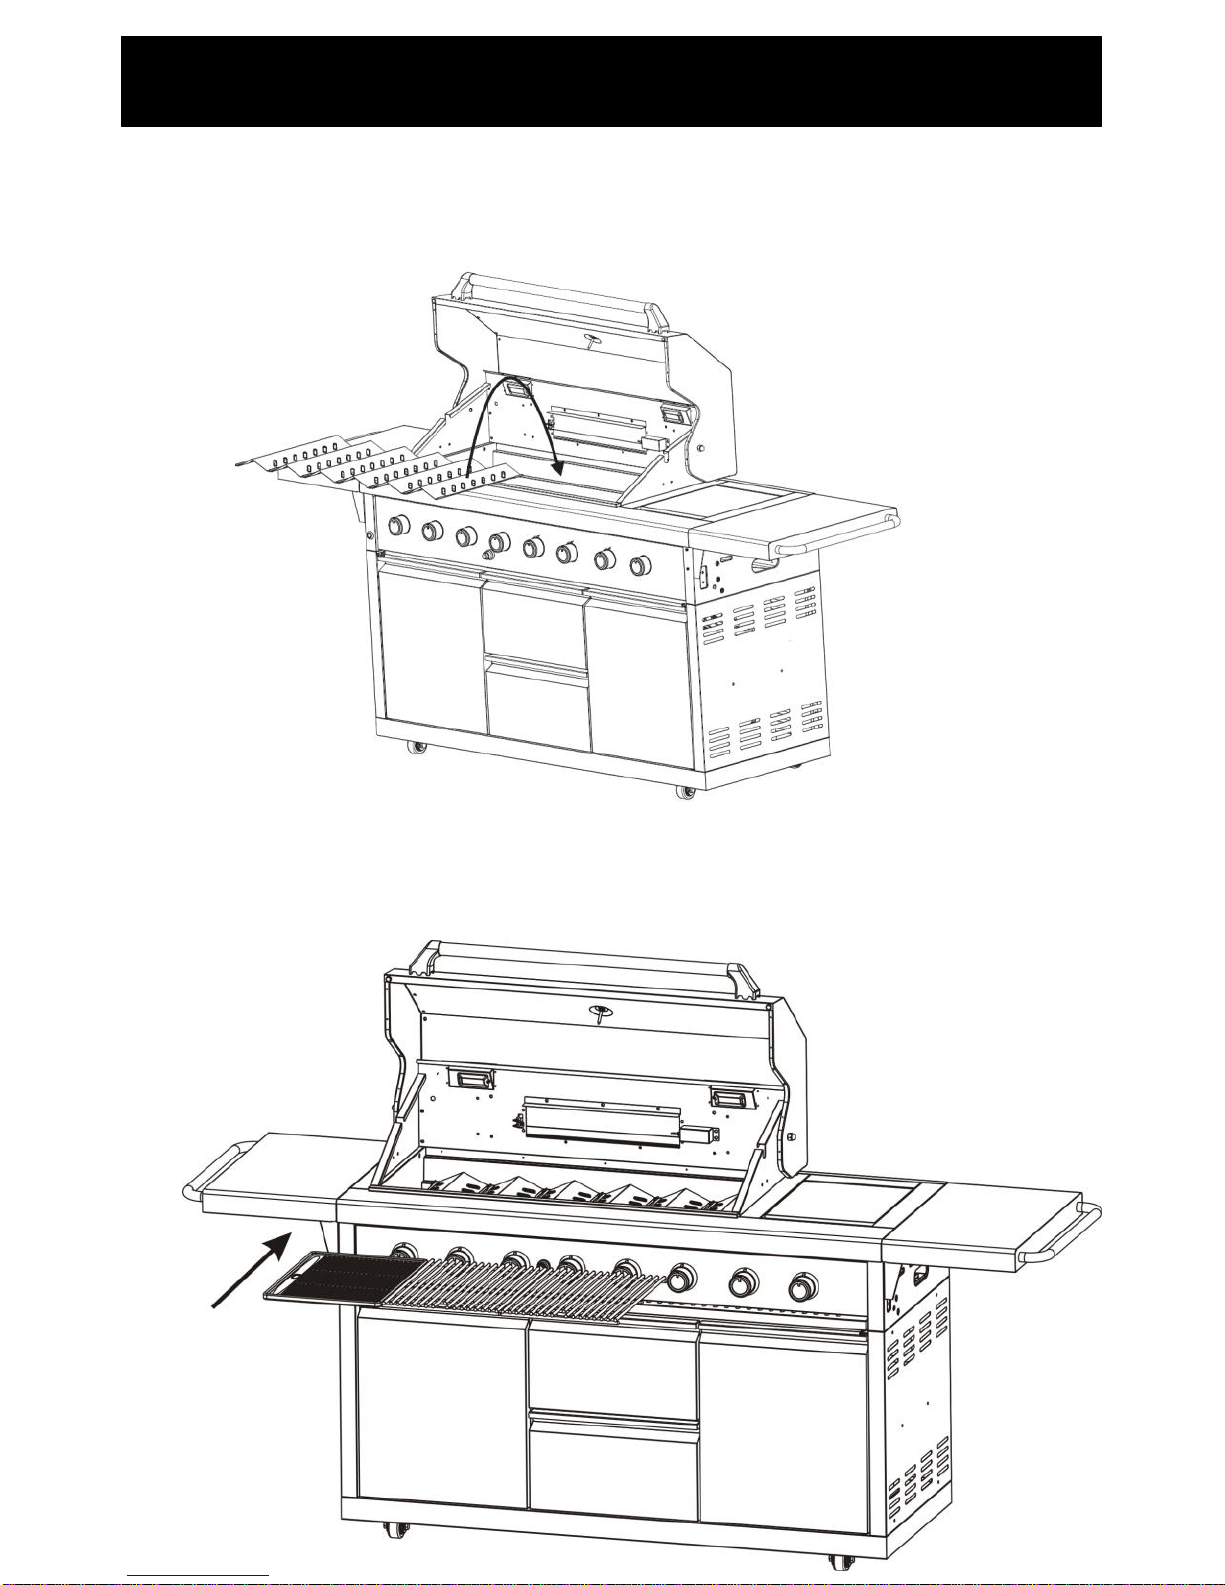
Assembly Procedure
Step 4.
Place Grill Plates over the top of Flame Tamers in place on the Firebox.
Page 14
Step 3.
The Burners on this BBQ come pre-assembled. During transit, the Flame tamers may have moved.
Ensure Flame Tamers (Part No.3) are placed evenly over the top of the BBQ Burners .
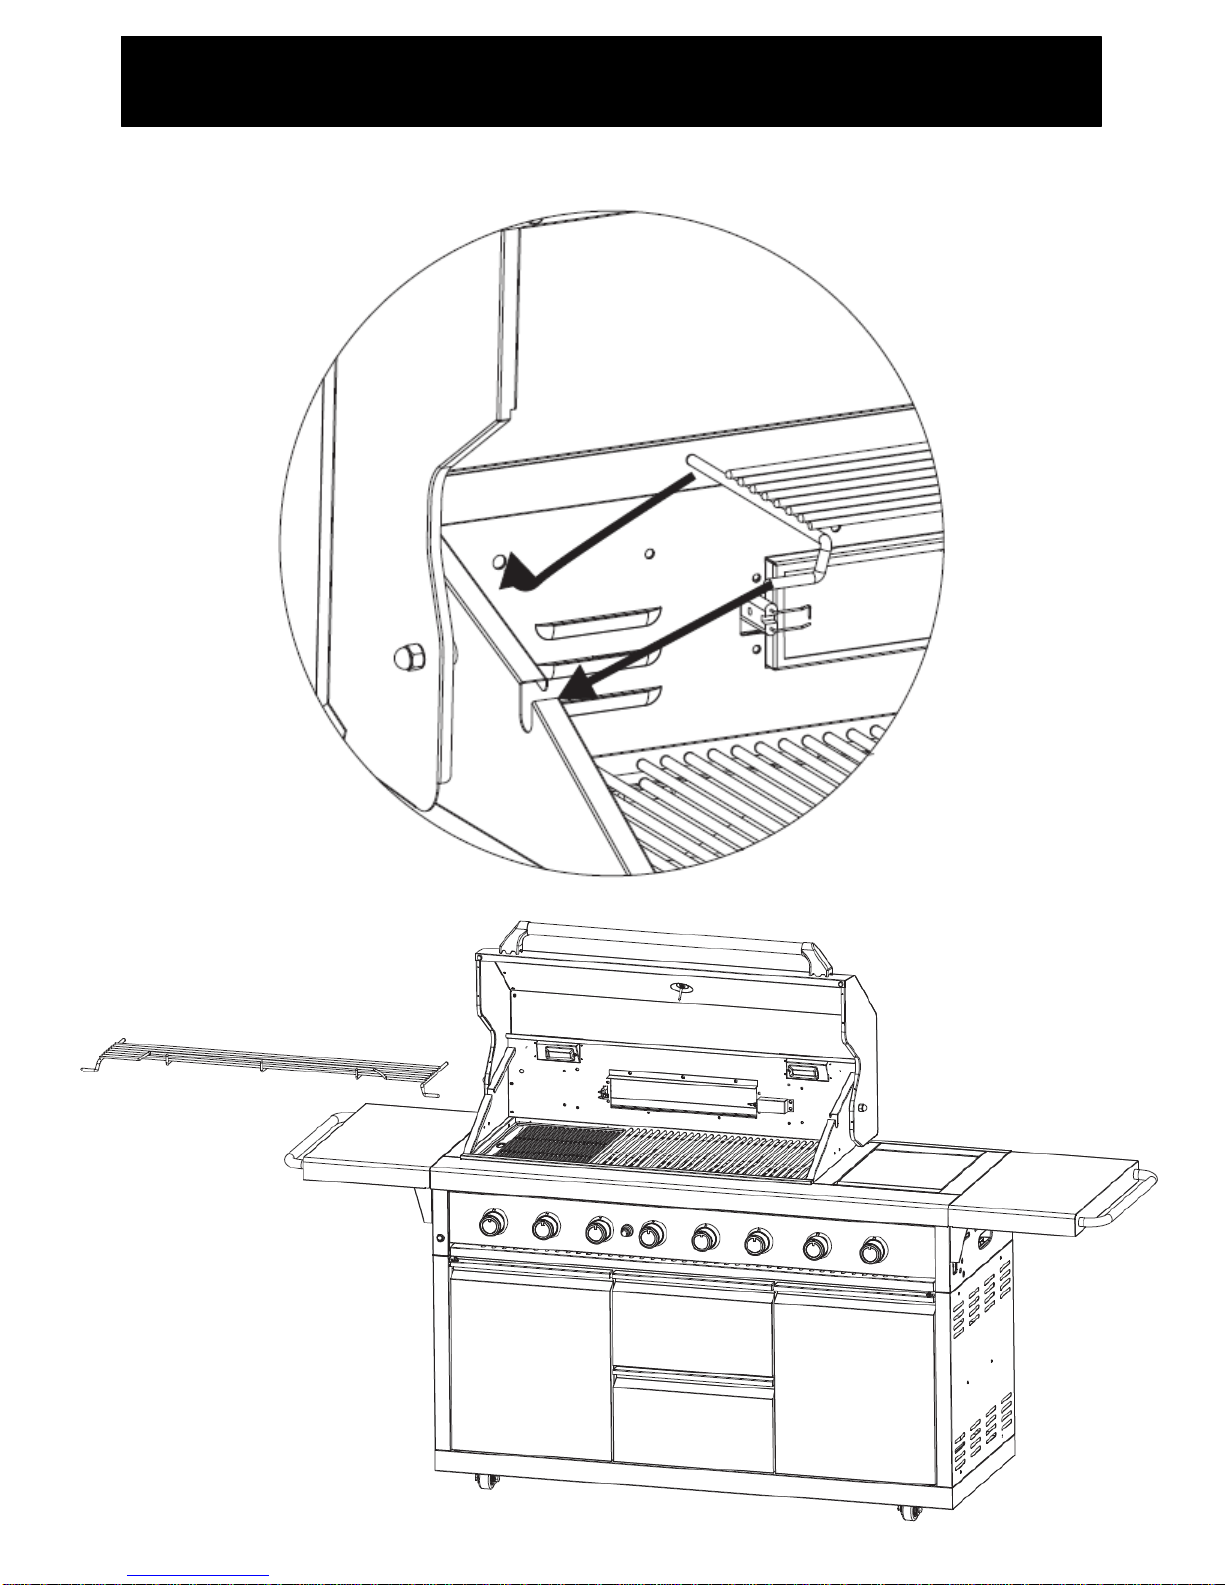
Assembly Procedure
Step 5.
Place Warming Rack over Grill Plates towards the back of the Firebox.
Page 15

Assembly Procedure
Step 6.
Place battery into Igniter by unscrewing ignition dial anticlockwise, insert battery.
When the battery is installed correctly, you will hear a clicking sound when pressing the ignition
button.
Page 16
Note:
1x AA Battery required. Not included.

Assembly Procedure
Step 7.
The BBQ is intended to be used with a standard 9kg LPG cylinder. This is the type of cylinder that
can be refilled at petrol station or swapped for similar cylinder.
Take the hose that came with the BBQ, feed it through the house hole at the rear of the main body.
Check that it has arubber seal on the regulator end of the hose and connect this end to the gas
cylinder, ensuring that the hose is not twisted. You won’t need a spanner here. Just turn the fitting in
an anti clockwise direction and hand tighten as much as you can. This should seal it sufficiently.
Important: The hose must not be kinked.
It is important to conduct a leak test prior to use. Follow leak test procedure. (Procedure
located on Page 2 of this manual)
Page 17
Important: The LPG cylinder must be on the outside of the main body when the BBQ is in use.

Assembly Procedure
Step 8.
To store the cylinder after cooking and when the BBQ is not in use remove the hose from the LPG
cylinder.
Pull out the gas cylinder bottle drawer from the main body and loosen the wing nut
Place the gas cylinder in position and tighten the wing nut.
Push drawer back into the cabinet, then tighten the bolt to secure it in place.
Take the hose that came with the BBQ and bring it back inside the main body of the BBQ.
Page 18
Bolt
Wing Nut

•Never leave burners on high for more than 10 minutes unless actually cooking. If the
burner makes hissing sounds when lit, it may be burning inside. Turn burner off,
allow it to cool and try again.
•Close the gas cylinder valve after each use.
•Never use plastic or glass utensils on the BBQ
•Never use the BBQ in strong winds
•Never lay the gas cylinder down (always keep upright)
•Never allow the flexible gas supply hose or any electrical cord to come in contact
with any heated surface of the BBQ.
•Never lean heavily on the side shelves of your BBQ or attempt to transport your BBQ
by lifting it from the side shelves.
•Before you start cooking for the first time, clean the BBQ thoroughly with hot soapy
water. This is necessary to remove residuals and solvents, oil and grease, which
may have remained from the manufacturing process. The hotplate and grill should be
thoroughly cleaned in the same manner.
Operating your BBQ Page 19

Lighting the Main Burner & Side Burner
Lighting the BBQ is easy, but must be done with due care.
Make sure that the gas is turned on at the cylinder, or that gas is available to the BBQ.
Ensure that the hood is up (or lid when lighting the Side Burner).
Spark Ignition
Push the knob control in and turn anticlockwise to the high position. You should hear
clicking as the igniter creates sparks to light the gas. Once lit, release the igniter button.
Manual Ignition
You can light your BBQ manually by holding a lit match next to one of the burners using
the match holder, while the burner is on low. You can access the burners through the
grill of your BBQ with the match holder.
Difficulty lighting
If the burner doesn’t light first go, check the gas controls and try a couple more times. If
the burner still does not light, wait a few minutes to allow the gas to disperse before
trying again. If satisfactory operation cannot be achieved, consult your retailer before
proceeding.
Note: Failure to follow the lighting procedures correctly can lead to a hazardous
condition.
Controlling the flames
The knobs have three basic positions: Off, High and Low. You can achieve any flame
height between low and high by rotating the BBQ control knob between these positions.
Checking the flame
Look underneath the BBQ so that you can see the flames. They should be a soft blue
colour with yellow tips. If the flames are too yellow, there is too much gas and not enough
air. The flame will be inefficient and will give off too much smoke. If the flame is too pale,
there is too much air and not enough gas. If either of these situations occur you may
need to clean the burners (See ‘Maintenance’ section of this manual).
Note:‘Blowback’ is a situation where the flame burns inside the burner, towards the front.
It can be recognised by a sharp roaring sound coming from the burner. It is not
dangerous unless it is allowed to persist. If this occurs, simply turn the burner off, wait a
few seconds then relight.
Note: Never attempt to light the side burner with a pot over the burner. Light the burner
first and then place the pot over the burner.
Operating your BBQ Page 20
Table of contents


