Gourmia HALOGRILL GHG1600 User manual

HALOGRILL
MODEL# GHG1600

© 2016 Gourmia
www.Gourmia.com
The Steelstone Group
Brooklyn, NY
All rights reserved. No portion of this manual may be reproduced by any means whatsoever
without written permission from The Steelstone Group, except for the inclusion of quotations in a
media review.
Although every precaution has been taken in the preparation of this manual, The Steelstone
Group assumes no responsibility for errors or omissions. Nor is any liability assumed for damages
resulting from the use of the information contained herein. Although every eort has been made
to ensure that the information contained in this manual is complete and accurate, The Steelstone
Group is not engaged in rendering professional advice or services to the individual consumer;
further, The Steelstone Group shall not be held responsible for any loss or damage allegedly
arising from any information or suggestion in this manual.
10987654321
Printed in China
Welcome to Delicious Entreés, Snacks,
Desserts & More from Gourmia!
With the purchase of the HaloGrill, you’ve opened the door to amazingly avor-packed
foods prepared with lightning fast speed. Consider all the foods you can easily enjoy
using the features of the truly hands-free HaloGrill: seared juicy steaks, golden broiled
chicken, delicate sh llets and tender-crisp fresh vegetables. And, as a handy bonus
feature, many of your favorite prepared frozen foods can be easily heated in mere
minutes for your convenience. You and your family will love all the delicious dinners,
snacks, vegetables, desserts and more that come from inside your new, easy and
innovative HaloGrill.
The following pages of this manual give you full and complete instructions for all the
functions and features of the HaloGrill. Inside these pages, you’ll nd complete step-
by-step instructions for assembly, operating and maintenance of your HaloGrill. Please
read all safety instructions and complete directions carefully for safe usage at all times.
Thank you for your purchase! We hope you will enjoy all the innovative products
brought to you by our family at Gourmia.

5
SAFETY INFORMATION p. 6
FEATURES & FUNCTIONS p. 8
BEFORE FIRST USE & ASSEMBLY p. 10
CONTROL PANEL WITH LCD DISPLAY p. 12
AUTO TIME/TEMP MODE: 1-2-3 EASY!
MANUAL TIME & TEMP OPTIONS
QUICK & EASY COOKING TIPS p. 14
MAINTENANCE p. 17
WARRANTY & SERVICE p. 22
TABLE OF CONTENTS

76
SAFETY INFORMATION
SAFETY INFORMATION
IMPORTANT SAFEGUARDS
When operating this electric appliance, basic safety instructions should
always be followed. Refer to the following for these instructions.
1. READ ALL SAFETY & USAGE INSTRUCTIONS BEFORE USING HaloGrill.
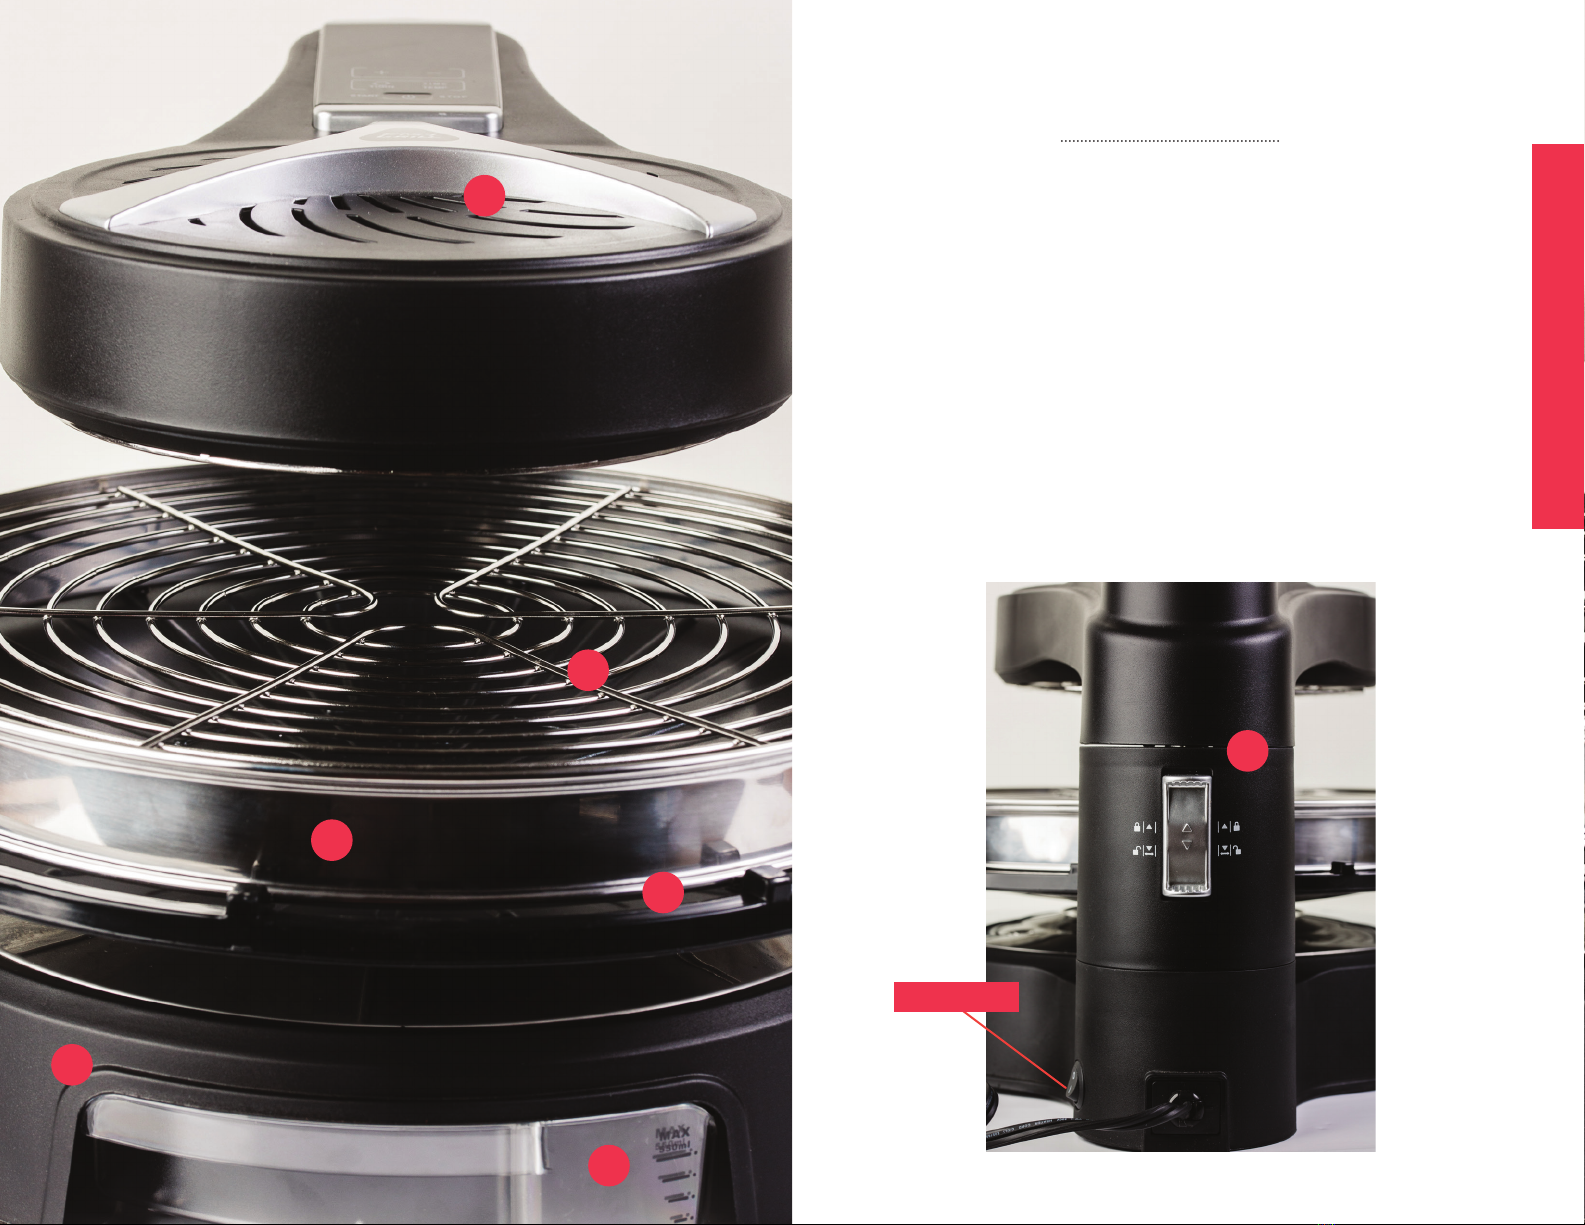
2. EXERCISE EXTREME CAUTION: Use extreme caution when moving Pan and
Rack onto or o of the Grill Base to ensure that liquids or foods do not spill
into the interior of the Base. Spills may cause electrical shock or injury.
3. Before using, ALWAYS place the HaloGrill Base on a heat-resistant glass, wood
or stone surface. Do not place on any counter or table that may be aected
by high heat.
4. AVOID ELECTRICAL SHOCK. DO NOT immerse cord, plugs or the HaloGrill
Base in water or other liquid.
5. DO NOT touch the surface of the HaloGrill Base or Pan when HOT. Use
pot holders or oven mitts when handling the hot Pan or SwingArm
Heating Hood.
6. Allow sucient space around the HaloGrill for proper air ow and movement
of the SwingArm Heating Hood when cooking.
7. UNPLUG the HaloGrill from outlet when not in use or before cleaning. Do not
let cord hang over edge of table or counter or touch hot surfaces, including
the HaloGrill.
8. DO NOT add or remove parts or accessories while HOT.
9. Children should never use the HaloGrill; close supervision is required when
appliance is used near children.
10. Never touch, cover or obstruct the SwingArm Heating Hood or Pan during
operation; serious burns may occur. Keep children away from the HaloGrill
while in operation.
11. Operate the HaloGrill on a level surface well away from any hot gas or
electrical burner, heat source, combustible spray cans or pressurized items.
12. Do not operate the HaloGrill outdoors.
13. Never operate the HaloGrill with a damaged cord or plug or one that has
malfunctioned or been damaged in any way. Immediately contact Customer
Service for analysis.
FOR HOUSEHOLD USE ONLY
Electrical Polarized Plug: This HaloGrill has a
polarized plug (one blade is wider than the other).
To reduce the risk of electrical shock, the plug
is intended to be used by inserting it into the
electrical outlet only one way. If the plug does
not t securely into the outlet, turn the plug and
re-insert. Do not modify this plug. If the plug
does not t the outlet securely, call a qualied
electrician for assistance. DO NOT use this plug
with extension cords of any kind.
14. DO NOT add unauthorized accessory attachments. Such use may result in
electric shock, injury or re.
15. Use only factory cord supplied; NEVER add extension cords. When done
using, switch control to OFF then pull plug from outlet.
16. Do not use the HaloGrill for any use other than intended. Do not attempt to
deep fry in the HaloGrill. Do not use the Pan or Rack on a stovetop or other
heat source.
SAVE THESE INSTRUCTIONS

A
F
B
G
D
E
C
9
FEATURES & FUNCTIONS
A. SwingArm Heating Hood
B. HaloGrill Base
C. Grill Pan
D. Extender Ring
E. Stainless Steel Rack
F. Tower with SwingArm Lock. O/On Button on side of Tower.
G. Drain Cup
O/On Button

g. 1 g. 2
g. 3 g. 4
g. 5 g. 6
g. 7
11
BEFORE FIRST USE
1. Place the HaloGrill on a level heat-safe surface with enough clearance in all
directions to rotate the SwingArm as needed.
2. Using a soft, damp cloth, clean the HaloGrill Base, SwingArm, Tower,
Pan, Extender Ring and Rack. Do not clean the interior of the SwingArm
Heating Hood or the Control Panel.
3. Dry thoroughly with a soft cloth.
4. Read all Safety Instructions.
ASSEMBLY
1. Position the Pan over the HaloGrill Base. (g 1)
2. Fit the bottom nut of the Pan into the opening in the center of the
HaloGrill Base. (g 2)
3. Slide the Drain Cup into the HaloGrill Base. (g 3)
4. Place the Extender Ring on the Pan (if using) and add the Rack on top
(g 4 and 5). Position the SwingArm Heating Hood over the Pan and lock
into place. (g 6 and 7)
5. Plug the HaloGrill into the outlet. Press the O/On Button on the Tower.
6. Set the Control Panel (see directions following).
7. When cooking is complete, press the Start/Stop Button on the Control
Panel. Press the O/On Button on the Tower. Unlock and move the
SwingArm Heating Hood to the right or left away from the cooked food
and Pan.
8. Remove the cooked food. Return the SwingArm Heating Hood to the
center position and lock into place before moving.
9. When cool, clean the HaloGrill as directed in Maintenance (p. 19).
11
BEFORE FIRST USE & ASSEMBLY

B
A
C
D
E
13
HALOGRILL CONTROL PANEL WITH LCD DISPLAY
The Control Panel houses the LCD Display and electronic platform for the Auto
Time/Temp Mode or the Manual Time & Temp Options. Adjustments may also be
made during the cooking operation.
A. Time/Temp Button
B. + and – Buttons
C. Minute Timer
D. Start/Stop Button
E. Turn Button
I. Cooking with Auto Time/Temp Mode: 1-2-3 Easy!
II. Cooking with Manual Time & Temp Options
III. Making Adjustments during Cooking
I. Cooking with Auto Time/Temp Mode: 1-2-3 Easy!
Follow the Assembly directions to set up. (p. 11)
1. Press the Time/Temp Button once. The LCD Display will ash the default
temperature of 550 °F.
2. Press the Time/Temp Button again. The LCD Display will ash the
default time of 99 minutes.
3. Press the Start/Stop Button to start cooking. The Grill Pan will start
turning, the Timer will begin to count down and the SwingArm Heating
Hood will heat up.
When cooking is complete:
The Timer will count down until the time is complete and the SwingArm Heating
Hood will automatically turn o. The Grill Pan will stop turning.
Press the Start/Stop Button on the Control Panel to Stop. Press the O/On Button on
the Tower to OFF.
Unlock the SwingArm Heating Hood and move to the left or right. Remove cooked
food. Move the Heating Hood back to the center position and lock.
The cooling fan will cycle for 5 minutes and then turn o (unplug after cooling fan
turns o). When cool, clean as directed (p. 19).
NOTE: If your food is cooked to perfection before the default time of 99 minutes is
complete, press the Start/Stop Button at any time and the SwingArm Heating Hood

15
HALOGRILL CONTROL PANEL WITH LCD DISPLAY
will turn o and the Grill Pan will stop turning. Press the O/On Button on the Tower
to turn OFF. Follow directions above to remove cooked food.
II. Cooking with Manual Time & Temp Options
Follow the Assembly instructions to set up. (p. 11)
1. Press the Time/Temp Button once. The LCD Display will ash the default
temperature of 550°F.
2. To set the temperature, press the + or – Buttons to set desired
temperature. The range of temperatures is 175°F to 550°F.
3. Press the Time/Temp Button again. The LCD Display will ash the default
time of 99 minutes.
4. To set the time, press the + or – Buttons to set desired time. The range of
times is 1 minute to 99 minutes (in 1 minute increments).
5. Press the Start/Stop Button to start cooking. The Grill Pan will start
turning, the Timer will begin to count down and the SwingArm Heating
Hood will heat up.
When Cooking is Complete:
When done, the Timer will count down until the time is complete and the SwingArm
Heating Hood will turn OFF. The Grill Pan will stop turning. Press the O/On Button on
the Tower to turn OFF.
Unlock the SwingArm and move to the left or right. Remove cooked food. Move the
Arm back to the center position and lock before moving.
The cooling fan will cycle for 5 minutes and then turn o (unplug after cooling fan
turns o). When cool, clean as directed (p. 19).
III. Making Adjustments during Cooking
To stop the Pan while turning during cooking, press the Turn Button on the Control
Panel. To re-start, press the Turn Button again.
To add, remove or turn food during cooking, slide the Lock on the Tower down to
unlock the SwingArm . The SwingArm Heating Hood will automatically turn OFF.
Move the SwingArm to the left or right. Add or remove food as needed. Return the
EasySwing Arm to the center position and lock. The Heating Unit will begin again.
To change the temperature during cooking, press the Time/Temp Button once. Press
the + or – Buttons to desired temperature. Once set, cooking will automatically resume
and the temperature will adjust. Do not press the Start/Stop Button.

17
QUICK & EASY COOKING TIPS
Your HaloGrill will produce juicy, tender steaks, poultry and chops every time! The
HaloGrill also acts as a super-fast reheating platform for frozen pizza, atbreads,
appetizers and other quick-to-heat frozen foods. Follow the tips below for consistently
delicious results:
Remove excess fat before grilling meat to reduce the fat that accumulates while
grilling.
Add dry rubs or dry seasonings to meat, poultry and sh before or after grilling. To
baste or add sauces during grilling, follow the directions (p. 15) for stopping and re-
starting the Grill while cooking.
Lightly coat the Stainless Steel Rack before grilling sh or skinless poultry to assist in
moving cooked foods o the Rack after cooking.
Your HaloGrill has a superior, fast heating element for grilling! Watch foods carefully to
determine when food is ready to be removed.
For a wonderfully grilled fresh vegetable medley, cut or slice prepared vegetables such
as peppers, squash and onions into 1-inch pieces. Place in a bowl and toss with olive
oil, kosher salt and pepper. Arrange vegetables on the Rack and grill until just tender-
crisp, about 5-6 minutes. Serve while hot.
To reheat food, ensure the food ts completely on the Rack and does not fall through
to the Pan. Lightly coat the Rack with cooking spray. Check to ensure the food is no
more than 2-inches thick (it should not be too close to the SwingArm Heating Hood to
avoid burning). Re-heat foods at moderate heat and watch to avoid over-heating.
To prepare frozen foods, such as eggs rolls, atbread, pizza, taquitos, and other
appetizers and snacks, check the cooking times on the packaging and set the time/
temp accordingly. Place the foods to be grilled on the Rack; do not use other
containers to hold the food. The HaloGrill typically cooks faster than conventional
methods; watch carefully to avoid overcooking foods.
Frozen foods such as frozen entrées, pot pies and thick items such as frozen burritos
should not be grilled.
Microwave-safe trays and/or plastic containers should not be used in the HaloGrill.

19
MAINTENANCE
MAINTENANCE
1. ALWAYS allow the HaloGrill to cool completely before cleaning.
2. Unplug the HaloGrill before cleaning.
3. After each use, clean and dry the HaloGrill. Use a damp cloth to clean the
Base, Tower, Pan, Extender Ring and Rack. Dry with a clean, soft cloth.
4. DO NOT immerse the Base in water. Use non-abrasive soap only on all
parts.
5. Remove the Drain Cup, empty and wash in warm, sudsy water. Dry
thoroughly and replace.

21
WARRANTY & SERVICE
This Limited Warranty is for one full year from the date of purchase. It is
applicable to the original purchaser only and is not transferable to a third party
user. Repair or replacement of defective parts is solely at the seller’s discretion.
In the event that repair isn’t possible, the seller will replace the product/
part. If product repair/replacement won’t suce, the seller has the option of
refunding the cash value of the product or component returned.
Product defects not covered under the Warranty provisions include normal
wear and damage incurred from use or accidental negligence, misuse of
instruction specications or repair by unauthorized parties. The manufacturing
company is not liable for any incidental or consequential damages incurred by
such circumstances.
For Customer Service or Questions, Please call: 888-552-0033
www.gourmia.com

www.gourmia.com
Table of contents
Other Gourmia Grill manuals

Gourmia
Gourmia GEG1800 User manual

Gourmia
Gourmia GBQ330 User manual

Gourmia
Gourmia GDG1900 User manual

Gourmia
Gourmia GBQ330 User manual

Gourmia
Gourmia GGA2100 User manual

Gourmia
Gourmia GEG1800 User manual

Gourmia
Gourmia GGA2120 User manual

Gourmia
Gourmia GEG1400 User manual

Gourmia
Gourmia GDG1900 User manual

Gourmia
Gourmia GEG1400 User manual
Popular Grill manuals by other brands

Brinkmann
Brinkmann ProSeries 2500 owner's manual

Activa BARBECUE
Activa BARBECUE 10975 Assembly and use instructions

Nexgrill
Nexgrill 720-0958S operating instructions

Taurus
Taurus STEAKMAX 2600 manual

Suntec Wellness
Suntec Wellness BBQ-9462 instruction manual

George Foreman
George Foreman GV12 owner's manual