Sinar arTec User manual

Sinar arTec
_____________________________________________________________________
The Camera System for Digital
Architectural Photography
Operating Instructions

LEGAL INFORMATION
Sinar arTec Operating Instruction V 1.00 I
Copyright
Copyright © 2008 - 2009 Sinar AG. All rights reserved.
No part of this manual may be reproduced in any form (print, photocopy, micro film or any other procedure)
without a prior written permission of Sinar AG, nor may contents be used, reproduced, processed or distributed
using electronic systems.
Disclaimer
This manual was created with the appropriate care. No liability will be accepted for damages resulting from the
non-compliance with the advice contained herein.
Sinar AG reserves the right to modify the document following technical advancements.
Intellectual Property Rights Regarding Photography
Pictures taken with a photographic camera are subject to the intellectual property rights and the personal rights
of the respective country. Any other use than personal / private is only allowed in accordance with the intellec-
tual property right laws of the respective country. In some cases, taking and using photographic images is re-
stricted even for private use. Please be careful and make sure that you take pictures only in accordance with the
laws effective in the respective country.
Trademarks
The Sinar wordmark and the Sinar logo are registered trademarks of Sinar AG. All other trademarks referred to
in this manual belong to their respective proprietors.
Sinar AG
Stadtweg 24
CH 8245 Feuerthalen, Switzerland
Phone: +41/52 647 0707
Fax: +41/52 647 0606
www.sinarcameras.com
Sinar arTec Manual V 1.00 - EN.doc
Images: Sinar AG
Printed in Switzerland
Technical modifications reserved
1070.09/02.11 e – 02.11802
© 2008 - 2009 Sinar AG

CONTENT
Sinar arTec Operating Instruction V 1.00 II
Table of Contents
1INTRODUCTION ............................................................................................................................1
1.1 Fundamentals ......................................................................................................................1
1.1.1 Range of applications..........................................................................................................1
1.1.2 Symbols and Signs...............................................................................................................1
1.2 Technical Data .....................................................................................................................2
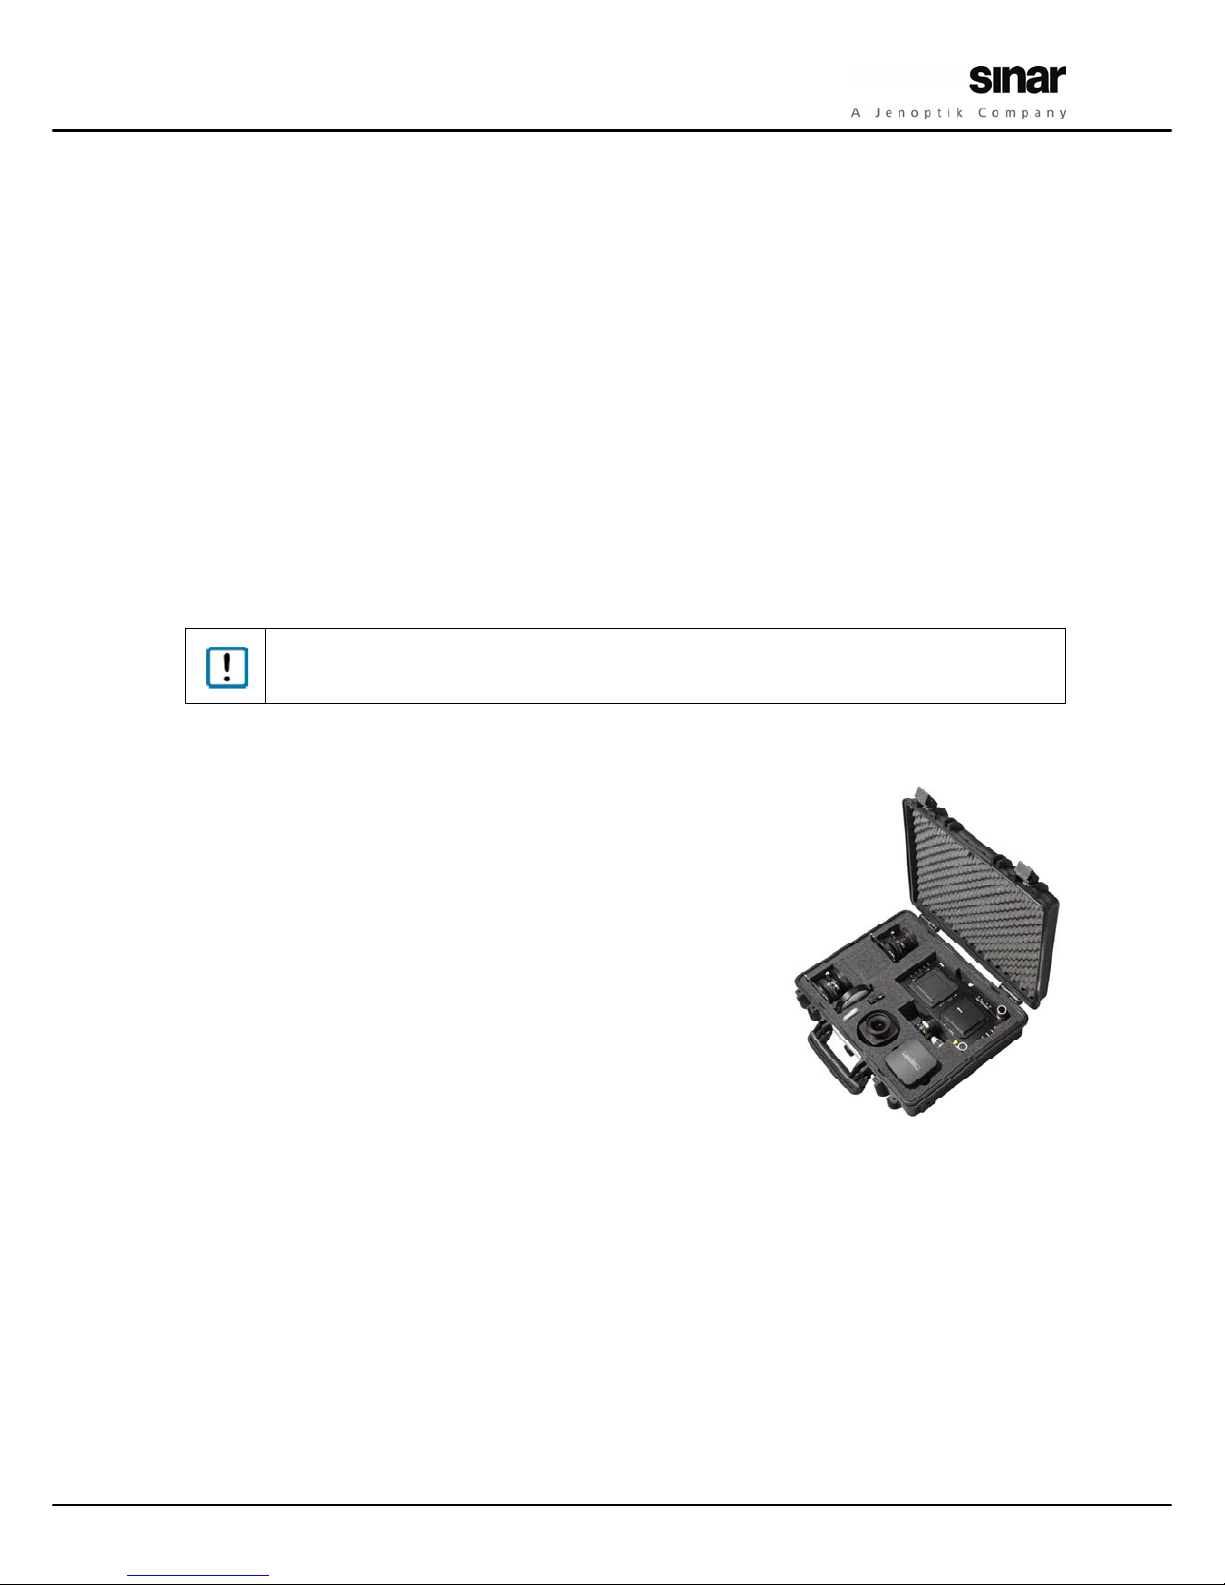
1.3 Scope of Delivery.................................................................................................................2
1.3.1 Sinar arTec Hy6 ...................................................................................................................2
1.3.2 Sinar arTec HB-V .................................................................................................................2
1.3.3 Sinar arTec-e54r..................................................................................................................3
1.3.4 Sinar arTec-e75r..................................................................................................................3
2PREPARATION ..............................................................................................................................4
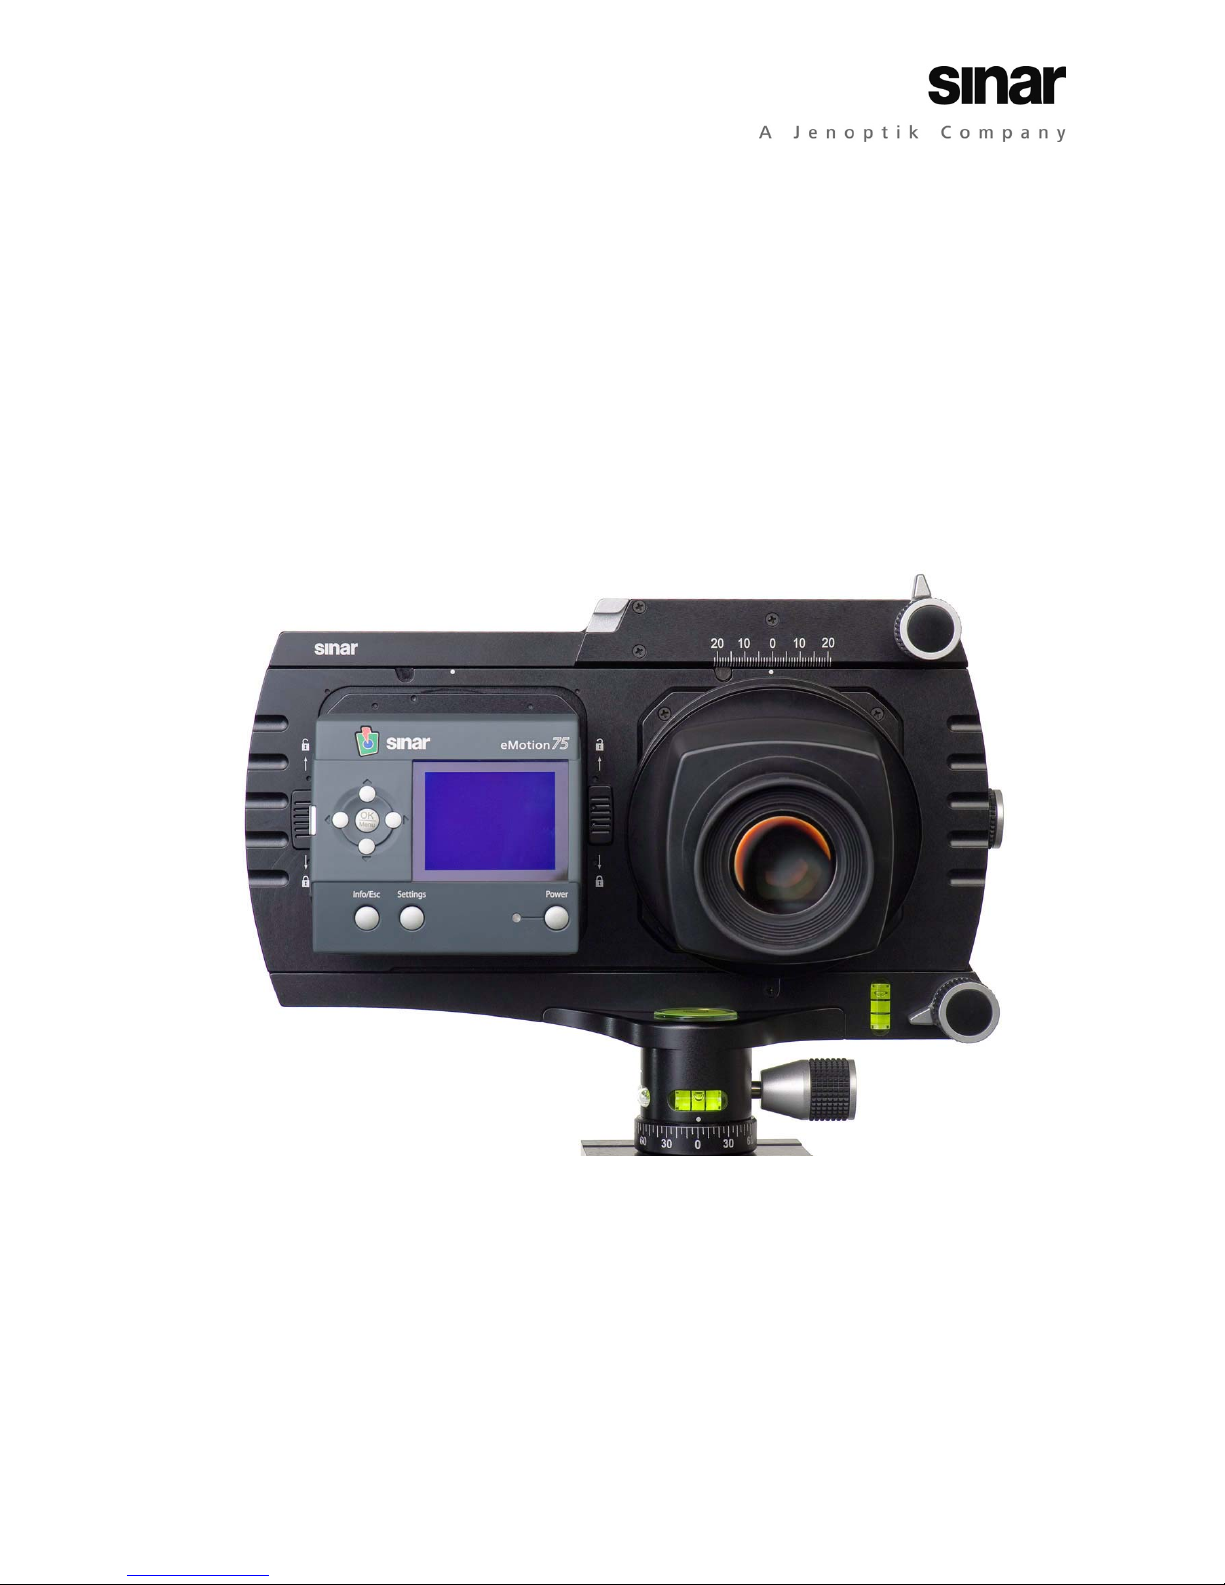
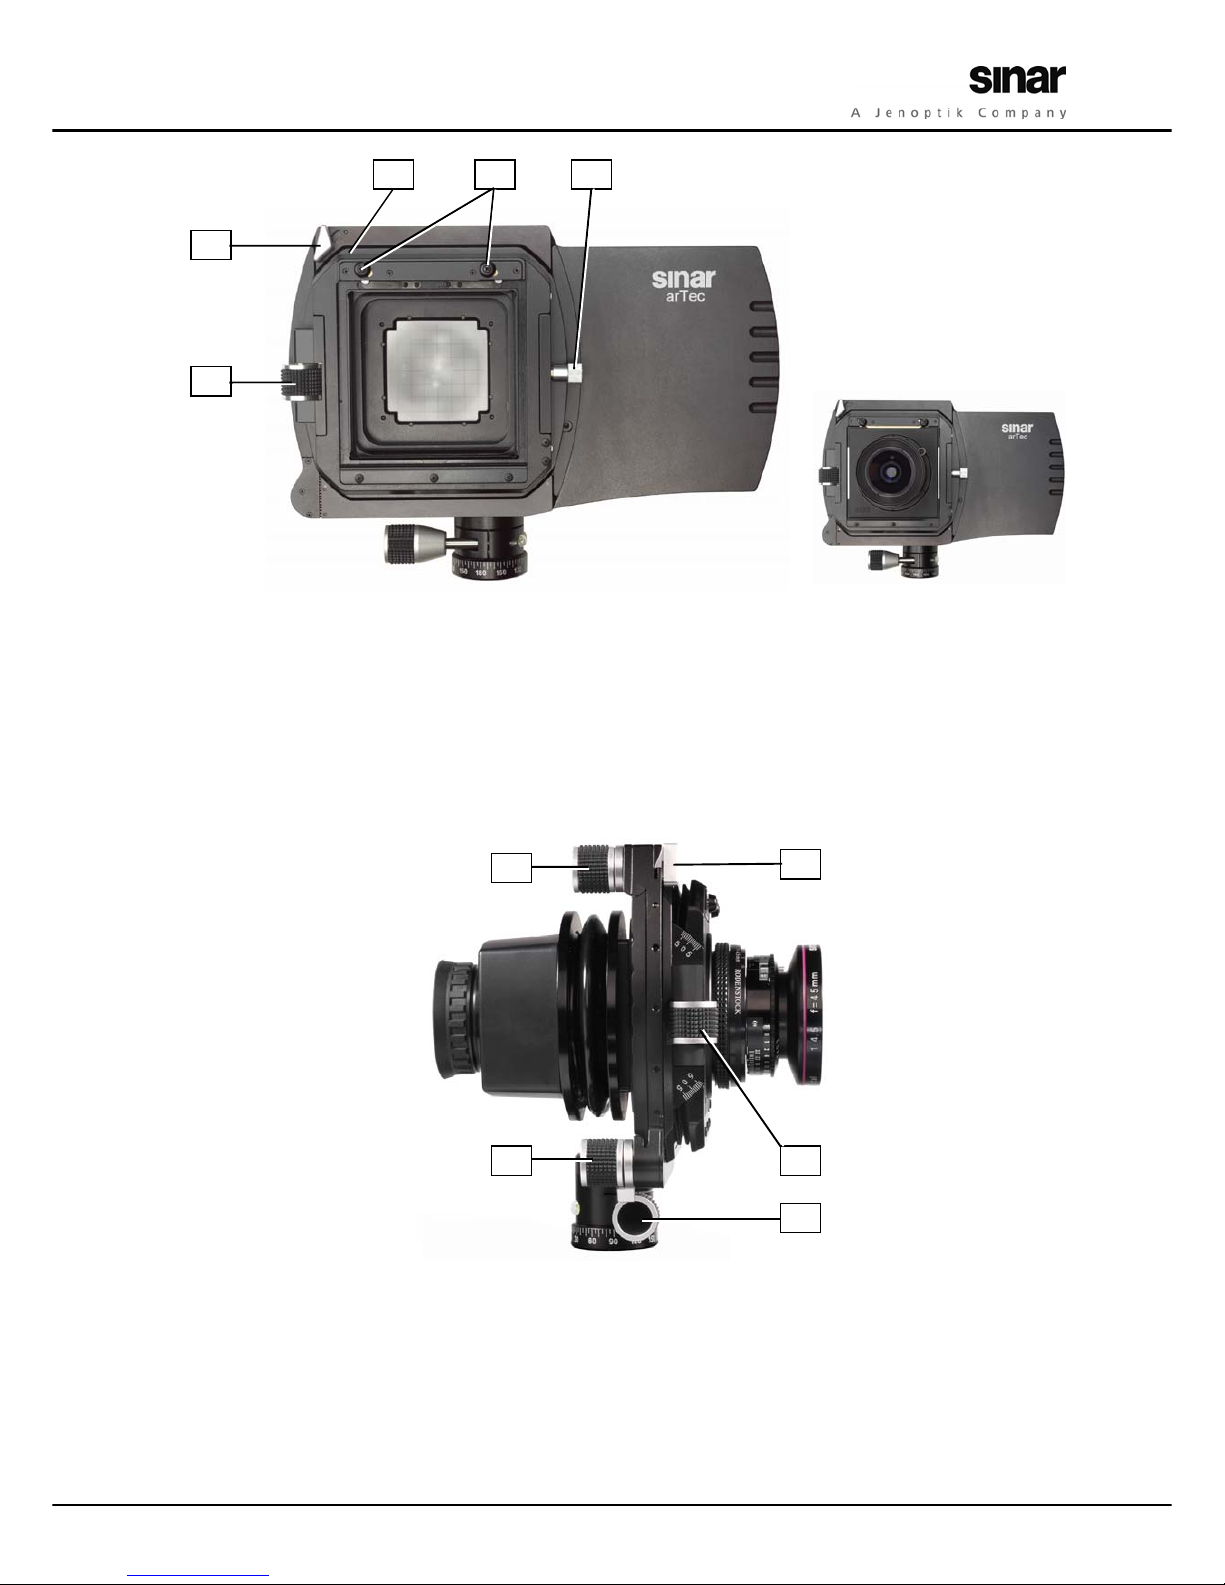
2.1 Description of the Camera and its Functions .......................................................................4
2.1.1 The operating elements.......................................................................................................4
2.1.2 Details of the Camera..........................................................................................................5
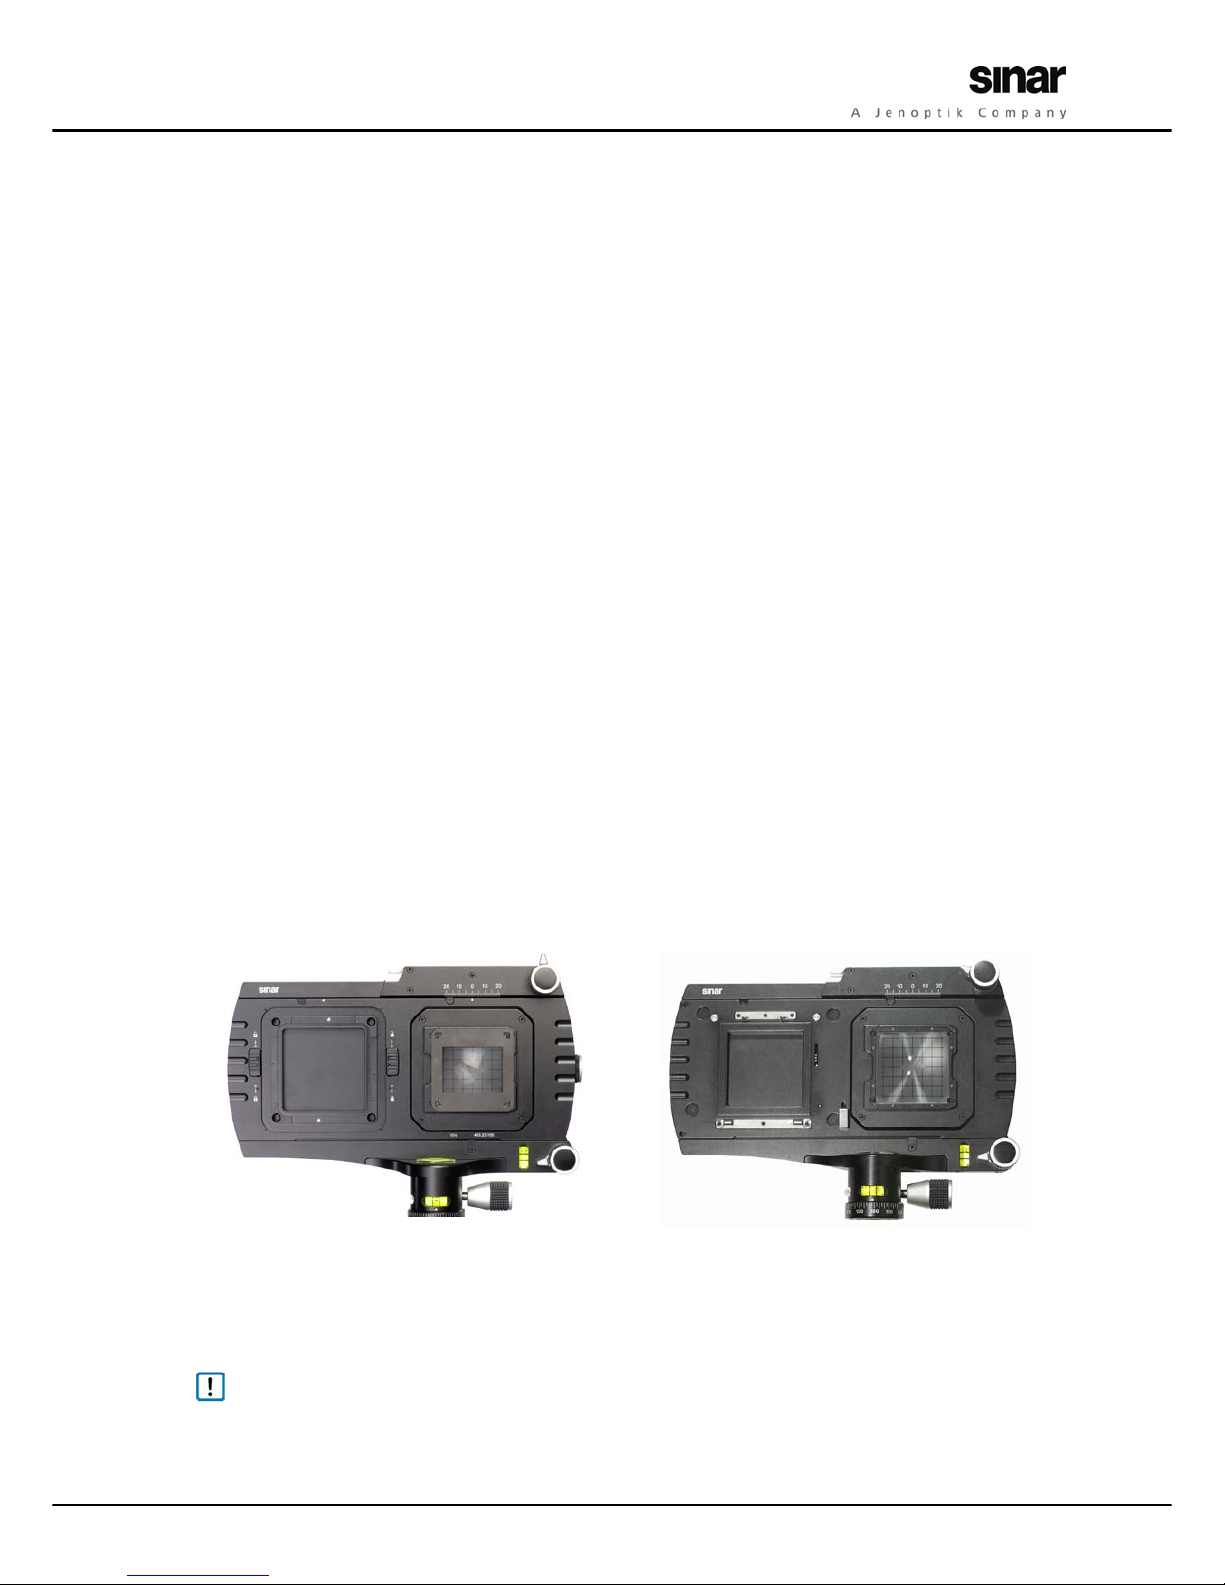
2.2 Setting up and Leveling the Camera ....................................................................................7
2.3 Attaching and Removing a Digital Back on a Sinar arTec Hy6 .............................................7
2.3.1 Attaching a Digital back ......................................................................................................7
2.3.2 Removing the Digital back...................................................................................................8
2.4 Attaching and Removing a Digital Back on a Sinar arTec HB-V ...........................................8
2.4.1 Attaching a Digital back ......................................................................................................8
2.4.2 Removing a Digital back......................................................................................................8
2.5 Changing the Image Format ................................................................................................9
2.5.1 Changing the format on a Digital back with a Revolving adapter on Sinar arTec Hy6 .........9
2.5.2 Changing the format on a Digital back with a Conventional adapter on Sinar arTec Hy6....9
2.5.3 Changing the format on a Digital back mounted on a Sinar arTec HB-V..............................9
2.5.4 Changing the format orientation of the Format mask..........................................................9
2.6 The Focusing Magnifier .....................................................................................................10
2.6.1 Features of the Focusing magnifier....................................................................................10
2.6.2 Attaching the Focusing magnifier......................................................................................10
2.6.3 Removing the Focusing Magnifier .....................................................................................10
2.7 The Focusing Screen ..........................................................................................................11
2.8 The Format Mask ..............................................................................................................11
2.8.1 Features ............................................................................................................................11
2.8.2 Changing the format.........................................................................................................11
2.9 Attaching and Removing the Lens .....................................................................................12
2.9.1 Attaching the lens .............................................................................................................12
2.9.2 Removing the lens.............................................................................................................12
2.10 How to Operate the Sinaron Digital CEF Lens ...................................................................13
2.10.1 Viewing the subject ..........................................................................................................13
2.10.2 Focusing ...........................................................................................................................13
2.10.3 Setting the shutter speed..................................................................................................14
2.10.4 Setting the aperture..........................................................................................................14
2.10.5 Cocking the shutter ..........................................................................................................14
2.10.6 The exposure ....................................................................................................................14
2.11 Connecting the Cables.......................................................................................................15
2.12 Photography on Film.........................................................................................................15
2.12.1 General.............................................................................................................................15
2.12.2 Photographs on roll film ...................................................................................................16
2.12.3 Advancing the film............................................................................................................16

CONTENT
Sinar arTec Operating Instruction V 1.00 III
3IMAGE SETTINGS AND EXPOSURE..............................................................................................17
3.1 Possibilities of Image Settings ...........................................................................................17
3.2 Horizontal and Vertical Shifts ............................................................................................17
3.2.1 Fundamentals of vertical perspective correction ................................................................17
3.2.2 Vertical perspective correction with the Sinar arTec...........................................................18
3.2.3 Fundamentals of horizontal perspective correction............................................................18
3.2.4 Horizontal Perspective correction with the Sinar arTec ......................................................20
3.3 Swings and Tilts ................................................................................................................20
3.3.1 General .............................................................................................................................20
3.3.2 Tilting................................................................................................................................20
3.3.3 Swings ..............................................................................................................................20
3.4 Step by Step Towards the Exposure ..................................................................................21
3.4.1 Image settings...................................................................................................................21
3.4.2 Changing between Viewing position and Exposure position..............................................21
4ACCESSORIES FOR THE SINAR ARTEC CAMERA..........................................................................22
4.1 Lenses................................................................................................................................22
4.2 Lens Adapter Rings............................................................................................................22
4.3 White Shading Diffusor .....................................................................................................23
4.4 Filter Rod Holder ...............................................................................................................23
4.5 Lens Shade ........................................................................................................................24
4.5.1 Why should you use a lens shade? ....................................................................................24
4.5.2 Artec Lens Shade...............................................................................................................24
4.5.3 Bellows Lens Hood............................................................................................................24
4.6 Swiveling Polarizing Filter .................................................................................................25
4.7 Accessory Shoe..................................................................................................................25
5COMPENSATION OF THE LIGHT FALL-OFF OF A LENS WITH SHADING ......................................26
5.1 General ..............................................................................................................................26
5.2 Creating a Shading File......................................................................................................26
5.3 Using a Shading Image in the Sinar eXposure™ Software.................................................27
5.3.1 Preparation .......................................................................................................................27
5.3.2 Defining the Shading file and assigning it to the images....................................................27
5.3.3 Computing the Shading ....................................................................................................28

CONTENT
Sinar arTec Operating Instruction V 1.00 1
1 Introduction
1.1 Fundamentals
We congratulate you on the purchase of your Sinar arTec camera and we thank you for your trust in our prod-
ucts. We are convinced that the Sinar arTec will be extremely helpful in your work. Its sturdy and precise con-
struction assures you a long and problem-free operation.
Before you use your Sinar arTec camera for the first time, please read the Operating Instructions very care-
fully. This will enable you to use the camera to best advantage and it will prevent disruptions that may result
from improper operation.
1.1.1 Range of applications
The Sinar arTec camera is a professional camera system that was designed specifically for digital architectural
and landscape photography. It features a viewing- and an exposure position. The viewing position is used for
composing the image precisely on the focusing screen and the exposure position is then used for making the
actual photograph. To change from the viewing position to the exposure position, a slider is moved to the
right, so that the digital back will “see” the exact same image that you composed on the focusing screen.
The Sinar arTec Hy6 version can be used with Sinar or Leaf digital backs that are equipped with Sinar Hy6 or
Leaf AFi interfaces, respectively.
The Sinar Rotation Adapter enables you to change from the vertical to the horizontal format without having to
remove the digital back, which guarantees a secure and dust-free operation.
The Sinar arTec HB-V version can be used with Sinar, Hasselblad, Leaf or Phase One digital backs that are
equipped with a Hasselblad V camera interface.
Fig. 1a: Sinar arTec with Sinar Hy6 camera interface Fig. 1b: Sinar arTec with Hasselblad-V camera interface
1.1.2 Symbols and Signs
Notes marked with this symbol are to be observed with emphasis.
[14] Numbers in square brackets refer to a camera element or operating controls of the camera.

CONTENT
Sinar arTec Operating Instruction V 1.00 2
1.2 Technical Data
Vertical shift range: +25 / -15 mm
Horizontal shift range: +20 / -20 mm
Swings and tilts: ± 5º in all directions (360º)
Dimensions: 27 x 19 x 7 cm (approx. 10 1.5 x 7.5 x 3")
Weight: 1.45 kg (approx. 3 lb)
Tripod socket: Can be rotated 360º; 3/8" thread
Operating temperature: 0º C – +45º C (+32º F – +113º F)
Storage temperature: -10º C – +60º C (+14º F – +140º F)
Relative humidity: 5% – 80%, non-condensing
1.3 Scope of Delivery
The Sinar arTec camera is currently available in four different versions. The sets of items that are included are
different for each version.
Immediately upon receiving your camera, please verify that the set of items that are supplied with
your version of the camera is complete and undamaged. If anything is missing or if something is
damaged, contact your supplier immediately.
1.3.1 Sinar arTec Hy6
Item no. 493.23.000, with an interface that is compatible with the
Sinar Hy6 camera.
493.23.100 Sinar arTec Hy6
551.32.086 Focusing Magnifier
493.23.504 Format Mask 36 x 48 mm
475.45.036 Sinar arTec Camera Case
02.1180x Operating Instructions Sinar arTec (as a PDF file on a CD)
1.3.2 Sinar arTec HB-V
Item no. 493.23.001, with an interface that is compatible with Hasselblad V
cameras (available as of April 2009)
493.23.101 Sinar arTec HB-V
551.32.086 Focusing Magnifier
493.23.504 Format Mask 36 x 48 mm
475.45.036 Sinar arTec Camera Case
02.1180x Operating Instructions Sinar arTec (as a PDF file on a CD)
Fig. 2:
Sinar arTec Camera Case
with all the accessories that
can be put into it.

CONTENT
Sinar arTec Operating Instruction V 1.00 3
1.3.3 Sinar arTec-e54r
Item no. 493.23.011, Sinar arTec Hy6, with Sinarback eMotion 54 LV
493.23.100 Sinar arTec Hy6
552.36.185 SB eMotion/Sinar Hy6 Revolving Adapter
02.10216 Note regarding Sinarback eMotion Adapter
552.36.111 Sinarback eMotion 54 LV
551.43.090 Sinarback Software
551.63.054 Firewire Cable 1394 A, 4.5 m / 15 ft
551.33.090 Digital Cleaning Kit
751.43.003 Kodak Gray Card
551.43.097 White Shading Diffusor 100
552.36.096 Sinar V290 Battery, 7.2 V Li+
552.36.093 Charger for V290 Battery, including mains adapter
551.32.086 Focusing Magnifier
493.23.504 Format Mask 36 x 48 mm
552.37.092 CF Card 4 GB
552.37.090 CF Card Reader
551.64.070 Trigger Cable eMotion
475.45.038 Sinar arTec System Case
02.1180x Operating Instructions Sinar arTec (as a PDF file on a CD)
Fig. 3
Empty Sinar arTec System Case in
which the whole scope of delivery
and also lenses of choice are stored.
1.3.4 Sinar arTec-e75r
Item no. 493.23.013, Sinar arTec Hy6, with Sinarback eMotion 75 LV
493.23.100 Sinar arTec Hy6
552.36.185 SB eMotion/Sinar Hy6 Revolving Adapter
02.10216 Note regarding Sinarback eMotion Adapter
552.36.113 Sinarback eMotion 75 LV
551.43.090 Sinarback Software
551.63.054 Firewire Cable 1394 A, 4.5 m / 15 ft
551.33.090 Digital Cleaning Kit
751.43.003 Kodak Gray Card
551.43.097 White Shading Diffusor 100
552.36.096 Sinar V290 Battery, 7.2 V Li+
552.36.093 Charger for V290 Battery, including mains adapter
551.32.086 Focusing Magnifier
493.23.504 Format Mask 36 x 48 mm
552.37.092 CF Card 4 GB
552.37.090 CF Card Reader
551.64.070 Trigger Cable eMotion
475.45.038 Sinar arTec System Case
02.1180x Operating Instructions Sinar arTec (as a PDF file on a CD)

CONTENT
Sinar arTec Operating Instruction V 1.00 4
2 Preparation
2.1 Description of the Camera and its Functions
2.1.1 The operating elements
Fig. 4a: Rear view of the Sinar arTec showing the digital back and the flexible focusing magnifier
Fig. 4b: Front view of the Sinar arTec showing the lens, the Rod holder and an Accessory shoe
ASinar arTec camera body
BSinar Revolving Adapter
CDigital Back (different models)
DRemovable 3x focusing magnifier with flexible angle of viewing
E Sinaron Digital CEF lens
F Optional arTec Filter Rod Holder
G Optional Accessory Shoe
B
D
A
C
E
F
G

CONTENT
Sinar arTec Operating Instruction V 1.00 5
2.1.2 Details of the Camera
Fig. 5: Rear view of the Sinar arTec camera body
The area shown in blue highlights the slider, which is moved to the right for the change into the Exposure position.
1 Slider
2 Unlatching key for Slider
3Click stop for the Viewing position or the Exposure position
4Scale for horizontal shifts +20/-20 mm
5 Micro drive for horizontal shifts
6 Locking lever for the Horizontal micro drive
7 Attachment position for digital backs
8 Locking slider for digital back, left / right (Sinar arTec Hy6)
9 Combined Fresnel lens and Focusing screen
10 Reversible magnetic metal format mask
11 Guides for the Focusing magnifier
12 Four spirit levels
13 Camera base
14 Locking screw for camera base rotation
15 Micro drive for Vertical shifts
16 Locking lever for the Vertical micro drive
17 Openings for positioning the adapter plate's cones (Sinar arTec Hy6)
2 6
5
15
16
14
13
7
8
9
10
12
1
3 4
11
17

CONTENT
Sinar arTec Operating Instruction V 1.00 6
Fig. 6a: Front view of the Sinar arTec, without a lens Fig. 6b: The Sinar arTec with an attached lens
21 Lens carrier frame, can be rotated 360º
22 Lens Unlocking slider
23 Micro drive for tilting the Lens carrier frame
24 Zero-position Locating pin for rotating/swinging the Lens carrier frame
25 Locking lever for rotations/swings of the Lens carrier frame
Fig. 7: All important operating elements are conveniently accessible to the photographer working behind the camera.
5 Micro drive for horizontal shifts
14 Locking screw for the camera base rotation
15 Micro drive for vertical shifts
23 Micro drive for tilting the Lens carrier frame
25 Locking lever for rotations/swings of the Lens carrier frame
5 25
23
14
15
25
23
24
22
21

CONTENT
Sinar arTec Operating Instruction V 1.00 7
2.2 Setting up and Leveling the Camera
1. Mount the Sinar arTec on a sturdy tripod equipped with a 3/8“ tripod thread [13].
2. Tighten the fastening screw of the camera base [14] and make sure that the camera is attached
firmly to the tripod head.
3. Level the camera, using the arTec camera’s spirit levels for longitudinal and lateral alignment.
4. If necessary, loosen the fastening screw of the camera base [14] again and align the camera with
the subject to be photographed.
2.3 Attaching and Removing a Digital Back on a Sinar arTec Hy6
Fig. 8: Attaching a digital back to the Sinar arTec Hy6 camera
2.3.1 Attaching a Digital back
5. Remove the left protective cover by shifting the two Locking latches [8] upwards until they are le-
vel with the line at the tip of the arrow.
6. Mount the digital back – after first having attached the corresponding adapter plate* to that back
– in the horizontal position, inserting the four studs of the adapter plate into the four correspond-
ing holes [17] on the camera. Hold the digital back to the camera with gentle pressure and slide
the two latches [8] downwards until they are level with the line at the tip of the arrow. Make sure
that both sides of the digital back are fastened securely.
* Adapter Plate 552.36.285 or 552.36.286 for the Sinarback eMotion, or appropriate adapters for digital backs
from other suppliers
8

CONTENT
Sinar arTec Operating Instruction V 1.00 8
2.3.2 Removing the Digital back
1. Grasp the digital back firmly with one hand and slide the two Locking latches [8] upwards,
one after the other, until they are level with the line at the tip of the arrow.
2. Lift the digital back from the camera and attach the corresponding protective cover in order to
protect the mounting seat [7] for the digital back from dust as much as possible.
2.4 Attaching and Removing a Digital Back on a Sinar arTec HB-V
Fig. 9: Attaching a digital back to the Sinar arTec HB-V camera
51 Magnetic discs to hold the Protection cover
52 Upper Hasselblad V Interface claw
53 Lower Hasselblad V Interface claw
54 Film advance cog
55 Film advance button
2.4.1 Attaching a Digital back
1. Remove the left Protective cover that is held in place by magnets [51] by grasping it at the top and
then simply pull it away.
2. Place the digital back – after first having attached the corresponding adapter plate* to that back –
on the lower claw [53] and swing the digital back upwards and firmly press it against the camera
until it latches in the Upper claw [52]. Verify that the digital back is attached securely by means of
a controlled grasp.
* Adapter Plate 552.36.270 for the Sinarback eMotion, or appropriate adapters for digital backs from other sup-
pliers (Hasselblad, Leaf, Phase One, etc.)
2.4.2 Removing a Digital back
1. Grasp the digital back firmly with one hand and press the unlocking slide of the Sinarback eMotion
Adapter Plate, or the unlocking button of a digital back from another supplier.
2. Lift the digital back from the camera and immediately attach the corresponding protective cover so
that the mounting seat [7] for the digital back will be protected from dust as much as possible.
51
52
53
54
55

CONTENT
Sinar arTec Operating Instruction V 1.00 9
2.5 Changing the Image Format
Fig. 10: Digital back in landscape format Fig. 11: Digital back in portrait format
2.5.1 Changing the format on a Digital back with a Revolving adapter
on Sinar arTec Hy6
The Sinar Revolving adapter of the Sinarback permits the quick, secure and dust-free changing from the land-
scape to the portrait format or vice-versa. Simply rotate the digital back by 90ºclockwise or counter-clockwise
until it stops.
In order to turn the Sinar Revolving adapter from the landscape to portrait format, the camera
slider must be placed in the Viewing position (see also image 23a).
2.5.2 Changing the format on a Digital back with a Conventional adapter
on Sinar arTec Hy6
When a camera adapter other than the Sinar Revolving Adapter is used on a Sinar arTec Hy6 camera, the digital
back has to be detached from the camera and rotated by 90ºfor changing the format from landscape to por-
trait (or vice-versa) and then be re-attached to the camera (also see chapter 2.3)
2.5.3 Changing the format on a Digital back mounted on a Sinar arTec HB-V
In order to change from a landscape to a portrait format on a digital back with a Hasselblad-V camera-
interface, the digital back has to be removed from the camera and then be re-attached (please refer also to
chapter 2.4).
2.5.4 Changing the format orientation of the Format mask
The Format mask is held in place on the focusing screen magnetically. In order to re-orient the format mask,
first detach the focusing magnifier, then place the format mask in the desired position and then slide the focus-
ing magnifier back into position.

CONTENT
Sinar arTec Operating Instruction V 1.00 10
2.6 The Focusing Magnifier
Fig. 12: Attaching the Focusing magnifier Fig. 13: The focusing magnifier in place on the camera
2.6.1 Features of the Focusing magnifier
The flexible Sinar Focusing magnifier 551.32.086 has a 3x magnifying power and it enables you to view the en-
tire focusing screen at a glance.
Its eyecup can be rotated to set a diopters correction.
The bellows placed between the magnifying lens and the magnifier housing enables you to view the entire fo-
cusing screen, even when the camera lens is strongly tilted or swung. Otherwise the bundle of light rays would
be blocked by the Fresnel lens that is located under the focusing screen. Thanks to this flexibility, the focusing
screen can still be viewed all the way to its corners with camera lenses with short focal lengths and strongly re-
duced light transmission along the edges of the image.
2.6.2 Attaching the Focusing magnifier
1. Remove the Protective cover by sliding it to the right.
2. Align the Focusing Magnifier at the right side of the guides [11] and slide it to the left until it clicks
in place.
2.6.3 Removing the Focusing Magnifier
To remove the Focusing magnifier from the camera, simply slide it to the right.
In order to protect the focusing screen from damage, always install the protective cover when the
camera is not in use.
11

CONTENT
Sinar arTec Operating Instruction V 1.00 11
2.7 The Focusing Screen
The Focusing screen [9] of the Sinar arTec camera consists of a glass plate with grid lines and a Fresnel lens po-
sitioned right below that plate. This arrangement guarantees a clear and bright image for viewing.
Fig. 14: Format mask over the Focusing screen with a Fresnel lens
2.8 The Format Mask
2.8.1 Features
The metallic Format mask of the Sinar arTec camera, item no.493.23.504, has an opening that corresponds to
the size of the sensor of the Sinarback eMotion 54, Sinarback eMotion 75, or the Sinarback eVolution 75 and it
is affixed precisely over the focusing screen by means of its eight magnets.
2.8.2 Changing the format
To re-orientate the Format mask from the landscape to the portrait format (or vice-versa), simply lift it from the
camera by hand – after first removing the focusing magnifier –, rotate it by 90ºand then re-attach it to the fo-
cusing screen.
10
9

CONTENT
Sinar arTec Operating Instruction V 1.00 12
2.9 Attaching and Removing the Lens
2.9.1 Attaching the lens
The lenses used on the Sinar arTec camera are from the "Sinaron Digital CEF" line of lenses, which are equipped
with a focusing mount.
To attach the lens, insert the lens board into the Lens carrier frame straight from above (see figure 15). Now
swing the lens upwards with gentle but secure pressure until the brass-colored Lens latching slider becomes
completely visible (also see figure 17). Make sure that the lens is installed securely by grasping it in a controlled
manner.
Fig. 15: Attaching the lens Fig. 16: Latching the lens board Fig. 17: The lens latching slider
Make sure that the lens is installed securely by grasping it in a controlled manner.
2.9.2 Removing the lens
In order to remove the lens from the camera, first disconnect the Trigger cable [42] from the X-contact of the
shutter [33]. Grasp the lens with one hand and use the other hand to shift the Lens unlocking slider [22] of the
camera to the left. Now you can lift the lens from the camera.
To prevent damage to the lens elements, always install the protective covers when the lens is not in use.

CONTENT
Sinar arTec Operating Instruction V 1.00 13
2.10 How to Operate the Sinaron Digital CEF Lens
Fig. 18: Sinaron Digital CEF Lens
31 The shutter
32 Shutter cocking lever
33 X-Flash synchronization socket
34 Shutter setting knob
35 Shutter speed setting ring
36 Shutter release with a receptacle for a cable release
37 Aperture setting knob
38 Focusing ring
39 Lens board
The shutter built into the Sinaron Digital CEF lenses is a traditional mechanical between-the-lens shutter of the
type that has been in use for professional photography for many years. For those who are not familiar with this
type of shutter, the comments that follow are intended to explain its proper operation:
2.10.1 Viewing the subject
The lens features two modes: The Viewing mode and the Exposure mode. In order to observe the subject
through the lens, the shutter has to be open. The shutter [31] can be opened or closed by means of the Shutter
setting knob [34].
2.10.2 Focusing
Focusing the lens on the subject is achieved by turning the Focusing ring [38]. The small f-stop numbers ar-
ranged symmetrically around the index line serve to indicate the depth of sharpness for the aperture that is be-
ing used. The numbers on the focusing ring itself serve to indicate the distance at which the lens is focused (in
meters and feet).
31
34
35
32
36
37
38
33
39

CONTENT
Sinar arTec Operating Instruction V 1.00 14
2.10.3 Setting the shutter speed
The shutter speed is selected by means of the Shutter speed-setting ring [35]. Shutter speeds ranging from
1/500 to 1 second can be selected, plus "B" (Bulb) and "T" (Toggle). With the "B" setting, the shutter remains
open as long as the Cable release [41] is pressed. With the "T" setting, the shutter opens when the Cable re-
lease is pressed once and it remains open until the cable release is pressed for a second time.
2.10.4 Setting the aperture
The working aperture is set by means of the Aperture setting knob [37]. The range of f-stops may vary for dif-
ferent lenses. For the best possible light transmission, the subject should be viewed with the shutter set at its
maximum aperture.
2.10.5 Cocking the shutter
Because the shutter is completely mechanical, it has to be cocked manually before every exposure by means of
the Shutter cocking lever [32].
2.10.6 The exposure
In order to release the shutter, the Cable release has to be threaded into the receptacle on the Shutter release
lever [36] and the shutter must be closed by means of the Shutter setting knob [34]. In addition, the shutter
must be cocked by operating the Shutter cocking lever [32]. Only then can the exposure be made.

CONTENT
Sinar arTec Operating Instruction V 1.00 15
2.11 Connecting the Cables
1. Connect the digital back with the flash socket [33] on the shutter, using the Trigger cable [42]
that is supplied for this purpose, one end of which is plugged into the Trigger socket [45] on the
digital back and the other end is plugged into the Flash synchronization socket [33] on the shutter.
2. Thread the Cable release [41] into the Shutter release lever [36] on the shutter.
Fig. 19: Sinar arTec with attached release cables Fig. 20: Connector sockets on Sinarback eMotion 75/54
41 Manual Shutter release cable
42 Trigger cable
43 X-Flash synchronization socket
44 Firewire socket
45 Trigger-in socket
46 Winder-out socket
For proper operation and the handling of your digital back please read the operating instructions
supplied with the respective digital back.
2.12 Photography on Film
2.12.1 General
The Sinar Artec HB-V camera can also be used to capture
images on roll film. This requires the use of a Hasselblad V
Roll Film Magazine (for instance: Type A12-6x6).
Please note that certain Sinaron Digital CEF
lenses have image circles that do not cover the
entire area of a 6x6 cm frame on roll film. This
is the case with Sinaron Digital CEF lenses VHR
5.6/23 mm, HR 4.5/28 mm and HR 4.0/35 mm.
Also please note that 645-size Hasselblad V roll
film magazines (such as Type A16-645) can only
be used for landscape format images.
42
41
43 44 4645
Bild 21: Sinar arTec HB-V with a Film Magazine

CONTENT
Sinar arTec Operating Instruction V 1.00 16
2.12.2 Photographs on roll film
1. First load a film into the roll film magazine and wind it to the first frame (to this end, please follow the
instructions that come with the Hasselblad roll film magazine). The roll film magazine can be coupled
to, and uncoupled from the Sinar arTec HB-V camera exactly like a digital back with a Hasselblad-V in-
terface (please also see chapter 2.4).
2. With the Sinar arTec camera in the Viewing position, you can now compose your picture on the focus-
ing screen.
3. When you have finished composing the image, shift the Sinar arTec to the Exposure position.
4. Remove the Cover slide from the film magazine so that the film can be exposed.
5. Make the exposure by activating the Cable release attached to the lens' shutter.
6. Now you can advance the film to the next frame (please see chapter 2.12.3) or put the Cover slide
back into the roll film magazine so that you can remove it from the camera (see chapter 2.4).
Please note that the double-exposure prevention feature does not work when a Hasselblad V Roll
Film Magazine is used on a Sinar arTec camera.
Please make sure that the Cover slide is inserted into the roll film magazine properly before remov-
ing the magazine from the Sinar arTec camera.
2.12.3 Advancing the film
The Sinar arTec HB-V camera is equipped with a mechanism to advance the film
[54]. In order to advance the film to the next frame after an exposure has been
made, press the Film advance button [55] upwards repeatedly, always letting it
return to the rest position between strokes, until the exposure-ready signal win-
dow (on the right side of the exposure counter window) on the roll film maga-
zine shows white again. To make this procedure a little easier, shift the Focusing
magnifier a bit out of the way.
The film advance slider has to be shifted approximately 12 to 14 times.
Fig. 22: Advancing the
film on a Sinar arTec HB-V
55
54
Table of contents
Other Sinar Digital Camera manuals

Sinar
Sinar f1 User manual

Sinar
Sinar p2 User manual

Sinar
Sinar Medium Format Camera System Hy6 User manual

Sinar
Sinar m 493.03.000 User manual

Sinar
Sinar P-SLR User manual

Sinar
Sinar m Digital Camera User manual

Sinar
Sinar Hy6 65 Instruction manual

Sinar
Sinar Medium Format Camera System Hy6 User manual

Sinar
Sinar p3 User manual