Singer Safety 491D Manual

Singer
491D
Sewing
Machine
Operator's
Guidebook
SINGER
INDUSTRIAL
PRODUCTS
CONTENTS
Page
Introducing
the
new
Singer
model
491D
machine
1
Machine
Lubrication
2
Needles
3
Thread
3
Needle
Setting
4
Threading
the
Machine
4
Removing
the
Bobbin
5
Winding
the
Bobbin
6
Threading
of
Bobbin
Case
7
Replacement
of
Bobbin
Case
7
Preparation
for
Sewing
8
Sewing
8
Needle
Thread
Tension
Adjustment
9
Thread
Tension
Spring
Adjustment
10
Thread
Protector
Adjustment
10
Presser
Foot
Pressure
Adjustment
11
Stitch
Length
Adjustment
11
Tips
for
Perfect
Operation
12
V.
Copyright
(C)
1973
THE
SINGER
COMPANY
All
rights
reserved
worldwide.
J
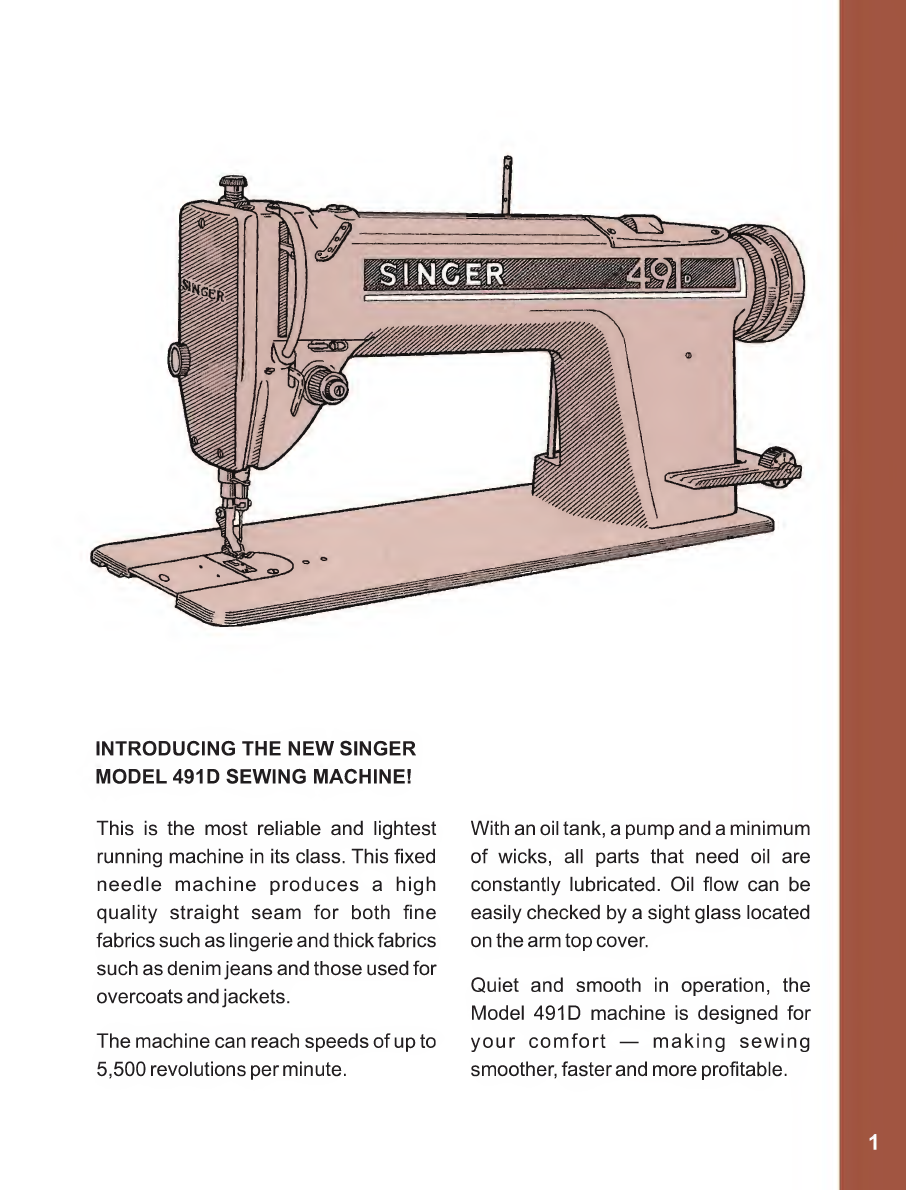
INTRODUCING
THE
NEW
SINGER
MODEL
491D
SEWING
MACHINE!
This
is
the
most
reliable
and
lightest
running
machine
in
its
class.
This
fixed
needle
machine
produces
a
high
quality
straight
seam
for
both
fine
fabrics
such
as
lingerie
and
thick
fabrics
such
as
denim
jeans
and
those
used
for
overcoats
and
jackets.
The
machine
can
reach
speeds
of
up
to
5,500
revolutions
per
minute.
With
an
oil
tank,
a
pump
and
a
minimum
of
wicks,
all
parts
that
need
oil
are
constantly
lubricated.
Oil
flow
can
be
easily
checked
by
a
sight
glass
located
on
the
arm
top
cover.
Quiet
and
smooth
in
operation,
the
Model
491D
machine
is
designed
for
your
comfort
—
making
sewing
smoother,
faster
and
more
profitable.
1
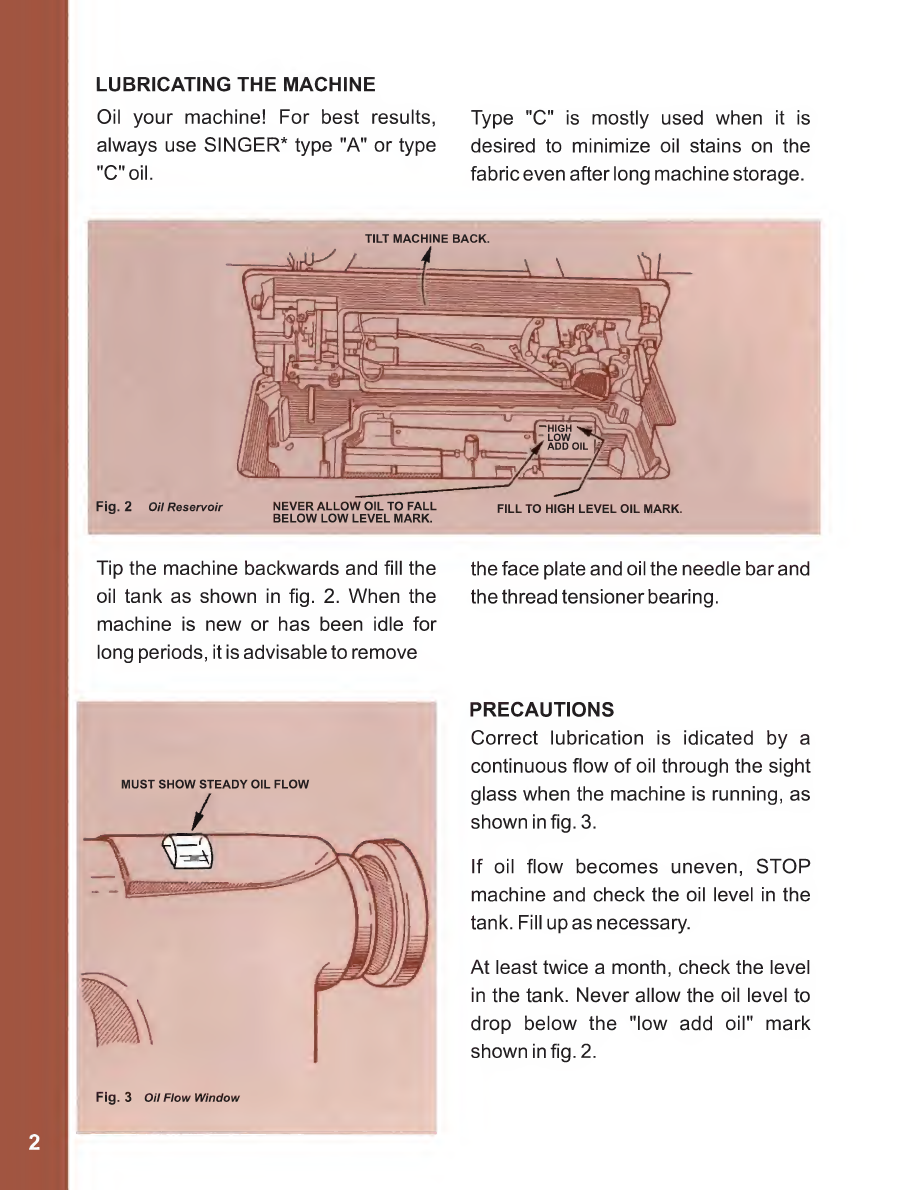
LUBRICATING
THE
MACHINE
Oil
your
machine!
For
best
results,
Type
"C"
is
mostly
used
when
it
is
always
use
SINGER*
type
"A"
or
type
desired
to
minimize
oil
stains
on
the
"C"
oil.
fabric
even
after
long
machine
storage.
Tip
the
machine
backwards
and
fill
the
oil
tank
as
shown
in
fig.
2.
When
the
machine
is
new
or
has
been
idle
for
long
periods,
it
is
advisable
to
remove
MUST
SHOW
STEADY
OIL
FLOW
/
the
face
plate
and
oil
the
needle
bar
and
the
thread
tensioner
bearing.
PRECAUTIONS
Correct
lubrication
is
idicated
by
a
continuous
flow
of
oil
through
the
sight
glass
when
the
machine
is
running,
as
shown
in
fig.
3.
If
oil
flow
becomes
uneven,
STOP
machine
and
check
the
oil
level
in
the
tank.
Fill
up
as
necessary.
At
least
twice
a
month,
check
the
level
in
the
tank.
Never
allow
the
oil
level
to
drop
below
the
"low
add
oil"
mark
shown
in
fig.
2.
Fig.
3
Oil
Flow
Window
NEEDLES
The
needles
you
use
directly
affect
the
quality,
strength
and
appearance
of
the
stitching
produced
by
your
machine.
That
is
why
the
use
of
SI
NGER
needles
is
so
important,
according
to
the
table
below:
NEEDLES
CATALOG
No.
CLASS
AND
VARIETY
SIZES
1901
135x7
8,
9,
10,
11,
12,
13,
14,
15,
16,
17,
18,
19,
20,21,22,
23
&
24
1955
A
bent
needle
will
cause
stitch
failures
A
needle
with
a
damaged
or
burred
tip
and
sewing
irregularity.
results
in
poor
work
finish
and
may
damage
the
fabric.
THREAD
In
the
Class
491D,
ONLY
use
left
twist
thread
in
the
needle.
Either
right
or
left
twist
thread
can
be
used
in
the
bobbin.
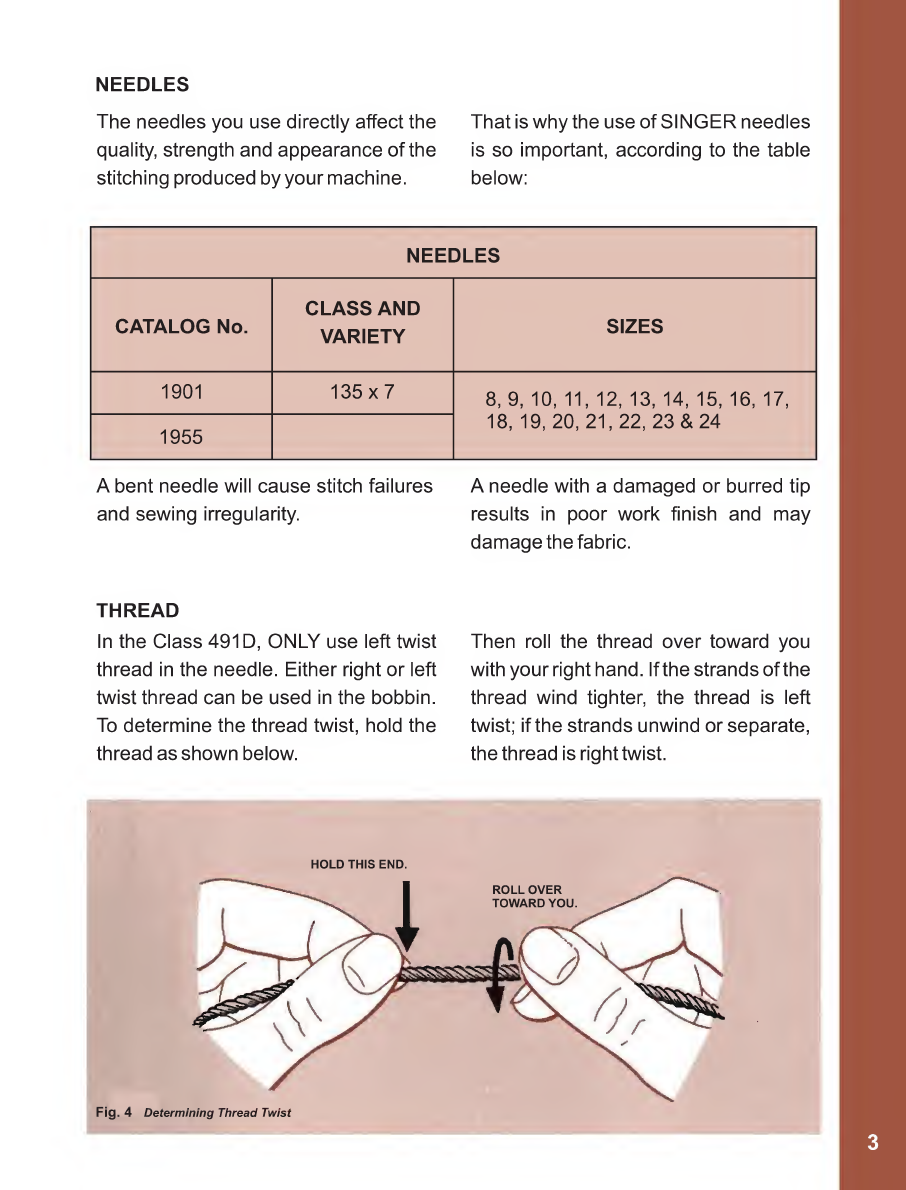
To
determine
the
thread
twist,
hold
the
thread
as
shown
below.
Then
roll
the
thread
over
toward
you
with
your
right
hand.
If
the
strands
of
the
thread
wind
tighter,
the
thread
is
left
twist;
if
the
strands
unwind
or
separate,
the
thread
is
right
twist.
HOLD
THIS
END.
Fig.
4
Determining
Thread
Twist

TO
SET
THE
NEEDLE
MOVE
TO
HIGHEST
POINT.
LOOSEN
SCREW.
(
I
N
S
E
R
T
NEEDLE
UP
AS
FAR
AS
POSSIBLE.
LONG
GROOVE.
Setting
the
Needle
Fig.
5
Rotate
the
machine
pulley
over
toward
you
until
the
needle
bar
moves
to
its
highest
point.
After
loosening
the
needle
set
screw,
insert
the
needle
up
to
the
top
as
shown
in
fig.
5.
The
long
groove
of
the
needle
should
face
the
left
end
of
the
machine,
as
shown
in
fig.
5.
Then
firmly
tighten
the
needle
set
screw.
Threading
the
Needle
Upper
Threading
THREADING
THE
MACHINE
First
rotate
the
machine
pulley
over
toward
you
until
the
needle
reaches
its
highest
point,
then
pass
the
needle
thread
from
the
unwinder
through
the
threading
points
in
the
order
shown
in
fig.
6.
Pull
about
two
inches
of
thread
through
the
eye
of
the
needle.
Fig.
6
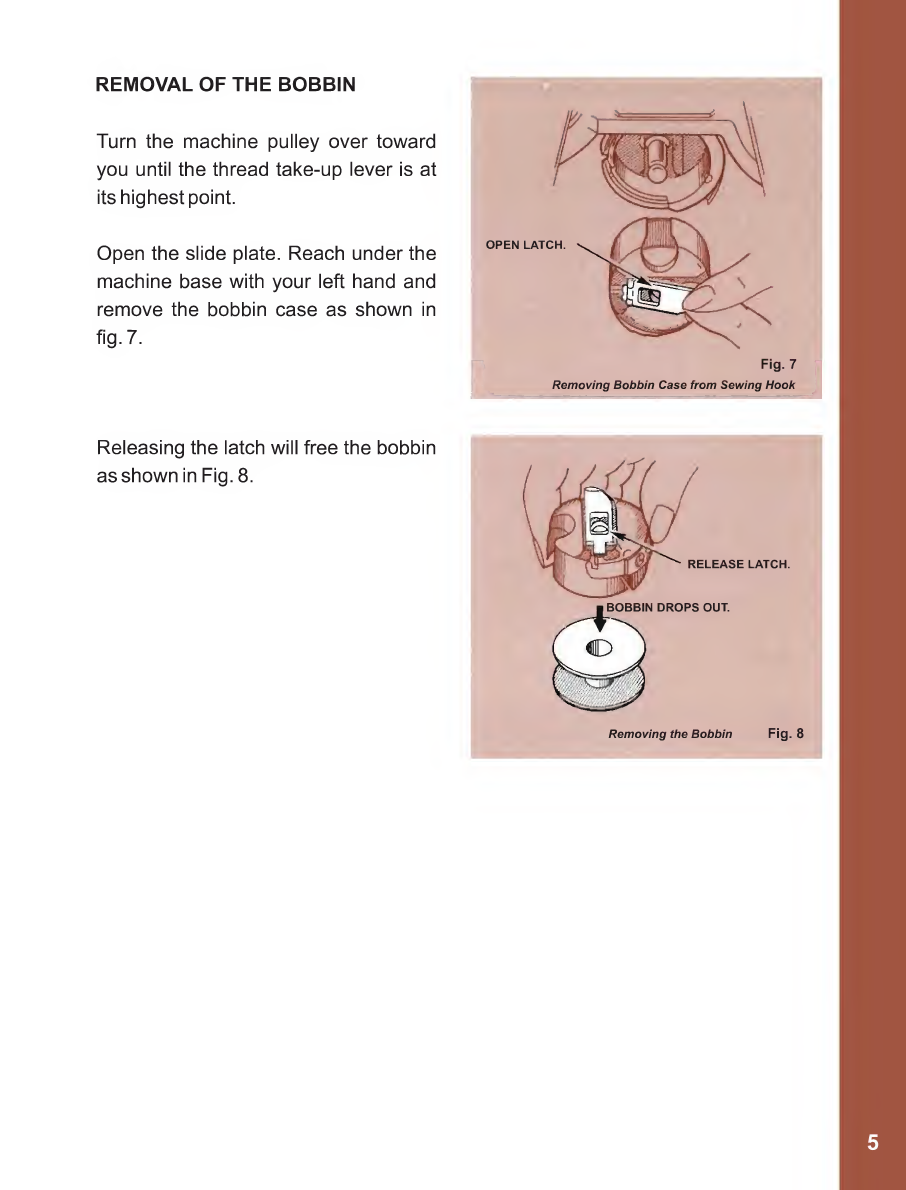
REMOVAL
OF
THE
BOBBIN
Turn
the
machine
pulley
over
toward
you
until
the
thread
take-up
lever
is
at
its
highest
point.
Open
the
slide
plate.
Reach
under
the
machine
base
with
your
left
hand
and
remove
the
bobbin
case
as
shown
in
fig.
7.
Releasing
the
latch
will
free
the
bobbin
as
shown
in
Fig.
8.

WINDING
THE
BOBBIN.
Place
the
bobbin
on
the
shaft
C
of
the
bobbin
winder
by
pushing
it
on
as
far
as
it
will
go
and
pass
the
thread
through
the
threading
points
as
shown
in
fig.
9.
Wind
end
of
thread
around
the
bobbin
a
few
times.
Press
down
on
the
thumb
latch,
pushing
driving
pulley
over
against
belt.
Start
the
machine.
The
bobbin
winder
stops
automatically.
For
more
thread
on
the
bobbin,
turn
screw
A
clockwise;
for
less
thread,
rotate
it
counterclockwise.
When
winding
a
bobbin
with
fine
thread,
light
tension
should
be
used.
Adjust
knurled
screw
D,
fig.
9,
to
regulate
the
tension.
If
the
thread
winds
unevenly
on
the
bobbin,
loosen
screw
B
and
move
the
tension
lever
left
or
right
as
necessary.
Tighten
screw
B.
Bobbins
can
be
wound
while
sewing
at
the
same
time.
Lubricate
the
thread
filler
periodically.
Put
a
few
drops
of
oil
on
the
filler
lubrication
point
shown
in
fig.
9.

THREADING
THE
BOBBIN
CASE
Hold
the
bobbin
so
that
the
thread
will
unwind
in
the
direction
shown
in
fig.
10.
Hold
the
bobbin
case
as
shown
in
fig.
10,
and
place
the
bobbin
inside
as
shown
in
fig.
11.
BOBBIN
CASE
REPLACEMENT
After
winding,
hold
the
bobbin
case
by
the
latch
with
your
left
hand
and
place
it
on
the
center
stud
of
the
bobbin
case
holder
as
shown
in
fig.
12.
Release
the
latch.
Press
the
bobbin
case
back
until
the
latch
catches
the
groove
near
the
stud.
Leave
about
two
inches
of
thread
to
hang
free.
Fig.
11
REPLACE
BOBBIN
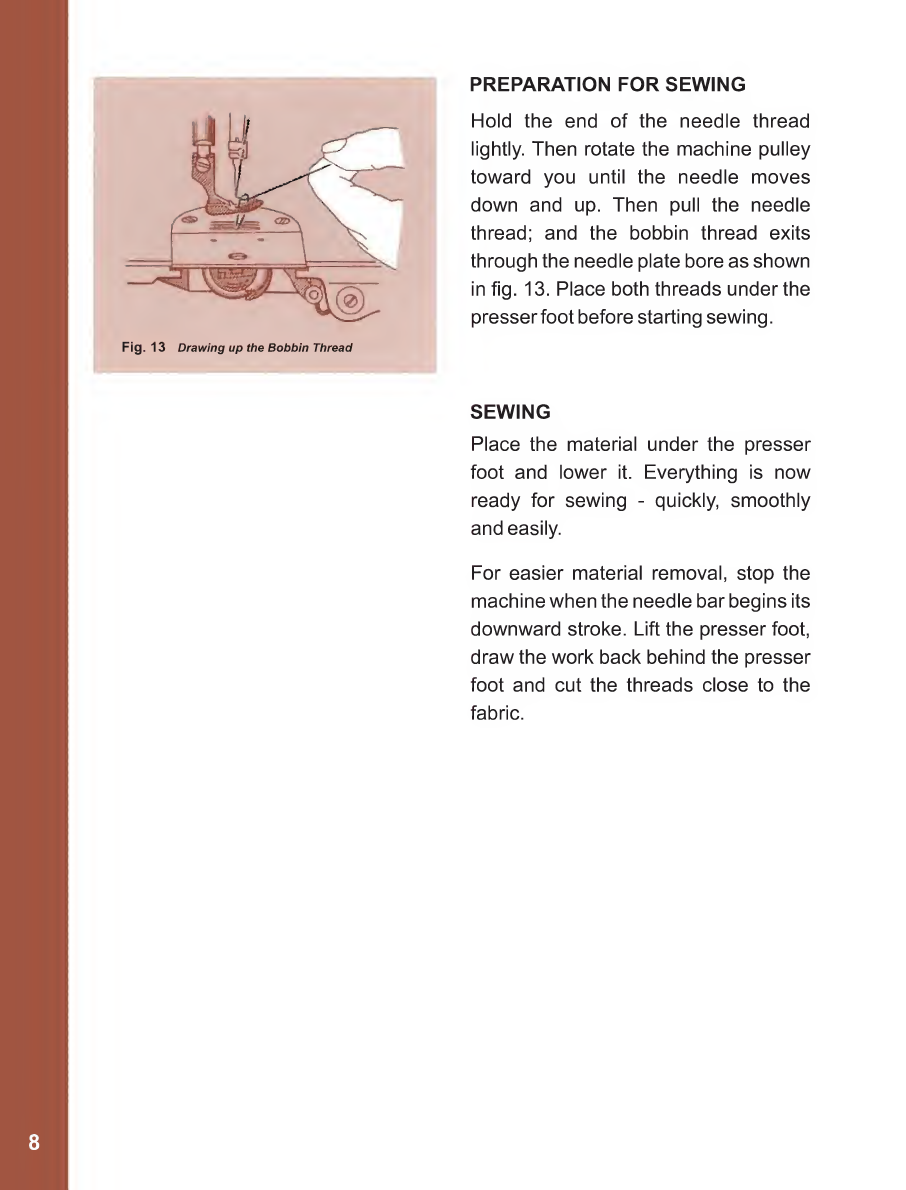
PREPARATION
FOR
SEWING
Hold
the
end
of
the
needle
thread
lightly.
Then
rotate
the
machine
pulley
toward
you
until
the
needle
moves
down
and
up.
Then
pull
the
needle
thread;
and
the
bobbin
thread
exits
through
the
needle
plate
bore
as
shown
in
fig.
13.
Place
both
threads
under
the
presserfoot
before
starting
sewing.
SEWING
Place
the
material
under
the
presser
foot
and
lower
it.
Everything
is
now
ready
for
sewing
-
quickly,
smoothly
and
easily.
For
easier
material
removal,
stop
the
machine
when
the
needle
bar
begins
its
downward
stroke.
Lift
the
presser
foot,
draw
the
work
back
behind
the
presser
foot
and
cut
the
threads
close
to
the
fabric.
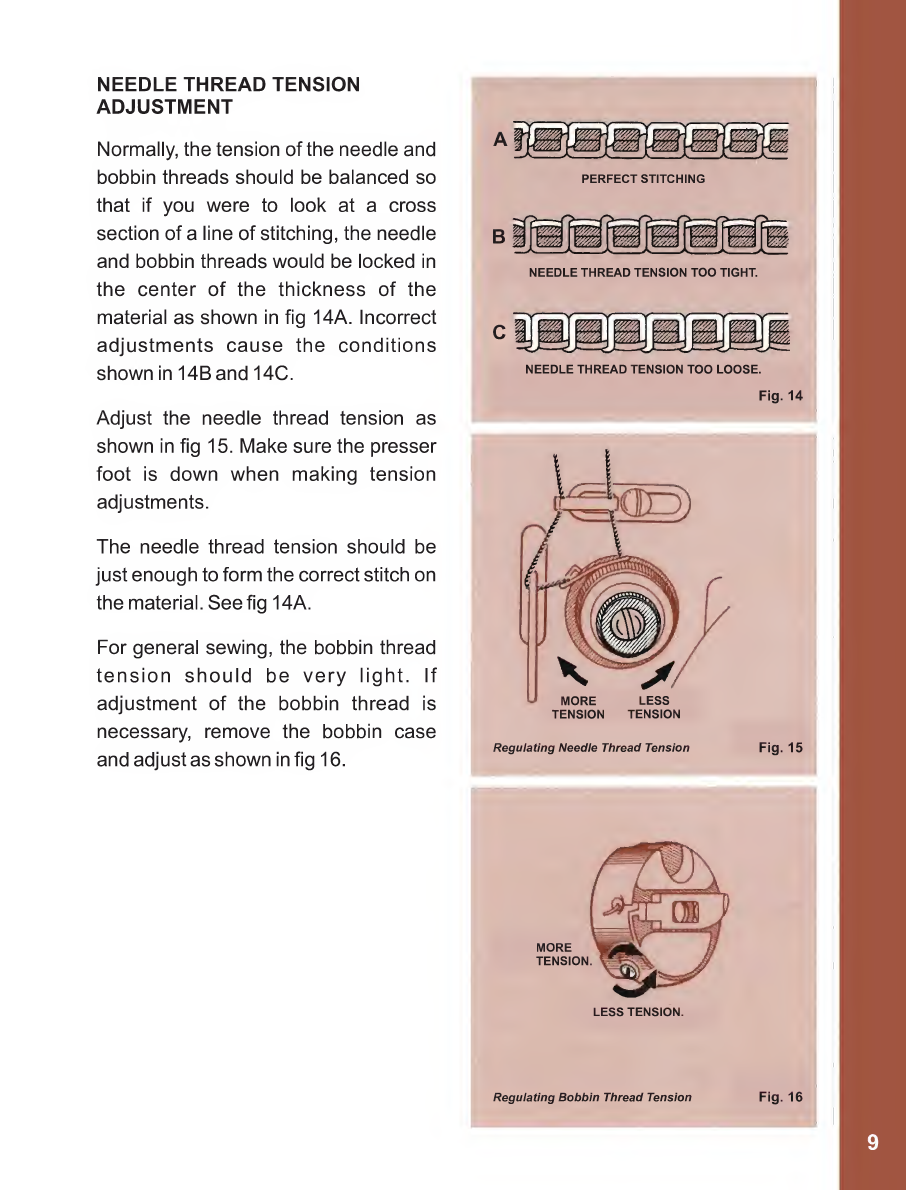
NEEDLE
THREAD
TENSION
ADJUSTMENT
Normally,
the
tension
of
the
needle
and
bobbin
threads
should
be
balanced
so
that
if
you
were
to
look
at
a
cross
section
of
a
line
of
stitching,
the
needle
and
bobbin
threads
would
be
locked
in
the
center
of
the
thickness
of
the
material
as
shown
in
fig
14A.
Incorrect
adjustments
cause
the
conditions
shown
in
14B
and
14C.
Adjust
the
needle
thread
tension
as
shown
in
fig
15.
Make
sure
the
presser
foot
is
down
when
making
tension
adjustments.
The
needle
thread
tension
should
be
just
enough
to
form
the
correct
stitch
on
the
material.
See
fig
14A.
For
general
sewing,
the
bobbin
thread
tension
should
be
very
light.
If
adjustment
of
the
bobbin
thread
is
necessary,
remove
the
bobbin
case
and
adjust
as
shown
in
fig
16.
PERFECT
STITCHING
NEEDLE
THREAD
TENSION
TOO
TIGHT.
NEEDLE
THREAD
TENSION
TOO
LOOSE.
Fig.
14
MORE
LESS
TENSION
TENSION
Regulating
Needle
Thread
Tension
Fig.
15
LESS
TENSION.
Regulating
Bobbin
Thread
Tension
Fig.
16

THREAD
PROTECTOR
ADJUSTMENT
To
achieve
perfectly
interlaced
stitches,
taking
into
account
material
thickness
and
stitch
length,
adjustments
to
the
thread
protector
D
may
be
required,
which
can
be
adjusted
by
moving
left
or
right
as
illustrated
in
fig.
18.
THREAD
TENSION
SPRING
ADJUSTMENT
The
tension
and
stroke
of
spring
movement
of
the
thread
tensioner
A
may
require
different
adjustments
depending
on
the
thread
thickness
and
the
material
used.
Thicker
threads
and
thicker
materials
require
higher
tension,
while
delicate
materials
require
lower
tension.
Also
the
movement
of
the
tensioner
spring
must
be
increased
to
ensure
correct
thread
control.
Using
a
screwdriver
on
screw
B,
turn
it
counterclockwise
to
decrease
tension
or
counterclockwise
to
increase
tension
as
shown
in
fig.
17.
To
adjust
the
height
of
the
tensioner
spring,
loosen
screw
C
(fig.
18)
and
turn
the
entire
tensioner
assembly
to
the
left
if
you
wish
to
lower
it
and
shorten
it,
or
to
the
right
to
raise
it
and
increase
it.
Firmly
tighten
screw
C.
For
thick
materials
or
long
stitches,
move
the
thread
protector
to
the
right.
For
thin
materials
or
short
stitches,
move
the
thread
protector
to
the
left.
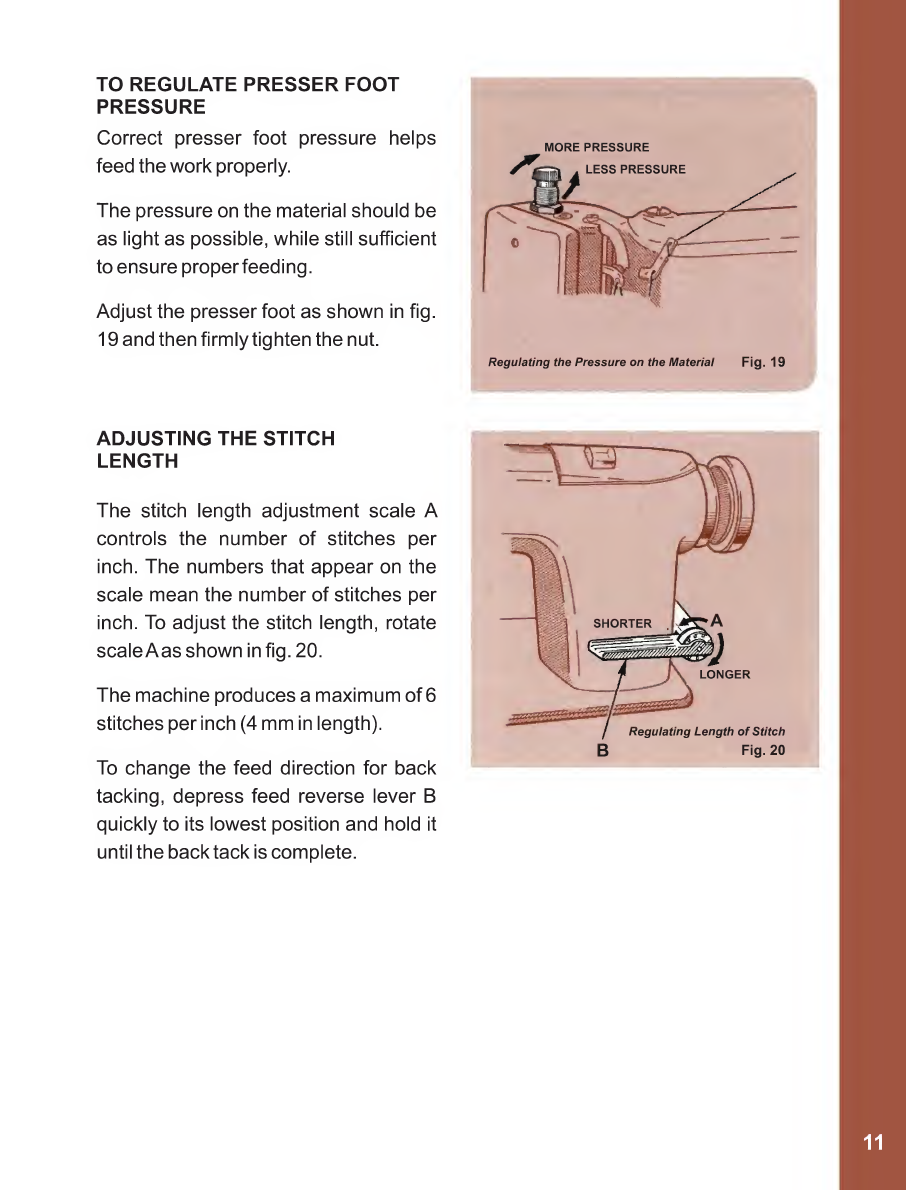
TO
REGULATE
PRESSER
FOOT
PRESSURE
Correct
presser
foot
pressure
helps
feed
the
work
properly.
The
pressure
on
the
material
should
be
as
light
as
possible,
while
still
sufficient
to
ensure
properfeeding.
Adjust
the
presser
foot
as
shown
in
fig.
19
and
then
firmly
tighten
the
nut.
ADJUSTING
THE
STITCH
LENGTH
The
stitch
length
adjustment
scale
A
controls
the
number
of
stitches
per
inch.
The
numbers
that
appear
on
the
scale
mean
the
number
of
stitches
per
inch.
To
adjust
the
stitch
length,
rotate
scale
Aas
shown
in
fig.
20.
The
machine
produces
a
maximum
of
6
stitches
per
inch
(4
mm
in
length).
To
change
the
feed
direction
for
back
tacking,
depress
feed
reverse
lever
B
quickly
to
its
lowest
position
and
hold
it
until
the
back
tack
is
complete.
11
TIPS
FOR
PERFECT
OPERATION
•
Always
keep
the
oil
level
in
the
oil
reservoir
at
the
"HIGH"
mark.
•
When
turning
the
machine
pulley,
always
turn
it
over
towards
you.
•
Always
keep
the
bed
slide
plate
closed
when
the
machine
is
in
operation.
•
Clean
out
any
lint
or
other
waste
around
the
hook
and
between
the
feed
rows
on
the
underside
of
the
throat
plate.
•
Do
not
try
to
'help'
the
machine
by
pulling
the
fabric.
•
Never
press
the
knee
lifter
while
the
machine
is
running.
•
Do
not
run
the
machine
when
threaded
unless
there
is
material
under
the
presserfoot.

THE
SAME!
BUY
PARTS
AND
NEEDLES
MADE
BY
SINGER.
TO
BE
DOUBLY
SURE
...
of
new
machine
performance,
make
sure
that
all
replacement
parts
and
needles
are
exactly
the
same
as
those
in
new
SINGER
machines.
A
LOOK
FOR
THE
TRADEMARK
1.
on
every
package
or
container.
2.
on
the
needle
or
numbered
part.
Needles
in
packaging
marked
"For
Sinqer
Machines"
are
NOT
made
by
SINGER.
TO
ALL
WHOM
IT
MAY
CONCERN:
The
improper
placing
of
the
"SINGER"
trademark,
or
any
other
trademark
of
The
Singer
Company
(all
of
which
are
duly
registered
trademarks)
on
any
machine
that
has
been
repaired,
rebuilt,
refurbished,
or
altered
in
anyway,
outside
a
SINGER
factory
or
an
authorized
SINGER
agency
is
prohibited.
v
A
registered
trademark
of
THE
SINGER
COMPANY.
J

Translated
from
Portuguese
edition
Available
on
www.archive.org
Table of contents


