From the library of Superior Sewing Machine & Supply LLC - www.supsew.com
2
CONTENTS
PAGE
DESCRIPTION
.•.•••••••.•.•••••••.••.•.•••••
3
LUBRICATION
AND CLEANING
•••••••••••••••••
4
INFORMATION
FOR
OPERATION
•••••••••••••
4-11
PAGE
ADJUSTMENTS
••••.•••••••••••••••••••••
12-16
PARTS
LIST
.•.•••••••••••••••••••••••••••••
17
INDEX
Bed
Slide (Slide Plate)
••••••••.•••••••••••.•.•
8
Belt Guard
•••••.•••••.•••••••.••••.••••••.•
3
Bobbin and Bobbin
Case
••••••••••.••••••••.
7-9
Bobbin
Winder
•••••••••••••.••••••.•••••••
4, 7
Capacity
of
Machine
•..•.•••••.•.••..•••.•
3,
12
Centralizing Feed Dog
••••.••••••••••••••••••
16
Common
Causes
of
Stitching Troubles
••••••••••••
5
Description
of
Oil
••.•.•.•••..•.••••.••••••••
4
Dimensions
of
Machine
••.••••••.••.•••••••••••
3
Drawing Up Bobbin Thread
•.••••••••••••••••••
8
Feed Dog
••••••••.•••••.•••••••••••••••
1
5,
16
Feed,
Reverse
••••••••.•••••.••••••••••
;
••
3,
10
Feed Timing
•••••••••••••••••.•••••••••••••
15
Graduated Stitch Indicator
••••••••••••••••••••
10
Knee
Lifter
•••••.••••••••.•••••••••••••••••••
3
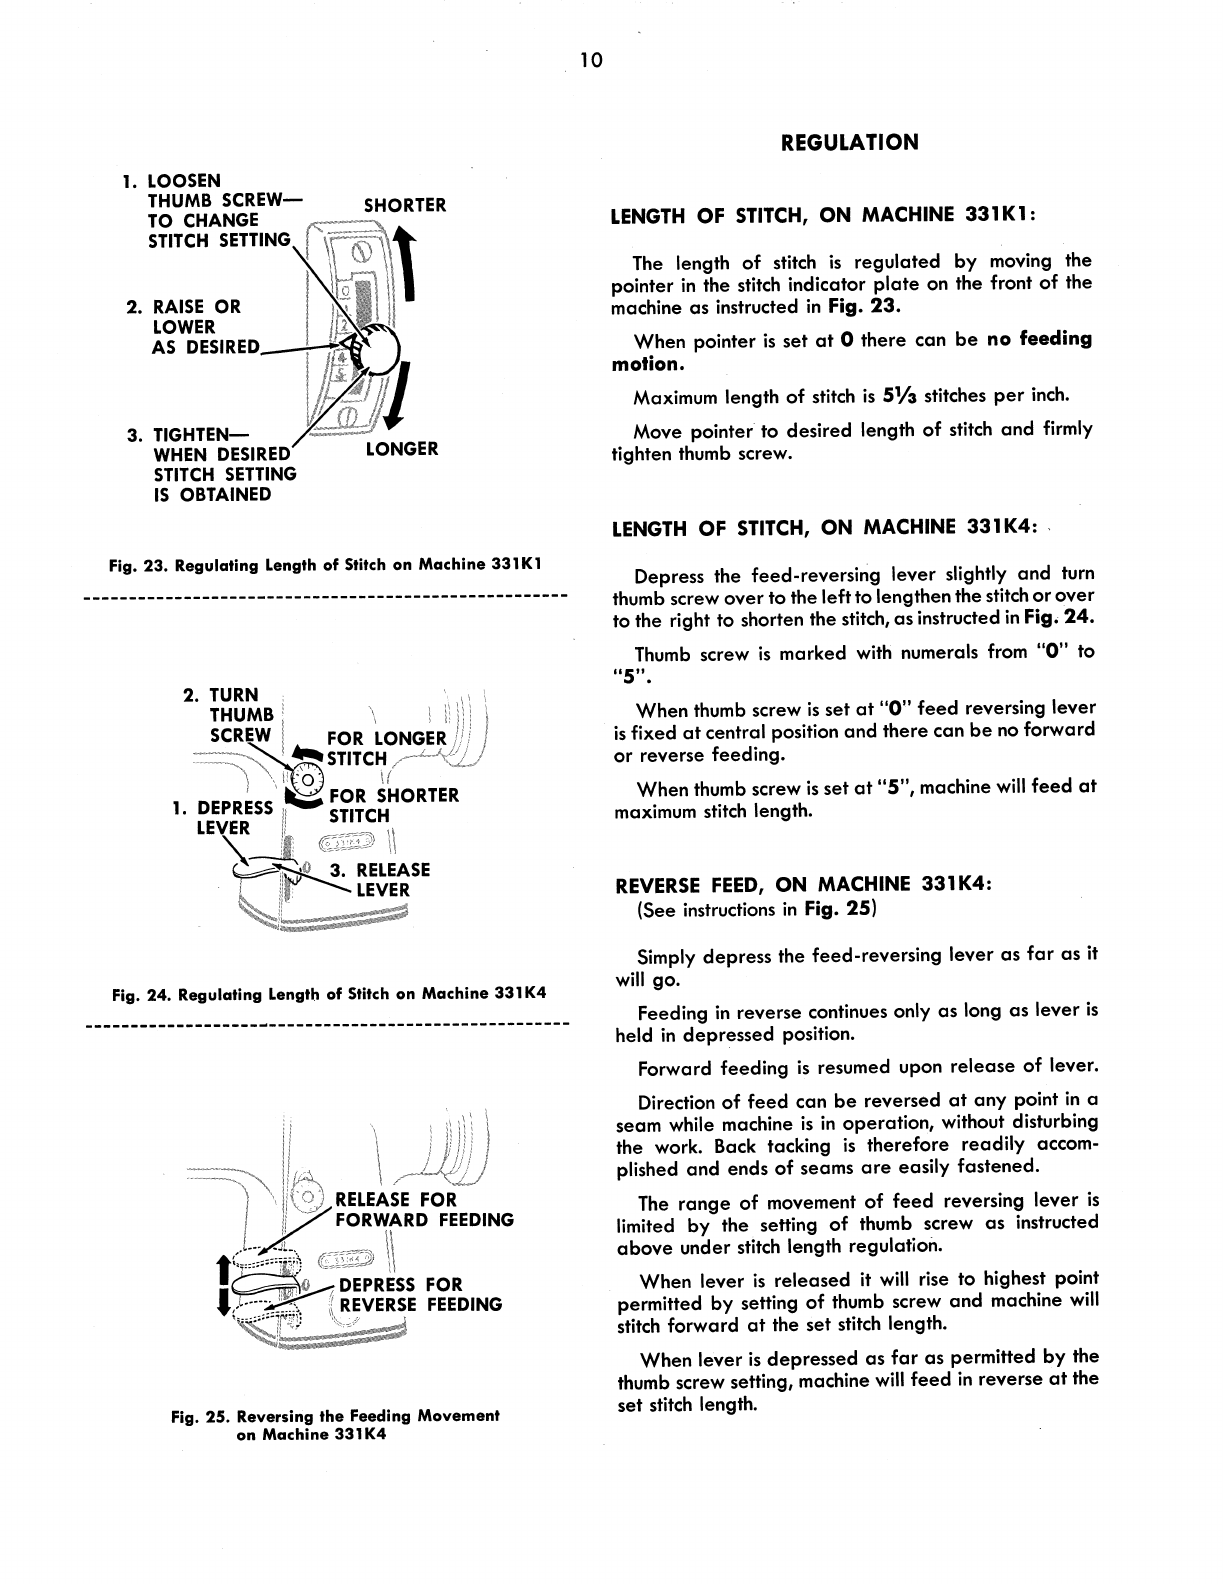
Length
of
Stitch
••••••..••••..•••••.•.•.•••
3,
10
Light Fixture
••.•.•••••••••••••••••••••••••••
3
Link
Take-up
••••••••••.•••••••••••••••••••
3, 6
Lint, Removal
of
Excess
••.••••.••••••••••..•.••
4
Machine
Dimensions
•••••••••••••••••••••.••••
3
Machine Pulley
•••••.•••••••••••••••••••••
3,
11
Needles
••••••••••.•••.•.••••••••••••.••••••
5
Needle Bar
••••..•••••.••••••.•.•••••
3, 12, 13
Needle Setting
...•..••••••••••••••.•••••••••
5
Needle to Shuttle, Clearance
•••••••.••••••
13,
16
Perfect Stitch
••••••.••••••••.•••...••••••••••
8
Preparation
for
Sewing
..•••.••.••••••.•••.•••
8
Presser Bar
••••.•••••..•••••••
·
•••••.•••••••
12
Presser
Bar Guide Bracket
•••••••.•••••••••••
12
Presser
Foot
•••••••.••••••••.••••••.••
3, 12, 15
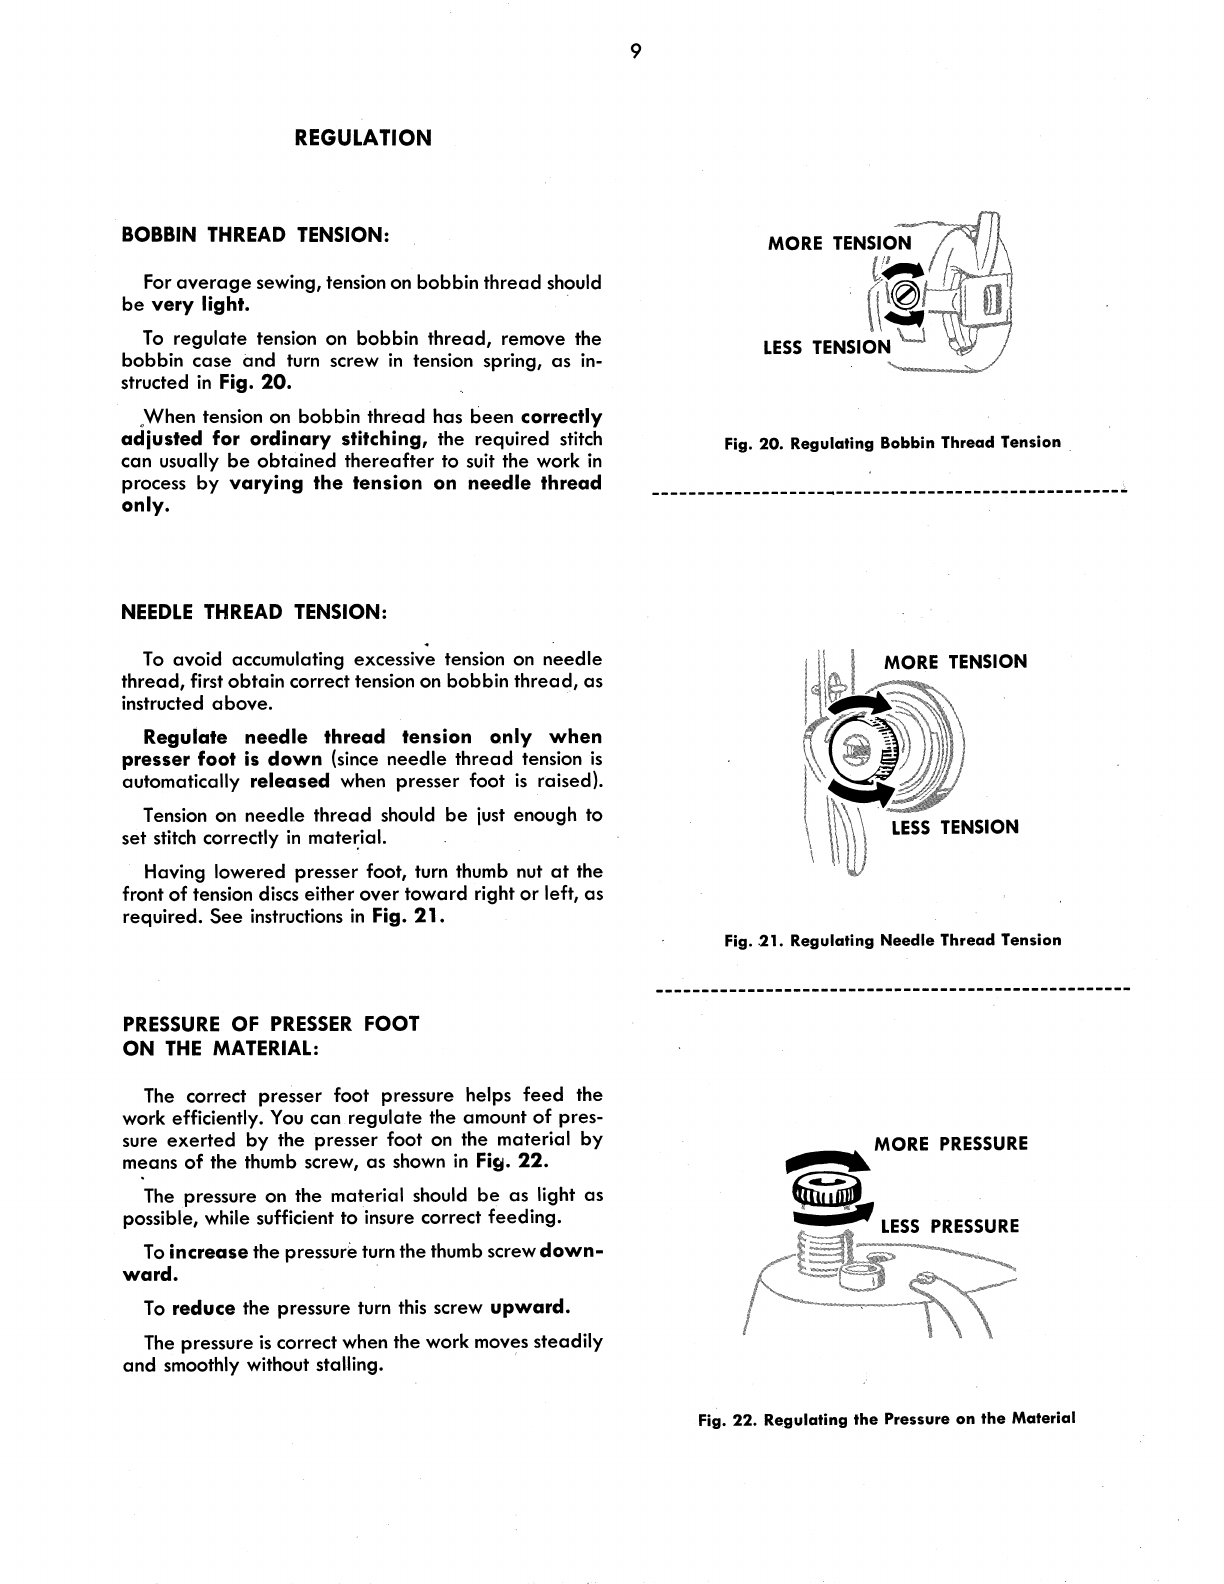
Pressure
of
Presser
Foot
•.••••••••••••••••.••
9,
15
Pulley
••••••••••••••••••••••••••••••••••
3,
11
Reverse
Feed
••••••••••••••.•••••••••••••
3,
10
Rotary
Tens
ion
••••••...••••..•••••••••••••
3, 9
Setting Up Machine
•••.•••••.••••••••••••••••
3
Shuttle
•••••••••••••••••••••••••••••••••
13,
14
Shuttle to Needle Clearance
•...•••••.•••••
13,
16
Specifications
•••.••.••••.••.••••..•••••••
3,
12
Speed
•••.••••••••••••••.•••••••••••••.••••
3
Starting to Sew
•••••...•••.•.••••••••••••
8,
11
Spillage, to Avoid
••••.•.•••.•..••••••••••••••
7
Stand
•••••••••••••••••••••••••.••••••••••••
3
Stitch Indicator
•••••••••••••••••••••••••.••
10
Stitch Length
•••••••••••••••••••••••••••••••
10
Stitch Type
•••••••••••••••••••••••••••••••••
3
Stitching Troubles,
Causes
of
••.••••••••••••••••
5
Stop Motion
••.•..•••••••••.••.••••••••••••
11
Table
•.••.••.•.••••••••••••••••••••••.•••••
3
Tacking
•••••.••••.••••••••••••••••••••••••
10
Take-up Lever
•••••••••••••••••••••.••••••
3, 6
Take-up Lever Guard
..••••.•••.••••••••••••••
3
Tension,
Check Spring
•.•••...•.•••••••••••••
1
4
Tension,
Threads
••.••••••••.•.•••••••••••••
8, 9
Thread
.•••••••••••••••••••.•.••••••••••••••
5
Threading, Bobbin Case
•••••••••••••••••••••••
7
Threading,
Upper
(Needle)
•••••••••••.••.•••••
6
Throat Plate
••••••••••••••••.••••••••••••
3,
16
Treated Material, Speed when Sewing
•••••••••••
3
Treadling Procedure
•••••••••••••.••••••••••
11
Turning a Corner
•.•••••••••.•••••••••••••••••
8
Twist
of
Thread
••••••.••.••••••••••••••••••••
5
Unwinder
••••••••••••••••.••••••••••••••••
3, 6
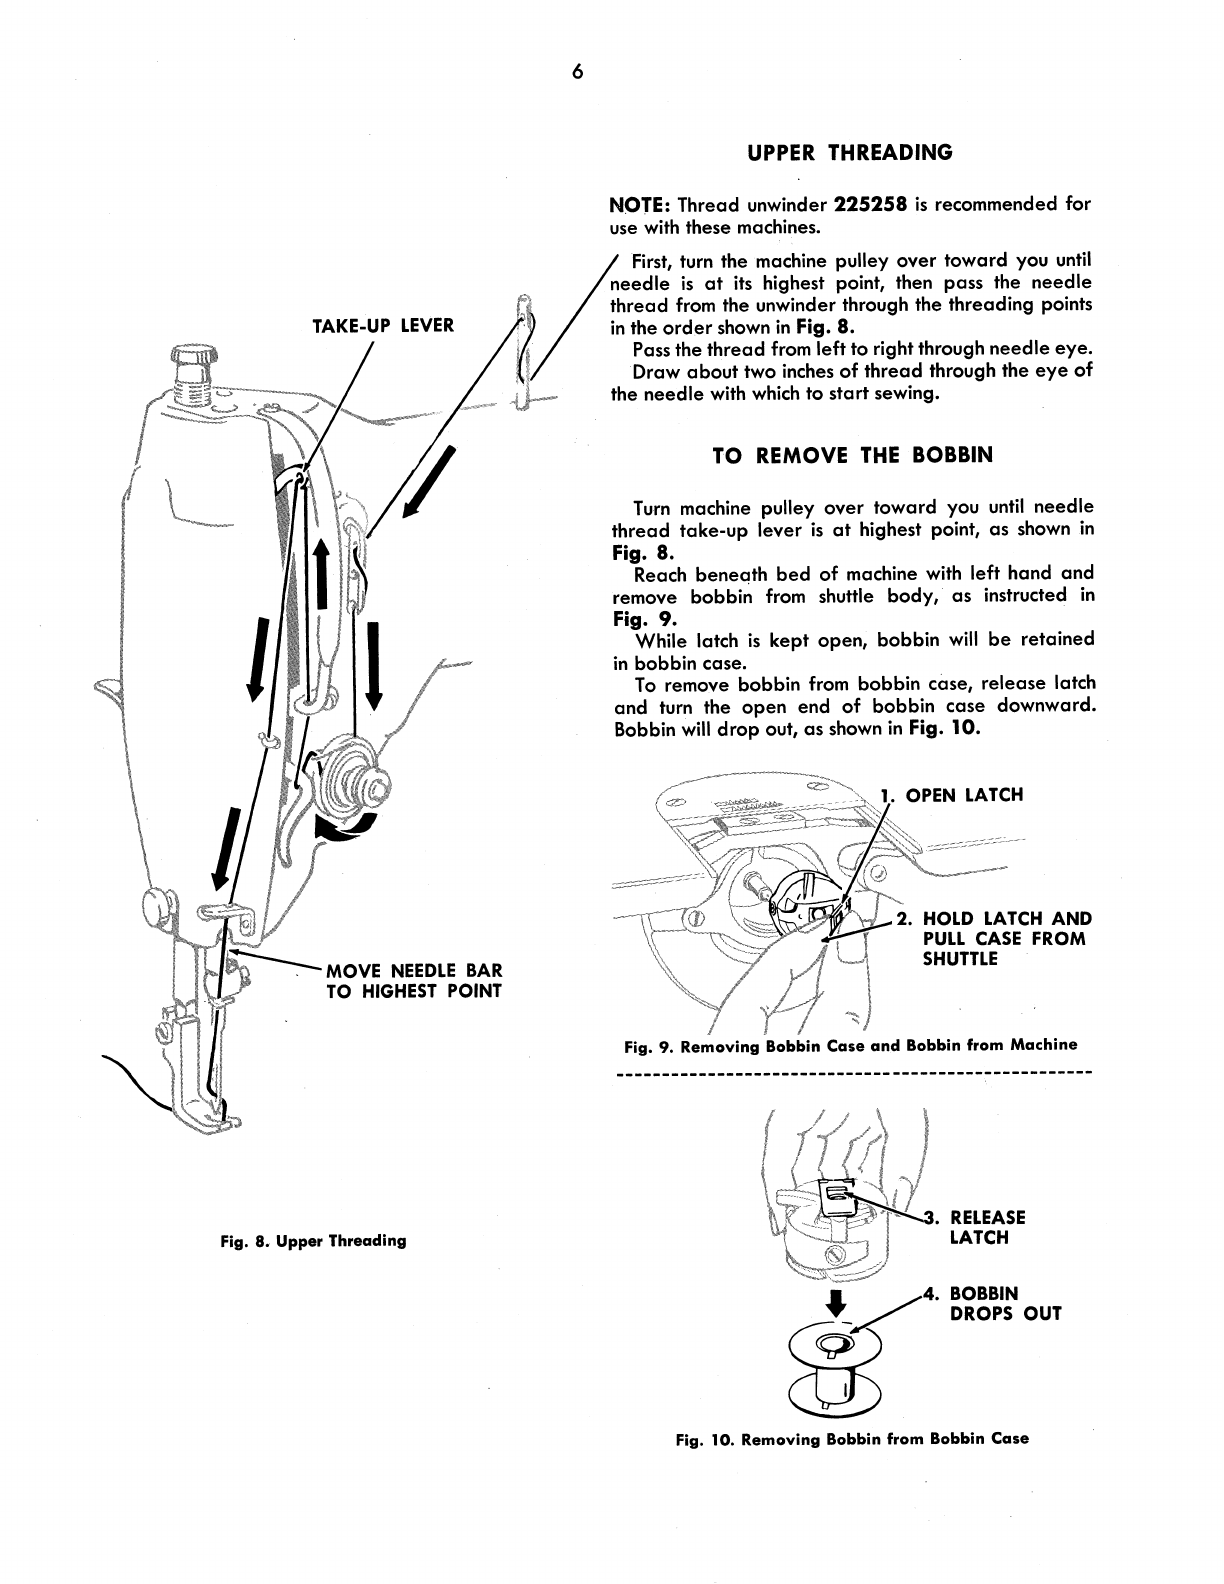
Upper Threading
••••••••.••••••••••••••.••••
6
Winder
(Bobbin)
•••••••••••••••••••••••••••
4, 7