manuals.online logo
Brands
  1. Home
  2. •
  3. Brands
  4. •
  5. Singer
  6. •
  7. Sewing Machine
  8. •
  9. Singer ME457 User manual

Singer ME457 User manual

INSTRUCTION MANUAL
ME457
This household sewing machine is designed to comply with IEC/EN 60335-2-28 and UL1594.
IMPORTANT SAFETY INSTRUCTIONS
When using an electrical appliance, basic safety precautions should always be followed, including the
following: Read all instructions before using this household sewing machine. Keep the instructions at a suitable
place close to the machine. Make sure to hand them over if the machine is given to a third party.
DANGER – TO REDUCE THE RISK OF ELECTRIC SHOCK:
• A sewing machine should never be left unattended when plugged in. Always unplug this sewing machine
from the electric outlet immediately after using and before cleaning, removing covers, lubricating or when
making any other user servicing adjustments mentioned in the instruction manual.
WARNING – TO REDUCE THE RISK OF BURNS, FIRE, ELECTRIC SHOCK,
OR INJURY TO PERSON:
• Do not allow to be used as a toy. Close attention is neccesary when this sewing machine is used by or near
children.
• Use this sewing machine only for its intended use as described in this manual. Use only attachments
recommended by the manufacturer as contained in this manual.
• Never operate this sewing machine if it has a damaged cord or plug, if it is not working properly, if it has
been dropped or damaged, or dropped into water. Return the sewing machine to the nearest authorized
service center for examination, repair, electrical or mechanical adjustment.
• Never operate the sewing machine with any air openings blocked. Keep ventilation openings of the sewing
machine and foot control free from the accumulation of lint, dust, and loose cloth.
• Keep ngers away from all moving parts. Special care is required around the sewing machine needle.
• Always use the proper needle plate. The wrong plate can cause the needle to break.
• Do not use bent needles.
• Do not pull or push fabric while stitching. It may deect the needle causing it to break.
• Wear safety glasses.
• Switch the sewing machine o (“O”) when making any adjustment in the needle area, such as threading
needle, changing needle, threading bobbin, or changing presser foot, etc.
• Never drop or insert any object into any opening.
• Do not use outdoors.
• Do not operate where aerosol (spray) products are being used or where oxygen is being administrated.
• To disconnect, turn all controls to the o (“O”) position, then remove plug from outlet.
• Do not unplug by pulling on cord. To unplug, grasp the plug, not the cord.
• The foot control is used to operate the machine. Avoid placing other objects on the foot control.
• Do not use the machine if it is wet.
• If the LED lamp is damaged or broken, it must be replaced by the manufacturer or its service agent or a
similarly qualied person, in order to avoid a hazard.
• The power cord of the foot control can not be replaced. If the power cord is damaged the foot control must be
disposed.
• This sewing machine is provided with double insulation. Use only identical replacement parts. See
instructions for Servicing of Double-Insulated Appliances.
SAVE THESE INSTRUCTIONSFOR EUROPE
ONLY:
FOR EUROPE ONLY:
This appliance can be used by children aged from 13 years and above and persons with reduced physical,
sensory or mental capabilities or lack of experience and knowledge if they have been given supervision or
instruction concerning use of the appliance in a safe way and understand the hazards involved. Children shall
not play with the appliance. Cleaning and user maintenance shall not be made by children without supervision.
The machine must only be used with foot control of type FC-2902D(220-240 area) / 4C-326G(230~ area )
manufactured by Wakaho Electric lnd. Co., Ltd.(Vietnam)
FOR OUTSIDE EUROPE:
This sewing machine is not intended for use by persons (including children) with reduced physical, sensory or
mental capabilities, or lack of experience and knowledge, unless they have been given supervision or instruction
concerning use of the sewing machine by a person responsible for their safety. Children should be supervised to
ensure that they do not play with the sewing machine.
The machine must only be used with foot control of type FC-2902D(220-240 area) / 4C-326G(230~ area )
manufactured by Wakaho Electric lnd. Co., Ltd.(Vietnam)
SERVICING OF DOUBLE INSULATED PRODUCTS
In a double-insulated product, two systems of insulation are provided instead of grounding. No ground means
is provided on a double-insulated product, nor should a means for grounding be added to the product. Servicing
of a double-insulated product requires extreme care and knowledge of the system and should be done only by
qualied service personnel. Replacement parts for a double-insulated product must be identical to those parts
in the product. A double-insulated product is marked with the words ‘DOUBLE INSULATION’ or ‘DOUBLE
INSULATED’.
TABLE OF CONTENTS
MAINTENANCE............................................ 24
Cleaning the Machine................................................... 24
Cleaning the Bobbin Area............................................. 24
Cleaning under the Bobbin Area................................... 24
Troubleshooting............................................................ 25
INTRODUCTION............................................. 1
Intended Use .................................................................. 1
Machine Overview.......................................................... 1
Needle Area Overview.................................................... 2
Top of Machine ............................................................... 2
Overview Accessories .................................................... 3
Included Accessories (Not Pictured)............................... 3
Presser Feet................................................................... 4
Optional Accessories...................................................... 4
Stitch Overview............................................................... 5
Utility Stitches ..................................................................... 5
Decorative Stitches .............................................................. 5
PREPARATIONS............................................ 6
Unpacking the Machine.................................................. 6
Connect to the Power Supply......................................... 6
Packing Machine after Sewing ....................................... 6
Free Arm/Removable Accessory Tray ............................ 7
Presser Foot Lifter.......................................................... 7
Thread Knife................................................................... 7
Spool Pin ........................................................................ 8
Wind the Bobbin ............................................................. 9
Insert the Bobbin ............................................................ 9
Thread the Machine...................................................... 10
Needle Threader............................................................11
Needles .........................................................................11
Change the Needle....................................................... 12
Thread Tension............................................................. 13
Sew without Feed Teeth ............................................... 13
Presser Foot Pressure.................................................. 13
Change the Presser Foot ............................................. 14
Attaching the Edge/Quilting Guide ............................... 14
OPERATING YOUR MACHINE.................... 15
Select a Stitch............................................................... 15
For sewing the grey stitch patterns .................................... 15
For sewing the blue or red stitch patterns .......................... 15
Stitch Width Dial & Stitch Length Dial ......................... 16
Three Needle Position Dial........................................... 16
Reverse Sewing ........................................................... 16
SEWING........................................................ 17
Sewing.......................................................................... 17
Start to Sew – Straight Stitch........................................ 17
Change Sewing Direction............................................. 18
Finish Sewing ............................................................... 18
Straight Stretch Stitch................................................... 18
Multi-Step Zigzag Stitch................................................ 19
Slant Overedge Stitch................................................... 19
Closed Overlock Stitch ................................................. 20
Blind Hems ................................................................... 20
Darning and Mending ................................................... 21
Repair Large Holes ............................................................ 21
Repair Tears ....................................................................... 21
One-Step Buttonhole.................................................... 22
Sew Zippers.................................................................. 23
67
5
10
8
12
9
1
2
3
411
English
1
INTRODUCTION
Optimal use and maintenance are described in these instructions. This product is not intended for industrial or commercial use.
Additional assistance, by region, may be found online at www.singer.com.
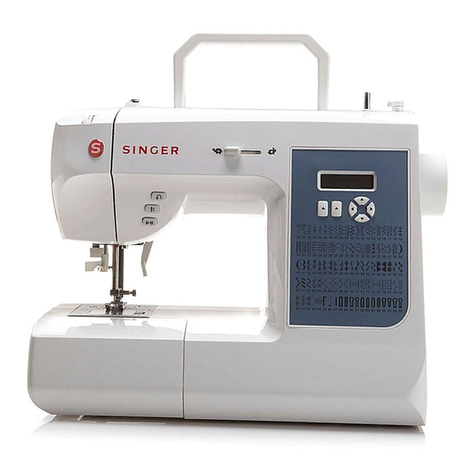
1. Feed Teeth Lever — move from side to side to engage or
disengage the feed teeth. Positioned at the back of the free
arm.
2. Accessory Tray / Free Arm — provides a at surface when
sewing and allows storage for your accessories. Remove the
accessory tray to use the free arm which makes it easier to
sew, e.g., trouser hems and sleeves.
3. Thread Knife — for trimming thread ends at the end of
sewing.
4. Threading Slots — thread paths with tension discs and take up
lever.
5. Reverse Sewing Lever — reverses stitching direction, for
example, when securing the beginning or ending of a seam.
6. PresserFootPressure— controlsthepressurethepresserfoot
exerts onto the fabric.
7. Thread Tension Dial — adjustable for setting the desired
tension for your stitch, thread and fabric.
8. Three Needle Position Dial — the needle position can be
altered as desired (see page 16).
9. Stitch Width Dial — controls the width of stitches, making
them narrower or wider (see page 16).
10. Hand Wheel — used to manually control the movement of the
needle and the thread take-up lever.
11. Stitch Length Dial — controls the length of stitches, making
them shorter or longer as desired. It is also used for stretch
stitch selection (see page 16).
12. Stitch Selector Dial — is used to select stitch patterns and
buttonhole settings (see page 15).
Intended Use
Machine Overview
1
2
3
4
5
6
7 8 9 10
11
12
13 14
98
26
5
47
3
1
English
2
Needle Area Overview
Top of Machine
1. Needle Plate — provides a at area around presser foot for
sewing. Guidelines indicate various seam allowances used
to guide fabric while sewing.
2. Feed Teeth — feed the fabric under the presser foot when
sewing.
3. Presser Foot — holds fabric against feed teeth which draw
fabric under the presser foot as you sew.
4. Presser Foot Holder Screw — loosen the screw to
remove the presser foot holder.
5. Presser Foot Holder — holds the presser foot.
6. Presser Foot Release Button — press this button to release
the presser foot from the holder.
7. Buttonhole Lever — used for buttonhole sewing.
8. Built-in Needle Threader — thread the needle quickly and
easily.
9. Presser Foot Bar — accommodates the presser foot holder.
10. Needle Clamp Screw — secures the needle.
11. Thread Guide — helps maintain thread ow when sewing.
12. Needle Thread Guide — helps maintain thread ow
when sewing.
13. Bobbin Cover — protects the bobbin while sewing.
14. Bobbin Cover Release Button — push to open the bobbin
cover.
1. Bobbin winding tension disc
2. Thread guides
3. Handle
4. Spool pin
5. Hole for auxiliary spool pin
6. Bobbin winding spindle
7. Bobbin winding stopper
8. Thread tension discs
9. Thread take-up lever
English
3
Overview Accessories
Included Accessories (Not Pictured)
• Needles
• Foot control
• Power cord
Bobbin x4 — Only use the type of transparent bobbins delivered with your machine (SINGER® Class 15
transparent bobbins). One of the bobbins is inserted in the machine upon delivery.
Felt Pad — Used to cushion the spool of thread when using the Auxiliary Spool Pin.
Spool Cap — Two sizes (large and small) for various thread spool styles.
Auxiliary Spool Pin — For sewing with large thread spools or when using specialty threads.
Brush and Seam Ripper — Used to remove stitches/brush o lint.
L-Screwdriver — Used to remove the needle plate, presser foot holder or needle screw.
Edge/Quilting Guide — Used for straight and accurate sewing, e.g., when quilting. Insert the guide into
the slot at the back of the presser foot holder. Adjust the position to t your project.
English
4
Presser Feet
All-purpose Foot (T)
(attached to the machine upon delivery)
This foot is used for general sewing on most types of fabric. The bottom of the foot is at, so that the fabric
is held down rmly against the feed teeth while sewing. It also has a wide slot so that the needle can move
from left to right, depending on which stitch you sew.
F
Blind Hem Foot (F)
The Blind Hem Foot is used for sewing blind hems in garments and home decor. There is an adjustable
guide with an extension at the front, used to guide the fold of the hem while stitching.
Zipper Foot (I)
This foot is used for inserting zippers. Attach the foot to the presser foot holder on either side of the foot,
depending on which side of the zipper is being sewn. The Zipper Foot can also be used to create and insert
piping.
One–Step Buttonhole Foot (D)
This foot allows you to make perfectly sized buttonholes for your button. It has a space at the back for a
button, used to set the size of the buttonhole. The machine will automatically sew a buttonhole to t that
button size.
Satin Stitch Foot (A)
The Satin Stitch Foot is used for satin stitches and other more dense decorative stitches. It has a groove on
the underside that allows the dense stitching to pass freely underneath the foot.
Optional Accessories
Additional optional accessories are available for your machine. Check with your authorized SINGER®retailer for more information.

Other Singer Sewing Machine manuals

Singer 31-17 User manual

Singer

Singer 31-17 User manual

Singer XL-550 User manual

Singer

Singer XL-550 User manual

Singer 3342 User manual

Singer

Singer 3342 User manual

Singer Quantum XL-1 User manual

Singer

Singer Quantum XL-1 User manual

Singer 82-21 User manual

Singer

Singer 82-21 User manual

Singer 1507 User manual

Singer

Singer 1507 User manual

Singer CLASS 99 User manual

Singer

Singer CLASS 99 User manual

Singer 2259 User manual

Singer

Singer 2259 User manual

Singer JUNIOR MISS 67B User manual

Singer

Singer JUNIOR MISS 67B User manual

Singer TS+ User manual

Singer

Singer TS+ User manual

Singer 2 User manual

Singer

Singer 2 User manual

Singer 457A105 Setup guide

Singer

Singer 457A105 Setup guide

Singer 153K101 Quick start guide

Singer

Singer 153K101 Quick start guide

Singer 6180 User manual

Singer

Singer 6180 User manual

Singer 110W117 User manual

Singer

Singer 110W117 User manual

Singer 306 User manual

Singer

Singer 306 User manual

Singer Class 262 User manual

Singer

Singer Class 262 User manual

Singer Imperial 7000 Setup guide

Singer

Singer Imperial 7000 Setup guide

Singer Stylist 7258 User manual

Singer

Singer Stylist 7258 User manual

Singer 71-141 Quick start guide

Singer

Singer 71-141 Quick start guide

Singer M2500 User manual

Singer

Singer M2500 User manual

Singer Simple 2263 User manual

Singer

Singer Simple 2263 User manual

Singer 02; 22 User manual

Singer

Singer 02; 22 User manual

Singer 410W110 User manual

Singer

Singer 410W110 User manual

Popular Sewing Machine manuals by other brands

Brother PE-180D Service manual

Brother

Brother PE-180D Service manual

ELNA 2002 instruction manual

ELNA

ELNA 2002 instruction manual

Siruba DL7200D-NM1 Instruction book

Siruba

Siruba DL7200D-NM1 Instruction book

Silver Viscount 9500e instruction manual

Silver

Silver Viscount 9500e instruction manual

Pfaff 3588-05/020 instruction manual

Pfaff

Pfaff 3588-05/020 instruction manual

JUKI DDL-9000A instruction manual

JUKI

JUKI DDL-9000A instruction manual

Pfaff 284 Instruction book

Pfaff

Pfaff 284 Instruction book

Reliable MSK-335B Specification sheet

Reliable

Reliable MSK-335B Specification sheet

Kenmore 385. 19000 owner's manual

Kenmore

Kenmore 385. 19000 owner's manual

Brother FD4-B271 instruction manual

Brother

Brother FD4-B271 instruction manual

Brother Computerized Embroidery Machine Operation manual

Brother

Brother Computerized Embroidery Machine Operation manual

Husqvarna Viking Designer SE user guide

Husqvarna Viking

Husqvarna Viking Designer SE user guide

Riccar RL634DE user manual

Riccar

Riccar RL634DE user manual

ZOJE ZJ9800 Operation manual

ZOJE

ZOJE ZJ9800 Operation manual

Siruba C007JP Instruction book

Siruba

Siruba C007JP Instruction book

IKEA SY user guide

IKEA

IKEA SY user guide

Pfaff 571 instruction manual

Pfaff

Pfaff 571 instruction manual

Brother BB370 Quick setup guide

Brother

Brother BB370 Quick setup guide

manuals.online logo
manuals.online logoBrands
  • About & Mission
  • Contact us
  • Privacy Policy
  • Terms and Conditions

Copyright 2025 Manuals.Online. All Rights Reserved.