Singer XL-550 User manual

Service Manual
104 73 19-26
12 May 2011
XL-550
© 2011 SVP Worldwide -All Rights Reserved.

2Singer Furura XL-550
Index
Service tools.................................................................................................................................................4
1. Needle bar height ....................................................................................................................................5
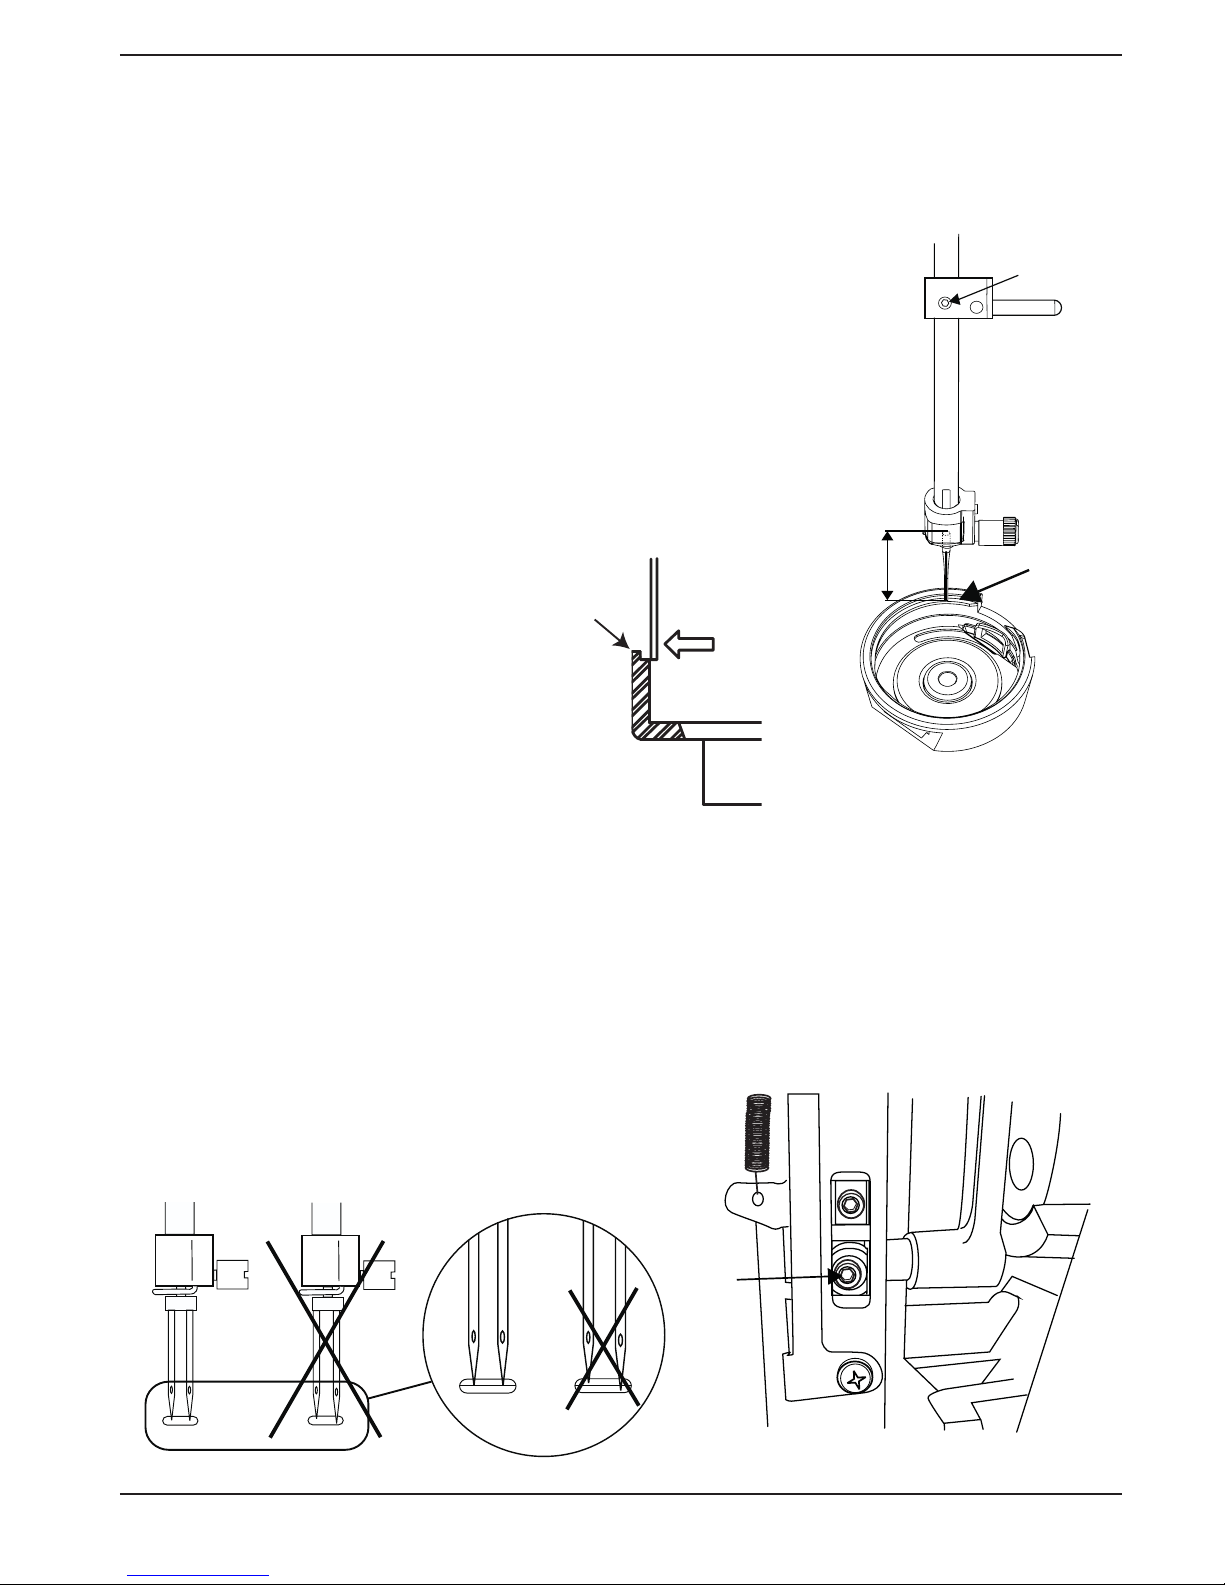
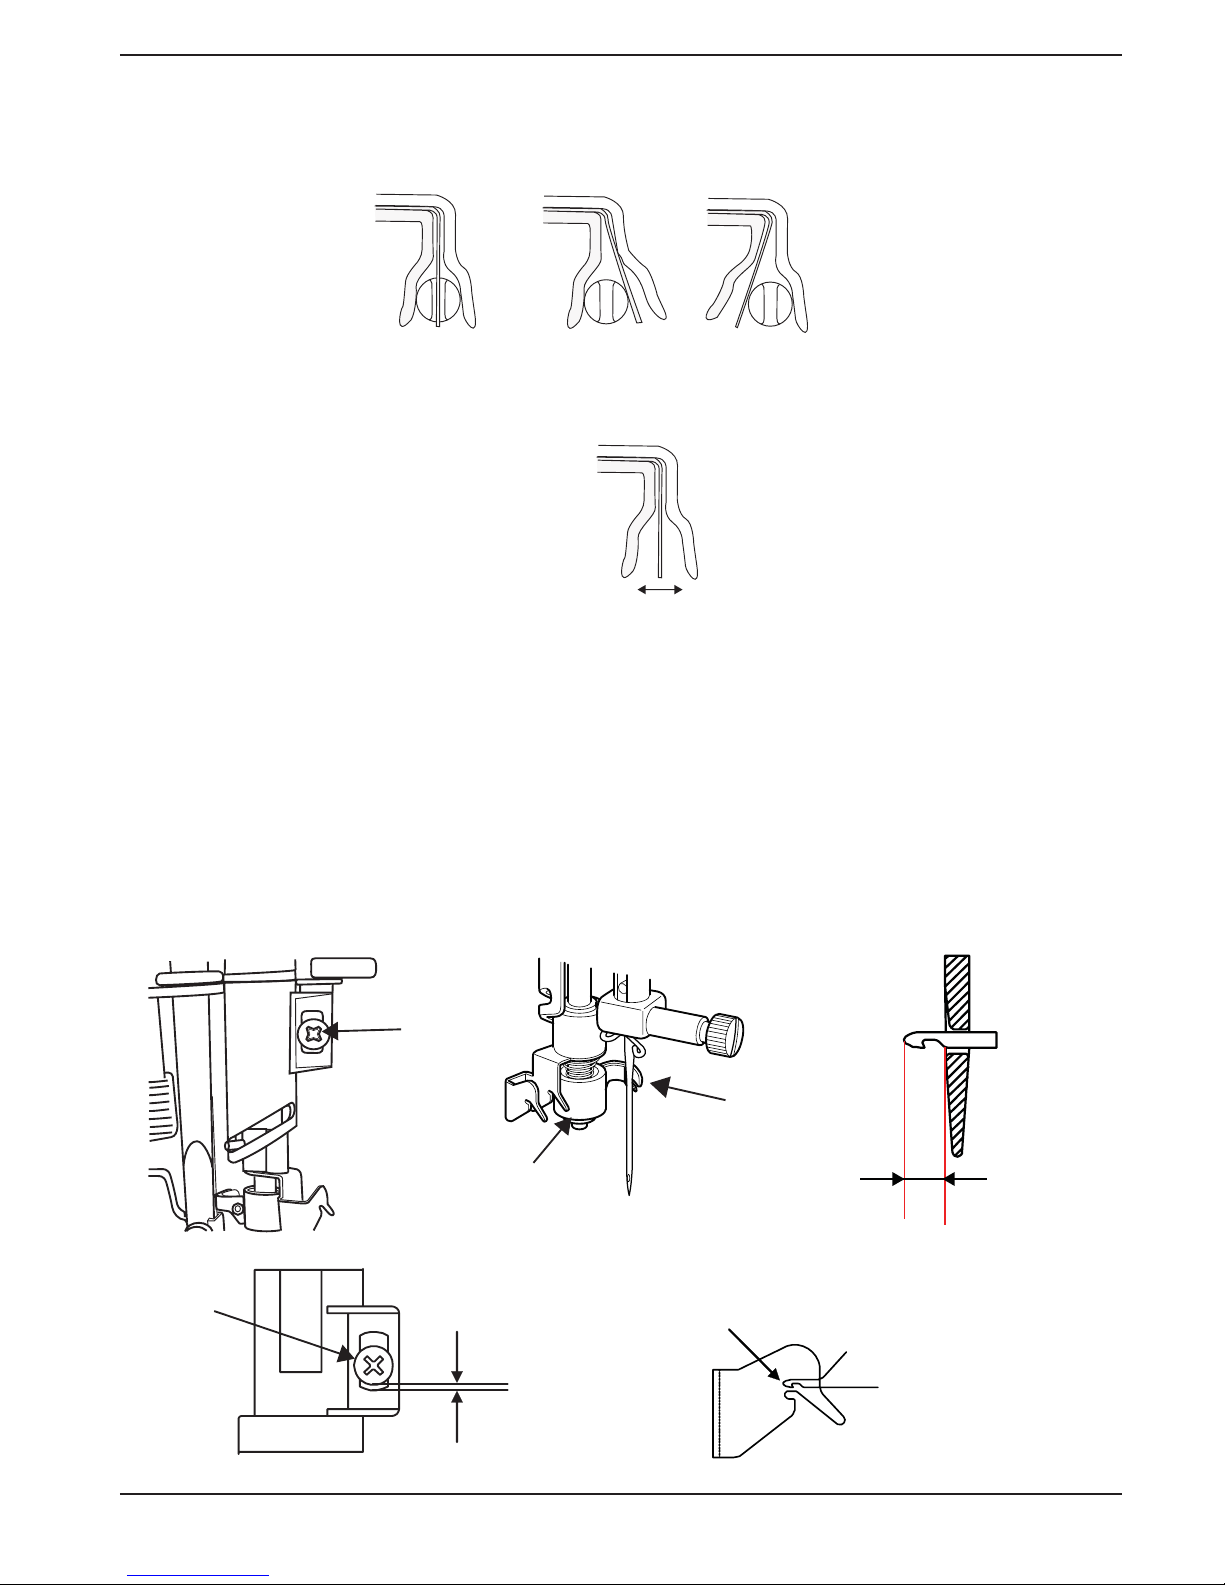
2. Needle threader height ............................................................................................................................6
3. Presser foot height ..................................................................................................................................8
4. Presser foot parallelism to the needle hole in needle plate......................................................................9
5. Presser foot parallelism to the needle plate feed dog slot’s...................................................................10
6. Feed-dog height ....................................................................................................................................11
7. Feed timing ............................................................................................................................................12
8. Positioning of Step motor for feeding - Feed balance basic point.........................................................13
9. Feed Balance .........................................................................................................................................14
10. Basic positioning of zigzag step motor ................................................................................................15
11.Adjustment of needle at center position................................................................................................16
12. Tension of timing belt............................................................................................................................17
13.The timing of the hook in relation to the needle ....................................................................................18
14. Play of hook gears................................................................................................................................19
15. Retaining bracket for bobbin case........................................................................................................20
16. The Timing of take-up lever in relation to the hook...............................................................................21
17. Play of gears for take-up lever..............................................................................................................22
18.Parallelity of needle bar swing...............................................................................................................23
19. Needle clearance to hook ....................................................................................................................24
20. Alignment of needle plate to hook ........................................................................................................25
21. Bobbin case thread tension .................................................................................................................26
22. Upper thread tension unit....................................................................................................................27
Function mode of sewing machine - thread sensor deactivated. ...............................................................28
Test mode of sewing machine....................................................................................................................29
Apply to model XL-550...............................................................................................................................29
Test mode for sewing machine...................................................................................................................30
Error code list .............................................................................................................................................31
Test mode for sewing machine with embroidery unit..................................................................................32
Removing face, thread cutter , bobbin winding and covers ......................................................................34
Removing base , front and back covers.....................................................................................................35
Removing base , front and back covers cont. ............................................................................................36
Remove the top cover.................................................................................................................................38
Remove Hoop carrier cover........................................................................................................................39
Adjustment origin position of embroidery foot along X & Y axis.................................................................40

Singer Furura XL-550 3
ESD
ATTENTION!
It is of the utmost importance that precautions are being taken in order to avoid damage of the electronics
by electro static discharges ESD (=Electro Static Discharge). To avoid that these errors arise it is important
to handle loose circuit boards in a controlled way.
Electrostatic charges are caused by:
• When a person is walking (influence) over synthetic tilled or carpeted floor
• When its friction between and separation of two insulating materials.
If this static electricity discharges through electronic components, these may be partially or irreparably
damaged. Electrostatically charged persons represent the greatest danger for components. This can be dis-
sipated by controlled electrostatic discharge.
Always use wrist band when servicing.
Please note that on disposal, this product must be
safely recycled in accordance with relevant
National legislation relating to
electrical/electronic products. If in doubt please
contact your retailer for guidance.
Veuillez noter qu’en cas de destruction, ce produit doit
bénéficier d’un recyclage sécurisé, conforme à la
législation nationale applicable aux produits
électriques/électroniques. En cas de doute, veuillez
contacter votre distributeur agréé.
Bitte beachten Sie, dass hinsichtlich der Entsor-
gung dieses Produkts, vorschriftsmäßig entspre-
chend der gültigen nationalen Gesetzgebung für
elektrische/elektronische Produkte, recycelt
werden muss.Bei Zweifel setzen Sie sich bitte mit
Ihrem Fachhändler in Verbindung.
• All casted parts within our products are marked with name of
material if allowed by size.
• All molded plastic parts within our products are marked with name
of material if allowed by size.
• Innerhalb unserer Produktion werden alle gegossenen Teile mit dem
Materialnamen bezeichnet, wenn es deren Größe erlaubt.
• Innerhalb unserer Produktion werden alle geformten Teile mit dem
Materialnamen bezeichnet, wenn es deren Größe erlaubt.
• Toutes les pièces moulées (en métal) de nos produits sont marquées
du nom du matériau utilisé, quand la taille de la pièce le permet.
• Toutes les pièces moulées (en plastique) de nos produits sont
marquées du nom du matériau utilisé, quand la taille de la pièce le
permet.

4Singer Furura XL-550
Service tools
A reasonable requirement in a domestic sewing machine is that it should able to sew all types of fabrics
used in the home. The settings made when assembling and sewing-in the machines are those most suited
to
give the best results in the majority of fabrics and fabric combinations. In doing so, consideration has been
given to the requirements of different markets. This does, however, mean that when sewing extreme fa-
brics,
better results may be obtained in certain cases by altering the settings. It must be pointed out that these
altered settings can cause poorer results on more normal fabrics. How the different standard ratings are
set can be seen from the description under each setting instruction. The following list of setting gauges and
service tools is intended as an instruction about the special service tools needed to servicing this machine.
1. On several different occasions the needle is used as a setting gauge.
The setting ratings are adapted to needle 90. Make sure to use an undamaged needle.
2. Screwdriver Philips 2PH
3. Screwdriver Philips 1PH
4.Gauge for the feed dog lift.
Ref. No 413 12 73-01
5. Gauge for the needle height - 28.95 mm
Ref. No 412 35 29-02
6. Distance gauge 0.05-1,00 mm
Ref: No. 412 38 85-01
7. Wrench 7 mm
8. Allen Key (hex driver) : 2 mm
9. Allen Key (hex driver) : 2.5 mm
10 Allen Key (hex driver) : 1.5 mm
11. Wrist band
Ref No 412 23 02-01

Singer Furura XL-550 5
1. Needle bar height
Check
Note: ALWAYS check the Needle Height before checking the following settings “Needle timing to hook”
and ”Feed-dog timing (vertical motion) “
Check
1. Remove needle plate and bobbin case.
2. Select straight stitch (center needle position).
3. Replace needle with the special needle gauge.
Ref. No 412 35 29-02
4. Bring the needlebar into its lower turning position.
6. The distance between the upper end of the needle and the sur-
face (B) of the hook ring should be 28.95 (+/- 0.05 mm).
5. Check this by push on the tip (B) of the Special needle gauge,
and it should just touch the upper part of hook ring(C).
The check is done with a gauge which is
28.95 mm long.
Adjustment
The setting is done with a gauge which is
28.95 mm long.
1. Remove face cover
2. Bring the needle bar to its highest position, from the front , loosen
set screw (A) and retighten it lightelly.
3. Bring the needle bar to its lower turning position.
4. Move the needle bar until the correct distance is obtained, the tip of needle must be flush with hook
ring.
5. Tighten set screw (A).
6. Check by means of a twin needle that the needle bar is not twisted, it may cause jump
stitches when sewing with a twin needle.
7. Check also so the needle threader operates correctly
NOTE! This setting affects:
2. Needle threader height
5. Feed-dog timing (vertical movement)
12. Needle timing to hook
28.95 mm
A
B
C
A

6Singer Furura XL-550
2. Needle threader height
Check.
1. Insert a new # 70 needle.
2. Set the machine to straight stitching (center needle position).
3. Bring the needlebar to its highest turning position.
4. Go down with the threader hook into the needle eye, the threader hook shall go smoothly into the
needle eye and the tip of hook should be approx. 1,5 mm out side the needle, to the front.
Adjustment of threader hook hightways
1. Insert a new # 70 needle.
2. Remove the face cover.
3. Turning the hand wheel by hand to so the needle bar comes to its highest position.
4. Loosen screw (A) of the threader stopper.
5. Go down with the threader hook into the needle eye.
6. Move the threader holder so that the threader hook is on the upper side of the needle eye.
see Fig 1.
7. Tighten the screw (B) . Make sure to attaching the threader stopper onto stopper pin (D).
NOTE! The direction of threader stopper should be facing to the front so it does not hit the needle support
bracket.
#90 #80 #70
Fig 1
A
~1.5 mm

Singer Furura XL-550 7
Adjustment of threader hook sideways
1. If the sideways position of the hook isn’t correct, adjust the hook position with a small screw driver.
2. Recheck that the needle threader works correctly.
Adjustment of threader hook lenghts
1. Insert a new # 70 needle.
2. Remove the face cover.
3. Turning the hand wheel by hand to so the needle bar comes to its highest position.
4. Remove screw (K) that holds the Thread stop pipe.
5. Loosen the nut (F), located under threader support shaft.
6. Go down with the threader hook into the needle eye.
7. Turn the hook, until the tip of threader hook is approx 1,5 mm out side the needle on the front side.
8. Tighten the nut (F) .
9. Re position the Thread stop pipe and Enter the screw (K).
Tip of needle should be according to (L) , then the screw (K) position is approx. 0.4-0.6 mm from the bot-
tom of the thread stop pie hole.
K
F
G
~1.5 mm
L
~0.4-0.
6
K

8Singer Furura XL-550
3. Presser foot height
Check
1. Lower the feed dog, with the feed dog drop mechanism,so it is below the needle plate.
2. Raise the presser foot to its heighest position.
3. The clearance between the needle plate and the presser foot should be 5.6 mm.
4. Lower the presser foot (A) , it should be parallel to the needle plate slot (B).
Adjustment
1. Remove the face cover,
2. Lower the feed dog, with the feed dog drop mechanism, so it is below the needle plate.
3. Raise the presser foot to its heighest position.
4. Loosen the set screw (D) and adjust the presser foot height by moving the presser bar up or down.
5. Tighten the set screw (D) securely
6. Lower the presser foot and check so the presser foot is parallel with the needle plate slot (B).
if not
a. Raise the presser foot
b. Loosen up set screw (D) and adjust the parallelity of the presser foot, by turn the Presser bar to the
left or to the right.
7. Tighten the set screw (D) securely.
8. Re-check height and parallelity of the presser foot.
5.6 mm
DD
A
B
C

Singer Furura XL-550 9
4. Presser foot parallelism to the needle hole in needle plate
Check
1. Lower the feed dog, with the feed dog drop mechanism,so it is below the needle plate.
2. Lower the presser foot (A) so its on the needle plate, it should now be parallel to the needle plate slot
(B).
3. The hole for needle (C) in the Needle plate, should pe parallel, front to back, to the presser foot’s (A)
hole.
Adjustment - Front to back
1. Lower the presser foot and check so the presser foot is parallel with the needle plate slot (B).
if not
a. Raise the presser foot
b. Loosen up set screw (D) and adjust the parallelity of the presser foot, by move the Presser bar to the
front or to the back.
7. Tighten the set screw (D) securely.
8. Re-check height and parallelity of the presser foot.
A
B
C
D
C
C
D

10 Singer Furura XL-550
5. Presser foot parallelism to the needle plate feed dog slot’s
Check
1. Lower the feed dog, with the feed dog drop mechanism,so it is below the needle plate.
2. Lower the presser foot so its on the needle plate, it should now be parallel to the needle plate slot.
side to side. It must be same distance on the left side as on the right side of the presser foot to the feed
dog slot.
Adjustment - side ways
1. Remove the face cover,
2. Lower the feed dog, with the feed dog drop mechanism, so it is below the needle plate.
3. Loosen the three set screws (A) and adjust the presser foot side setting by moving
the presser bar unit (B)so it’s same distance on the left side as on the right side of the presser foot to the
feed dog slot.
4. Tighten the three set screw (A) securely
5. Re-check height and parallelity of the presser foot.
A
AA
B

Singer Furura XL-550 11
6. Feed-dog height
Check
1. Set machine into test mode and select mode 2.
2. Raise the presser foot.
3. Bring the feed dog to its highest position by turning hand wheel.
4. The top of the feed dog ishould now be 0.9 to 1.1 mm above the needle plate.
Adjustment
1. Bring the feed dog to its highest position.
2 Remove the needle plate.
3. Loosen up the nut (A).
4. Adjust by turning the screw (B) until a correct feed dog height (0.9-1.1 mm) is obtained.
Turn clockwise : It will be higher
Turn counter clockwise : It will be lower
5. Tighten the nut (A)
3. Mount the needle plate and Re-check the feed dog height.
0.9-1.1 mm
A
B

12 Singer Furura XL-550
7. Feed timing
Check
Note: Always check “Needle bar height”, “Feed dog height” before any check is done on ”Feed Timing”.
1. Set machine at function mode and select straight stitching and maximum stitch length.
2. Set needle to its upper turning position.
3. Turn the hand wheel in the sewing direction,
4. When the feed dog starts its movement backwards it should move 0-0.3 mm, before the needle start to
travel down from its upper turning position.
Adjustment
NOTE! Remove the covers, but the front cover must be connected to the pc board.
1. Set machine at function mode and select straight stitching and maximum stitch length.
2. To adjust the Feed dog timing , loosen up the 2 set screws (A) on the Lower shaft (B).
3. Insert a hex driver into one of the screws.
If feed-dog motion too early - Hold the hex screw in position and turn hand wheel towards you.
If feed-dog motion too late - Hold the hex screw in position and turn hand wheel away from you.
4. Tighten the set screw (A) on the main shaft (B)
5. Turning hand wheel and set the needle to its upper turning position and in the position just before it start
to travel down.
7. Check so the feed dog movement is in the range of 0-0.3 mm, before the needle start to travel down from
its upper turning position.
8. If wrong: Re-do from point 2.
9. If ok : Tighten both set screws firmelly after the adjustment.
NOTE! After adjustment , be sure to check and/or adjust “Needle timing to hook”
Needle at upper turning position
0 - 0.3mm
A
A
B

Singer Furura XL-550 13
8. Positioning of Step motor for feeding
- Feed balance basic point
This adjustment would normally only be carried out if the feed step motor has been replaced.
Adjustment:
1. Turn off main power.
2. Remove front cover and back cover.
3. Move the feed step motor gear and loosen ONLY screw (2) at feed step motor gear (A) which is fixed
with stepping motor axis for feeding.
4. Turn on machine and select button sewing (Zero feed).
NOT! If both screws are loose at this point - error #6 will apper in display.
5. Loosen screw (1) at pinion gear (A). The feed step motor gear is now disengaged from the motor.
5. Rotate feed step motor gear (A) and then tighten screw (2) at a position where pinion gear hits with
stopper (B)
6. Turn off the main power and then tighten screw (1)
A
1
A
2
Fig. 2 ---
A
B
2

14 Singer Furura XL-550
9. Feed Balance
*Pay much attention to this adjustment which is very important and critical.
Check of ”Zero” feeding
1. Enter Test mode and select stitch 102 to check “Zero” feed.
2. Place a piece of paper or fabrics under presser foot and run the machine, at this point there should not
be any feeding.
Adjustment of “Zero” feeding
1. Enter Test mode and select stitch 102 .
2. Place a piece of paper or fabrics under presser foot and run
the machine and check to see the feeding direction
3. To adjust eventuall feeding, loosen up the screw (A).
4. Adjust by turning screw (B) in either way until correct
- If the 3 mm Hex screw (B) is turned clockwise, it will feed in
forward direction.
- If the 3 mm Hex screw (B) is turned counter clockwise, it will
feed in reverse direction.
5. Hold the 3 mm Hex screw (B) while tighten the screw (A).
6. Re-check.
Adjustment can be done without removing the front and the
rear covers . Only the base plate should be removed before adjustment.
Check of stitch balance
After checking or setting the ”Zero” feeding , the fine tunning of the
stich balance has to be done.
1. Turn on the machine, select a large key button hole in normal se-
wing mode.
2. Thread up the machine.
3. Sew larger size of keyhole buttonhole and the balance of the head
portion should be equal between right and left sides.
Adjustment of stitch balance
1. If feed is not correct,
Adjustment can be done without removing the front and the rear covers .
Only the base plate and feeding cap should be removed before adjustment.
2. Turn on the machine in function mode, select a large key button hole in
normal sewing mode.
3. Loosen up the screw (A) .
4. Adjust by moving the motor gear in either direction with 3 mm hex driver.
- Turn the screw (B) clockwise to adjust reverse stitch.
- Turn the screw (B) counter clockwise to adjust forward stitch.
Repeat the process until desired feed balance is obtained.
4. Tighten the screw (A).
5. Re-check from point 1 in ”check of stitch balance”
B
A

Singer Furura XL-550 15
10. Basic positioning of zigzag step motor
Adjustment
1. Turn off the main power and remove face cover and needle bar unit
2. Loosen two screws (1&2) fixing pinion gear by rotating pinion gear (A).
Position of screw (1) and screw (2) will be located as shown in fig. 1&2 below.
3. Rotate pinion gear (A) to shift needle position. After needle position is shifted to center, temporally fix
the screw (1).
4. Turn on the main power and pinion gear will move so that screw (1) may be located upward and then
loosen screw (1). After above steps, the motor shaft will be excited so the shaft will not move and pinion
gear can be rotatable. Rotate pinion gear (A) again until it hits with stopper (B) then tighten screw (2) by
inserting tool from lower as shown on picture below. At this time, shift needle bar to right end so the pi-
nion gear will hit with stopper.
2
A
)LJ )LJ
1
B
2

16 Singer Furura XL-550
11. Adjustment of needle at center position
Check
1. Set the machine on straight stitching, center position.
2. Insert a new # 90 needle.
3. The needle position should now be in the centre of the middle slots of needle plate, see illustation 1.
Adjustment
1. Remove face cover.
2. Break loose the 2mm hex set screw (A).
3. Turn eccentric screw (B) on needle bar until the needle is in the centre of the middle slots of needle
plate, see illustation 1
4. Tighten the 2 mm hex set screw (A).
Needle position
A
B

Singer Furura XL-550 17
12. Tension of timing belt
Check
This checking is needed before adjusting “Needle timing to hook”.
1. Remove the covers
2. Push on the belt, it should not be to hard or to loose.
- Too weak tension may result in slippage between hook gear and lower shaft
gear due to thread jamming, bunching and fabric snagging.
- Too strong tension may result in incorrect operation due to increased machine torque.
Adjustment
1. Loosen two screws (A) on support plate for idler pulley.
2. Move the position of idler pulley ontil the correct belt tension is obtained.
3. Tighten the two screws (B).
A

18 Singer Furura XL-550
13. The timing of the hook in relation to the needle
Check
- Set a new needle size 90 universal into the machine.
- Remove the needle plate, bobbin case holder and the bobbin case.
- Set machine on straight stitching.
- As the needle is moving upwards, the tip of the hook should pass behind the centre of the needle, when
the needle is 2.8 mm above its lower turning position.
NOTE! Before any adjustment is done check that the setting "7. Feed timing" is correct.
Check with setting gauge,
Spacer, Ref. No: 63-102600-18/000
feeler gauge 2.8
Needle clamp Ref. No: 413 10 22-01
1. Turn the hand wheel until the needle is at its lower turning position.
2. Put the spacer onto the needle bar and push it upwards against the needle bar frame (C).
3. Take then the timing clamp and put it on the needle bar and tighten its screw lightly.
4. Take a 2.8 mm feeler gauge (A) and put its cutout on the needle bar, above the clamp.
5. Loosen the clamp a little and push both feeler gauge and clamp upwards against the spacer.
6. Tighten the screw on the timing clamp.
7. Remove the 2.8 mm feeler gauge (A).
8. Turn the hand wheel, in the sewing direction, until the timing clamp (B) stops against the spacer.
9. The tip of the hook should now be behind the centre line of the needle.
Adjustment
1. Loosen the 2 setting screws in the wheel of the lower shaft.
2. Make sure that the feed dog is in its down stroke position.
3. Repeat checking points 1 to 8 with the setting gauges.
4. Turn the hook until its tip arrives behind the centre line of the needle.
5. Tighten one of the setting screws.
6. Check.
7. Tighten both screws.
A B
C

Singer Furura XL-550 19
14. Play of hook gears
Check
1. Move the cog wheel with the hand wheel and check play of the gears at 4 positions – at each 90 degree
angle
2. At each position - rotate the hook back and forth with the finger tip to check the play
- a play should be found in two or three diffrant positions.
- no play should be found on one position(max two positions).
Adjustment
1. Remove backcover and frontcover.
2. Loosen, screw (B) holding the bearing clamp.
3. By using the slot (C) and turn the eccentric bearing (A) the play can be adjusted.
NOTE! The hole (C) in the bearing shall always be to the front.
B
A
C

20 Singer Furura XL-550
15. Retaining bracket for bobbin case
Check
1. Remove needle plate
2. Check if bobbin case stop (C) is aligned with the lower side of plate spring’s alignment line (D) as
illustrated below.
Adjustment
1. Loosen screws (A and B),
2. Move the retaining bracket in either direction as illustrated, tighten screw (B) temporarily.
3. Check if bobbin case stop (C) is aligned with the lower side of plate spring’s alignment line (D) as
illustrated below.
4. Tighten screw (A).
C
Other manuals for XL-550
1
Table of contents
Other Singer Sewing Machine manuals

Singer
Singer 3210 User manual

Singer
Singer 1371A1 User manual

Singer
Singer 9134 User manual

Singer
Singer 4522 User manual

Singer
Singer 253-1 User manual

Singer
Singer 148-5 Quick start guide

Singer
Singer 2691D200G Setup guide

Singer
Singer 109W100 User manual

Singer
Singer 44-14 User manual

Singer
Singer 246-2 User manual

Singer
Singer 20U31 User manual

Singer
Singer 569U 1100 series User manual

Singer
Singer 66 - 2 User manual

Singer
Singer 675 User manual

Singer
Singer 348K User manual

Singer
Singer Heavy Duty 14HD854 User manual

Singer
Singer 331K1 Instruction manual

Singer
Singer 133K12 Setup guide

Singer
Singer 146-30 Instruction Manual

Singer
Singer 246-5 User manual