Singtech SGT-T600 User manual

PN: 5839004043

ALL RIGHTS RESERVED
© 2011. All rights are reserved. No part of this document may be
reproduced without permission.
While all efforts have been made to ensure the accuracy of all
contents in this manual, we assume no liability for errors or
omissions or statements of any kind in this manual, whether such
errors or omissions or statements resulting from negligence,
accidents, or any other cause. The contents of this manual are
subject to change without notice.
Protect our environment! We strive to produce products in
compliance with global environmental standards. Please consult
your local authorities for proper disposal.
Note: User’s Manual is just to guide the user about the functionality
of the phone. This is not any certificate of technology. Some
functions may vary due to modifications and upgrading of software
or due to printing mistake.

TABLE OF CONTENTS
GENERAL INFORMATION..........................................1
PHONE OVERVIEW....................................................2
STATUS ICONS...............................................................3
SMART TOUCH SCREEN................................................4
GETTING STARTED....................................................5
Installing SIM Card and Battery.........................................5
Installing Memory Card.....................................................5
Charging the Battery........................................................6
Switch On/Off the Phone..................................................6
Automatic Customer Registration......................................7
BASIC OPERATIONS..................................................8
Make Calls.......................................................................8
To Dial International Number ............................................8
Clear Wrong Enters..........................................................9
Adjusting the Sound Volume.............................................9
Answer/Reject an Incoming Call.......................................9
Options During ACall.......................................................9
MAIN MENU..............................................................10
Call Logs.......................................................................10
Phonebook....................................................................10
Messages......................................................................10
Calculator......................................................................13
Internet..........................................................................14
Camera.........................................................................14
Image Viewer.................................................................14
Time Manager................................................................14
Calendar........................................................................14
Media Player..................................................................15
File Manager..................................................................15
User Profiles..................................................................15
Settings.........................................................................15
FM Radio.......................................................................19
Organizer ......................................................................19
Ebook reader.................................................................20

Bluetooth.......................................................................20
Google ..........................................................................20
Wi-fi...............................................................................20
Fun & Games ................................................................20
Answer Machine............................................................21
NTV...............................................................................21
Opera............................................................................22
E-mail............................................................................22
Sound Recorder.............................................................22
APPENDIX ................................................................23
Appendix A: Troubleshooting..........................................23

SAFETY PRECAUTIONS
Before using your phone, please read the following important
information to eliminate or reduce any possibility of causing
damage and personal injury.
Do not use wireless phones while driving.
Switch off wireless devices in aircraft. The signal may
cause interference. Using them on aircraft is illegal.
Do not use mobile phones where blasting is in
progress. Follow any regulations and rules strictly.
Do not use mobile phones at Petrol stations. Don’t
use near fuel or chemicals. Do not dispose your
battery or mobile in a fire.
Follow any regulations or rules in hospital and health
care facilities. Switch phone off near medical
equipment.
All wireless devices may get interference that could
affect performance.
The repair or installation of the device should be done
at Authorized service centers
Use only approved accessories and batteries.
Use only in normal position. Do not expose your
phone to extreme high temperatures above +60C
(+140F). Do not use anything static to clean your
phone.
Ensure the phone is turned on and in service. Enter
the emergency number, then press Pick Up key. Give
your location. Do not end the call until told to do so.
Improper use will invalidate the warranty! These safety instructions
also apply to original accessories.

1
GENERAL INFORMATION
Antenna
Use of other antenna devices could damage your mobile phone
and reduce performance. Your phone has a built-in antenna. Don’t
touch the antenna area unnecessarily when the phone is switched
on. Contact with the antenna affects call quality and may cause the
phone to operate at a higher power level than otherwise needed.
Network Service
A lot of features described in this manual are called network
service. They are special services provided by wireless service
providers. You should subscribe to these services from your home
service provider and learn instructions on uses before you select
the network you want to use.
Accessories
Li-Ion battery is the manufacturer-approved rechargeable battery
available for your phone. Some batteries may performs better after
several full charge/discharge cycles.
Use batteries, chargers and accessories approved by the phone
manufacturer with this particular model. The use of any other types
will invalidate any approval or warranty applying to the phone, and
may be dangerous.
Please consult with your dealer for availability of approved
accessories.

2
PHONE OVERVIEW
1 Receiver 8 Cord hole
2 Screen 9 Earphone Jack
3 Call/Send Key 10 Stylus
4 End Key 11 Side Keys
5 Menu Key 12 Camera Button
6 Power Key 13 Camera
7 USB Connecter 14 Speaker

3
STATUS ICONS
The table below lists various icons that might appear on the status
bar while using the phone. Apart from the icons for signal strength
level and the power, other icons are displayed as per the current
mode and priority of the phone.
Icon Description
Indicates the network signal strength of Master SIM.
Indicates the network signal strength of Slave SIM.
Indicates the current battery capacity.
Indicates that there is an unreadmessage in Master SIM.
Indicates that there is an unread message in Slave SIM.
Indicates that there is a missed call in Master SIM.
Indicates that there is a missed call in Slave SIM.
Indicates that the current Sound Status is the Ring only.
Indicates that the current Sound Status is the Vibrate
then Ring.
Indicates that the current Sound Status is the Vibrate and
Ring.
Indicates that the current Sound Status is the Vibrate
only.
Indicates that the current profile mode is the Headset
mode.
Indicates that the current alarm clock is set as activated.
Indicates that the audio player is running.
Indicates the current keypad-locked state.
Indicates that the Wi-Fi is connected.
Indicates that the Bluetooth is turn on.

4
SMART TOUCH SCREEN
The phone features a full touch, 8 cm wide screen with eight idle
displays and access to utilities on just one-touch. So swipe right or
left to navigate through various screens accessing your favorite
features without entering the main menu. In the standby mode, tap
the screen and then drag left or right to view the desktop screens.
Please refer to “settings > Phone settings > desktop setting” for
more details.
The first row known as the status bar displays various icons,
including signal strength, battery, time and profile mode. Tap the
status bar and scroll down to open the notification bar. The
notification bar provides immediate access to the features, such as
Bluetooth, User Profile, Multi SIM Settings and Wi-Fi.
Customizable Menu Icons
You can re-design and customize the desktop as per your desire.
Just long press on the desired icon and move it to the required
position. You can place the icons anywhere on the same screen or
in any other menu screen.

5
GETTING STARTED
Please switch off your phone before inserting or removing the
battery/SIM card or memory card.
Installing SIM Card and Battery
Your phone is provided with two SIM slots for two different SIM
cards. The SIM card inserted in the slot1 is called Master SIM, and
the other one in the slot2 is known as Slave SIM.
Hold the phone with the front facing downwards; pull
the battery cover.
Remove the back cover of the phone.
Insert the SIM cards in the slots.
Attach the battery.
Push the battery cover until it clicks into place.
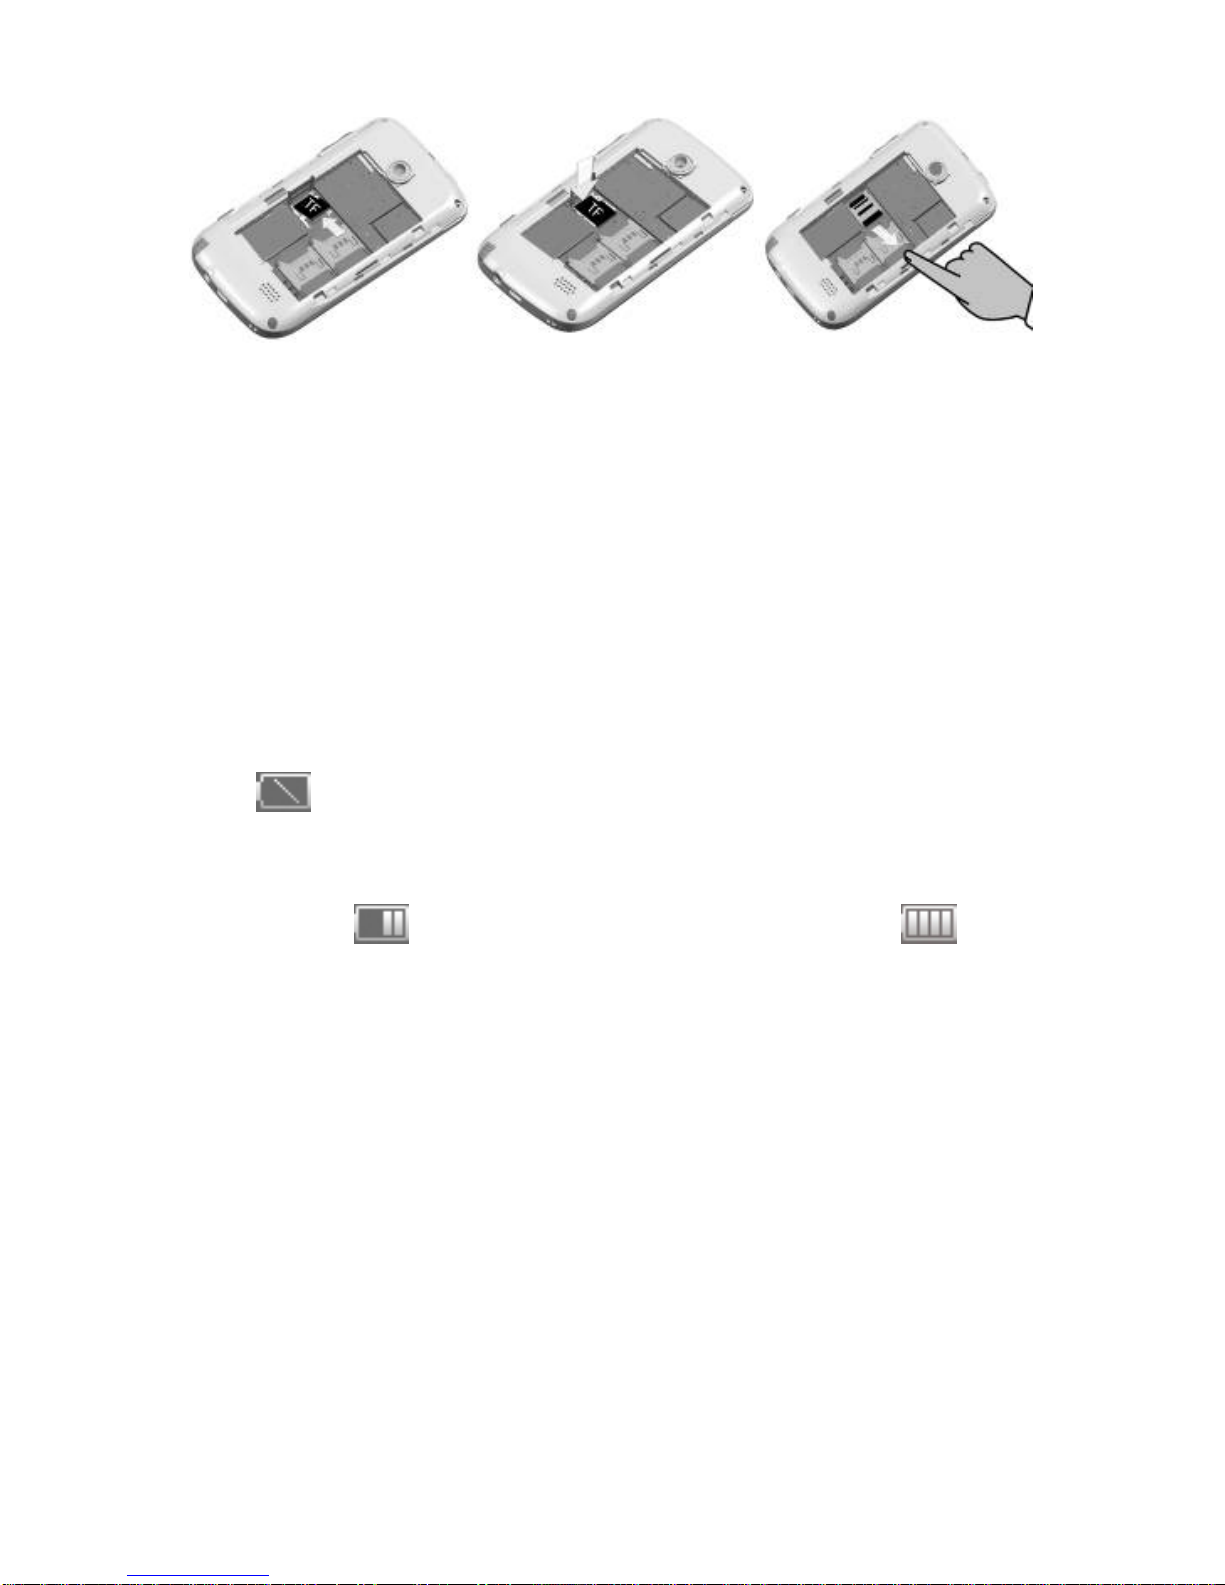
Installing Memory Card
The phone supports T-Flash card, which is a multimedia memory
card used to multiply the memory of the phone. The T-flash card is
small and should be pulled out /installed carefully and prudently in
order to avoid any kind of damage.
Switch off your phone.
Remove the battery cover.
Slide the T-Flash card into the slot.
Attach the battery.
Push the battery cover until it clicks into place.
6
Charging the Battery
The phone prompts a warning tone and message stating
insufficient battery when the power of your phone is low. Please
follow the instructions mentioned below to charge your phone:
Plug the connector of the charger into the jack of the
phone.
Plug the charger into a standard AC wall outlet.
Note:
When is shown on the screen, it indicates that there is not
enough power and you should now charge your phone. When
charging is complete, the battery icon will stop flashing.
Charging……. Fully Charged……
You must fully charge the battery before using the phone for the first time.
It is recommended to charge the battery for four hours before using the
phone for the first time.
If the phone is turned on during charging, you can still make or
answer calls, but this will consume battery power, thus will extend
the charging time of the phone.
Switch On/Off the Phone
To turn on/off the phone, press and hold the Power Key. If you have
enabled the SIM Lock function then enter the PIN code (the 4 to 8
digits secret code of your SIM card). It is preconfigured and
provided to you by your network operator or retailer. If you enter an
incorrect PIN code 3 times in succession, your SIM card will be
locked. To unlock it, you must obtain a code from your network

7
operator.
Automatic Customer Registration
After 4 hours of usage a SMS from the phone will be sent
automatically for the customer registration.
Note: standard SMS charges apply.

8
BASIC OPERATIONS
Make Calls
If the icon / appears on the screen, then you can make or
receive calls.
In the standby mode, tap Dialer , enter the desired phone
number (should affix the international/ national/ regional code
or district code if necessary) and then tap / to make a
call.
In the standby mode, tap Phonebook , use the scroll bar to
select the desired contact or enter the initials of the name to be
searched and then tap to make a call.
In the standby mode press Call/Send Key to dial a phone
number listed in the recent call log.
To Dial International Number
The phone supports dialing the international emergency phone
number. Using your handset, you can dial an emergency call in any
country or region under the normal situation regardless of SIM card
inserted when the phone is located within the coverage of the GSM
network.
Input the emergency phone number and press send key or tap
/ to dial.
In the idle mode, tap the * twice to prefix the international
symbol +.
Enter the country code, area code and phone number.
Tap / to make an International call.
The phone will select the main network automatically after powered
on if it is located within the coverage of the main network. The
phone can use other network, called as roaming, if the phone is not
located within the coverage of the main network when the network
operator protocol permits.

9
Clear Wrong Enters
If you tap a wrong number, tap ( ) to erase the wrong number.
Adjusting the Sound Volume
During a call, you can press the Side Key to adjust the earpiece
volume.
Answer/Reject an Incoming Call
To answer an incoming call, press the Call/Send Key or tap
the ( ) . You can use the earphone to answer the call when the
generic earphone is inserted in the phone.
To end or reject an incoming/ongoing call, press the End Key
or tap the ( ).
Options During A Call
Press <Options> to use the following functions during the call:
Hold Single Call: temporarily hold the current call.
End Single Call: end the current call.
New Call: call the opposite party to build a Call to Many.
Phonebook: enter in the phonebook menu.
Messages: enter in the SMS menu.
Sound Recorder: record the current call.
Background sound: enter in the background sounds menu.
Mute: open or close the mute mode.
DTMF: open or close the DTMF function during the call.

10
MAIN MENU
Menu guides you to the various features, applications and services
available in your phone. Tap access to the Main Menu.
Call Logs
Access the call log menu to view the call details of the Master SIM
and Slave SIM.
Call History
This sub-menu lets you view the call details i.e. the missed,
received and dialed call logs. Scroll the Up/Down keys to select a
call and then select view to see the details. Press options to
perform the operations, such as call, send message, add to
blacklist, delete。
Missed Calls
With this function, you can check recent missed calls. Scroll
Up/Down to select a missed call. Press options to access missed
call information, and perform operations, such as delete, save to
phone book, call, and so on.
Phonebook
This menu refers to the directory wherein all the contacts are stored
in an alphabetical order. You can view, edit, delete, send message
and perform various other functions on each contact of your
phonebook.
Messages
Your phone features, sending and receiving of SMS (Short
Message Service) and MMS (Multimedia Message Service).
In the standby mode, Tap to access the Main Menu and then
tap Messages.
Write Message
You can create and send SMS/MMS to a particular contact using
this sub-menu.

11
SMS
A SMS is a text message that can only contain letters, numbers and
symbols.
Inbox/Conversations
Inbox sub-menu enables you to view all the messages received on
your Master/ Slave SIM.
Drafts
The created messages can be saved to drafts folder for future use.
After selecting a message from the Drafts folder, select Options to
edit/delete or send the saved message from the desired SIM.
Outbox
The messages that are not delivered successfully get stored in the
outbox folder.
Archive
You can move messages from inbox, drafts or sent messages to
archive folder.
Delete messages
You can delete the messages stored in Inbox, Drafts, Outbox, Sent
messages and Archive.
Templates
Your phone is provided with some commonly used pre-defined
messages. These messages can be edited, removed and send
instantly.
Message Settings
Text message
Master/Slave SIM Message Settings: You can change the SMS
settings, such as profile settings, voicemail server, and common
settings, also, you can check the memory status and choose the
preferred storage.
Service Message
1. Enable push: You can set accept all, accept authenticate or
trusted, disable.
2. Enable service loading: You can set prompt, auto launch and
disable.
3. Enable white list: You can set discard if unmatched, notify if

12
unmatched, and disable.
4. White list: You can edit white list.
Conversations
You can set to on/off to enable/disable the conversation feature.
Schedule SMS
This service allows you to send a message to a particular contact at
a time pre-defined by you.
MMS
A Multimedia message or MMS can contain letters, an image, audio
or video file.
Inbox
Inbox sub-menu enables you to view all the multimedia messages
received on your Master/Slave SIM.
Drafts
The created messages can be saved to drafts folder for future use.
After selecting a message from the Drafts folder, select Options to
edit/delete or send the saved message from the desired SIM.
Outbox
The messages that are not delivered successfully get stored in the
outbox folder.
Sent Messages
This sub-menu saves all the successfully sent multimedia
messages.
Archive
You can move messages from Inbox, Drafts or Sent messages to
archive.
Delete Messages
You can delete the message stored in Inbox, Drafts, Outbox, Sent
and Archive messages folder.
Templates
Your phone is provided with some commonly used pre-defined
messages.
Message Settings
You can change the MMS settings through this menu.

13
1. Multimedia Message
Data Account: You can set primary account and secondary
account for Master/ Slave SIM.
Common Settings:
Compose: You can configure Slide time, Creation Mode,
Picture Resizing , auto signature, signature.
Sending: You can configure Validity period, Delivery Report,
Read Report, Priority, Delivery Time, Send and save.
Retrieval: You can configure Home network, Roaming, Filters,
Read report and Delivery Report.
Preferred Storage: You can set phone or memory card for the
preferred storage.
Memory Status: You can check the usage, used memory and
free memory of phone and memory card.
2. Service Message
Enable Push: You can set to accept all, accept authenticate or
trusted or disable.
Enable Service Loading: You can set to prompt, auto launch or
disable.
Enable White list: You can set discard if unmatched, notify if
unmatched or disable.
White list: You can edit white list.
Broadcast Message
This network service enables you to receive all kind of text
messages, such as weather reports or transportation information.
There are several networks who afford this service in this world.
Please consult your network operator for more reference.
Calculator
Calculator enables you to make basic arithmetic calculations, such
as addition, subtraction, multiplication and division. Enter the
numbers using on-screen keyboard and choose the desired
operator. Use CLEAR to delete the entered numbers and = to get
the output.

14
Internet
To access the Internet menu, enter the Main Menu in the standby
mode and then select internet. You can use the network-related
services with this function.
STK Services
This service is offered as the SIM card service provided by the
network operator.
Data Account
You can use this function to edit the account related settings.
Camera
The phone is provided with a 3.2 MP camera, which supports the
photographing and video shooting functions. Pictures are saved in
the file system of the phone or the memory card. You can tap /
to switch between video and camera mode.
Image Viewer
Pictures taken can be accessed quickly through Image viewer.
Select Options for available options while viewing pictures.
Time Manager
World clock
Tap Add and choose the desired city. The related date and time will
be displayed on the screen.
Clock
The mobile phone provides 5 alarms and you can set them as your
need. If you have configured an alarm, an icon indicated that you
have configured the alarm will appear.
Stopwatch
You can use the phone as a stopwatch.
Calendar
You can view and edit the memo of a specified date with this
function.

15
Media Player
Media player allows you to play audio and video files. The phone
supports T-Flash memory card, wherein you can store your favorite
songs and videos. The Play, Stop, Back, Forward functions
correspond to the ( ) buttons respectively, Please press
the side key to adjust music volume and press to switch to full
screen.
Warning: Make sure that the volume is appropriate for your hearing while
using the audio player.
File Manager
You can browse, open and manage the data saved in the Phone
and Memory card by accessing the Storage sub-menu. The phone
provides a certain space for users to manage files and supports the
T-Flash card. You can use the file manager to conveniently manage
various directories and files on the phone and the T-Flash card.
Choose Files to enter the root directory of the memory. The root
directory will list the default folders, new folders and user files. You
can also format both the storage i.e. phone and memory card.
User Profiles
The phone provides seven pre-defined user profiles that allow the
operations of the phone to best suit the environment you are in.
The profiles are General, Silent, Meeting, Outdoor, Power Saving,
Flight Mode and My Style. The phone will automatically enter the
headset profile if you connect the headset to your phone.
Settings
Multi SIM Switch
Select with SIM status or Use default mode as desired.
Multi SIM Settings
Select Multi SIM open, Only Master SIM open, Only Slave SIM
open as desired.
Table of contents
Other Singtech Cell Phone manuals


