Sinocan L06-19 series User manual

i
V 1.0
Users guide-V1.0
July, 2006
Sinocan All-in-One
19 inch LCD Computer
User’s Guide
Sinocan 19 inch All-in-One PC User's Guide

ii
V 1.0
Notice
Copyright
The copyright of this user’s guide belongs to any authorized company.
and is protected by copyright law. This means partial or full duplication
of this document (electronically, mechanically or otherwise) is prohibited
without the permission of the authorized company.
The contents may be modified without notice for the improvement of
design, function, and reliability.
We do not guarantee the prevention of data loss. Please be cautious
not to lose important data and keep back-ups at all times.
Even though we did our best in drawing up this user’s guide, there
may be omissions and errors we failed to notice. Manufacturers and
suppliers cannot be held liable for problems stemming from those
errors and omissions.
Registered Trademark
Microsoft Windows XP is a registered trademark of Microsoft.
Intel Pentium and Celeron are registered trademarks of Intel.
Company names and product names mentioned in this document are
used to help your understanding and are registered trademarks.
The permissible level (Class B) of electromagnetic waves
The product was tested for electromagnetic waves and was rated as cl
ass B, certified for sale and use worldwide.
Sinocan 19 inch All-in-One PC User's Guide

iii
V 1.0
Caution
For safe and proper installation and use of this product, please read
this guide carefully.
Even though this product is equipped with a safety device to prevent
users from getting injured, please follow the instructions carefully.
Caution during installation
zInstall on an even and stable place to prevent product damage
and injury.
zInstall in a place with good ventilation to reduce humidity and to
prevent overheating.
zKeep objects with magnetic properties away from this product.
zCheck the operational voltage before plugging the power cord
into the outlet.
zUse the power cord that is included with the product and do not
place heavy things on it.
zTo prevent electric shock and fire, do not use an outlet that is
damaged or that is not standard.
zIf you plug the power cord into an extension cord, be sure that
the total voltage of all the devices connected to the cord does
not exceed the number specified on it.
Caution during use
zIf peripheral equipment is connected to this product, turn on the
power source of the peripheral equipment first when you starting
up. On the contrary, when shutting down, turn off the power
source of this product first to prevent damage to the product.
zPlease make sure that no liquid enters into the product. This can
cause damage to the product, fire, or electric shock.
zUnplug the power cord before cleaning this product. Please
wipe with tissues or fabrics that are sprayed with a PC cleaner
Sinocan 19 inch All-in-One PC User's Guide

iv
V 1.0
and do not directly spray the product.
zWhen this product will be idle for an extended period of time,
unplug the power cord to prevent damage stemming from power
surges.
zWhen unplugging the power cord, pull by the plug, not the wire.
zDo not place this product in a place where the temperature is
over 60oC (140 o
F) and ventilation is poor. This may damage
the product.
zThe optimum temperature for the operation of this product is
40oC, so keep electric heaters away from this product.
zTake precautions to avoid losing data stored on the hard disc of
this PC and back-up important data at all times in case of an
unforeseen accident.
zDo not attempt to disassemble this product. When this PC
needs repairs or updates, request warranty service and have a
service person do the work.
zShould the following situations occur, contact one of our quality
assurance divisions.
9When liquid gets into the product or when it is exposed to
humidity for an extended time
9When this PC does not operate well even though you are
following the instructions
9When this product has fallen and broken or become cracked
during delivery.
Sinocan 19 inch All-in-One PC User's Guide

v
V 1.0
Table of contents
Notice .........................................................................
Copyright ...............................................................................................ii
Registered Trademark ...........................................................................ii
The Permissible level (Class B) of electromagnetic waves ....................ii
Caution .................................................................................................iii
Caution during installation.................................................................iii
Caution during use............................................................................iii
Table of contents....................................................... v
Chapter 1. Introduction .............................................. 1
Product features....................................................................................1
Unpacking.............................................................................................2
Optional devices ...................................................................................2
Other peripherals..................................................................................3
Chapter 2. About the computer ................................... 4
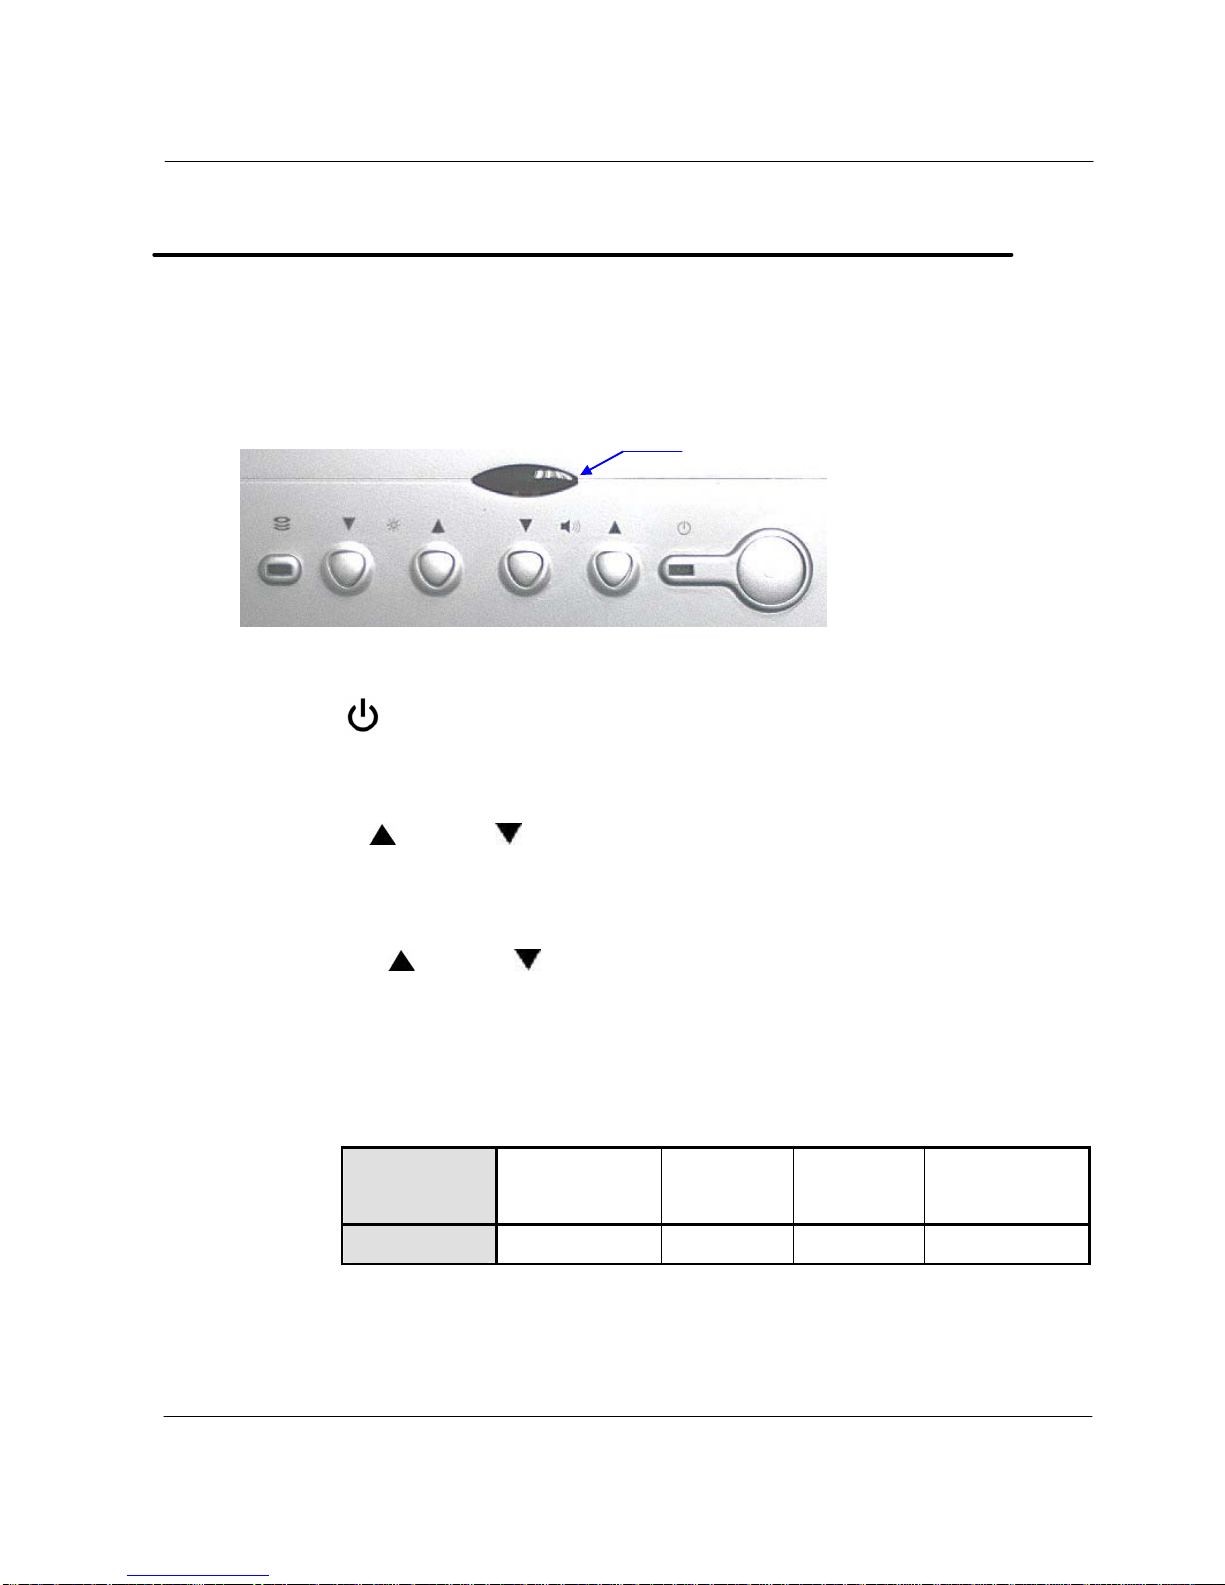
The front of the main body (control panel).............................................4
The rear panel of the computer (Input/output connections)...................5
The side panel of the computer (Input/output connections)…………..…6
Install power cord and power adapter step………………………………..6
Install TV cable step…………….………………………………………….7
Chapter 3. Starting up the computer for the first time .. 8
For Windows XP Home Edition.............................................................8
Step 0: Windows XP and basic driver pre-setup.............................8
Step 1: To set up the computer ......................................................9
Step 2: The installation of drivers for other peripherals.................10
Step 3: The installation of software for other peripherals..............11
Step 4: Completion of setup .........................................................11
Chapter 4. Using the computer...................................12
To Use Windows XP Home Edition.....................................................12
Using other applications......................................................................13
Partitioning the hard disk.....................................................................13
Chapter 5. Changing the setup...................................14
BIOS CMOS setup utility.....................................................................14
How to change BIOS CMOS setup .................................................14
System upgrades................................................................................17
Hardware upgrades.........................................................................17
Software upgrades..........................................................................17
BIOS Upgrade.................................................................................17
Chapter 6. Reinstalling the OS...................................20
How to reinstalling Windows XP..........................................................20
Appendix 1. Troubleshooting ..........................................22
Appendix 2. Product specifications and system diagram...25
Sinocan 19 inch All-in-One PC User's Guide

vi
V 1.0
Appendix 3. Stand and Base assembly.............................29
Appendix 4. Product warranty ……………………………………..33
Sinocan 19 inch All-in-One PC User's Guide

1
V 1.0
Chapter 1. Introduction
Congratulations on your purchase of the All-In-One 19” TFT-LCD Panel
PC.
Product features
LCD-PC is the all-in-one PC that combines a 19” TFT-LCD monitor
and a desktop computer, offering an ultra light weight of 10Kg and a
modern design that suits any working conditions.
LCD-PC is so user-friendly that anyone can use it without difficulty
because it has all major components in its all-in-one main body.
Even though the LCD-PC is very compact, its functionality is limitless.
It supports out-dated and conventional peripheral devices, adapting to
users’ working environments. It also supports the latest peripheral
devices with its four built-in USB ports (compatible with USB v2.0) and
one IEEE1394 adaptor.
The PC enables wireless networking without additional equipment
using its built-in network adaptor.
The PC’s 19” TFT-LCD display, directly driven by digital signals, offers
a clearer image than that of separate TFT-LCD monitor of the same
class, which is driven by analog signals. Furthermore, it allows for
the use of extended screens and has multi monitor functionality
because it is equipped with an extension port for connecting to TVs or
other external monitors.
This PC is designed to run best using Windows XP, Microsoft’s latest
operating system. When used with the Windows XP operating system,
you can get a more stable and diverse computing environment.
The adoption of a 1 9 ” TFT-LCD monitor minimizes harmful
electromagnetic waves and power consumption. Its design is
engineered for the human body to minimize eyestrain.
Sinocan 19 inch All-in-One PC User's Guide

2
V 1.0
Unpacking
This product is packaged with cardboard paper for safe delivery. If
there is a defect or missing part, contact the agency where you
purchased the product.
The box should contain the following items.
919” TFT-LCD monitor all-in-one PC main body
9PS-2 wheel mouse (Option)
9PS-2 keyboard (Option)
9180W AC/DC power adapter
9AC power cord
9Wireless LAN mini-pci card & Antenna (Option, built in the main
body)
9TV Tuner mini-pci card (Option, built in the main body)
9TV cable connector and remote control (Option for TV Tuner)
9Microsoft Windows XP Home Edition installation CD / Driver
Recovery CD (Option)
9Users Guide (This document)
9Master CD (with the driver file for backup)
Optional devices
A touch screen is optional and you can order it before the product is
shipped. To enable touch screen, you need to have the following
device;
919” Touch Screen Panel
¾Touch Screen Controller
¾Touch Screen Driver
[For reference]
This PC has a mini-PCI slot in its main body allowing for expandability with
peripheral devices that have a mini-PCI card. Our company will launch new
models can support wireless LAN or TV-tuner.
Sinocan 19 inch All-in-One PC User's Guide

3
V 1.0
Other peripherals
This PC supports the following peripheral devices
9PS/2 Keyboard and Mouse
9Printer (USB)
9One serial communication port (COM1)
9Seven USB devices (compatible with USB 2.0)
9IEEE 1394 devices
9External speakers/headphones
9External microphones
9External audio devices
9External monitors
9External TV cable input (Option)
[For reference]
zWhat is USB?
USB is a high-speed serial bus standard for the connection of peripheral
devices that reduces the use of valuable system resources. Devices
that support USB are USB mice, USB keyboards, USB PC cameras,
USB HDDs, and USB memory sticks.
zWhat is IEEE 1394?
IEEE 1394, an input/output serial bus standard created to connect high-
speed peripheral devices to a computer, can transmit data at 400 Mbps.
Devices that support IEEE 1394 are digital cameras, digital camcorders,
HDDs, and DVDs that have adopted the IEEE 1394 standard.
Sinocan 19 inch All-in-One PC User's Guide

4
V 1.0
Chapter 2. About the computer
This chapter will briefly outline the computer exterior, buttons, LED
indicator devices, and additional input/output connection devices.
The front of the main body (control panel)
zPower button
: Turns the computer on and off.
zButtons for adjusting the screen contrast
Up( )/Down( ) : Adjusts the contrast of the TFT-LCD display.
zButtons for adjusting the speaker volume
Up( )/Down( ) : Adjusts the sound volume of the internal
speaker.
zLED indicator lights
POWER : Indicates power status.
Power
status Working
(G0/S0) Sleeping
(S1~S4) Soft Off
(G2/S5) Mechanical
Off (G3)
LED Color Green Red Red Off
HDD : Indicates the hard disc is working, LED Color : Green.
Remote Control Window
Sinocan 19 inch All-in-One PC User's Guide

5
V 1.0
The rear panel of the computer (Input/output connections)
The following picture shows connectors that are for input/output
connections located at the rear/side of the main body. Here we provide a
brief explanation about the name and function of each connection port.
Rear I/O Panel
Rear I/O Panel
Icon Connections
Power Adapter Input
PS/2 mouse connection
PS/2 keyboard connection
USB device connection
10/100 /1000 Mbps network (LAN) cable connection
Serial communication device connection
Exterior monitor connection
TV Cable Input
(If system installed mini-pci tv tuner card, you can
insert TV cable into this connector, else this
connector is disable.
Sinocan 19 inch All-in-One PC User's Guide

6
V 1.0
The side panel of the computer (Input/output connections)
Side I/O Panel
Side I/O Panel
Icon Connections
USB device (3, 4) connection
External speaker or headphone connection
External microphone device connection
Audio input connections for external AV device
connection
IEEE 1394 device connection
SD/MS/MMC/xD Card reader support : SD/MS/MMC/xD.
Install power cord and power adapter step :
1. Insert power cord into power adapter
2. Insert power adapter cable into “Power Adapter Input” of rear I/O panel
SD/MS/MMC/xD
Sinocan 19 inch All-in-One PC User's Guide

7
V 1.0
3. Insert power cord into AC power socket
Install TV cable step :
1. Install TV connector on TV cable
2. Insert TV cable into “TV Cable Input” of rear I/O panel
Sinocan 19 inch All-in-One PC User's Guide

8
V 1.0
Chapter 3. Starting up the computer for the first time
This chapter will show you how to register a user ID for Windows and for
this computer, and how to set up additional drivers and applications step by
step.
For Windows XP Home Edition
Step 0: Windows XP and basic driver pre-setup
This product is pre-setup with the latest driver file for Windows XP
Home Edition, basic specifications and other optional specifications
chosen by the user before shipping.
The following is a list of operating systems and basic driver files that
are pre-setup.
zMicrosoft Windows XP Home Edition
zIntel Chipset driver
zIntel 945G (GMA950) Video driver
zRealtek ALC655 Audio driver
zMarvell 88E8053 PCI-E Fast Ethernet NIC driver
zIntel USB 2.0 driver
zMicrosoft DirectX
zTV tuner driver (option)
zTouch screen driver (option)
zWireless lan driver (option)
[For reference]
The touch screen, wireless LAN, TV tuner (option) must be ordered
before the product is packaged and shipped. We regret to inform you
that we cannot separately supply a touch screen for products sold
without this feature.
Sinocan 19 inch All-in-One PC User's Guide

9
V 1.0
Step 1: To set up the computer
To set up the computer that is pre-setup with Microsoft Windows XP
Home Edition in step 0:
1. Connect the mouse and keyboard that come with the main body
and turn on the power of the main body. The following “Microsoft
Windows Start” dialog box will be displayed. To continue the setup,
click <Next> at the bottom of the screen.
2. When the “User’s Time Zone” dialog box is displayed, select the
proper time zone for your location and select <Next>.
3. When the “ End Users’ License Agreement” menu is displayed,
select “I accept this agreement” and then click <Next>.
4. When you see the “Your Product Key” page on the screen, enter
the product key specified in Windows XP Home Edition user’s
guide that comes with the purchase of this PC and select <Next>.
5. A dialog box will appear asking you to designate a computer name.
Enter a computer name and computer description in the blanks
and click <Next>.
6. A dialog box will appear asking you how you want to connect to the
Internet. Select the one that best suits your connection and press
<Next>. If your computer is not connected to a network or failed to
establish a network connection, a dialog box with “failed to
establish an Internet connection” will pop up. If you wish to set up
the Internet connection later, click <Skip>. In that case, you can set
up or change the network configuration at [Start]-[Control panel]-
[Network and Internet connection] after you are finished installing
Windows.
7. If you chose a LAN connection for accessing the Internet, a dialog
box reading “High speed connection setup” will be displayed. Fill in
the fields and press <Next>.
Sinocan 19 inch All-in-One PC User's Guide

10
V 1.0
If you chose DSL or cable modem connections, the below dialog
box will pop up. Follow the instructions to continue the network
connection setup.
8. When you are finished with the Internet connection setup, a dialog
box reading, “Are you going to receive verification service?” will be
displayed. Even though you can have the verification right away to
know whether your copy of Windows is licensed or not, you are
recommended to select “No, not at this time.” This is because it is
better to activate Windows when you test the computer for a while
and you are sure that there are no problems with your new PC.
However, you must activate Windows within 30 days.
9. Lastly, you will see a dialog box asking who will use this computer.
Enter names of users who will share the computer and press
<Next>. To proceed to the next step you have to enter at least one
name.
10.When a dialog box that reads “Thank you!” pops up, this means the
basic setup is complete. Press <Finish> to reboot your computer
and to run Windows XP.
Step 2: The installation of drivers for other peripherals
Skip this step if you do not use other peripherals.
To use other peripherals this PC supports such as printers, serial
communication devices, USB devices, IEEE 1394 devices, and game
consoles/ MIDI devices, connect the device to the main body, press
the power button and boot the PC. When booting is complete, install
the pertinent driver in the system. Because the system automatically
senses and installs plug-and-play peripherals, follow the instructions
displayed on the setup menu and refer to the device’s user’s guide.
For peripherals that are not plug-and-play, users have to install the
device and reboot the system for normal operation.
Refer to the user’s guide of each device for detailed instructions.
Sinocan 19 inch All-in-One PC User's Guide

11
V 1.0
Step 3: The installation of software for other peripherals
Skip this step if you do not use other peripherals and go to step 4.
For efficient use of other peripherals (printers, serial communication
devices, USB devices, IEEE 1394 devices, and game consoles/ MIDI
devices), install the appropriate software (e.g. utilities or other
applications provided by the manufacturer of the device) following the
instructions displayed on the setup menu and referring to the user’s
guide.
Step 4: Completion of setup
When you are finished with step 3, basic installation is complete and
the computer is ready to use once it is rebooted.
Sinocan 19 inch All-in-One PC User's Guide

12
V 1.0
Chapter 4. Using the computer
In this chapter, we will give a brief explanation about the use of the
computer
To Use Windows XP Home Edition
To use basic Microsoft Windows XP Home Edition programs and
applications that are available with this OS, refer to the user’s guide
(booklet), or the ‘Help and Support Center’.
To refer to the ‘Help and Support Center’, click [Start]-[Help and
Support] on the desktop and click on topics you need to refer to.
Microsoft Windows XP Home Edition’s ‘Help and Support Center’
provides the following information on a variety of features and other
basic operations of Windows XP Home Edition.
zWhat’s new in Windows XP
¾Confirmation of license and registration
¾Windows components
zMusic, video, games and photos
zWindows Basics
zNetworking and the Web
¾Electronic mail and the Web
¾Home network or small scale network
¾The sharing of files, printers, and other resources
¾Cipher and security
¾Networking (including Internet connection)
zWorking remotely
zDesignation of computer users
zCustomizing your computer
zPrinting and faxing
zPerformance and maintenance
zFixing a problem
zSend your feedback to Microsoft
Sinocan 19 inch All-in-One PC User's Guide

13
V 1.0
Using other applications
To use other applications obtained or purchased separately, refer to
the user’s guide of each application provided by the software
manufacturer.
Partitioning the hard disk
For user’s convenience, the hard disk built into this product is divided
into two partitions (drive C and drive D). Drive C, a system drive, is
installed with a Windows operating system, a variety of drivers, and
other applications when you receive the computer. In contrast, drive D,
a usual data drive, is empty.
This is to let users store data in drive D to be protected in the event of
a system failure. When the hard disk must be reformatted and the
system must be reinstalled due to serious damage to the system, only
drive C needs to be reformatted while data stored in drive D is kept
intact without any intervention.
Sinocan 19 inch All-in-One PC User's Guide

14
V 1.0
Chapter 5. Changing the setup
This chapter will briefly outline how to change the setup to suits each user
using BIOS CMOS setup utility programs. This chapter also covers how to
upgrade your computer system.
BIOS CMOS setup utility
This PC adopts BIOS based on Phoenix Technology’s latest Award BIOS
6.0 version. The optimum settings for this product are given for each as
default.
Users can change settings using the BIOS CMOS setup utility included wi
th this product. The BIOS CMOS setup utility is also useful when making
changes to the booting order, when selecting a password, or when adding
a new device.
However, if the BIOS CMOS utility setup is wrongly configured, a serious
system error can take place such as “unable to boot the system”, so be c
areful when changing the settings.
[For reference]
BIOS CMOS setup refers to setting up the components of the system
hardware and saving them. The settings are saved even when the power is off
because the settings are stored in CMOS RAM built into the system and
powered by internal batteries.
How to change BIOS CMOS setup
Here is a brief outline of how to change CMOS settings using the
BIOS CMOS setup utility.
1. Turn on the computer.
2. When the startup page appears, press <Del> to activate the BIOS
CMOS setup utility. If you press the <Del> key too late, it
automatically boots Windows. Should that occur, reset the
computer and press <Del> once again.
Sinocan 19 inch All-in-One PC User's Guide
Table of contents
Other Sinocan Desktop manuals