Siva 50245 User manual
Betriebsanleitung
Bitte lesen Sie sich diese Anleitung vor dem ersten Gebrauch
genau durch und bewahren Sie diese auch nach Abschluss
der Montage gut auf!
Manual Instruction
Read these instructions carefully before use. Please keep them after assembling.
Notice d´utilisation
Veillez lire attentivement la notice avant d´utiliser votre modéle et de conserver
soigneusement celle –ci après avoir termine les travaux.
Manuale operativo, istruzioni
Leggere le istruzioni attentamente prima dell’utilizzo. Conservare l’imballo ed il manuale
operativo poichè contengono importanti informazioni.
Instrucciones de uso
Lea este manual detenidamente antes de utilizarlo por primera vez y guárdelo en un
lugar seguro incluso después de que se haya completado la instalación.
Art.-Nr. 50245
Achtung: Geeignet für Personen ab 14 Jahren!
Attention: Suitable for persons + 14 years!
Attention: Convient aux personnes de plus de 14 ans!
Attenzione: adatto a persone + 14 anni!
Atención: Adecuado para personas + 14 años!
Made in China
Siva GmbH
Leutkircher Str.28
88410 Bad Wurzach
Tel.: +49 (0) 7564/9497012
Fax: +49 (0) 7564/9497011
www.sivatoys.de

2
DE
Liebe Kunden,
vielen Dank, dass Sie sich für ein Siva Produkt
entschieden haben.
Da es zu geringfügigen Abweichungen kommen
kann, können gegenüber Daten und
Abbildungen dieser Betriebsanleitung keinerlei
Ansprüche abgeleitet werden. Bei
Nichtbeachtung der Betriebsanleitung und den
Sicherheitsanweisungen erlischt der
Garantieanspruch. Dadurch kann von Siva
GmbH keinerlei Haftung für Schäden Verluste
oder Kosten übernommen werden. Anspruch
auf die Garantieleistung besteht nur, wenn das
Spielzeug gemäß der Betriebsanleitung genutzt
wird. Ebenso die Schäden oder Fehlfunktionen
nicht auf höhere Gewalt oder betriebsbedingten
Verschleiß zurückzuführen sind. Ausgeschlossen
sind Verschleißteile wie Antennen, Akkus usw.
Die Garantiefrist beträgt 12 Monate ab
Verkaufsdatum. Beachten Sie bitte die Hinweise
in der Anleitung und bewahren Sie diese zum
Nachlesen auf.
GB
Dear customers,
Thank you very much for purchasing a product
of Siva.
Since there may be slight differences, no claims
can be compared with data and drawings in this
manual. Failure to follow the operating
instructions and the safety instructions will void
the warranty. This can be accepted no liability
for damages or losses costs of Siva GmbH. Claim
on the warranty service is only available if the
toy is being used in accordance with the
operating instructions. Similarly, the damage or
malfunctions are not due to force majeure or
normal wear and tear. Excludes wearing parts
such as antennas, batteries, etc. The warranty
period is 12 months from the date of purchase.
Please follow the instructions in the manual and
keep it for future reference.
FR
Cher clients,
Merci beaucoup d’avoir acheté un produit de la
société SIVA.
Du fait qu’il peut y avoir quelques petites
différences mineures entre votre produit et le
contenu de la notice (images, données,…) qui ne
change aucunement la fonctionnalité du
modèle, cela ne pourra pas faire office de
réclamation. Naturellement la garantie est
annulée suite à une non-conformité au niveau
de l’utilisation ou respect des indications
contenues dans la notice. La société Siva GmbH
ne peut en aucun cas être tenue pour
responsable en cas de perte ou de surcout. La
garantie ne sera appliquée que dans le cas
d’une utilisation du modèle conforme aux
indications contenues dans la notice
d’utilisation. De même, la garantie s’appliquera
uniquement si les dommages ne sont pas
causés par une manipulation de trop grande
violence ou usure normale du modèle. Ne sont
pas contenu dans la garantie les pièces d’usures
comme antenne, accu, etc. La durée de la
garantie est de 12 mois à partir de la date
d’achat. Veillez respecter les remarques et les
indications contenues dans la notice
d’utilisation et gardez celle-ci précieusement
afin de pouvoir les relire à tout moment.
Veillez observer que les piles, accumulateur ou
accus vides ou défectueux , ainsi que les
appareils électroniques comme chargeurs,
modèle et radiocommande ne doivent pas être
jetés dans une poubelle traditionnelle mais être
ramenés vers un centre de tri afin de pouvoir
les recycler convenablement.

3
IT
Gentile Cliente,
Ti ringraziamo per aver acquistato un prodotto
Siva.
Se noterai nel manuale operativo alcuni disegni
ed immagini leggermente diverse dal modello
in tue mani non preoccuparti, si tratta di
disegni ed immagini che utilizziamo talvolta
anche per prodotti simili, dello stesso genere,
della stessa famiglia e/o gruppo di
appartenenza.
GARANZIA:
La garanzia del prodotto è di 12 mesi a partire
dalla data di acquisto.
Sono escluse dalla garanzia tutte le parti
soggette a normale usura quali ad esempio
antenne, batterie. Le richieste di assistenza in
garanzia verranno accettate solamente se il
prodotto viene utilizzato in conformità alle
istruzioni per l'uso qui di seguito riportate. La
garanzia legale copre i difetti di fabbricazione e
di materiale in uso normale. La mancata
osservanza delle istruzioni qui riportate annulla
di fatto la garanzia ed esonera Siva GmbH da
qualsiasi responsabilità, anche economica, per
danni arrecati a persone, animali o cose.
La garanzia non comprende:
•Danni causati dalla mancata osservanza delle
istruzioni di sicurezza o delle istruzioni per
l'uso
•Danni per forza maggiore, battaglie,
manipolazione errata
•Sovraesposizione al sole
•Modifiche non autorizzate
•Danni causati dalla perdita di controllo
•Influenza di corrente, alta tensione o fulmini
•Normale usura
•Difetti ottici
•Costi di trasporto
ES
Estimados clientes,
Muchas gracias por comprar un producto de
SIVA.
Debido a que puede haber pequeñas
diferencias entre su producto y el manual
(imágenes, datos, ...) que no cambia la
funcionalidad del modelo, no se puede usar el
manual como escusa de reclamación,
Naturalmente, la garantía queda sin efecto
debido al mal uso del producto o al mal uso del
manual. Siva GmbH no se hace responsable de
ninguna pérdida del mismo. La garantía solo se
aplicará siempre que se haya usado el modelo
de acuerdo con las indicaciones contenidas en
manual. Del mismo modo, la garantía se
aplicará solo si el daño no es causado por la
manipulación , la velocidad excesiva o el
desgaste normal del modelo. No están incluidas
en la garantía las piezas de desgaste tales como
antena, batería, etc. El período de garantía es
de 12 meses a partir de la fecha de compra. Por
favor, guarde el tiket de compra, d’utilisation et
gardez celle-ci précieusement afin de pouvoir
les relire à tout moment.
Veillez observer que les piles, accumulateur ou
accus vides ou défectueux, ainsi que les
appareils électroniques comme chargeurs,
modèle et radiocommande ne doivent pas être
jetés dans une poubelle traditionnelle mais être
ramenés vers un centre de tri afin de pouvoir
les recycler convenablement.

4
Lieferumfang –Contents –Contenu du kit
DE
•US MILITARY TRUCK
•Fernsteuerung 2.4 GHz
•USB Ladegerät
•Li-Fe Akku 7,4V 500mAh
•3x AA Batterien für die Fernsteuerung
•Kamera
•Smartphone Halter
•Stoffabdeckung
•Schraubenzieher
•Anleitung
GB
•US MILITARY TRUCK
•Radio control 2.4 GHZ
•USB Charger
•Battery Li-Fe 7,4V 500mAh
•3x AA batteries for radio control
•Camera
•Smartphone holder
•Cloth cover
•Screwdriver
•Manual instruction
FR
•US MILITARY TRUCK
•Radiocommande 2.4 GHZ
•Chargeur USB
•Accu Li-Fe 7,4V 500mAh
•3x piles AA pour la radiocommande
•Caméra
•Support de Smartphone
•Housse de recouvrement en toile
•Tournevis
•Notice
IT
•US MILITARY TRUCK
•Trasmittente 2,4 GHz
•Caricabatterie USB
•Batteria Li-Fe 7,4V 500mAh
•3x AA batteries per la trasmittente
•Telecamera
•Supporto Smartphone
•Copertura in tessuto
•Cacciavite
•Manuale d’uso e istruzioni
ESP
•US MILITARY TRUCK
•Emisora 2.4 GHZ
•Cargador USB
•Batería Li-Fe 7,4V 500mAh
•3 pilas AA para la emisora
•Cámara
•Destornillador
•Soporte para el teléfono
•Lona camión
•Manual de instrucciones
Technische Daten –Technical Data - Données
techniques - dati tecnici - Datos técnicos:
Maße/Dimensions/Dimensioni/Medidas:
~ 475 x 150 x 170 mm
Gewicht/Weight/Poids/Peso/:
~ 1.100 g
Akku/Battery/Accu/Batteria/Bateria:
Akku: Li-Fe 7,4V 500mAh
Fahrzeit/Driving time/ Temps de
parcours/Tempo di utilizzo/ Tiempo de uso:
~ 20 - 25 min.
Ladezeit/Charge time/Temps de charge/
Tempo di carica/ tiempo de carga:
~ 120 min

5
Entsorgungshinweise –Disposal notes –
Consignes de recyclages –Smaltimento –
Advertencias de reciclaje
DE
Bitte beachten Sie, dass leere Akkumulatoren,
Batterien, Knopfzellen etc. und Elektrobauteile
wie Ladegerät, Modell und Fernsteuerung nicht
in den Hausmüll gehören, da sie der Umwelt
und Gesundheit schaden. Entsorgen Sie diese
bei den bekannten Sammelstellen, denn nur so
werden sie ordnungsgemäßem Recycling
zugeführt.
GB
Please note that empty accumulators, batteries,
button cells etc. and electrical components such
as charger, model and remote control should
not be disposed in the garbage, because they
harm the environment and health. Dispose it
into the collect-boxes because only then they
are fed proper recycling.
FR
Veillez observer que les piles, accumulateur ou
accus vides ou défectueux , ainsi que les
appareils électroniques comme chargeurs,
modèle et radiocommande ne doivent pas être
jetés dans une poubelle traditionnelle mais être
ramenés vers un centre de tri afin de pouvoir
les recycler convenablement.
IT
In ogni paese esistono normative ben precise
relative a come smaltire i rifiuti. Informatevi!
In linea generale tutte le parti devono essere
divise e smaltite negli appositi contenitori
prima di essere portati in discarica per la
raccolta differenziata.
Batterie esauste: Una volte esaurite le batterie
vanno gettate negli appositi contenitori, non
disperdere nell’ambiente.
Componenti elettrici: Vanno portati in discarica
per la raccolta differenziata.
Confezione: Dividere plastica da cartone e ferro
e smaltire negli appositi contenitori.
Le batterie sono contrassegnate con il simbolo
di un contenitore di rifiuti incrociato (vedi
sotto). Questo simbolo indica che le batterie
non devono essere smaltite con i rifiuti
domestici. Per le batterie contenenti più di
0,0005% di mercurio, più di 0,002% di cadmio o
più 0,004% in peso di piombo, il nomme
chimico del particolare inquinante utilizzato è
situato sotto il simbolo della spazzatura, dove
"Cd" significa cadmio, "Pb" significa piombo e
"Hg" per il mercurio ".
È possibile smaltirne gratuitamente le batterie
e gli accumulatori usati nei punti di raccolta del
tuo comune, delle nostre sedi o ovunque
vengono vendute le batterie. In questo modo si
soddisfano gli obblighi legali contribuendo alla
protezione dell'ambiente.
ES
Tenga en cuenta que las pilas, acumuladores o
baterías recargables vacías o defectuosas, así
como los dispositivos electrónicos como
cargadores, modelos y controles de radio, no
deben tirarse en un contenedor tradicional, sino
que deben llevaerse a un centro de clasificación
para su reciclaje.

6
ACHTUNG –WARNING –ATTENTION –
ATTENZIONE –ATENCIÓN !
•Enthält verschluckbare Kleinteile, nicht für
Kinder unter 36 Monaten geeignet.
Erstickungsgefahr !
•Contains small parts! Not suitable for children
under 36 months! Danger of suffocation !
•Contient de petites pièces facilement
avalables ! N’est pas adapté pour des enfants
de moins de 36 mois ! Danger d’étouffement !
•Non adatto a bambini di età inferiore ai 36
mesi. Piccole parti possono essere ingerite o
inalate con pericolo di soffocamento.
•Contiene piezas pequeñas, no apto para niños
menores de 36 meses. Asfixia!
•Benutzung nur unter unmittelbarer Aufsicht
von Erwachsenen!
•Use only under the supervision of an adult!
•A n’utiliser que sous la surveillance d’une
personne adulte !
•Utilizzare sotto la sorveglianza diretta di un
adulto responsabile!
•Usar solo bajo la supervisión directa de Adulto!
Wichtige Hinweise –Importants notes –
Informations importantes - Informazioni
importanti - Notas importantes
DE
1. Schalten Sie vor dem Betrieb zuerst die
Fernsteuerung, dann das Modell ein.
2. Schalten Sie nach dem Betrieb zuerst das
Modell, dann die Fernsteuerung aus.
3. Akkus und Batterien nur unter Aufsicht von
Erwachsenen laden!
4. Neue und gebrauchte Batterien oder
unterschiedliche Batterietypen sollten nicht
zusammen verwendet werden.
5. Nicht aufladbare Batterien und Akkus dürfen
nicht aufgeladen werden!
6. Batterien nicht kurzschließen!
7. Batterien mit der richtigen Polarität einlegen!
GB
1. Before using turn first the remote control
then the model.
2. After using stop first the model and then the
remote control.
3. Charge the accumulators and batteries out of
reach of children and under the supervision of
an adult!
4. Do not mix different types of batteries or old
with new.
5. Non-rechargeable batteries should not be
recharged!
6. Don’t short-circuit the batteries!
7. Insert the batteries with the correct polarity!
FR
1. Mettez toujours en marche l’émetteur en
premier puis le modèle.
2. Après l’utilisation arrêtez le modèle en
premier puis seulement l’émetteur.
3. Chargez toujours les accus hors de porté des
enfants et sous la surveillance d’un adulte !
4. Ne mélangez pas les différents types de piles
ni des anciennes avec des nouvelles.
5. N’essayez jamais de recharger des piles ou
accus non rechargeables !
6. Ne court-circuitez pas les piles/accus!
7. Veillez à toujours mettre en place les
piles/accus en respectant impérativement la
bonne polarité!
IT
La seguente procedura evidenziata in grassetto è
molto importante.
Prima va accesa la trasmittente e poi va acceso il
prodotto.
Quando finito di utilizzarlo, prima spegnere il
prodotto e poi spegnere la trasmittente.
ISTRUZIONI DI MONTAGGIO: ATTENZIONE!
Contiene bordi taglienti funzionali, punte
funzionali e fili elettrici. Pericolo di perforazione.
ISTRUZIONI RELATIVE A MANUTENZIONE PER UN
USO SICURO DEL PRODOTTO: ATTENZIONE!
Questo prodotto può essere utilizzato solo con il
caricatore raccomandato che è quello fornito
nella confezione di vendita. Il trasformatore non
è un giocattolo. I trasformatori o i caricabatterie
di questo prodotto devono essere esaminati

7
regolarmente, per verificare la presenza di
danneggiamenti nel cavo di alimentazione, nella
spina, nell’involucro, o in altre parti e non
devono essere utilizzati finchè non sono stati
riparati.
COME RIMUOVERE E INSERIRE LE BATTERIE
SOSTITUIBILI:
ATTENZIONE! Le batterie non ricaricabili non
devono essere caricate. Le batterie ricaricabili
devono essere rimosse dal prodotto prima di
essere caricate.Le batterie ricaricabili devono
essere caricate sotto la supervisione di un adulto
responsabile.Diversi tipi di batterie, batterie di
marche diverse e batterie nuove e usate non
devono essere mischiate.
Le batterie devono essere inserite rispettando la
corretta polarità.Le batterie scariche devono
essere rimosse dal prodotto.I morsetti di
alimentazione non devono essere cortocircuitati.
Se le batterie perdono liquido vanno manipolate
con cura, utilizzando guanti e facendo attenzione
che il liquido non entri in contatto con la pelle e
le parti sensibili tipo occhi, labbra, orecchie etc.
Se c’è stato accidentale contatto con il liquidi
LAVARE CON ABBONDANTE ACQUA E
RIVOLGERSI AD UN MEDICO.
ES
Antes de operar, primero apague el
Control remoto, luego el modelo.
2. Después de la operación, apague el modelo
primero, luego el control remoto apagado.
3. Las baterías solo deben cargarse bajo la
supervisión de un adulto
4. Las baterías nuevas y usadas o diferentes tipos
de baterías no deben mezclarse.
5. Se pueden usar baterías no recargables y
baterías recargables
6. ¡No cortocircuite las baterías!
7. ¡Inserta las baterías con la polaridad correcta!
Service
Tel.: +49 (0) 7564 94970 12
Fax: +49 (0) 7564 94970 11
service@sivatoys.de
Konformitätserklärung
Die Siva GmbH versichert, dass die angebotenen
Modelle in Übereinstimmung mit den
grundlegenden Anforderungen der EG-
Richtlinien stehen. Falls Sie originale
Konformitätserklärungen wünschen oder
weitere Fragen haben, wenden Sie sich an:
www.sivatoys.de/Konformitätserklärung
Declaration of Conformity
Siva GmbH guarantees that the specified
models are in compliance with the essential
requirements of EC Directives. If you want
original declarations of conformity or any other
questions, please contact:
www.sivatoys.de/DeclarationofConformity
Déclaration de conformité
Par la présente, la société Siva Gmbh déclare
que le modèle présenté est conforme en tous
points avec les textes de la directive de l’union
européenne.
Si vous avez des questions à ce sujet ou si vous
souhaitez avoir une déclaration de conformité
officielle, veuillez-vous adresser à:
www.sivatoys.de/Déclarationdeconformité
Dichiarazione di conformità
Siva GmbH garantisce che i modelli specificati
sono conformi ai requisiti essenziali delle
direttive della EC European Community
(Comunità Europea). Se si desiderano
dichiarazioni di conformità originali o altre
domande, contattare:
www.sivatoys.de/Dichiarazionediconformità
Declaración de conformidad
Siva GmbH asegura que los modelos ofrecidos
cumplen con los requisitos básicos de las
directivas de la CE. Si necesita una declaración
de conformidad original o tiene más preguntas,
contáctese con:
www.sivatoys.de/Declaracióndeconformidad
DE
ACHTUNG
Bitte lesen Sie die Bedienungsanleitung sorgfältig durch, bevor Sie Ihr Modell in Betrieb
nehmen und bewahren Sie dann an einem sicheren Ort auf, damit Sie diese jederzeit
lesen können.
1. Laden Sie die Batterien vor dem Gebrauch vollständig auf.
2. Warten Sie nach dem vollständigen Aufladen des Akkus einige Minuten, bevor Sie ihn
an die Elektronik anschließen.
3. Schalten Sie nach dem Gebrauch den Schalter aus und trennen Sie den Akku vom
Modell. Lassen Sie das Gerät einige Minuten abkühlen, bevor Sie den Akku aufladen.
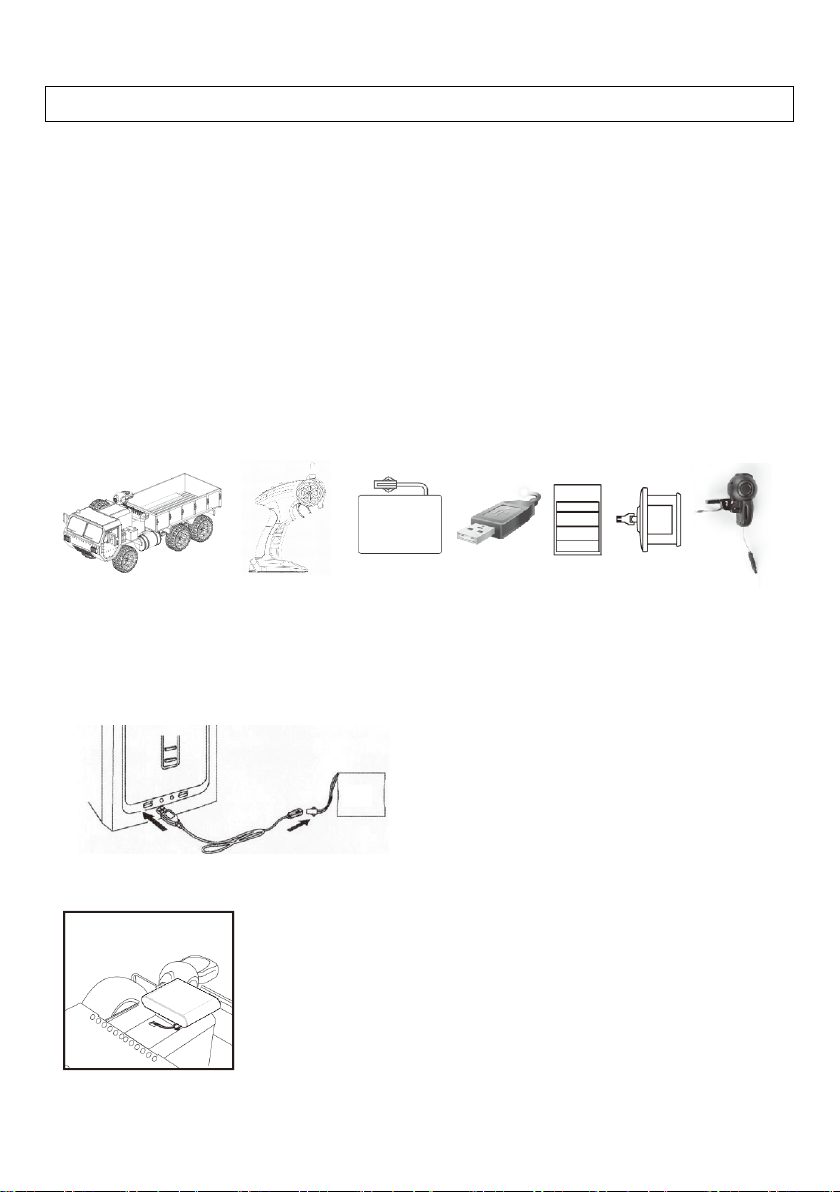
Lieferumfang
Einlegen des Akkus und Ladevorgang
Schließen Sie den Akku an das Ladekabel an
und verbinden Sie dieses dann mit einer
freien USB-Buchse an Ihrem Computer oder
Ladegerät. Wenn die rote LED leuchtet, ist
die Ladung in Gange. Sobald die LED nicht
mehr leuchtet ist der Akku voll und der
Ladevorgang ist abgeschlossen.
Nach dem die Batterie voll aufgeladen sind, öffnen Sie das Akku
Fach. Legen Sie den Akku hinein und stecken sie ihn an, danach
schließen Sie das Akku Fach wieder.
1x U.S. Military Truck
1x Fernsteuerung
1x Akku
1x Ladekabel
1x Anleitung
1x WIFI Kamera Set

9
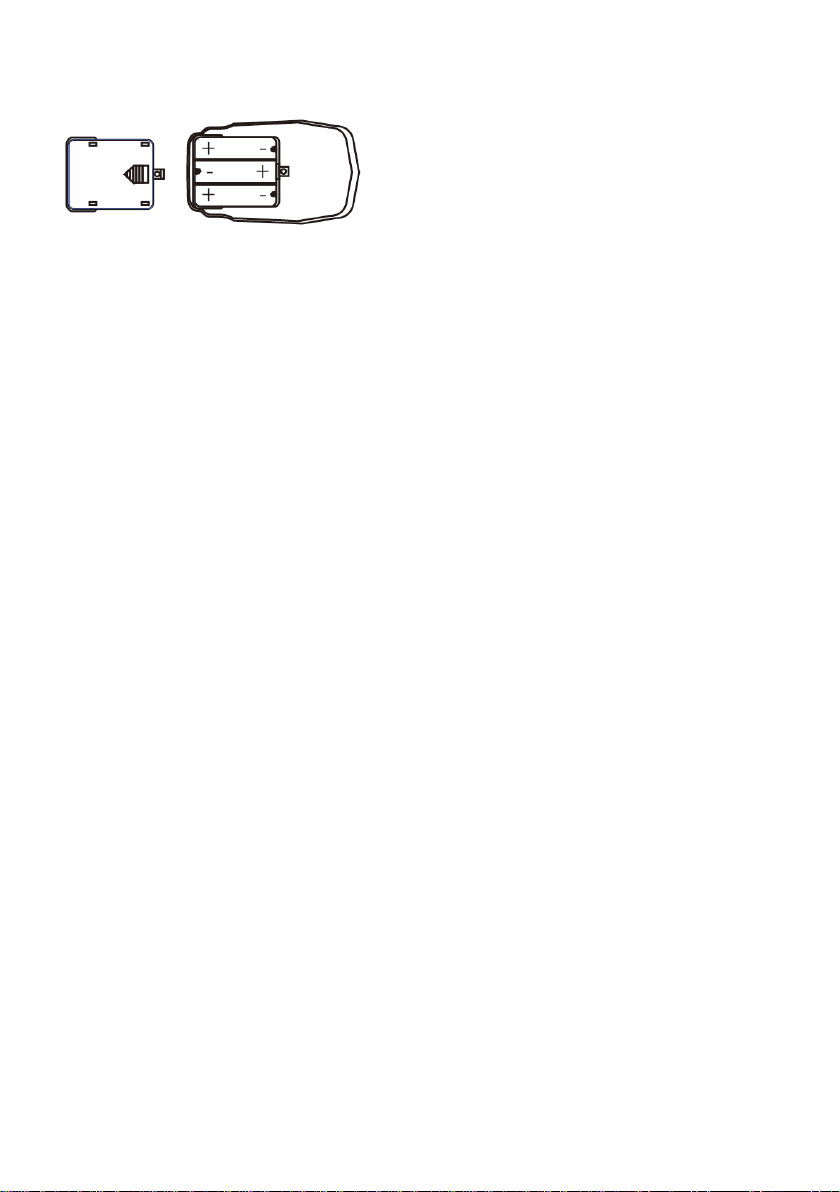
Einlegen der Batterien in die Fernsteuerung
1. Öffnen sie das Batteriefach auf der Rückseite
des Senders.
2. Legen sie 3 x 1.5 V “AA” Batterien ein und
schließen Sie das Batteriefach wieder.
ACHTUNG
1. Achten Sie beim Batteriewechsel auf die richtige Polarität.
2. Versuchen Sie nicht, nicht wiederaufladbare Batterien aufzuladen.
3. Das Aufladen des Akkus sollte immer in Gegenwart eines Erwachsenen erfolgen.
4. Mischen Sie keine alten und neuen Batterien, wenn Sie diese wechseln.
5. Stellen Sie sicher, dass keine anderen Sender, die Ihr System stören könnten, in
Ihrer Nähe aktiv sind, wenn Sie Ihr Modell starten.
6. Wenn die Geschwindigkeit Ihres Autos immer weiter abnimmt, ist der Akku leer.
Laden Sie diesen gemäß den Anweisungen Ihres Militärfahrzeugs wieder auf.
7. Wechseln Sie die Batterien in folgenden Fällen unbedingt aus: Der Batteriestand
des Senders oder des Fahrzeuges ist niedrig, Sie können die Batterie Ihres Modells
nicht laden, oder die Ladeanzeige bleibt schwarz, oder Sie haben dieses nicht an
eine Stromquelle angeschlossen.
8. Entfernen Sie unbedingt die Batterien aus Ihrem Sender und Modell, wenn es nicht
mehr verwendet wird. Bringen Sie die Schalter des Senders und Ihres Modells in die
Position "OFF", wenn Sie es nicht mehr verwenden

10
Benutzung des U.S. Military Trucks
Starten Sie Ihr Fahrzeug, indem Sie den Schalter in die Ein-Position bringen, legen Sie
dieses auf den Boden und schalten Sie anschließend Ihre Fernsteuerung ein. Wenn die
LED an Ihrer Fernsteuerung aufhört zu blinken können, ist sie mit dem Fahrzeug
verbunden. Mit der Fernsteuerung können Sie das Fahrzeug steuern.
Hinweis: Solange die LED blinkt, können Sie das Fahrzeug nicht steuern.
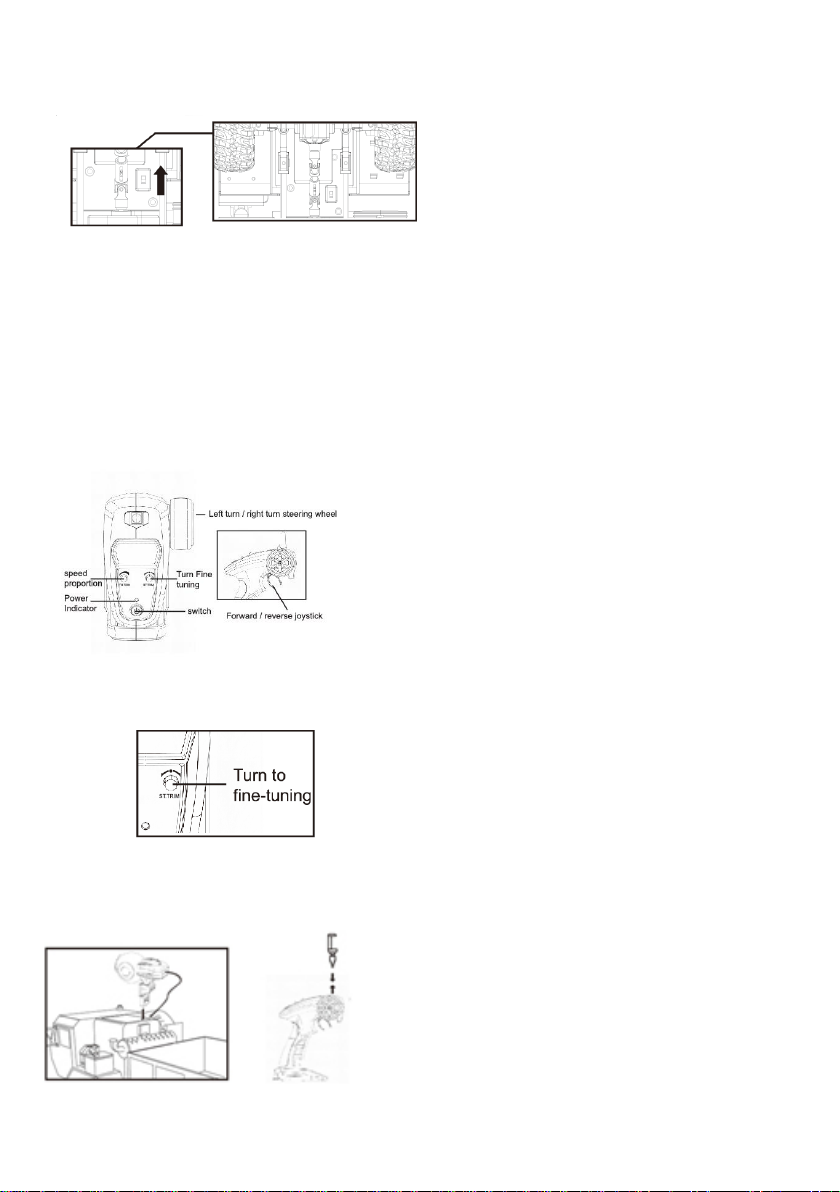
Die Fernsteuerung
1. Drücken Sie den Hebel Ihres Senders zurück
und Ihr Modell bewegt sich vorwärts. Drücken Sie
ebenfalls den Hebel Ihres Senders vorwärts und
Ihr Modell bewegt sich rückwärts. Umso stärker
Sie den Hebel drücken, desto schneller bzw.
langsamer fährt Ihr Modell.
2. Drehen Sie das Lenkrad nach rechts oder
links und Ihr Auto fährt nach rechts oder links
3. Das Lenkrad Ihres Senders verfügt über eine
Feinabstimmungsfunktion, mit der Sie die
Reaktion Ihres Modells bei einer geraden Linie
einstellen können. Wenn Ihr Auto nach links
driftet, ohne das Lenkrad zu berühren, müssen sie
nach rechts kompensieren oder umgekehrt.
4. WIFI Kamera
Die WIFI-Kamera am Dach des Fahrzeugs in die
vorgesehene Vorrichtung stecken und das Kabel
mit dem Fahrzeug verbinden.
Die Smartphone-Halterung an der Fernsteuerung
anbringen.
Hinweis: Wenn Sie über die App-Steuerung
verwenden, müssen Sie den Sender ausschalten.
Andernfalls funktioniert die App nicht.
On/Off Schalter

11
Fehlerbehebung
Probleme
Ursache
Lösung
Das Auto fährt nicht
Batterie ist entladen oder
defekt
Ersetzen Sie die Batterie
und stellen Sie den
Schalter auf OFF um
Energie zu sparen, wenn
das Fahrzeug nicht
verwendet wird.
Fehlerhaftes einlegen der
Batterien
Legen Sie die Batterien
richtig ein. Achten Sie die
richtige Polarität
beachten.
Schalter in OFF Position
Überprüfen Sie das alle
Schalter vom Auto und
Fernsteuerung in der On
Position sind.
Das Auto fährt nur sehr
langsam
Batterie ist entladen oder
defekt
Ersetzen Sie die Batterie
und stellen Sie den
Schalter auf OFF wenn das
Fahrzeug nicht verwendet
wird.
Die Fernsteuerung ist zu
weit weg
Bringen Sie die
Fernsteuerung näher zum
Fahrzeug
Das Auto fährt nicht
gerade aus
Feineinstellungen des
Autos stimmen nicht
Wenn Ihr Auto nach links
oder rechts driftet, ohne
dass Sie es gelenkt haben,
müssen Sie die
Feineinstellung in die
entgegengesetzte
Richtung verwenden.
Wenn das Auto also nach
rechts driftet, müssen Sie
links korrigieren und
umgekehrt, bis Ihr Auto in
einer geraden Linie fährt.

12
WIFI Verbindung
1. Laden Sie die App herunter und installieren Sie diese.
IOS: Suchen Sie im Apple Store nach der App "WIFI-Truck" laden Sie diese herunter
und installieren sie danach.
Oder scannen Sie einfach den QR-Code (Abbildung 1) und laden Sie damit die App
herunter.
Android: Suchen Sie im Google Play Store und nach der App "WIFI-Truck laden Sie
diese herunter und installieren sie danach.
Oder scannen Sie einfach den QR-Code (Abbildung 2) und laden Sie damit die App
herunter.
2. WIFI-Verbindung
•Schalten Sie Ihr Smartphone ein
•Suchen Sie in den Einstellungen nach den WLAN-Netzwerken. Suchen Sie dort
nach dem WLAN-Netzwerk des U.S. Military Trucks. Vergewissern Sie sich, dass
die Verbindung hergestellt ist.
•Öffnen Sie die App "WIFI-Truck" auf Ihrem Smartphone und rufen Sie die
Steuerungsoberfläche auf.
1/2/3/4: Richtungssteuerung
5 Bedienoberfläche anzeigen/ausblenden
6 Einstellungen
7 Nehmen Sie ein Bild auf
8 Videoaufnahme
9 Galerie
10 Kamerafahrt
IOS - Apple
Android
Abbildung 1
Abbildung 2
11 Einhandbedienung
12 Manuelle Bedienoberfläche
13 Wegpunkte
14 Sensor im Schwerkraftmodus
15 Geschwindigkeitsabstimmung
16 Feineinstellung der Richtung
13
GB
WARNING
Please read this instruction manual carefully before use, and properly keep this manual
for future use.
1. Before using the product, fully charge the battery.
2. After the battery is fully charged, please place it in a shady place for 1-3 minutes, then
connect with the product.
3. After use, please turn off the product switch, disconnect the battery from the product,
place it in a shady place for 1-3 minutes, then charge it.
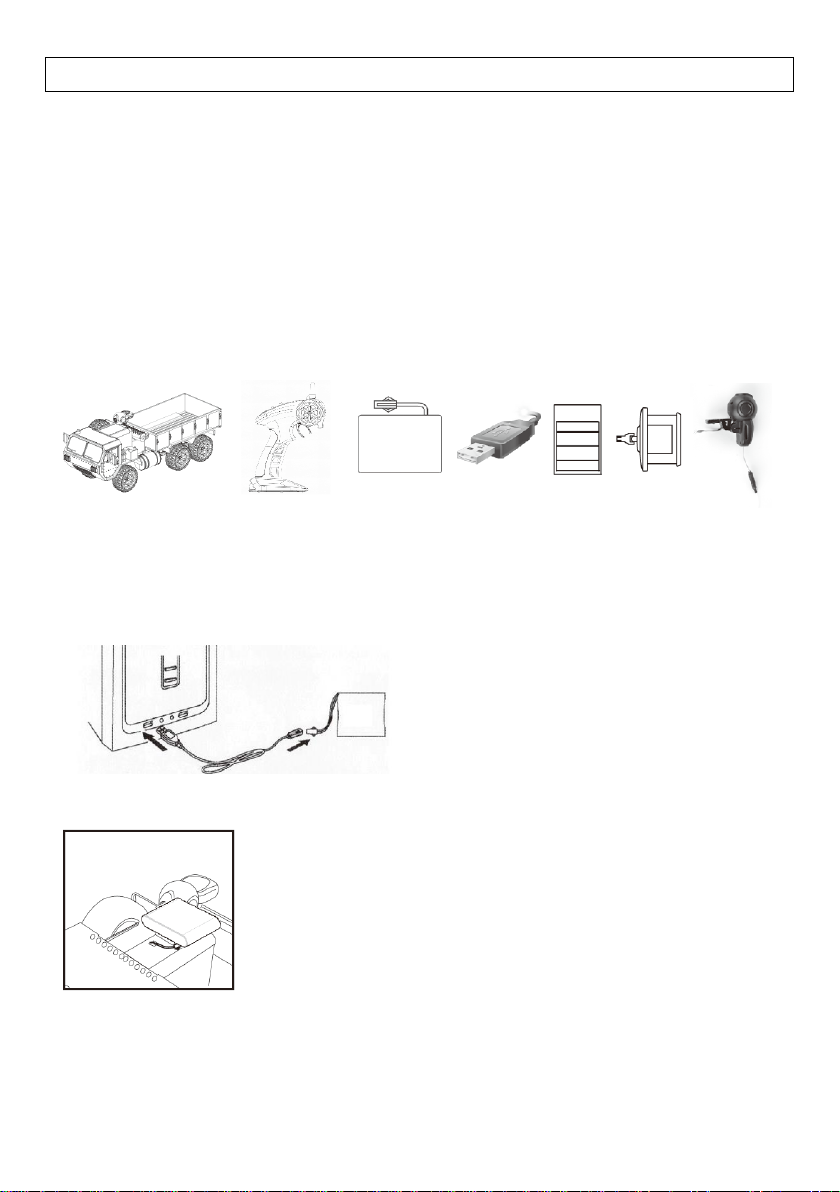
Packing List
Installation and charging for the battery of the U.S. Military Truck
Connect the battery to the charging cable,
then plug the USB charging cable into the
USB port of the computer or the USB
charger. Then turn on the power. When the
red light is on, it means that charging is in
process, and when the red light is off it
means the battery been fully charged.
After charging is completed, the body is disassembled and the
battery block is placed in the battery compartment. To connect
the battery pack to the body of the interface cover.
1x U.S. Military Truck
1x Remote Control
1x Battery
1x USB
Charging cable
1x Manual
1x WIFI Suite

14
Installation for the batteries of the remote control
1. Open the battery cover on the backside of
the remote control.
2. Insert 3 x 1.5 V “AA” batteries with correct
direction and cover the battery cover.
Cautions
1. Pay attention to the direction when installing or replacing batteries.
2. Do not use non-rechargeable batteries.
3. When charging the rechargeable battery, adult guardianship is required.
4. Do not mix old and new batteries or different types of batteries.
5. During the operation, please pay attention to the nearby interference signal,
otherwise the remote control distance will be affected.
6. If the speed of the truck becomes more and more slow, it means the battery
power is low, please charge the military truck as per the above method.
7. Please replace the battery in the following cases: the battery of the remote
control is low, it is unable to charge the truck and the charging indicator
becomes dark or is not turned on.
8. Please take out the battery in the remote control and take out the battery. Put
the power switch of the truck to the “OFF” position if the truck is not used for a
long time.

15
Operation Method
Turn on the rc car’s power switch, and put it on the plane, then open the transmitter
switch. When the transmitter indicator stops flashing, you can operate the joystick and
begin playing. Remark: cannot operate the joystick when the transmitter indicator is
flashing.
The remote control
1. Push backwards the joystick of the remote
control, the truck moves forward; push forward
the same, the truck moves backwards. Pull the
joystick backwards halfway, the truck will move
slowly when the joystick is fully pulled backwards,
the truck will move forward quickly.
2. Turn right/right steering wheel clockwise the
truck turns left; turn left/left steering wheel
counter clockwise, the truck turns right.
3. Adjust the remote control steering fine-
tuning, can adjust the remote control car straight
line running performance. If the car moves
forward to the left, turn the adjusting needle to
the right, the adjustment needle to the left, until
the remote control car normal straight.
4. WIFI Camera
Install WIFI camera to the top of car, and connect
the camera plug with car body
The mobile holder fixed on the transmitter
Note: only the WIFI version and WIFI camera is
available for distribution.
Note: if you need to use by App control, please
turn off the remote controller. Otherwise app
does not work.
Power switch

16
Troubles Eliminating Methods
Problems
Causes
Solution
Unable to control the
truck
Battery power is low or no
power
Replace the battery and
put the switch at the OFF
position to save energy.
Incorrect installation of
battery
Correctly install the
battery and pay attention
to the direction.
Switch is at the OFF
position
Check if the switches on
the truck and remote
control are turned on.
Truck moves too slowly
Battery power is low or no
power
Replace the battery and
put the switch at the OFF
position to save energy.
The truck moves out of
control range
If the truck moves more
and more slowly, please
take the remote control
near the truck.
Unable to move straightly
The truck moves out of
control range
When the remote control
car moves forward, if the
remote control car moves
to the left, it should adjust
the front wheel fine-
tuning to the right. If the
remote control car moves
to the right, it should
adjust the front wheels
fine-tuning to the left, and
keep cycling until the
remote control car can
drive normally in a straight
line.

17
WIFI connection
1. Download and install the software.
ISO: Users please go to the apple store to search the “WIFI- Truck”, download and
install.
Or simply scan the QR code (figure 1) to download and install.
Android: Foreign users in the google play to search the “WIFI-Truck” download and
install, or scan QR code (figure 2) to download and install.
2. WIFI connection
•Connect body power supply
•Into the phone settings option, the WIFI option to find the device WIFI name and
connect, there “tick” that the connection is successful, complete the set out after
the option.
•In the phone to open the software “WIFI-Truck”, click on the icon the enter the
control interface. (as far as possible when using from other WIFI signal source
environment)
•Specific instructions please refer to the instructions.
1/2/3/4 : Directional control around
5 Show/hide control interface
6 Settings
7 Take photo
8 Record video
9 Photo&video
10 Camera flip
IOS - Apple
Android
Figgure 1
Figgure 2
11 One-hand control interface
12 Hands control interface
13 Functional way points
14 Gravity sensor mode
15 Speed tuning
16 Steering gear fine-tuning
18
FR
ATTENTION
Veuillez lire attentivement le manuel d’utilisation avant de mettre en route votre modèle
et de le conserver soigneusement afin de pouvoir à tout moment le consulter.
1. Chargé complètement les accus avant toute utilisation.
2. Après avoir complètement chargé les accus attendez quelques minutes avant de
connectez celui-ci à l’électronique pour une utilisation.
3. Après l’utilisation mettez l’interrupteur sur off puis débranchez l’accu du modèle,
laissez refroidir l’ensemble quelques minutes avant de recharger l’accu.
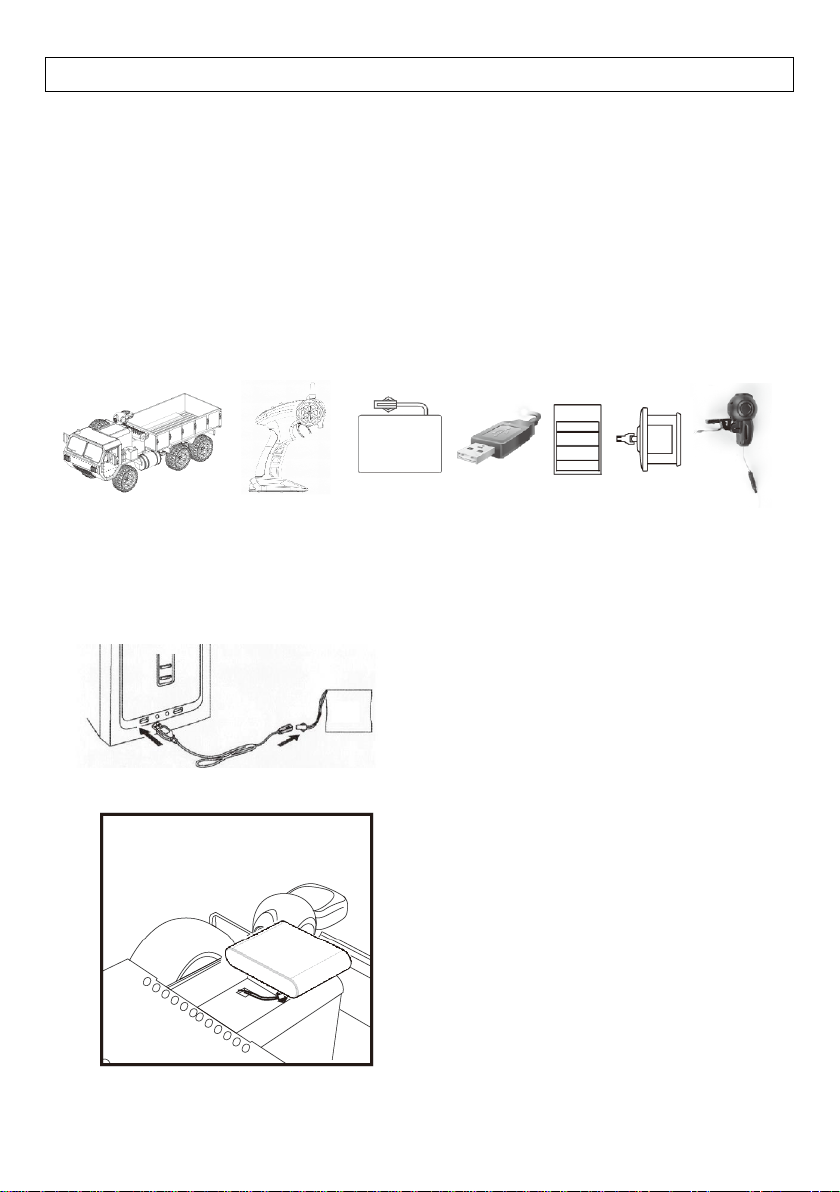
Liste du contenu
Installation et procédure de recharge de l’accu de votre
Connectez l’accu au câble de charge, puis
branchez celui-ci sur une prise USB de
disponible sur votre ordinateur ou chargeur.
Allumez ce dernier. Lorsque la LED rouge est
allumée cela signifie que la charge est en
court, et lorsque celle-ci est éteinte cela
signifie que l’accu est plein et que la charge
est stoppée.
Après avoir complètement recharge votre
accu, ouvrez le compartiment de batterie et
placez-y votre accu. Branchez celui-ci puis
refermez le compartiment.
1x U.S. Military Truck
1x Emetteur
1x Accu
1x Câble de
charge USB
1x Notice
1x WIFI Suite
19
Installation des batteries de l’émetteur
1. Ouvrez le compartiment de batterie sur
l’arrière de l’émetteur.
2. Mettez 3 x 1.5 V “AA” batteries en place puis
refermez le couvercle du compartiment.
ATTENTION
1. Veillez à respecter la polarité lorsque vous changez les batteries.
2. N’essayez pas de recharger des batteries non rechargeables.
3. La recharge de l’accu doit toujours ce faire en présence d’un adulte.
4. Ne mélangez pas les anciennes et les nouvelles batteries lorsque vous les
changez.
5. Vérifiez qu’aucun autre émetteur pouvant interférer avec votre système ne soit
actif autour de vous lorsque vous allez mettre en marche votre modèle.
6. Si la vitesse de votre voiture diminue de plus en plus, cela signifie que la batterie
se décharge. Veillez recharger celle-ci en respectant les indications de charge de
votre voiture militaire.
7. Veillez changer les piles dans les cas suivants: le niveau d’énergie des batteries
de l’émetteur est faible, vous n’arrivez plus à recharger la batterie de votre
modèle ou l’indicateur de charge devient noir ou que vous n’avez pas connecté
celui-ci à une source d’énergie.
8. Veillez retirer les batteries de votre émetteur et de votre modèle si celui-ci n’est
plus utilisé. Placez les interrupteurs de l’émetteur et de votre modèle en
position “OFF” lorsque vous ne l’utilisez plus.
20
Utilisation de votre modèle
Mettez en marche votre modèle en plaçant l’interrupteur on position On, déposez-le au
sol puis allumez votre émetteur. Lorsque l’indicateur de votre émetteur arrêtera de
clignoter vous pouvez l’utiliser, les gouvernes répondront aux ordres donnés aux
manches. Remarque: les commandes ne répondent pas aussi longtemps que l’indicateur
clignote.
Fonction de votre émetteur
1. Poussez le levier de votre émetteur en
arrière et votre modèle se déplace vers l’avant, de
même, poussez le levier de votre émetteur en
avant et votre modèle se déplace vers l’arrière.
Poussez le levier de votre émetteur en arrière que
de la moitié de la course et votre modèle se
déplace doucement vers l’avant, poussez
complètement et votre modèle prend toute sa
vitesse.
2. Tournez le volant de direction à droite ou à
gauche et votre voiture va tourner respectivement
à droite ou à gauche.
3. La fonction direction de votre émetteur
possède une fonction réglage fin afin d’ajuster la
réaction de votre modèle en ligne droite. Si votre
voiture dérive vers la gauche lorsque vous ne
touches pas le volant de direction il faut l’ajuster
délicatement à droite ou inversement.
4. WIFI Camera
La caméra WIFI s’installe sur le dessus de la
voiture et est connecté au corps de celui-ci
Le support mobile est fixé sur l’émetteur
Note: seul la version WIFI peut être équipé d’une
caméra WIFI disponible dans le commerce.
Note: si vous utilisez au travers l’App control,
veillez éteindre l’émetteur. Dans le cas contraire
l’app ne fonctionnera pas.
Interrupteur
Table of contents
Languages:
Popular Toy manuals by other brands


REVELL
REVELL F-14D Super Tomcat Last Flight Assembly manual

Eduard
Eduard ZOOM F/A-18F seatbelts STEEL quick start guide

Fisher-Price
Fisher-Price P9681 quick guide

Trix
Trix BR 189 manual

Eduard
Eduard H8K2 Emily cockpit interior quick start guide

Enabling Devices
Enabling Devices St. Bernard Puppy user guide

Flitework
Flitework Midi EDGE 540 instruction manual

Lionel
Lionel Extension Searchlight Car quick start guide

LEGO
LEGO The Hobbit - An Unexpected Journey 3920 manual

Faller
Faller Butchery/Bakery Assembly instructions

LEGO
LEGO 79008 Assembly instruction

MD Helicopters
MD Helicopters 900 Series Rotorcraft Flight Manual Supplement