SKETCHNBUILD SNB-B24 User manual

SNB-B24 24” BAND SAW
MANUAL

SNB-B24 BANDSAW MANUAL
2
6/2016
CONTENTS
1. CONFIGURATION……………………………………………………………………………….….3
2. USE AND APPLICATION……………………………………………………………………….…4
3. SPECIFICATIONS………………………………………………………………………………….….4
4. OPERATION……………………………………………………………………………………….…...4
5. SAFETY………………………………………………………………………………………….………..5
6. TRANSMISSION……………………………………………………………………………………...7
7. TRANSPORTATION & INSTALLATION………………………………………………………7
8. MAINTENANCE………………………………………………………………………………….……7
9. TROUBLESHOOTING………………………………………………………………..…………….7
10. APPENDIX & BEAR LIST…………………………………………………………….…………….8
11. ELECTRICAL CONFIGURATION……………………………………….……………………….9
CAUTION: Read these instructions carefully before turning on the machine.
SNB-B24 BANDSAW MANUAL
3
6/2016
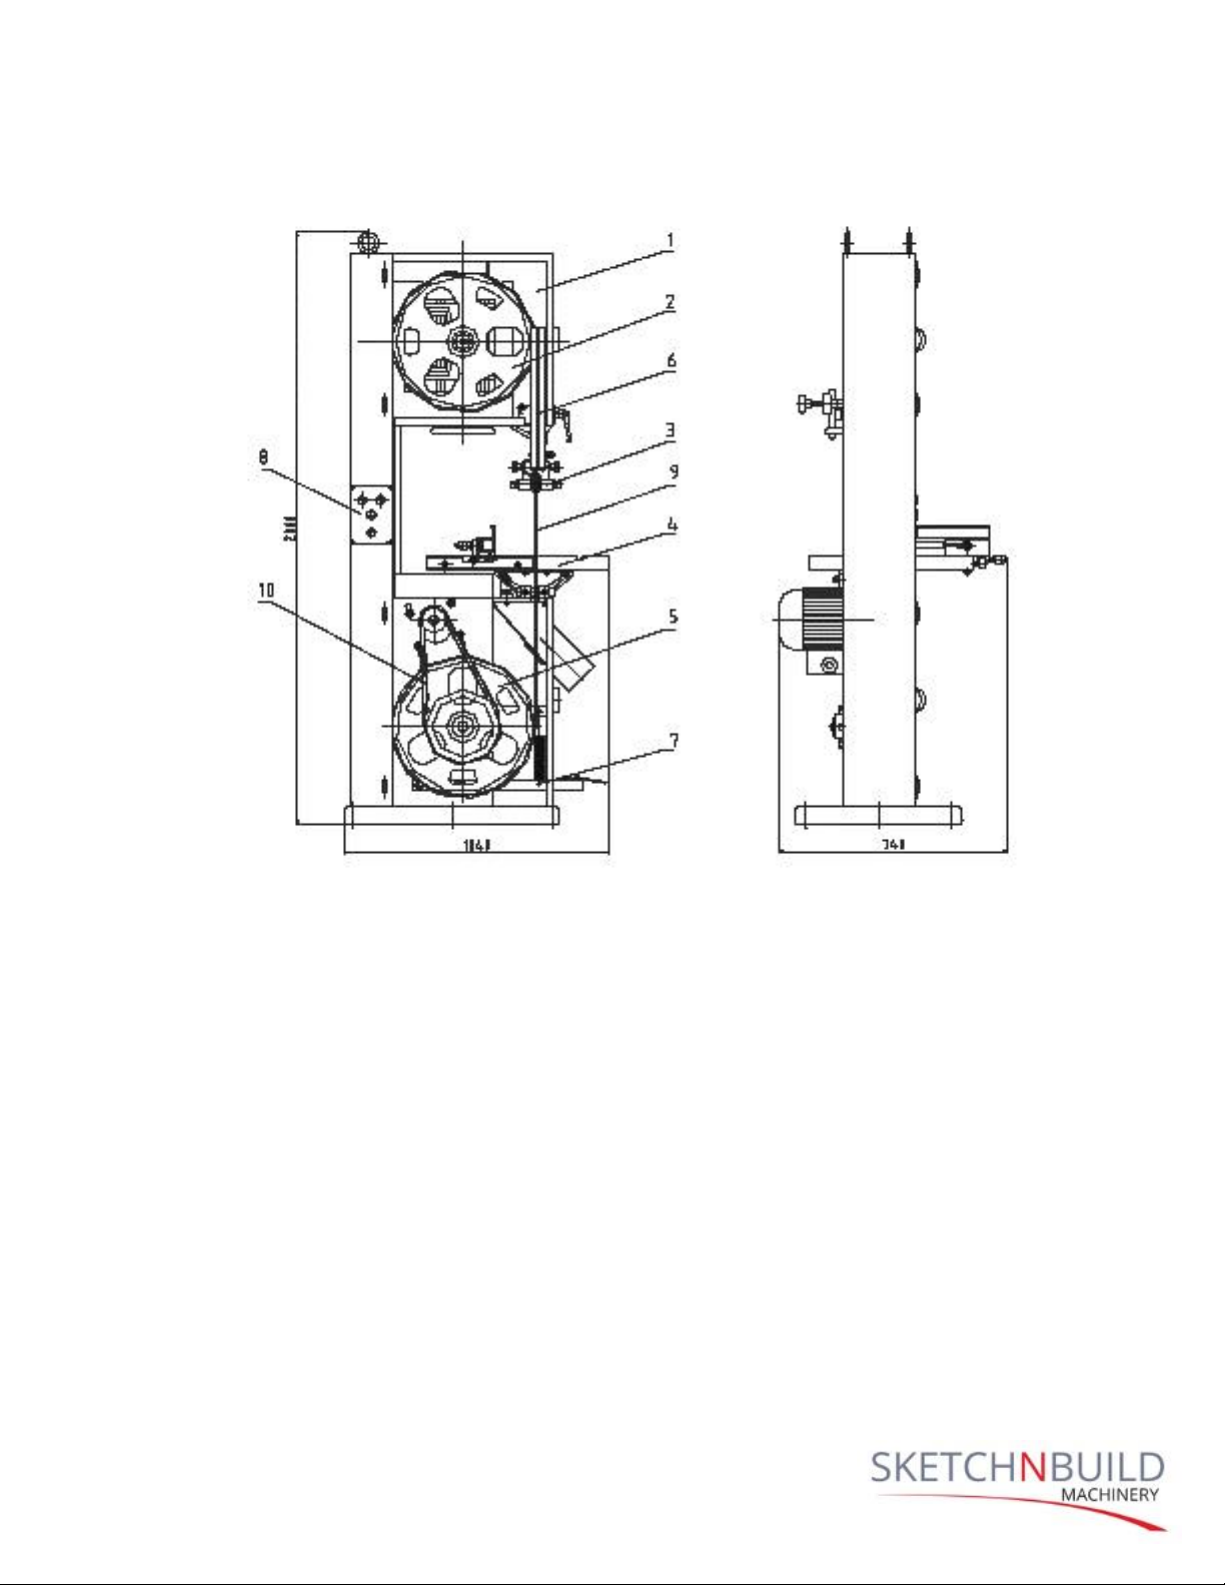
1. CONFIGURATION
1. Machine Body
2. Top Saw Wheel
3. Saw Blade Guide
4. Working Table
5. Bottom Saw Wheel
6. Safety Cover
7. Brake System
8. Electrical
9. Saw Blade
10. V-Blade

SNB-B24 BANDSAW MANUAL
4
6/2016
2. USE AND APPLICATION
The SNB-B24 is suitable for wood, plastic applications. Some features include
sawing, re-sawing, cross cutting & angle cutting.
Main Characteristics:
i) Narrow saw blade which provides for a smooth cutting surface therefore saving
material.
ii) Special steel wheel to ensure a smooth and steady cut.
iii) Strong welded machine base.
iv) Light top and bottom pulley with a special guide system.
3. SPECIFICATIONS
(a) Motor Power-------------------------------------------------3kw
(b) Power Source------------------------------------------------3Phase / 220v / 60Hz
(c) Saw Wheel Speed------------------------------------------800 r/min
(d) Saw Wheel Diameter---------------------------------------24” inches (600mm)
(e) Table Tilt Angle-----------------------------------------------0-20°
4. OPERATION
1. Before operating the SNB-B24, please ensure that all run parment are well
prepared.
2. First, pull the blade over the top pulley, turn the knob slightly to stretch blade. Check
that the teeth of the blade are facing the cutting direction and that the blade passes
between each guide. Saw blade surface will appear about 3/16” (5mm) of the side of
the top pulley and bottom pulley’s same side will be in the same plane. Turn pulley
round by hand to check the position. If not aligned, adjust the screw on the rear of
the machine support (diag. A), or adjust the bottom wheel screw (diag. B).

SNB-B24 BANDSAW MANUAL
5
6/2016
3. Adjusting Saw Guides: Turn pulleys round by hand until saw blade passes through
the two guides, then adjust the height of the guide. Make the roller higher than the
work piece. The distance between the rear roller and the back of the blade must be
about 0.5-1mm (Diag. C). The distance between the back of the blade and the rollers
must be about 2mm (Diag., D).
4. Adjusting the Fence: The surface of the fence must be parallel to the saw blade side-
surface.
5. Different Blade Size; Every time a different blade size is installed, the top and
bottom blade guides must be readjusted. To ensure that the teeth of the blades are
correct, the blade must be slackened. This prevents the lateral deformation of the
cork. Always ensure the blade teeth are sharpened and set. Worm blades can easily
overheat and are subject to excessive traction.
6. Testing; Connect the power and push start button to test. Check the direction of the
saw wheel, clockwise is the correct direction, if not, re-adjust. Run the machine for
about 10 mins before use.
5. SAFETY
1. KEEP GUARDS IN PLACE and in working order
2. REMOVE ADJUSTING KEYS AND WRENCHES. Form a habit of checking to see that
keys and adjusting wrenches are removed from the machine before turning on.
3. KEEP WORK AREA CLEAN. Cluttered work areas invite accidents.

SNB-B24 BANDSAW MANUAL
6
6/2016
4. DO NOT USE IN HAZARDOUS OR DANGEROUS ENVIRONMENTS. Do no operate
machine in damp, wet locations or where any flammable or noxious fumes may
exist. Keep work area well lit.
5. KEEP CHILDREN, VISITORS and PETS AWAY. All children, visitors and pets should be
kept away and at a safe distance from work area. Make workshop child or pet proof
with padlocks, master switches and by removing starter keys.
6. DO NOT FORCE MACHINE. Machine will work safer at the rate in which it is designed
when not forced to operate.
7. USE THE RIGHT EQUIPMENT. Do not force machine or attachment to do a job for
which it is not designed.
8. WEAR PROPER SAFETY APPAREL. Do not wear loose clothing, gloves, neckties, rings,
bracelets or other jewelry which may get caught in moving parts. Non-slip footwear
is recommended. Wear protective hair covering.
9. ALWAYS USE SAFETY GLASSES. Also use a face or dust mask if work area is dusty.
Everyday eyeglasses only have impact resist lenses and they are NOT safety glasses.
10. SECURE WORK. Use clamps or a vise to hold work when working. It is safer than
using your hands and frees both hands to operate the machine.
11. DO NOT OVERREACH. Keep proper footing and balance at all times.
12. MAINTAIN MACHINE WITH CARE. Keep parts sharp and clean for safer performance.
Follow instructions for lubricating and changing accessories.
13. USE RECOMMENDED ACCESSORIES/PARTS. Use of improper accessories may cause
risk of injury.
14. RISK OF UNINTENTIONAL START. Always disconnect from power source before
adjusting or performing any maintenance. Make sure the switch is in the OFF
position before reconnecting.
15. KICKBACK. Many woodworking machines can “kickback” the work piece towards the
operator. Know what conditions can create “kickback” and learn how to avoid them.
16. DMAGED PARTS. Before further use of a part, guard or other part that is damaged,
check carefully to determine if it is able to operate properly and perform its
intended function. Check for alignment of moving parts, binding of moving parts,
broken parts, mounting or any other conditions that may affect its operation. A part
that is damaged should be replaced.
17. NEVER LEAVE THE MACHINE RUNNING OR UNATTENDED. TURN POWER OFF. Do not
leave the machine until it comes to a complete stop.
18. NEVER OPERATE THE MACHINE WHEN TIRED, OR UNDER THE INFLUENCE OF DRUGS
OR ALCOHOL. Full mental alertness is required at all times when running a machine.

SNB-B24 BANDSAW MANUAL
7
6/2016
19. NEVER ALLOW UNSUPERVISED OR UNTRAINED PERSONNEL TO OPERATE THE
MACHINE. Make sure any instructions given in regards to the operation of the
machine is safe and clearly understood.
6. SAFETY
The saw blade runs by the pulleys turning. The motor is fitted on the rear of the machine
and power is transmitted with the aid of the V-Belt.
7. TRANSPORTATION & INSTALLATION
1. Machine is delivered completely assembled. Choose a suitable location and check
that it is accessible from all sides.
2. The machine should be installed in a closed space. Working conditions of a
workshop are considered enough.
3. Floor surface should be even and stable, and if necessary, machine can be bolted to
the floor.
8. MAINTENANCE
1. If machine is unusable, it must be repaired by a skilled technician.
2. Moving parts must be lubricated often. Good lubrication ensures a longer life of the
machine.
9. TROUBLESHOOTING
PROBLEM
CAUSE
TROUBLESHOOTING
Saw blade not Running
Smooth and Steady
Pulley Surface covered by
dust
Clean surface of pulley
Saw Blade tension is too
low
Adjust saw blade
Saw blade is worn
Replace blade with a new
one
Saw teeth setting is worn
Reset or change the saw
blade
Blade not sharp
Sharpen blade

SNB-B24 BANDSAW MANUAL
8
6/2016
Feeding speed is too fast
Adjust to suitable feed
speed.
Sawing not straight
1) Adjust Fence
2) Check the teeth
10. APPENDIX & BEAR LIST
Appendix
No.
Model
Standard
Quantity
Position
1
Saw Blade
25x0.9x4400
1
Main Machine
2
V-Belt
B-1250
2
Main Machine
3
Instruction Manual
1
Bear List
No.
Model
Standard
Quantity
Position
1
GB/T276-93 bear 6207-2RS
2
Top Pulley
2
GB/T276-93 bear 6207-2RS
2
Bottom Pulley

SNB-B24 BANDSAW MANUAL
9
6/2016
11. ELECTRICAL
Table of contents
Popular Saw manuals by other brands

IMET Spa
IMET Spa BASIC 300 PLUS SHI Instructions for use

Craftsman
Craftsman 103.22181 Operating instructions and parts list

EINHELL
EINHELL TE-CS 190/1 Original operating instructions

DeWalt
DeWalt XR FLEX VOLT DCS690 instruction manual

Draper
Draper BS230B instructions

Evolution
Evolution FURYTWIN125 Original instruction manual


