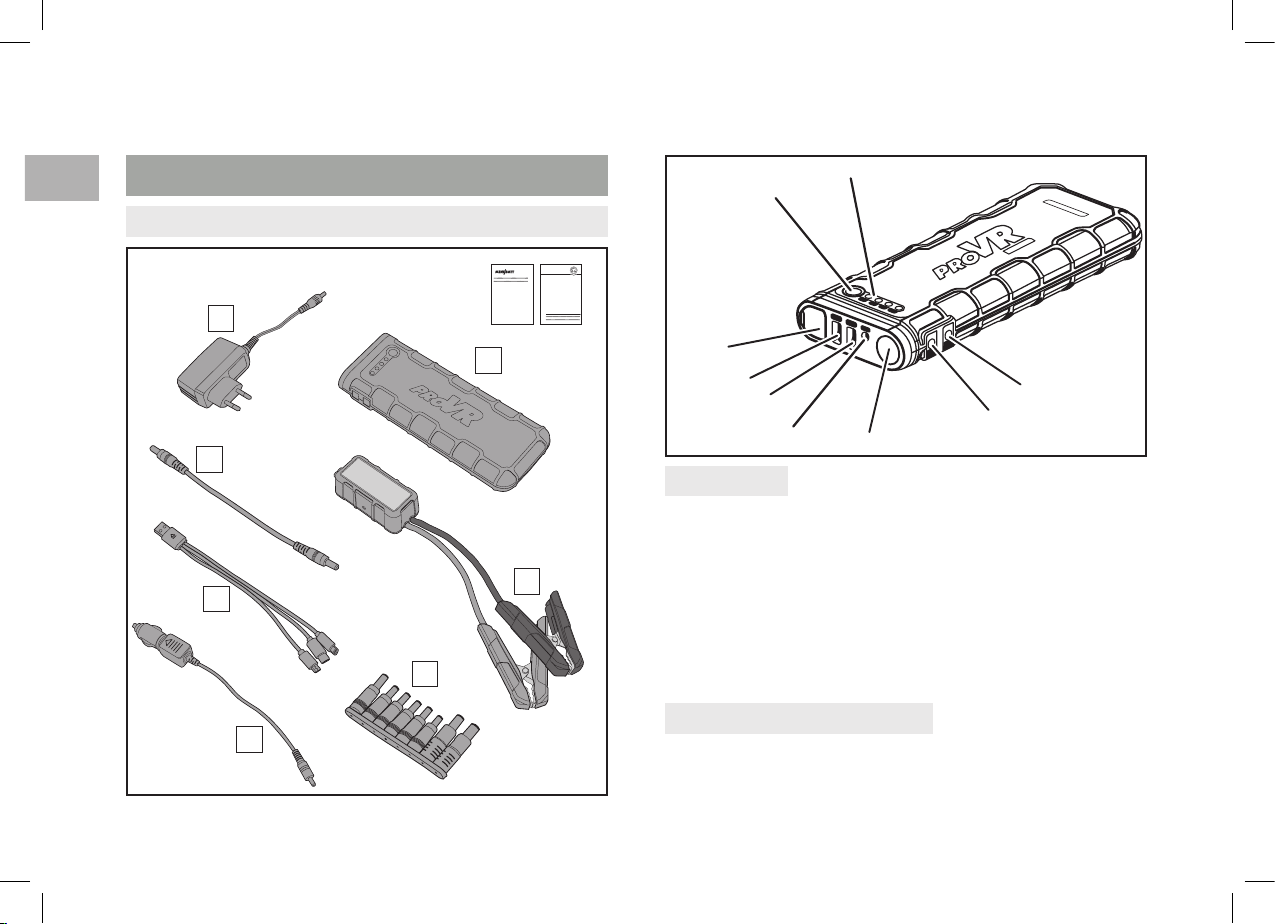
Skoda 000 051 763R User manual

Order Number/ Objednací číslo/ Bestellnummer
User manual/ Uživatelský návod/ Benutzerhandbuch
JUMP STARTER
POWERBANK
STARTOVACÍ POWERBANKA
STARTHILFE POWERBANK
000 051 763R

EN
2
A
B
F
G
E
C
D
Indicator
USB 5V/1A outlet
USB 5V/2A outlet
15V/1A inlet LED light
19V/3,5A outlet
12V/10A outlet
Switch
Jump starter
adapter socket
Jump Starter Powerbank
Technical specifications
Kit contents
Parts list
Part name Quantity Position
Powerbank 1 A
Connecting cable 1 B
USB cable 1 C
Adapter 8 D
Mains adapter 1 E
Charging adapter 12 V 1 F
Jump starter adapter with clamps 1 G
User manual MINIBATT 1
User manual ŠKODA 1
›Dimensions: 224x87x29mm
›Weight: 610g
›Battery capacity: 20 000mAh (74Wh)

EN
3
88.8
888
88.8
888
v
A
v
%
JUMP STARTREADY
PRODUCT
BATTERY
CLAMPS REVERSED
User manual
Powerbank charging instructions
Emergency starting of the vehicle
(Fig. 1) (Fig. 2)
›Output: 5V 1A; 5V 2A; 12V 10 A; 19V 3,5A
›Input: 15V 1A
›Total charging time: 8 hours (using the mains adapter)
›Starting current: 300A
›Maximum current: 600A
›Operating temperature: -20 ºC ~ 60 ºC
Indicator
Indicator 1 2 3 4
Battery charge level 25% 50% 75% 100%
› Plug the mains adapter (E) into a 230V mains socket.
› Connect the mains adapter to the 15V / 1A input port.
› Push the switch to check the battery charge level.
› Plug the 12V charging adapter (F) into the vehicle 12V socket.
› Connect the 12V charging adapter to the 15V / 1A input port.
› Connect the jump starter adapter with clamps to the powerbank.
The device test is started and the LCD display shows the power-
bank voltage.
Fig. 1
Fig. 2
Follow the instructions on the LCD display.
› When JUMP START READY appears on the LCD display, it means
the connection is correct and the circuit is working. You can attempt
to start the engine.
88.8
888
88.8
888
v
A
v
%
JUMP STARTREADY
PRODUCT
BATTERY
CLAMPS REVERSED
+
› Connect the red terminal to the positive (+) pole of the battery,
connect the black terminal to the ground point according to the
vehicle user manual. The adapter tests the voltage and condition of
the vehicle battery and shows the data on the display.
› While the power bank is charging, the corresponding indicator
ashes according to the battery status. After charging the power
bank to 100%, all indicators go out.

EN
4
Charging mobile phones or tablets
› Connect the USB cable (C) to the USB 5V/2A or USB 5V/1A output
port.
› Connect the other end of the USB cable to the mobile phone (Fig. 1)
or to the tablet (Fig. 2).
› Push the switch to start charging.
› Select the appropriate adapter for the notebook and connect it to
the cable (B) and the notebook.
› Push the switch to start charging.
› Connect the 12V vehicle accessory cable to the 12V/10A output
port.
› Push the switch to start charging.
› Press the switch for 3 seconds to turn on the LED light.
› When pressing the switch slightly, you can toggle between 4 modes
of the LED light in the following order: normal, strobe, emergency, o.
› Connect the connecting cable (B) to the USB 19V / 3.5A output port.
After starting the vehicle, disconnect both clamps and let the
engine run.
› When CLAMPS REVERSED appears on the LCD, an alarm sounds to
indicate incorrect connection. Connect the clamps correctly. The LCD
shows JUMP START READY, then start the engine.
› When PRESS BOOST BUTTON appears on the LCD, an alarm
sounds, which means that the vehicle battery voltage is too low.
Press the “BOOST” button until JUMP START READY appears on the
LCD, then start the engine within 30 seconds.
› If no vehicle battery data is displayed on the LCD, the alarm does
not sound, which means that the vehicle battery is discharged or
removed; check that the terminals are connected correctly, press
the “BOOST” button until “JUMP START READY” lights up and then
start the engine within 30 seconds.
+
88.8
888
88.8
888
v
A
v
%
JUMP STARTREADY
PRODUCT
BATTERY
CLAMPS REVERSED
Charging 19V electronic equipment, e.g. laptops
Charging 12V electronic equipment
LED light
(Fig. 1) (Fig. 2)

EN
5
13. Do not use the powerbank to start the vehicle while charging
the powerbank internal battery.
14. Use only the accessories supplied with this powerbank.
15. Do not use as a toy.
16. Do not leave the powerbank wet or immerse it in water.
17. Do not use in explosive atmospheres, such as in the presence
of ammable liquids, gases or dust.
18. Do not expose to extreme heat or re.
19. Do not wear metal objects when using the powerbank.
20. Do not use the powerbank if it is damaged in any way. In this
case, have it checked in a specialized workshop.
21. Do not use the powerbank if any cable clamp or cable is dam-
aged.
22. The powerbank may be repaired only by a specialized
workshop.
23. Only charge the powerbank at an ambient temperature
between 0 °C to 60 °C.
24. Charge the powerbank only with the original charger supplied
in the package.
25. Charge the powerbank regularly and keep it charged.
26. Do not charge the powerbank with the engine o, there is a
risk of discharging the vehicle battery.
27. Do not store in a vehicle at high and/or low temperatures for a
long time.
28. Always store in the original packaging.
1. Only for vehicles with a voltage of 12V, there is a risk for others.
It is forbidden to use for other machines, such as aircraft, ships,
etc.
2. Do not connect the (-) terminal to the vehicle battery, but to the
ground point dened in your vehicle user manual.
3. Do not touch any metal parts of the jump starter adapter
clamps.
4. Before an emergency start using the power bank, check
that all battery connections are clean! Make sure the adapter
clamps are connected correctly! If the battery contacts in the
vehicle are dirty or corroded, the power bank performance may
be reduced.
5. Do not attempt to start the vehicle in an emergency mode more
than 3 times in a row. Overheating could damage the powerbank
and the vehicle. Take at least two minutes between attempts. The
jump starter adapter may get overheated and disconnected for
safety reasons. After disconnecting and cooling down, the power-
bank must be switched on again.
6. Make sure that the powerbank is stable and securely stored in the
engine compartment when starting the engine in an emergency.
7. Do not short-circuit the adapter clamps or connect them to the
same place. Always follow the user manual.
8. Make sure that the blue connector of the jump starter adapter
is fully connected to the powerbank Melting could occur to the
blue connector.
9. Start only when 3 to 4 indicator lights are on.
10. Never leave the powerbank on the battery after a successful
start of the vehicle; disconnect it from the battery within 30
seconds after starting. Otherwise damage may occur to the
powerbank.
11. Do not use instead of the vehicle battery.
12. Do not use as a vehicle battery charger.
Caution

6
CZ
A
B
F
G
E
C
D
Indikátor
USB 5V 1A výstup
USB 5V 2A výstup
15V 1A vstup LED světlo
19V 3,5A výstup
12V 10A výstup
Spínač
Zásuvka pro
startovací adaptér
Startovací powerbanka
Technické specifikace
Obsah sady
Seznam dílů
Název dílu Množství Pozice
Powerbanka 1 A
Propojovací kabel 1 B
USB kabel 1 C
Redukce 8 D
Síťový adaptér 1 E
Nabíjecí adaptér 12V 1 F
Startovací adaptér se svorkami 1 G
Uživatelský návod MINIBATT 1
Uživatelský návod ŠKODA 1
›Rozměry: 224x87x29mm
›Váha: 610g
›Kapacita baterie: 20 000mAh (74Wh)

7
CZ
88.8
888
88.8
888
v
A
v
%
JUMP STARTREADY
PRODUCT
BATTERY
CLAMPS REVERSED
Návod k obsluze
Instrukce k nabíjení powerbanky
Nouzové nastartování vozu
(Obr. 1) (Obr. 2)
›Výstup: 5V 1A; 5V 2A; 12V 10 A; 19V 3,5A
›Vstup: 15V 1A
›Celkový čas nabíjení: 8 hodin (ze síťového adaptéru)
›Startovací proud: 300A
›Maximální proud: 600A
›Provozní teplota: -20 ºC ~ 60 ºC
Indikátor
Indikátor 1 2 3 4
Stav baterie 25% 50% 75% 100%
› Zapojte síťový adaptér (E) do síťové zásuvky 230V.
› Připojte síťový adaptér do vstupního portu 15V 1A.
› Stisknutím spínače zkontrolujte úroveň nabití baterie.
› Zapojte nabíjecí adaptér 12V (F) do 12V zásuvky vozu.
› Připojte nabíjecí adaptér 12V do vstupního portu 15V 1A.
› Připojte startovací adaptér se svorkami k powerbance. Spustí se
testování zařízení a LCD displej zobrazuje napětí powerbanky.
Obr. 1
Obr. 2
Postupujte dle pokynů na LCD displeji.
› Když se na LCD displeji zobrazí JUMP START READY, znamená to,
že připojení je správné a obvod funguje. Můžete zahájit startování
motoru.
88.8
888
88.8
888
v
A
v
%
JUMP STARTREADY
PRODUCT
BATTERY
CLAMPS REVERSED
+
› Připojte červenou svorku ke kladnému (+) pólu akumulátoru, čer-
nou svorku připojte ke kostřicímu bodu dle manuálu k vozu. Adaptér
otestuje napětí a stav akumulátoru vozu a zobrazí data na displeji.
› Po dobu nabíjení powerbanky bliká příslušný indikátor dle stavu
baterie. Po nabití powerbanky do 100% všechny indikátory zhasnou.

8
CZ
Nabíjení mobilního telefonu nebo tabletu
› Zapojte USB kabel (C) do výstupního portu USB 5V 2A nebo USB
5V 1A.
› Druhý konec USB kabelu připojte k mobilnímu telefonu (Obr. 1)
nebo tabletu (Obr. 2).
› Stisknutím spínače zahájíte nabíjení.
› Vyberte příslušnou redukci pro notebook a připojte ji ke kabelu (B)
a notebooku.
› Stisknutím spínače zahájíte nabíjení.
› Zapojte kabel 12V automobilového příslušenství do výstupního
portu 12V 10A.
› Stisknutím spínače zahájíte nabíjení.
› Stisknutím spínače na 3 sekundy zapnete LED světlo.
› Pokud mírně stisknete spínač, můžete přepínat 4 režimy LED světla
v pořadí: normální, stroboskop, SOS, vypnuto.
› Zapojte propojovací kabel (B) do výstupního portu USB 19V 3,5A.
Po nastartování vozidla odpojte obě svorky a nechte motor běžet.
› Když se na LCD displeji zobrazí CLAMPS REVERSED, zazní alarm, indi-
kující nesprávné připojení. Připojte svorky správným způsobem. Na LCD
displeji se zobrazí JUMP START READY, poté nastartujte motor.
› Když se na LCD displeji zobrazí PRESS BOOST BUTTON, zazní
alarm, což znamená, že napětí akumulátoru vozidla je příliš nízké,
stiskněte tlačítko „BOOST“, dokud se na LCD displeji nezobrazí
JUMP START READY, poté do 30 sekund nastartujte motor.
› Když se na displeji LCD nezobrazují žádná data o akumulátoru vozi-
dla, nezazní alarm, což znamená, že akumulátor vozidla je vybitý nebo
vyjmutý, zkontrolujte, zda jsou svorky správně připojeny, stiskněte
tlačítko „BOOST“, dokud se nerozsvítí „JUMP START READY“, poté
do 30 sekund nastartujte motor.
+
88.8
888
88.8
888
v
A
v
%
JUMP STARTREADY
PRODUCT
BATTERY
CLAMPS REVERSED
Pro nabíjení 19V elektroniky, např. notebooku
Pro nabíjení 12V elektroniky
LED světlo
(Obr. 1) (Obr. 2)

9
CZ
16. Nenechávejte powerbanku ve vlhku a neponořujte ji do vody.
17. Nepoužívejte výrobek ve výbušném prostředí, například v
přítomnosti hořlavých kapalin, plynů nebo prachu.
18. Nevystavujte výrobek extrémnímu teplu nebo ohni.
19. Při používání powerbanky nenoste kovové předměty.
20. Nepoužívejte powerbanku pokud je jakkoli poškozena. V tomto
případě ji nechte zkontrolovat odborným servisem.
21. Nepoužívejte powerbanku, pokud je poškozena jakákoli kabelo-
vá svorka nebo kabel.
22. Powerbanku může opravovat pouze odborný servis.
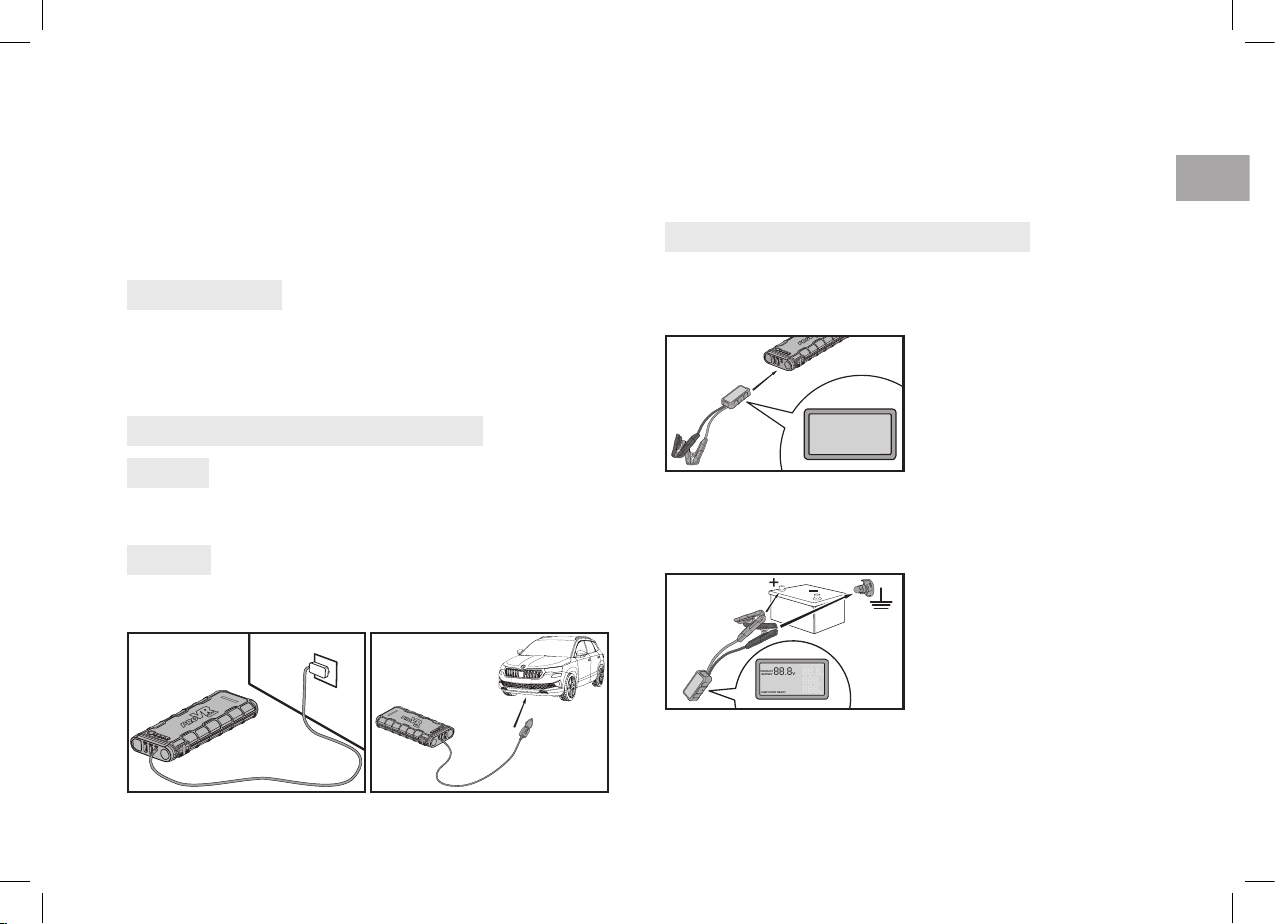
23. Nabíjejte powerbanku pouze při okolní teplotě mezi 0 ° C - 60 ° C.
24. Nabíjejte powerbanku pomocí originální nabíječky dodané v
balení.
25. Powerbanku nabíjejte pravidelně a udržujte ji v nabitém stavu.
26. Nedobíjejte powerbanku při vypnutém motoru, hrozí vybití
akumulátoru vozu.
27. Neskladujte dlouhodobě ve voze při vysokých a nízkých tep-
lotách.
28. Skladujte vždy v originálním balení.
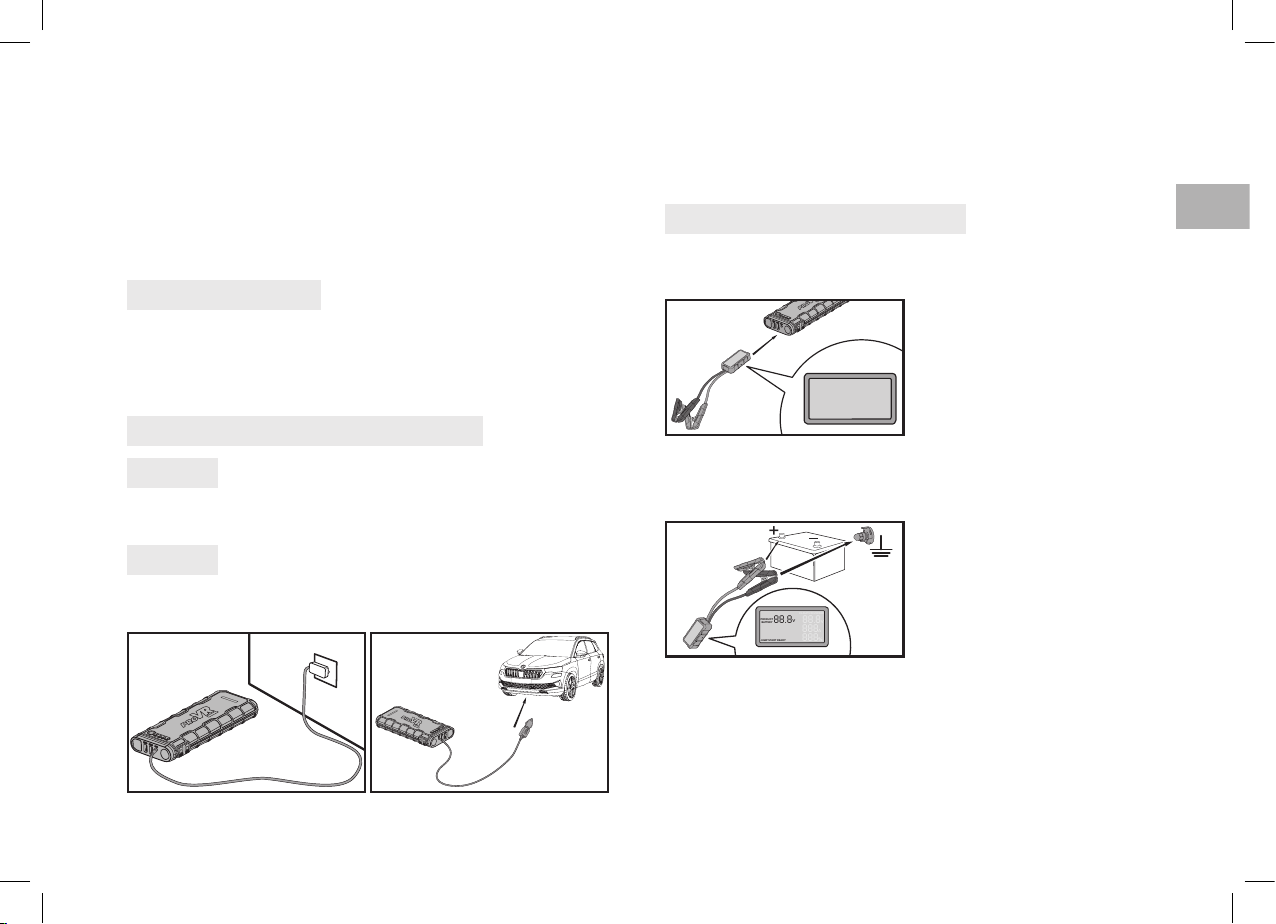
1. Pouze pro vozidla s napětím 12V, pro jiné hrozí nebezpečí. Je
zakázáno používat pro jiné stroje, jako jsou letadla, lodě atd.
2. Nepřipojujte svorku pro (-) pól na akumulátor vozu, ale na kost-
řicí bod denovaný v Návodu k obsluze vašeho vozu.
3. Nedotýkejte se kovových částí svorek startovacího adaptéru.
4. Před nouzovým startováním pomocí powerbanky zkontrolujte,
zda jsou všechna připojení akumulátoru čistá! Ujistěte se, že jsou
svorky adaptéru správně připojeny! Pokud jsou kontakty akumulá-
toru ve voze znečištěné nebo zkorodované, výkon powerbanky se
může snížit.
5. Nestartujte nouzově vůz více než 3krát za sebou. Přehřátím by
mohlo dojít k poškození powerbanky a vozu. Mezi pokusy mějte
časový rozestup alespoň dvě minuty. Startovací adaptér se může
přehřát a z bezpečnostních důvodů odpojit. Po odpojení a vy-
chladnutí, je nutno powerbanku opět zapnout.
6. Dbejte na stabilní a bezpečné uložení powerbanky v motorovém
prostoru při nouzovém startování motoru.
7. Svorky adaptéru navzájem nespojujte ani je nezapojujte na stej-
né místo. Vždy postupujte dle návodu k obsluze.
8. Ujistěte se, že je modrý konektor startovacího adaptéru plně
zapojen do powerbanky. Mohlo by dojít k roztavení modrého
konektoru.
9. Startujte pouze tehdy, když svítí 3 až 4 kontrolky.
10. Nikdy nenechávejte powerbanku na akumulátoru po úspěšném
nastartování vozu, do 30 sekund od nastartování ji odpojte od
akumulátoru. Jinak může dojít k poškození powerbanky.
11. Nepoužívejte místo akumulátoru ve vozidle.
12. Nepoužívejte jako nabíječku akumulátoru vozu.
13. Nepoužívejte powerbanku při startování vozu během nabíjení
interní baterie powerbanky.
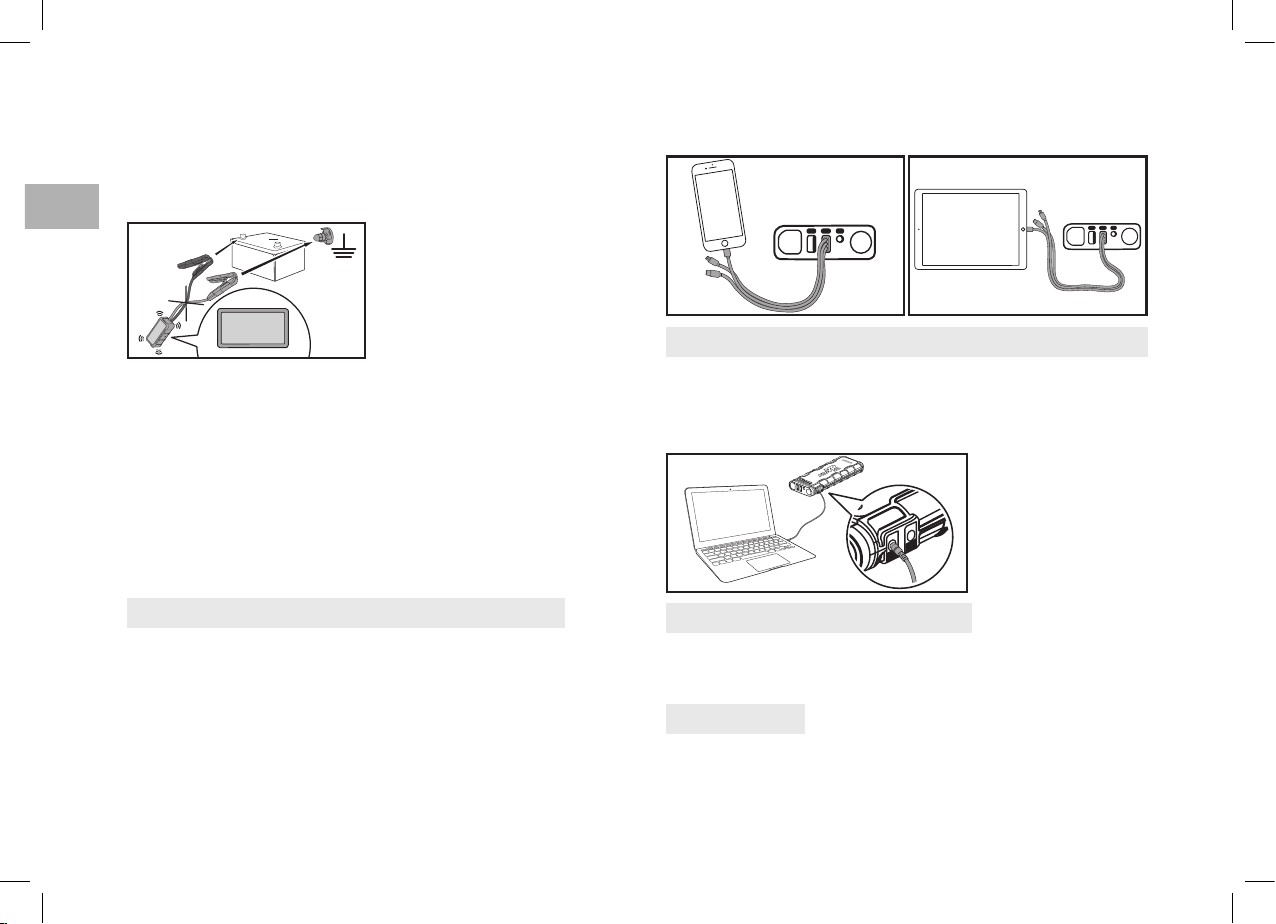
14. Používejte pouze příslušenství dodané s touto powerbankou.
15. Nepoužívejte jako hračku.
Upozornění

DE
10
A
B
F
G
E
C
D
Indikator
USB 5V 1A Ausgang
USB 5V 2A Ausgang
15V 1A Eingang LED Leuchte
19V 3,5A Ausgang
12V 10A Ausgang
Schalter
Steckdose für den
Startadapter
Starthilfe Powerbank
Technische Spezifikation
Inhalt des Sets
Teileliste
Bezeichnung des Teils Stückzahl Position
Powerbank 1 A
Verbindungskabel 1 B
USB Kabel 1 C
Reduktion 8 D
Netzadapter 1 E
Ladeadapter 12V 1 F
Startadapter mit Klemmen 1 G
Benutzerhandbuch MINIBATT 1
Benutzerhandbuch ŠKODA 1
›Abmessungen: 224x87x29mm
›Gewicht: 610g
›Kapazität der Batterie: 20 000mAh (74Wh)

DE
11
88.8
888
88.8
888
v
A
v
%
JUMP STARTREADY
PRODUCT
BATTERY
CLAMPS REVERSED
Bedienungsanleitung
Anweisungen zum Laden der Powerbank
Notstart des Fahrzeugs
(Abb. 1) (Abb. 2)
›Ausgang: 5V 1A; 5V 2A; 12V 10 A; 19V 3,5A
›Eingang: 15V 1A
›Ladezeit: 8 Stunden (vom Netzadapter)
›Startstrom: 300A
›Maximaler Strom: 600A
›Betriebstemperatur: -20 ºC ~ 60 ºC
Indikator
Indikator 1 2 3 4
Batteriestatus 25% 50% 75% 100%
› Den Netzadapter (E) in die Netzsteckdose 230V stecken.
› Den Netzadapter in den Eingangsport 15V 1A stecken.
› Den Ladezustand der Batterie durch Betätigen des Schalters prüfen.
› Den Ladeadapter 12V (F) in die 12V Steckdose im Fahrzeug stecken.
› Den Ladeadapter 12V in den Eingangsport 15V 1A stecken.
› Den Startadapter mit Klemmen an die Powerbank anschließen. Der
Test der Einrichtung wird gestartet und die LDC Anzeige zeigt die
Spannung der Powerbank an.
Abb. 1
Abb. 2
Nach Anweisungen im LDC Display vorgehen.
› Wenn JUMP START READY auf dem LCD-Display erscheint,
bedeutet dies, dass die Verbindung korrekt ist und der Stromkreis
funktioniert. Sie können den Startvorgang des Motors einleiten.
88.8
888
88.8
888
v
A
v
%
JUMP STARTREADY
PRODUCT
BATTERY
CLAMPS REVERSED
+
› Die Klemme an den positiven (+) Pol des Akkumulators, die
schwarze Klemme an den Massenpunkt nach Benutzerhandbuch des
Fahrzeugs anschließen. Der Adapter testet die Spannung und den
Zustand des Akkumulators und zeigt die Daten im Display an.
› Während des Ladevorgangs der Powerbank blinkt der jeweilige
Indikator nach Batteriezustand. Nachdem die Powerbank auf 100 %
geladen ist, erlöschen alle Anzeigen.

DE
12
Aufladen Ihres Mobiltelefons oder Tablets
› Das USB Kabel (C) in den Ausgangsport USB 5V 2A oder USB 5V 1A
stecken.
› Das andere Ende des USB Kabels an das Handy (Abb. 1) oder Tablet
(Abb. 2) anschließen.
› Der Ladevorgang wird durch Betätigen des Schalters gestartet .
› Wählen Sie den passenden Laptop-Adapter und verbinden Sie ihn
mit dem Kabel (B) und dem Laptop.
› Der Ladevorgang wird durch Betätigen des Schalters gestartet.
› Stecken Sie das 12V Kabel aus dem Fahrzeugzubehör in den Aus-
gangsport 12V 10A.
› Der Ladevorgang wird durch Betätigen des Schalters gestartet.
› Die LED Leuchte wird nach Drücken des Schalters für 3 Sekunden.
› Wenn Sie den Schalter leicht drücken, können Sie die 4 LED-Li-
chtmodi in folgender Reihenfolge umschalten: normal, Stroboskop,
SOS, aus.
› Das Verbindungskabel (B) in den Ausgangsport USB 19V 3,5A
stecken.
Nach dem Starten des Fahrzeugs beide Klemmen abklemmen
und den Motor laufen lassen.
› Wenn CLAMPS REVERSED auf dem LCD-Display angezeigt wird,
ertönt ein Alarm, der auf eine falsche Verbindung hinweist. Schließen
Sie die Klemmen in der richtigen Weise an. Auf dem LCD-Display wird
JUMP START READY angezeigt, dann den Motor starten.
› Wenn PRESS BOOST BUTTON auf dem LCD-Display erscheint,
ertönt ein Alarm, der anzeigt, dass die Spannung der Fahrzeugbatte-
rie zu niedrig ist, drücken Sie die „BOOST“-Taste, bis JUMP START
READY auf dem LCD-Display erscheint, und lassen Sie den Motor
innerhalb von 30 Sekunden an.
› Wenn keine Fahrzeugbatteriedaten auf dem LCD-Display angezeigt
werden und kein Alarm ertönt, was darauf hinweist, dass die Fahrze-
ugbatterie entladen oder ausgebaut ist, prüfen Sie, ob die Klemmen
richtig angeschlossen sind, drücken Sie die Taste „BOOST“, bis
„JUMP START READY“ aueuchtet, und lassen Sie den Motor inner-
halb von 30 Sekunden an.
+
88.8
888
88.8
888
v
A
v
%
JUMP STARTREADY
PRODUCT
BATTERY
CLAMPS REVERSED
Zum Aufladen der 19V Elektroni, z.B. Laptop
Zum Aufladen der 12V Elektronik
LED Leuchte
(Abb. 1) (Abb. 2)

DE
13
11. Nicht anstelle der Batterie im Fahrzeug verwenden.
12. Nicht als Ladegerät für Autobatterien verwenden.
13. Verwenden Sie die Powerbank nicht zum Starten des Fahrze-
ugs, während die interne Batterie der Powerbank geladen wird.
14. Verwenden Sie nur das mit dieser Powerbank mitgelieferte
Zubehör.
15. Nicht als Spielzeug verwenden.
16. Lassen Sie die Powerbank nicht in nasser Umgebung liegen
und tauchen Sie sie nicht in Wasser.
17. Verwenden Sie das Produkt nicht in einer explosionsgefährde-
ten Umgebung, z. B. in Gegenwart von brennbaren Flüssigkeiten,
Gasen oder Staub.
18. Setzen Sie das Produkt nicht extremer Hitze oder Feuer aus.
19. Tragen Sie keine Metallgegenstände, wenn Sie die Powerbank
benutzen.
20. Verwenden Sie die Powerbank nicht, wenn sie in irgendeiner
Weise beschädigt ist. In diesem
Fall durch Fachservice prüfen lassen.
21.Verwenden Sie die Powerbank nicht, wenn eine Kabelklemme
oder ein Kabel beschädigt ist.
22. Die Powerbank kann nur von einem qualizierten Servicetech-
niker repariert werden.
23. Laden Sie die Powerbank nur bei einer Umgebungstemperatur
zwischen 0°C und 60°C auf.
24. Laden Sie die Powerbank mit dem Original-Ladegerät auf, das
im Lieferumfang des in der Packung enthalten ist.
25. Laden Sie die Powerbank regelmäßig auf und halten Sie sie
geladen.
26. Laden Sie die Powerbank nicht bei ausgeschaltetem Motor
auf, da die Autobatterie sonst entladen werden kann.
27. Lagern Sie das Gerät nicht über einen längeren Zeitraum bei
hohen oder niedrigen Temperaturen im Fahrzeug.
28. Immer in der Originalverpackung aufbewahren.
1. Nur für Fahrzeuge mit Spannung 12 V, andere Fahrzeuge sind
gefährdet. Es ist verboten, das Gerät für andere Maschinen wie
Flugzeuge, Boote usw. zu verwenden.
2. Schließen Sie die Klemme für den (-) Pol nicht an die Autobatte-
rie an, sondern an die in der Betriebsanleitung Ihres Fahrzeugs
angegebene Klemme.
3. Die Metallteile der Klemmen des Startadapters nicht berühren.
4. Bevor Sie die Powerbank für einen Notstart verwenden, über-
prüfen Sie sie, dass alle Batterieanschlüsse sauber sind! Achten
Sie darauf, dass die Adapterklemmen richtig angeschlossen sind!
Wenn die Batteriekontakte im Fahrzeug schmutzig oder korrodi-
ert sind, kann sich die Leistung der Powerbank verringern.
5. Starten Sie das Fahrzeug nicht öfter als 3 Mal hintereinander.
Bei Überhitzung könnten die Powerbank und das Auto beschädigt
werden. Lassen Sie zwischen den Versuchen mindestens zwei
Minuten verstreichen. Der Starteradapter kann überhitzen und
aus Sicherheitsgründen abgeschaltet werden. Nach dem Trennen
der Verbindung und dem Abkühlen muss die Powerbank wieder
eingeschaltet werden.
6.Vergewissern Sie sich, dass die Powerbank sicher im Mo-
torraum verstaut ist, wenn der Motor in einem Notfall gestartet
wird.
7. Verbinden Sie die Adapteranschlüsse nicht miteinander und
stecken Sie sie nicht an der gleichen Stelle ein. Beachten Sie
immer die Bedienungsanleitung.
8. Stellen Sie sicher, dass der blaue Stecker am Starteradapter
vollständig in die Powerbank eingesteckt ist. Es könnte zum
Schmelzen des blauen Steckers kommen.
9. Starten Sie nur, wenn 3 bis 4 Kontrollleuchten aueuchten.
10. Lassen Sie die Powerbank niemals auf der Batterie, nachdem
Sie das Fahrzeug erfolgreich gestartet haben, innerhalb von 30
Sekunden nach dem Starten von der Batterie abklemmen. Ander-
nfalls kann die Powerbank beschädigt werden.
Hinweis

ES
14
A
B
F
G
E
C
D
Indicador
Salida USB 5V 1A
Salida USB 5V 2A
Entrada 15V 1A Luz LED
Salida 19V 3,5A
Salida 12V 10A
Conector
Toma para el adaptador
de arranque
Arrancador (powerbank)
Especificaciones técnicas
Contenido del kit
Lista de componentes
Nombre de la pieza Cantidad Posición
Arrancador (powerbank) 1 A
Cable de conexión 1 B
Cable USB 1 C
Reducción 8 D
Adaptador de red 1 E
Adaptador de carga 12V 1 F
Adaptador de arranque con pinzas 1 G
Manual de instrucciones MINIBATT 1
Manual de instrucciones ŠKODA 1
›Dimensiones: 224x87x29mm
›Peso: 610g
›Capacidad de la batería: 20 000mAh (74Wh)

ES
15
88.8
888
88.8
888
v
A
v
%
JUMP STARTREADY
PRODUCT
BATTERY
CLAMPS REVERSED
Manual de Instrucciones
Instrucciones para cargar el arrancador
Arranque de emergencia del vehículo
(Fig. 1) (Fig. 2)
›Salida: 5V 1A; 5V 2A; 12V 10 A; 19V 3,5A
›Entrada: 15V 1A
›Tiempo de carga total: 8 horas (con adaptador de red)
›Corriente de arranque: 300A
›Corriente máxima: 600A
›Temperatura de funcionamiento: -20 ºC ~ 60 ºC
Indicador
Indicador 1 2 3 4
Estado de la batería 25% 50% 75% 100%
› Conecte el adaptador de red (E) en la toma de corriente de 230V.
› Conecte el adaptador de red en el puerto de entrada de 15V 1A.
› Presionando el conector compruebe el nivel de carga de la batería.
› Conecte el adaptador de carga 12V (F) en la toma de 12V del vehí-
culo.
› Conecte el adaptador de red 12V en el puerto de entrada de 15V 1A.
› Conecte el adaptador de arranque con las pinzas al arrancador. La
prueba del dispositivo se inicia y la pantalla LCD indica el voltaje del
arrancador.
Fig. 1
Fig. 2
Proceda según las instrucciones en la pantalla LCD.
› Cuando aparece JUMP START READY en la pantalla LCD, signica
que la conexión es correcta y el circuito está funcionando. Usted
puede iniciar el arranque del motor.
88.8
888
88.8
888
v
A
v
%
JUMP STARTREADY
PRODUCT
BATTERY
CLAMPS REVERSED
+
› Conecte la pinza roja al polo positivo (+) de la batería y la pinza
negra al punto de conexión a bastidor según el manual de instruccio-
nes del vehículo. El adaptador comprobará el voltaje y el estado de la
batería del vehículo y mostrará los datos en la pantalla.
› Durante el tiempo de carga del arrancador, parpadea el indicador
correspondiente según el estado de la batería. Una vez cargado al
100%, todas las luces de control se apagan.

ES
16
Cargar del móvil o tablet
› Conecte el cable USB (C) en el puerto de salida USB 5V 2A o USB
5V 1A.
› Conecte el otro extremo del cable USB al teléfono móvil (Fig. 1) o
tablet (Fig. 2).
› Presionando el conector se inicia la carga.
› Seleccione la correspondiente reducción para el portátil y conécte-
la al cable (B) y al portátil.
› Presionando el conector se inicia la carga.
› Conecte el cable 12V de los accesorios del coche al puerto de salida
12V 10A.
› Presionando el conector se inicia la carga.
› Conecte el cable de conexión (B) al puerto de salida USB 19V 3,5A.
Una vez arrancado el vehículo, desconecte ambos bornes y man-
tenga el motor en marcha.
› Cuando aparezca CLAMPS REVERSED en el display, sonará una alarma
que indica una conexión incorrecta. Conecte los bornes de manera
correcta. En la pantalla LCD aparecerá JUMP START READY, a continu-
ación, arranque el motor.
› Cuando aparezca PRESS BOOST BUTTON en la pantalla LCD, so-
nará una alarma, indicando que el voltaje de la batería del vehículo es
demasiado bajo, pulse el botón „BOOST“ hasta que la pantalla LCD
muestre el letrero JUMP START READY, entonces arranque el motor
antes de 30 segundos.
› Cuando la pantalla LCD no muestre ningún dato sobre la batería
del vehículo, la alarma no sonará, indicando así que la batería del
vehículo está descargada o desconectada. Compruebe si los bornes
están adheridos correctamente, presione el botón „BOOST“ hasta
que se encienda “JUMP START READY“, a continuación arranque el
motor antes de 30 segundos.
+
88.8
888
88.8
888
v
A
v
%
JUMP STARTREADY
PRODUCT
BATTERY
CLAMPS REVERSED
Para cargar los dispositivos electrónicos de
19V, por ejemplo, un portátil
Para cargar los dispositivos electrónicos de 12V
(Fig. 1) (Fig. 2)

ES
17
› Presionando el conector durante 3 segundos se encenderá la luz
LED.
› Al presionar suavemente el conector, es posible cambiar los modos
de la luz LED en el siguiente orden: normal, estroboscopio, SOS,
apagado.
Luz LED
10. No deje nunca el arrancador en la batería después de arrancar
el vehículo, desconéctelo de la batería antes de que transcurran
30 segundos desde el arranque. De otra manera podría dañarse.
11. No utilizar en lugar de la batería del vehículo.
12. No utilizar como cargador de la batería del vehículo.
13. No utilizar el arrancador durante el arranque del vehículo si su
batería interna está cargándose.
14. Utilice solamente los accesorios entregados con este arranca-
dor.
15. No usar como juguete.
16. No exponga el arrancador a la humedad y no lo sumerja en el
agua.
17. No utilice el producto en atmósferas explosivas, como en pre-
sencia de líquidos, gases o polvos inamables.
18. No exponga el producto al calor extremo o al fuego.
19. No lleve objetos metálicos cuando utilice el arrancador.
20. No utilice el arrancador si está dañado de cualquier manera. En
tal caso, encárguelo para una revisión en un taller especializado.
21. No utilice el arrancador si cualquier borne o el cable está
dañado.
22. El arrancador puede ser reparado solamente en un taller
especializado.
23. Cargue el arrancador solamente en una temperatura ambiente
entre el 0 ° C a 60 ° C.
24. Cargue el arrancador utilizando un adaptador original entrega-
do en el envase.
25. Cargue el arrancador con regularidad y manténgalo siempre
cargado.
26. No cargue el arrancador estando el motor apagado, la batería
del vehículo puede descargarse.
27. No almacene el producto durante un tiempo prolongado en el
vehículo con temperaturas altas o bajas.
28. Almacénelo siempre en su envase original.
1. Sólo para vehículos con 12V, en los demás vehículos es peligro-
so. Se prohíbe su utilización en otros medios de transporte como
son aviones, barcos, etc.
2. No conecte el borne correspondiente al polo (-) a la batería del
vehículo, sino al punto de conexión a bastidor denido en el Manu-
al de Instrucciones de su automóvil.
3. No toque las partes metálicas de los bornes del adaptador de
arranque.
4. ¡Antes del arranque de emergencia compruebe
si todas las conexiones a la batería están limpias! ¡Asegúrese que
los bornes del adaptador están conectados correctamente! El ren-
dimiento del arrancador puede bajar si los contactos de la batería
en el vehículo están sucios o con corrosión.
5. No arranque de emergencia el coche más de 3 veces seguidas.
El sobrecalentamiento podría causar daños al arrancador y al
vehículo. Deje pasar al menos dos minutos entre los intentos. El
adaptador de arranque podría sobrecalentarse y desconectarse
por razones de seguridad. Una vez desconectado y frío, es nece-
sario volver a encender el arrancador.
6. Procure que el arrancador esté colocado de forma estable y se-
gura en el espacio del motor durante su arranque de emergencia.
7. No conecte los bornes del adaptador entre sí y evite también
conectarlos en el mismo lugar. Proceda siempre según el Manual
de Instrucciones.
8. Asegúrese que el conector azul del adaptador de arranque está
conectado completamente al arrancador. El conector azul podría
fundirse.
9. Arranque sólo cuando se enciendan de 3 a 4 luces de control.
Atención

FR
18
A
B
F
G
E
C
D
Indicateur
Sortie USB 5V 1A
Sortie USB 5V 2A
Entrée 15V 1A Lumière LED
Sortie 19V 3,5A
Sortie 12V 10A
Interrupteur
Prise pour adaptateur
de démarrage
Banque d’alimentation de démarrage
Spécifications techniques
Contenu du kit
Liste des composants
Nom de la pièce Unités Position
Banque d’alimentation 1 A
Câble d’interconnexion 1 B
Câble USB 1 C
Adaptateur 8 D
Adaptateur de réseau 1 E
Adaptateur de chargement 12V 1 F
Adaptateur de démarrage avec bornes 1 G
Notice d’utilisation MINIBATT 1
Notice d’utilisation ŠKODA 1
›Dimensions: 224x87x29mm
›Poids: 610g
›Capacité de batterie: 20 000mAh (74Wh)

FR
19
88.8
888
88.8
888
v
A
v
%
JUMP STARTREADY
PRODUCT
BATTERY
CLAMPS REVERSED
Mode d’emploi
Instructions pour charger la banque d’alimentation
Démarrage d’urgence de la voiture
(Fig. 1) (Fig. 2)
›Sortie: 5V 1A; 5V 2A; 12V 10 A; 19V 3,5A
›Entrée: 15V 1A
›Temps de charge total: 8 heures (à partir de l’adaptateur de réseau)
›Courant de démarrage: 300A
›Courant maximal : 600A
›Température de service: -20 ºC ~ 60 ºC
Indicateur
Indicateur 1 2 3 4
Niveau de batterie 25% 50% 75% 100%
› Branchez l’adaptateur de réseau (E) dans une prise réseau 230V.
› Connectez l’adaptateur de réseau au port d’entrée 15V 1A.
› Appuyez sur l’interrupteur pour vérier le niveau de charge de la batterie.
› Branchez l’adaptateur de charge 12V (F) à la prise de voiture 12V.
› Connectez l’adaptateur de charge 12V au port d’entrée 15V 1A.
› Connectez l’adaptateur de démarrage avec bornes à la banque
d’alimentation. Le test de l’appareil démarre et l’écran LCD ache la
tension de la banque d’alimentation.
Fig. 1
Fig. 2
Procédez selon les instructions sur l’écran LCD.
› Quand l’écran LCD visualise JUMP START READY, cela signie
que la connexion est correcte et le circuit fonctionne. Vous pouvez
commencer à démarrer le moteur.
88.8
888
88.8
888
v
A
v
%
JUMP STARTREADY
PRODUCT
BATTERY
CLAMPS REVERSED
+
› Connectez la borne rouge au pôle positif (+) de la batterie, connec-
tez la borne noire au point de masse selon le manuel de la voiture.
L’adaptateur soumet à l’essai la tension et l’état de la batterie de la
voiture et ache les données sur l’écran.
› Pendant le chargement de la banque d’alimentation, l’indicateur co-
rrespondant clignote en fonction de l’état de la batterie. La banque
d’alimentation chargée à 100 %, tous les indicateurs s’éteignent.

FR
20
Chargement d’un téléphone portable ou
d’une tablette tactile
› Connectez le câble USB (C) au port de sortie USB 5V 2A ou USB 5V 1A.
› Connectez l’autre extrémité du câble USB au téléphone mobile (Fig. 1)
ou à la tablette tactile (Fig. 2).
› En appuyant sur l’interrupteur, vous commencez à le charger.
› Sélectionnez l’adaptateur approprié pour l’ordinateur portable et
connectez-le au câble (B) et à l’ordinateur portable.
› En appuyant sur l’interrupteur, vous commencez à les charger.
› Connectez le câble 12 V des accessoires de véhicule au port de
sortie 12V 10A.
› En appuyant sur l’interrupteur, vous commencez à les charger.
› Connectez le câble d’interconnexion USB (B) au port de sortie
USB 19V 3,5A.
Après avoir démarré le véhicule, débranchez les deux bornes et
laissez tourner le moteur.
› Quand l’écran LCD visualise CLAMPS REVERSED, une alarme sonne
an d’indiquer la connexion incorrecte. Connectez de manière correcte
les bornes. L’écran LCD va visualiser JUMP START READY, puis le mote-
ur sera démarré.
› Quand l’écran LCD visualise PRESS BOOST BUTTON, une alarme
sonne ce qui signie que la tension du véhicule est trop basse,
appuyez sur le bouton « BOOST » jusqu’à ce que les mots JUMP
START READY soient visualisés sur l’écran LCD, puis démarrez le
moteur au bout de 30 secondes.
› Si aucune donnée de batterie du véhicule n’est achée sur l’écran
LCD, aucune alarme ne sonne, ce qui signie que la batterie du véhi-
cule est déchargée ou retirée, vériez que les bornes sont correcte-
ment connectées, appuyez sur le bouton « BOOST » jusqu’à ce que
les mots «JUMP START READY» soient allumés, puis démarrez le
moteur au bout de 30 secondes.
+
88.8
888
88.8
888
v
A
v
%
JUMP STARTREADY
PRODUCT
BATTERY
CLAMPS REVERSED
Pour charger des appareils électroniques 19 V,
par exemple un ordinateur portable
Pour charger des appareils électroniques 12 V
(Fig. 1) (Fig. 2)
Table of contents
Languages:
Popular Remote Starter manuals by other brands

ADS
ADS TR4650A owner's manual

PURSUIT
PURSUIT PRO9556Z Quick installation guide

Vector
Vector VEC012AP Owner's manual & warranty information

CompuSTAR
CompuSTAR FT-MB221-DC installation guide

Directed Electronics
Directed Electronics VSM200 Quick reference install guide

NOCO Genius
NOCO Genius genius BOOSTMAX GB500 User guide & warranty