Skyhawk miniSensor User manual

Quickstart Guide
Vibration/Magnet
miniSensor

ATTENTION
The miniSensor is used in conjunction with an existing Skyhawk CE
account, subscription, and an active in-range Hub unit.
Sensors are shipped with a default sensitivity of 7, unless otherwise noted.
Depending upon your application, this setting may need to be adjusted.
High sensitivity can lead to false alerts from external environmental factors
such as rain, hail or extraneous vibrations. If false alerts arise, the vibration
sensitivity can be adjusted by using the procedure on page 9.

Need to download the Skyhawk CE App?

Table of Contents
Device Overview ..................................... 4
Status Lights .......................................... 5
Sensor Activation ................................... 6-7
Start-Up Operation ................................. 8
Adjust Accelerometer Sensitivity ......... 9
Trigger Type Setups .............................. 10-11
Enable/Disable Accelerometer ............. 12
Shutdown Operation .............................. 13
Resetting Sensor .................................... 14
Battery Replacement ............................. 15-16
Battery Optimization .............................. 17
Product Support ..................................... 18
Limited Product Warranty ...................... 19 - 21
Regulatory Information .......................... 22

Device Overview
status
Cover Screws
LED Status Indicator
Magnet Reed Alignment Notch
Function Button
4

5
Device Status Lights
Powering On (Valid Hub Connection)
Event Trigger On & Active Status
Device Reset
Powering Down
Powering On (Failed Hub Connection)
Blink PauseRapid Flashing
(10 Sec.)
(5 Sec.)
(Every 10 Sec. Normal)
(5 Sec.)
NOTE: If the Sensor is out of range or the Hub unit was not turned on, the status LED on the Sensor
will start rapidly blinking red after power up. Make sure the Hub unit was turned ON first or try
relocating the Sensor/Hub combination so they are closer to each other. Power cycle or reset Sensor
to retry Hub unit connectivity validation. (For further troubleshooting refer to hardware user manual)
(5 Sec.)
(Every 10 Sec. Retransmission)

Activate Sensor
Open Skyhawk CE App Open Main Menu Select Add Sensor
Add Sensor
6

Activate Sensor (Continued)
NOTE: QR code and serial number can also be found on the original packaging.
Scan the unique QR code located on the
back of the device and follow all in-app
instructions to finish activating your
sensor.
Product Serial Number can be entered
manually if QR code can not be read.
7

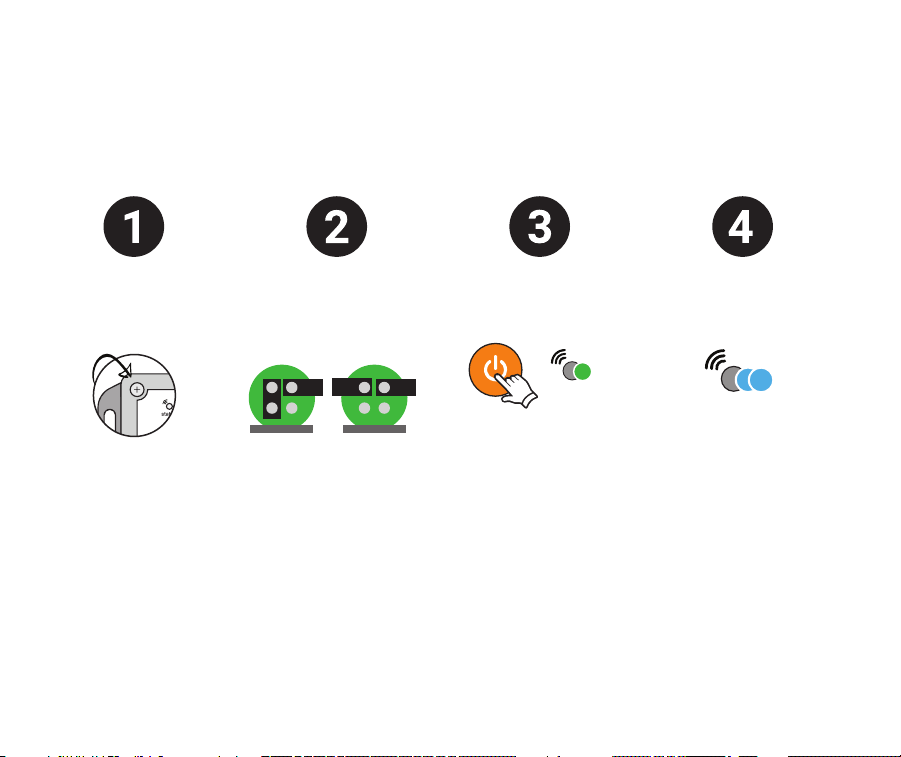
Start-Up Operation
status
8
1.) Press and release the power/function button; the status light blinks green.
2.) Once powered on, the Sensor will automatically send an ON alert to your Hub; then, after
about a 5 second pause the status light will rapid blink green to confirm a valid connection.
Powering On w/ Valid Hub Connection
(5 sec.)
NOTE: The status LED on the Sensor will start rapidly blinking red after power up if the Hub unit is not
on, or in range.
(IMPORTANT: Hub unit needs to be ON and in range, for Sensor connectivity)

9
Adjust Accelerometer Sensitivity
IMPORTANT: Sensor must be turned on to enter program mode
status
Press and hold button
until LED sequence begins
(5 Sec.)
Push button 1-10 times
to adjust sensitivity
(LED will blink once
on each push)
Test Accelerometer
Functionality
Enter Program
Mode
Adjust Accelerometer
Sensitivity
Wait 10 Sec.
(Sensitivity status confirmation)
(1-10 Blinks)
status
status
1 (Least Sensitive) ----> 10 (Most Sensitive) Default set at 7
Sensitivity
Unit will blink 1-10 times
to indicate sensitivity.
status
5 rapid green blinks as
an acknowledgment
from the hub.

10
Trigger Type Setup
Accelerometer (By Default)
Attach Sensor 1-Minute,
Until Next Trigger*
Sensor ReadyTrigger Sensor
(Test Sensor functionality)
status
status status
Short Pause
confirm
5 seconds of
green blinks
(Unit communicated
with Hub)
status
5
5 rapid green blinks as
an acknowledgment
from the hub.
*Every Trigger is followed by a back off. The first four triggers are followed by one-minute. After the
5th trigger, all future triggers are followed by one hour until a heartbeat or a reed trigger or if the unit is
power cycled.

11
Trigger Type Setup
Magnet Reed Switch
(Optional item, purchased separately)
(Refer to hardware manual for detailed installation)
Trigger
Magnet
(Test Sensor
functionality)
status
Locate Magnet Notch
(Top of Sensor)
Attach other End
to Monitored Object
Attach
Pull Magnet Kit
status
5
Confirm 5 seconds
of green blinks
(Unit communicated
with Hub)
status
5 rapid green blinks as
an acknowledgment
from the hub.
12
Enable/Disable Accelerometer
IMPORTANT: Remove batteries prior to changing jumper configuration.
Test Accelerometer
Functionality
status
Unscrew/Open
Sensor Case
Configure Jumpers
(Located above battery tray)
On Off
3131
Close Case >
Turn Sensor On
status
(Press + Release)

Shutdown Operation
status
Powering Down
13
NOTE: If Hub unit is in range during the shut down process, the Sensor will send a power-down
alert to your Skyhawk CE App.
1.) Press and release the power/function button; the status light starts blinking red.
2.) Sensor will continue to blink red 5 times during shutdown.
If the Sensor is not going to be used for an extended period of time:

14
Resetting Sensor
Reset Sensor to original factory default setting
(15+ Sec.)
Startup Operation
Begins
Press & Hold
Function Button
Keep Holding
Function Button
Release
Function Button
status
Press and hold button
until LED sequence changes
to rapid blinking red
NOTE: While holding the function button the status light sequence will pass though the sensitivity
menu in which the status light will start blinking green/red. Continue to hold past this until the status
light is only rapidly blinking red.
status
(1 second)
status
(Red/Green/Blue
continuous rapid flash)
(2 seconds)
5 green blinks
1 second apart
for 5 seconds

15
Battery Replacement
(Refer to hardware manual for detailed instructions)
IMPORTANT: Always replace batteries with 2 new and identical name-brand AAA alkaline batteries.
If jumpers have been modified, removing and replacing batteries will update unit to new settings.
Unscrew/Open
Sensor Case
Remove Batteries
(Located under PC card)
Insert New Batteries
(Following +/- symbols)
Startup Sequence
Begins When User
Presses And Releases
Power Button.
status
(Red/Green/Blue
continuous rapid flash)

16
Tighten Screws In “X” Pattern Order,
1, 4, 3 Then 2 Until Completely Seated.
Battery Replacement
(Refer to hardware manual for detailed instructions)
status
5
1 2
3 4
Device Will Enter
Sleep Mode
6
(**When the cover is screwed on, be sure
the notch is at the top. LED light will not
be visible if rotated 180 degrees**)

17
Battery Optimization
If not using the Sensor for more than 1-2 days, it is recommend to turn
the device off. Store unit in dry place when not in use.
While transporting or not actively using the Sensor in a deployment, it is
recommended to power down the device to prevent unwanted and
excessive triggering. Accelerometer will activate due to vibration in
transport and battery life will shorten considerably.

For product support and to download detailed user and product manuals:
Product Support & Manuals
support.sky-hawk.com
or
Contact us at 1-800-760-3966
18

Limited Product Warranty
19
THIS LIMITED WARRANTY FOR SKYHAWK PRODUCTS GIVES YOU SPECIFIC LEGAL RIGHTS AND YOU MAY ALSO HAVE OTHER RIGHTS,
WHICH VARY BY STATE, PROVINCE, OR JURISDICTION.
THIS LIMITED WARRANTY CAN BE FOUND ONLINE AT WWW.SKY-HAWK.COM/LEGAL AND IN THE DOCUMENTATION WE PROVIDE
WITH OUR PRODUCTS.
COMPANY WARRANTS THAT DURING THE WARRANTY PERIOD, THE PRODUCT WILL BE FREE FROM DEFECTS IN MATERIALS AND
WORKMANSHIP.
COMPANY EXPRESSLY LIMITS THE DURATION AND REMEDIES OF ALL IMPLIED WARRANTIES, INCLUDING WITHOUT LIMITATION THE
WARRANTIES OF MERCHANTABILITY AND FITNESS FOR A PARTICULAR PURPOSE TO THE DURATION OF THIS EXPRESS LIMITED
WARRANTY.
SOME STATES DO NOT ALLOW LIMITATIONS ON HOW LONG AN IMPLIED WARRANTY LASTS, SO THE ABOVE LIMITATION MAY NOT
APPLY TO YOU.
OUR RESPONSIBILITY FOR DEFECTIVE SKYHAWK PRODUCTS IS LIMITED TO REPAIR, REPLACEMENT OR REFUND AS DESCRIBED
BELOW IN THIS WARRANTY STATEMENT.
Who May Use the Limited Product Warranty?
This limited warranty extends only to the original purchaser of the Skyhawk Product from the Skyhawk Website or from an authorized
Skyhawk Dealer, or to the first person who activates the Skyhawk Product through registration of the Product to their Skyhawk Account
(“you“/ “your”). It does not extend to any subsequent owner or other transferee of the Product.
What Does the Limited Product Warranty Cover?
This limited warranty covers defects in materials and workmanship of the Product for the Warranty Period as defined below.
Table of contents
Popular Accessories manuals by other brands


wattstopper
wattstopper RD‑250 installation instructions

HYDACELECTRONIC
HYDACELECTRONIC HYDACLAB HLB 1400 Original instructions

Silvercrest
Silvercrest SFS 52 B2 instructions

Multitech
Multitech MultiConnect Conduit Series manual

RecorderGear
RecorderGear PB500 user manual

Alfalaval
Alfalaval Rotacheck instruction manual

Silvercrest
Silvercrest SEAS 20 A1 operating instructions

STREET WISE
STREET WISE SWXLPB4 user manual

Rocket Fish
Rocket Fish RF-LAPCOL Guía del usuario

Silvercrest
Silvercrest 43150 Assembly, operating and safety instructions

M Climate
M Climate LoRaWAN user manual

Fire-Lite
Fire-Lite CHG-120 series instruction sheet