M Climate LoRaWAN User manual

User manual
MClimate H&T Sensor LoRaWAN®
mclimate.eu/lorawan-resources
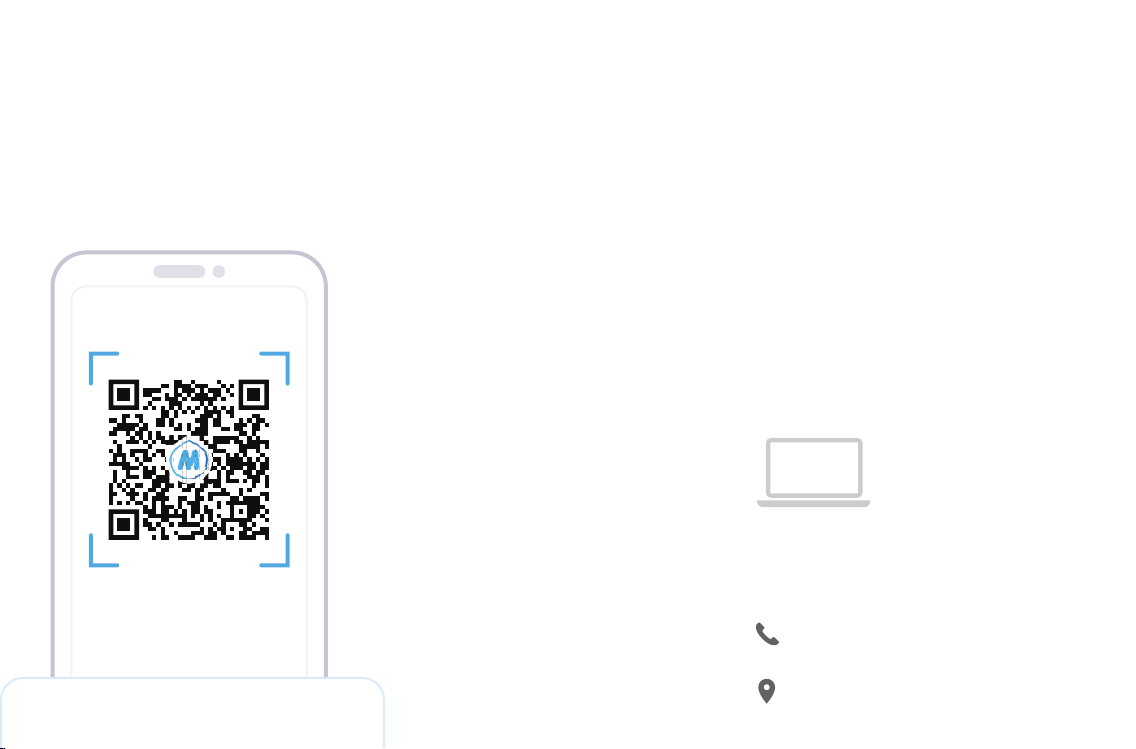
Scan the QR Code
to access MClimate
H&T Sensor LoRaWAN®
extended documentation
За да разберете как се
инсталира MClimate H&T
Sensor LoRaWAN®,
сканирайте QR кода или
посетете линка до него.
Bulgarian
Et teada saada, kuidas
installida MClimate H&T
Sensor LoRaWAN®, QR-koodi
või külastada linki kõrval.
Estonian
Chcete-li zjistit, jak
nainstalovat MClimate H&T
Sensor LoRaWAN®,
prohlédněte si kód QR nebo
navštivte odkaz vedle něj.
Czech
A MClimate H&T Sensor
LoRaWAN® telepítésének
kiderítéséhez keresse meg a
QR-kódot, vagy keresse fel a
mellette található linket.
Hungarian
Tutustu MClimate H&T Sensor
LoRaWAN®-laitteen
asentamiseen, skannaa
QR-koodi tai vierailla sen
vieressä olevassa linkissä.
Finnish
Chun a fháil amach conas a
shuiteáil MClimate H&T
Sensor LoRaWAN®, scanadh
an cód QR nó tabhair cuairt ar
an nasc in aice leis é.
Irish
For at finde ud af, hvordan du
installerer MClimate H&T
Sensor LoRaWAN®, scan
QR-koden eller besøg linket
ud for det.
Danish
Pour savoir comment installer
MClimate H&T Sensor
LoRaWAN®, scannez le code QR
ou visitez le lien à côté de
celui-ci.
French
Per installare MClimate H&T
Sensor LoRaWAN®
scannerizzare il codice QR
oppure aprire il link al suo lato.
Italian
Om te weten te komen hoe u
MClimate H&T Sensor
LoRaWAN® installeert, scan
de QR-code of bezoek de link
ernaast.
Dutch
Um herauszufinden, wie man
MClimate H&T Sensor
LoRaWAN® installiert, scannen
Sie den QR-Code oder
besuchen Sie den Link
German För att ta reda på hur du
installerar MClimate H&T
Sensor LoRaWAN®, skanna
QR-koden eller besök länken
bredvid den.
Swedish
Lai uzzinātu, kā instalēt
MClimate H&T Sensor
LoRaWAN®, skenēt QR kodu vai
apmeklējiet saiti blakus tai.
Latvian Para saber como instalar
MClimate H&T Sensor
LoRaWAN®, digitalize o código
QR ou visite o link ao lado dele.
Portuguese
Para saber cómo instalar
MClimate H&T Sensor
LoRaWAN®, escanee el código
QR o visite el enlace al lado.
Spanish
Norėdami sužinoti, kaip
įdiegti MClimate H&T Sensor
LoRaWAN®, nuskaitykite QR
kodą arba apsilankykite
nuorodą šalia jo.
Lithuanian
Pentru a afla cum să instalați
MClimate H&T Sensor
LoRaWAN®, scanați codul QR
sau accesați link-ul de lângă
acesta.
Romanian
Biex issir taf kif jinstallaw
MClimate H&T Sensor
LoRaWAN®, skennjati l-kodiċi
QR jew żur il-link li jmiss lilu.
Maltese
Για να μάθετε πως να
εγκαταστήσετε τον MClimate
H&T Sensor LoRaWAN®,
σκανάρετε τον QR κωδικό ή
επισκεφτείτε τον σύνδεσμο
δίπλα του.
Greek
Ak chcete zistiť, ako
nainštalovať MClimate H&T
Sensor LoRaWAN®, skenujte kód
QR alebo navštívte odkaz vedľa
nej.
Slovak
Aby dowiedzieć się, jak
zainstalować MClimate H&T
Sensor LoRaWAN®, zeskanuj
kod QR lub odwiedź link obok
niego.
Polish
Чтобы узнать, как установить
MClimate H&T Sensor
LoRaWAN®, отсканируйте
QR-код или перейдите по
ссылке, расположенной рядом
с ним.
Russian
00359 800 3 1010
Monday-Friday 09:00 - 18:00
Sofia, Bulgaria
Aleksandar Malinov Boulevard 31, Campus X, Building 2,
floor 1, office 1-2
Need some help?
For more product information and issues related to it, visit:
mclimate.eu/lorawan-resources
or write us to:
lorawan-support@mclimate.eu
1

Table of content What’s inside the box?
What is in the box?
01 2
MClimate H&T Sensor LoRaWAN®
Device parts
03 4
LED, Buttons and behaviour
04 5
Commissioning
05 6-7
Installation
06 8
Installation of external temperature sensor (NTC)
07 9
Technical details, Safety instructions,
Legal Notices & Compatibility
02
3
2

In order to operate MCllimate H&T Sensor
LoRaWAN®, you will need:
LoRaWAN® network
Battery
Battery type: 2xAA battery 1,5VDC
Device operating voltage: 2.7 - 3.6VDC
Description: LoRaWAN temperature and humidity sensor
Model: MC-LW-HT-01
Dimensions: 80 x 80 x 20mm
Weight: 107gr
Frequency range: 863÷870MHz
LoRaWAN® Device type: Class A End-device
Power supply: 2xAA batteries 1,5VDC
Sensors: built-in temperature and humidity sensor
Work temperature: 0°С to +60°С
Material: ABS
Environmental conditions, in which the device is intended to operate:
-Indoor using;
-for altitude up to 2000m;
-for an ambient temperature:0°С to +60°С;
-for maximum relative humidity of 80% for temperature up to 31°С,
decreasing linearly to 25% relative humidity at temperature 50°С;
-for environment with a degree of contamination 2 (PD2).
Storage and transportation conditions:
- for an ambient temperature :-40°С to +85°С;
- for relative humidity 5% to 90% without condensation
Manufacturer
Melissa Climate Jsc
Gen. Gurko 4 street
1000 Sofia,Bulgaria
Compliance with the WEEE Directive
The appliance marked with this symbol should not be disposed of with
other household waste. It must be handed over to the relevant
collection point for the recycling of electrical and electronic equipment.
Legal Notices
Please read the safety instructions before installing the
device! Failure to follow the recommended instructions in
this manual may be dangerous or in violation of the law. The
manufacturer Melissa Climate Jsc., is not responsible for any
loss or damage caused by failure to follow the instructions
in the operating manual.
Technical specifications CompatibilitySafety Instructions
3
All information, including but not limited to, features,
functionality, and / or other product specifications are
subject to change without notice. MClimate retains all rights
to review or update its products, software or documenta-
tion without being required to notify any natural or legal
person.
The MClimate and MClimate logo are trademarks of Melissa
Climate Jsc. All other brands and product names mentioned
herein are trademarks of their respective owners.
EU Declaration of Conformity
This device complies with the essential requirements and
other applicable provisions of the following EU directives:
2014/53/ЕС
EN 50491-3:2009
EEU 300 220-1 V3.1.1:2017
EEU 300 220-2 V3.1.1:2017
EN 60950-1:2006+A11:2009 +A1:2010+A12:2011+
А2:2013 + AC:2015
EN 301 489-1 V2.1.1:2017

Assembled H&T Sensor, top view Disassembled H&T Sensor, top view
Device parts
4
LED status
NTC Sensor port
Batteries
holder
Status button
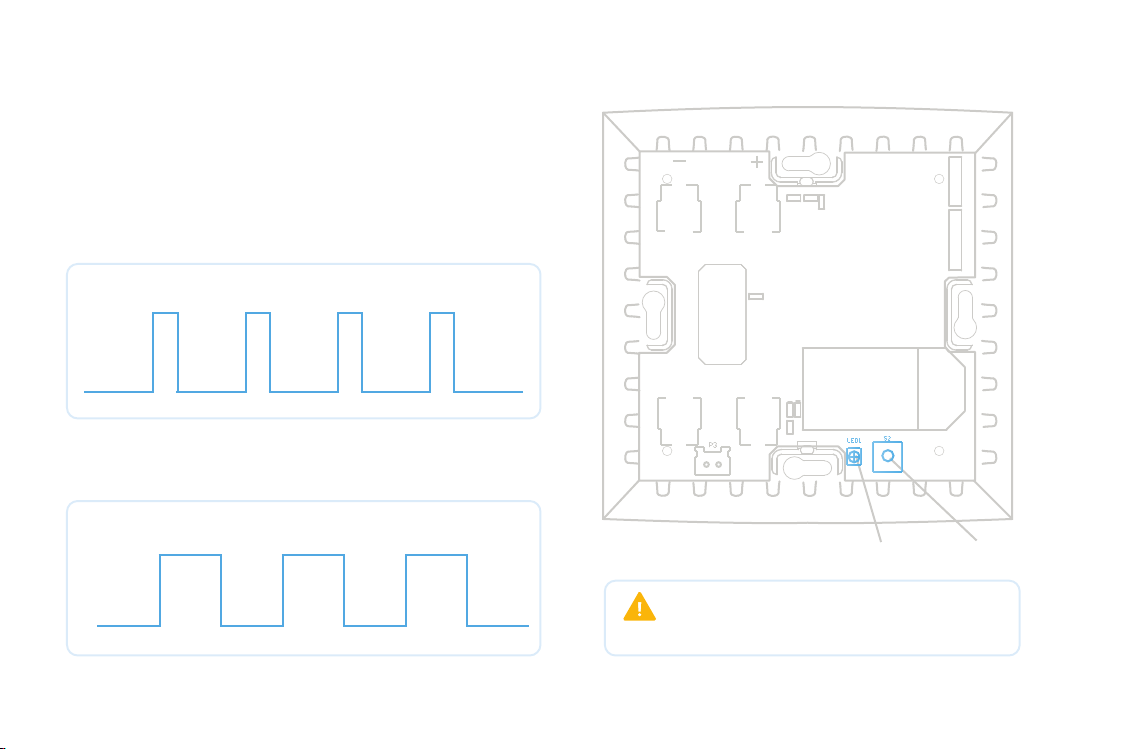
When you press the button, the device indicates the current
network status:
1.Device has successfully connected to the network (has received
Join Accept):
a.The LED will blink on (30ms duration) and off (800ms duration)
multiple times to indicate that it’s connected to a network
2.Device is not yet connected to a network:
a.The LED will blink on (800ms duration) and off (800ms duration)
multiple times.
800ms 800ms 800ms 800ms 800ms
30ms30ms30ms30ms
Device is connected to a network
LED, Buttons and behaviour
5
LED status Status button
800ms
800ms 800ms 800ms
800ms 800ms 800ms
Device is NOT connected to a network
Warning: The button has no other function than to
check the connection status. Long-pressing it will
NOT reset the device.
Continue the Installation with the instructions of your
LoRaWAN® Network provider.
2
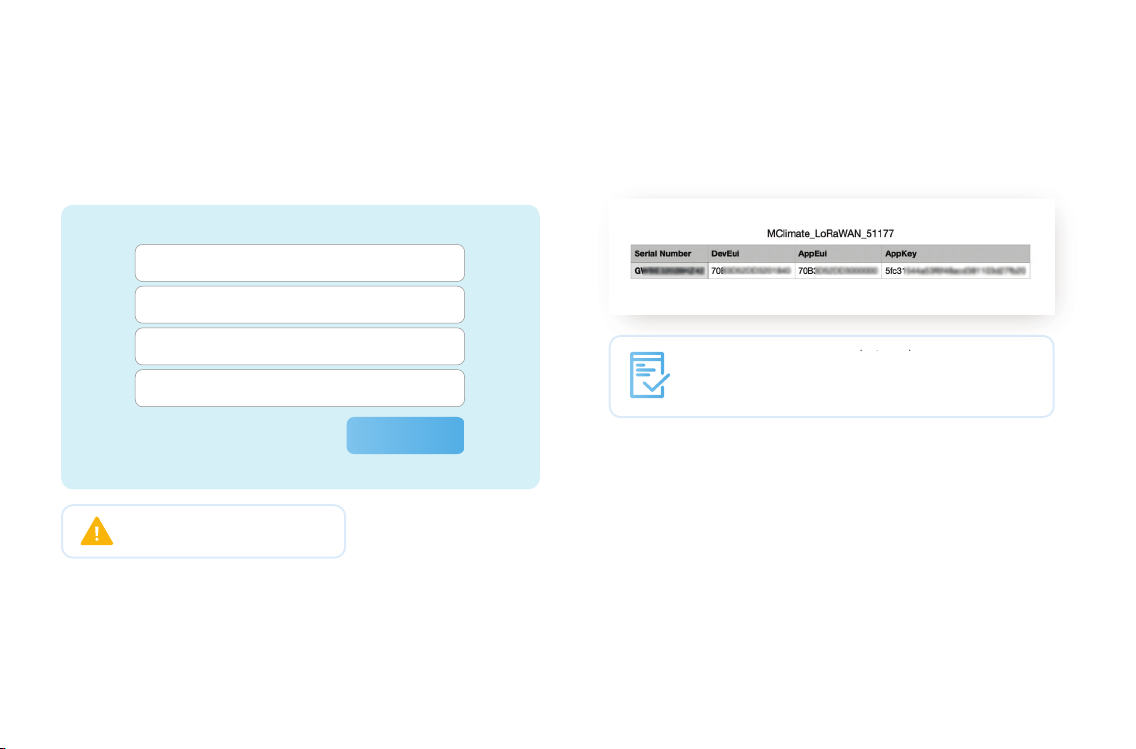
Device ID: 9X7621HS
DevEUI: 70B3D25DD30009E1
AppEUI: 70B3D25DD3000000
AppKey: a0658dfae72131saf1249abc11
Register
You can get DevEUI, AppEUI (JoinEUI) & AppKey
information from the LoRaWAN® credentials .csv file we
sent you with the fulfillment confirmation.
You can get DevEUI, AppEUI (JoinEUI) & AppKey
Commissioning
1Open your LoRaWAN® Network provider access panel and add the
device using the supplied Serial Number, DevEUI, AppEUI
(JoinEUI) and AppKey.
The data is example. Do not use.
6

3In order to remove the frontal plastic cover, apply pressure on
the bottom and top and bottom sides of the device and gently
lift one of the sides.
Commissioning
4After inserting the 2xAA 1.5VDC batteries in the device, it will
automatically connect to the network. In order to see whether the
device has connected to the network, please check LED, Buttons
and behaviour.
7
1
2
2
Disassembled H&T Sensor, top view
We recommend installing the device in an open environment
(e.g. not in a recess) at 1.5m height. Do not install the device
near air vents as it will negatively impact the measurements.
Avoid big metal as it will worsen the RF performance. Use
double-sided tape to attach it or remove the frontal plastic
cover and use screws to attach it in a more permanent
manner.
We recommend installing the device so that the QR code with
the serial number stays on the bottom-right side of the
device in order to ensure good measurements.
Installation
8
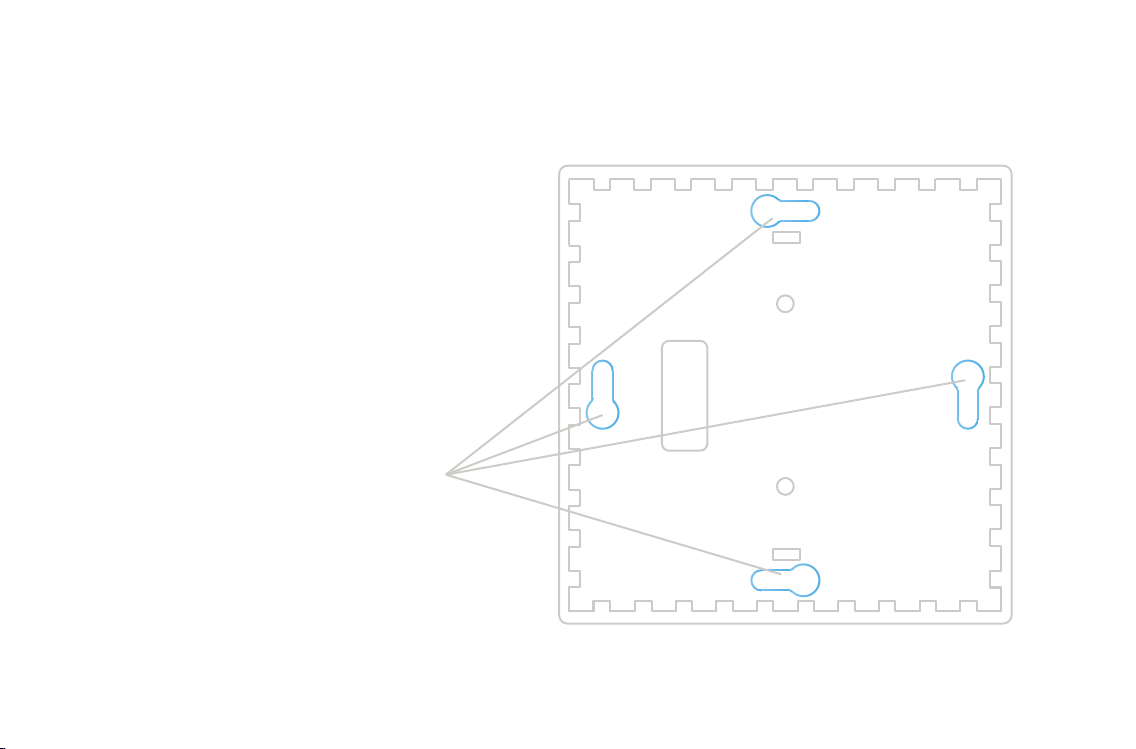
H&T Sensor, back view
Screw holes
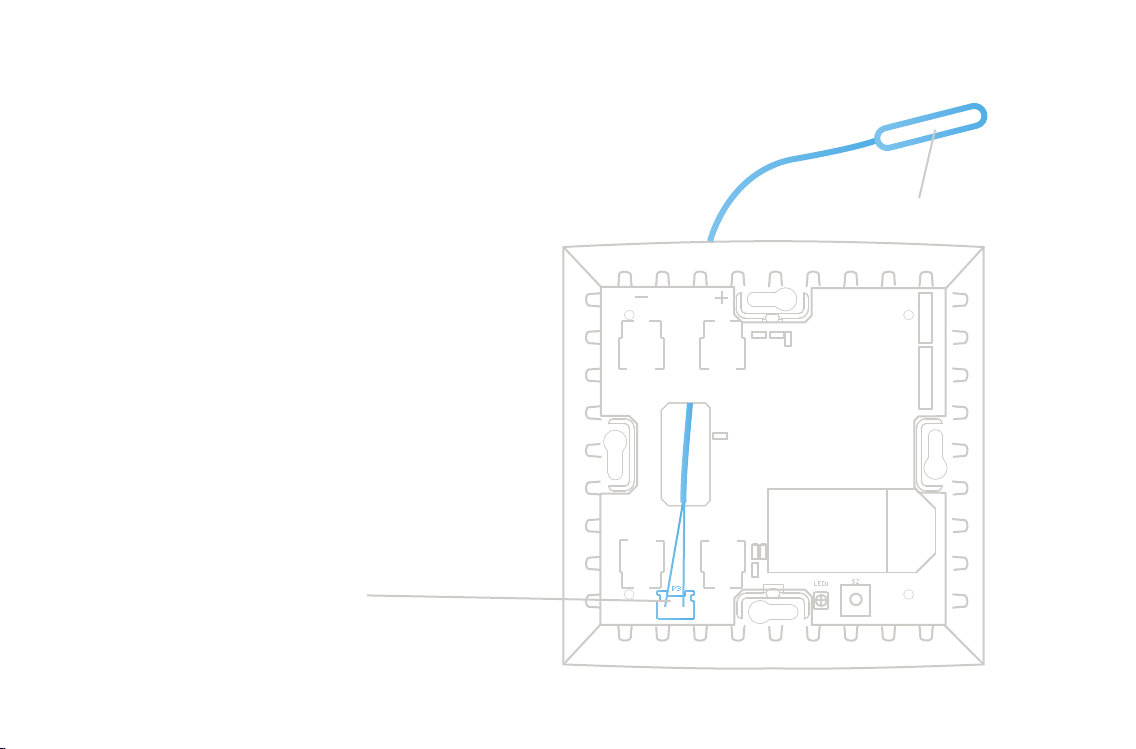
MClimate H&T measures ambient temperature and relative
humidity using a digital temperature sensor. The device also
supports installing an additional temperature sensor (NTC) in
cases where you want to monitor e.g. pipe surface temperature.
In case you have purchased an external temperature sensor
(NTC), connect it to the connector as shown in the picture below.
You will automatically start receiving the temperature reading as
of the next uplink.
Installation of external temperature sensor (NTC)
9
External temperature sesnor (NTC)
Connect the External temperature
sensor (NTC) to port P3
Disassembled H&T Sensor, top view
Table of contents
Other M Climate Accessories manuals


