Sleep Secrets Symphony User manual

Assembly Instuctions - Please keep for future reference
Symphony TV Bed
Important - Please read these instructions fully before starting assembly
Depth x Width x Height
219cm x 146cm x 107cm (Double)
If you have a fault with your product or missing fittings, please contact our customer service team on
01992 450333 (Monday to Friday 08:30 - 17:30 excluding bank holidays).
Dimensions 4 ft 6
Depth x Width x Height
229cm x 160.5cm x 107cm (King)
Dimensions 5 ft
Depth x Width x Height
229cm x 190.5cm x 107cm (Super King)
Dimensions 6 ft
32inch TV MAX
5cm Max TV Depth

Warnings
Assembly time: 1.5 Hours
Do
• When you are ready to start, make sure you have the right tools, plenty of space and a clean
dry area for assembly
• Check the pack and ensure you have all the parts listed
• Due to the size of the product we recommend is it assembled in the room intended for use
• Ensure the product is fully assembled as illustrated before use
• Make sure all the legs are in contact with the floor
• Check all the fittings are secure regularly
• Retain these instructions for future reference
• Unwrap all packaging materials and place the components on top of the carton or on a clean
soft floor to prevent it from scratches
• This product should only be used on firm level ground
• Keep small parts out of reach from children
• This product is intended for a maximum weight of 100kg per side (200kg combined)
• Do not exceed the weight limit
• Tools not included
Safety and Care Advice
• DO NOT use power tools to assemble this product
• DO NOT over tighten fittings
• DO NOT stand or jump on the product
• DO NOT sit on the side rails
• DO NOT use the product if parts are missing or damaged
DO NOT
Care Instructions
• Wipe with a clean damp cloth. If there are any stubborn marks, use a non abrasive sponge
with warm soapy water
• Do not use solvent based cleaners or detergents as they can bleach or damage the product
• Never use scourers, abrasives or chemical cleaners
Customer Service Help Line & Missing Parts
• If you have a fault with your product call customer services on 01992 450 333 ( Monday to
Friday 08.30 - 17.30 excluding bank holidays) or visit www.sleepsecrets.co.uk
• If you are missing fixtures and fittings for your product, please contact our customer
service team and they will send a replacement out to you.
If you have a fault with your product or missing fittings, please contact our customer service team on
01992 450333 (Monday to Friday 08:30 - 17:30 excluding bank holidays).
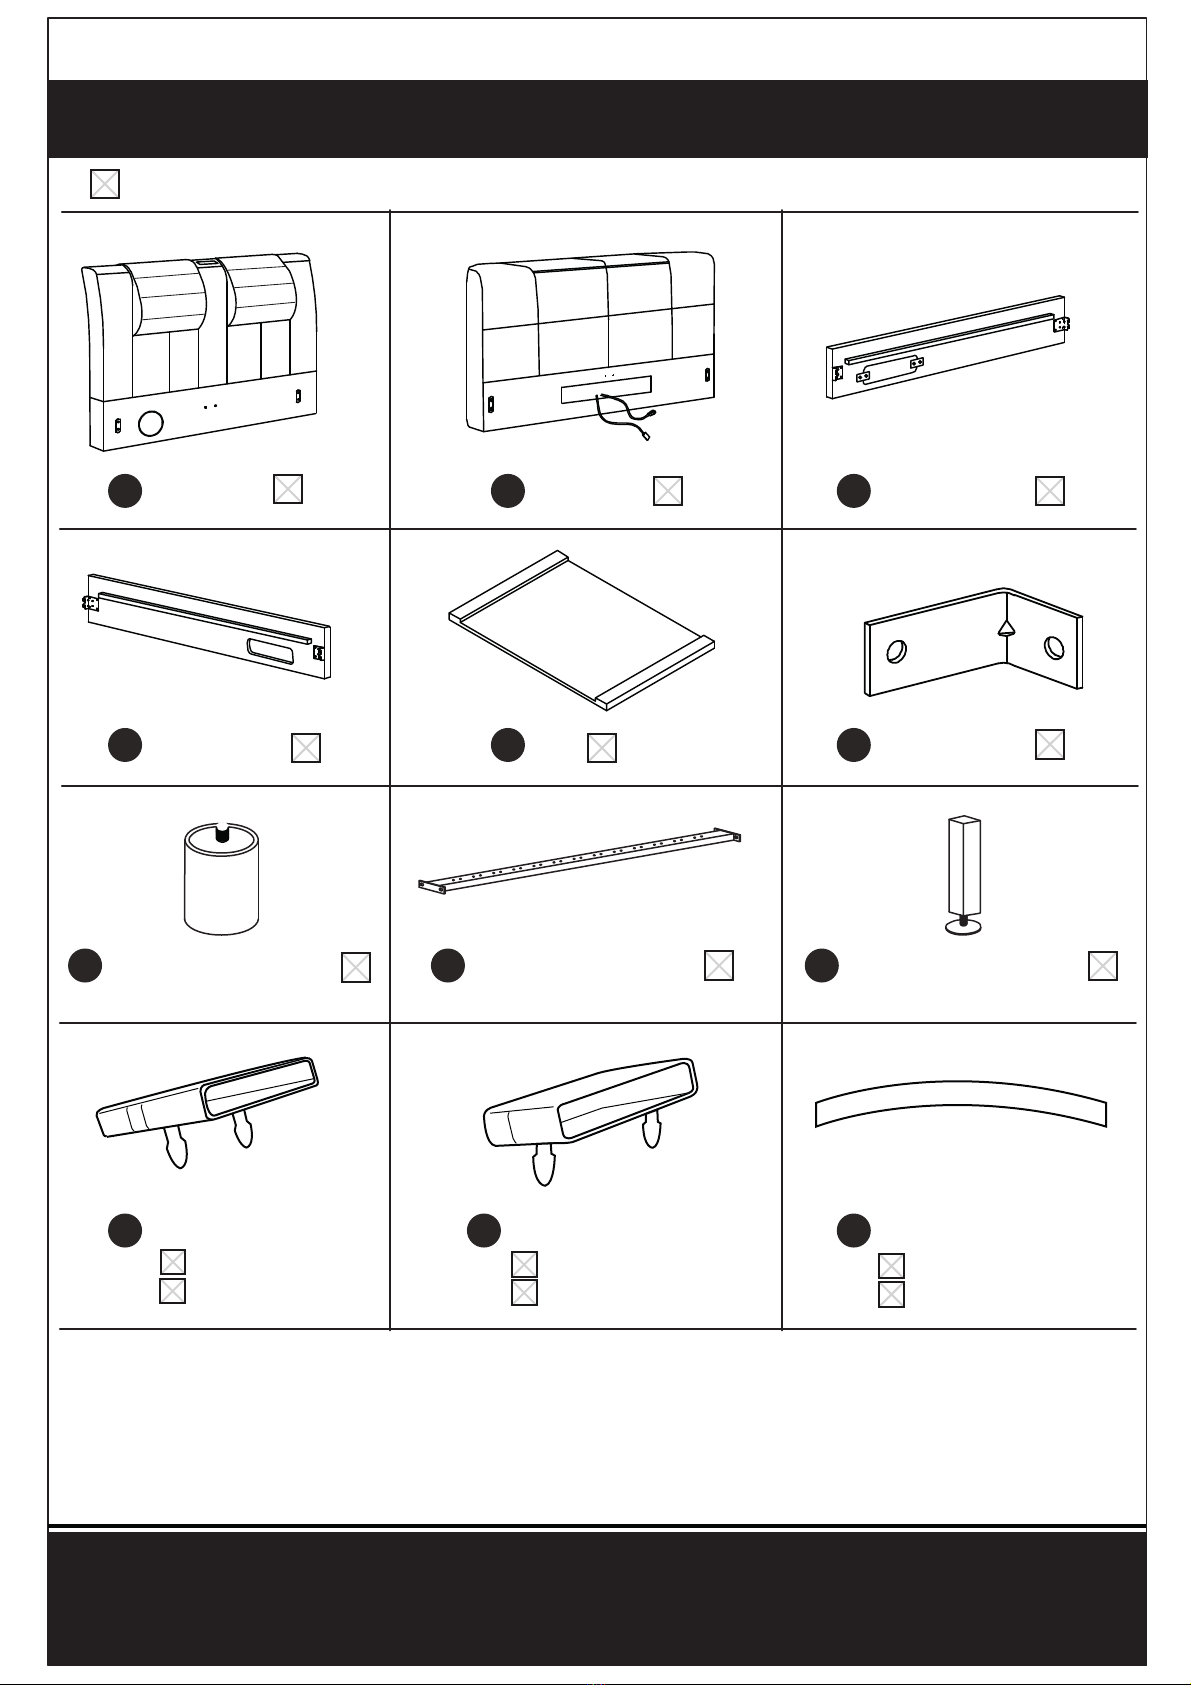
Components If you have damaged or missing components
call the Customer Helpline: 01992 450 333
2
Tick boxes provided to check the components
FootboardHeadboard Right Side Rail
Left Side Rail Tray Bracket x 2
Tray Foot Supports x 2 Centre Support Rail x 1 Centre Support Legs x 2
If you have a fault with your product or missing fittings, please contact our customer service team on
01992 450333 (Monday to Friday 08:30 - 17:30 excluding bank holidays).
x14 (King & Super King)
x13 (Double)
Centre Slat Caps
x28 (King & Super King)
x26 (Double)
Slat Caps
x28 (King & Super King)
x26 (Double)
Slats (Curved)
A B C
D E F
G H I
J K L
(not supplied)
Components If you have damaged or missing components
call the Customer Helpline: 01992 450 333
3
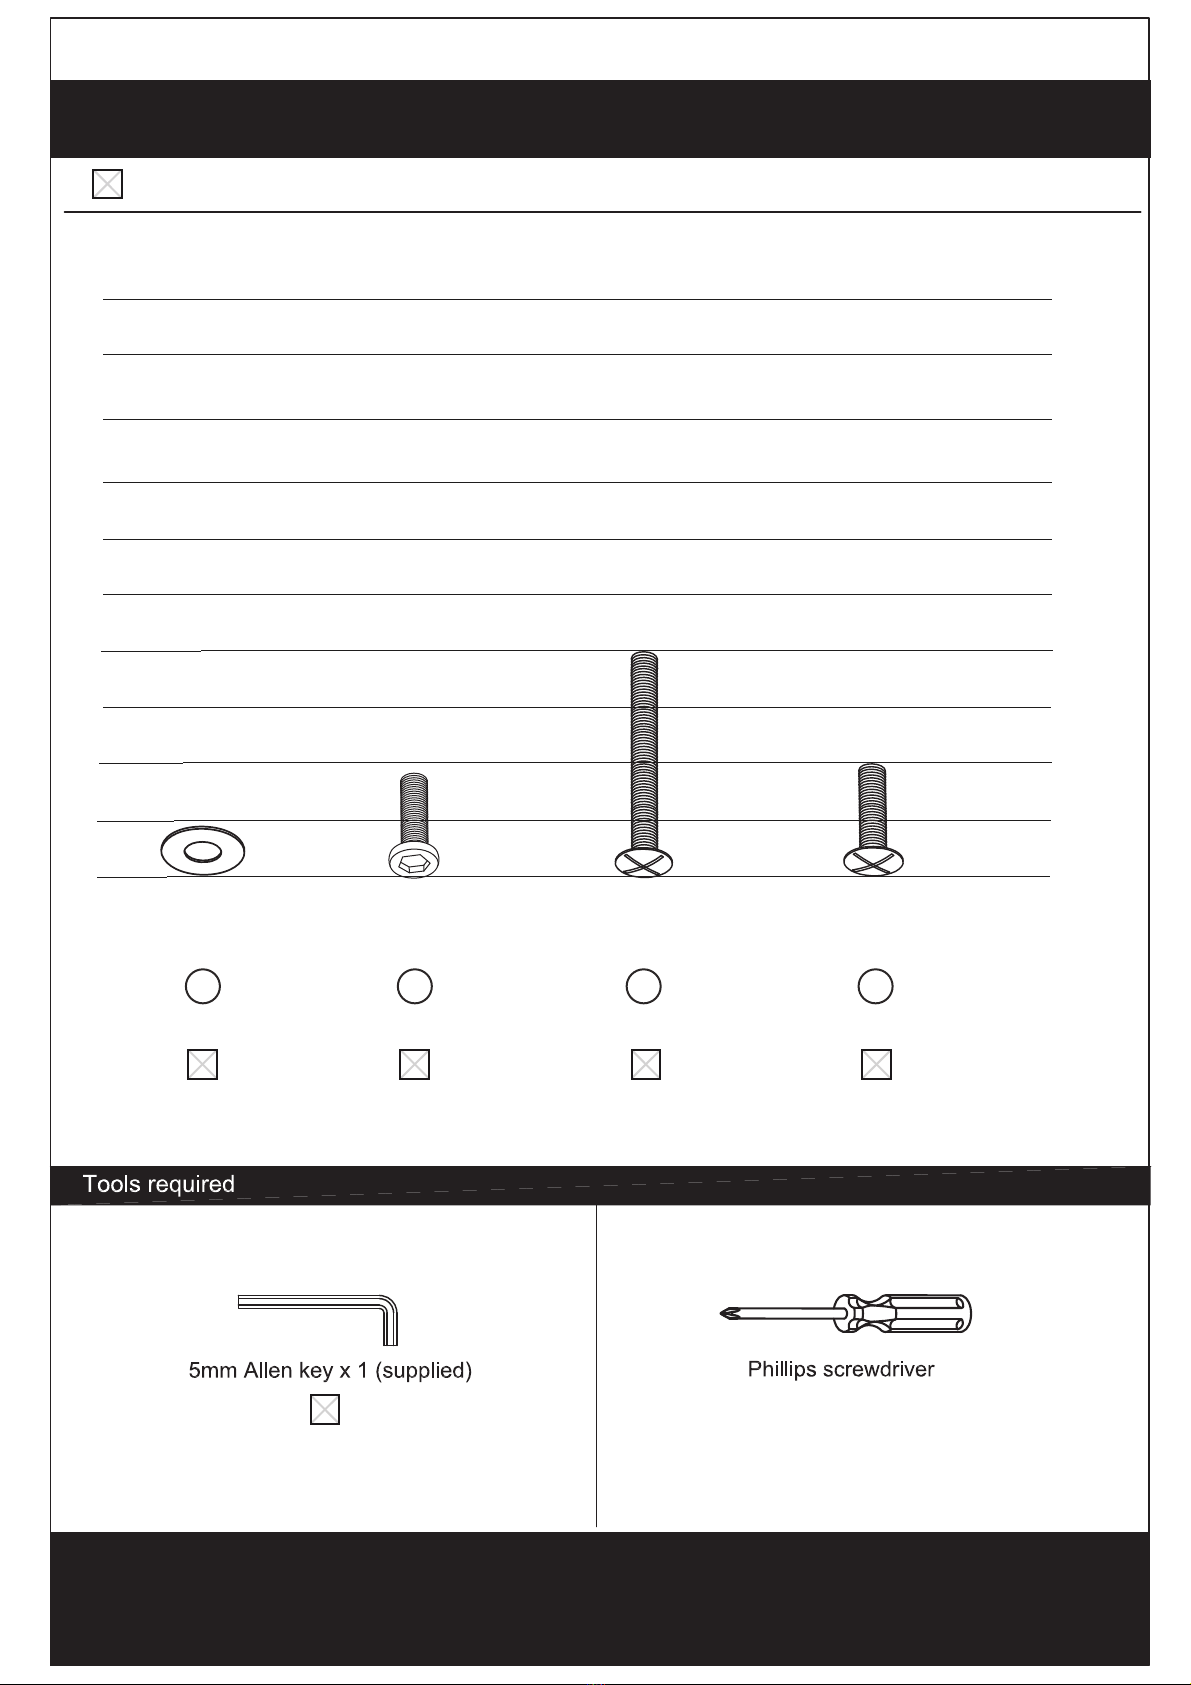
Tick boxes provided to check the components
If you have a fault with your product or missing fittings, please contact our customer service team on
01992 450333 (Monday to Friday 08:30 - 17:30 excluding bank holidays).
3cm
2cm
1cm
0cm
9cm
4cm
6cm
7cm
8cm
5cm
10cm
M8 x 40mm
Bolt
2x
M8 x 18mm
Bolt
8x
M8 x 20mm
Bolt
8x
M8
Washer
10x
1 2 3 4
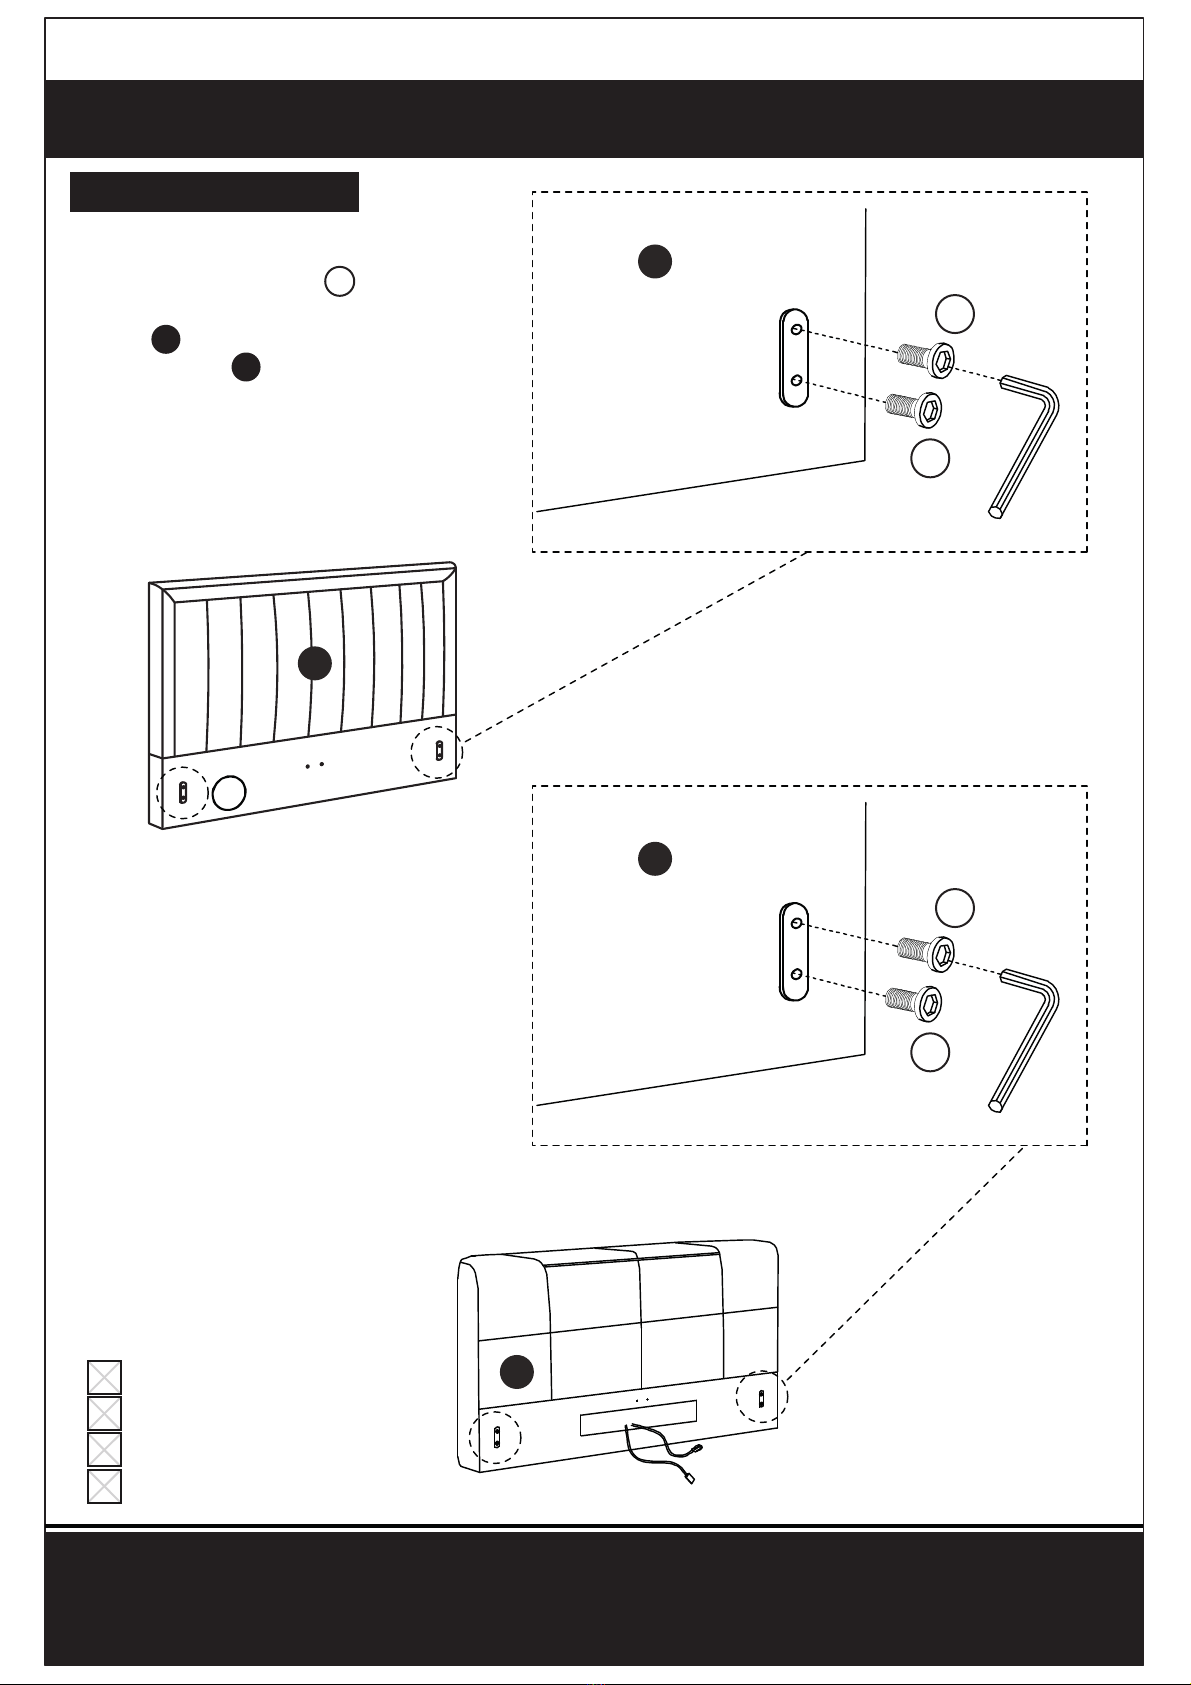
Step 1
Loosely attach 2 x bolts
to both corners of the head-
board . Then repeat for
the footboard as
shown.
Parts
(A) Headboard
(B) Footboard
(2) Bolt M8 18mm x 8
M5 Allen Key
Assembly Instructions
Inserting bolts
4
2
2
2
A
B
2
2
If you have a fault with your product or missing fittings, please contact our customer service team on
01992 450333 (Monday to Friday 08:30 - 17:30 excluding bank holidays).
A
B
M5 Allen key
(supplied)
A
B
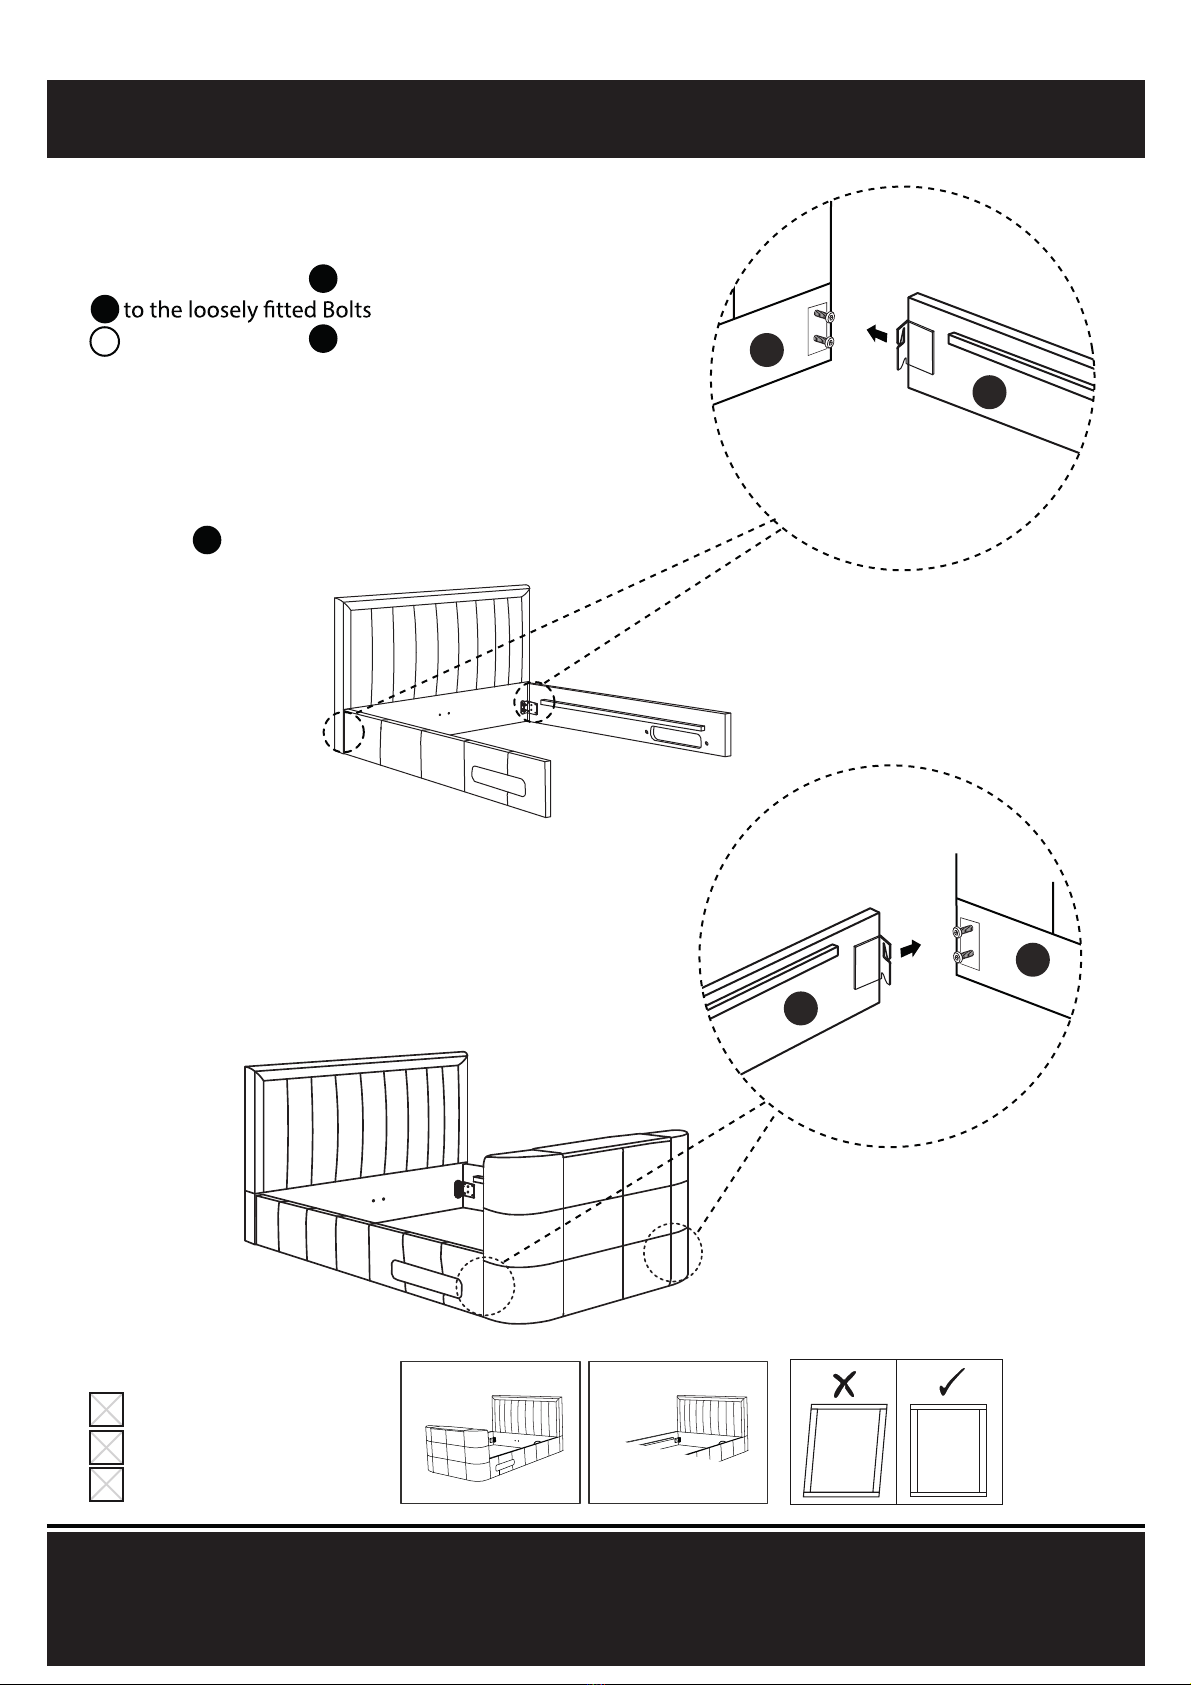
5
Hook on the side rails &
on the headboard
then securely tighten the
bolts.
Do not over tighten.
Repeat this step on the
footboard .
Step 2
Parts
(C)Right Side Rail
(D)Left Side Rail
M5 Allen Key
Assembly Instructions
Attaching side rails
Footboard Headboard
2
C
D
A
B
If you have a fault with your product or missing fittings, please contact our customer service team on
01992 450333 (Monday to Friday 08:30 - 17:30 excluding bank holidays).
C
A
G
B
D

c) Place the brackets (that
are now attached to the
tray up against the
chosen side rail or .
Attach the tray by
inserting 2 x bolts with
2 x washers .
Step 3
a) Attach the 2 x brackets
to tray by inserting
2 x bolts with 2 x
washers .
Parts
(E) Tray
(F) Bracket x 2
(1) Washer x 4
(4) Bolt M8 20mm x 4
(G) Tray support feet x 2
Assembly Instructions
Attaching the tray
6
F
G
F
1
4
b) Insert 2 x feet to the
other side of the tray
by rotating them
anti-clockwise.
F
F
EE
E
G
GE
E
E
CD
E
If you have a fault with your product or missing fittings, please contact our customer service team on
01992 450333 (Monday to Friday 08:30 - 17:30 excluding bank holidays).
4
1
4
1
4
41
1
1
4

Components If you have damaged or missing components
call the Customer Helpline: 01992 450 333
Tick boxes provided to check the components
7
Wireless Control Box
AC / DC Adaptor
Hand Control
(2032 Battery is
included)
Motor Power Supply
If you have a fault with your product or missing fittings, please contact our customer service team on
01992 450333 (Monday to Friday 08:30 - 17:30 excluding bank holidays).
TV Power Supply
(5R)
(4R)
(3R)
(2R)
(1R)
MK4 Cabling
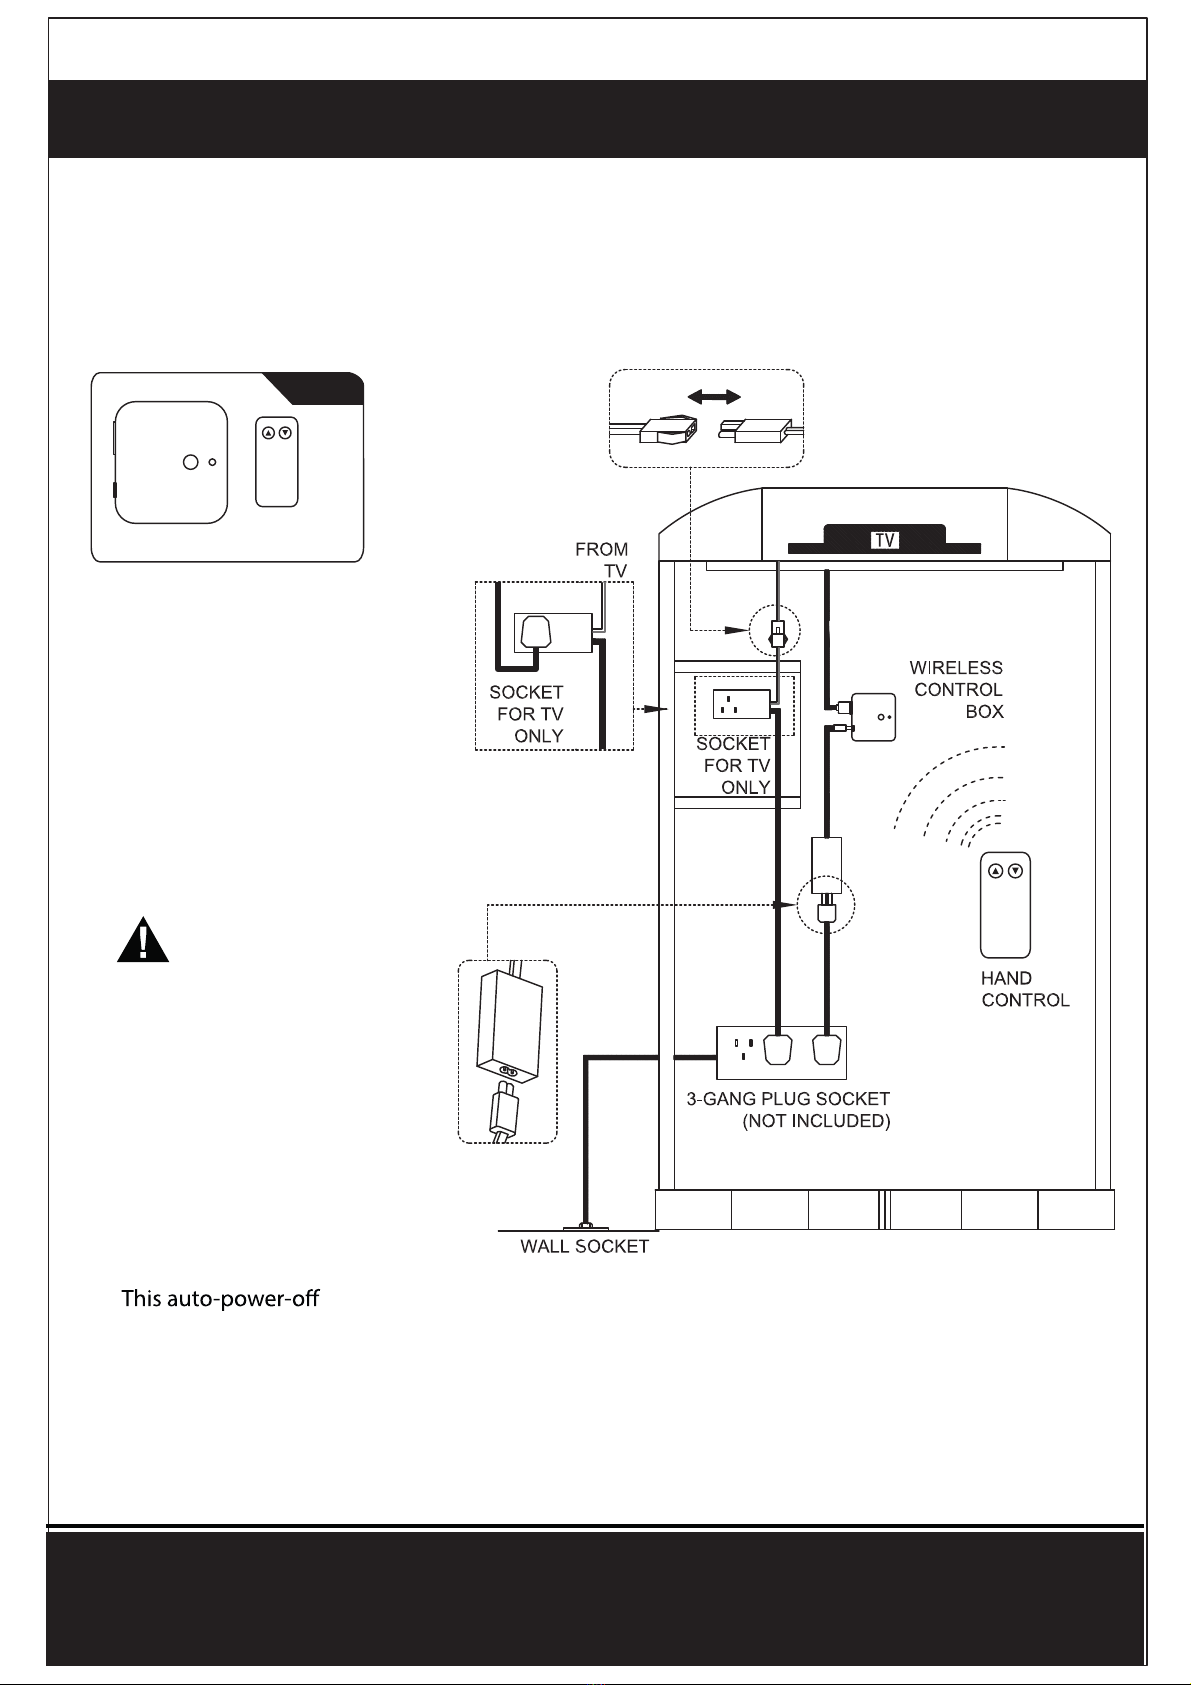
8
Do not plug the
receiver power
supply (1R) into
the auto switch
as the mechanism
will not work!
MK4
Plug the receiver power
supply in (4R) and the TV
power line (1R) directly into
the mains (Via a multi gang
or extension socket, not
supplied).
Plug your TV into
the auto-switch socket.
device cuts power to the
TV when stowed avoiding
overheating and potential
damage to the unit.
a)
b)
(3R)
(4R)
(5R)
(2R)
(2032 battery included)
TV Mechanism MK4 Cabling Guide
If you have a fault with your product or missing fittings, please contact our customer service team on
01992 450333 (Monday to Friday 08:30 - 17:30 excluding bank holidays).
This appliance is not intended for use by persons (including children) with reduced physical,
sensory or mental capabilities, or lack of experience and knowledge, unless they have been
given supervision or instruction concerning the use of the appliance by a person responsible
for their safety. Children should be supervised to ensure that they do not play with the appliance.
Contact the supplier if any of the cords or part component
(1R)
is damaged.
(1R)

9
TV Bed MK4 Remote Control Guide
MK4
When necessary, you will need to use a 2032 battery in the remote for replacement.
1. Connect the mechanism motor inlet cord from the footboard to the 5-Pin Din outlet.
2. Connect the DC power supply to the DC jack, both on the back of the Box.
3. One press on the remote controls up button will drive the TV bracket upwards,
press again on the up button will pause the upward movement.
4. One press on the down button will drive the TV bracket downwards, press again
on the down button will pause the downwards movement.
Operation – Refer to wire diagram for parts listing
Synchronize (Pairing) the controller Box to the Handset
Provided that the button on the controller box below the LED has not been PRESSED, the
pair should be synchronized. If you need to synchronize them follow the instructions.
quickly.
This will delete the pairing (so the handset will not work). To reset the pairing follow the next
steps:
1. Press and hold the button on the controller box for three seconds.
4. The pairing is completed and the handset is operative with the control box.
Note the leads to connect both new and old TV remote systems are the same.
Your remote control system is pre-set and you can use this immediately. You will only need to reset
the remote system if your hand set does not respond.
If you have a fault with your product or missing fittings, please contact our customer service team on
01992 450333 (Monday to Friday 08:30 - 17:30 excluding bank holidays).
10
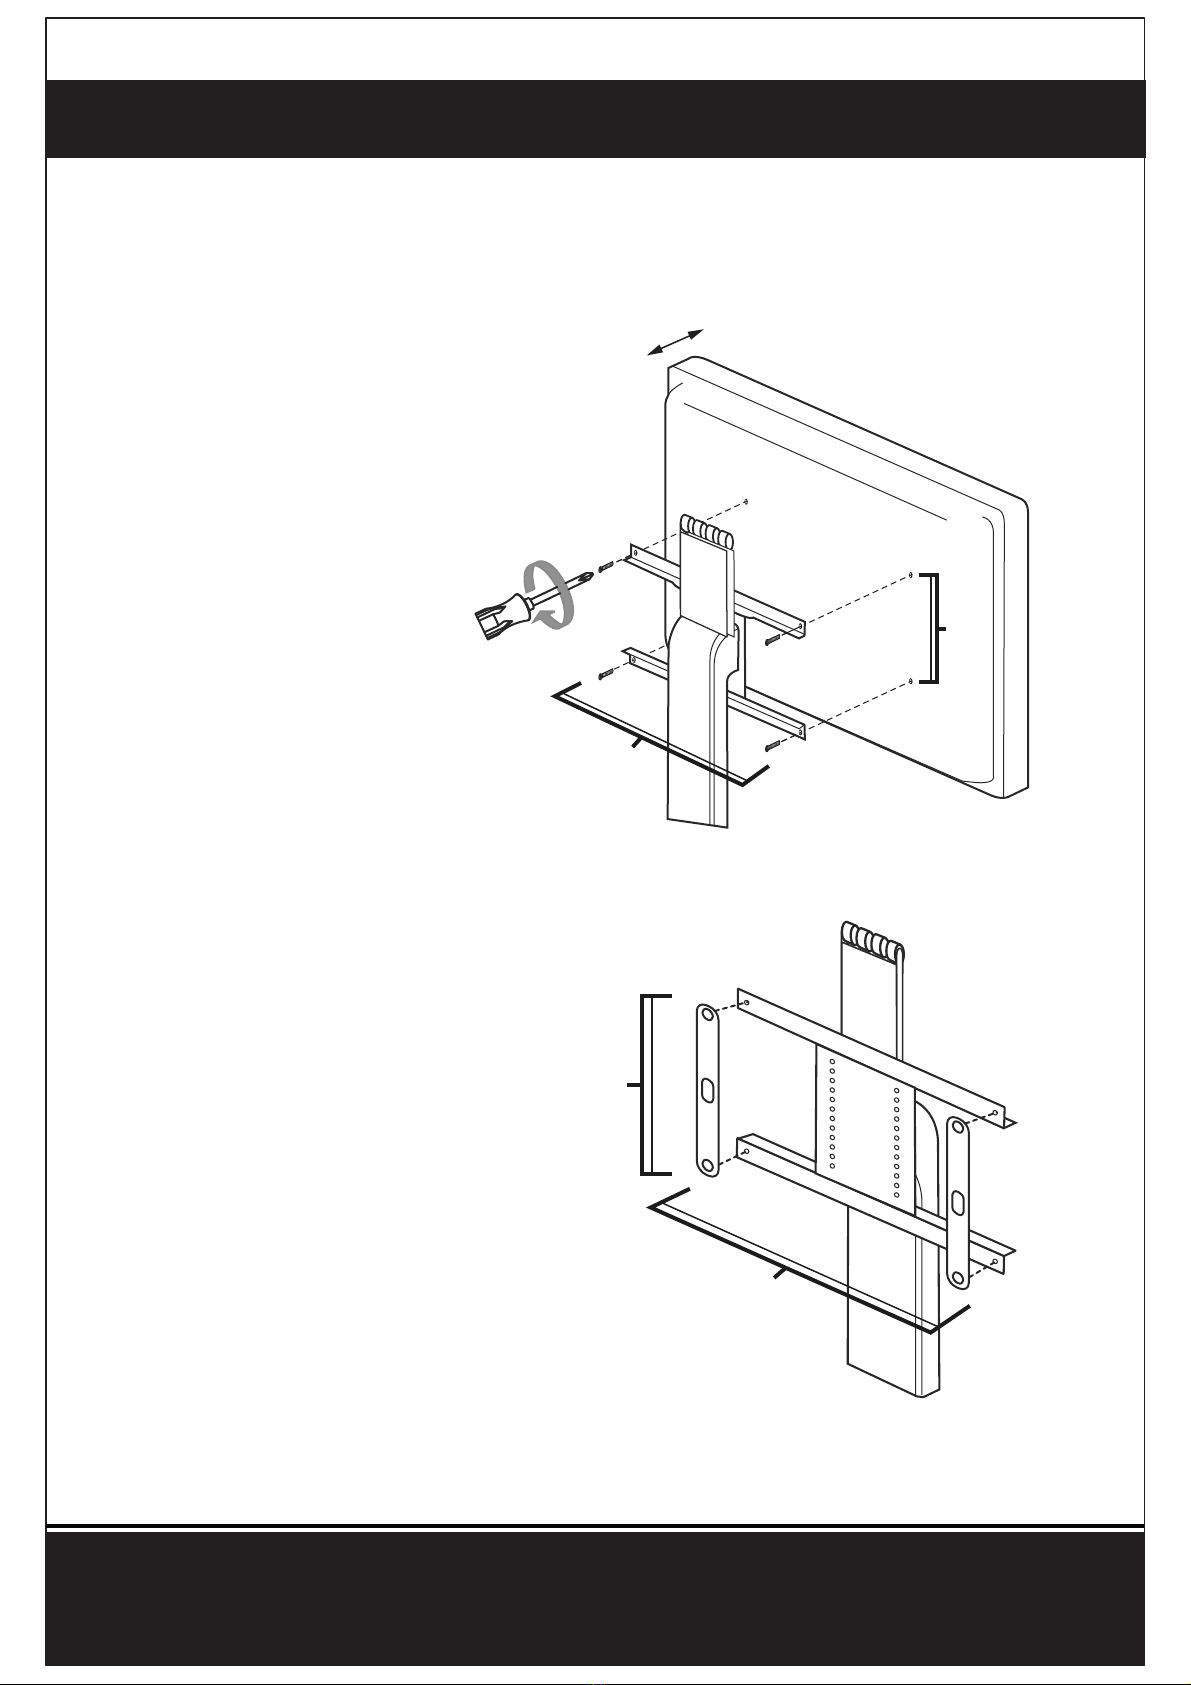
Fitting the TV
When using the electric
mechanism, please allow
the TV bracket to fully
rise or retract before
pushing the button again.
Should you repeatedly
push the button whilst
mechanism is moving
safety device will cut off
the power to prevent
damage. Should this
happen, unplug the TV
bed from the main power
supply and remove the
plug from the wall for 5
minutes. Reinsert the
plug and switch on to
start using the TV bed
again.
Note: When raising the Note: If you are not fitting the TV at this point, please move directly
to the next step.
mechanism without the
TV fitted, lift the lid on
the footboard first. Do
not let the lid touch the
mechanism whilst it is
in motion at any time,
either moving up or
down, until the TV is
fitted.
5cm max TV depth
200mm
200mm
Max Weight 20kg
200mm
200mm
If you have a fault with your product or missing fittings, please contact our customer service team on
01992 450333 (Monday to Friday 08:30 - 17:30 excluding bank holidays).
11
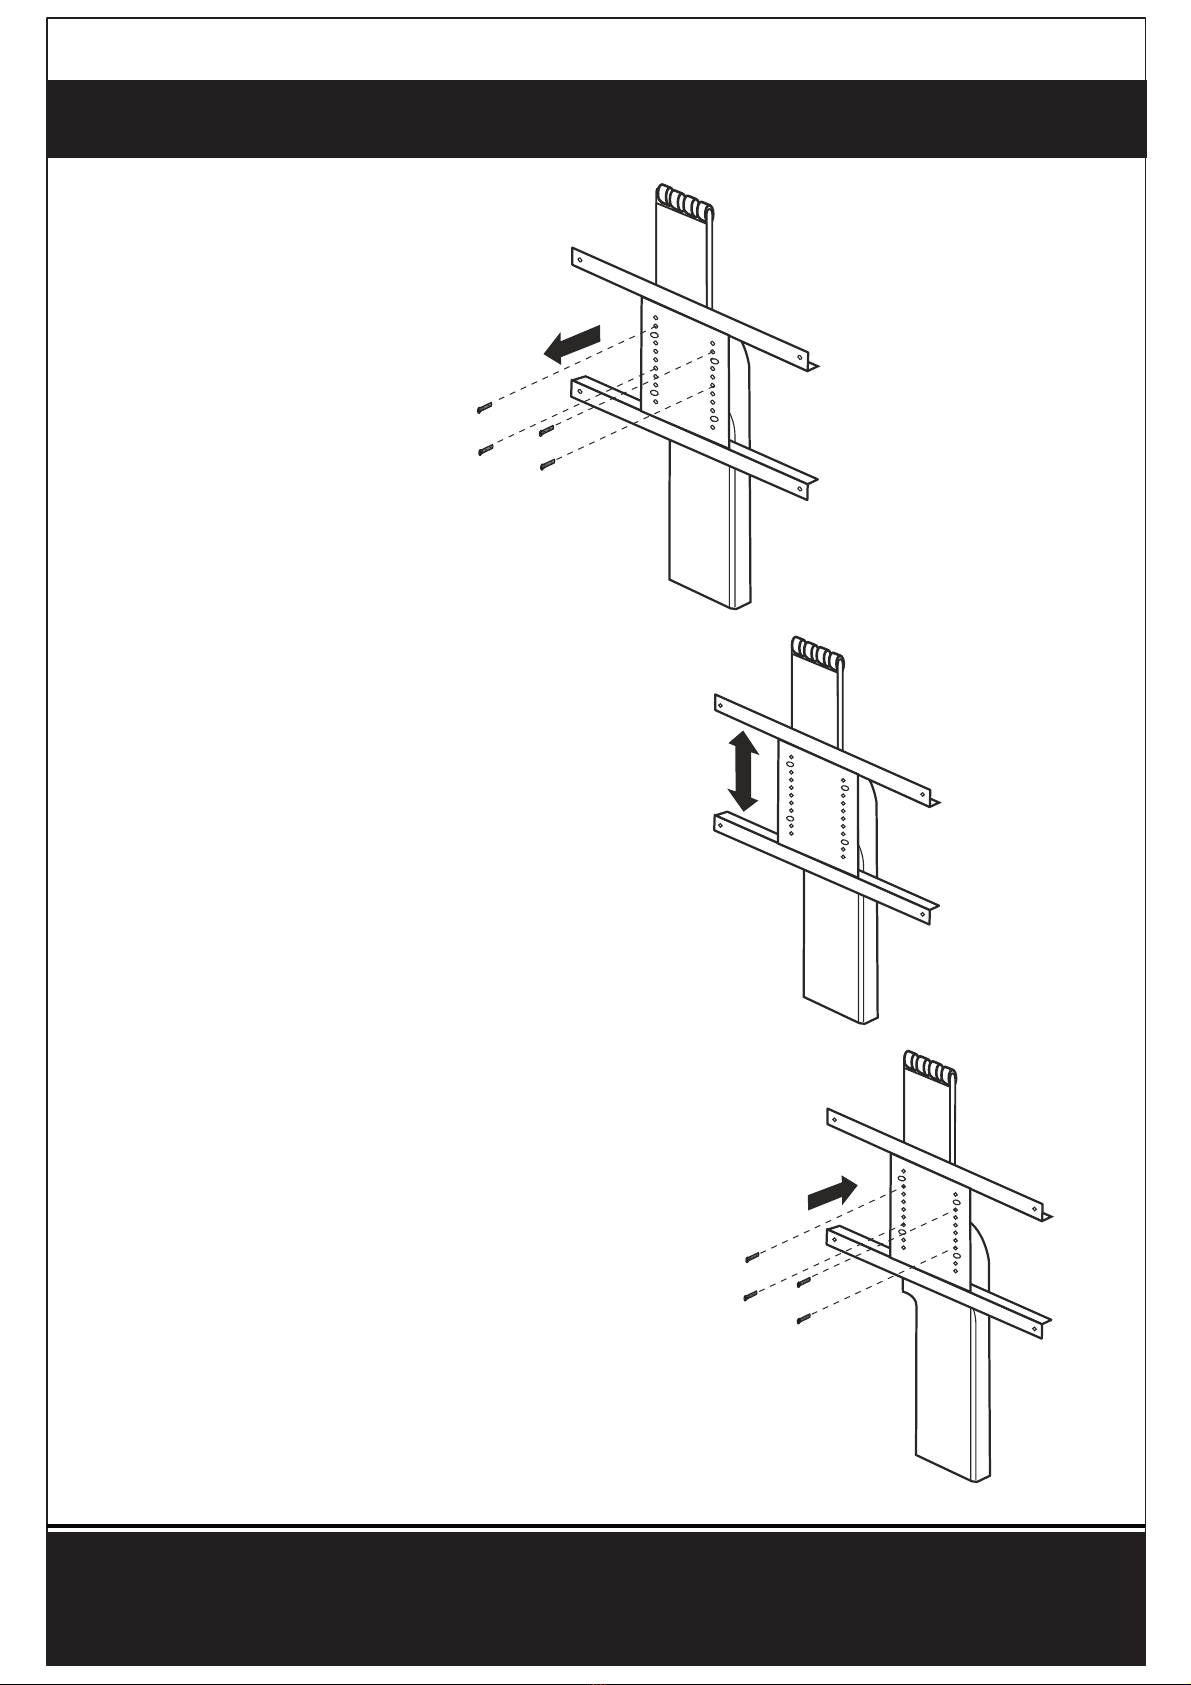
Adjusting TV Bracket
Remove 4 bolts
from plate.
Adjust height of
brackets
Reattach 4 bolts
to plate.
Should you need to
adjust the position of the
TV bracket to best fit
your TV, follow these
steps:
1.
Remove the 4 bolts on
the front plate as shown.
2.
Move the bracket up
or down as required.
3.
Reattach 4 screws
onto front plate. Attach
television as shown in
previous step.
If you have a fault with your product or missing fittings, please contact our customer service team on
01992 450333 (Monday to Friday 08:30 - 17:30 excluding bank holidays).

12
TV Bracket
200mm
200mm
100mm
100mm
100mm
200mm
The position of the
mounting holes your
TV use will vary
depending on the
make and model.
The TV bed has
a universal
can accomodate TVs
with the following
standard VESA
compliant sizes.
400mm
200mm
400mm
100mm
If you have a fault with your product or missing fittings, please contact our customer service team on
01992 450333 (Monday to Friday 08:30 - 17:30 excluding bank holidays).

Assembly of Slats
Parts
(1) M8 Washer x 6
(
(H) Centre Support Rail x 1
Centre Support Legs x 2(I)
If you have a fault with your product or missing fittings, please contact our customer service team on
01992 450333 (Monday to Friday 08:30 - 17:30 excluding bank holidays).
13
1
1
I
I
H
H
Fit the centre rail
into position against
the headboard . Then
attach them by using
2 x bolts and 2 x
washers .
Repeat this step with
the footboard .
Attach the support legs
to the centre rail
by using bolts and
washers on each one.
I H
H
A
B
1
1
3
3
1
1
3
4
4
4
10mm
10mm
Adjust the feet so they are not in
below it. There should be a 10mm
gap. To adjust, rotate the lower
section until at desired height.
(3) M8 x 40mm x 2
(4) M8 x 20mm x 4
Assembly of Slats
If you have a fault with your product or missing fittings, please contact our customer service team on
01992 450333 (Monday to Friday 08:30 - 17:30 excluding bank holidays).
Step 1
Step 3
Step 2
Side rail
support
Assembly is now complete
Side rail
support
K
K
J
H
L
L
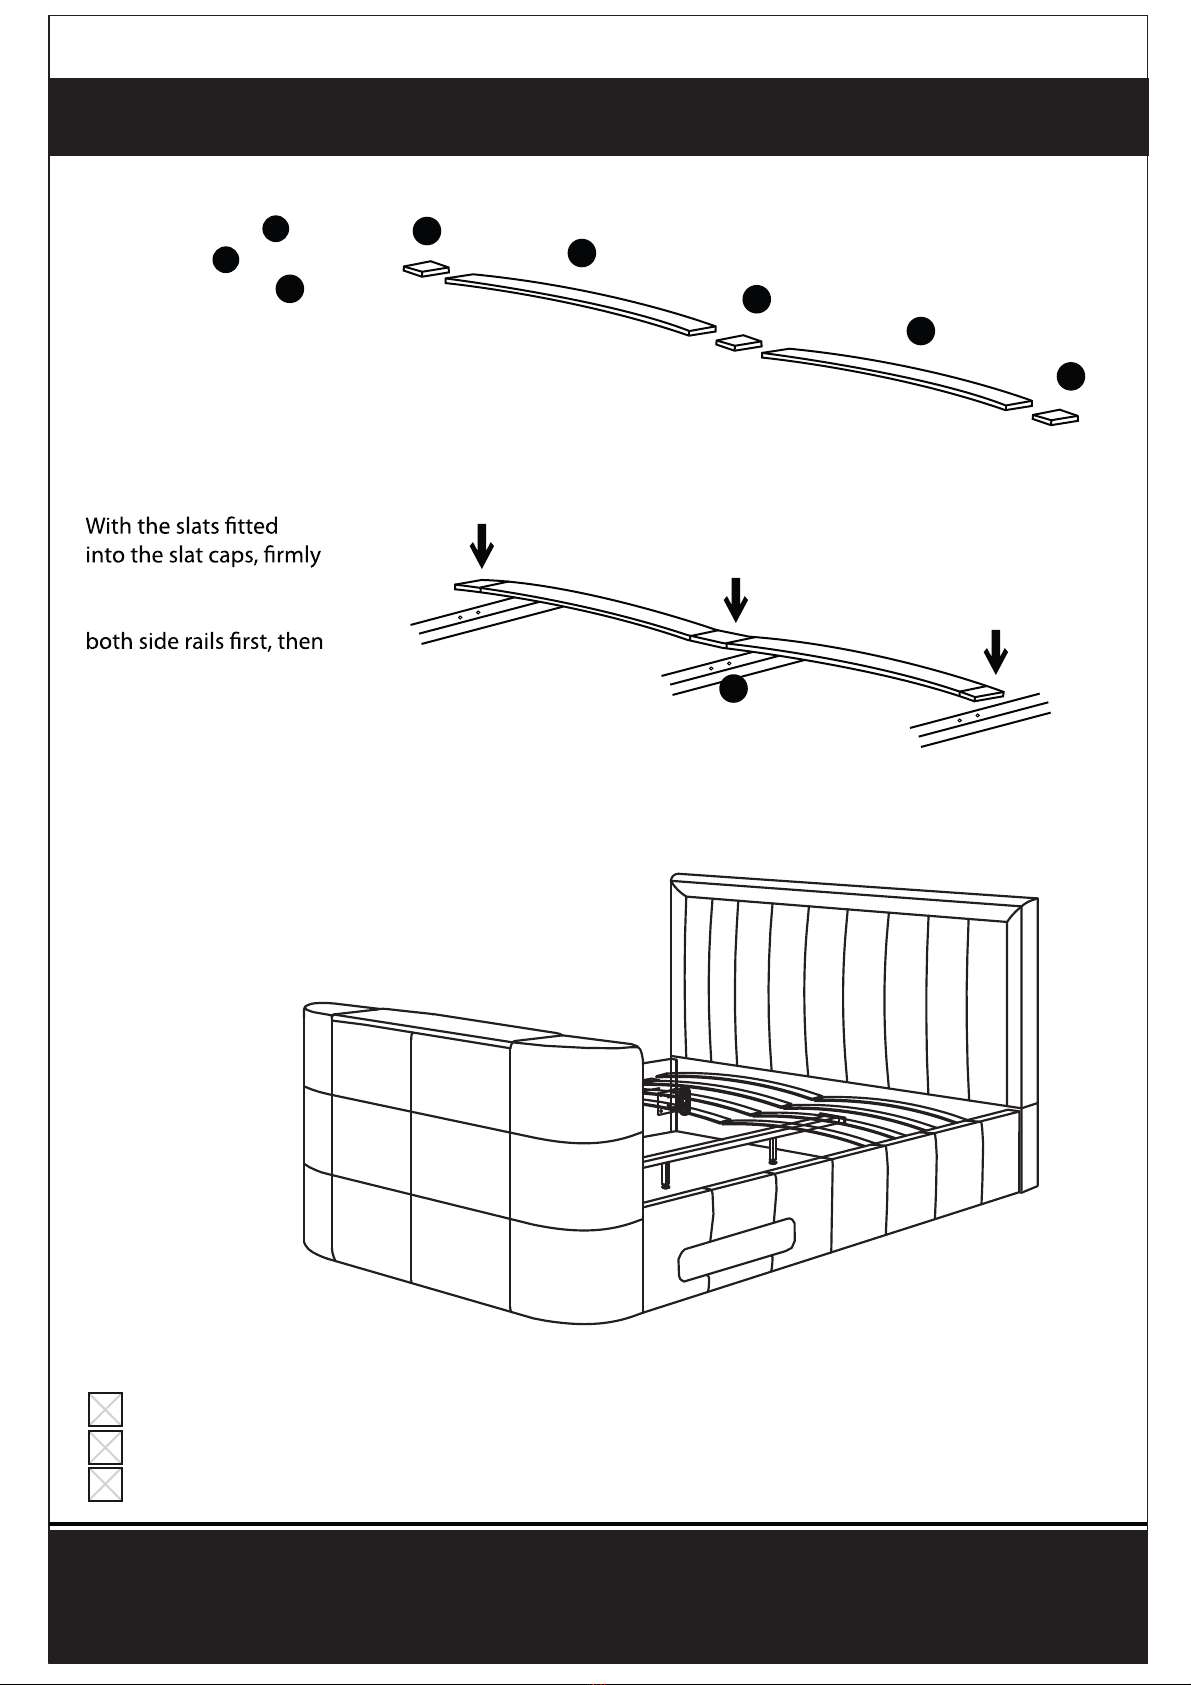
Slot the bed slats
into the end and
centre plastic caps
as shown.
K
J
push the end caps into
the wooden support on
push down the middle
slat cap into place on the
centre rail.
L
14
Parts
(j) Slats x 26 / 28
(h) Centre plastic caps 13 / 14
(i) End plastic caps 26 / 28
Double / King - Super King
Table of contents
Popular Indoor Furnishing manuals by other brands

Grosfillex
Grosfillex WORKLINE 2.0 quick start guide

Discovery Telecom
Discovery Telecom 80255 manual

Meblik
Meblik R0.40 manual

Office Star Products
Office Star Products Curia & Co CO-SK21-MCM Assembly instructions

J.Burrows
J.Burrows TORO TOR18BKCKT Assembly instructions

Lippert
Lippert Bed/Table Pedestal V2 installation manual

Furniture of America
Furniture of America YNJ-2081C35 Assembly instructions

Alvin
Alvin Comfort CH777 Assembly instructions

Dorel Home Products
Dorel Home Products DA2034099 Instruction booklet

sweeek.
sweeek. EMY IEMCHRBFX2CB manual

BUT
BUT 4894223210447 Assembly instructions

Olymp
Olymp LavaSit VAREO Mounting instructions


