SLIDE-LOK S3634 User manual

READ ALL INSTRUCTIONS BEFORE YOU BEGIN.
DO NOT JUMP AHEAD OF ANY STEP.
The Patented Dovetail Assembly System
Simply Slide A Into B
It’s That Easy!
Quick And Easy Assembly
All components will slide together without
force or effort if the dovetails are lined up
properly. If force or exertion is necessary,
pieces are not aligned correctly.
slide-lok.com/assembly/S3634
800-835-1759
Female Dovetail
Glue this edge
Male Dovetail
A B
Male
Dovetail
Female
Dovetail
Slide Together
Slide Female dovetail
into Male dovetail
If this is your first time assembling a SLIDE-LOK cabinet, you may find it helpful to first assemble the
cabinet without gluing to give yourself the opportunity to become familiar with the assembly process of SLIDE-
LOK storage cabinets. All components will slide together without force or effort if the dovetails are lined up
properly. Do not force. If force or exertion is necessary, pieces are not aligned correctly. Take apart and
start over. Be sure to glue all joints at time of assembly. Allow glue to completely dry before installing.
D
A
E
E
C
B
S3634
Assembly Instructions
Step 1. - Identify all Pieces
slide-lok.com/assembly/S3634
A. FACE FRAME
B. SIDE PANELS
C. SHELF NAILERS
D. TOP & BOTTOM
SHELVES
E. DOORS
F. ADJUSTABLE SHELF
(3) Adjustable legs & doweled tops
(3) Dowels
(4) Clear bumpers
(2) Corner brackets
(4) Shelf clips
(4) 1 ½” Door screws
(4) 2 ½” Black installation screws
(24) 1/2” Silver screws for adj. Legs, corner
brackets & shelf clips
(3) 1 ¼” Black screws for joining
cabinets together
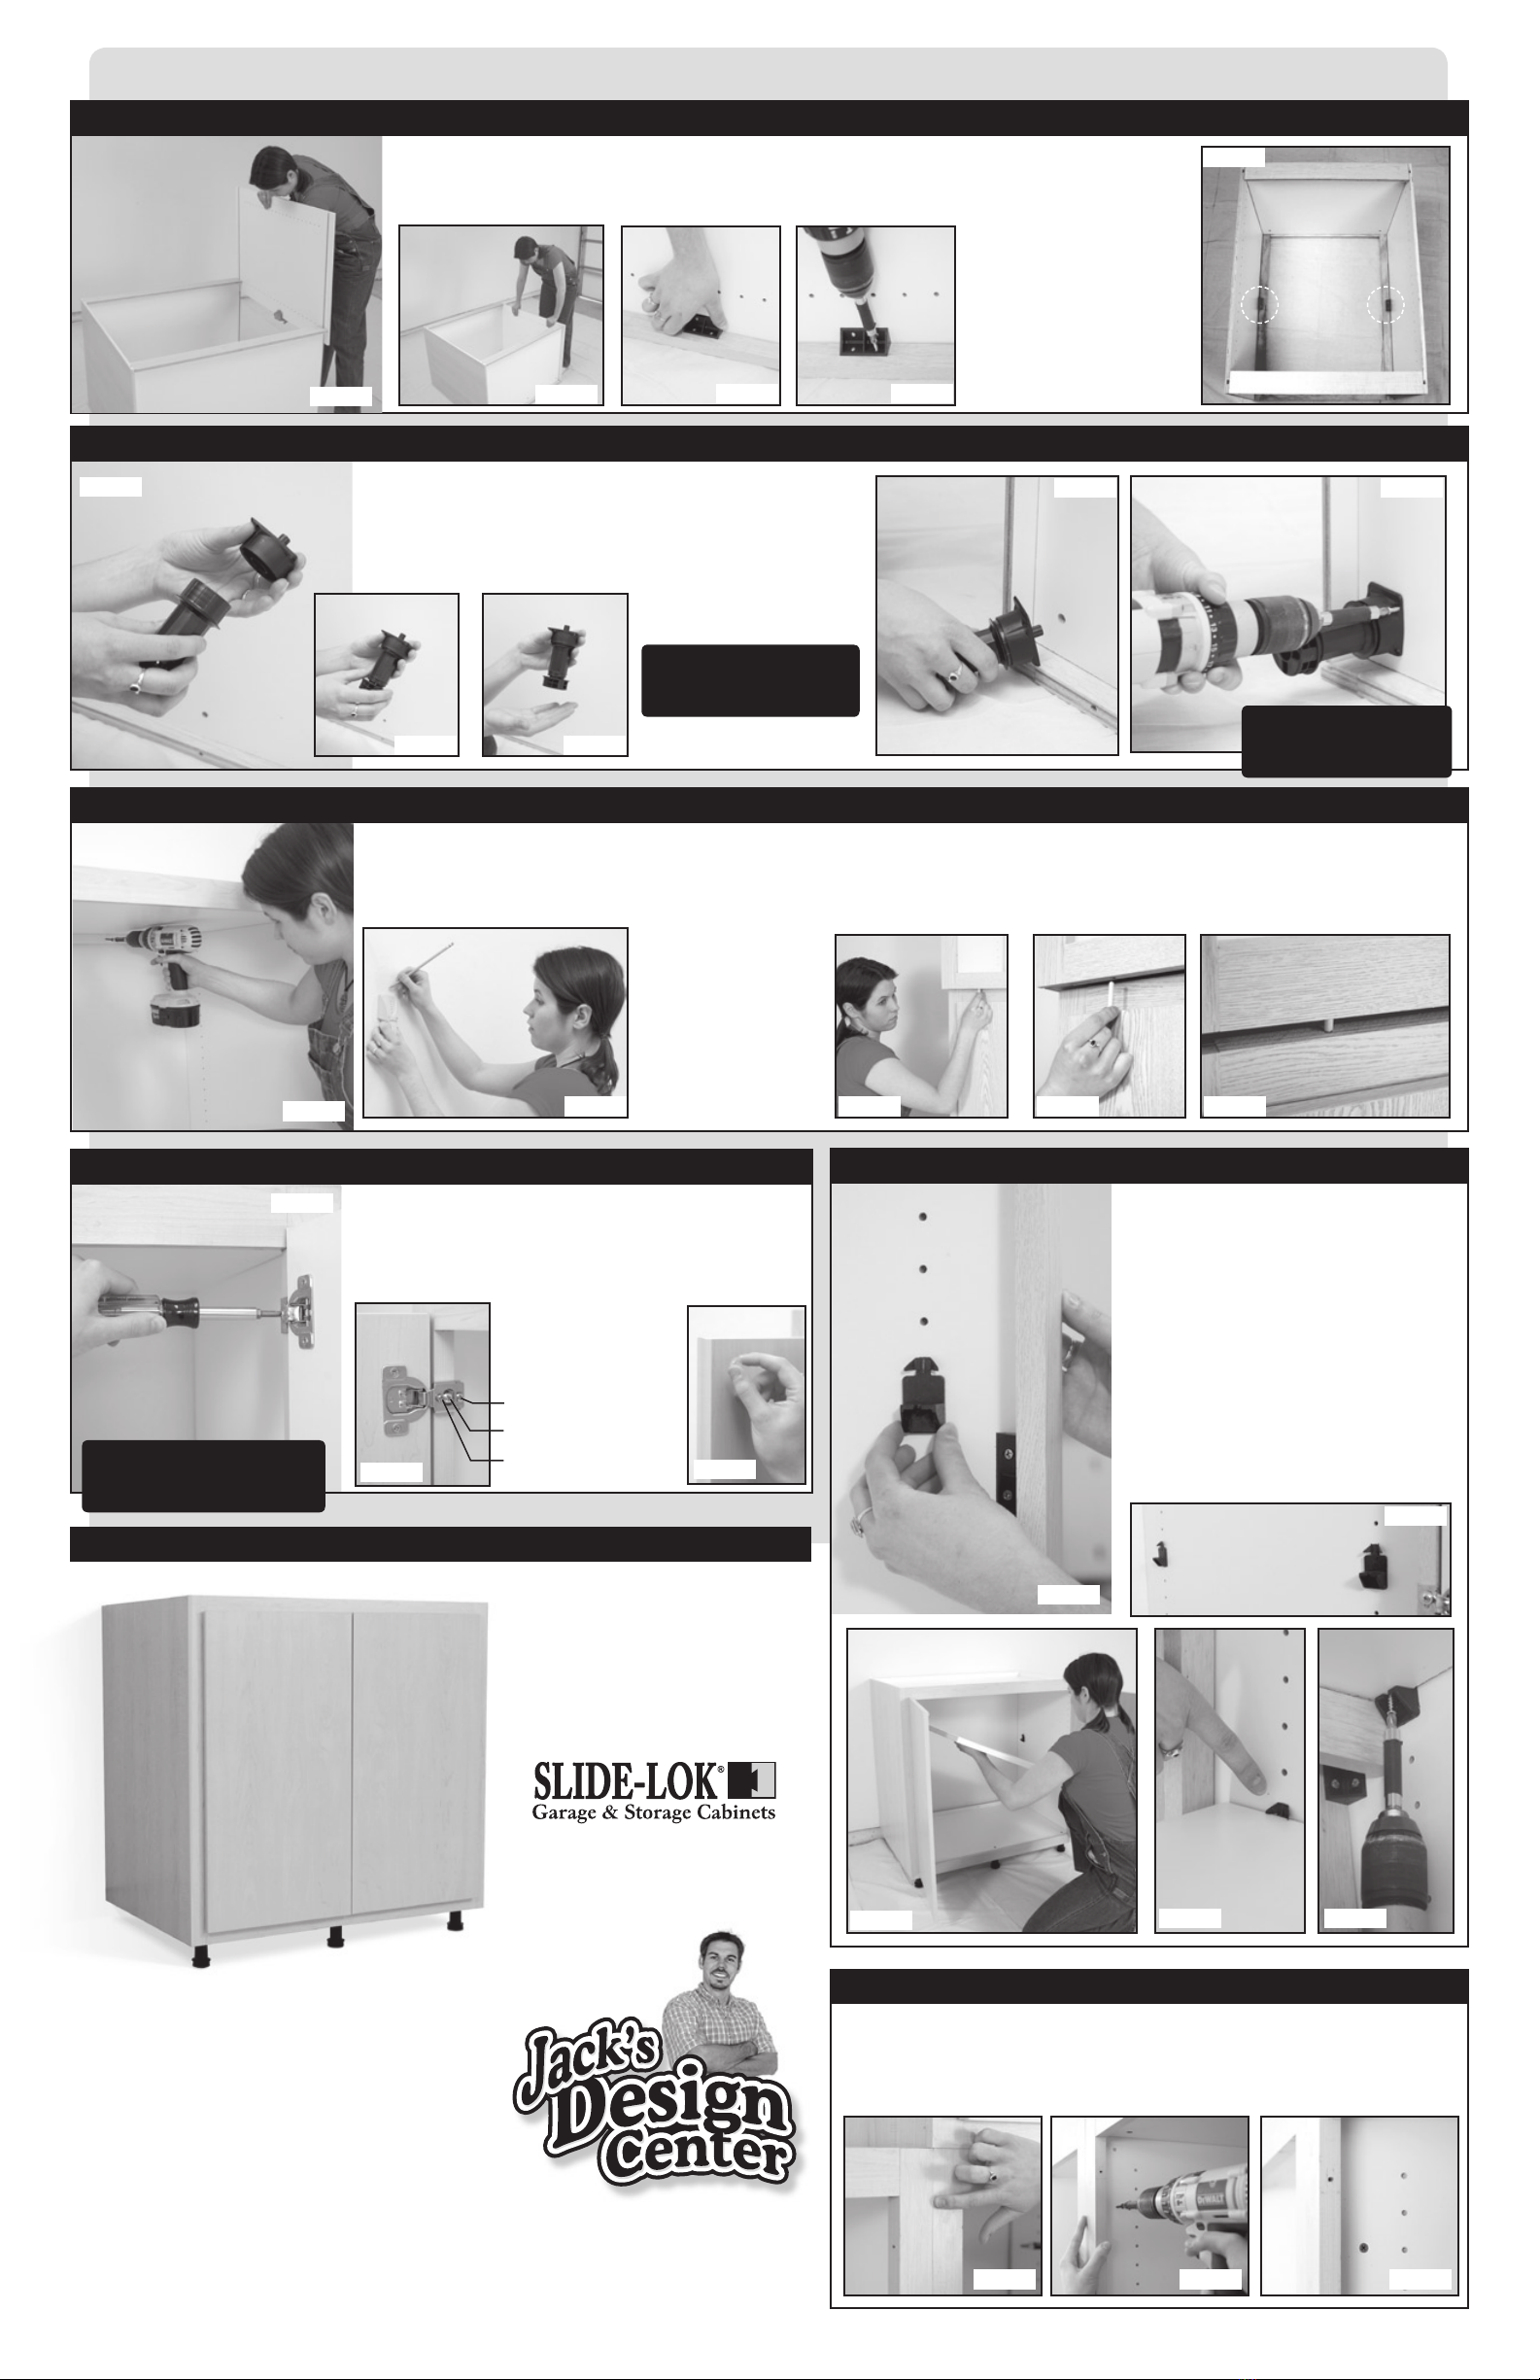
Step 2. - Attaching Top and Bottom Shelves
Step 3. - Attaching the First Side Panel
Glue rabbet joint as in fig. 3A. Dovetail joint and side panel as in fig. 3B. Slide
one side panel “B” into place while aligning dovetails on top and bottom of
both shelves (see fig. 3C). Make sure to start all dovetails simultaneously,
then slide side panel into rabbet joint as in fig. 3D & 3E.
Step 4. - Attaching Top and Bottom Nailers
Glue the female dovetail on the nailer see fig. 4. Slide one nailer onto the top
shelf (fig. 4A) and one nailer onto the bottom shelf (fig. 4B). Make sure they
touch the side panel.
Place face frame “A” face down on a smooth surface
to prevent scratching (you may use the box it came
in). Glue all female dovetail joints as shown in fig. 2.
Slide shelves “D” into position while aligning as in
fig. 2A & 2B with holes closest to the face frame.
DO NOT SLIDE OTHER
SIDE PANEL ON AT
THIS TIME.
!
[ fig 1 ]
Remove cabinet parts from box and identify all pieces as
pictured in fig. 1.
[ fig 2A ] [ fig 2B ]
[ fig 2 ]
[ fig 3 ] [ fig 3A ] [ fig 3B ]
[ fig 3D ]
[ fig 3E ]
[ fig 3C ]
[ fig 4 ] [ fig 4A ]
[ fig 4B ]
NOTE:
A general purpose carpenters
wood glue is recommended for
assembly. Apply a 1/16” bead of
glue to the entire length of the
female Dovetail joint
F
Remember to follow the steps exactly as shown. Do not jump ahead, or you’ll get tangled up!
Step 5. - Attach Second Side Panel and Installing Corner Blocks
Repeat STEP 3 for the other side panel see fig. 5 and 5A. Take the corner blocks and 1/2” screws and
attach to face frame and side panels (see fig. 5B and 5C) in the middle of the cabinet. (see fig. 5D)
Step 7. - Fastening Cabinet to Wall and Stacking Cabinets
After glue is dry locate studs in wall (fig. 7A). Attach cabinet to wall using 2 ½” screws (fig. 7). STACKING CABINETS: If you are stacking
the cabinet place cabinet on top of already installed cabinet, carefully overhang cabinet to revealing dowel holes. Push dowels into all of the
pre-drilled holes (fig. 7B and 7C). Next align dowels with cabinets below (fig 7D). Set cabinet down in place and attach to wall (fig, 7).
NOTE:
It is important that the
cabinet is set flush to the
wall and fastened to wall
studs for stability and
strength.
Step 10. - Congratulations!
CONGRATULATIONS!
You have just finished
assembling and installing
a SLIDE-LOK cabinet.
Attach corner blocks to both
side of the cabinet, see
figure 5D
[ fig 5 ] [ fig 5A ] [ fig 5B ] [ fig 5C ]
[ fig 5D ]
[ fig 7 ] [ fig 7A ] [ fig 7B ] [ fig 7C ] [ fig 7D ]
Step 8. - Hang Cabinet Doors
To hang doors, use the 1 ½” silver screws. Hold door up
so the door hinge hole lines up with the pre-drilled hole in
the face frame. Screw in the hinge so the doors are level
across the top and flush in the front. Take clear bumpers
and attach as in fig. 8B, to top and bottom of doors.
NOTE:
Hinge is 6 way adjustable
(up, down, in out, back
and forth) fig. 8A.
In and out
Up and Down
Back and Forth
[ fig 8 ]
[ fig 8A ] [ fig 8B ]
DO NOT TO OVERTIGHTEN!
It is recommended that you finish
tightening with a screwdriver to avoid
stripping the pre-drilled holes.
!
Step 9. - Install Adjustable Shelf
[ fig 9 ]
[ fig 9A ]
[ fig 9B ] [ fig 9C ] [ fig 9D ]
To install shelf, use all 4 shelf clips. Push
shelf clip into holes, as in fig. 9, on side
panel. Make sure the clips are level in
front, back and on the other side panel,
see fig. 9A
Angle shelf and slide into cabinet, setting
one side of shelf on top of shelf clip, see
fig. 9B. Let shelf drop onto the other side
and snap into place, see fig. 9C. To secure
screw into underside of shelf as in Fig. 9D.
NOTE: - Attaching Two or More Cabinets
When putting two cabinets together, hold both face frames flush, see fig. 10A.
Take a 1 ¼” screw and insert it behind the face Frame, into the side panel of
one cabinet through the other cabinet’s side panel, screwing it tightly together
see figures 10B & 10C. Do this at the top, middle and bottom of the cabinet.
[ fig 10A ] [ fig 10B ] [ fig 10C ]
Step 6. Attaching Cabinet Legs
If You Plan To Stack This Cabinet, Do Not Put The Legs On.
Assemble adjustable leg by attaching the dowel head to the leg
(fig. 6, 6A, and 6B). Take the assembled leg and insert dowel
into the hole provided as in fig. 6A. Use 1/2” screws and screw
leg into bottom of cabinet to keep it firmly in place (fig. 6C and
6D). Let glue dry completely.
Before Proceeding to the
next step, let glue dry
completely.
!
[ fig 6 ]
[ fig 6A ] [ fig 6B ]
[ fig 6C ] [ fig 6D ]
IF YOU PLAN ON USING THIS
CABINET AS A STACKABLE
Do not attach the legs to this
cabinet and skip to Step 7.
!
NOTE: To secure shelf clips to side,
use 1/2” silver screws and screw shelf
clips into side panel.
Visit Jack’s Design Center, an interactive SLIDE-LOK
Storage System design tool, which will enable you to
design your own SLIDE-LOK Storage system online
www.slide-lok.com
800-835-1759
Design Your Own
SLIDE-LOK Storage Solution
Other SLIDE-LOK Indoor Furnishing manuals

Popular Indoor Furnishing manuals by other brands


Home Decorators Collection
Home Decorators Collection Bella V183104XXA-NP Use and care guide

DAVIS DIRECT
DAVIS DIRECT HD1619-403 Assembly instruction

Space Seating
Space Seating 15-37A720D operating instructions

Havit
Havit GC939 user manual

Runfine
Runfine RFVA0069B Operator's manual

Kimball Office
Kimball Office Interworks EQ Assembly instructions


