SMARTA BIKE LX User manual

'Its a bicycle with something extra!'
LX & GT

Thank you For Purchasing a Smarta
Bike!
Our mission is to offer the most reliable and best performing electric
bicycles (ebikes) for the best price.
Every single Smarta bike is checked by a Quality Control technician
before being carefully packaged and boxed.
any components are stainless steel to prevent rust. Durable sealed
bottom bracket units are standard on Smarta bikes. The battery cells and
components used are normally found on ebikes costing over £1,500. You
have purchased a well made, well thought out product and we hope you
enjoy it for a long time. To ensure you get the most from your new ebike
please read the following carefully.
*IMPORTANT*
Get help if you intend to lift the bike from the box nd mind your b ck when
you do so. You c n lso cut the side of the box to void lifting.
Charge your battery now
ost of you will want to use the ebike as soon as possible. The battery will
arrive in a dormant state suitable for shipping. Essentially the battery will
be sleeping and may be damaged if it is not charged before first use.
It is a good idea to put your battery on charge immediately because the
initial charge should be for 10 to 12 hours. Please read Battery Charging
section now.

Contents of the Box
One well made bicycle with:
A front motor wheel
Pedelec sensor
Electronic V brakes
Optional twist grip throttle
Pedelec mode switch
Battery gauge
36V 10Ah Lithium-ion battery
Battery charger
Battery lock/ignition and 2 keys
anual
Tools Re uired
Spanners: 8mm, 10mm, 15mm, 18mm
Allan Key set
Screwdrivers: Phillips-head and flat-head
Bottom Bracket Tool: 14mm socket
Preparation for Use
Is your battery on charge?
Once you are happy that all the parts are in the box you can begin
assembling the ebike. We may have done most of the assembly but you
should have it checked for safety before riding
**It is dvised th t you ensure your bike is ssembled nd inspected
by suit bly qu lified person. This is m tter of person l s fety.**
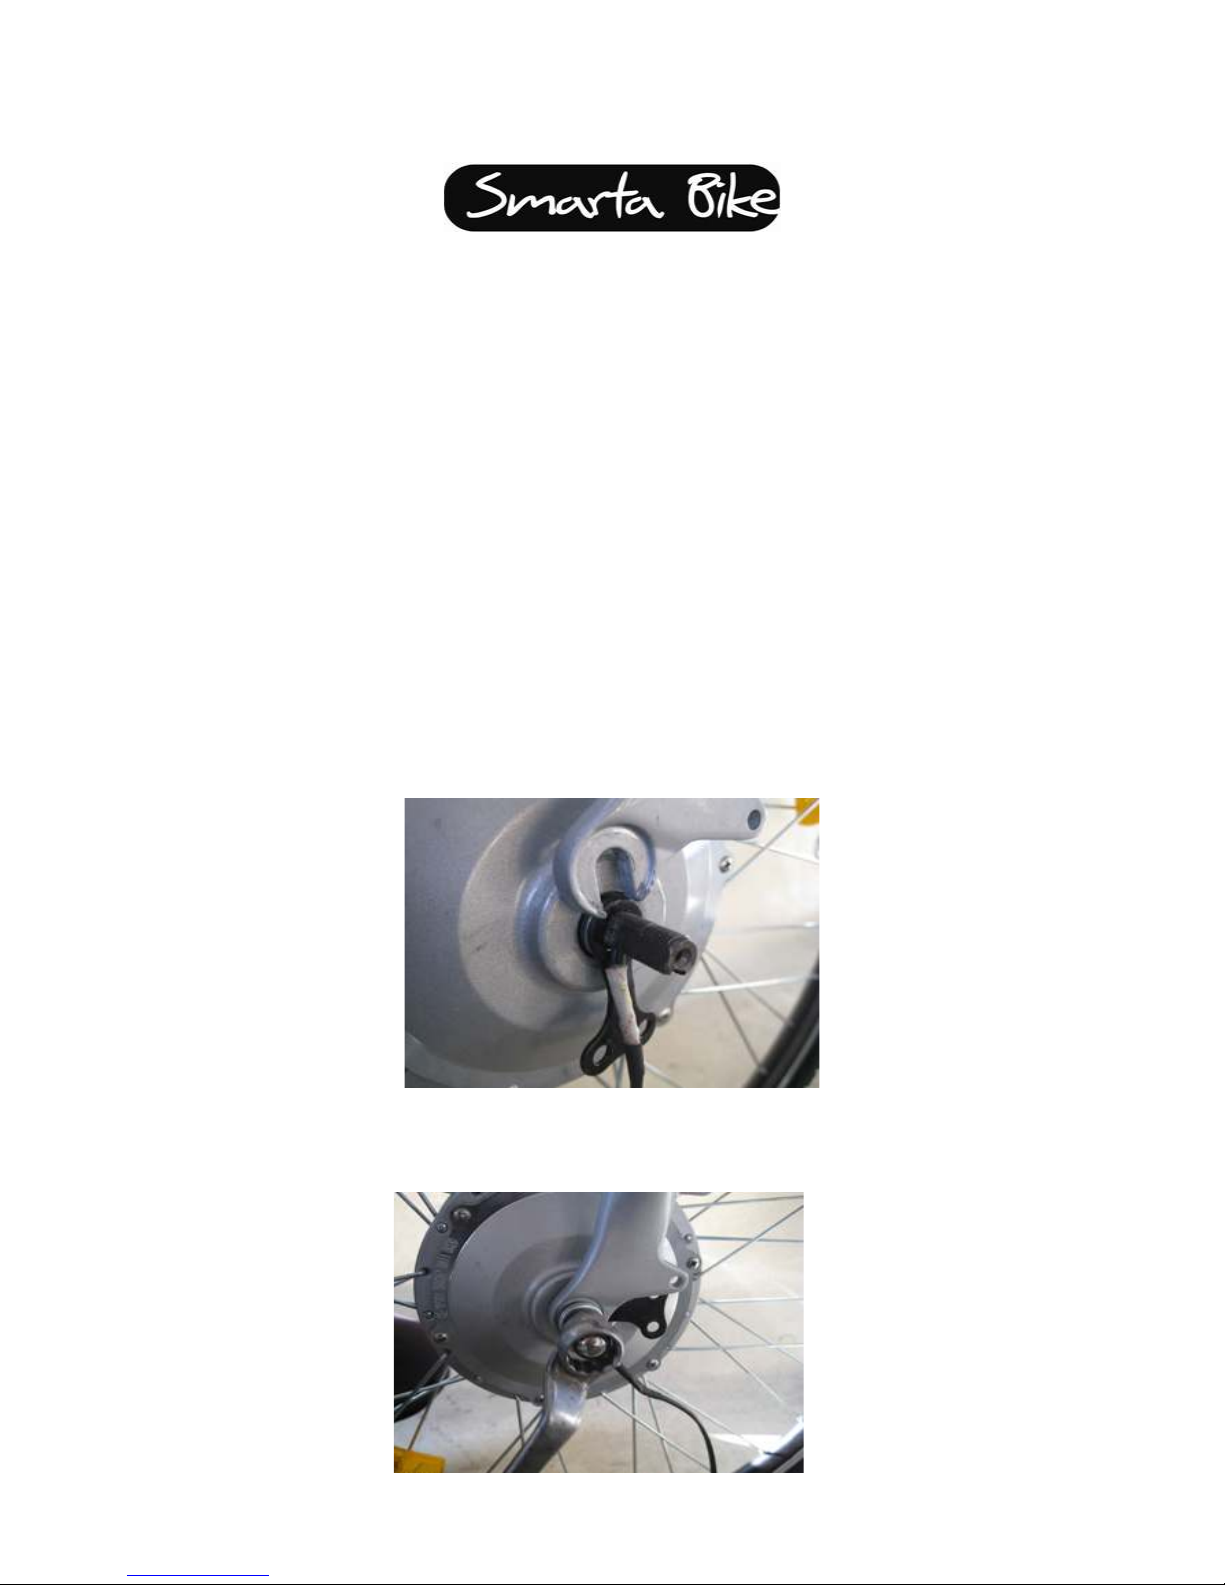
Please see the pictures below as a guide to fitting the front hub motor.
Please slot the front motor wheel into the front forks with the cable coming from the
left and under the axle. * you may need help to hold the bike steady.
Please tighten the wheel nut ensuring the power/control cable is not caught and free
to be routed up the fork. WARNING: The torque setting for the wheel nuts is 30Nm.
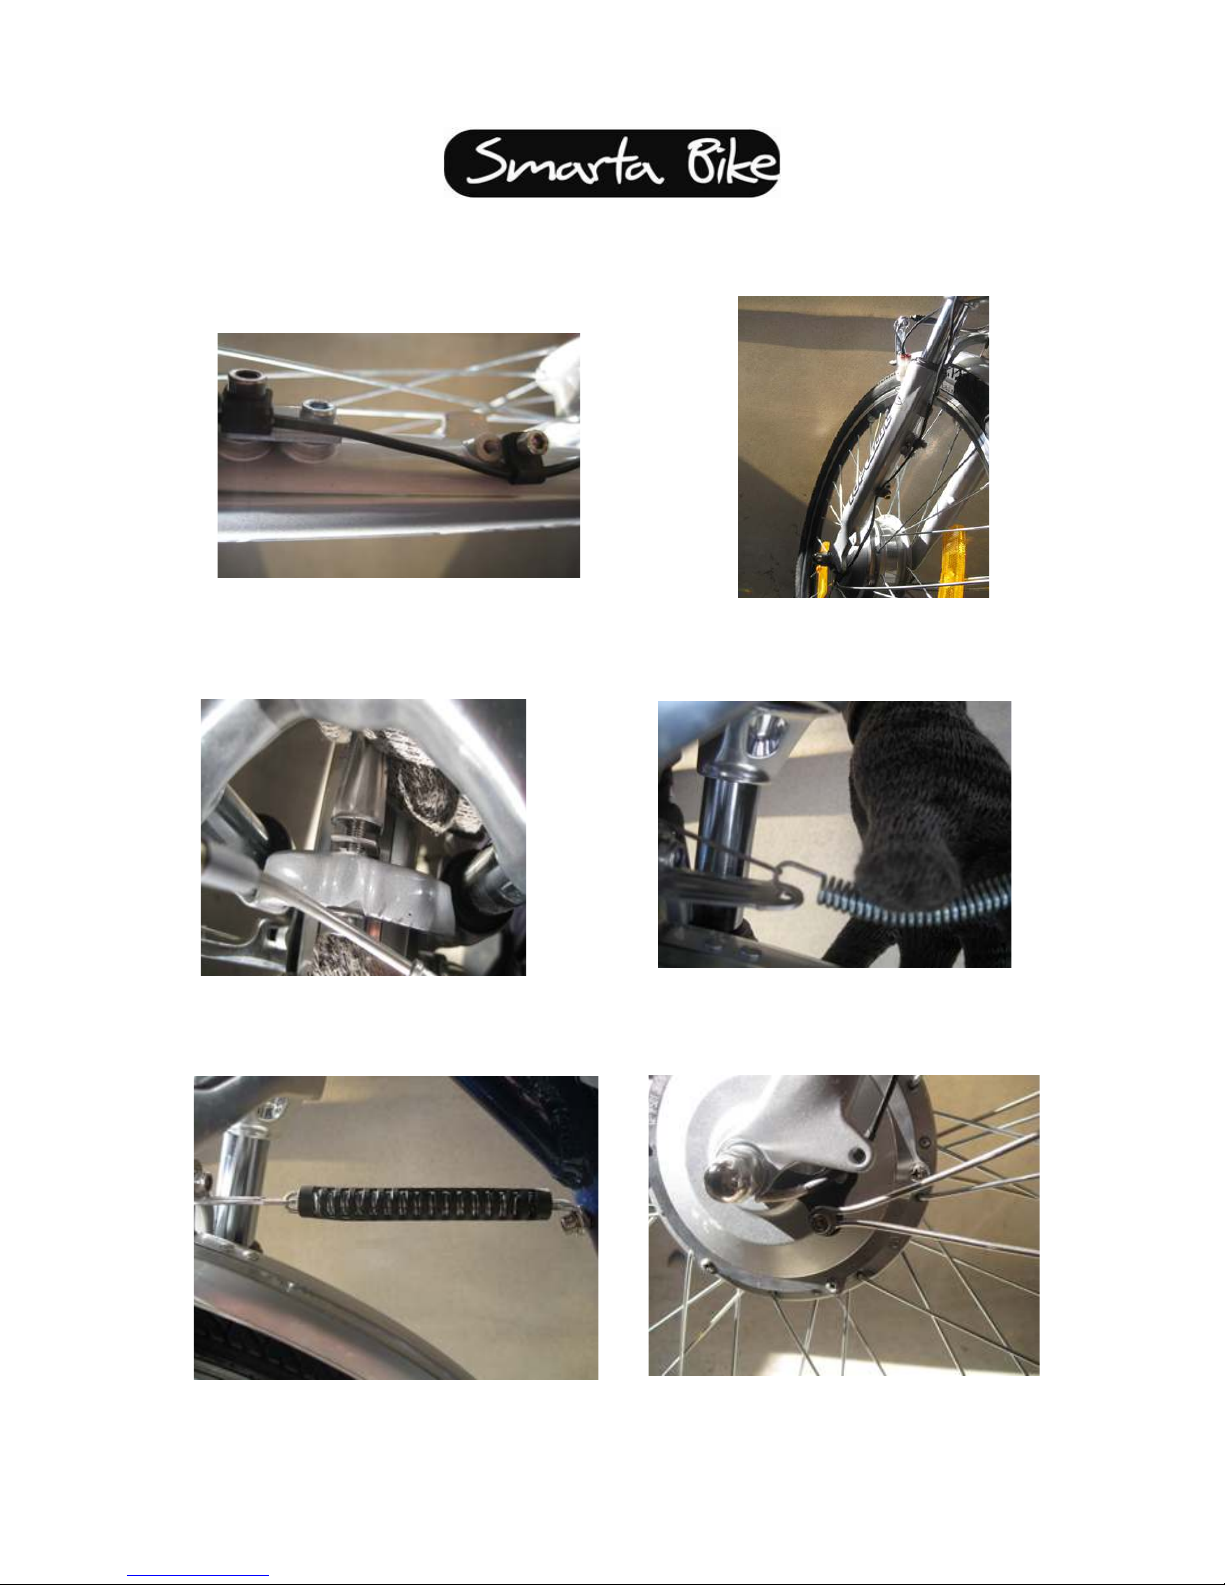
You can from the following 2 pictures the way to route the motor cable up the fork.
Once you are happy that the wheel has been inserted correctly and the motor cable
has been routed up the fork you can attach the mudguard and wheel spring assembly.
Below you can see the complete mudguard and spring assembly.
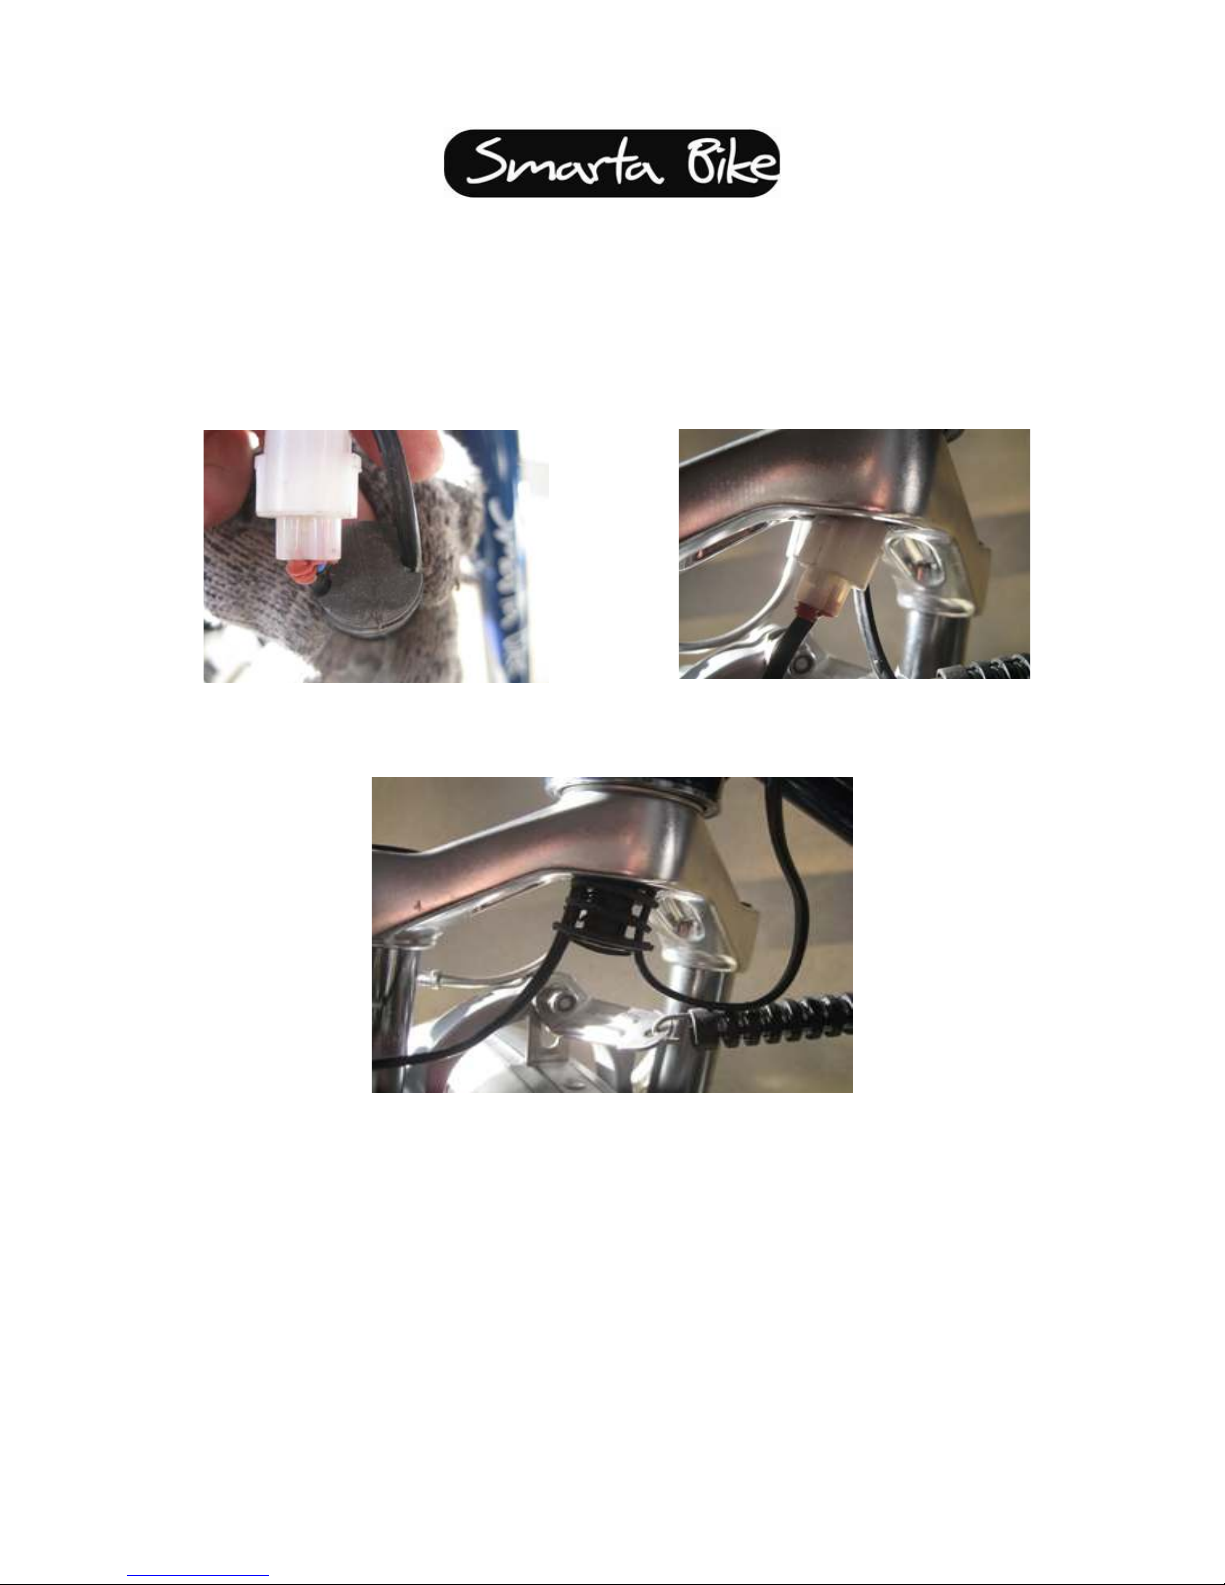
Please see the pictures below as a guide to connecting the motor to the
control unit via the wireharness.
Now you need to fit the motor cable to the wireharness using the connector block
shown. It comes from the central arch of the forks and is kept in place using a bung.
Please be sure to leave enough cable exposed on the motor side so that steering is not
restricted.
You can fit the handlebars at any point, we believe it is easier when the
front wheel is in place and you can use the side stand to keep the bike in
place. At this point you can also ensure the headset is aligned with the
front wheel.
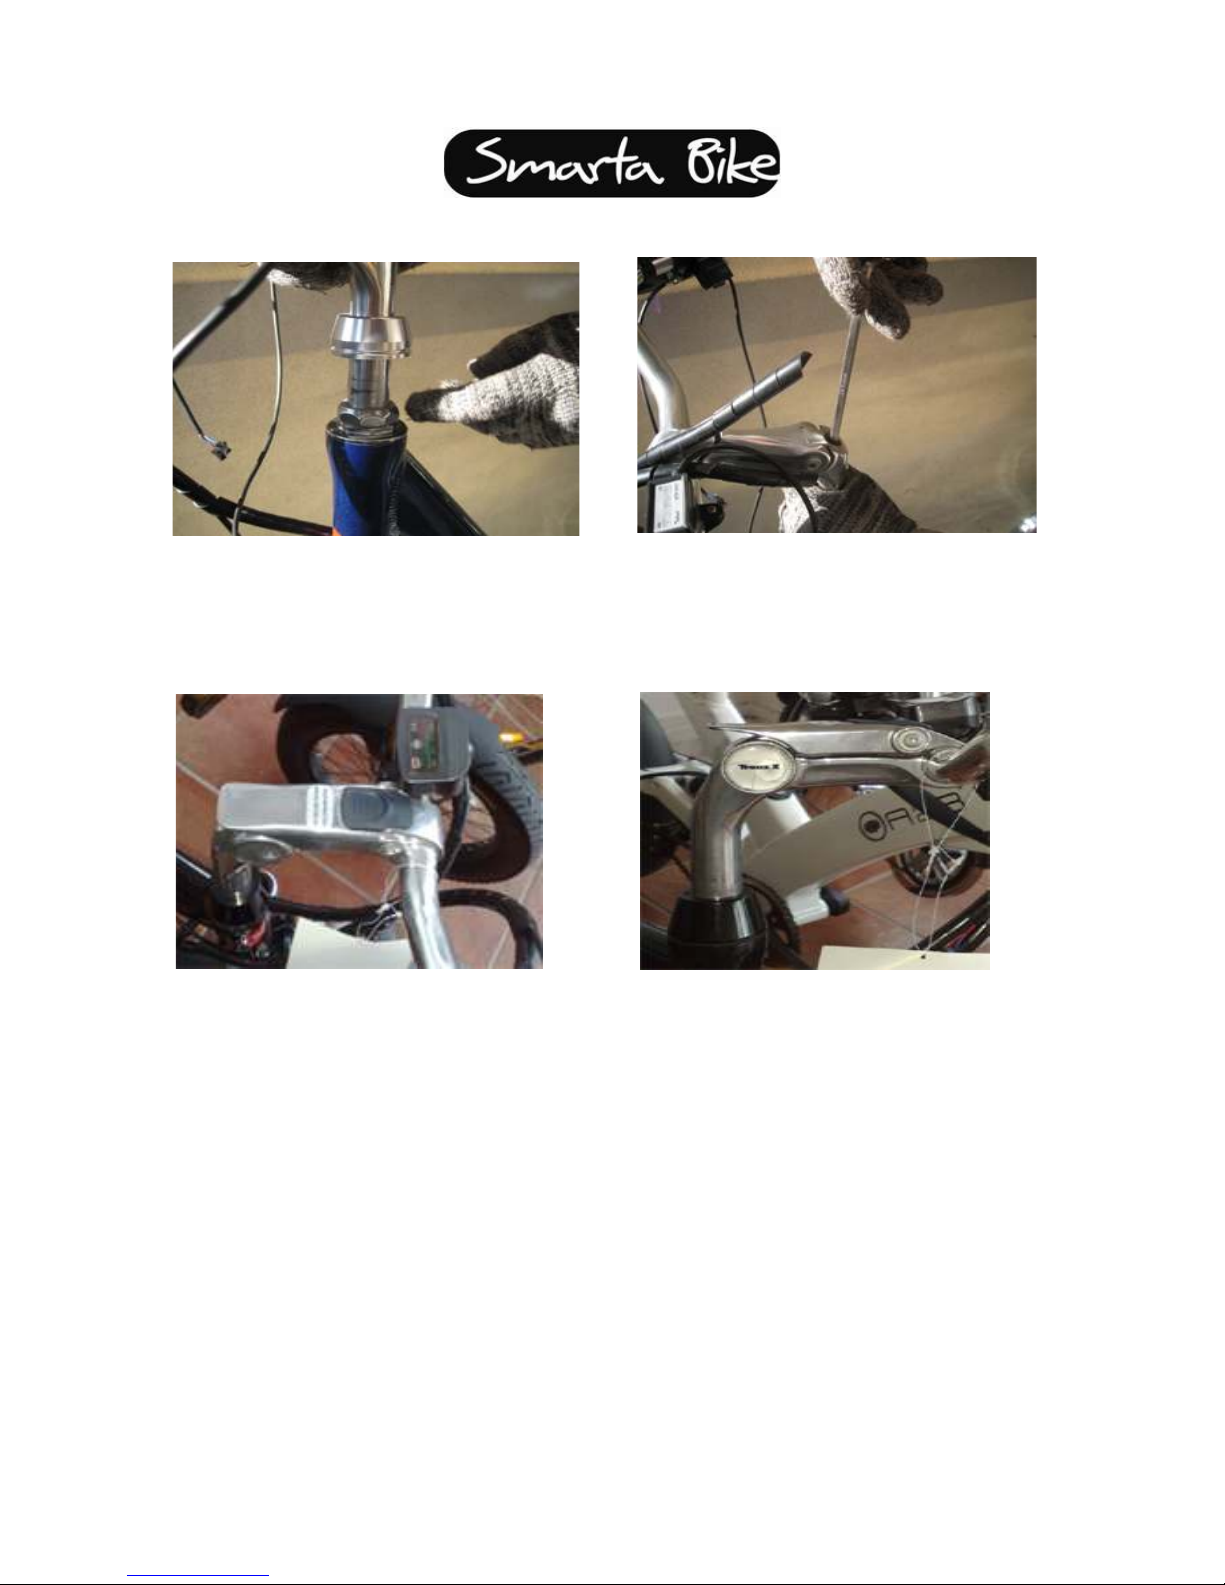
Slot in the steering column, align and tighten.
Centre and fix the handlebars in place as shown. You wont need to do this if you have
the TransX handlebar adjuster fitted. In which case read the specific TransX manual
for the adjuster.
Please note the pedals are marked 'L' for left and 'R' for right as if you
were in the riding position. They should screw on using a rotation direction
towards the front of the bike (clockwise for 'R' and anti-clockwise for 'L')
Please note they are self tightening so once they start to lock you only need
to make another ¼ to ½ turn using a 15mm spanner.
Pump your tyres to between 50 and 60 psi.
Set your brakes up and test them before riding.

Please see the front brakes being connected after the wheel has been fitted.
Check all nuts and bolts and spokes and ensure the bike is safe to ride.
Give the brakes one more check.
If you are determined to set your bike yourself please check a reliable
source such as www.sheldonbrown.com/ to understand how the
mechanical components should be prepared for use.
Charging Your Battery
ost of you will be familiar with charging some kind of battery
device, even if it is just your mobile phone. The Smarta battery
charger should be used only with the Smarta battery and vice versa.
The battery can be charged on or off the bike.
Connect the charger to the battery charge port and plug the charger
into the wall.
Turn on the charger at the wall and you will see the green light turn
red.
Leave the battery on charge until the charger light turns green

again...this means it is fully charged.
The first 3 times you charge it please leave on charge for 12 hours
ignoring the green charger light. Shorter charges may result in a
lower battery capacity and life. WARNING if you use the b ttery
before the initi l ch rge you m y c use irrevoc ble d m ge.
When charging on the bike the ignition should be turned off.
When a green light indicates a full charge you can disconnect the
charger and the battery will remain above 90% of charge for several
days i.e. it has a slow self-discharge rate. Regardless, if it has been
more than 2 days since its last charge it should be charged before
next use.
Disconnect and switch off when fully charged.
When you connect the battery to the bike and switch on you will see
the battery gauge lights glow.
Battery Care
In a sense it is possible to describe your battery as 'alive' or 'active' and
unsurprisingly with that comes a life span. Just like you service your
bicycle there are things you can do to prolong your use and enjoyment of
the battery. Please read the following carefully and if you need anything
explained please do not hesitate to contact us.
Avoid frequent full discharges because this puts additional strain on the
battery. Several partial discharges with frequent recharges are better for
lithium-ion than one deep one. Recharging a partially charged lithium-ion
does not cause harm because there is no memory. (In this respect, lithium-
ion differs from nickel-based batteries.) Short battery life in a laptop is
mainly cause by heat rather than charge / discharge patterns.
Although there is no memory effect a full discharge once every 6 months
can help to calibrate the battery gauge and ensure an accurate reading.
Keep the lithium-ion battery cool. Avoid leaving in the boot of a hot car for
example. For prolonged storage, keep the battery at a 40% charge level.
Avoid purchasing old batteries. The chemistry works best when it is fresh.

If you have a spare lithium-ion battery, use one to the fullest and keep the
other cool. Do not freeze the battery. For best results, store the battery at
40% state-of-charge.
Some lithium-ion batteries fail due to excessive low discharge. If
discharged below 25Volts, the internal safety circuit opens and the battery
appears dead. A charge with the original charger may no longer be
possible.
WARNING if the b ttery volt ge h s f llen below 15V nd h s
rem ined in th t st te for few months, rech rge should be voided.
To prevent f ilure, never store the b ttery fully disch rged. Apply
some ch rge before stor ge, every 2 months while being stored, nd
then ch rge fully before use.
Using the Bike
Once you have made sure the bike is set up correctly and safe to ride you
can put the charged battery in, lock it in place and switch it on.
You will see the power gauge lights on the handlebars come on to show the
current state of battery charge.
You are now ready to cycle.
The B ttery 36V Lithium Ion LiMnO4
This battery uses the same battery cells found in some of the most
expensive ebikes available in Europe. Our goal is that you can rely on this
product everyday.
The battery has been fully tested and certified as safe by the global
consumer testing agency the Underwriters L bor tories. www.ul.com
Throttle
The throttle is available to use whenever the battery is turned on. It allows
you to provide a variable amount of power to the motor so you can control
your speed. When you release the throttle it returns to the off position.

The throttle is located on the right handlebar like a motorcycle.
Pedelec System
When you pedal power can be engaged in three modes: Low, edium and
High. You can also turn the power off via the pedelec selector.
**W rning – Ple se turn the pedelec off when you re w lking with
the bike. If the ped ls rot te the power will be eng ged. Also be c reful
th t no one twists the throttle when you re st tion ry nd not
expecting the power.
Electronic S fety Br kes
The brakes on your Smarta ebike are connected to the control unit and cut
the power when you use them. This means that the bike will stop well even
if you have the throttle on while you brake. It is recommended that as with
mopeds and motorcycles you use both brakes when stopping. Depending
on the riding conditions the right amount of front and rear brake

application will ensure you stop in a controlled manner. It is wise to get the
mechanical parts of the brakes serviced regularly.
The Hub Motor
The motor is a high efficiency hub. It is lightweight and has a high power
to weight ratio. The hub is sealed and provides power directly where it is
needed. It has smooth performance through the rpm range making standing
starts quick and controlled.
The Control Unit
Essentially the brain of the system and a very important component. The
efficiency and performance of the system is very dependant on the quality
of the controller processes.
This control unit has been hand picked for its ability to get the most out of
the components while simultaneously protecting them to ensure longevity.
It is responsive and gives the product a flexibility that responds well to
many riding conditions and riding styles.
The Rest
The remaining components such as the gears and drive chain are normal
bicycle components and we recommend if you get them serviced regularly
and have periodic safety checks.
Important Maintenance
Although we have made every effort to make this product intuitive and
'maintenance free' your Smarta ebike is firstly a bicycle, then an ebike.
This means you must perform pre-ride checks and servicing of the bicycle
components.
Pre-Ride Checks
You should ensure the brakes are working satisfactorily and you can
stop safely.
Check your tyres are in good condition, suitable for the riding
conditions and pumped to 50 – 60 psi.
Check the chain is clean, at the correct tension and ready for use.

Test the pedals and steering column are not loose or have inhibited
movement.
Essenti l M inten nce
Probably the single most important bit of maintenance requires the
brakes to be serviced regularly. This may be more often than a
normal bicycle because it has been shown that ebikes are used by
their owners more often than standard bicycles.
**Ple se check nd service br kes s required**
On any bike the spokes should be checked every few rides to ensure
they are holding the wheel true and at approximately equal tension.
The motor will put increased stress on the spokes and although we
use extra strong spokes and a more robust spoke lacing pattern they
should be checked at the very least once a month.
The nuts and bolts that hold your machine together may come loose
over time with vibration caused by use or transportation. It is
important to check these regularly.
**Ple se check ll nuts, bolts, br kes, ge rs nd spokes fter the
first few rides. New products h ve we ring in period when the
met l nd c bles will re ct to the new conditions. C bles
gener lly stretch nd nuts nd spokes m y lose tension.**
We use standard bicycle components on the Smarta ebikes so you
won't have any problem sourcing replacements if required. If you
want a professional bike service or need any help or advise you can
always contact us.
The 3 Year Conditional Warranty
Summ ry of W rr nty
The frame of the bike is supplied with a 3 year conditional warranty.
The electronic components (excluding the battery but including the
charger) are supplied with a 1 year conditional warranty.
The battery is supplied with a 1 year conditional warranty charging
to % of full Voltage within: Year 1-75%

Consumables such as tyres, tubes, brake blocks, bulbs/LEDs, are not
covered under this warranty.
The Warranty applies for normal* use of the product only and does
not include sport use.
The warranty does not apply if:
our set up/operating/care instructions have not been followed.
You fail to have the product serviced twice annually at an approved
service agent during the warranty period.
the product has been modified
the use is not consistent with the limitations of the product or its
components and evidence of overloading is evident, e.g. mechanical
or thermal stress overload.
If there is natural wear.
*Norm l Us ge
Normal usage for these components can be defined as road or cycleway
riding and with a total load no more than 100Kg and power used to assist/
augment cycling rather than an effective drive system.
Conditions of B ttery W rr nty
The initial charge is performed.
Storage procedures are followed.
The battery warranty does not transfer to a new owner unless the battery is
returned for analysing and conditioning. (Your retailer may be a small
charge for this service). This can be done by either purchaser or seller.
Troubleshooting
The concept of battery power is not new to most people. Rechargeable
batteries are used in many products used by millions of people everyday.
ost of those batteries are Lithium ion, however most of the battery packs
are smaller than 36V.
What may be a problem is that not all of you will have used a bike with a
motor or electrical connections before...so there is a short learning period
where you should take a little time to understand your new machine. Our

trouble shooting guide will help you answer the most common questions.
If you need more help simply email us. Troubleshooting@TETS.biz
Problem: No Power and gauge is OFF.
Check the battery is connected and locked in place.
ake sure the key is turned on.
Check the battery charge level by pressing the button on the battery if
it needs charging connect the charger.
Check the battery fuses located on the battery. The input fuse is
5Amp and the output is 20Amp.
Check the connections and make sure the battery power line is
connected to the switch and the gauge is connected to the controller.
If the power works then it is a connection problem with the power
gauge.
If all seems well give the battery a charge for 4 hours and try again,
then contact us.
Problem: No Power and gauge is ON.
Ensure the electronic brakes are returning to the normal brake 'off'
position...if not they will be disengaging the power.
If the problem persists after you check the above then disconnect the
electronic brakes at the controller, if the power returns then you may have
a faulty brake sensor.
Check the motor and throttle connections at the controller and along the
wire harness.
Problem: Intermittent Power
1. If a power failure occurs after stops it is almost certainly the brake
levers, have them serviced to ensure they return to the full off
position. Servicing normally involves proper set-up of the brakes and
application of water expelling/lubricant solution the the brake cables.
2. If your pedelec disc has become dirty or damaged you may
experience an intermittent loss of power while pedalling. Check your
magnetic pedelec disc and sensor for damage and dirt. They are
located on the bottom bracket axle and are likely to require periodic

cleaning.
3. If loss of power is experienced after bumps it is most likely to be a
connection.
Check the battery contacts and ensure they are clean and making
good contact.
Check the ignition to see if it is faulty by wiggling the key. N.B. It is
not a good idea to hang lots of keys from the ignition because the
weight will cause rapid and excessive wear.
5. Check that the fuse holders are secure.
6. Completely discharge and recharge the battery twice. This is the least
likely scenario but it is a required fault check.
7. When the power cuts out test the voltage across the battery terminals
using a multimeter and call us with this information.
Problem: Battery not Charging
1. Check if the charger is working...if no light check the plug fuse on
the charger
2. Are you connecting the charger in the right order (see charging the
battery).
3. Check the input (5Amp) fuse on the battery.
4. If you have a multimeter check the voltage across the battery
terminals. If it is below 20Volts the charger may not be able to start
charging and the battery may be damaged.
Problem: Not Giving Full Range
1. Ranges can vary dramatically from customer to customer under
different riding conditions.
2. Your bike may have an adjustable power/range setting on the
controller, this may need to be changed if you require a longer range.
3. Hills and loads over 90Kgs reduces the range significantly.
4. Please check the brakes are correctly set-up i.e. not rubbing and the
tyres are correctly inflated...usually 50 to 60 psi – this is the number
one cause of reduced range.
5. If you are using the throttle to build momentum you put a huge strain
on the motor, controller and battery and this will evaporate your

range. Work together with your machine for maximum benefit.
6. If it is a new battery it may take a few cycles (charge/discharge)
before it fully opens up the capacity.
Problem: otor Noise
1. Be exact about when the noise is experienced: when running motor
off load or under load, when cycling with motor switched off, when
using pedals, before or after braking etc. Often a service will rectify
noises.
2. otors with quality metal gearing will make more noise than the
motors that use plastic cogs.
3. If the noise of your motor suddenly gets louder it is a good idea to
have it checked out. Contact us.
Should you have any need please contact:
Discl imer/Decl r tion
Smarta and The Electric Transport Shop Ltd assume no responsibility for
accidents or malfunctions resulting from improper use of the components,
battery or charger.
When you ride the machine on public roads, cycleways, footpaths or
anywhere other than your own private land, we kindly ask you to observe
and obey the applicable laws and be mindful of your fellow road users and
pedestrians.

Dispos l of B ttery & Electronic Equipment
Please dispose of Electrical and Electronic equipment properly. It is an
offence to dispose of these parts in your household rubbish. Local councils
in the UK provide facilities for such disposal and can direct you to your
nearest recycling point.
This manual suits for next models
1
Table of contents


