SmartBidet SB-3000 User manual

SB-3000
Warranty
(62~63)
User Manual (2~21)
Manual del usuario (22~41)
Manuel de l'utilisateur (42~61)
“Important safeguards/general cautions ”are information that can protect the user from safety hazards and also prevent
losses. Please be sure to read the manual correctly for proper usage.
• Please read the manual carefully before installation and utilization.
• This product is made for the US and Canada.
• The function and design of the product may be changed for quality improvements.
“Precauciones generales/protecciones importantes” es información que puede proteger al usuario de peligros de seguridad
y también evitar pérdidas. Por favor asegure leer el manual correctamente para un uso adecuado.
• Por favor lea el manual cuidadosamente antes de la instalación y utilización.
• Este producto está fabricado para Canadá y los Estados Unidos.
• El diseño y función del producto puede ser cambiado para mejora de calidad.
Les «Consignes de sécurité importantes / précautions générales» sont des informations pouvant protéger l'utilisateur
des dangers pour la sécurité et prévenir les pertes. Assurez-vous de lire le manuel correctement pour une utilisation correcte.
• Veuillez lire attentivement le manuel avant l'installation et l'utilisation.
• Ce produit est fabriqué pour les États-Unis et le Canada.
• La fonction et la conception du produit peuvent être modifiées pour améliorer la qualité.
SB-3000 Electronic Bidet Seat
TM

2
Important Functions
Simply Clean. Stainless Nozzle.
Simplemente Limpia. Tout Simplement Propre.
Inoxidable Boquilla. Inoxydable Buse.
3-in-1 Improved Hygienic Functions
3-en-1 Funciones Mejoradas de Higiene
3-in-1 Amélioration des Fonctions D'hygiène
Revolutionary Heated Seat & Warm Air Dryer
Asiento Térmico Revolucionario y Secador de Aire Caliente
Sièges Chauffants Révolutionnaire et Sécheuse Air Chaud
SB-3000
Distributed by Hitrons Solutions Inc
Warm Air Dryer
Sechoir a air chaud
Secador de aire caliente
Easy Installation
Installation facil
Facil instalacion
Soft Closing
Fermeture en douceur
Cierre suave
Heated Seat
Siege chauffant Asiento
calefaccionado
Heated Water
Eau chaude
Agua caliente
Adjustable Nozzle
Bec reglable
Boquilla ajustable
Replaceable Nozzle A
buse remplaçable A
boquilla reemplazable A
Child Wash
Lavar Niño
Laver L'enfant
Easy to Use
Facile a utilizer
Facil de Usar
A
s
A
s
S
Distributed b
y
Hitrons Solutions Inc

3
Contents
Preparation
Other
0peration
&
Cleaning
Troubleshooting
Specications
20
21
4
6
IDENTIFICATION
OPERATION (BASIC)
OPERATION (DETAILS)
INSTALLATION
WATER DRAINING/
SEPARATION OF THE UNIT FROM
THE TOILET BOWL
MAINTENANCE
8
10
12
15
18
19
IMPORTANT SAFEGUARDS /
GENERAL CAUTIONS
CAUTIONS BEFORE INSTALLATION

4
The following terms are used in this manual to indicate hazards of varying degrees of severity.
I
ndicates potentially hazardous situation which, if not avoided, may result in minor or
moderate injury or in damage to the product or other property.
Indicates potentially hazardous situation which, if not avoided,
could result in death or serious injury.
WARNING
Indicates an imminently hazardous situation which, if not avoided,
will result in death or serious injury.
DANGER
CAUTION
READ ALL INSTRUCTIONS BEFORE INSTALLATION AND USE
DANGER - To reduce the risk of electrocution
WARNING - To reduce the risk of burns, electrocution, fire, or injury to persons
PLEASE OBSERVE THE FOLLOWING PRECAUTION BEFORE USING THIS PRODUCT
Do not open the product to repair or remodel.
Only qualified service personnel should service this product.
Do not use attachments not recommended by the manufacturer.
Do not dismantle
Connect this product to cold water supply pipe carrying potable water.
Do not connect to an industrial water supply line that
does not carry water of drinking quality.
This will negatively effect hygiene and performance.
Prohibited
About Low Temperature Burns.
A burn occurs when the skin has been exposed to high temperatures.
However, a low temperature burn may occur when the skin has been in contact with an
object at relatively low temperature (about 104 ℉). Close supervision is necessary when
this product is used by children or adults with sensitive skin.
Prohibited
If using any chemical toilet bowl cleaner, be sure to wipe up
any spills that splash onto Electric Bidet Seat.
Do not use benzene or any acid chemical detergent.
Only neutral detergent permitted.
Prohibited
1
IMPORTANT SAFEGUARDS

5
Do not plug in the power cord before connecting the water supply hose.
Prohibited
This product must be grounded.
An approved Ground Fault Circuit Interrupt must be used.
Grounding
Do not splash water on this product.
Please provide adequate ventilation to avoid high levels of humidity
which can damage the electronic components.
It is necessary to provide adequate ventilation with a fan,
open door or open window when bathing.
Do not spray water
Do not touch the power cord with wet hands.
Do not reach for a product that has fallen into water.
Unplug immediately!
Wet hands prohibited
This product must be connected to a standard voltage power source.
Do not connect power cord if the cord is damaged or broken.
Do not plug the unit into a loose electric outlet.
Observe at all times
Please disconnect the power cord when you clean this product or
detach it from toilet bowl.
Do not supply electrical power to the unit until the plumbing work
has been completed.
Observe at all times
Keep the electrical cord away from heated surfaces to prevent a fire
hazard.
Also, keep any flammable materials away from this product at all times.
Use of fire prohibited

6
CAUTION
Never operate this product if it is not
working properly, if it has been
dropped or damaged, or dropped into
water. Return the product to a service
center for examination and repair.
Prohibited
Do not obstruct or put
anything into the dry air
outlet. Do not apply
excessive force to the
shower nozzle.
Prohibited
Do not strain or push the connected hose and tube connecter;
it may cause water leakage.
Never drop or insert any object into any opening or hose.
Use proper plumbing supplies if any modification is to be made.
Prohibited
Drain the water from unit and unplug the power if this product is
not going to be used for an extended period of time.
Refer to page 21.
Observe at all times
Do not stand or sit on
the seat cover lid.
It is not designed to
support a user
body weight.
Prohibited
Allow the seat
and lid to close
automatically.
Do not force the
lid closed.
Prohibited
Use this product only as described
in the operating instructions.
Never use while sleeping or drowsy.
Do not use while bathing.
Observe at all times
Be careful so that
this product does not
become stained with
excrement and urine.
Observe at all times
- SAVE THESE INSTRUCTIONS -
THIS PRODUCT MUST BE PLUGGED into a regular voltage grounded GFCI outlet (North America 120Vac).
The rated power consumption is 1400W. In locations where only a standard two-prong outlet is available,
it is the responsibility of the user to install a grounded three-prong outlet.
Using a higher voltage is dangerous and may result in a fire or other accident.
This product is not responsible for damage resulting from the use of it on other than specified voltage,
or operating it without proper grounding.
WIRING REQUIREMENT
1
IMPORTANT SAFEGUARDS
2
CAUTION BEFORE INSTALLATION

7
(1)
This product has a three-prong grounding plug, which must be plugged into an outlet that is properly installed and
grounded. In the event of an electrical short circuit, grounding reduces the risk of electric shock by providing an
escape wire for the electric current. If repair or replacement of the cord or plug is necessary, do not connect the
grounding wire to either flat blade terminal. The wire with insulation having an outer surface that is green with or
without yellow stripes is the grounding wire. Check with a qualified electrician or service person if the grounding
instructions are not completely understood, or if in doubt as to whether the product is properly grounded.
(2)
This product is for use on a nominal 120Vac circuit, and has a grounding plug that looks like the plug illustrated in
sketch A in Figure 1. A temporary adapter, which looks like the adapter illustrated in sketches B and C, may be
used to connect this plug to a 2-pole receptacle as shown in sketch B if a properly grounded outlet is not available.
The temporary adapter should be used only until a properly grounded outlet (sketch A) can be installed by a qualified
electrician. The green colored rigid ear, lug, or the like extending from the adapter must be connected to a permanent
ground such as a properly grounded outlet box cover. Whenever the adapter is used, it must be held in place by the screw.
This appliance has to be grounded.
GROUND INSTRUCTIONS
GROUNDING PIN
ADAPTER ADAPTER
METAL SCREW TAB for
Grounding Screw
GROUNDED
OUTLET
- Figure 1-
The use of an extension cord is not recommended or advised. If it is necessary to use an extension cord, use
only a three-prong extension cord (one to one), and a three slot built-in GFCI receptacle that will accept the
plug on this product. The marked rating of the extension cord should be equal to or greater than the electrical
rating of the unit (10amp). Consult a qualified electrician or service person if you are not sure whether the unit is
properly grounded.
IMPROPER GROUNDING CAN RESULT IN A RISK OF ELECTRIC SHOCK.
Electric wiring has to be done in accordance with all local codes,
or in the absence of local codes, with the National Electrical Codes.
DANGER
This Product must be on a separate circuit. No other appliance
should share the circuit with this product.
Sharing a circuit could cause the branch circuit fuse to blow
or the circuit breaker to trip. Continuous usage under these
conditions could result in fire or property damage.
WARNING
GROUNDED
OUTLET BOX

8
MAIN UNIT
1
Occupied Sensor
Quick Release Button
Operation LED Window
Heated Seat
Lid
Caution Label
Deodorizer
Dryer Vent
ACCESSORIES
2
Base Plate (1 pcs)
Bolt Case (2 pcs)
Remote
control User manual
Remote control
holder
1.5V AAA type
Battery (2pcs)
For plumbing For product fixation For remote control Installation
instructions
Water supply hose
(for electrical toilet seat)
Simple Operation Panel
Drain button
Posterior Wash
Spiral Stream Wash
Feminine Wash
T-Valve L-Valve
Mounting bolts
(2pcs)
Nuts
(2pcs)
Water supply hose
(for toilet flush water tank)
3
Identication
On/Off

9
POSTERIOR FEMININE
TURBO CHILD DEODO-
RIZATION
OSCILLATE
STOP DRYER POSTERIOR FEMININE
TURBO CHILD DEODO-
RIZATION
OSCILLATE
STOP DRYER
Stop all operation.
Posterior wash.
Feminine wash.
Dry washed area.
Spiral Stream (Turbo) Wash
When selected during wash function nozzle
oscillates automatically for a wider wash.
The unit will stop after operating the automatic
wash for 30 sec then dryer for 1 minute.
When user sits on the seat, it automatically
operates to deodorize. (Can select on/off)
The water temperature can be adjusted up to 4 levels
(off, low, middle, high).
The seat temperature can be adjusted up to 4 levels
(off, low, middle, high).
Can set time in the remote control with
hour( ) and minutes( ) buttons.
If Economy mode is selected, seat temperature
and water temperature will stay at 89.6℉.
If this(
) symbol flashes, please change
the battery in remote control.
❶Posterior Wash ❿Heated Water
❷Feminine Wash Seat Temperature
❸Dryer Heated Seat
❹Spiral Stream Wash Water Pressure
❺Deodorizer Dryer
❻Remote signal Nozzle Position
❼Battery Life Water Pressure
❽
Child Wash & Dry
Nozzle Position
❾Water Temperature
On/Off
❶❷❸
❹ ❺
❻
❼
❾
❽
❿
Display
Remote Control
3
Simple Operation Panel
Feminine
Wash
Posterior
Wash
Stop
- When you sit down on this product, sit in the center in order to activate the sensor.
(If the unit's input water temperature is lower than 54℉(12.2℃) , the water temperature
could be lower than the above noted temperatures)
POSTERIOR FEMININE
TURBO CHILD DEODO-
RIZATION
OSCILLATE
STOP DRYER
POSTERIOR FEMININE
TURBO CHILD DEODO-
RIZATION
OSCILLATE
STOP DRYER
POSTERIOR FEMININE
TURBO CHILD DEODO-
RIZATION
OSCILLATE
STOP DRYER POSTERIOR FEMININE
TURBO CHILD DEODO-
RIZATION
OSCILLATE
STOP
DRYER
POSTERIOR FEMININE
TURBO CHILD DEODO-
RIZATION
OSCILLATE
STOP DRYER
POSTERIOR
FEMININE
TURBO CHILD DEODO-
RIZATION
OSCILLATE
STOP DRYER
POSTERIOR FEMININE
TURBO CHILD DEODO-
RIZATION
OSCILLATE
STOP DRYER POSTERIOR
FEMININE
TURBO CHILD DEODO-
RIZATION
OSCILLATE
STOP DRYER
POSTERIOR FEMININE
TURBO CHILD DEODO-
RIZATION
OSCILLATE
STOP DRYER POSTERIOR FEMININE
TURBO CHILD DEODO-
RIZATION
OSCILLATE
STOP
DRYER
POSTERIOR FEMININE
TURBO CHILD DEODO-
RIZATION
OSCILLATE
STOP DRYER POSTERIOR FEMININE
TURBO
CHILD DEODO-
RIZATION
OSCILLATE
STOP DRYER
POSTERIOR FEMININE
TURBO CHILD DEODO-
RIZATION
OSCILLATE
STOP DRYER POSTERIOR FEMININE
TURBO CHILD DEODO-
RIZATION
OSCILLATE
STOP DRYER
POSTERIOR FEMININE
TURBO CHILD DEODO-
RIZATION
OSCILLATE
STOP DRYER POSTERIOR FEMININE
TURBO
CHILD
DEODO-
RIZATION
OSCILLATE
STOP DRYER
POSTERIOR FEMININE
TURBO CHILD DEODO-
RIZATION
OSCILLATE
STOP DRYER POSTERIOR FEMININE
TURBO CHILD
DEODO-
RIZATION
OSCILLATE
STOP DRYER
POSTERIOR FEMININE
TURBO CHILD DEODO-
RIZATION
OSCILLATE
STOP DRYER POSTERIOR FEMININE
TURBO CHILD DEODO-
RIZATION
OSCILLATE
STOP DRYER
POSTERIOR FEMININE
TURBO CHILD DEODO-
RIZATION
OSCILLATE
STOP DRYER POSTERIOR FEMININE
TURBO CHILD DEODO-
RIZATION
OSCILLATE
STOP DRYER
POSTERIOR FEMININE
TURBO CHILD DEODO-
RIZATION
OSCILLATE
STOP DRYER POSTERIOR FEMININE
TURBO CHILD DEODO-
RIZATION
OSCILLATE
STOP DRYER
POSTERIOR FEMININE
TURBO CHILD DEODO-
RIZATION
OSCILLATE
STOP DRYER POSTERIOR FEMININE
TURBO CHILD DEODO-
RIZATION
OSCILLATE
STOP DRYER
POSTERIOR FEMININE
TURBO CHILD DEODO-
RIZATION
OSCILLATE
STOP DRYER POSTERIOR FEMININE
TURBO CHILD DEODO-
RIZATION
OSCILLATE
STOP DRYER
POSTERIOR FEMININE
TURBO CHILD DEODO-
RIZATION
OSCILLATE
STOP DRYER POSTERIOR FEMININE
TURBO CHILD DEODO-
RIZATION
OSCILLATE
STOP DRYER

10
ᆞPlease plug the power cord into 120Vac power outlet.
ᆞPlug the unit into the proper power source and the LED power light will start flashing.
ᆞWait until the LED power light stops flashing and becomes solid red.
ᆞThe water tank will be filled after pushing a or button.
ᆞWhen the water tank is filling the buzzer "Beeps"continuously.
After the water tank is full, the buzzer will end with "One Solid Beep".
PREPARATION
2
Check for any water leaks.
1
ᆞPlease turn on the water supply valve and check connected spots(1~5) for the leakage.
CAUTION
Please press the "off"or "low"button to reduce the seat temperature after using.
Special precautions should be taken for children, those who cannot adjust the temperature,
and those who have sensitive skin.
CAUTION
CAUTION
DO NOT ALLOW CHILDREN TO USE THE TURBO WASH or SPIRAL STREAM WASH FUNCTION!
SUPERVISION IS STRONGLY RECOMMENDED FOR THE ELDERLY OR OTHER PERSONS
THAT MAY HAVE LIMITATIONS IN BODY MOVEMENT, ILLNESS OR DISABILITIES!
Observe at all times
water supply
vavle
4
Operation (Basic)
On/Off
On/Off

11
SIT DOWN ON THE SEAT
ᆞWhen the digital skin sensor on the seat is activated, the operation LED window on the main unit
will light "Occupied sensor"and simultaneously, the deodorizer fan will start to work.
ᆞSee page 12 for details about changing the seat or water temperature.
OPERATION
3
CLEANSING
ᆞCLEANSING 1. (Posterior Wash)
1- Press "Posterior Wash"( ). Automatically, the nozzle comes out and
sprays warm water to posterior.
2- Additional functions during your Posterior Wash experience are available. See Oscillation,
page 13
STOP
ᆞPress this button to stop all operation.
ᆞCLEANSING 2. (Feminine Wash)
1- Press "Feminine Wash"( ). Automatically, the nozzle comes out and
sprays warm water to feminine area.
2- Additional functions during your Feminine Wash experience are available. See Oscillation,
page 13
ᆞCLEANSING 3. {Spiral Stream (Turbo) Wash}
1- Press "Spiral Stream (Turbo)"( ), the nozzle spray is more or
focused to produce the effect of strong wash, to help stimulate bowel movement.
2- Press "Water pressure - High & Low button"to adjust the water pressure.
CLEANSING cont.
ᆞCLEANSING 3. {Spiral Stream (Turbo) wash}
1- Press "Spiral Stream (Turbo) wash"Automatically, the water
nozzle comes out and sprays a warm stream of water to the posterior center of the rectum.
2- If necessary, adjust "Position"of water stream with the ( / )buttons.
3- Press "Water pressure High & Low button" ( / )to adjust the water pressure
to your desired comfort.
4- Press the "STOP"button when you feel your abdomen is full or wait until
the "Spiral Stream (Turbo) wash"function stops, approximately 1 minute.
5- You will shortly feel the urge to push the water out of your colon, push the water and feces
out as thoroughly as you can.
6- Relax for a few minutes and be sure you feel your colon is empty and then use
the "Posterior Wash"and "Dryer" function to finish.
POSTERIOR FEMININE
TURBO CHILD DEODO-
RIZATION
OSCILLATE
STOP DRYER
POSTERIOR
FEMININE
TURBO CHILD DEODO-
RIZATION
OSCILLATE
STOP DRYER
POSTERIOR FEMININE
TURBO CHILD DEODO-
RIZATION
OSCILLATE
STOP DRYER POSTERIOR
FEMININE
TURBO CHILD DEODO-
RIZATION
OSCILLATE
STOP DRYER
POSTERIOR FEMININE
TURBO CHILD DEODO-
RIZATION
OSCILLATE
STOP DRYER POSTERIOR FEMININE
TURBO
CHILD DEODO-
RIZATION
OSCILLATE
STOP DRYER
POSTERIOR FEMININE
TURBO CHILD DEODO-
RIZATION
OSCILLATE
STOP DRYER POSTERIOR FEMININE
TURBO CHILD DEODO-
RIZATION
OSCILLATE
STOP DRYER
POSTERIOR FEMININE
TURBO CHILD DEODO-
RIZATION
OSCILLATE
STOP DRYER POSTERIOR FEMININE
TURBO CHILD DEODO-
RIZATION
OSCILLATE
STOP DRYER
POSTERIOR FEMININE
TURBO CHILD DEODO-
RIZATION
OSCILLATE
STOP DRYER POSTERIOR FEMININE
TURBO CHILD DEODO-
RIZATION
OSCILLATE
STOP DRYER
POSTERIOR FEMININE
TURBO CHILD DEODO-
RIZATION
OSCILLATE
STOP DRYER POSTERIOR FEMININE
TURBO CHILD DEODO-
RIZATION
OSCILLATE
STOP DRYER

12
POSTERIOR FEMININE
TURBO CHILD DEODO-
RIZATION
OSCILLATE
STOP DRYER POSTERIOR FEMININE
TURBO CHILD
DEODO-
RIZATION
OSCILLATE
STOP DRYER
POSTERIOR FEMININE
TURBO CHILD DEODO-
RIZATION
OSCILLATE
STOP DRYER POSTERIOR FEMININE
TURBO CHILD
DEODO-
RIZATION
OSCILLATE
STOP DRYER
DEODORIZER
Deodorizer ON/Off (initial setting is Off)
- Press button for( ) press the button again for 3 seconds, the function is canceled.
- After setting Deodorizer function, it is automatically activated when sensing the human body.
- Once used, the Deodorizer function automatically stops after 1 minute of operation.
On: Press "Deodorization" button
Single Chime
Off: Press "Deodorization" button
Double Chime
Reference
- Deodorizer function stops while dryer is selected. After dryer function completes, deodorizer automatically is activated.
WARM AIR DRYER
1- Press "Dryer"( ), warm dry air will be gently directed to the washed area for about 3 minutes.
2- You may adjust the warm air temperature by pressing High( ) and Low( ) buttons.
※This product memorizes the air temperature of prior use.
WATER PRESSURE ADJUSTMENT
ᆞAfter sitting down on the this product, the LED lamp for water
pressure on the Power Control will light at third or middle level.
ᆞPress high( ) , or low( ) to adjust the pressure of the water spray to
your desired comfort level.
WARM WATER TEMPERATURE
AND SEAT TEMPERATURE ADJUSTMENT
ᆞThe temperature of water and seat are adjustable to the desired level by pressing
the "WATER" ( )and "SEAT" ( ) button.
OFF Low Normal High
WATER TEMPERATURE
SEAT TEMPERATURE
POSTERIOR FEMININE
TURBO CHILD DEODO-
RIZATION
OSCILLATE
STOP DRYER POSTERIOR FEMININE
TURBO CHILD DEODO-
RIZATION
OSCILLATE
STOP
DRYER
POSTERIOR FEMININE
TURBO CHILD DEODO-
RIZATION
OSCILLATE
STOP DRYER POSTERIOR FEMININE
TURBO CHILD DEODO-
RIZATION
OSCILLATE
STOP DRYER
POSTERIOR FEMININE
TURBO CHILD DEODO-
RIZATION
OSCILLATE
STOP DRYER POSTERIOR FEMININE
TURBO CHILD DEODO-
RIZATION
OSCILLATE
STOP DRYER
POSTERIOR FEMININE
TURBO CHILD DEODO-
RIZATION
OSCILLATE
STOP DRYER POSTERIOR FEMININE
TURBO CHILD DEODO-
RIZATION
OSCILLATE
STOP DRYER
POSTERIOR FEMININE
TURBO CHILD DEODO-
RIZATION
OSCILLATE
STOP DRYER POSTERIOR FEMININE
TURBO CHILD DEODO-
RIZATION
OSCILLATE
STOP DRYER
POSTERIOR FEMININE
TURBO CHILD DEODO-
RIZATION
OSCILLATE
STOP DRYER POSTERIOR FEMININE
TURBO CHILD DEODO-
RIZATION
OSCILLATE
STOP DRYER
POSTERIOR FEMININE
TURBO CHILD DEODO-
RIZATION
OSCILLATE
STOP DRYER POSTERIOR FEMININE
TURBO CHILD DEODO-
RIZATION
OSCILLATE
STOP DRYER
POSTERIOR FEMININE
TURBO CHILD DEODO-
RIZATION
OSCILLATE
STOP DRYER POSTERIOR FEMININE
TURBO CHILD DEODO-
RIZATION
OSCILLATE
STOP DRYER
POSTERIOR FEMININE
TURBO CHILD DEODO-
RIZATION
OSCILLATE
STOP DRYER POSTERIOR FEMININE
TURBO CHILD DEODO-
RIZATION
OSCILLATE
STOP DRYER
POSTERIOR FEMININE
TURBO CHILD DEODO-
RIZATION
OSCILLATE
STOP DRYER POSTERIOR FEMININE
TURBO CHILD
DEODO-
RIZATION
OSCILLATE
STOP DRYER
5
Operation (Details)

13
- Deodorizer function stops while dryer is selected. After dryer function completes, deodorizer automatically is activated.
ᆞWhen using Posterior or Feminine wash functions, pressing the "OSCILLATE"( )
button will provide a short-motion, front to back oscillating spray for a much wider cleansing
experience.
ᆞYou may change the position of the Oscillating spray by pressing the "OSCILLATE"( )
button again and "Front" ( ) or "Rear"( ) buttons simultaneously.
ᆞPush the "OSCILLATE"( ) button again and the oscillation motion will stop automatically.
Auto-Setting of Oscillation Feature
ᆞYou can set this function to automatically oscillate whenever the seat is occupied and the Posterior or
Feminine washes are in operation.
Step 1: Sit on this product.
Step 2: Press the "OSCILLATE"( ) button for 3 seconds or until you hear a single Chime.
Step 3: Sit on this product and proceed with Posterior or Feminine Wash.
Note: In the automatic setting, you may still adjust the position of the Oscillating spray by pressing the
"Front"( ) or "Rear"( ) buttons.
Canceling the Automatic Oscillation function
Step 1: Sit on this product.
Step 2: Press the "OSCILLATE"( ) button for 3 seconds or until you hear a double Chime.
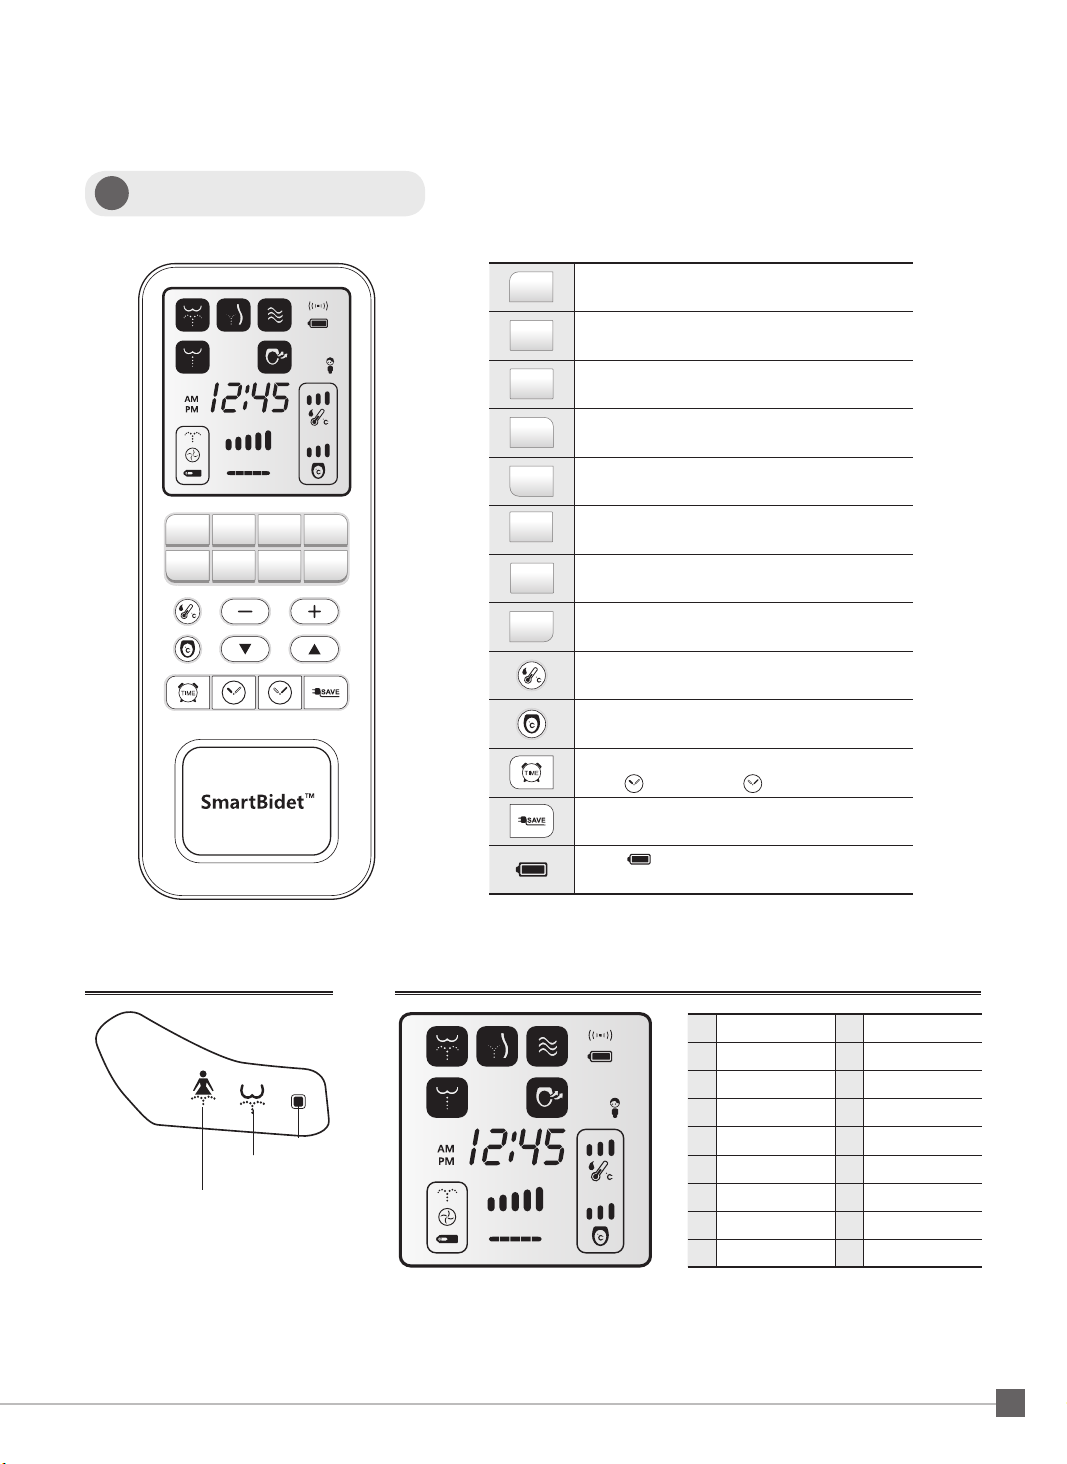
OSCILLATION ( Nozzle Movement Function)
POSTERIOR FEMININE
TURBO CHILD DEODO-
RIZATION
OSCILLATE
STOP DRYER POSTERIOR FEMININE
TURBO CHILD DEODO-
RIZATION
OSCILLATE
STOP DRYER
POSTERIOR FEMININE
TURBO CHILD DEODO-
RIZATION
OSCILLATE
STOP DRYER POSTERIOR FEMININE
TURBO CHILD DEODO-
RIZATION
OSCILLATE
STOP DRYER
POSTERIOR FEMININE
TURBO CHILD DEODO-
RIZATION
OSCILLATE
STOP DRYER POSTERIOR FEMININE
TURBO CHILD DEODO-
RIZATION
OSCILLATE
STOP DRYER
POSTERIOR FEMININE
TURBO CHILD DEODO-
RIZATION
OSCILLATE
STOP DRYER POSTERIOR FEMININE
TURBO CHILD DEODO-
RIZATION
OSCILLATE
STOP DRYER
POSTERIOR FEMININE
TURBO CHILD DEODO-
RIZATION
OSCILLATE
STOP DRYER POSTERIOR FEMININE
TURBO CHILD DEODO-
RIZATION
OSCILLATE
STOP DRYER
POSTERIOR FEMININE
TURBO CHILD DEODO-
RIZATION
OSCILLATE
STOP DRYER POSTERIOR FEMININE
TURBO CHILD DEODO-
RIZATION
OSCILLATE
STOP DRYER
POSTERIOR FEMININE
TURBO CHILD DEODO-
RIZATION
OSCILLATE
STOP DRYER POSTERIOR FEMININE
TURBO CHILD DEODO-
RIZATION
OSCILLATE
STOP DRYER
POSTERIOR FEMININE
TURBO CHILD DEODO-
RIZATION
OSCILLATE
STOP DRYER POSTERIOR FEMININE
TURBO CHILD DEODO-
RIZATION
OSCILLATE
STOP DRYER
POSTERIOR FEMININE
TURBO CHILD DEODO-
RIZATION
OSCILLATE
STOP DRYER POSTERIOR FEMININE
TURBO CHILD DEODO-
RIZATION
OSCILLATE
STOP DRYER
Child Wash and Dry
ᆞWhen pressing button, the unit will automatically run Posterior Wash 3rd level for 30 seconds
then Dryer 3rd level for 1 minute. While using, if you press the stop button, the function will stop.
ᆞThis function adjusts nozzle position and dryer temprature for a child’s specification.
The recommended minimum child ’s age to use the bidet seat is 5 years old. We recommend adult
supervision while the child is using the unit.
ᆞNozzle position is adjustable to the desired position by pressing "Front"() or
"Rear"() button from 1 to 5 positions.
After using this product, the nozzle will return to position 3.
NOZZLE POSITION ADJUSTMENT
POSTERIOR FEMININE
TURBO CHILD DEODO-
RIZATION
OSCILLATE
STOP DRYER POSTERIOR FEMININE
TURBO CHILD DEODO-
RIZATION
OSCILLATE
STOP DRYER
POSTERIOR FEMININE
TURBO CHILD DEODO-
RIZATION
OSCILLATE
STOP DRYER POSTERIOR FEMININE
TURBO CHILD DEODO-
RIZATION
OSCILLATE
STOP DRYER
ᆞWhen the power is OFF, all of the LED lights will also be turned off and the unit will be turned OFF.
ᆞIf you push the button for 3 seconds, the power will turn OFF after a beep sound.
ᆞTo turn the Power back ON, please push the button.
Power ON/OFF
On/Off
On/Off

14
5
Operation (Details)
Nozzle Cleaning (Automatic)
- This product has an automatic nozzle self-cleaning function that cleans the nozzle before and
after each wash function.
Night Light on/off setting
- Press “Stop” and “Temperature” remote buttons simultaneously until
night light is turned on or off.
POSTERIOR FEMININE
TURBO CHILD DEODO-
RIZATION
OSCILLATE
STOP DRYER POSTERIOR FEMININE
TURBO CHILD DEODO-
RIZATION
OSCILLATE
STOP
DRYER
POSTERIOR FEMININE
TURBO CHILD DEODO-
RIZATION
OSCILLATE
STOP DRYER POSTERIOR FEMININE
TURBO CHILD DEODO-
RIZATION
OSCILLATE
STOP DRYER
POSTERIOR FEMININE
TURBO CHILD DEODO-
RIZATION
OSCILLATE
STOP DRYER POSTERIOR FEMININE
TURBO CHILD DEODO-
RIZATION
OSCILLATE
STOP DRYER
ECONOMY (Energy Save Mode)
- Keep seat cover closed when not in use to prevent heat from being lost.
- Keep temperature set to low.
- Unplug the power cord if you do not plan to use the unit for a long period of time.
Saver On/ Off
- When pressing( ) the energy saver LED on the main unit will turn on.
(press button again, the saver LED will turn off)
- Energy saver mode automatically maintains a water and
seat temperature of 89.6℉(32℃).
- While the energy saving mode is on, if you increase or
decrease the water and seat temperature, the Energy Saving mode
will automatically turn off. If you stand up from the bidet seat,
the Energy Saving mode will automatically turn back on.
Other energy saver tips
In order to save energy, please abide by the following instructions:
In energy saver mode, the seat heating temperature could appear to be lower
than the actual temperature setting.
OCCUPIED
SENSOR ENERGY
SAVE POWER

15
6
Installation
CAUTION BEFORE INSTALLATION
ᆞThis product requires 120V usage.
ᆞPlease do not plug in the electrical cord prior to installation.
ᆞPlease consult with a licensed electrician if electrical work is needed. In case a grounded
outlet is not available, grounding should be done in order to prevent short circuits or
electric shock.
STEPS
1 2
※Check for any water leaks.
3 4
Shut water supply by turning
it to the right.
Disconnect existing hose from water tank.
Connect the T-valve to the water tank.
Connect the water supply hose to the
assembled T-valve. Remove existing seat and lid.
• Release the bolts on both
sides of the existing toilet
seat to remove the seat
and lid.
• Store the removed seat,
nut and water hose in a
safe area in case you
move or it needs to be
reinstalled.
Water supply hose
Exisiting toilet
seat
Toilet
body
Nut
T-valve
(with packing)
Water Tank
Shut off Valve

16
※Check for any water leaks.
Base plate
5
7
※Customers should use the new hose set provided
with the product. Do not use used set again.
8
6
Put the rubber nuts into the fixing
holes of the toilet.
Put the bolt into the bolt case and align it
with the top of the base plate. Insert bolt
with bolt case onto the base plate. After
this is done, insert it into the rubber nuts
with screwdriver.
Push the main unit onto the base
plate until hearing “click” sound.
Connect the flexible tube from the side of
the T-valve to the SmartBidet's valve in
order to fill the tank with water.
Bolt Case
Bolt
Screwdriver
Nuts
6
Installation

17
Wireless remote mounting guide.
9
Install wireless remote with adhesive tape
Inserting batteries
ᆞInsert supplied batteries (1.5V AAA) and close battery cover.
ᆞRemove adhesive from back of the holder and place the holder where desired.
(Please check the polarity, before inserting the batteries.)
Adhesive
tape Wall

18
7
Water Draining / Separation Of Unit From The Toilet Bowl
Please follow the instructions below when moving or separating the unit from the toilet for cleaning purposes.
Disconnect the power plug.
Shut the water supply valve.
Push and hold the button to the left of the nozzle to
completely drain the water from the water tank.
Loosen the nut on the hose that is connected to the unit, and
then separate the electronic toilet seat from the toilet in the
following order as illustrated.
ᆞWhile pushing the button (area shown as an arrow) push the electronic toilet seat slightly toward to the front
and then the body unit will begin to slide out. Next, lightly pull the unit toward the front and it will detach
from the toilet.
Do not turn the seat upside-down. This can cause damage to the unit as well as fire hazard.
1
2
3
4
Disconnect the T-valve from the water tank.
5
Connect the water hose to the toilet which was disassembled while installing the electronic toilet seat,
and turn the water valve to the left to open it. See if there is any leaking from the water hose connection.
6
Re-install the toilet seat and lid that was separated when installing the electronic toilet seat.
ᆞAs explained above, steps 1~4 are instructions for separation of the unit for basic cleaning purposes,
and steps 5~7 are instructions for separation when moving, etc.
7

19
8
Maintenance
ᆞWhen you clean this product, do not use thinner, benzene or
toilet bowl cleaner. It may cause damage to the surface of unit.
ᆞUse a wet cloth when you clean this product.
ᆞDo not spray water directly on to this product.
ᆞWhen you clean this product, disconnect the power plug.
CLEANING THE BODY OF UNIT
1) Close the water shut off valve.
2) Flush the toilet to empty the water reservoir.
3) Unscrew the water filter nut.
4) Clean the strainer with a small brush or water.
5) Re-screw the water filter nut.
6) Open the water shut off valve.
This product will not operate properly if the strainer is clogged.
Please clean the strainer regularly.
CLEANING THE STRAINER
ᆞWhen you press down onto the "Posterior Wash"( )
button for 3 seconds without occupying the seat, the nozzle
will extend. Clean the nozzle with a soft toothbrush.
ᆞAfter cleaning the nozzle, push the "Stop" ( )
button once again, and the nozzle retracts itself.
CLEANING THE NOZZLE
On/Off
On/Off
MAINTENANCE FOR WINTER SEASON
ᆞCheck if the power cord is plugged in.
ᆞKeep the water temperature on "Middle or High Level"to prevent water from freezing.
ᆞIf you do not intend to use the unit for 14 days or longer, disconnect the power plug and
drain the water.

20
9
Trouble Shooting
Troubleshooting
Problem Solution
The nozzle
does not spray
1. The water tank is not filled.
if the water tank is filled, water is
supposed to come out when pushing
the drain button
2. The water supply valve is closed.
3. Freezing inside the main unit or the
water supply pipe
1. Wait about one minute.
2. Press the desired washing button once
again.
3. Open the water supply valve.
4. Heat the room (for about two hours).
Operating the unit while parts are
frozen will cause a malfunction.
The unit is not
operating
1. Disconnected the power cord.
2. The seat is not occupied.
3. The battery of remote controller is
exhausted.
1. Connect the power cord.
2. Check the power supply system in
your house.
3. Occupy the seat (The unit has an
occupied skin sensor).
4. Replace the battery.
Water is leaking
1. Check the water supply system
1. If water is leaking from the main unit,
call the service center or the place you
purchased unit.
The washing water
pressure is weak
1. The water pressure level is set to "LOW".
2. The strainer is clogged.
1. Set the water pressure to "HIGH"
2. Clean the strainer.
The washing water is
not warm
1. The water temperature is set to "LOW"
2. Continuous operation has depleted
the supply of warm water.
1. Set the water temperature to "HIGH"
2. Wait about three minutes.
The seat and dryer is
not warm
1. Turn Off the energy saver. If it is on, the
seat and water temperature are
maintained at 86.9˚F.
1. Set the seat & dryer temperature to
"HIGH"
Other manuals for SB-3000
1
Table of contents
Languages:
Other SmartBidet Bathroom Fixture manuals