Smartlink SMARTLINK COMPANION SLC14 User manual

SmartLink Companion User Manual Version 1.2
“SMARTLINK COMPANION”
(Voice Pendant)
SLC14
SLC3
(14 button) (3 button)
USER MANUAL

--1-- SmartLink Companion User Manual Version 1.2
Table of Contents
1. The SMARTLINK COMPANION __________________________________________ 2
2. KIT CONTENTS_______________________________________________________ 2
3. HOME SET-UP________________________________________________________ 3
3.1 Setting up your SMARTLINK COMPANION ________________________ 3
3.2 SMARTLINK COMPANION Registration with a DECT/GAP base station____ 4
3.3 Saving Phone Numbers on Your SMARTLINK COMPANION____________ 4
4. HOW TO USE SMARTLINK COMPANION__________________________________ 4
4.1 Placing calls with speed-dial __________________________________ 4
4.2 Answering incoming calls ____________________________________ 4
4.3 Adjusting volume __________________________________________ 5
4.4 Ending a call ______________________________________________ 5
4.5 Recharging your SMARTLINK COMPANION HANDSET _______________ 5
4.6 Placing calls on the SMARTLINK COMPANION keypad _______________ 5
5. CUSTOMIZING YOUR SMARTLINK COMPANIONhandset____________________ 5
5.1 Adjusting the ring tone ______________________________________ 5
5.2 Selecting ring tones on your SMARTLINK COMPANION_______________ 6
5.3 Selecting receiver volume ____________________________________ 6
6. INDICATORS_________________________________________________________ 6
6.1 Out-of-range indicator _______________________________________ 6
6.2 Low POWER INDICATOR _____________________________________ 7
6.3 LED color indicators ________________________________________ 7
7. DECT Base Station____________________________________________________ 7
7.1 Page Key_________________________________________________ 7
7.2 LED - In use LED __________________________________________ 7
8. MAINTENANCE TIPS __________________________________________________ 8
9. SPECIFICATIONS _____________________________________________________ 8
10. COMPLIANCE ______________________________________________________ 9
11. APPENDIX - 1 _____________________________________________________ 10
12. APPENDIX - 2 _____________________________________________________ 10

SmartLink Companion User Manual Version 1.2 --2--
1. THE SMARTLINK COMPANION
The SMARTLINK COMPANION is a handy digital enhanced cordless phone you
can wear around your neck, tuck into a back pocket or leave beside your bed
lamp at night. It goes wherever you go…
Just press the ONE-TOUCH button whenever you want to do any of the following:
-Place a call any time of the day or night,
-Answer incoming calls, and
-Hang up.
2. KIT CONTENTS
Your kit contains the following:
1 SMARTLINK COMPANIONhandset
1 SMARTLINK COMPANION AC adaptor/Charger
1 deluxe collar strap
1 user manual
Touch button
Vi
sua
l In
d
i
cato
r
Front view
Micro
p
hone
Hands free loudspeaker
SMARTLINK
COMPANION SMARTLINK
COMPANION Charger

--3-- SmartLink Companion User Manual Version 1.2
3. HOME SET-UP
All you need to do is to set up the SMARTLINK COMPANION and subscribe to a
DECT/GAP base station.
3.1 SETTING UP YOUR SMARTLINK COMPANION
Perform the following three steps to set up your SMARTLINK COMPANION:
Flip the power switch to the left using a ballpoint pen.
Plug the SMARTLINK COMPANION AC adaptor into a wall socket.
Allow six hours for your SMARTLINK COMPANION to charge the
batteries.
Leave the power switch in the ON position after setting up your
SMARTLINK COMPANION.
When the SMARTLINK COMPANION is on, you will see an orange LED light flashing
three times per second. The orange light means your SMARTLINK COMPANION is
on but has not yet registered with a base station.
The SMARTLINK COMPANION LED light will flash green once every 10 seconds as
soon as it connects to a base station, enabling you to place and receive calls.
Battery life is up to 144 hours in standby mode.
However you should recharge your SMARTLINK COMPANION daily.
Your SMARTLINK COMPANION will beep as soon as battery power is low.
Power supply for
COMPANION charger
Micro switch
Plug for charger
and optional
headset

SmartLink Companion User Manual Version 1.2 --4--
3.2 SMARTLINK COMPANION REGISTRATION WITH A DECT/GAP BASE STATION
•Connection
Perform the following to connect your SMARTLINK COMPANION™ to a DECT/GAP base station:
Preset the base station to REGISTRATION MODE
(Refer to Installation Manual of Base Station being used)
Dial the numbers below:
+ º+ # + 1 0000 +
1is the number of the base station and 0000 is the PIN code for the base station.
Your SMARTLINK COMPANION will register with a maximum of four different DECT/GAP
base stations.
•Selecting a Base Station
When your SMARTLINK COMPANION is registered with two or more base stations,
perform the following to select which one you want to use:
+ º+ 8 + 1 +
1is the number of the base station you want.
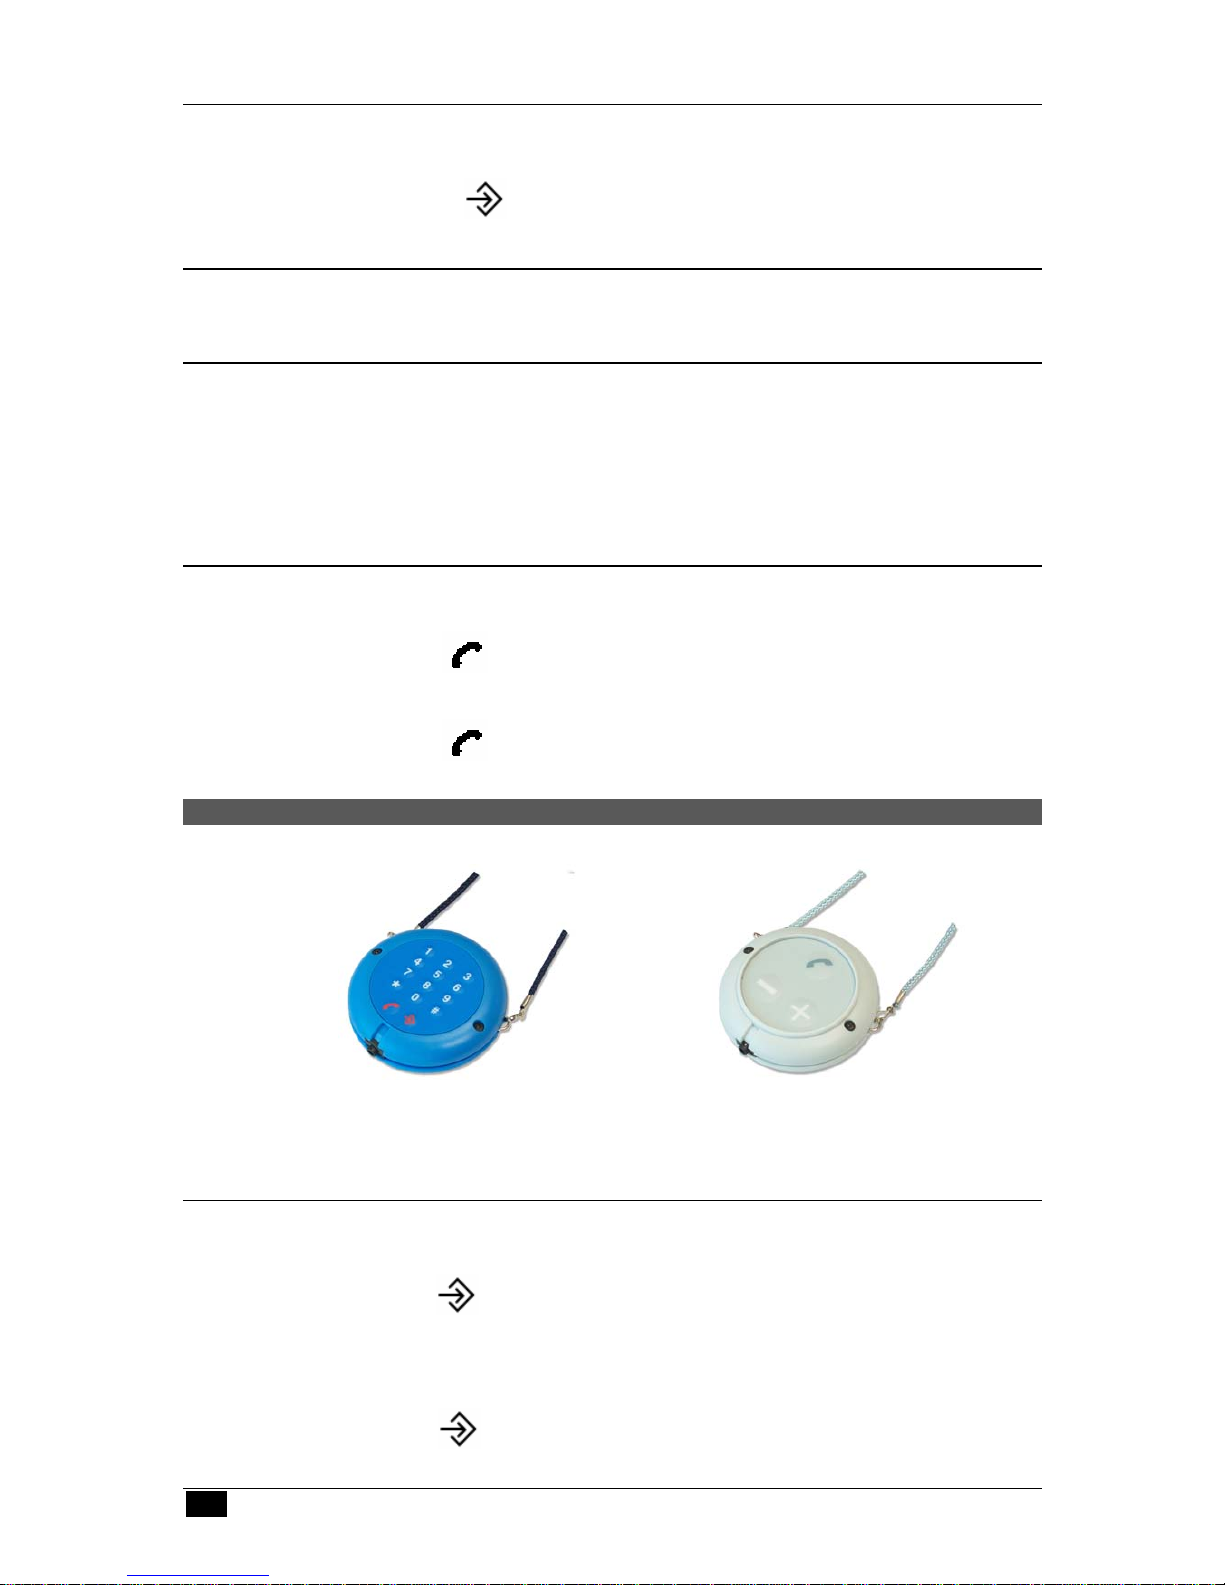
•Please Refer to Appendix 2 for details on registering 3 button versions.
3.3 SAVING PHONE NUMBERS ON YOUR SMARTLINK COMPANION
SMARTLINK COMPANION has a speed-dial memory feature. Just press the ONE-
TOUCH button to dial the number stored in memory.
Key in the following to store a new phone number:
(Up to 4 outgoing numbers and 3 Auto-Answer numbers with Caller-ID enabled)
+ 1 + the number you want to save +
+ 2 + the number you want to save +
+ 3 + the number you want to save +
Your SMARTLINK COMPANION handset is now fully installed and connected to a base station.
You can now place and receive calls.
NB: If more than one number is programmed into unit, then multiple presses of the
One-Touch button will rotate between numbers when call is in progress.
•Please Refer to Appendix 1 for more detail on programming keys.
4. HOW TO USE SMARTLINK COMPANION
4.1 PLACING CALLS WITH SPEED-DIAL
All you need to do is:
Press the ONE-TOUCH button to place a direct call to the number you
saved in the SMARTLINK COMPANION handset memory.
4.2 ANSWERING INCOMING CALLS
When your SMARTLINK COMPANION rings, all you need to do is:
Press the ONE-TOUCH button once.

--5-- SmartLink Companion User Manual Version 1.2
4.3 ADJUSTING VOLUME
If you can’t hear your conversation partner comfortably, you will need to raise or
lower the volume on your SMARTLINK COMPANION handset as follows:
Press the key until you find the right volume.
4.4 ENDING A CALL
Hold down the ONE-TOUCH button on the front of your SMARTLINK
COMPANIONhandset until you hear a beep.
4.5 RECHARGING YOUR SMARTLINK COMPANION HANDSET
You should recharge your SMARTLINK COMPANION handset daily as follows:
Connect the handset to the AC adaptor.
Your SMARTLINK COMPANION will beep as soon as recharging starts. A red LED
light will flash once every two seconds to confirm that recharging is in progress.
4.6 PLACING CALLS ON THE SMARTLINK COMPANION KEYPAD
Perform the following to place an individual call using your SMARTLINK COMPANION
keypad:
Press to obtain a dial tone.
Dial your number.
Press to hang up at the end of your call.
5. CUSTOMIZING YOUR SMARTLINK COMPANION HANDSET
You can customize your SMARTLINK COMPANION using the keypad on the back of
the handset.
SLC14 SLC3
Back view Please refer to SmartLink for
programming of SLC3 (3 button)
(In-house programming required)
5.1 ADJUSTING THE RING TONE
For greater hearing comfort, perform the following to adjust the ring tone volume on
your SMARTLINK COMPANION handset:
Press
Then press
ºand 4
Now press 0, 1, 2or 3(you will hear each tone as you press each key).
The 0key is for silent mode.
Press to validate your choice. You will then hear a beep to confirm
your selection.

SmartLink Companion User Manual Version 1.2 --6--
5.2 SELECTING RING TONES ON YOUR SMARTLINK COMPANION
Perform the following to personalize you ring tone:
Press
Then press
ºand 3
Now press 1, 2, 3, 4or 5(you will hear each tone as you press each key)
Press to validate your choice. You will then hear a beep to confirm
your selection.
5.3 SELECTING RECEIVER VOLUME
Perform the following to adjust the volume of the SMARTLINK COMPANION built-in
speaker:
Press once.
Now press again to adjust the volume
Your SMARTLINK COMPANION has six volume settings (0-1-2-3-4-5). You access
them by repeat pressing of the key. You will hear a beep whenever you have
reached the minimum and maximum settings.
Example: Press the several times and your SMARTLINK COMPANION will show:
3-4-5-(Beep)-4-3-2-1-0-(Beep)-1-2-3-4 and so on.
6. INDICATORS
6.1 OUT-OF-RANGE INDICATOR
If you move out of range of the base station, your SMARTLINK COMPANION
transmission and reception will suffer. A beep and LED light will alert you whenever
you stray too far.
•Maximum Range Indicators
Your SMARTLINK COMPANION handset will beep twice whenever it is almost out of
range. Beeping will continue until you are comfortably back within operating range
again.
When you hear the double beep, move back towards the base station. If you continue
moving away from it, you will go offline. The LED on your SMARTLINK COMPANION
will then blink in orange three times per second to show that you can no longer place
or receive calls.
•Disconnection from Base Station
If your SMARTLINK COMPANION is out of range, you will hear the beeps and see the
LED blink in orange three times per second. All you need do is move your SMARTLINK
COMPANION closer to its base station.

--7-- SmartLink Companion User Manual Version 1.2
6.2 LOW POWER INDICATOR
Your SMARTLINK COMPANION needs adequate battery power to function properly.
When the battery runs low, you will hear and see the following:
One beep every three seconds when power is low, and
The LED light blinks in red once every 5 seconds.
6.3 LED COLOR INDICATORS
Handset Status Colour Blink Rate
Online
Green
Once every 10 seconds
Call in progress
Green
Steady light
Low battery
Red
Once every 5 seconds
Recharge underway
Red
2 times per second
Offline
Orange
3 times per second
7. DECT BASE STATION
The base may be any DECT/GAP Base station. Simply ensure the nominated base
station is plugged into your phone line and mains power. Then check your SmartLink
Companion into the base station to instantly start making calls on your SmartLink
Companion. (Refer to Installation Manual of the Base Station being used)
You may locate your SmartLink Companion anytime by pressing the “Page” button
found on your Base Station.
7.1 PAGE KEY
The Page key on the Base may be used to send a page to the SmartLink
Companion. The handsets will ring for 1 minute unless the page key is pressed again
on the base or a key is pressed on any locked handset.
Usual operation of existing base stations in the market:
Key action SMARTLINK COMPANION action
Short press (<5 s) Send a page to handsets
Long Press (>=5s) Enter subscription mode (in use LED will flash)
7.2 LED -IN USE LED
The LED on the Base unit usually indicates different modes of operation.
Action LED state
Standby mode ON
In call Flashing
Key pressed (<5s) ON
Subscription mode Flashing
To change the ringer melody or volume of your Base, please refer to Installation
manual of the Base Station being used.

SmartLink Companion User Manual Version 1.2 --8--
8. MAINTENANCE TIPS
Clean your SMARTLINK COMPANION with a soft damp cloth only. Do not use
aerosol sprays.
Avoid contact with any liquids.
It is normal for batteries to warm up during recharge.
Do not use any recharging device except the AC adaptor supplied in your
SMARTLINK COMPANION kit. Never try to open your SMARTLINK
COMPANION handset to avoid creating an electrical hazard to your health.
Return it to our after-sale support service for any needed repairs.
Do not use the handset in any room or area that presents a risk of combustion
or explosion.
9. SPECIFICATIONS
Standard : DECT ( Digital Enhanced Cordless Telecommunications )
GAP ( Generic Access Profile )
Frequency range: 1880 MHZ to 1900 MHz
Number of channels: 120 duplex channels
Modulation: GFSK
Speech coding: 32 kbit/s
Emission power: 10 mW ( average power per channel )
Range: Up to 300 metres in open space
Base power supply: 220-240 V / 50 Hz for the base
Handset power supply: rechargeable battery 37AAAM, Ni-mH 370mAh
Battery capacity: Up to 6 days standby, up to 3.5 hours talk time
Charge up time: Approx 6 hours
Temperature range: +5 °C to +45 °C
Dimensions: 57*19 mm (diameter*thickness)

--9-- SmartLink Companion User Manual Version 1.2
10. COMPLIANCE
The phone complies with the following standards
Part Standard
DECT Radio TBR 6
DECT acoustics TBR 10 – 3rd edition
DECT GAP TBR 22
SMARTLINK COMPANION complies with relevant EC standards
FOR FURTHER DETAILED INFORMATION PLEASE REFER TO
SMARTLINK REGARDING TECHNICAL INSTALLATION MANUAL.
WARNING:
This voice pendant is not designed for making emergency telephone calls during a
power fail unless some form of battery back up is available at the base station.

SmartLink Companion User Manual Version 1.2 --10--
11. APPENDIX - 1
KEY_1
KEY_2 KEY_3
KEY_4
KEY_5 KEY_6
KEY_7
KEY_8 KEY_9
KEY_STAR
KEY_0 KEY_HASH
PHONE
MENU/VOLUME
Figure 1 : keypad layout
Some keys have more than one usage depending on the SmartLink Companion’s
state (standby, in call, menu mode). The following table gives all the possible actions
for each key.
KEY Action
Key name Standby Mode Menu Mode During Call
KEY_PHONE Go in talk mode Hang up
KEY_MENU/
KEY_VOL Settings Validate
Speaker Volume ( in call)
KEY_0 Dial 0 Dial 0
KEY_1 Dial 1 Dial 1
KEY_2 Dial 2 Dial 2
KEY_3 Dial 3 Dial 3
KEY_4 Dial 4 Dial 4
KEY_5 Dial 5 Dial 5
KEY_6 Dial 6 Dial 6
KEY_7 Dial 7 Dial 7
KEY_8 Dial 8 Dial 8
KEY_9
KEY_PAUSE Dial 9 Dial 9 (short press)
Pause (long press)
KEY_STAR
KEY_R
Dial * (short press)
R (long press)
KEY_HASH
KEY_ INT
Intercom Dial # (short press)
Intercom (long press)
Figure 2 : Keypad description
Short press is less than 3 seconds. Long press is more than 3 seconds.
12. APPENDIX - 2
To register a 3 button SmartLink Companion, use the following steps:
Preset the base station to registration mode.
Press and hold down “-“ (minus key) and switch ON the SmartLink Companion.
Press “+” (plus key) and then press the Phone symbol button 5 times, each time
holding the key down for more than three seconds until a beep is heard.
(The handset number is automatically defined by the base.)

--11-- SmartLink Companion User Manual Version 1.2
© Copyright SmartLink International Pty Ltd
July 2008
Level 1, 304-308 New Street
Brighton VIC 3186 AUSTRALIA
Tel: +61 3 9596 0770 Fax: +61 3 9596 8195
Email: [email protected]
Web Site: www.smartlink.com.au
To the best of our knowledge, the information contained in this manual is correct at the time of print.
SmartLink International Pty Ltd reserve the right to make changes to the features and specifications at
any time without prior notice in the course of product development.
This manual suits for next models
1
Table of contents