Smeg WM61121 User manual

Instructions for Use
Washing machine

187352
Thank you for your condence in purchasing our washing machine, and
congratulations on the excellent choice.
Your new washing machine meets the requirements of modern treatment of
laundry. It is rational in the consumption of energy, water and washing agents.
Our appliances are friendly to the environment. Some of the materials may be
recycled, others deposited or decomposed. To avoid pollution of environment,
once your appliance is no longer useful, take it to your local authorized waste
appliance dealer.
The appliance is intended exclusively for use in households. If the appliance is
used for professional purposes, for prot, or for purposes beyond regular use
in a household, or if appliance is used by a person who is not a consumer, the
warranty period equals the shortest warranty period possible as stipulated by
the relevant legislation.
Description of washing machine ..................... 3
Cautions ............................................................. 4
Installation and connection.............................. 6
Operation.......................................................... 10
Tips for washing and energy saving ............. 16
Cleaning and maintenance............................. 18
Failures............................................................. 21
Tables ............................................................... 24
2

187352
Dimensions (w x d x h):
600 mm x 600 mm x 850 mm
Depth with door open: 106 cm
Weight (net): 90 kg
Nominal voltage: 230 V, 50 Hz
Power: 2300 W / 2200 W (depending on model)
Max. load: 6 kg
Power socket: (230 V, 50 Hz, 10 A)
Water pressure: min. 0,05 MPa, max. 0,8 MPa
Fuse: 10 A
1. Front panel
2. Detergent dispenser
3. Door
4. Filter lid
5. Adjustable legs
6. Water outlet hose
7. Water inlet hose
8. Mains power cable
3
Description of washing machine
Technical information
(depending on model)

187352
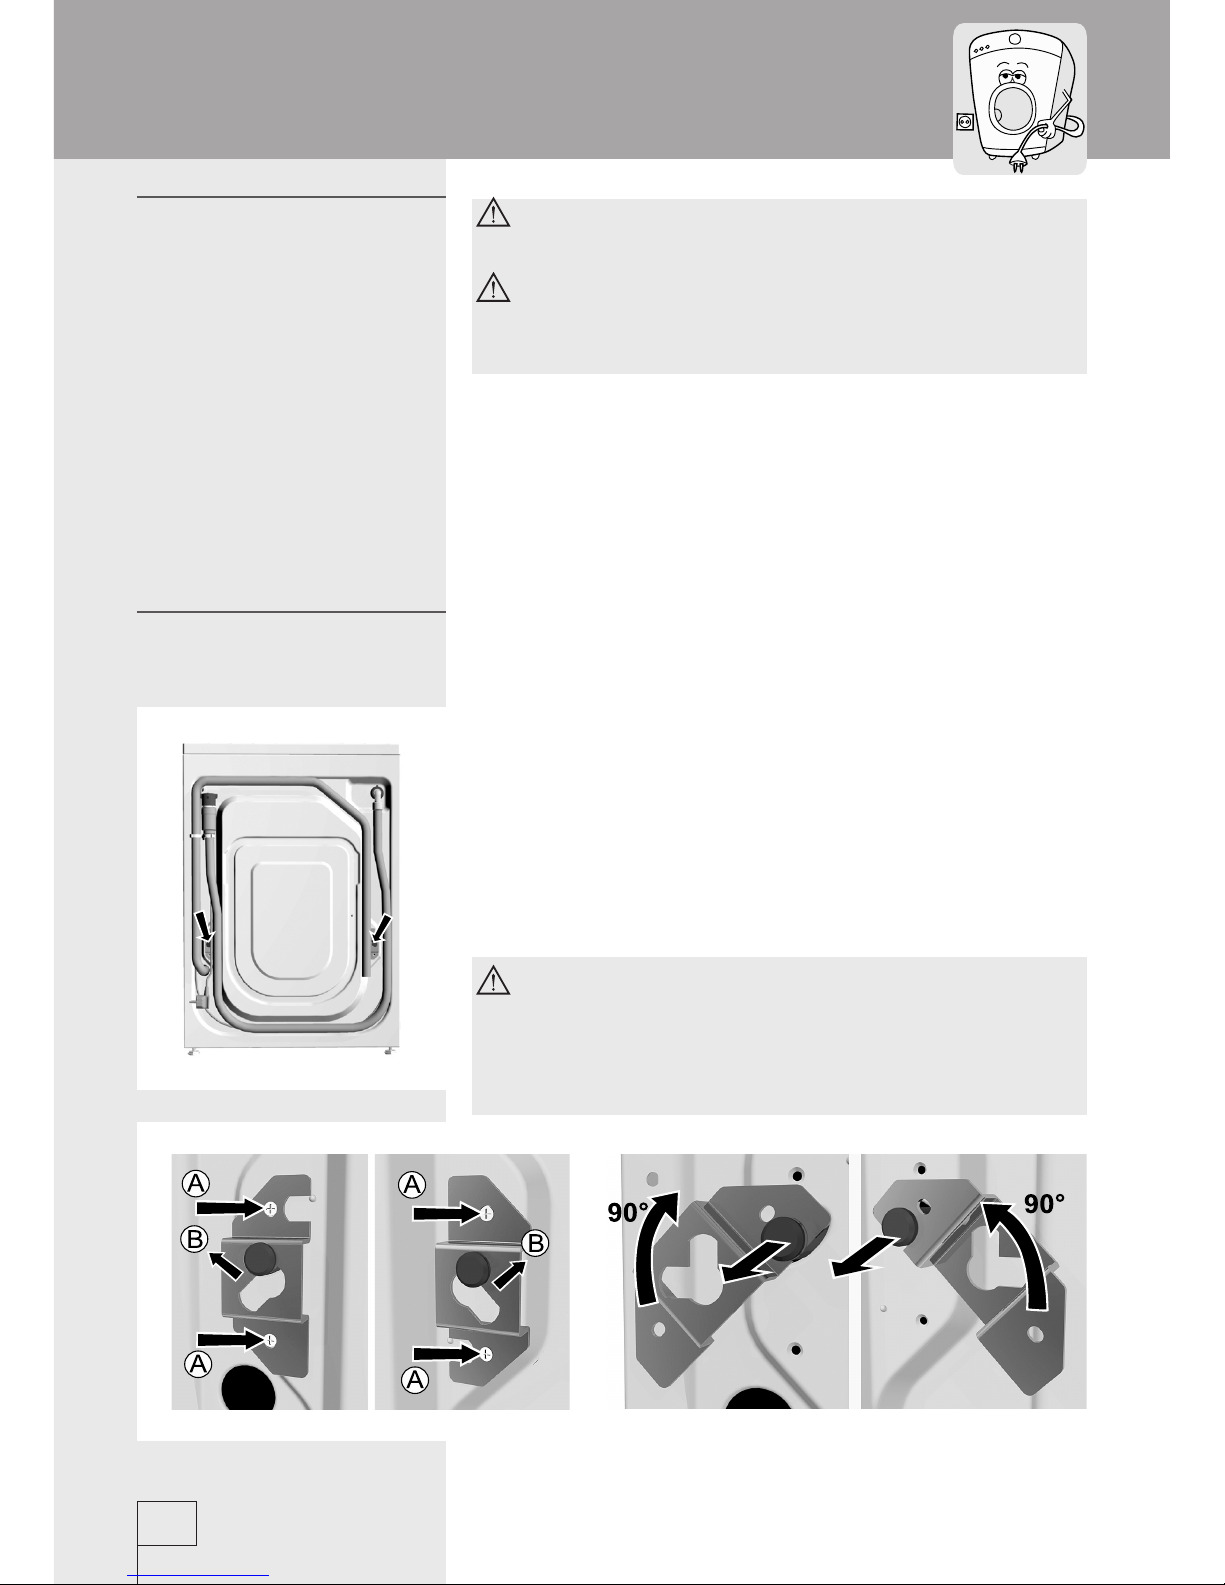
•Besuretoremovetransportbracketspriorrstuseoftheappliance.
Attemptedoperationoftheblockedmachinemayresultinirreparable
damagewhichisnotcoveredbythemanufacturer’swarranty!
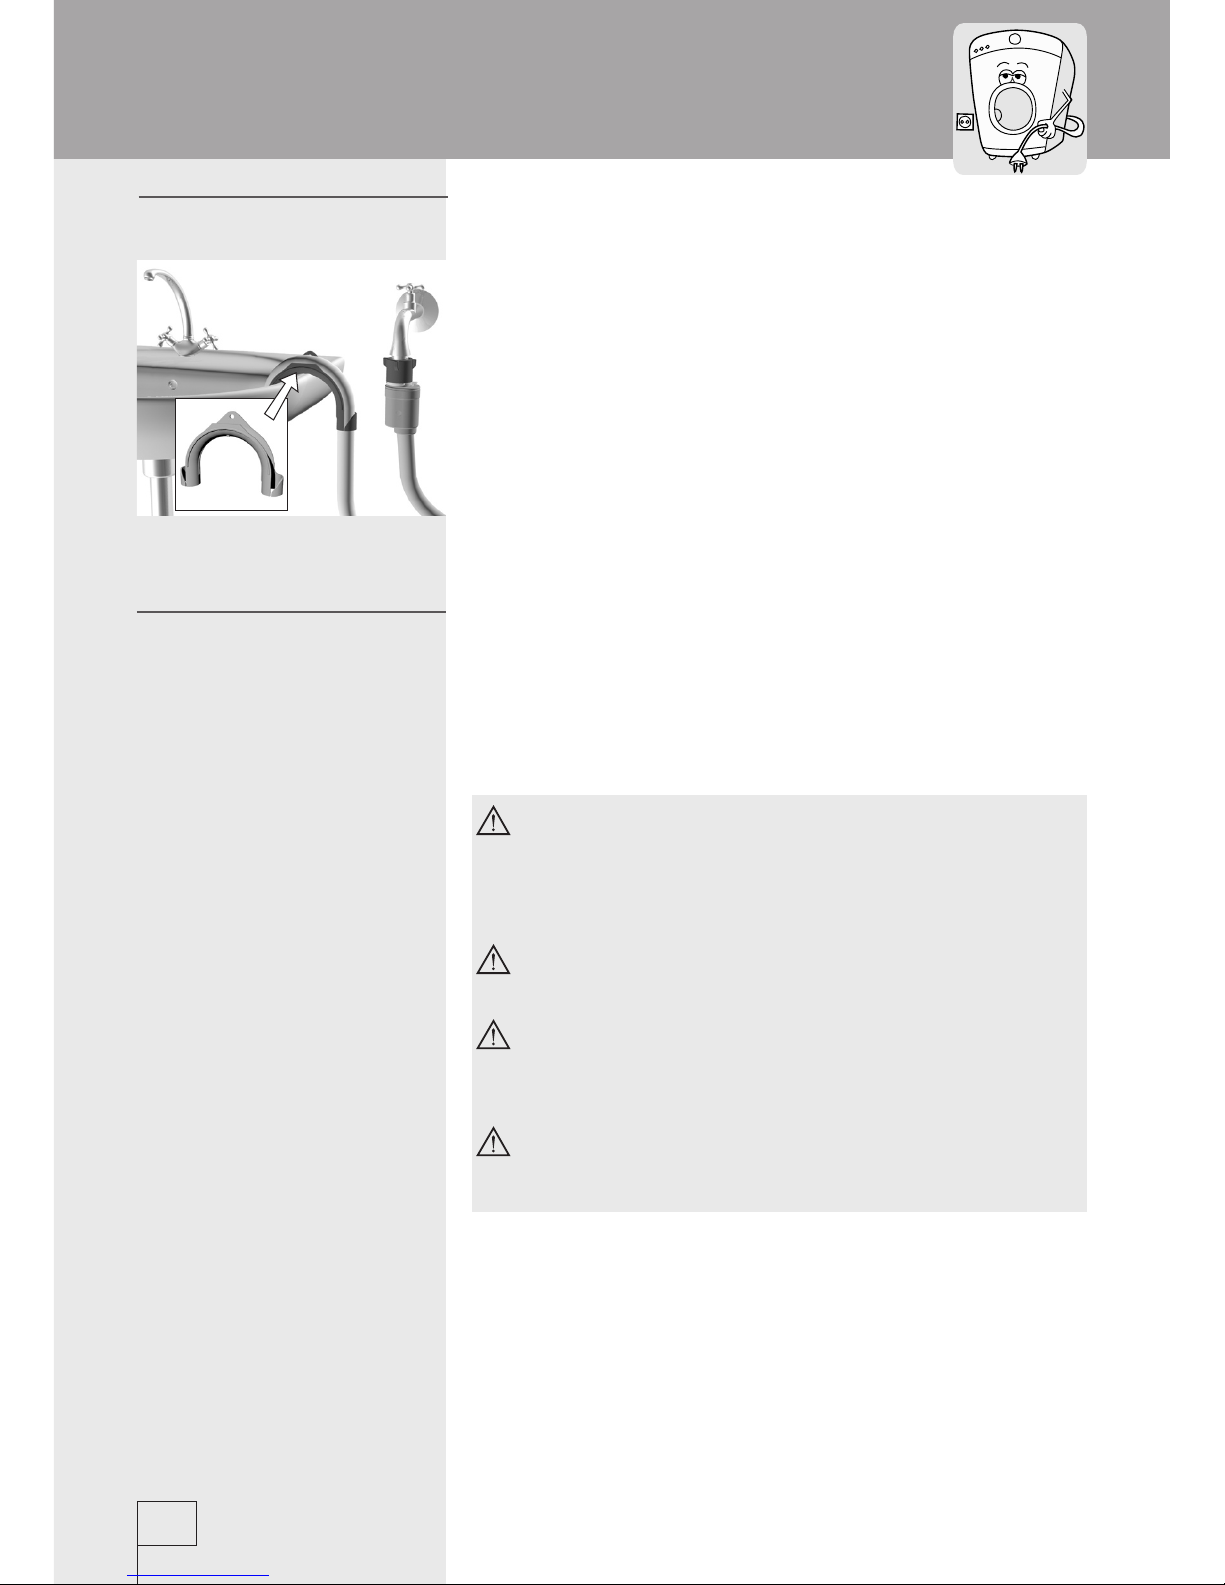
•Whenconnectingyourwashingmachinetowatersupply,besuretouse
brand new water inlet hose and appropriate sealing gaskets (attached).
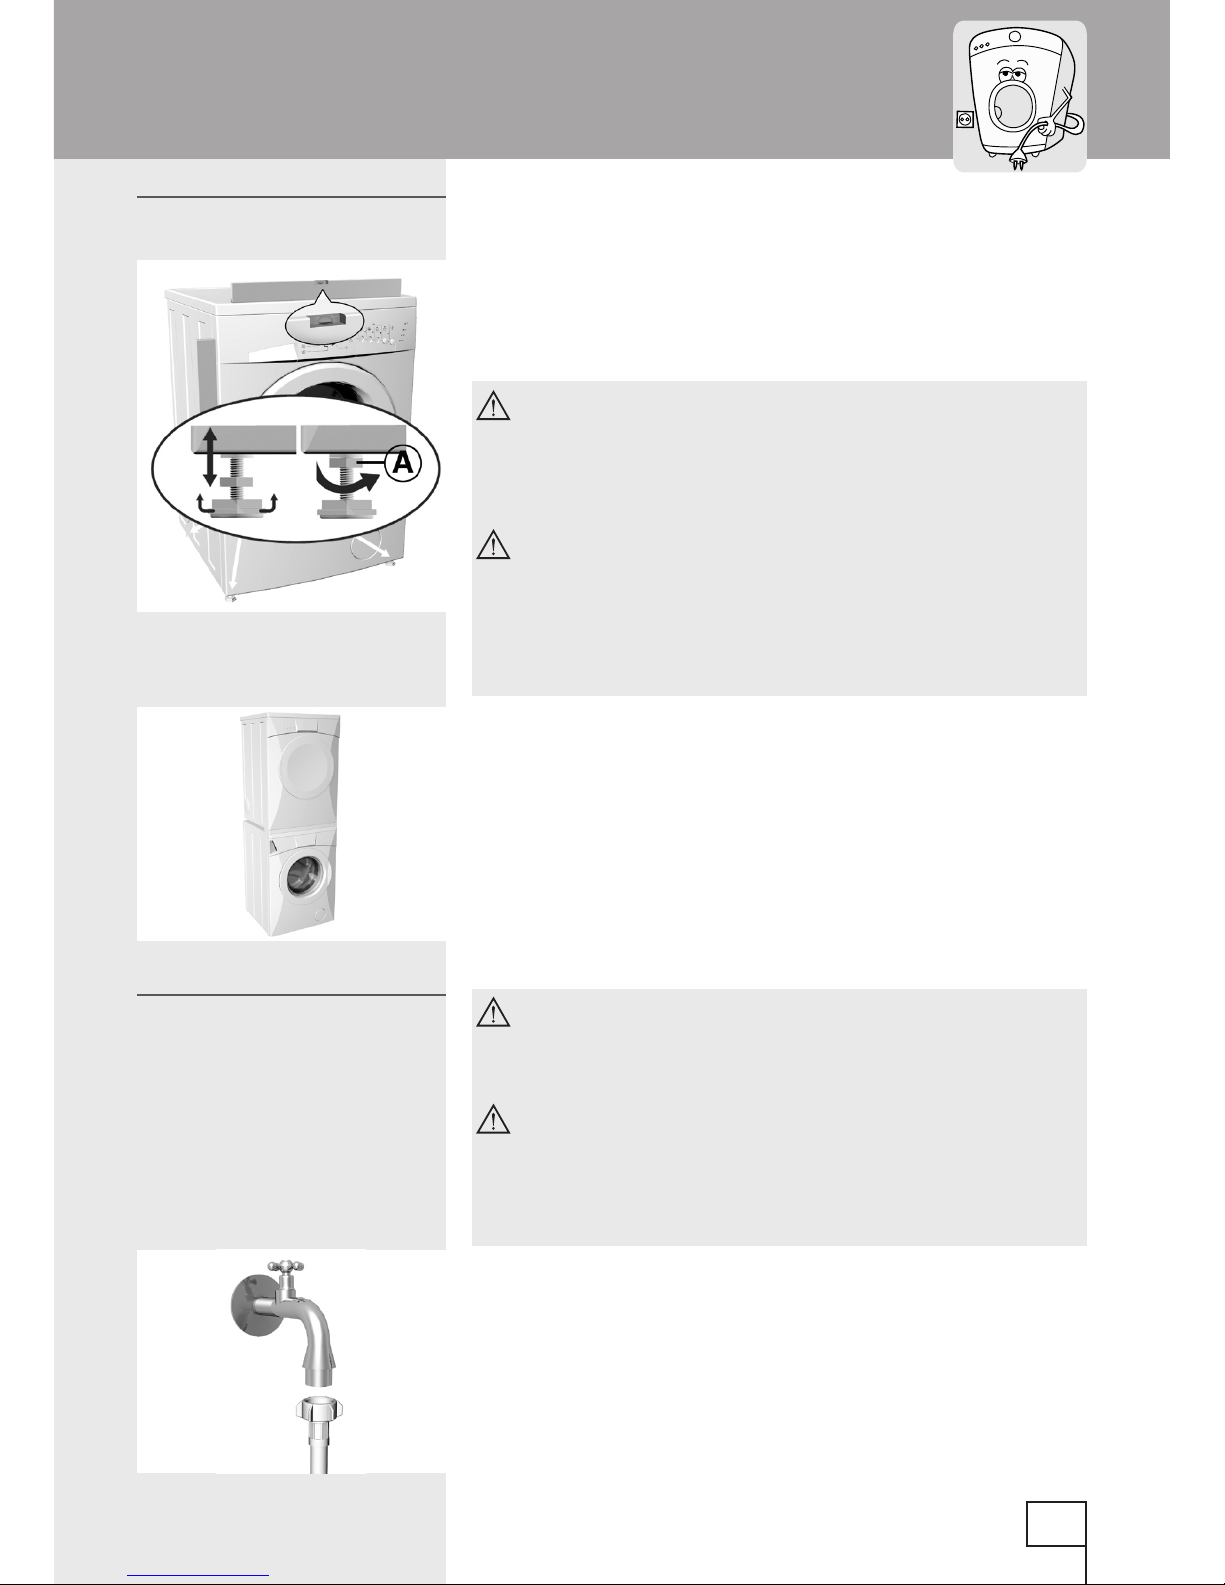
•Donotlocatethemachineinaroomwithtemperaturebelow0°C.Partsofthe
machinemaybedamagediffrozen.
•Installthewashingmachineinaperfectlyhorizontalposition,onsolidat
concreteoor.
•Followtheinstructionsforcorrectinstallationandwaterandmains
connections.
•Neverimmersetheendofthedrainhoseintothedrainingwater.
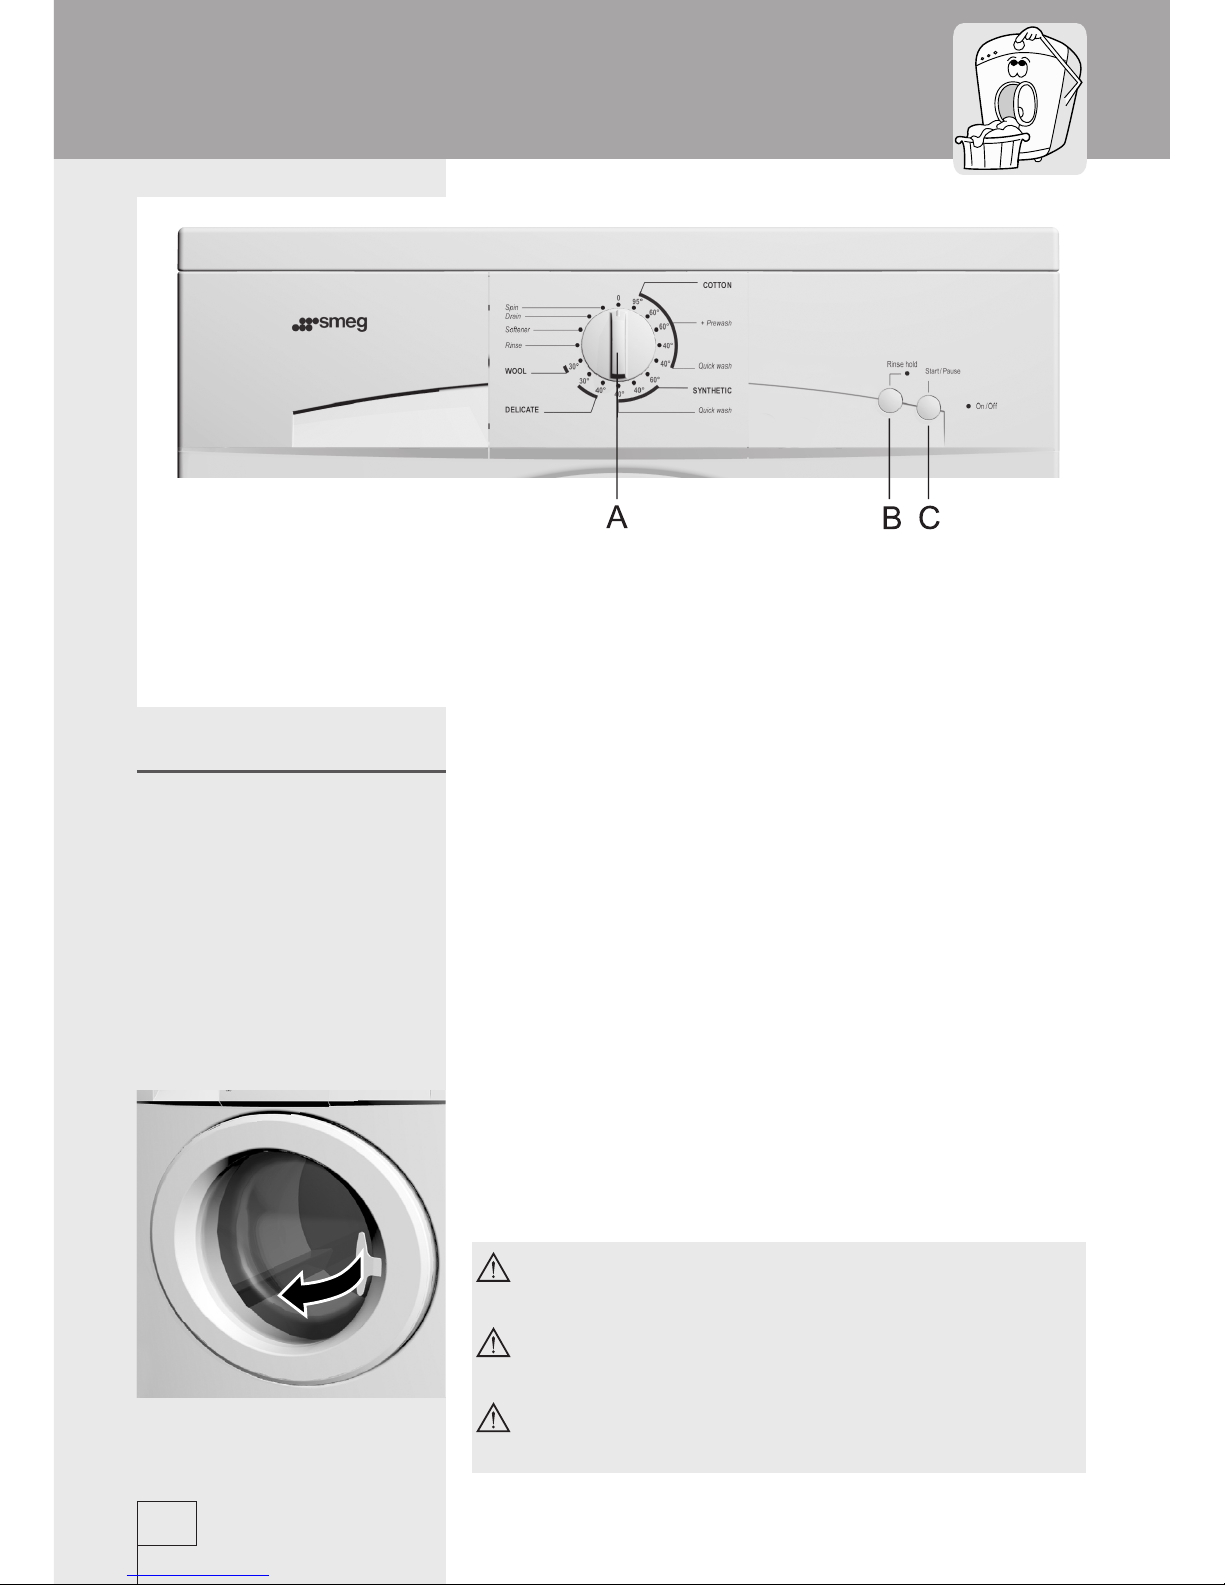
•Priorstartingthewashingcyclelockthedoorbypressingthematthe
designed spot.
•Doormaynotbeopenduringthewashingcycle.
•Useonlydetergentsandsoftenersformachinewash.Manufacturermaynot
assumeresponsibilityforanydamageandeventualdiscoloringofgaskets
andplasticcomponentsasaconsequenceofincorrectuseofbleachand/or
coloring agents.
•Forremovaloflimeresiduesusesuchagentswithaddedanti-corrosion
agents.Followthemanufacturer’sinstructions.Finishthelimeremovalby
multiplerinsingtoremovecompletelyeventualacidresidues.
•Neverusedetergentscontainingsolvents,sincethereisadangerofcreating
toxicgasseswhichmaydamagethemachineandresultinignitionor
explosion.
•Uponcompletionofwashingoperationclosethewaterfaucet.
•Beforeanytransportblockthemachinebyinsertingatleastonetransport
blockingrod.Priorthisoperationdisconnecttheappliancefromthemains
power!
•Ratingplatewithbasicinformationislocatedabovetheopeningofthe
machine.
•Thewarrantyshallnotapplytoconsumables(bulbs),minordiscolorationor
deviationsofcolor,increasednoiselevelasaconsequenceofapplianceage,
whichdoesnotaffectappliancefunctionality,andaestheticaldeciencies
whichdonotaffectappliancefunctionalityorsafety.
4
Cautions

187352
Before connecting the appliance read
these instructions carefully. Repairing
the failure arising from inappropriate
connections or use of the appliance is not
covered by the guarantee.
The symbol on the product or on its
packaging indicates that this product
may not be treated as household waste.
Instead it shall be handed over to the
applicable collection point for the
recycling of electrical and electronic
equipment. By ensuring this product is
disposed of correctly, you will help prevent
potential negative consequences for the
environment and human health, which
could otherwise be caused by
inappropriate waste handling of
thisproduct. For more detailed information
about recycling of this product, please
contact your local city ofce, your
household waste disposal service or the
shop where you purchased the product.
5

187352
In removing the wrapping be careful not to
damage the appliance with a sharp object.
Before connecting the appliance, let it
warm up to room temperature (wait for two
hours).
•Ourappliancesarepackedinenvironmentally
friendlymaterialswhichmayberecycled,
depositedordecomposedwithoutanythreatto
the environment.
•Tothisendallwrappingsaremarkedaccordingly.
•Move the pipes.
•LoosenscrewsAattherearofthemachine
(Fig. 1).
•Remove the brackets B (Fig. 1) and slide them
intothegrooveontheblockingrod(Fig.2)-the
right one should be turned around.
•Usethebracketstorotateblockingrodsfor90°
and pull them out.
•Close the openings with attached plastic pegs.
Savetransportbracketsforeventuallateruse.
Be sure to remove the transport brackets
prior rst use, otherwise the appliance
may be permanently damaged. In such
cases the warranty conditions are void.
Fig. 1
Fig. 2
Fig. 2
6
Installation and connection
Package removal
Removal of transport
brackets

187352
•Puttheapplianceinhorizontalpositionbyturning
the adjustable legs.
Thelegsareadjustableupto+/-1cm.
After the adjustment tighten the nuts rmly (A)
- towards the bottom of the machine!
Vibrations, moving of the appliance and
loud operation due to incorrect setting of
the adjustable feet shall not be covered by
this warranty.
The appliance should be placed on a
surface with concrete base; the surface
should be dry and clean in order to prevent
slipping. The adjustable feet should also
be cleaned before installation.
•Ifyouhaveatumbledryerofthesame
dimensions,youcanplaceitontopofthe
washing machine.
To ensure correct operation of the appliance,
water pressure inlet must be between 0,05 and
0,8 MPa.
Minimum water pressure can be established
by measuring the quantity of poured out water.
3 litres of water must be poured out from
completely opened tap in 15 seconds.
• Insert the gasket with screen into the water inlet
hose thread Screw the hose thread to the water
faucet
•Incaseofhotandcoldwaterconnection,connect
onehosetocoldandothertohotwaterfaucetas
markedattherearoftheappliance(lettersCand
H)(C-cold;H-hot)
7
Water inlet connection
Leveling the appliance

187352
• Fix the outlet hose to run into the sink or the
bathtub,orconnectitdirectlytothewalldrain
outlet (diameter min. 4 cm).
•Walldrainmustbeinstalledproperlyandmust
enable occasional cleaning.
•Fastentheoutlethosesupportwithapieceof
rope led through the hose elbow, to prevent the
hosefromslippingtotheoor.
Theendofoutlethoseshouldbeplacedbetween
minimum 60 cm and maximum 100 cm above the
oorlevel.
• Plug the mains power cable to the wall mains
socket.
•Requiredvoltageandotherinformationarewritten
ontheratingplateabovethedooropeningofthe
machine.
The wall socket must be accessible at all
times and must be equipped with an earth
lead (in accordance with the local safety
regulations).
The permanent connection must be tted
by an authorized personnel only.
Damaged mains power cable may be
replaced only by the producer or his
authorized personnel.
Never plug the appliance into the electric
shaver socket or hair dryer socket.
8
Connect the appliance
to the mains supply
Water outlet connection

187352
9

187352
•
Openthedoorofthemachine
•Loadthelaundryintothedrum
•Close the door
•Openthewaterinletfaucet
•Select the program
•Add washing and treatment agents (detergent and
softener)
•StarttheoperationbypushingtheSTART/PAUSE
button (C)
- Open the door of the machine.
Doorisopenedbypullingthehandle(lever)on
therighthandsideofthedoortowardsyou.
- Sort the laundry by the type of fabrics.
Do the buttons and zippers, tie the strings
and pull out the pockets.
Very delicate laundry should be put in a
special protective sack.
It is suggested to load the drum with items
of different sizes.
A - program selector
B - Rinse hold button
C - START/PAUSE button
Signal LED’s: - ON/OFF (orange)
- pump stop/failure
(green)
10
Operation
Washing procedure

187352
Pay attention to the labels on the clothes,
indicating the recommending washing mode
(see table of textile treatment symbols on the
last page of these instructions).
Programisselectedbyturningtheprogramselector
(A)fromthe“0”positiontothedesiredwashing
program.TheON/OFFsignalLEDstartsashing.
Theprogramselector(A)maybeturnedinboth
directions, and the appropriate program selected
accordingtothetypeoflaundrywashedandthe
required washing temperature (see Program Chart
forhelp).Youmayselectbasicorpartialprograms.
Selectedprogrammaybechangedatrandomprior
pushingtheSTART/PAUSEbutton(C).
- Selection of basic programs
Basic programs represent integral programs containing
allwashingstages,includingsofteningandspinning
(seeProgramChart).Theyareselectedbyturningthe
program selector to the appropriate position.
Cotton: whites/colored
Normallystainedcottonandaxbedlinenand
underwear, table cloth, bathroom towels, top
garments, etc.
Forlessstainedlaundryofthistype,useshort
program.Itsavesenergyandwashingtime.
Forheavilysoiledcottonusetheprogramwiththe
prewash.
Synthetic
Normallystainedshirts,blousesandotherpolyester
andpolyamidegarments,oramixtureofthese
fabricswithcotton.
Forlesssiollaundryofthistype,useshortprogram.
Itsavesenergyandwashingtime.
Delicate
Thisisaprogramfordelicatefabrics(dresses,
Washing machine
operation
Washing machine
operation
11

187352
skirts, blouses) and curtains.
Wool
Especiallygentleprogramforwashingwooland
garmentsmadefrommixtureofotherfabricswith
wool,appropriatelymarkedformachinewashing.
- Selection of additional function
Rinse hold
•Thisfunctionisswitchedonaftertheselectionof
abasicprogrambypressingthebutton(B).Itmay
also be switched on during the operation, prior
lastrinse.IndicatorLEDabovethebuttonison.
•Thefunctionisswitchedoffbypressingthesame
buttonagain-signalLEDisoff.
•Theprogramstopsattheendoflastrinse,prior
spinning:laundryremainssoakedinwaterand
preventscrease,ifyouareunabletoremove
itfromthedrumimmediatelyaftertheendof
washingcycle.IndicatorLEDabovethebuttonis
ashing.
•Theselectedprogramiscompletedbypushing
theSTART/PAUSEbutton(C),butyoumayalso
applyadditionalprograms(drainorspin),butyou
mustrstreturntheprogramselectortothe“0”
positionforatleastonesecond,priorselecting
anyoftheadditionalprograms.
Whenprogramcontinues,indicatorLEDabove
thebuttongoesoff.
- Selection of partial programs
Theseareindependentprogramsandmaybeused
whenyoudonotneedtheentirewashingprogram.
Incaseyouwouldliketousemoreadditional
programsinasequence,youmustturnoffthe
applianceprioranynewprogramselection(turnthe
programselector(A)to“0”foratleastonesecond).
12

187352
Rinse
Independentprogramforrinsingdelicatelaundry,
withoutintermediatespinningandwithshortnal
spin.Youmayuseitforrinsingmanuallywashed
delicatelaundryorforextrarinsingforpeoplewith
skin sensitive to detergents.
Softener
Thisprogramisintendedforsoftening,bleaching
orimpregnatingofwashedlaundry.Itiscompleted
with spinning at max. 1000 RPM.
Rinse hold
Use it when the washing program was interrupted
orifdrainfunctionwasengaged,andyouonlywish
tothewateroutofthedrum,withoutspinning.
Spin
Intensivespinningfornon-delicatelaundryathigh
spin RMP.
- Adding washing and softening agents
(seeTipsforwashingandenergysaving)
•pre-washcompartment
•main wash compartment
•softenercompartment
Washingdetergentmaybeaddeddirectlyintothe
drum, using the measuring vessel.
When adding softener, be careful to ll the
dispenser only up to the marked level.
Be sure to close the detergent dispenser
when opening/closing the appliance door.
13

187352
•PushtheSTART/PAUSEbutton(C).TheON/OFF
LEDstopsashing,themachinestartsoperating
afterafewseconds.Ifthedoorisnotproperly
closedafterstartingtheoperation,theON/OFF
LEDstartsashingagainafterafewseconds.
Whenyouclosethedoor,themachineinitiates
the selected program.
•Incaseyouwouldliketoalterthewashing
programaftertheinitiatedwashingoperation,
turntheprogramselectorforonesecondtothe
position“0”,followedbytheselectionofanew
program.Switchingthemachineoffdeletesany
previouslyselectedadditionalfunctions-Rinse
hold,sotheyhavetobereactivated.
- End of operation
FlashingON/OFFLEDindicatesthattheprogram
was completed.
•Extractthelaundryfromthedrumandremove
anyalienobjectsfromthedoorgasket.
• Leavethedoorajartoallowtheinteriortodry.
• Closethewaterinletfaucet.
• Switchthemachineoffbyturningtheprogram
selectortoposition“0”.
•By the user
Selecting Rinse hold function
Program is stopped when it comes to the Rinse hold
stage(ifthisfunctionhadbeenpreviouslyselected).
Drum door remains closed all the time. Indicator
LEDabovetherinseholdfunctionstartsashing.
Washingprocedureiscontinuedbypressingthe
START/PAUSEbutton(C).
Own interruption
Youmayalsostoptheprogrambyturningthe
programselectortotheposition“0”.Ifthereiswater
inthedrumselectoneofadditionalprograms(drain,
Start the operationStart the operation
InterruptionsInterruptions
14

187352
spin)toemptythewaterandterminatetheprogram.
Pause button
BypressingtheSTART/PAUSE button (C) program
maybesuspendedatanytime.Aftercertaintimeyou
mayopenthedoorifthereisnowaterinthedrum,
otherwise this is not possible. Program is continued
bypressingtheSTART/PAUSEbutton(C).
•Failures
Programissuspendedincaseafailureoccurs.
SignalLED’sareashing(seecf.Troubleshooting).
•Power failure
At electric cutout the program is interrupted,
however,afterthepowersupplyhasbeenre-
established,theprogramoperationautomatically
proceeds.
If a power failure occurs when the drum is
still full of water, be careful not to open the
door before you pump the water out.
15

187352
•Beforewashingsortoutthelaundryaccordingto
thetype,degreeofdirtinessandcolorfastness.
•Prior selecting the washing program consult the
sewntabwithinformationonaparticularpiece
oflaundry(seeMaintenance chart on the last
page).
•Washseparatelythenewcoloredtextileproducts
forthersttime.
•Washheavilysoiledlaundryinsmallquantitiesor
add more detergent.
•Treat stubborn stains with special stain remover, it
willsaveenergy.
•Withlightlystainedlaundryselectwashing
programwithoutpre-wash,useshortprogramand
selectlowerwashingtemperature.Thiswayyou
maysaveupto50%ofenergy.
•Avoidwashingtoolittlequantitiesoflaundry
becauseofenergysavingandforbetter
performancesoftheappliance.
•Thelargestallowedquantityofdrylaundryis
indicated in the Program chart.
•Beforewashingemptythepockets,closezip
fasteners,andremoveanymetalfastenersor
badges that might clog the drain or damage the
laundryordruminterior.
•Loosenthestackedlaundrypriorinsertingitinto
the drum.
•Useonlydetergentsformachinewash.
•Add powder or liquid detergents according to the
manufacturer’sinstructions.
•Ifwaterhardnesslevelexceeds14°dHdegrees,
theuseofwatersofteneris required.
•Chlorine-basedwhiteningagentsarenot
recommended, as it can damage the heater.
16
Tips for washing and energy saving

187352
• Ifyoudonotapplytheprogramwhichincludes
thepre-washfeature,youmayaddwashing
detergentdirectlyintothedrum.
•Ifyouusethickliquidsofteneritisrecommended
todiluteitwithwater,topreventcloggingof
dispenser compartment ducts.
•Washing machine is equipped with the dispenser
partitiongate,soyoumaypourliquiddetergent
alsointothecentralcompartment.Ifyouuse
powderdetergentthegateisliftedup,andincase
ofliquiddetergentitissliddown.
•Liquiddetergentsareintendedformainwash
only,withoutpre-wash.
•Insertparticularlydelicatelinen(stockings,
delicatefemaleunderwear,etc.)intothespecial
bag.
• HighspinRPMleavelessmoistureinlaundry
whichdriesoutmuchquickerinthetumbledryer,
therebysavingenergy.
Do not put clods of detergent into the
soap dispenser as the tube in the washing
machine may clog.
17
Hardness
scale
Degree of hardness
°dH(°N) m mol/l °fH(°F) p.p.m.
1-Soft 0-7 0-1,3 0-12 0-120
2-Medium 7-14 1,3-2,5 12-25 120-250
3-Hard 14-21 2,5-3,8 25-37 250-370
4-Extrahard >21 >3,8 >37 >370
IncaseofhardwateradddetergentaccordingtotheChartfor
degree1andaddappropriatequantityofwatersoftener(see
manufacturer’sinstructions).

187352
Disconnect the washing machine from the
mains before cleaning!
•Thecasingshouldbecleanedwithsoftclothand
mild detergent.
•Theinteriorofthedrumandthedoorgasketis
cleanedbywashingat60°Cwithoutlaundryand
addinghalfquantityofdetergent.
•Ifnecessary,cleanthedetergentdispenser.Pullit
outfromitscasingcompletelybypressingtheap
(see Fig.).
•Ifnecessary,cleanthecoverofthebungunder
the running water.
18
Cleaning and maintenance

187352
•Wash it under running water using a brush, and
dryit.Removeanyleftoverdrieddetergentfrom
thebottomofthecasing.
•Cleantheentirerinsingareaofthewashing
machinewithabrush,especiallythenozzleson
theuppersideoftherinsingchamber.
•Cleanfrequentlythewaterinlethosescreen
under running water.
•Aftereachwashwipethedoorrubbergasket.This
willprolongitsusefullife.
•Openthelterlidusingatscrewdriverorsimilar
tool.
•Filterneedsoccasionalcleaning,especially
followingheavilyshaggyoroldlaundry.Before
cleaning,drainanywaterfromthemachinevia
drain pipe.
19

187352
•Turnitanti-clockwise,pullitoutandcleanunder
running water.
•Insertthelterbackasshownonthepicture
(arrowandpointer),andtightenbyturningitin
clockwise direction. To ensure good sealing the
gasketsurface(A)mustbedirtfree.
20
Table of contents
Other Smeg Washer manuals