Smith & Brown SHO-G572-BP5 User manual
110008Z9328
5-BURNER BUILT-IN
COOKTOP USER MANUAL
GB
INSTRUKCJA OBS -PALNIKOWEJ
Y GAZOWEJ DO ZABUDOWY
PL
GB
Dear customer;
Thank you for buying this appliance. You bought a high-quality appliance which is
produced in accordance with all CE security standards recognized.
Please read this user manual for your security and satisfaction. Please, keep this
user manual in a secure place and do not give your appliance to other people
without this manual.
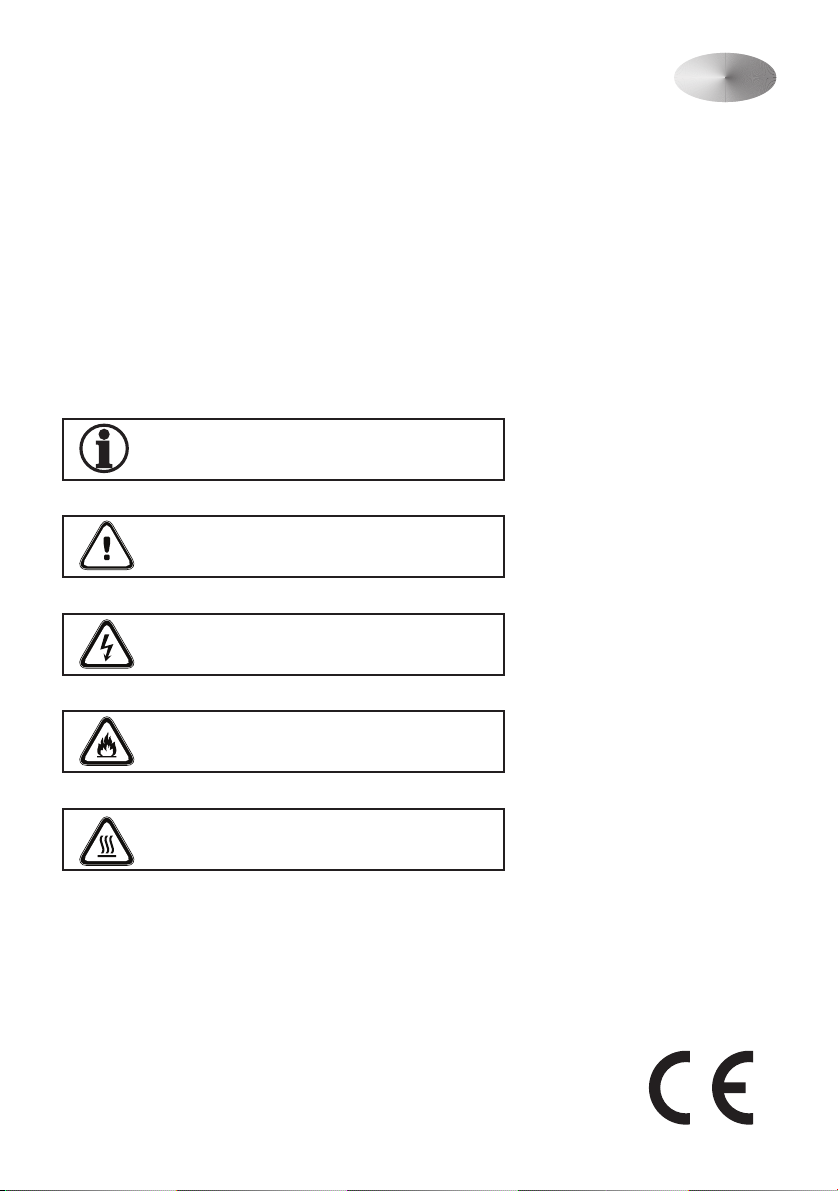
Symbols and Definitions
There are following symbols in this user manual:
Important information and tips
for usage.
Warnings for dangers against safety
of life or property
Warnings for electricity shocks
Warnings for re danger
Warnings for hot surfaces
In accordance with the EEE regulation.
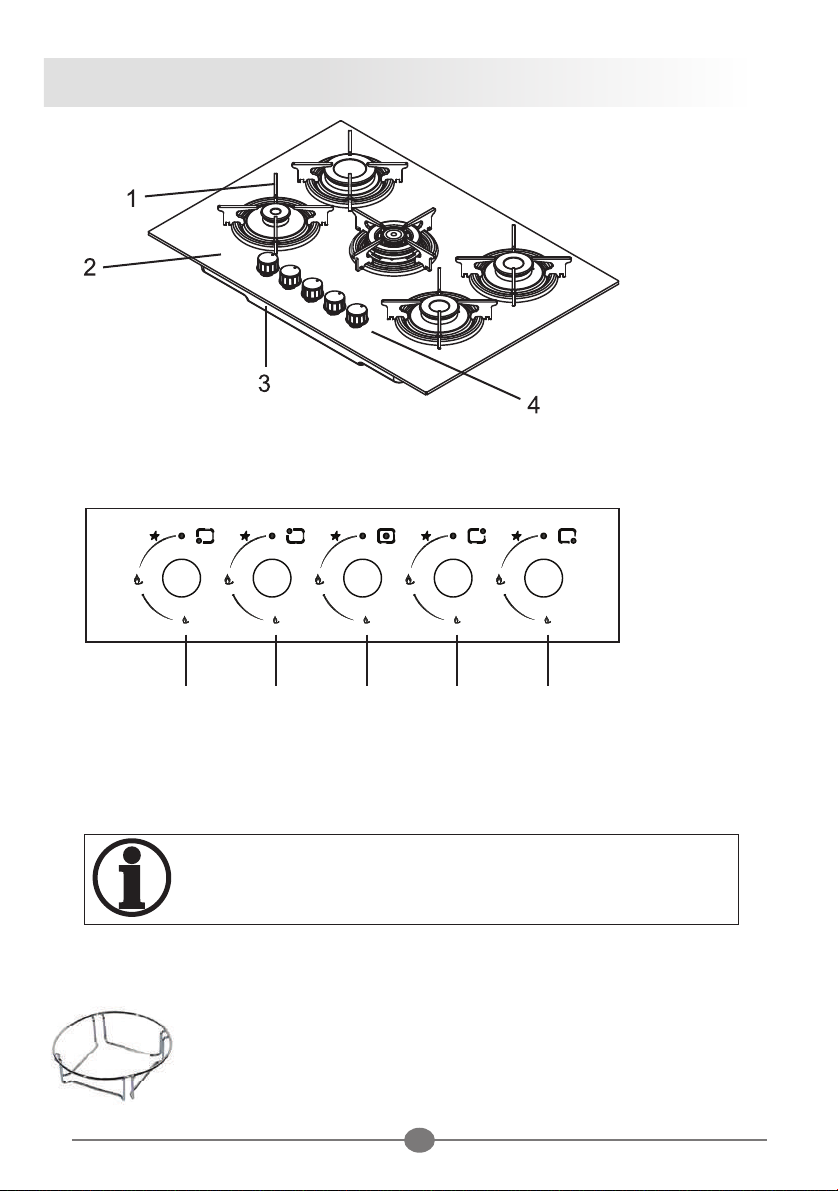
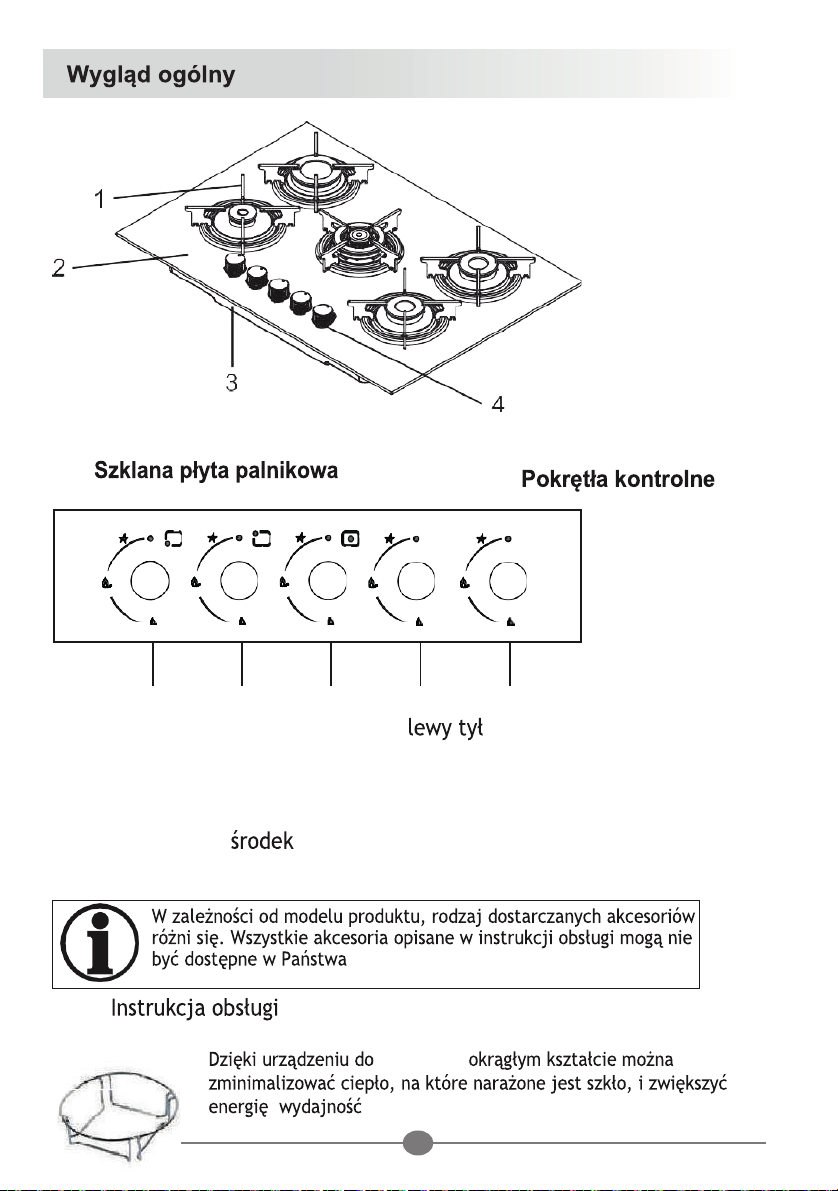
General View
1- Pot holders
2- Glass burner table
1-High Heat Burner – left back
2-Subsidiary Burner – left front
3-Wok Burner – middle
Delivery range:
According to the type of the model, the accessories
given vary. Not all the accessories in this user manual
might be found in your appliance.
1.User Manual
2.Stewpot Device
With the round-shaped surface stewpot device, you can minimize
the heat that the glass is exposed to and increase the energy
productivity.
3- Bottom casing
4- Control panel
2
4- Normal Burner – Right front
5- Normal Burner – Right back

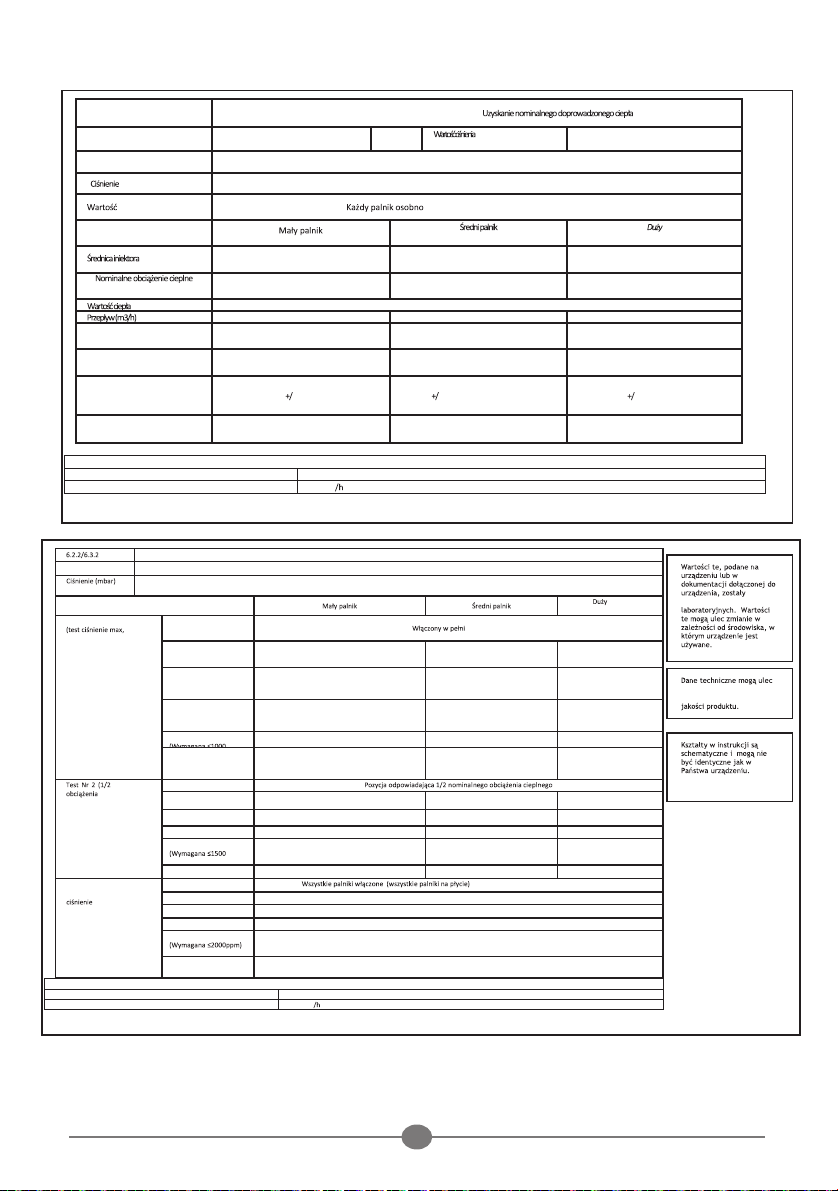
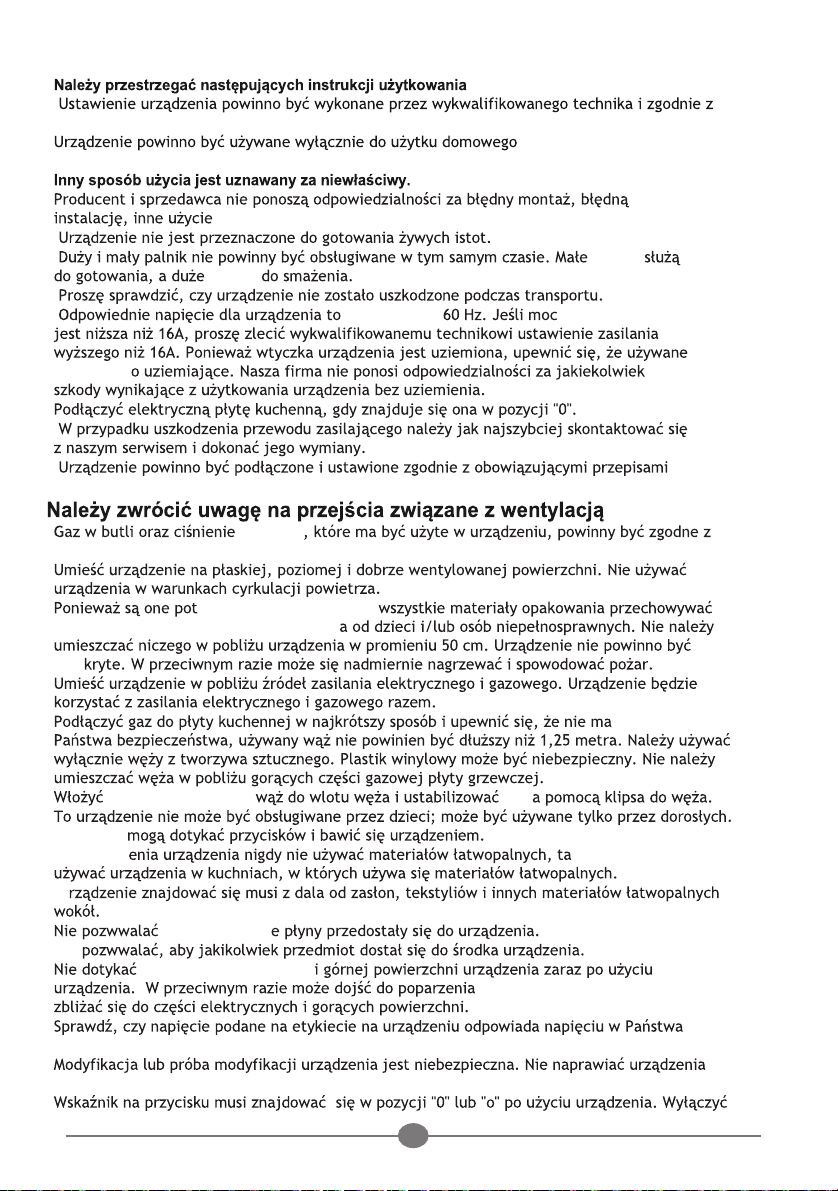
Technical Features
3
These rates given on the appliance or is in
the documents given with the appliance
are tested in the laboratory conditions.
These rates might change in accordance
with the environment which the appliance
is used.
Technical specifications are subject to
change without giving notification in order
to increase the product quality.
Shapes in the manual are schematic and
might not be the same as your device.

4
ATTENTION
The following usage instructions should be followed.
* The setup of the appliance should be done by a qualied technician and in accordance with the regulations.
* This appliance should only be used for domestic usage purposes – cooking and reheating the food.
Another way of usage is considered inappropriate.
* The manufacturer and the seller do not accept any liability for faulty installation, faulty tightening usage out of
purpose and ones that are specifically stated.
* This appliance is not designed for cooking living creatures.
* The big and small burners should not be operated at the same time. Small gas parts are for cooking and big gas
parts are for pan frying.
* Please check is your appliance has been damaged during the transportation.
* The appropriate voltage for your appliance is 220-240V, 50-60 Hz. If the power of your energy supply is lower
than 16A, please have a qualified technician to set up a supply higher than 16A.
Since the plug of your appliance is grounded, make sure that you use grounding socket. Our company is not
responsible for any damage arising out of usage the device without grounding system.
* Plug your electric cooktop while it is at“0” position.
* When the power cord is damaged, contact our service as soon as possible and make it replaced.
* This appliance is not connected to a kit which is connecting it to a burning unit. The appliance should be
connected and set up in accordance with the current regulations.
Ventilation conditions should be observed.
*The bottled gas and the hood pressure to be used in your appliance should be in accordance with local
regulations.
*Place your appliance on a flat, horizontal and well ventilated surface. Do not use the appliance under air
circulation conditions.
*Since they are potentially dangerous, keep all the package materials (plastic, nylon or polystyrene and etc.)
away from kids and/or disabled people. Do not place anything near the device within 50 cm. The device should
not be covered up; otherwise it might heat up excessively and cause a fire.
*Place the appliance near the electric and gas supplies. The appliance will use the electric and gas supplies
together.
*Connect your gas to your cooktop in the shortest way and without leakages. For your safety, the hose you use
should not be longer than 1.25 meters. Only use plastic hoses. Vinyl plastic might be dangerous. Do not place the
hose near the hot parts of the gas cooktop.
*Insert the plastic hose into the hose inlet tightly and stabilize it with a hose clip.
*This appliance cannot be operated by children; it can only be used by adults. Make sure that children do not
touch the buttons and play with the appliance.
*Never use inflammable materials such as gasoline to clean your appliance. Do not use the appliance in kitchens
where inflammable materials are used.
*Keep your appliance away from curtains, textiles and other inflammable materials around.
*Do not let water and any liquids leak into the appliance.
*Do not let any object enter into the appliance.
*Do not touch the gas nozzles, the grill and the top surface of the appliance right after you use your appliance.
Otherwise, you can burn your hands. Children and patients should be kept away from the electric parts and the
hot surfaces.
*Check if the voltage stated in the label on the appliance corresponds to the voltage at your home (for the
electric models).
*It is dangerous to modify or attempt to modify the appliance. Do not attempt to repair the appliance in case
of failure.
*Make sure that the indicator on the button is in“0”or “o”position after you use it. Turn off the main gas outlet
or the cylinder gas outlet.
*If you decide not to use the appliance anymore, please make the parts which may harm kids harmless and make
the device unusable in accordance with the local laws on health and security.
*In case of a gas leakage, close the bottled gas hood, open the windows and ventilate the room and contact
your technical service immediately.

While testing for a gas leakage, never use lighter, match, glowing cigarette or similar flaming source.
*Gas taps are secure and locked. Do not try to turn it before pushing the button.
*The valve of the appliance has a security lock. Fire should be hold for 3-5 seconds. If the gas nozzles do not catch
fire or re glowing from the nozzles goes out, close the button and do not try to fire it again in one minute. If this
continues after 3-4 times you try, call the nearest authorized technical service.
*The data plate which includes technical information is placed at a visible point under the safety cap and it is also
added to this manual. The data plate under the safety cap should not be removed in any case. The illustrations
regarding the usage of this appliance are grouped together at the end of this manual.
DECLARATION OF CONFORMITY
This appliance complies with the EC directives below:
-90/396/EEC “Gas Security Requirements”
-73/231 EEC “Low Voltage”
These instructions are only valid for this user manual and the countries in the data plate on the appliance with
their ID letters.
BEFORE CONNECTING YOUR DEVICE
The product is designed for the gas type declared on the data plate and it can be transformed into another type
of gas if necessary. This should be done by the authorized after sale services only.
TRANSPORTATION:
Keep the original box of your appliance in order to use during transportation. Use a duct tape to stabilize the
gas nozzles and the nozzle caps. Before transportation, put a cardboard between the upper cover and the grill.
INSTALLATION INSTRUCTIONS:
Important!!! These instructions are only for the qualified technicians.
The appliance should be installed in accordance with the applicable laws. Before performing any operation on
the appliance, unplug the appliance from the mains supply.
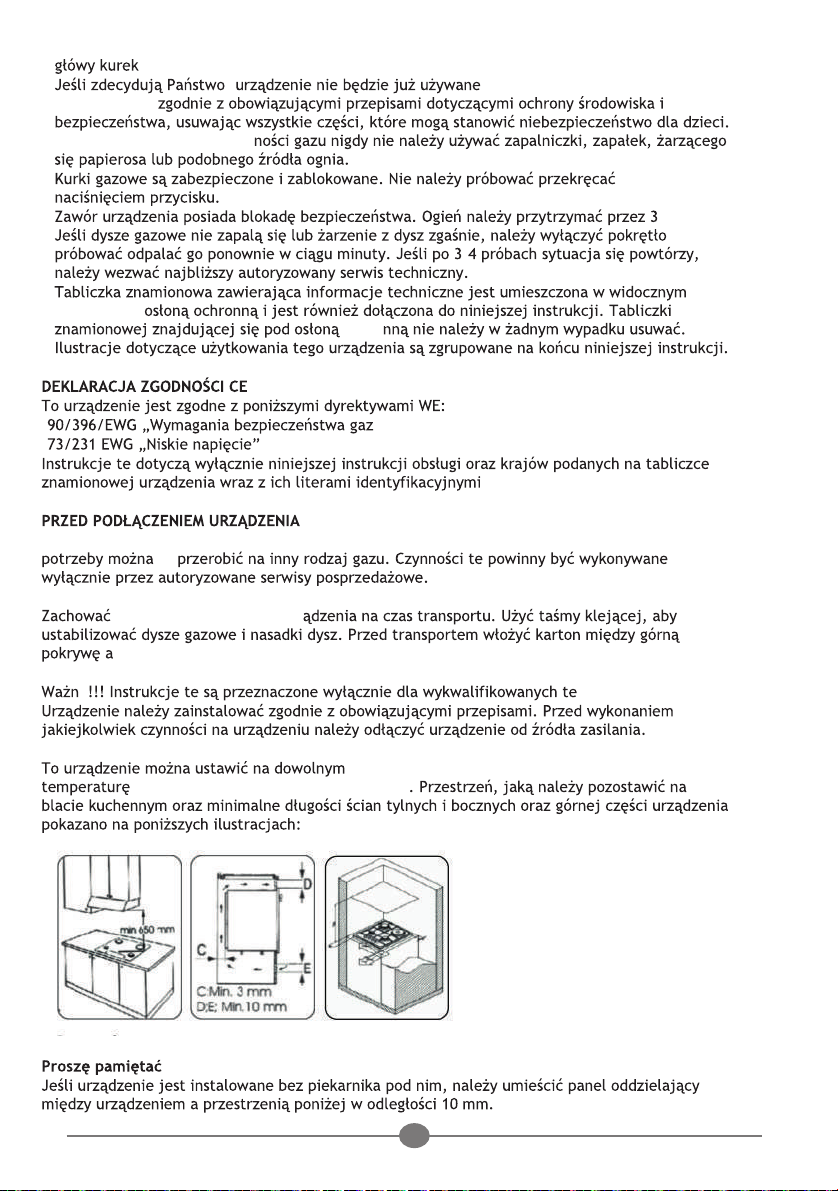
Placing on the kitchen counter for Built-In models:
This appliance can be placed on any kind of kitchen counter (minimum temperature: 900 C Degrees) as long as it
is resistant to the temperature. The space to be left on the kitchen counter and the minimum lengths for rear and
side walls and top of the appliance are shown in the illustrations below:
5
Attention:
If the appliance is installed without an oven under it, a separator panel must be put between appliance and
the space below with 10 mm distance.
*If the appliance is installed on an oven, insert a separator panel with 15mm distance at least and follow the
instructions of the oven manufacturer by providing well ventilation as specied below. Both for electrical
purposes and facilitating the disassembly, electricity connection of each device should be done separately.
It is recommended an oven equipped with an internal cooling system to be used.
Fixing the appliance:
Follow the steps below in order to fix the appliance to its place:
Place the special gaskets which are provided with external perimeter of
the kitchen counter by aligning perfectly without overlapping ends of
the gaskets according to the figure given below.
Place the device onto kitchen counter by centering it exactly into the
middle of the counter as shown in the figure.

6
A
C
B
Min. 30
Max. 40
A
E
C
Fix your appliance onto your kitchen counter by using the special parts provided.
The correct installation of the sealing gaskets provides full protection against
liquid leakage.
GAS COOKTOP INSTALLATION:
For correct installation, see the related paragraph and reference illustrations. Do not put your appliance near
inflammable or similar materials. The installation class is Type 3 for gas and type Y for electrical parts. The slot
units should be designed in a way that they can resist up to a 900 C Degrees temperature or more.
Installation area and removing the burning steam:
The appliance should be installed and operated in proper places and in accordance with the applicable local laws.
The installer should follow the applicable laws related to ventilation and removing burning steam.
Installation Area:
There should be a space providing sufficient natural ventilation in order to burn the gas properly in the room
where the appliance is installed (A). If the appliance has no safety valve, this space should be adjusted in a way
that it cannot be blocked from inside and outside. It should be placed on the opposite side of the steam outlet
appliances. If it is not possible to provide the necessary space, the air may be provided from the room ventilated
well and sufficiently on condition that there is no dangerous area or low pressure area.
This gas operated appliance generates temperature and humidity in the room where the appliance is installed.
Provide well ventilation for the kitchen. Keep natural ventilation spaces open or install a mechanical ventilation
device (aspirator or hood with exhaust duct). When the appliance is used for a long time and continuously,
additional ventilation might be necessary for example by opening a window or using more efficient ventilation
(increasing hood suction speed).
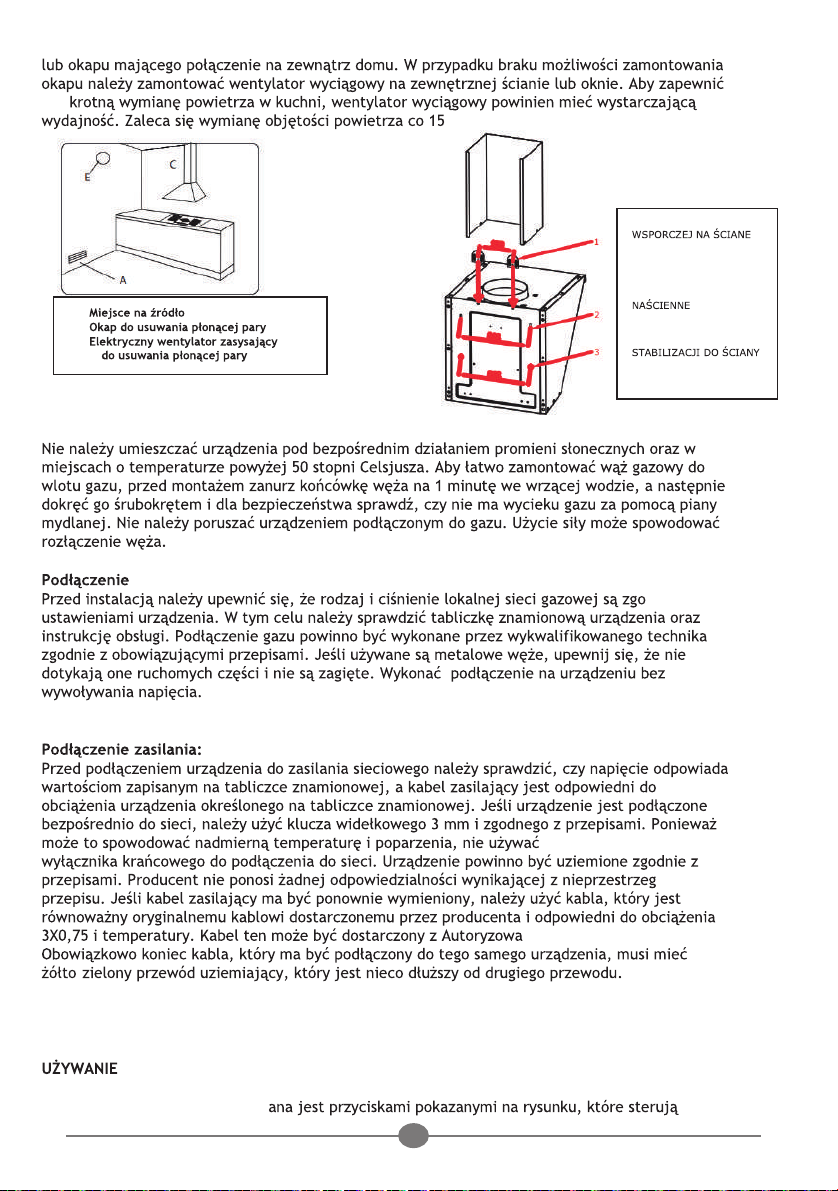
Removing the burning steam: In addition, the burning steam generated by these gas operated appliances
should be removed with the help of a direct exhaust duct or a hood having a connection to the outside of the
house. If it is not possible to install a hood, an aspirator fan should be installed on the outside wall or window.
In order to guarantee the air volume in the kitchen to be replaced 3-5 times, the aspirator fan should have a
sufficient capacity. It is recommended to replace the air volume every 15-20 minutes.
A: Space for air source
B: Hood for removing the burning steam
C: Electrical aspirator fan for removing the
burning steam
1
2
3
1- Wall supporter sheet dimensions
2- Wall hanging hole dimensions
3- Wall fixing holes
7
Do not place your appliance under direct sunlight and places above 50°C degrees.
In order to install the gas hose to the gas inlet easily, immerse the hose end into boiling water for 1 minute before
installation. Then, tighten it with a screwdriver and check if there is gas leakage with soap foam for your safety.
Do not move the gas connected appliance. Applying force might disconnect the hose.
Gas Supply Connection:
Before installation, make ensure that the type and pressure of the local gas supply comply with the settings of the
appliance. For this, check the data plate of the appliance as well as user manual.
The gas connection should be performed by a qualied technician in accordance with the local applicable laws.
If metal hoses are used, make sure that they do not touch the moving parts and are not bending. Perform the
connection on the device without causing any voltage.
Power connection:
Before connecting the appliance to mains supply, check if the voltage corresponds to the values written in the
data plate and the power cable is appropriate for the load of the appliance specied in the data plate. If the
appliance is directly connected to the mains, place an all-pole fork spanner having 3mm contact gap and
complying with the regulations. Since it may cause excessive temperature and burns, do not use a reducer,
adaptor or limit switch for connection to mains supply. The appliance should be grounded in accordance with
the regulations. The manufacturer does not accept any liability arising out of not observing this regulation.
If the power cable is to be replaced again, use a cable which is equivalent to the original cable provided by the
manufacturer and suitable to 3X0.75 load and temperature. This cable can be provided from the Authorized
Services. It is obligatory the end of the cable to be connected to the same appliance to have a Yellow-Green
grounding conductor which is a little bit longer than the other conductor.
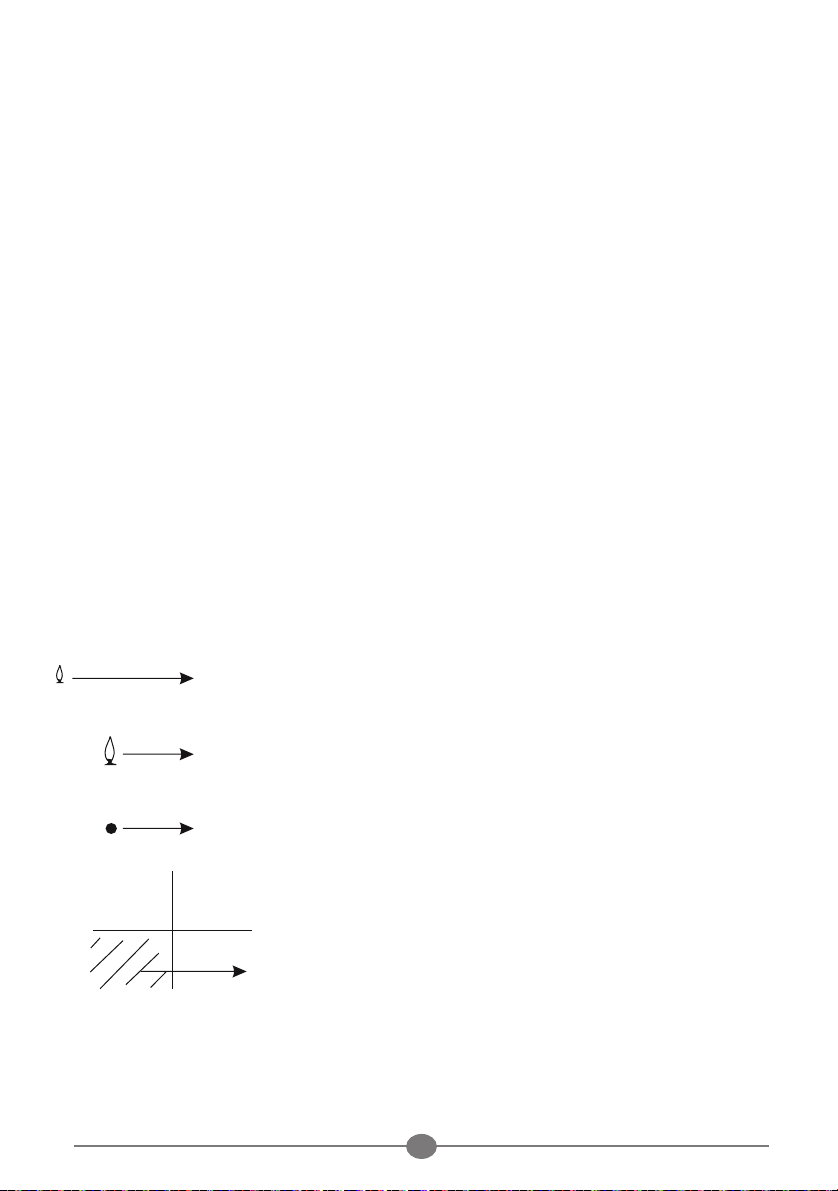
USING GAS NOZZLES
Gas Nozzles:
Distributing the gas to the nozzles is controlled by the buttons shown in the gure which also control the taps.
Based on the models, the symbols are printed on the buttons and control panels. The below mentioned
adjustments can be done by moving the indicator so as to correspond to the printed symbols.
Low Heat
Minimum capacity,
minimum gas distribution
High heat
Maximum capacity,
maximum gas distribution
Plug off
No gas distribution
Nozzle Position

8
Gas connection and safety
1- For LPG (bottled gas) connection, attach the metal clamp to the hose coming from the LPG bottle. By heating it
up with boiled water, place the one end of the hose to hose inlet coupling at the back of the appliance by pushing
it till the end. Then, take the clamp to the end of the hose and tighten it with a screwdriver. The necessary gasket
and hose inlet coupling for the connection are shown in the figure below.
NOTE: The regulator to be connected to the LPG bottle should be 300mmSS.
2- The natural gas connection should be performed by an authorized technician. For the natural gas
connection, insert the gasket into the nut at the end of the natural gas connection hose. Turn the nut in order
to attach the hose to the main gas pipe. Check if there are any leakages and then complete the connection.
The gas hose and the power cable of the appliance should not be near hot places
such as the backside of the appliance. The gas hose should be connected by making
wide angled turns against bending possibility. Moving an appliance of which gas
connection was performed might cause gas leakages.
3- Connect your cooktop to the main gas tap in the shortest way and without leakage possibility. For your
safety, the hose to be used should be 40 cm minimum and 125 cm maximum.
4- When checking if there is any gas leakage, do not use lighter, match, glowing cigarette or similar
flammable materials.
5- Apply soap foam to the connection point. If there is a leakage, soap foam would react in these parts.
6- If the cooktop is to be installed on a closet or a drawer, a heat protector panel should be installed under
the cooktop with a gap having 15 mm minimum.
Right Right Right
WRONG
Main gas pipe
Main gas pipe
Gasket
Gasket
Hose inlet coupling
Metal clamp
LPG connect hose
Nut
Natural gas connection hose

9
5
1
23
4
Using Cooktop
General information on cooking
Using Burners
Do not put oil in the pan more than its 1/3
capacity. While heating up the oil, do not
leave the cooktop unattended. Hot oil
may cause fire. Do not try to extinguish
fire with water! When the oil catches fire,
cover it with a fire blanket or a wet towel.
If it is safe, turn off the burner and call the
fire department.
• Before frying your food, make sure that they are dry
and place them slowly inside the frying oil. Make sure
that you defrost frozen foods before frying them.
• While heating up the oil, do not close the pan.
• To prevent the handles getting hot, place them in a
way that they will not be close to the fire. Do not use
unstable and tilting pots on the cooktop.
• Do not put empty pans and pots on the fire.
They might get damage.
• If you operate the burner without having a pan and
pot on it, it will harm your device. Turn the burners
off after every use.
• Since it may be hot, do not put aluminum and plastic
bowls onto the appliance. These bowls should also not
be used to store your food.
• Only use pots or vessels with flat bottoms.
• Put an appropriate amount of food inside the pots
and pans. Thus, you will not have to clean the leftovers
by preventing the meals boiling over
Do not put pan or pot caps onto the burners. Place
the pans and pots right in the middle of re. When
you want to put the pot onto another burner, raise
the pot and put onto the burner instead of sliding it.
Cooking with Gas
The size of the pot and the gas fire should be
proportional. Adjust the gas fire so that it will not be
seen outside of the pot and put the pot in the middle
of the burner.
The big fire symbol shows the highest cooking mode
and the small fire symbol shows the lowest cooking
mode. On the off (top) mode, gas connection is cut.
Firing up the gas-operated burners
1. Hold down the button of the burner.
2. Turn it to the anti-clockwise and bring it to the big
fire symbol. With the spark, the burner will catch fire.
3. Adjust it in the way you want.
Turning the gas-operated burners off
Turn the button of the gas burner to off (top) mode.
Gas Cutting safety device (in the models with thermal
elements). It cuts the gas in case that a liquid
extinguishes the fire by boiling over.
1- Gas cutting
safety
By pushing the button towards and reversing it
anti-clockwise, start the fire.
•After catching fire, hold the button for 3-5
seconds more and let the safety device come
into action.
WRONG WRONG
WRONG RIGHT
Strong burner
Subsidiary burner
Normal burner
Normal burner
Wok burner
18-22 cm
12-18 cm
14-20 cm
14-20 cm
22-26 cm
1
2
3
4
5
POSITION

10
WOK BURNER
The feature of wok burner is fast cooking. Woks which are especially used in Asian cuisine and
used to cook small-diced vegetables and meats faster with high heat are wide and deep formed
pans and made of sheet metal. These pans transmit the heat quickly and equally and the foods
are cooked at high heat and fried so quickly. Thus, their nutritive values are preserved and the
vegetables become crispy. You can also use this burner for cooking meals in normal pots. If you
want to use normal pot on the wok burner, you need to remove the pot carrier on the burner.
ATTENTION:
If the burner does not catch fire after you hold down the button for 15 seconds, release the button.
Before trying again, wait at least one minute. The gas which has not burned may explode!
6 Cleaning and Care
General instructions
If the product is cleaned regularly, the lifetime of the product is extended and the frequently
encountered problemsare reduced.
WARNING:
Unplug the appliance before starting the maintenance and cleaning
operation! There is a risk of electric shock!
WARNING:
Let the device cool down before cleaning. Hot surfaces may cause
burns!
• The appliance should be cleaned well after each use. Thus, food residues are cleaned easily and these residues
are prevented from burning on the next use.
• There is no special cleaning product for the cleaning of the appliance. You can clean the appliance with a dish
detergent, warm water and a soft cloth or a sponge, and then dry it with a dry cloth.
• After cleaning, make sure that you clean the food residues completely and clean the splashed food with water
immediately.
• Do not use cleaning materials containing acid or chloride while cleaning the holders, inox or stainless surfaces.
Use a soft cloth and a liquid (not abrasive) detergent and wipe it in the same direction.
Some detergents may harm the surface.
While cleaning, do not use abrasive
detergents, cleaning dusts and sharp
materials.
Do not use steam cleaners.
Cleaning of cooktop
Gas-operated cooktops
1- Remove the pot carriers and burner heads and clean
them.
2- Clean the cooktop.
3- Use potassium stearate (soft soap) which can be easily
found in the market to remove stubborn dirts and stains.
4-Make sure that you attach the burner heads at the right
places and inserted tightly.
SERIES
SERIES
GAS NOZZLE
GAS CLASS
PRESSURE (mbar)
Injector (mm)
CONSUMPTION (m3/h)
POWER (kw)
GAS NOZZLE
GAS CLASS
PRESSURE (mbar)
Injector (mm)
CONSUMPTION (m3/h)
POWER (kw)
SMALL MEDIUM BIG
SMALL MEDIUM BIG

11
Glass surface:
On the glass surface, no cleaning liquids or stains should be left and the surface should be cleaned with a cold, wet
towel and dried with a dry towel. The residues might harm the surface during the next use. Users must not remove
the residues with a knife, a dish fiber or similar materials. Remove calcium stains (yellow stains) with lime removers
in the market or use vinegar or lemon juice. If the surface is too dirty, apply the cleaning liquid with the help of a
cloth and wait as long as it is activated. Clean the surface with a wet cloth.
Sugar based foods such as thick cream and syrup should be cleaned immediately
before the surface cools down. Otherwise, the glass surface might get damaged
permanently.
In time, there may be color changes and fades on the surfaces. This would not affect the way that the appliance
operates. The fades and stains on the glass surface are normal and should not be considered as imperfections.
Cleaning of the control panel:
Clean the control panel and buttons/keys with a wet cloth and dry with a dry cloth.
Do not remove the control buttons of the control panel in order to clean,
otherwise the appliance might get damaged.
1- Control button
2- Gasket
Do not remove the gaskets under the control buttons for cleaning.
7 Troubleshooting
If you cannot eliminate the problem even though you have applied the
instructions in this section, please contact the dealer you purchased the product
or consult the Authorized Service. Never attempt to repair the broken appliance.
TROUBLESHOOTING TABLE
TROUBLE
The cooktop does not
catch fire
Smell of gas
Abnormal fire
Portable heater doesn’t work
The lighter doesn’t work
CAUSE
* Hood is left “off”
* Gas hose is twisted
* Gas is over
* Gas leakage on the pipe
* Plastic hose is damaged
* Bottled gas problems
* Gas nozzle is blocked
* Gas nozzle is not in the
right position
* There is no electricity
connection
SOLUTION
* Open the hood
* Get the hose in the proper position or replace
the hose
* Use a new bottled gas
* Cut the gas immediately and call the authorized
service
* Replace the hose
* Use a new bottled gas
* Clean the gas nozzles
* Place the gas nozzle in the right position
* Check the power cable of the cooktop
* Check if there is electricity in the socket
* Call the authorized service
12
8 PROTECTING THE ENVIRONMENT
To protect our environment and human health, electrical and electronic devises are
disposed based on the rules for the users and the manufacturer. Therefore, you cannot
dispose your device in the city garbage collection centre as shown in the label or the
symbol on the package. The user may bring the appliance to the special collection
centre of the municipalities and make it recycled or reused in other products in
accordance with the directive.
ENERGY CONSUMPTION
Dear Customer,
Please follow the below mentioned recommendations in order the appliance you
purchased to be used efficiently in terms of energy consumption and to contribute
the energy of the country.
1- While cooking on the cooktop, close the cap of the pot properly. The fire should
touch the bottom surface of the pot and should not exceed the limits of the surface.
2- Pots and pans should be closed with their original caps. When there is not a cap, the
heat and water is wasted and the food is cooked in a longer time and the
energy is wasted.
3- Do not boil water more than you need. A few centimeters of water will be enough for
boiling.
4- For the electric cooktops: Use pans and pots with flat bottoms. Make sure that the size
of the pan and the burner are proportional in terms of the diameter of the burner. If the
electric cooktop is only at the high level at the first moments of cooking, it will be more
economical. Foods will continue to be cooked on low heat by boiling. Turn off the burner
a specified period of time before cooking is completed. Thus, you will use the remaining
heat of the burner.

PL
.
elektrycznym.
.
powierzchniami .
Szanowny Kliencie ;
.
14
produkcie.
1-
Ruszty pod naczynia
2-
3-
Dolna obudowa
4-
1 2 3 4 5
1- Palnik wysokotemperaturowy –
4- Normalny palnik – prawy
przód
2-
Palnik pomocniczy-lewy przód 5- Normalny palnik
prawy przód
3- Palnik Wok -
Zakres dostawy
1-
2-
Aparat do duszenia potraw
duszenia o
15
Dane techniczne
6.1.2.1
Warunek
Temperatura gazu (t)
22,4°C
(mbar)
1010 mbar
Rodzajgazu
G20
(mbar) 20
Pozycjapalnika
palnik
(mm) 0,80 0,95 1,15
(kW) 1,10 1,65 2.20
MJ/m3)
37,78
0,108
0,149
0,201
Wynik(kW) 1,139 1,578 2.120
Tolerancja +3,52% -4,35% -3,65%
Wymaganatolerancja -8% -8% -8%
Decyzja
Pozytywna Pozytywna Pozytywna
G20
Palnik WOK
5kW
Palnik WOK
1,30m3
Spalanie
Rodzaj gazu
G30
50
Pozyca palnika
palnik
Test Nr 1
57,5mbar)
Pozycja kranu
(CO) M) (ppm) 33 77 110
(CO2) M (%) 1.89 2,74 3,70
(CO2) N (%) 14,0 14,0 14,0
(CO )N, (ppm)
244 393
416
Decyzja Pozytywna Pozytywna Pozytywna
cieplnego)
(50mbar)
Pozycja kranu
(CO) M) (ppm) 36 72 200
(CO2) M (%) 2.31 3,27 4.58
(CO2) N (%)
14,0
14,0
14,0
(CO )N, (ppm)
ppm)
218 308 611
Decyzja
Pozytywna
Pozytywna
Pozytywna
Test Nr 4
(normalne
próbne,
50mbar)
Pozycja kranu
(CO) M) (ppm)
243
(CO2) M (%)
(CO2) N (%)
14,0
(CO )N, (ppm)
616
Decyzja Pozytywna
G30
Palnik WOK
2,39kW
Palnik WOK
0,188m
3
przetestowane w warunkach
zmianie bez uprzedzenia w
celu w celu podniesienia
16
UWAGA
.
*
przepisami.
*
- gotowania i odgrzewania
potraw.
*
*
niezgodne z przeznaczeniem.
*
*
palniki
palniki
*
*
220-240V, 50- zasilania w domu
jest gniazd
*
*
*
.
*
w okapie
lokalnymi przepisami.
*
*
encjalnie niebezpieczne,
(plastik, nylon lub polistyren i itp.) z dal
przy
*
*
wycieków. Dla
*
szczelnie plastikowy go z
*
Dzieci nie
*
Do czyszcz kich jak benzyna. Nie
*
U
*
, aby woda i inn
*
Nie
*
dysz gazowych, rusztów
. Dzieci i osoby chore nie powinny
*
domu
(dla modeli elektrycznych).
*
samemu w przypadku awarii.
*
17
gazu lub kurek gazu z butli.
*
, , przed jego wyrzuceniem oddaj je
do recyklingu
*Podczas sprawdzania szczel
*
ich przed
*
-5 sekund.
i nie
-
*
miejscu pod
ochro
- owego”
-
.
Produkt jest przystosowany do rodzaju gazu podanego na tabliczce znamionowej i w razie
je
TRANSPORT:
oryginalne opakowanie urz
palniki.
INSTRUKCJE INSTALACJI:
e chników.
Umieszczanie na blacie kuchennym dla modeli do zabudowy:
blacie kuchennym o ile jest on odporny na
(minimalna temperatura: 900 stopni C)

18
ne na
ci
jak pokazano na rysunku.
s
i ilustracjam
Obszar instalacji i odprowadzanie pary:
pary.
Obszar instalacji:
W pomies
sowana, aby
Zawór p
dobrze i dostatecznie
:Ponadto
Usuwanie pary
19
3-5-
-20 minut.
do gazu:
dne z
reduktora, adaptera lub
ania tego
nych Serwisów.
-
DYSZ GAZOWYCH
Dysze gazowe:
Dystrybucja gazu do dysz sterow
A- powietrza
B-
C-
1-WYMIARY BLACHY
2- WYMIARY OTWORU NA
ZAWIESZENIE
3-OTWORY DO
Table of contents
Popular Cooktop manuals by other brands


Gaggenau
Gaggenau VG 491 210 CA installation instructions

Thermador
Thermador MASTERPIECE CIT36XKB installation instructions

Electrolux
Electrolux 36" Ceramic installation instructions

bora
bora PKG3 Operating and installation instructions

Bosch
Bosch NEM5466UC/01 use and care manual

ELICA
ELICA EIV430BL Use, care and installation guide