Smith & Brown A68 User manual


GB
ACKNOWLEDGMENT
Thank you for purchasing our product. We hope you enjoy using the
many features and benefits it provides. Before using this product please
study this entire instruction manual carefully. Keep this manual in a safe
place for future reference. Ensure that other people using the product
are familiar with these instructions as well.
General Information
• This appliance is designed for domestic household use and can be
built into a standard kitchen cabinet or housing unit.
• IMPORTANT: The adjacent furniture or housing and all materials used
in the installation must be able to withstand a minimum temperature of
100°C above the ambient temperature of the room it is located in, whilst
in use.
• Certain types of vinyl or laminate kitchen furniture are particularly
prone to heat damage or discolouration at temperatures below the
guidelines given above.
• Any damage caused by the appliance being installed in contravention
of this temperature limit, or by placing adjacent cabinet materials closer
than 4mm to the appliance, will be the liability of the owner.
• For use in leisure accommodation vehicles, please refer to the
appropriate information given in the installation instructions for this
appliance.
• When the oven is first switched on, it way give off an unpleasant smell.
This is due to the bonding agent used for the insulating panels within the
oven. This is completely normal, if it does occur,you merely have wait for
the smell to clear before putting food into the oven.
• The appliance and its accessible parts become hot during use.
• Tis appliance is not intended for use by persons (including children)
with reduced physical, sensory or mental capabilities, or lack of
experience and knowledge, unless or lack of experience and knowledge,
unless they have been given supervision or instruction concerning use
of the appliance by person reponsible for their safety.
• This appliance can be used by children aged from 8 years and above
and persons with reduced physical, sensory or mental capabilities or
lack of experience and knowledge if they have been given supervision
or instruction concerning use of the appliance in a safe way and
understand the hazards involved. Children shall not play with the
appliance. Cleaning and user maintenance shall not be made by
children without supervision.

• Children should be supervised to ensure that they do not play with the
appliance. This appliance is not intended for use by persons (including
children) with reduced physical, sensory or mental capabilities, or lack
of experience and knowledge, unless they have been given supervision
or instruction concerning use of the appliance by person responsible for
their safety.
• Do not harsh abrasive cleaners or sharp metal scrapers to clean the
glass of the oven.
• During use, the appliance becomes very hot. Care should be taken to
avoid touching heating elements inside the oven.
• Do not allow children to go near the oven when it is operating,
especially when the grill is on.
• Ensure that the appliance is switched off before replacing the oven
lamp to avoid the possibility of electric shock.
• The use of this appliance for any other purpose or in any other
environment without the express agreement will invalidate any warranty
or liability claim.
• Your new appliance is guaranteed against electrical or mechanical
defects, subject to certain exclusions that are noted in Of Guarantee.
The foregoing does not affect your statutory rights.
• Repairs may only be carried out by or their authorised service agent.
Environmental note
This appliance is marked according to the European directive
2002/96/EC on Waste electrical and Electronic Equipment (WEEE).
By ensuring this product is disposed of correctly, you will help prevent
potential negative consequences for the environment and human health,
which could otherwise be caused by inappropriate waste handling of
this product.The symbol on the product, or on the documents
accompanying the product, indicates that this appliance may not be
treated as household waste. Instead it shall be handed over to the
applicable collection point for the recycling of electrical and electronic
equipment.Disposal must be carried out in accordance with local
environmental regulations for waste disposal.For more detailed
information about treatment, recovery and recycling of this product,
please contact your local city office, your household waste disposal
service or the shop where you purchased the product.


1 - Cooking Function Selector on
2 - Keylock
3 - Time of day
4 - Alarm volume
5 - Display brightness
6 - AM/PM icon
7 - Thermostat on
8 - Cooking duration
9 - Cooking end time
10 - Minute minder
Menu Button: Every touch of this button consequently activates
keylock, time of day (if cooking timer isn’t set), alarm volume, display
brightness adjustment modes. Related icon apprears on the screen
during adjustment.
Program Button : Every touch of this button consequently activates
cooking duration, cooking end time (if cooking time is set) and minute
minder adjustment modes. Related icon apprears on the screen during
adjustment.
Fırın Programlayıcısı / Zaman Göstergesi(Modellere göre farklılık gösterir.)
1.3. Display and Touch Buttons Appearance:
Display:
Touch buttons:

2. Press “Plus (+)” to activate the child lock. "ON" appears and the
(key lock) icon appears steadily on the display.
To deactivate the key lock, while not being in any adjustment mode:
1.“Menu” button is pressed once, the (key lock) icon flashes and "ON"
appears on the display.
2. Press “Minus (-)” to deactivate the child lock. "OFF" appears on and
the (key lock) icon disappears from the display
Enabling the key lock can prevent unintended key presses.
To activate the key lock, while not being in any adjustment mode:
1.“Menu” button is pressed once, the (key lock) icon flashes and
"OFF" appears on the display
Plus(+) Button: This button is used to increase the value or to activate
a function in the adjustment modes. When touched for 5 seconds, the
AM/PM time of day mode will be activated in the clock display.
POWER UP; Timer disconnects the connection of the cooking function
selector connection for safety reasons, the oven is inoperative.
The (Time of day) icon and a flashing “OFF” appears on the display.
To be able to enable the oven, you have to adjust the time of day using
“Plus (+)” and/or “Minus (-)” buttons. Adjustment mode can be ended
by pressing the “Menu” button or by waiting for 5 seconds, the icon
will disappear then.
Minus(-) Button: This button is used for decrease the value or to
deactivate a function in the adjustment modes.
CAUTION! In power on condition, the oven is timer for safety reasons.
disables the function switch (oven). Therefore, the oven cannot be used.
To start using the oven, first set the clock. must
There are key lock activation, 24 hours or 12 hours time of day , alarm
tone selection, screen brightness settings options available .
Set options are not affected by power interrupts.
2. OPTIONS
2.1. Key Lock Feature:

To adjust the time of day, while not being in any adjustment mode:
NOTE: YOU CANNOT SET THE CLOCK IN CASE OF A RUNNING
COOKING PROGRAM
1. “Menu” button is pressed twice, the (Time of Day) icon flashes on
the display.
2. Adjust the time of day using “Plus (+)” and “Minus (-)” buttons.
3. Adjustment mode will be ended by touching the “Menu” button or
waiting for 5 seconds
1. “Menu” button is pressed three times. The (Alarm Volume) icon
flashes on the display.
2. Use “Plus (+)” or “Minus (-)” buttons to select the desired volume
level.
3. Adjustment mode can be ended pressing “Menu” button or waiting
for 5 seconds. The factory settings is "b-01". This setting is the highest
volume.
Time of Day 24h/12h selection: The factory default setting is the "24h"
mode. To switch to the ‘12h’ mode , press the “Plus (+)” button for
approximately 5 seconds until you hear a beep sound. Do the same to
switch back to the "24h" mode.
To change the alarm tone, while not being in any adjustment mode:
To change the display brightness, while not being in any adjustment
mode:
1. “Menu” button is pressed four times, The (Screen Brightness
Adjustment) icon will flash on the display.
2. Use “Plus (+)” and “Minus (-)” buttons to select the desired
brightness setting.
3. Adjustment mode can be ended pressing the “Menu” button or
waiting for 5 seconds. The factory settings is "b-03". This setting is the
highest brightness.
NOT: NOTE: Adjusted volume level appears on the display as
“b-01, b-02 or b-03”.
2.2. Time of Day Setting:
2.3. Alarm Tone Setting
2.4. Screen Brightness Adjustment:

NOTE: The current brightness level appears on the display as
“d-01, d-02 or d-03”.
Auto cooking means that the cooking will end automatically according
to a program entered by you.
This method is used for starting the cooking not immediately but at a
programmed time of day. This method is also called ‘delayed cooking
1. First, set the cooking period as explained above. ’
2. Consecutively Press the “Program” button until the (Cooking
End Time) icon flashes on the display.
3. Use the “Plus (+)” and/or “Minus (-)” button to set the desired
cooking end time
4. Set the cooking function and temperature using oven function and
thermostat commutator.
The (Cooking period ) and (Cooking End Time) icons both will
be visible on the display. The icon disappears from the screen when
the cooking start time has come and only the (Cooking time) icon
will continue to be displayed on the screen along with the remaining
cooking time.
Used to start cooking immediately. The desired cooking period is to
be set.
1. “Program” button is pressed. The (Cooking time) icon flashes on
the display.
2. “Plus (+)” and “Minus (-)” buttons should be used to set the desired
cooking time. After the cooking time is set ( after 5 seconds of the last
button press ), the (Cooking time) icon appears steadily on the display.
The remaining cooking time starts to count down and is displayed in
hours: minutes if longer than 1 hour or as minutes: seconds if shorter.
The maximum adjustable cooking time is 10 hours.
3. Do not forget to set the cooking function and temperature knobs to
desired positions.
TIMER FUNCTIONS
3.2. Fully Automatic Cooking:
Semi-Automatic Cooking:

NOTE: The warning tone will be muted by any button press other than
the Program button, with the End remaining on the display and the
oven remaining inoperative.
1.Press and hold the “Program” button for 3 second. Cooking program
and if it was minute minder period will cancelled and the timer will act
as cooking is finished, described above or
1. Press the “Program” button, the (Cooking time) icon flashes on
the display.
2. Reset the cooking period on the screen to 00:00 using the
“Minus (-)” button The timer will act as cooking is finished,described
above.
1. The (Alarm) icon flashes on the display and a buzzer tone is
produced lasting for 7 minutes if not cancelled.
2. Press any key to cancel the alarm tone . The current time of day will
be shown on the display.
1. Press the “Program” button consecutively 2 or 3 times until the
(Alarm) icon flashes on the display
2. Use “Plus (+)” and “Minus (-)” buttons to set the minute minder alarm
period. will get steady on the screen after a few seconds and the
countdown starts and is displayed. The maximum adjustable period
is 23 hours 59 minutes
1. (Cooking period) icon will flash and “End” appears on the display,
a warning tone will be produced for 7 minutes if not cancelled.
2. Press the “Program” button to cancel the warning tone. “End” will
disappear from the display. the current time of day will be shown
instead. The oven is now in manual mode, oven function and
thermostat commutator should be turned off as well, if not, the oven
will go on heating!
When Cooking is Finished;
3.3. Minute Minder:
When the countdown is completed;
To cancel a preprogrammed automatic cooking period ;

NOTE: In case of both minute minder and cooking duration count
down, the shorter one is displayed
NOTE: Both and icons will be off when waiting for a cooking in a
delayed cooking, upon a cooking program end and right after a power
up until the time of day is adjusted.
When the cooking function selector of the oven is turned to anyone of
ON positions, the (Cooking Function On ) icon appears on the
display.
Whenever the oven temperature is lower than the set temperature ,
the ( thermostat on ) icon appears on the display.
1. Press and hold the “Program” button for 3 second. Minute minder
period and if it was cooking program will cancelled.or
1.Press the “Program” button, the (Alarm) icon will flash on the display.
2.Reset the minute minder period to 00:00 using the “Minus (-)”
button .
To cancel the set time;
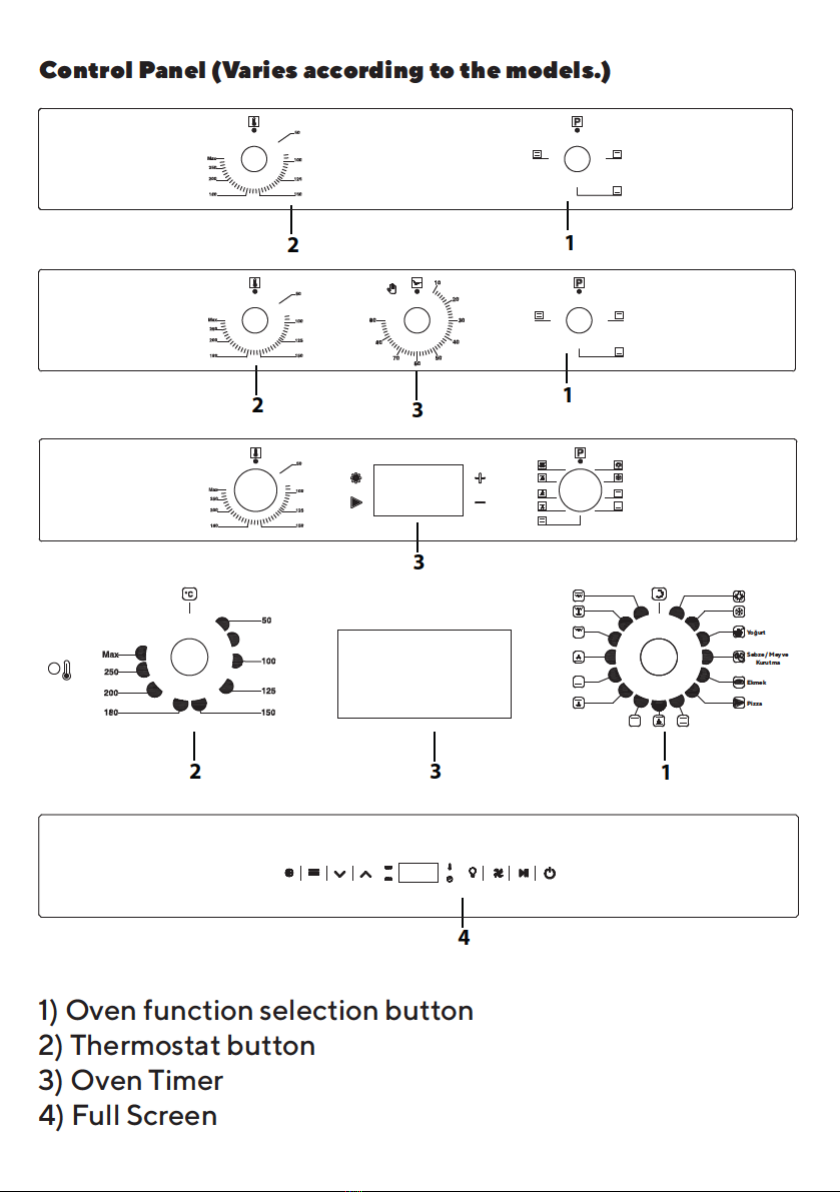
4.1 Cooking Function Selector:
4.2 Temperature Selector:
4 OVEN KNOB STATUS INDICATION

Control Panel (Varies according to models.)
123458
7
910 11
Functions
M: MODE: You can use the Mode button to cook in your own
personal standards. When you press the Mode button, you
can set respectively the resistance selection (bottom-top-
bottom and top), cooking degree and duration as you wish.
1) Mode Selection Button
2) Ready-made cooking programs
3) Minus Button
4) Plus Button
5) Cooking elements
6) Timer mode
7) Thermostat mode
8) Lamp button
9) Fan button
10) Start-Stop button
11) On-Off button


Food list
MENU
CAKE
MOLD CAKE
CUP CAKE
SPONGE
BOREK (PIE)
PASTRY
PIZZA
FLOUR COOKIES
SALTED COOKIES
APPLE-PIE
CHERRY PIE
DONUT
CROISSANT
BREAD
LASAGNA
GRILLED CHICKEN
GRILLED MEAT BALLS
GRILLED FISH
BEEF
ARAB KEBAB
DEGREE DURATION
180°
180°
180°
180°
200°
200°
200°
200°
200°
200°
200°
220°
180°
170°
170°
180°
180°
180°
180°
180°
25 MINS
37 MINS
27 MINS
22 MINS
31 MINS
33 MINS
48 MINS
26 MINS
53 MINS
48 MINS
58 MINS
39 MINS
32 MINS
21 MINS
31 MINS
27 MINS
32 MINS
22 MINS
22 MINS
22 MINS
SHELF
(F01)
(F02)
(F03)
(F04)
(F05)
(F06)
(F07)
(F08)
(F09)
(F10)
(F11)
(F12)
(F13)
(F14)
(F15)
(F16)
(F17)
(F18)
(F19)
(F20)
3
2-3
2-3
3
3
3
3
2-3
2-3
3
3
3
3
3
3
3
2-3
3
3
3


Table of contents
Languages:


