smith+nobel HSM-199R User manual
Model Number XXXXXX
4 SLICE TOASTER
INSTRUCTION MANUAL
5L PLANETARY
STAND MIXER
Model Number HSM-199R / HSM-199B / HSM-199C
INSTRUCTION MANUAL

2
Contents
03 Important Safety and General Instructions
06 Parts List and Accessories
07 Introduction
07 Instruction For Use
08 Speed Chart
09 Troubleshooting Guide
09 Cleaning & Maintenance
10 Recipes
13 Disposal Instructions
13 Technical Information
16 Warranty Details

3
Important Safety and General Instructions
Read all instructions thoroughly before first use, even if you are familiar with this
type of product. The safety precautions mentioned in this manual reduce the
risk of burns, fire, electric shock and injury when correctly followed. Keep this manual
in a safe place for future reference, along with the completed warranty card, purchase
receipt and packaging. If applicable, pass these instructions onto the next owner of this
appliance.
When using electrical appliances, to reduce the risk of personal injury or damage to property,
basic safety precautions must be observed, including the following:
• Limited to household use only: This appliance is intended for and limited to household
use only. Do not use it outdoors, where aerosol (spray) products are being used or where
oxygen is being administered.
• Intended purpose: Do not use this appliance for anything other than its intended purpose,
and only use it as described in this manual.
• Accessories: Do not use any accessories with this appliance that are not supplied or
specifically recommended.
• Always turn the power off at the power outlet before you insert or remove the plug.
Remove by grasping the plug – do not pull on the cord.
• Ensure that the wall socket is easily accessible, so that you can remove the mains plug
quickly if necessary.
• Always allow the appliance to cool down completely before storing away or cleaning.
Do not wind the power cord around the appliance.
• Only connect the appliance to a power outlet whose voltage matches that shown on
the rating label of the appliance.
• The appliance must be placed on a level; dry and heat resistant surface away from heat
or water sources.
• Never touch the inside of the appliance while it is operating.
• Do not operate the appliance with wet hands.
• Never pull or carry the appliance by its power cord. Do not allow the power cord to touch hot
surfaces or sharp edges.
• Do not expose the power cord where it may be pulled by children or tripped over. Do not run
power cord under carpeting. Do not cover the power cord with throw rugs, runners or similar.
!WARNING - This signal term indicates a moderate risk, which, if not avoided,
may result in death or severe injury.
!CAUTION - This signal term indicates a low risk, which, if not avoided, may
result in minor or moderate injury.
NOTE - This signal term warns you of potential damage.

4
• Arrange the power cord away from high traffic areas and where it will not be tripped over.
• !CAUTION: Do not place the appliance on or near combustible material such as curtains
or tablecloths or against a wall or other appliances. Always leave at least 10cm of free space
around the appliance.
• !WARNING: Do not use this appliance near an open window as rain may cause damage
or an electric shock.
• Do not use this appliance with an extension cord unless this cord has been checked and
tested by a qualified technician or service person.
• Do not place anything on top of the appliance whilst it is in use or storage.
• Never leave the appliance unattended while in use.
• Young children should be supervised to ensure that they do not play with the appliance.
• This appliance is not intended for use by persons (including children) with reduced
physical, sensory or mental capabilities, or lack of experience and knowledge, unless
they have been given supervision or instruction concerning the use of the appliance by
a person responsible for their safety. Children should be supervised to ensure that they
do not play with the appliance.
• Children can become trapped in the packing film when playing and suffocate.
• Keep packaging materials out of the reach of children.
• Do not allow children to play with the device or the packing film. Danger of suffocation.
• To protect against risk of electric shock, do not immerse the cord, plug or motor base in
water or any other liquid.
• Allow the motor base to completely cool down before either cleaning or storing.
• Unwind the power cable completely prior to use. Ensure that the power cable is not
damaged by sharp edges.
• Do not use the appliance for any purpose other than its intended use.
• Do not place the appliance on or near flammable or hot objects.
• Do not allow the power cord of the appliance to hang over the edge of a table or bench or touch
any hot surfaces.
• !CAUTION: Do not use this appliance with another programmer, timer or any other device
that switches the appliance on automatically, as this poses both a safety hazard and a fire risk.
• Some appliances are “sealed” using tamper-proof screws to avoid tampering or maintenance
by unskilled or unqualified persons and also for safety reasons.
• Do not operate any electrical appliance if the power cord is damaged or after the appliance has
been dropped or damaged in any way. If damage is suspected, contact after sales support
• Improper installation may result in the risk of fire, electrical shock and/or injury.
• Do not carry out any modifications to the appliance or its mains cable. Repairs to be
carried out on appliances should be completed by a professional workshop only;
otherwise warranty will be invalidated.
• !CAUTION: Modifications to the appliance by the user/s may cause damage to property
or persons and will be deemed as not in accordance with the instruction manual and no
liability for damage will be accepted by the manufacturer.

5
!WARNING:
• To reduce the risk of electric shock, do not immerse or expose the product,
flexible cord or plug to rain, moisture or any liquid.
• Do not use the product near baths, basins or other vessels containing water or
other liquids, or when standing in or on damp or wet surfaces.
• In the event where the appliance is dropped into water, turn off the power at the
power outlet and remove plug immediately.
DO NOT REACH INTO THE WATER TO RETRIEVE IT UNTIL IT HAS BEEN
DISCONNECTED FROM THE POWER OUTLET.
• It is important to note that the appliance will have to be inspected by a qualified
technician before using it again.
• Do not use chemical, steel wool or abrasive cleaners to clean the appliance.
• Wait until all components stop running before unplugging the power cord and removing the
mixer bowl.
• Always secure the mixer bowl onto the motor base before attaching any accessories.
• Do not place hands or fingers in the mixer bowl unless the motor has come to a complete
stop. Ensure the speed knob is in the O position and the appliance is switched off at the power
outlet and the power cord is unplugged before removing the mixing bowl.
• Never move the appliance whilst it is in operation.
• Place the appliance as close as possible to the power source so that you can disconnect the
plug quickly and easily.
• Ensure to keep hair, clothing and jewellery away from the mixer bowl whilst it is in operation.
• Do not use for more than 10 minutes continuously. Allow to cool for 10 minutes before
using again.
• !CAUTION: Ensure that the stand mixer is switched off before removing any
accessories.
• The appliances is intended to be used in household and similar applications such as
- staff kitchen area in shops, offices and other working environment
- farm houses
- by clients in hotel, motel and other residential type environments
- bed and breakfast type environments.
6
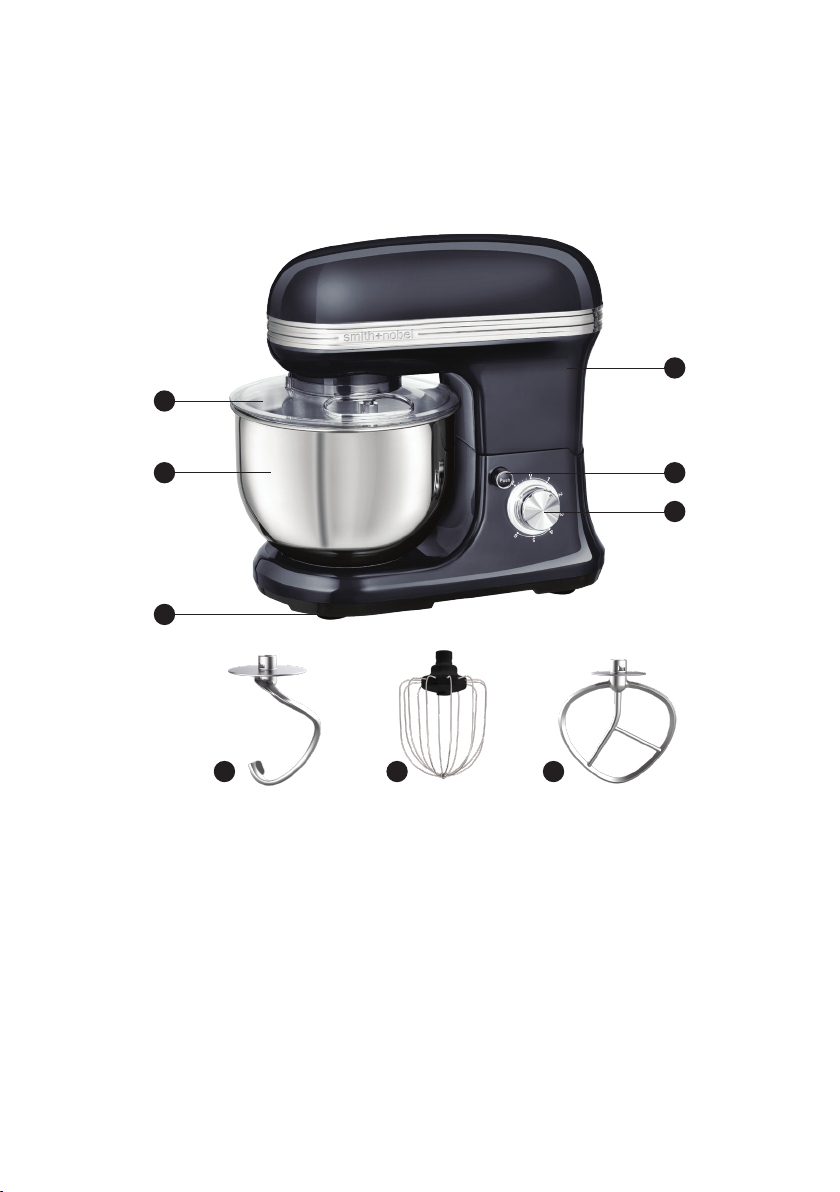
Parts List and Accessories
1. Pouring shield
2. 5 Litre stainless steel
mixing bowl
3. Slip resistant feet
4. Tilting arm
5. Tilt head release button
6. Control knob
7. Dough hook
8. Whisk
9. Flat beater
1
4
6
5
7 8 9
2
3
7
Introduction
Before using your Stand Mixer for the first time
Read all safety instructions in this manual before operating. Before using this appliance for
the first time, follow the steps below:
• Place the Stand Mixer on a flat, level, heat resistant surface.
• Wash all accessories in warm soapy water and dry thoroughly.
• With the exception of the stainless steel whisk and bowl, all accessories are NOT
dishwasher safe.
Speed Knob - Speed Regulating & Pulse Speed
• To adjust the speed, use the speed control knob as below:
Always start mixing on level 1 and slowly increase the speed to level 6 as the
ingredients start to combine.
• Adjust the speed control knob clockwise or anti-clockwise depending on the speed you
require.
• To use the pulse switch:
Turn and hold the control dial to ‘P’, the machine will move into the fastest speed.
Turn the control dial to ‘0’, the machine will stop moving.
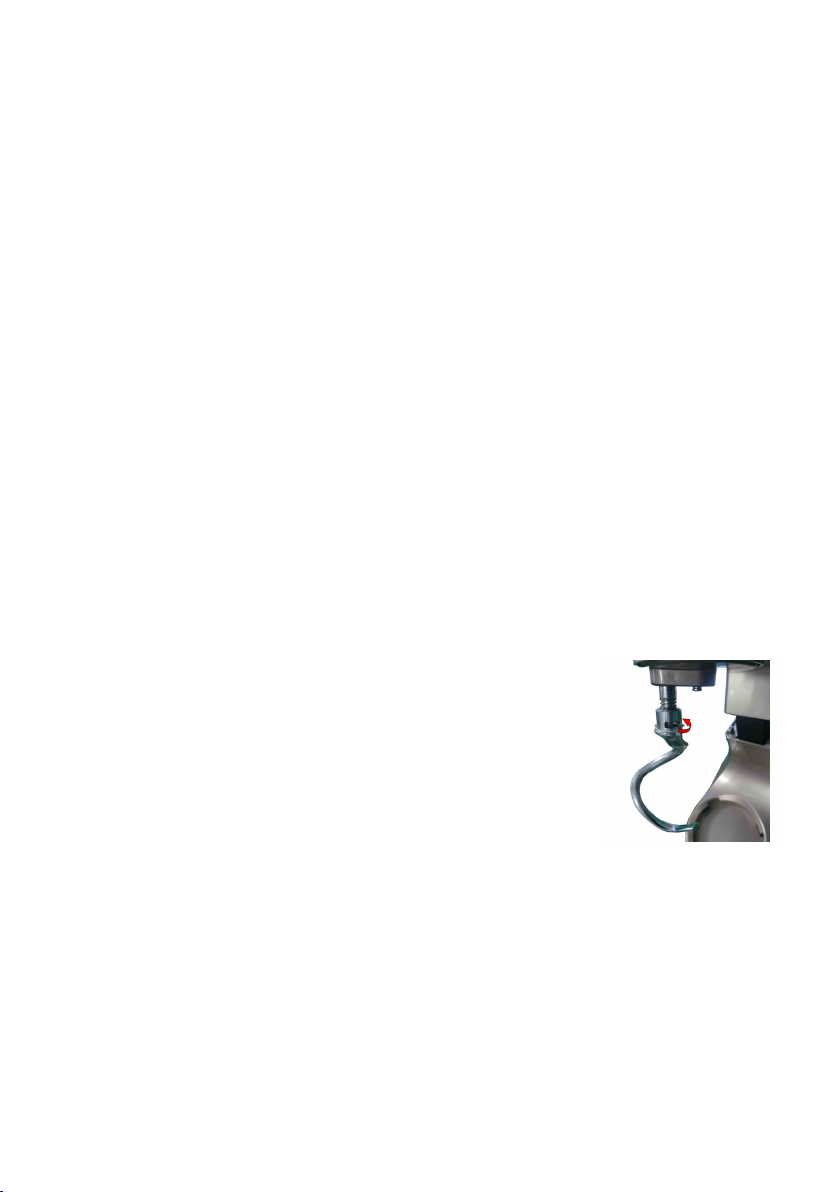
Inserting the dough hook, flat beater and whisk
• Press the release button and gently lift the tilting arm upwards.
• Insert the mixing tool into the corresponding groove of the
socket of the tilting arm, push up and turn the tool to lock into
position.
• Press the release button and gently lower the tilting arm to its
lowered position.
! CAUTION: Remove the plug from the socket when you are
inserting the dough hook, beater or whisk.
Using the Stand Mixer
1. Press the release button and gently lift the tilting arm upwards.
2. Place the mixing bowl filled with ingredients onto the mixing stand and twist to lock in place.
3. Insert the mixing tool into the corresponding groove of the socket of the tilting arm, push
up and turn the tool to lock into position.
4. Place the pouring shield over the bowl.
5. Press the release button and gently lower the tilting arm to its lowered position.

8
6. Turn the power on and select the appropriate speed. Use the hole in the pouring shield to
add ingredients as required.
7. Do not use for more than 10 minutes continuously. Allow to cool for 10 minutes before
using again.
8. When you have finished mixing, turn the power off and unplug the power cord.
9. To remove the bowl, press the release button, gently lift the tilting arm.
10. Remove the mixing bowl by twisting.
11. Release the mixing tool by turning from the tool socket and then remove.
12. Gently return the tilting arm to its lowered position.
! CAUTION: Do not place hands or fingers in the mixer bowl unless the motor has come to a
complete stop.
13. Ensure the speed control is set to 0 position and the appliance is switched off at the
power outlet with the power cord unplugged before removing the mixer bowl or lifting the
tilting arm.
Dough Hook
For heavy doughs like bread, short crust pastry or pasta use the dough hook at speeds 1, 2.
Flat Beater
The flat beater can be used for many ingredients ranging from medium weight doughs, cake
mixes, to lighter mixtures such as pancake batter or stir fry dough. Use the beater at speeds
4, 5, 6 as required.
Whisk
For whipping cream, eggs or puddings use the whisk at high speed 4 to 6.
Pulse
For short, powerful and continuous pulse movements, turn the control repeatedly to P position.
After operation turn the speed control to 0.
Speed Chart
Accessory Ingredients (Max) Water (Max) Time Speed
Flat Beater Flour: 1000g 1000g 5 minutes 4 – 6
Dough hook (Kneader) Flour: 1000g 550g 5 minutes 1 – 2
Whisk Egg white 10 eggs 4 minutes 4 – 6

9
1. Always remove the plug from the power outlet before cleaning.
!CAUTION: The mixer must not be immersed in water or other liquids. Electric shock
hazard! Remove the plug from the socket before you clean the appliance.
2. Remove the beater, dough hook and stainless steel whisk from the mixer.
3. Wash the beater, dough hook and stainless steel whisk and the mixer bowl in hot dish
washing detergent. The beater and dough hook must not be cleaned in a dishwasher. The
stainless steel whisk and bowl are dishwasher safe.
4. Rinse and dry all parts thoroughly after cleaning.
5. Wipe the mixer and base clean with a slightly damp cloth. The mixer and base
must not be cleaned in the dishwasher or immersed in water or any other liquid.
Troubleshooting Guide
Cleaning and Maintenance
Problem Solution
No power. Connect the appliance to the power
socket.
Spraying is occurring. Ensure the pouring shield is placed on the mixing bowl and
start with a lower speed.
The mixing attachment is
loose.
Insert the mixing tool into the socket and rotate so its
securely locked in place.
The machine stops during
operation.
Unplug and check for obstruction or overloading.
Turn the speed control to 0 and then restart. If the
machine will not operate,remove some of the ingredients
to reduce the load and restart.
If the problem does not resolve, unplug and allow to stand
for 10 minutes. Plug in and reselect the speed.
If the machine does not restart following the above
procedure, then contact customer support for further
advice.
Machine is labouring Switch off and remove some of the ingredients.

10
CHOCOLATE ORANGE CAKE
Ingredients
• 150g self-raising flour
• Pinch of salt
• 1tsp baking powder
• 50g cocoa powder
• 1 large orange, juiced and rind grated
• 175g unsalted butter or margarine
• 175g caster sugar
• 3 eggs
1. Preheat oven to 350°F (180 °C). Grease two round cake tins (20cm in diameter) and line
the base and sides with baking paper.
2. Sift the flour, salt, baking powder and cocoa into the mixer bowl.
3. Add the orange juice, orange rind, butter, sugar and eggs into the mixer bowl.
4. Beat with the stand mixer starting on a low speed setting and then gradually
increasing the speed setting until combined. Pour batter into the prepared tins.
5. Bake the cakes for 20-25 minutes or until springy to touch.
6. Remove cakes from the oven and allow them to cool down in the tins before turning
them out onto wire racks.
7. When cakes are completely cool, pierce them with a skewer and spoon the remaining
orange juice over cakes to soak in.
SCONES
Ingredients
• 1 egg
• 4tbsp oil
• 250g milk
• 500g self-raising flour
• 1tsp salt
• 1tbsp sugar
• Jam and cream to serve
1. Preheat oven to 428°F (220°C).
2. Place the egg, oil and milk in a small bowl and whisk until combined.
3. Sift the flour, sugar and salt into the mixer bowl.
4. Attach the dough hook and lower into the mixer bowl. Mix at a low speed setting and
then gradually increase the speed setting until combined. Do not overwork the dough; it
should not be sticky or too dry.
5. Once mixture is combined, turn the dough out onto a lightly floured surface and pat it
into a shape of about 2cm thickness.
6. Place the mixture back into the mixing bowl and cover with plastic wrap and rest for 10
minutes.
Recipes
Quantities listed below are only a guide.

11
7. Remove the mixture out of the mixer bowl and cut into scone shapes. Place onto a lightly
greased baking tray and brush the tops with milk.
8. Bake in the oven for 10-15 minutes or until lightly browned.
9. Enjoy served with jam and cream.
CHOCOLATE BROWNIES
Ingredients
• 150g unsalted butter
• 125g brown sugar
• 2 eggs
• 60g plain flour
• 60g cocoa
1. Preheat oven to 350°F (180 °C).
2. Place the butter and sugar into the mixer bowl.
3. Attach the flat beater and lower into the mixer bowl. Mix at a low speed setting and then
gradually increase the speed setting until combined.
4. Turn the stand mixer down to a low speed and add an egg and mix thoroughly
until fully combined before adding the second egg.
5. Mix through the flour and cocoa but ensure not to over mix.
6. Spread the mixture onto a greased baking tin, lined with baking paper.
7. Bake for 20-25 minutes or until firm. Ensure to check the brownies at least 5 minutes
before the end of baking to avoid overcooking.
8. Allow brownies to cool in tin before removing and cooling on a wire rack.
9. Enjoy dusted with icing sugar or top with chocolate icing.
CHOCOLATE ICING
Ingredients
• 125g unsalted butter (at room temperature)
• 60g icing sugar, sifted
• 125g dark chocolate, melted and cooled
• Place the butter and icing sugar into the mixer bowl and mix until pale and creamy.
• Add the chocolate and beat until mixture is smooth and fluffy.
• Spread over the cooled down brownies. Enjoy once the icing has set.
PIZZA DOUGH
Ingredients
• 200ml lukewarm water
• 25g yeast
• 1tsp salt
• Splash of extra virgin olive oil
• 300g flour

12
1. Preheat your oven to 220°C.
2. Combine the water, yeast, salt in the mixer bowl.
3. Attach the dough hooks to the food mixer, lower into the mixer bowl and mix on a low
speed until the yeast dissolves.
4. Add the oil and flour and continue mixing until the dough becomes elastic and starts to
pull away from the bowl. Then increase the mixing speed and mix until the dough is
sticky and smooth.
NOTE: Do not mix the dough continuously for more than 5 minutes at a time.
5 Grease a large metal bowl with olive oil. Form the dough into a ball, transfer it to the
bowl and cover it with plastic wrap and a towel. Allow the dough to double in size for
approximately 2 hours in a warm place.
6. After rising, knead the dough for a few minutes with a little olive oil.
7. For a thin crust divide the dough in half and roll out on a lightly floured surface. For a
thicker crust stretch out all the dough with your hands and roll until it is the same size
as a large pizza pan.
8. Place rolled out dough onto a greased pizza tin or stone.
9. Spread sauce or cheese over the base and top with your choice of ingredients. Finish
with a sprinkling of grated mozzarella cheese.
10. Bake until crisp and the topping is hot and melted.

13
Disposal Instructions
Technical Information
Rated voltage: 220 – 240V~
Rated frequency: 50 – 60Hz
Rated Power Output: 800W
Protection Class: II (This appliance does not require an earth)
Maximum capacity of bowl: 5L
CORRECT DISPOSAL OF THIS PRODUCT
This Wheeled Bin symbol indicates that this product should
not be disposed of with other household wastes. To prevent
possible harm to the environment or human health from
uncontrolled waste disposal, recycle it responsibly to promote
the sustainable recycling of material resources. Contact your
local authority for recycling facilities in your area.

14
Notes:

15
Notes:

16
Customer Service Centre: 1300 554 124 Model#: HSM-199B / HSM-199R / HSM-199C
August 2020
One Year Warranty Statement
smith+noble appliances are guaranteed from the date of purchase for 1 year against manufacturing
defects and abnormal deteriorations when used in accordance with the care and use instructions for
normal domestic use. The warranty excludes damage resulting from product misuse or product neglect.
Please return at your expense, to a Harris Scarfe store for assessment by a team member. Once approved,
a like replacement or refund may be offered. Please keep your receipt as proof of purchase for this product
warranty. The benefits given by this warranty are in addition to other rights and remedies you may have
under Australian Consumer Law.
This warranty is provided in addition to other rights and remedies you may have under law. Our goods
come with guarantees that cannot be excluded under the Australian Consumer Law. You are entitled to
a replacement or refund for a major failure and for compensation for any other reasonably foreseeable
loss or damage. You are also entitled to have the goods repaired or replaced if the goods fail to be of
acceptable quality and the failure does not amount to a major failure.
Harris Scarfe Australia Pty Ltd. ABN 83 095 018 803
Level 4, 111 Cecil Street, South Melbourne, Victoria 3205 Australia
Ph: 03 9863 2200
customerservice@harrisscarfe.com.au
This manual suits for next models
2
Table of contents


