Smoke-N-Hot Outdoor Cooking Center User manual

150601
S m o k e - N - H o t ® G r i l l s
3 8 0 0 N E 6 8 th S t r e e t
V a n c o u v e r , W A 9 8 6 6 1
[ T ] 3 6 0 - 314- 2 0 1 2
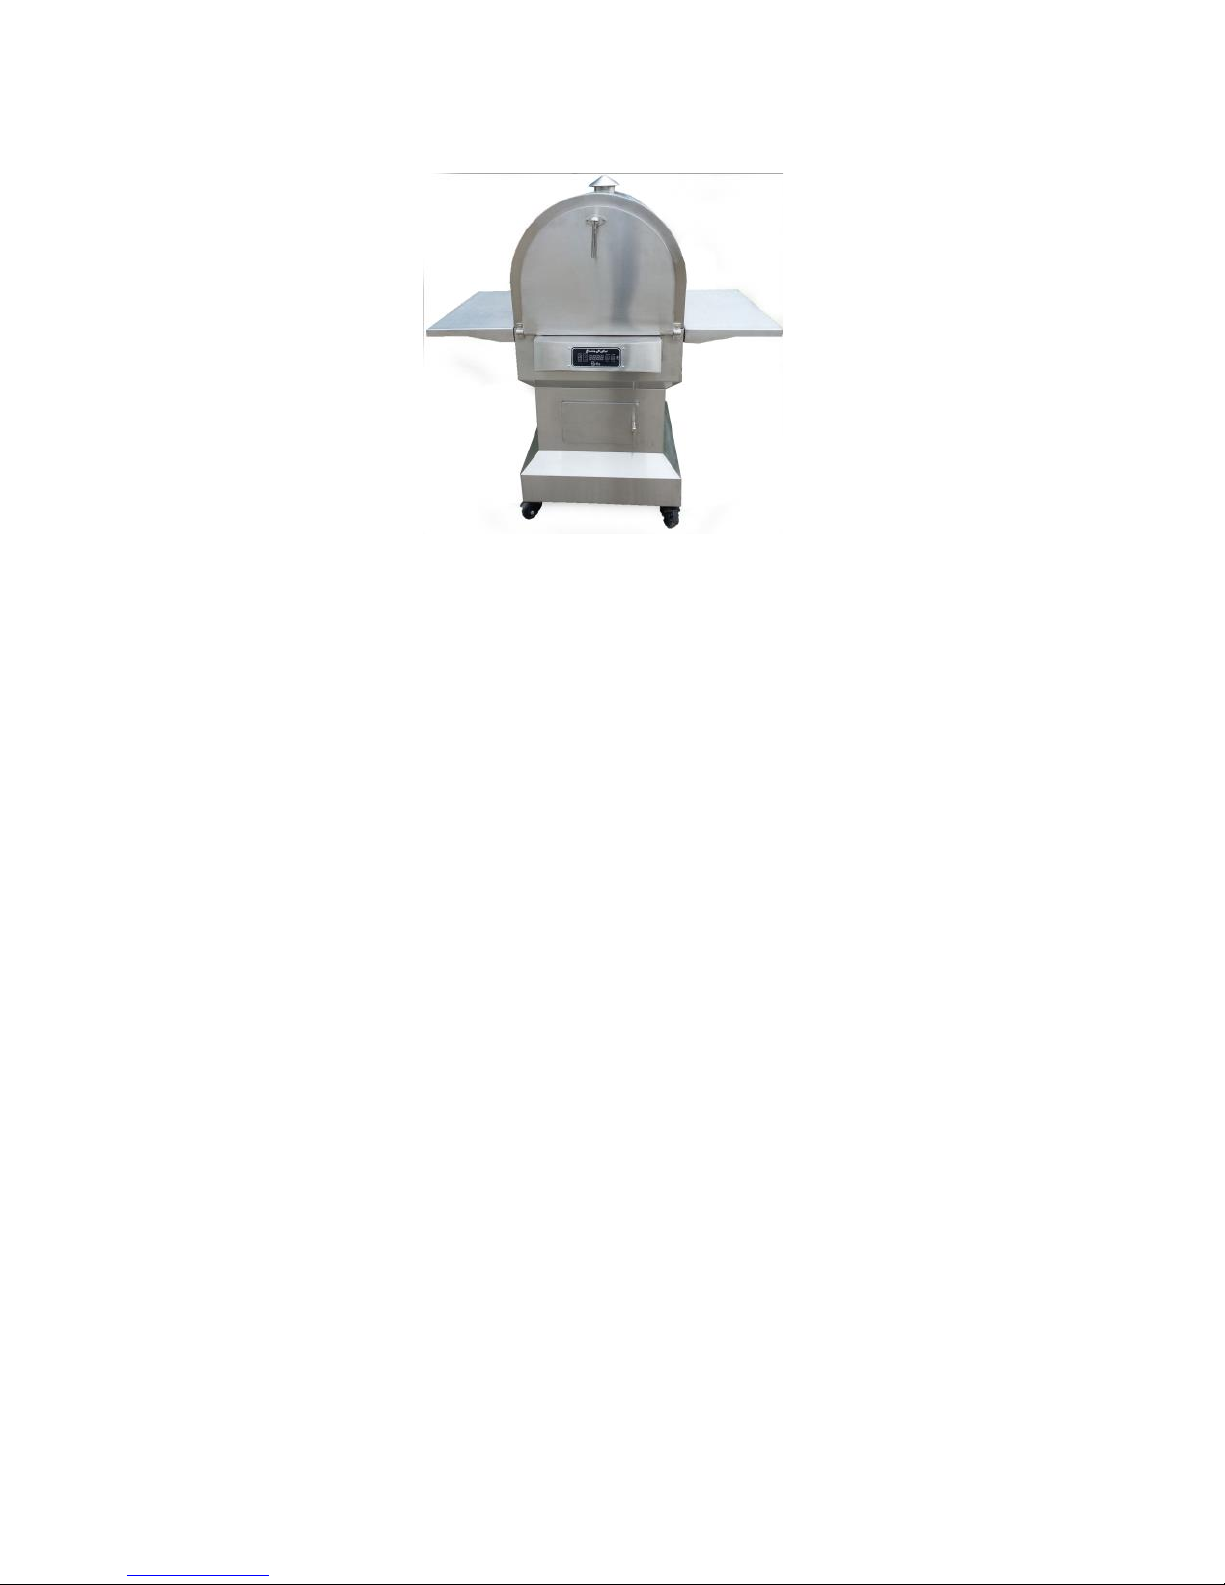
Smoke-N-Hot® Grill
Wood Fired Convection Outdoor Cooking Center
Welcome to the world of BBQ grilling and smoking with
the technologically superior
Smoke-N-Hot® Outdoor Cooking Center Grill

2
Smoke-N-Hot® ® Outdoor Cooking Center
Owner's Manual and User’s Guide
Congratulations on your purchase of a Smoke-N-Hot® grill. With proper care and maintenance, your grill will
give you years of trouble free operation. Please review the following information carefully for useful tips and infor-
mation that will help you utilize your grill’s extensive features and benefits.
Keep in mind that your Smoke-N-Hot® Grill is a true Convection Oven, with industry leading temperature con-
trol which automatically adjusts for outside ambient conditions and provides high-speed recovery for heat lost
through opening the lid. A true “set it and forget it”, way to Cook, Bake, Roast, Sear or Low and Slow Smoke; no
matter what the temperature is outside, the control will react to maintain your set point temperature. Just set and sit
back and enjoy.
We suggest you experiment with your new grill to discover just how many ways it adds to your cooking experience.
Impress your friends and family with your superior grilling talents. You’ll soon find that your Smoke-N-Hot® Grill
will become your cooking appliance of choice as it eliminates indoor heat and odors while yielding unbeatable re-
sults.
Please, take a few moments to register your grill using the form at the end of this booklet and note your model
and serial number in the space provided. This will register your warranty and provide easy reference to this infor-
mation in the future. Your model and serial number are located on the sticker under the hopper lid or on the box.
Thanks for choosing the Smoke-N-Hot® Grill!
Serial Number: ______________________ [Found on your shipping carton and grill body]
Date of Purchase____________________
My Dealer is_______________________________________
Smoke-N-Hot® Grills

3
Index Page
Welcome Page 2
Index 3
Packing List 4
Unpacking & Assembling Instructions 5
Safety Information 6
GFI Outlets 6
Read Prior To Lighting Your Grill 7
Smoke-N-Hot® Grill (How it works) 8
Overview and operating your Smoke-N-Hot®
Digital Control
9-11
Grease Fires 12
Manual Start Up: 13
Self-Cleaning and turning off your Smoke-N-Hot® Grill:
13
Information about BBQ Cooking Pellets 14
Flavored Pellet Guidelines 14
Periodic Grill Maintenance 14
Burn Pot and Igniter 14
Food Handling and Safety 15
Recommended Grilling Accessories 15-16
Approximate Smoking Times 17
Error Codes 18
Limited Warranty 19-20
Warranty Registration 22
Blank Page 23

4
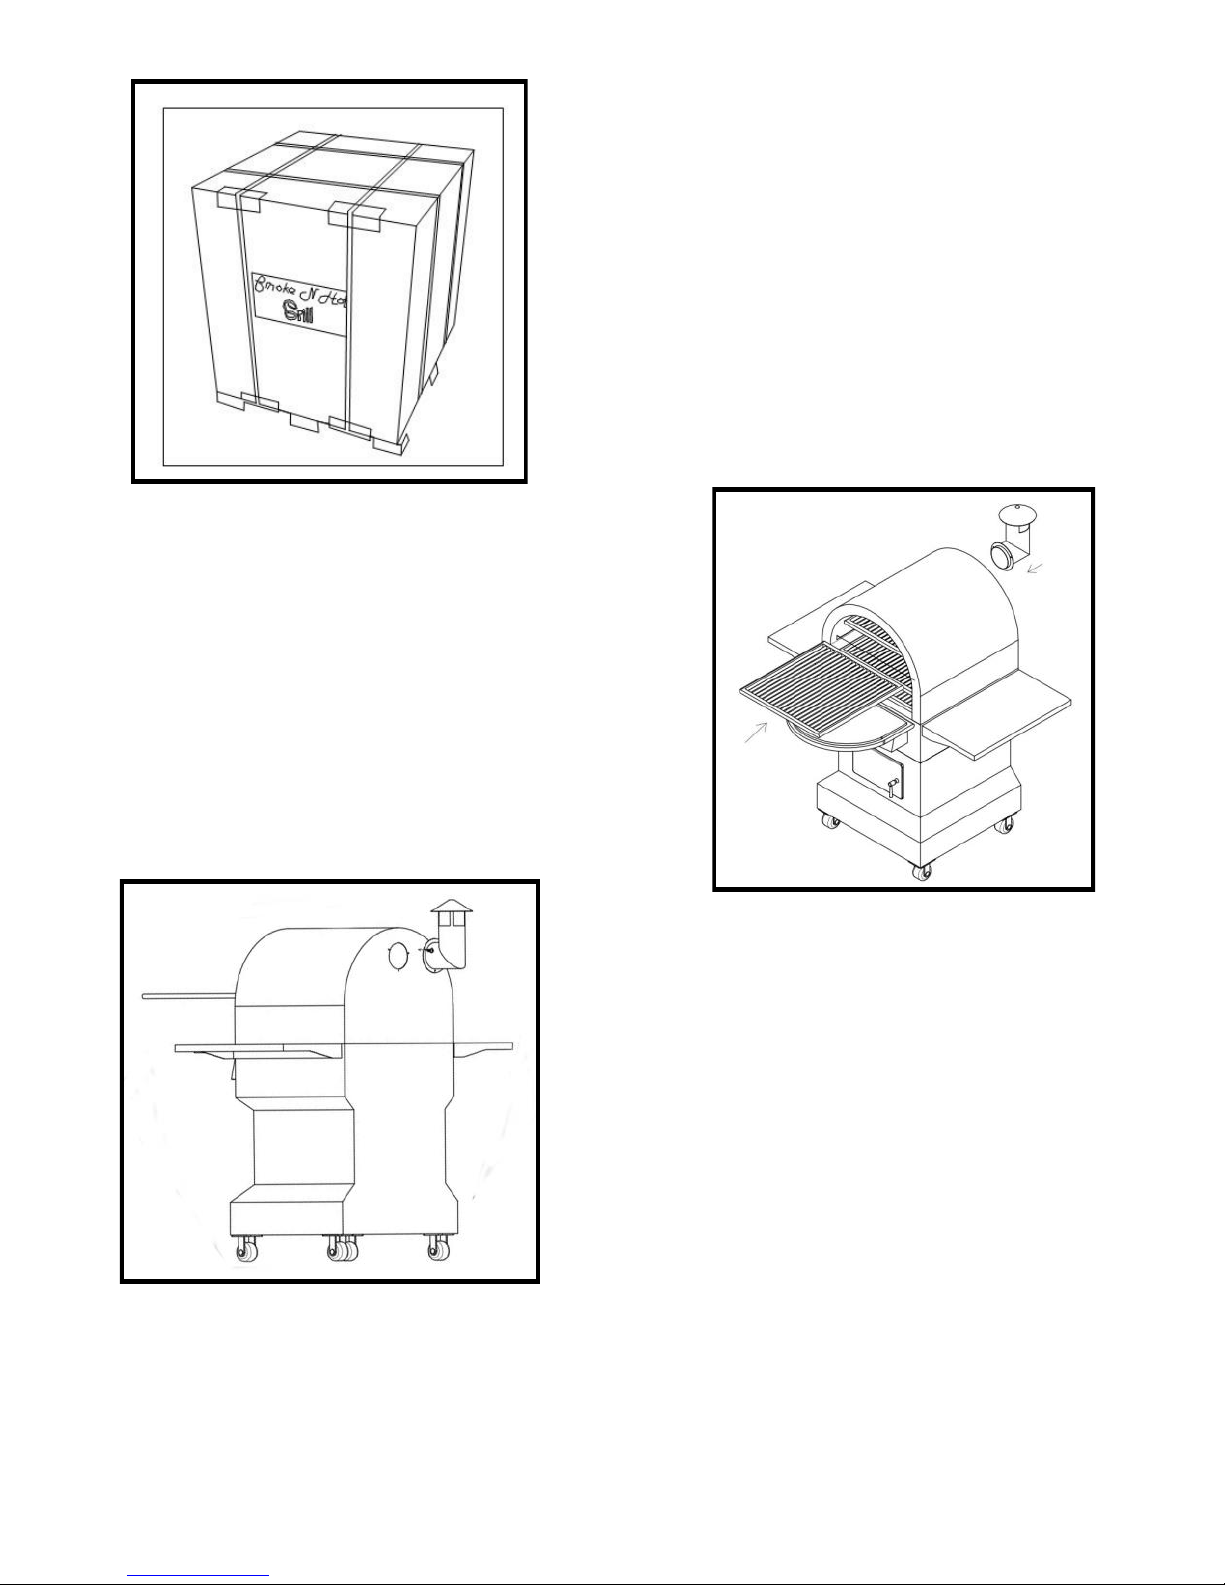
Unpacking and Assembling Your Smoke-N-Hot® Cooking center
Read all Safety Information Prior to Operating Grill!
Take care when opening boxes, they contain finished parts
Please note that during shipping some movement may have taken place, so a complete visual inspection is required.
Be sure to inspect entire grill after removing the protective shipping carton. Report any damage to
your retail dealer immediately. Shipping damage is not covered under warranty. You have 15 days to
file a hidden damage claim with the freight company.
Some surfaces may be sharp so wear gloves when assembling.
Do not plug in the grill until it's fully assembled, the plastic protective film is removed from all stain-
less steel surfaces, and you're ready to cook. See: “start-up procedure” for more details.
Your Master Carton will contain the following:
Box 1 Cooking Center Grill Assembly Cooking Grids [4] Chimney
Tools Required
#2 Phillips head screwdriver
CAUTION: If found, remove ALL protective plastic film from stainless steel surfaces after assembly of
the grill but before operation. It will melt and adhere to the SS!

5
ASSEMBLY INSTRUCTIONS
0. Read through these assembly instructions before
starting
1. Your grill will arrive in a carton as pictured in A.
Carefully cut the straps and remove the top car-
ton.
2. Inside the grill will be four cooking grids
[shelves ] and the chimney. Please remove
these. The flame shield remains in place.
3. Slide the cooking shelves in the correct spac-
es as determined by their width.
4. Unpack the chimney and mount on the rear
of the cooking center using the three screws
supplied.
5. Plug the power cord into the rear of the grill
and you are set to rock the BBQ world.
Notes:
A. Moving the grill in position over irregular ground may jar the shelves, burn pot, or flame shield. Be sure every-
thing is in the correct position before operation.
B. You may want to only use the number of cooking shelves necessary for the food you are cooking to reduce
cleanup

6
Warning: Read all Safety Information Prior to Operating Grill
For outdoor use only. Do not use in any enclosed area.
Keep grill 12” or more from any combustible surface.
To prevent Grease Fires, clean your grill on a regular basis. This includes the burner
hood.
Should a grease fire occur, turn off the grill, unplug the grill and leave lid closed until
the fire is out.
Do not put anything flammable on the shelf under the grill.
After a period of non-use, your Smoke-N-Hot® Grill should be checked for burn grate
obstructions. See cleaning instructions in this manual for correct procedures.
Accessible parts of the grill are very hot. Keep young children away while in use.
To avoid potential injury, never leave your grill unattended during cooking or cleaning if
children are present.
Do not use lava rocks or charcoal in your grill.
To avoid the chance of serious burns, never lean over an open grill or place hands or fin-
gers on the front edge of the cooking box.
Use heat-resistant barbeque mitts or gloves when operating this unit.
Make sure the fire is completely out and that the grill is completely cold before transporting
the grill. Never move your Smoke-N-Hot® Grill while operating or while the grill is hot.
GFI Outlets—Your Smoke-N-Hot® Grill will work on most GFI Outlets; the recommended
size 15 amps. If your GFI device is highly sensitive to power surges, it will very likely trip
during the startup phase of operation. At this part of the operation the sensitivity of the GFI
device may be too high or the GFI device too old. The quality of the GFI does not matter,
rather the sensitivity matters. Each time a GFI trips it increases in sensitivity.
The solution is to install a new GFI; one specifically rated for outdoor/damp locations or to
plug the grill into a non-GFI outlet.

7
Read Prior to Lighting!
Initial Burn Off
Prior to first use, if found, completely remove the plastic
film on all Stainless Steel Surfaces. Failure to do so will
cause the film to melt to the metal and it will be extremely
difficult if not impossible to remove.
Before cooking for the first time, we recommend that you Burn the grill to rid it of any
oils used in the manufacturing process. Remove the cooking grates and wash with a
mild soap and detergent. With the grates removed; light and set the grill to 450F (in
“cook mode”) with the lid down for 20 minutes. After burn off, turn the grill OFF and
replace the grates.
Grill Set-Up
Please be sure the burn pot is in place, the hopper has a supply of pellets and the lid
is closed, and the shelves are in the correct position.
A. The bottom shelf should be pushed all the way to the back as far as possible.
B. The top 3 cooking grids are pulled as far forward as possible.
These steps are important for the proper convection cooking air flow.
Lighting your Grill
Recommended practice is empty the burn pot as part of the normal maintenance pro-
cedure. Light as per instructions found in detail in this manual. Failure to light is most
likely due to a dirty or plugged burn pot and or a burn pot obstruction blocking the
auto igniter air passages. (Refer to Using Your Smoke-N-Hot® Grill for cleaning in-
structions.) Should your auto igniter fail to ignite the wood pellets, grill can be manu-
ally lit with a match and lighting agent. (Refer to Manual Lighting Instructions for
procedure)
Pre-Heating
It is extremely important to ALWAYS allow your grill to preheat and stabilize at 350° -
450°F before cooking. This allows the grill and grates to heat up and maintain proper
temperature once your food is introduced. If you don't allow the grill to preheat, you'll
find that it takes a longer period of time to bring both the grill and the food to cook-
ing temperatures.
Lid Position
Always cook with the lid closed. An open lid negates the convection air and lengthens
cooking times. Cooking with the lid closed keeps the temperature even, cooking the
food faster while using less fuel.
Cooking shelves
For easy basting or adjusting your food slide the cooking shelf out just like you would
for the oven in your home. You may want to add a tray or foil to catch any of the
drips from basting.

8
Smoke-N-Hot® -rod (How it works)
Your
Smoke-N-Hot® Grill
represents a new way of outdoor cooking. It's a true high quality convection oven
combining grilling baking and smoking capability
using time proven pellet-burning technology. With “State of the Art”
temperature control you’ll experience controlled, quick, savory and repeatable cooking results every time.
The perfect cooking experience starts with filling your hopper with all natural, 100% hardwood BBQ pellets.
Pushing the I/O Smart Start Button activates the “Electronic Igniter”, the combustion fan, and the auger. The auger
feeds the wood pellets from the hopper onto the burn pot, where the super-heated air ignites them. The
Outdoor
Cooking Center Control
allows you to set the desired cooking method and temperature and will automatically adjust
for ambient conditions. The convection fan provides combustion air to the burn pot as well as convective cooking air
evenly distributed throughout the cooking area. The Smoke-N-Hot® Grill’s unique natural smoke flavor is pro-
duced by the burning pellets, and the vapor produced by the juices dripping on the burner hood, and into the com-
bustion zone.
First Use
1. Prior to starting your cooking center, inspect the Burn area inside the grilling area. It's a recommended practice
to go through this procedure at initial startup and after every few uses to ensure peak performance. Actual frequen-
cy varies depending on usage and fuel type.
2. Make sure your Smoke-N-Hot® Grill is plugged into a 110 Volt AC outlet.
3. Open the Pellet Hopper Lid, found at the rear of your grill. Check for any foreign objects. Fill as necessary.
4. Open the main lid and clean the Porcelain Enameled Cooking Grates.
5. Open the Ash Door and Remove the Burn Pot.
6. Dump any ash from the burn pot.
7. Re-install the burn pot, making sure it's sitting flat after installation.
For the first use or after running the grill out of pellets you will need to prime the system. Turn on the grill; let it run
for 1 minute or until the auger motor stops turning. Turn the grill off & turn it on again until you hear pellets clinking
into the burn pot. Again turn the grill off and back on, the pellet feed system is primed and you are now set to pro-
ceed now.

9
Overview of your
Outdoor Cooking Center Control
.
Control I/O, ON/OFF Touch Pad
This pressure sensitive touch pad is used to turn the grill/appliance on and off.
Turning the grill “on” activates the automatic start-up mode and illuminates the digital LED readout.
Pressing the touch pad again activates the shutdown mode of the appliance.
The Smart Start touch pad allows electricity to flow to the electrical components for 20 minutes. When a temp of 165F is
reached, the igniter and startup feed rate will end and the appliance will operate in the desired cook or smoke mode at the set
temperature. Temperatures below 120°F may register as “Lo”
If 165F is not achieved after 20 minutes, the appliance will turn off.
When the Smart Start touch pad is used to turn off the appliance, the board will stop the auger from turning. The convection fan
will continue to run until the temperature drops to approx. 145F.
Grill / Meat Touch Pad
By pressing the Probe Display touch pad, the display will change between the temperature of the grill or the temperature of
the meat. The LED’s besides Actual or Set are used to indicate which temperature is presently displayed.
Temp (Temperature) LED Display Screen ;( Displays temperature and error messages),
By pressing the Display touch pad, the LED display screen will show either the actual temperature within the appliance or the set
-point. The LED besides actual or set-point is used to indicate which temperature is presently displayed. Note: it is normal for the
temp readout to vary from time to time. This is caused by pellets being placed in the burn pot and the pellets burning down until
the controller calls for more pellets to be placed in to the burn pot. This works similar to an oven when it turns off and on to main-
tain temperatures. As you preheat your grill, you will see larger deviations in temperature. After the grill is preheated and the
cooking temperature is set, the temperature will stabilize within a normal range.
When first started you will see a default temperature and then it will change to actual as the warm up process progresses. Note:
The temperature setting range is from 180F to 600F.

10
Operating Your Smoke-N-Hot® Grill
Outdoor Cooking Center
Temperature Control
About the Controller: The
ProGrill control is similar to
the control on your kitchen
oven. The big difference is the
ability to automatically com-
pensate for different ambient
conditions. This means that
you can cook outside whether
it's below freezing or desert
hot.
Automatic Start Up
1. To Start
Press the l/O Smart Start button to initiate the start cycle. At this time the igniter heats up, the Cook light on the
control flashes and the combustion fan starts. Additionally the auger will run continuously for approximately 60 sec-
onds to prime the grate for ignition. The Cooking Center will automatically start in 4-8 minutes. The igniter will turn
off automatically when either the internal temperature reaches 165º F or 15 minutes has passed. While the start-up
process is proceeding, complete steps 2, 3, & 4 to set-up the controller for pre-heat. The grill is pre-set to 450°F.
Always let your grill reach a temperature of between 350°F—450°F before setting a higher or lower cooking/smoking
temperature.
2. Insert Meat Probe
If using the meat probe insert the jack end of the probe into the control board followed by inserting the probe deep-
ly into the meat. Inserting the meat probe less than half way will result in reduced accuracy of the temperature
reading.
3. Set the TEMP DISPLAY Arrows to the desired temperature (Set light will illuminate) this will change
the displayed temperature to Set Temperature if it was previously displaying the actual temperature.
4. Set Meat DISPLAY to Set. (Set light will illuminate) and set the desired maximum cooking temperature of
the meat.
5. Set TEMP DISPLAY to Actual. (Actual light will illuminate)
Initially the current actual temperature in the cooking area will be displayed
. Note: Actual temperature will fluctu-
ate up or down. This is normal and represents the normal fluctuation of any oven.
Notes
1: Should the igniter fail to ignite in approximately 15 minutes the Cooking Center will shut down automatically and
the display will indicate error code 2.
2 Your Grill will smoke for a few minutes as the pellets are lighting and coming to full
3:
If the fire does not start, the Grill will continue to feed pellets and the fan will run for approximately 10-15
minutes. The grill will then automatically shut off. If this happens, some unburned pellets will build up in the burn
pot. To restart the fire, clean the excess pellets out of the burn grate and repeat the above steps.

11
5. To operate: When started, operate as follows;
Pre-Heat: A unique advantage of the
ProGrill
control is that when you turn it on and select your tempera-
ture, the
ProGrill
control will enter a
preheat and temperature learning cycle
. At this time your grill will both
preheat and compensate for current ambient conditions. After approximately 10-15 minutes (depending on
conditions and temperature settings) your grill will be ready for use and to maintain your desired cooking
temperature (see food preparation chart, Appendix A for recommended cooking temperatures)
Cooking: Temperature will be automatically maintained at your set temperature range. You may notice some
fluctuation up and down during this time. This is a normal part of any oven/appliance operation.
Smoking: Smoking is a variation on grilling and is one of the unique advantages of your Smoke-N-Hot®
Grill and gives you the temperature range for both, low and Hot Smoking. Low Smoke temperatures are be-
tween 180° and 225° produces a greater amount of smoke. Hot smoke mode set to temperatures between
225 and 295 will produce lighter smoke. Which method you use will largely depend on what is being smoked
(see Appendix B) and your personal preferences.
Smoke TIP: To vary smoke flavor intensity, experiment with the amount of time you use low and slow
cooking and the mix of flavored pellets you use along with the all-purpose pellets. This is more important if you use
stronger flavored pellets such as Mesquite. Switching to smoke mode soon after putting your food on the grill allows
the smoke to penetrate the meats before they have a chance to sear closed. Smoking works best when a longer
cooking time is required, such as large cuts of meat, fish, or poultry. Experiment with the length of time you leave
for smoking, before cooking thoroughly. Try different combinations of both modes. Some chefs prefer the smoke
mode at the end of cooking and to keep the food warm until ready for serving.
You can return to higher temperature cooking at any time by pressing the set button to set the temperature
(set light will illuminate). It is fine to go from very high heat (above 400°) to smoke Mode directly but be
sure to open the lid for a short time to help drop the temperature quickly.
Note: If the set temperature is reduced from a high temperature to a low temperature, it may take 15-20
minutes for the Smoke-N-Hot® grill to reach the new set-point.
6. Meat Probe Set Point –When the meat being cooked reaches the set point, the grill will default to a tempera-
ture of 180° to prevent the meat from being overcooked and will be ready for you when you are ready to eat.
7. Flame Shield –In addition to indirect grilling and smoking you have the option of direct cooking by opening the
sliding door on the top of the flame shield. Cooking this way full time or only at the end of the cook cycle just use a
grill tool to slide the door to the back and enjoy the benefits of direct cooking.

12
GREASE FIRES
CAUTION: Grease fires are caused by excessively greasy food; examples would be large whole chick-
ens or whole ducks. Not properly maintaining your grill by cleaning the grill after cooking greasy food,
or failing to clean ash from the burn pot on a regular basis could result in poor performance or a grease
fire.
In the unlikely event you experience a grease fire while cooking, remove your food and close the lid. If
the grease fire does not go out within 5 minutes, open the lid and lightly sprinkle baking soda on the
fire. Be careful not to burn yourself. If the fire remains, unplug the grill and shut the lid until the fire is
completely out. Once the grill cools to 120F, restart using the normal starting procedure.
Because grease and grilling are always companions, you should consider putting your grill on a grill
mat if there is concern about your deck or patio surface being stained. The handling of greasy items
such as roast chicken or the application of marinades or sauces may cause drips and stains that you
would want to protect your deck or patio from.
The Smoke-N-Hot® Grill has an advanced grease containment system. Grease that
is not consumed in the cooking operation will be channeled to one of the two
built in grease trays on the left and right sides. Please be sure the grease trays
are installed correctly and are cleaned out periodically.

13
Manual Start Up:
In case of igniter failure, you can start your Smoke-N-Hot® Grill manually.
Remove the porcelain enameled steel grills and the flame deflector.
Inspect the stainless steel burn pot to ensure that is clean of debris and that the igniter air holes are not ob-
structed. Also check to ensure proper placement of the burn grate.
Place a small handful of pellets in the bottom of the burn grate. Add a small amount of solid fuel fire starter,
such as those made from sawdust and wax or use wood shavings.
Add a small amount of fire-starter to the pellets on the burn grate. CAUTION: DO NOT USE FLAMMABLE
LIQUIDS SUCH A GASOLINE, GASOLINE-TYPE LANTERN FUEL, KEROSENE, CHARCOAL
LIGHTER FLUID, OR SIMILAR LIQUIDS TO START OR FRESHEN-UP THE FIRE! KEEP ALL
SUCH LIQUIDS WELL AWAY FROM THE GRILL WHILE IT IS IN USE.
Light the fire starter from the front access door of the combustion chamber through one of the vent holes.
Turn the ProGrill Control on by following steps 1-5 as noted in Automatic Start upon page 10
As soon as pellets are burning briskly, replace the porcelain enameled flame deflector and cooking grates. Your
grill will begin to produce smoke while the startup cycle is taking place. Close the lid.
Self-Cleaning and turning off your Smoke-N-Hot® Grill:
Your Smoke-N-Hot® Grill will give you many years of service with minimum cleaning. An important step is allow-
ing the grill and cooking grates to “Self Clean” by running the grill at a high temperature for 10-15 minutes after
each (use or before the next use). While the grill is still burning, make sure the control is in the “cook” mode and
use the display to set the temp to 600°. Let the grill burn off any residue inside the grill for 10-15 minutes and then
shut off.
To shut cooking center off, press l/O Smart Start. The fuel feed will stop. When internal temperatures have cooled to
approximately 120° the convection fans will automatically shut off. After the cooking center cools, clean the outside
with a mild detergent and soft rag. Cover the cooking center with the optional cover.
Note: If grease or smoke dis-
coloration is allowed to stay for long periods of time you may need a stronger cleaner to remove. Frequent through
cleanings are strongly advised.

14
Information about BBQ Cooking Pellets
Flavored pellets come in a variety of flavors such as Mesquite, Alder, Apple, Hickory, Maple and Cherry to name the
most common. They contain approximately 8,200 BTU’s of heat per pound; have very little ash and low moisture
content. Cooking pellets are 100% compressed hardwood, they are not heating pellets. Smoke-N-Hot® brand Pellets
will always provide the best hardwood flavor in your grill. Also please understand that pellets are compressed wood
and if mishandled will become saw dust. When loading the pellet hopper be sure that you are loading pellets and not
loose saw dust from broken/crumpled pellets. Flavored Pellet Guidelines
Mesquite yields a woodsy flavor to grilled foods and is often used with poultry. Hickory intensifies the flavor of food
with a robust, tangy taste suited to beef, pork or lamb. Apple or most any fruitwood adds a smoky, mild sweetness
and is highly recommended for baking bread, chicken and pork.
Flavor is an individual taste and we suggest you try the different flavors or combination of flavors to find the combi-
nations that suit your needs and tastes.
Caution: some wood pellets produced for heating fuel have a high content of softwood or
even recycled wood furniture which can include pitch, chemicals or glues and should not be
used for cooking. To be sure you are using clean burning pellets manufactured for cooking,
purchase 100% BBQ cooking pellets. Store pellets in a dry location for optimal performance.
Periodic Grill Maintenance
Stainless Steel Working Surfaces
ALWAYS clean dirt and dust off all stainless steel surfaces before you begin to cook. The dirt can cook into the metal
and discolor it. Dirt can be easily cleaned with hot soapy water and a soft cloth. There are also many commercial
products made to clean and protect your stainless steel surfaces. For light cleaning you can use the Scotch Brite No
Scratch blue pads in the direction of the SS texture.
Porcelain Enamel Surfaces
These surfaces can take heavy scrubbing and washing to keep as clean as you like. They do not like to be dropped
so handle with care when cleaning or moving. Your cooking grids will clean well in the dish washer.
Painted Surfaces
Your painted surfaces have a very durable high temp powder coat finish. The surfaces can be cleaned with mild
soap and water and wiped with a soft rag.
Flavor enhancer
From time to time you may need to brush off any burnt residue. The best time to clean is when you go through the
initial set-up / cleaning procedures and after every 5 to 10 uses.
Firebox and Hood
Because the firebox is used to channel the fan forced air into the burn grate, there is very little maintenance to be
done in this area. Occasionally, you may either vacuum or brush out any build-up of ash or burn debris that has fall-
en below the burn grate. Remove any accumulation of grease or debris on the inside surfaces.
Burn Pot and Igniter
Periodically check the air holes found in the burn pot for any blockages or build-ups. Using a wire brush, scrape off
any build up or blockage. When reinstalling, confirm the proper positioning in the burn pot. The burn pot should
slide in the housing rails easily with the igniter protruding into the burn pot. You will also want to visually check the
air holes in the igniter tube. Clean any debris or blockage out of both areas to ensure a perfect start.
Grease Trays
Based on cooking specific foods the grease trays may require cleaning more or less often. To clean the trays, re-
move them; wipe out any excess grease, followed by washing with soap and warm water. Be sure to never run the
grill without the grease trays in place.

15
Food Handling and Safety
Following are some basic hints for food safety. Number one rule is if in doubt about the safety of any food item, er-
ror on the side of caution! Make sure your hands are clean before handling food. Be sure you wash your hands thor-
oughly after handling fresh meat, fish and poultry. Prevent the cross contamination of bacteria by using separate
platters and utensils for raw and cooked food. To prevent cross contamination, use different utensils for each bast-
ing function.
Bacteria are living organisms that grow and multiply rapidly in warm, moist foods. A marinade should never be saved
to be used another day. If you are going to use it to serve with your meat, be sure to bring it to a boil before serv-
ing. Keep hot foods hot (above 140ºF) and cold foods cold (below 37ºF). Don't leave hot foods out of refrigeration
for more than two hours. Cooked foods and salads should not be left out in the heat for more than an hour. Fill a
deep tray or casserole dish with ice to keep salads cool and safe. Don't defrost meat at room temperature or on a
counter top. Marinate meat in the refrigerator. Always use a meat thermometer to determine the internal tempera-
ture of the foods you are cooking. It’s a good idea to put grilled food onto a heated platter, to help keep the food
warm. Steaks benefit from resting for several minutes before serving. This seals those delicious juices in the meat.
Grilling Accessories you may wish to have.
Aluminum Foil
Extra-strength foil is always useful for grilling. Used to make foil packages, cover food, or to fold up into a flat dish
to act as a drip pan. Also used to speed up cooking, protect bones from burning, and to keep foods warm.
Basting Brush
You may need a selection of these because you should not use the same brush in two different marinades. Use to
apply your favorite sauces and marinades to foods on the grill. Again look for one with a long handle to keep your
hands away from the heat. Natural bristles that are cut at a 45* angle make it easier to baste large cuts of meat.
Drip / Roast Pans
Used to prevent flare-ups, keep food from drying out, eliminate basting, and catch those flavorful juices that drip
from the meat. Various juices can also be added to the pan to impart a desired flavor, such as apple, lemon, cran-
berry, pineapple, any cola, etc. Drip pans are also useful when cooking extra greasy foods like a large whole chicken
or a whole duck.
Grill Baskets
Perfect for cooking foods that are difficult to handle on the grill, such as vegetables, seafood, fish and certain cuts
of meats. Usually made out of nickel-plated steel these baskets are made of two identical halves being held together
with hinges. Not only do they protect food, and make handling easier, but also allow for different foods to be com-
bined and grilled together without piercing the food.
Griddle
Use to griddle complete breakfasts, grill sandwiches, and toast fajitas. Cook all your bacon and sausages outdoors,
and they’re great for grilling vegetables, stir-frying, and searing.
Cooking Racks
Roast racks and rib racks are a great way to increase your cooking pleasure. Roast racks can be used to enhance the
convective cooking capabilities of your grill, by allowing the smoke flavored air to move around the entire roast
evenly. Rib racks are a great way to increase your capacity of your grill for those large gatherings. They can also be
used for chops and chicken pieces. (Additional small grates are available for purchase and will allow you to signifi-
cantly increase your total cooking surface.)

16
Tongs
Use tongs rather than a fork for turning and handling meats to avoid losing the natural juices. Extra-large ones with
long handles allow you to grip a variety of delicate foods. A must for turning those delicious burgers and fish filets.
Again, look for a long, sturdy handle and the widest blade possible. The holes in the blade prevent the build-up of
steam, which could make your food soggy.
Kabob Skewers (wood or metal)
Wood skewers adhere better to meat than the metal ones. When using the wood skewers, remember to soak them
in water for at least 30 minutes before using to prevent them from burning in the heat of the grill. Another way to
protect them would be to wrap the exposed ends with aluminum foil. Metal skewers should be those with flat blades
or dual prong. The flat skewer is designed to prevent the food from rotating when you turn the skewer. The dual
prong skewers hold all foods more securely and are ideal way to hold delicate meats and vegetables.
Metal Brush
It is important to clean your grill thoroughly before each use. A long handled brush with metal bristles is the best
tool for the job.
Skillets and Woks
These baskets allow you to stir-grill vegetables, seafood, and other small pieces of food the same way you would if
you were indoors. The holes allow the smoke and flavors to reach the food.

17
Grilling & Grease: Because greasy foods can lead to a grease fire in your grill [see page 13] it is recommended foods that
produce grease such as hamburger, chicken pieces, roasts either be smoked in the 200° range or cooked in the 400°+
range to allow the fat drippings to be burned off as they are produced. Also consider the use of a drip pan to catch fat and
juices so they can be used later for sauces and gravies.
Approximate Smoking Times for
Smoke-N-Hot® Grill
Always use a meat thermometer to be sure meats and poultry are cooked to a safe inter-
nal temperature and doneness. Serious Health risks may exist with undercooked meat!
Approximate cooking times are, from various sources and are based on meat at refrigerator tem-
peratures. Use a good quality temperature probe to assure best results. We suggest that when
grilling at higher temperatures, you apply barbecue sauce only during the last 15 to 30 minutes of
grilling to prevent excess browning or burning. NOTE: Keep lid closed when using Smoke Mode.
Smoking times are largely dependent on personal preference and the quality of the meat
being smoked. In general the longer you smoke the meat at a lower temperature the
more tender the meat will become. Y ou w ill also need to consider how much of a smoke
taste you want and what flavor of smoke. Oak, Hickory, Apple, Alder, Cherry, Mesquite to name
the most common. Here again that is largely a matter of personal preference.
For best results we recommend that you use a set point temperature in Smoke Mode from 225-
275° for most meats. If you wish to have a smokier flavor and have the time, you can go as low as
180°, but you usually don’t gain much by doing that. Always use a meat thermometer to be sure
meats and poultry are cooked to a safe internal temperature and doneness.
The following is a general guide and we recommend you experiment to find what temperature and
flavor best suites your personal taste. If you want to finish faster use higher temperature. Note:
this will in most cases result in a less tender product. When you have the time the lower tempera-
ture for a longer time will give you the best results. For additional tips and to view and share a
recipe go to www.smokenhotgrills.com/recipe
Item Control Set Point
°F
Internal Temp
°F
Beef 450—525 140 to 160
Ham 225-275 140 to 170
Lamb 225-275 145 to 160
Pork, Fresh 300-400 160 to 180
Pork, Pulled—See complete recipe on
the web site.
220-225 190
Veal 225-275 145 to 160
Venison 225-275 145 to 160
Chicken 200-450 170-180
Duck or Goose 200-450 180 to 185
Turkey 200-425 180 as measured in the thigh

18
Error Codes
Your Smoke-N-Hot® Grill control has built in error codes to help diagnose the system should cooking be interrupt-
ed. The error codes below will be displayed in the area where the temperature is normally displayed.
Display = ER-1
Grill Probe is bad or unplugged from the Control Board
What to do –You will probably need a service call by the dealer you purchased the grill form.
Display = ER-2
Grill did not light and reach hot grill temp (165°F) within allotted time- about 20 min
What to do –The most common cause of this is no pellets, check your hopper and reload pellets if
necessary. If you have run out of pellets you can use the manual feed to fill the empty auger system.
Display = ER-3
Power applied to the grill and the probe was above hot grill value (165°F) indicates a loss of power
during a run cycle
What to do –If there is fire in the burn pot, restart the grill normally. If the fire in the burn pot has
gone out yet the grill is still at a temperature over 165°F the ignition sequence of the program will not
occur. If this occurs, leave the lid to the grill open for a few minutes and then start the grill normally.
Display = NoPr
Meat Probe display is selected but the meat probe is not plugged in.
What to do –Either plug in the meat probe being sure to insert the probe well in to the meat being
cooked or ignore the message by pushing the grill button.
Display = ER-4
Please contact Smoke-N-Hot® grill customer service.
If any questions about grill operation please contact your local dealer or call or email Smoke-N-Hot® Grills; we are
here to help you.

19
5 Year Limited Warranty
Smoke-N-Hot® Grill
This limited warranty covers products manufactured by Smoke-N-Hot® Grills. Products carry a 60 Month limited warranty from
the date of purchase by the original owner against defects in material and workmanship. Electronic and electrical components
carry a 24 month replacement warranty when subjected to normal residential use. Limited warranty does not apply to paint,
porcelain enamel, burn pot, burn grate, grill cover, gaskets or damage caused from corrosion.
Conditions of Limited Warranty
1. During the term of the limited warranty, Smoke-N-Hot® Grills
obligation shall be limited to replacement of covered, failed components, F.O.B. point of shipment. Smoke-N-Hot® Grills will
repair or replace parts returned to Smoke-N-Hot® Grills freight prepaid, if the part(s) are found by Smoke-N-Hot® Grills to be
defective upon examination. Smoke-N-Hot® Grills shall not be liable for transportation charges, labor costs, or export duties.
Except as provided in this CONDITIONS OF LIMITED WARRANTY, repair or replacement of parts in the manner and for the
period of time stipulated hereunder shall constitute the fulfillment of all direct and derivate liabilities and obligations from Smoke-N
-Hot® Grills to you.
2. The warranty coverage begins on the original date of purchase as stated on the sales receipt. Product registration may speed
up your warranty claim.
3. Repair or replacement of the Smoke-N-Hot® Grill component does not extend the limited warranty.
4. Pouring liquids on or in your Smoke-N-Hot® Grills product will void this warranty.
5. Smoke-N-Hot® Grills takes every precaution to utilize materials that retard rust including the use of high-temperature paint
where advisable. Even with these safeguards, the protective coatings can be compromised by various substances and condi-
tions beyond Smoke-N-Hot® Grills control. High temperatures, excessive humidity, chlorine, industrial fumes, fertilizers, lawn
pesticides and salt are some of the substances that can affect paint and metal coatings. For these reasons, the limited warran-
ties DO NOT COVER RUST OR OXIDATION, unless there is loss of structural integrity on the grill component. Should any of the
above occur, refer to you Instruction Manual’s maintenance section for paint or porcelain enamel finish protection or repair.
Smoke-N-Hot® Grills recommends that you purchase a Smoke-N-Hot® Grills full-length protective cover for your grill when not
in use.
6. The warranty is based on residential use. Warranty coverage does not apply to products used in commercial applications.
Exceptions to the Limited Warranty
There is no written or implied performance warranty on the Smoke-N-Hot® Grills products, as the manufacturer has no control
over the installation, operations, cleaning, maintenance or the type of fuel burned.
This limited warranty will not apply nor will Smoke-N-Hot® Grills assume responsibility if your product has not been installed,
operated, cleaned and maintained in strict accordance with the manufacturer's instructions. Burning anything other than premium
wood pellets may void the warranty. The warranty does not cover damage or breakage due to misuse, improper handling or
modifications.
NEITHER THE MANUFACTURER, NOR THE SUPPLIERS TO THE PURCHASER, ACCEPTS RESPONSIBILITY, LEGAL OR
OTHERWISE, FOR THE INCIDENTAL OR CONSEQUENTIAL DAMAGE TO THE PROPERTY OR PERSONS RESULTING
FROM THE USE OF THIS PRODUCT. ANY WARRANTY IMPLIED BY LAW, INCLUDING BUT NOT LIMITED TO IMPLIED
WARRANTIES OF MERCHANTABILITY OR FITNESS, SHALL BE LIMITED TO ONE (1) YEAR FROM THE DATE OF ORIGI-
NAL PURCHASE. WHETHER A CLAIM IS MADE AGAINST THE MANUFACTURER BASED ON THE BREACH OF THIS
WARRANTY OR ANY OTHER TYPE OF WARRANTY EXPRESSED OR IMPLIED BY LAW, MANUFACTURER SHALL IN NO
EVENT BE LIABLE FOR ANY SPECIAL, INDIRECT, CONSEQUENTIAL OR OTHER DAMAGES OF ANY NATURE WHATSO-
EVER IN EXCESS OF THE ORIGINAL PURCHASE PRICE OF THIS PRODUCT. ALL WARRANTIES BY MANUFACTURER
ARE SET FORTH HEREIN AND NO CLAIM SHALL BE MADE AGAINST MANUFACTURER ON ANY ORAL WARRANTY OR
REPRESENTATION.
Some states do not allow the exclusion or limitation of incidental or consequential damages, or limitations of implied warranties,
so the limitations or exclusions set forth in this limited warranty may not apply to you. This limited warranty gives you specific
legal rights and you may have other rights, which vary from state to state.

20
The limited warranty for 60 months is in lieu of all other warranties expressed or implied, at law or otherwise, and Smoke-N-Hot®
Grills does not authorize any person or representative to assume for Smoke-N-Hot® Grills any obligation or liability in connection
with the sale of this product. This means that no warranties, either expressed or implied, are extended to persons who purchase
the product from anyone other than Smoke-N-Hot® Grills or an authorized Smoke-N-Hot® Grills dealer.
Procedure for Warranty Service
Call your nearest Smoke-N-Hot® Grills dealer for repair or replacement of your “in-warranty” parts.
Be prepared to furnish the following information:
1. Purchaser’s name, model and serial number of grill and date of purchase or a copy of the sales receipt.
2. A complete description of the problem.
Having written the required language for a warranty, please remember we are here to help you, call or email and we will help sot
out any problems or cooking questions.
Smoke-N-Hot® Grills
3800 NE 68th Street
Suite D
Vancouver, WA 98662
[T] 360-314-212
[E] support@smokenhotgrills.com
Table of contents
Other Smoke-N-Hot Grill manuals
Popular Grill manuals by other brands

AICOOK
AICOOK GC5006-GS user manual

CONTINENTAL EDISON
CONTINENTAL EDISON CERP6PERS2 Instruction booklet

Sunco living
Sunco living SC5712P Assembly & operating manual

Gasmate
Gasmate ODYSSEY BQ10622MG manual

Landmann
Landmann Black Dog 28 Assembly and operating instructions

Landmann
Landmann 31341 Assembly and operating manual