Snapper Pro S200X Series User manual

M
S200XSeries
Model Number:
5900664
5900692
5900695
5900693
5900694
Description
S200XKAV2561,25HP Kawasaki,61" CutZero-TurnRiding Mower
S200XKOH2761,27HP Kohler,61" CutZero-TurnRidingMower
S200XKAV2761,27HP Kawasaki,61" CutZero-TurnRiding Mower
S200XBV32,32HP Briggs& Stratton Zero-TurnRiding Mower
$200X/72,72" Mower Deck
Briggs & Stratton Yard PowerProductsGroup
5375 North Main Street
Munnsville, NY 13409
800-933-6175
5101090
RevisionC
Rev.Date:9/2007
TP100-7332-C-M2-SP

Thankyoufor purchasingthis quality-built SnapperPro product. We're pleasedthat
you've placedyour confidencein the SnapperPro brand. When operatedand maintained
accordingto the instructions in this manual,your SnapperPro product will provide many
yearsof dependableservice.
Thismanualcontainssafetyinformationto makeyou awareof the hazardsand
risksassociatedwith this machineand howto avoidthem. This machineis designedand
intendedto beusedand maintainedaccordingto the manualand operatedbytrained
professionalsfor finish cutting of establishedlawnsandis not intendedfor any other
purpose. It is importantthat you readand understandthese instructionsthoroughly
beforeattemptingto start or operatethis equipment
Unit Model Number Unit SERIALNumber
MowerDeck Model Number MowerDeck SERIALNumber
DealerName Date Purchased
Engine Make
EngineType/Spec.
EngineModel
EngineCode/SerialNumber
SeeFeaturesand Controls for the location of identification Numbers
DATEPURCHASED
Briggs & Stratton Yard Power Products Group
Copyright © 2007 Briggs & Stratton Corporation
Milwaukee, Wl, USA. All rights reserved.
TheSnapper Pro logo is a trademark of Briggs & Stratton
Corporation Milwaukee,Wl, USA.
Contact information:
Briggs & Stratton Yard Power Products Group
5375 N. Main St.
Munnsville, NY 13409-4003
(800) 933-6175
www.SnapperPro.com
AWARNING
The engine exhaustfromthis productcontainschemicals
knowntotheState of California tocausecancer,birth
defects, or other reproductive harm.

Tableof Contents
OperatorSafety..................................................... 2
Safety Rules and Information ...........................................2
Safety Decals..................................................................11
Safety interlock System..................................................12
Features& Controls .............................................. 13
Identification Numbers...................................................13
Control Functions ...........................................................14
Operation........................................................... lti
General...........................................................................16
ChecksBeforeStarting ...................................................16
CheckingTire Pressures.................................................17
SeatAdjustment .............................................................17
Mowing Height Adjustment ............................................18
Foot PedalAdjustment....................................................18
Raiseand Lowerthe Roll Bar.........................................19
Starting the Engine.........................................................20
Stopping the Rider..........................................................20
Pushingthe Rider by Hand.............................................20
Zero Turn Driving Practice..............................................21
Mowing...........................................................................23
Mowing Reccomendations.............................................23
Mowing Methods............................................................24
Attaching a Trailer...........................................................25
Regular Maintenance ............................................ 26
MaintenanceSchedule....................................................26
Checking/AddingFuel.....................................................27
FuelFilter........................................................................27
Oil & Filter Change..........................................................27
Lubrication......................................................................28
CheckHydraulicOil Level...............................................29
Hydraulic Oil Filter Change.............................................29
Servicing the Mower Blades...........................................30
Ground SpeedControl LeverAdjustment .......................32
Speed BalancingAdjustment..........................................32
NeutralAdjustment .........................................................33
Parking BrakeAdjustment ..............................................33
Return to NeutralAdjustment .........................................34
DeckRodTiming Adjustment .........................................35
DeckLevelingAdjustment ..............................................35
Mower Belt Replacement................................................36
Hydraulic Pump Drive Belt Replacement........................37
BatteryMaintenance.......................................................38
BatteryService ...............................................................39
Storage...........................................................................41
Starting After LongTerm Storage...................................41
Troubleshooting................................................... 42
Troubleshooting the Rider..............................................42
Troubleshooting the Mower............................................43
Troubleshooting Common Cutting Problems..................44
Specifications ...................................................... 45
NOTE.In this manual, "left" and "right" are referred to as seen
from the operatingposition.

OperatorSafety
OperatorSafety
Safety Rules and Information
OPERATINGSAFETY
Congratulations on purchasing a superior-quality pieceof lawn and
garden equipment. Our products are designedand manufactured to meet
or exceedall industry standardsfor safety.
Donot operatethis machine unless you havebeentrained. Readingand
understanding this operator's manual is a way to train yourself.
Powerequipment is only as safe asthe operator. If it is misused, or not
properly maintained,it can be dangerous! Remember,you are
responsiblefor your safety and that of those around you.
Usecommon sense,and think through what you aredoing. If you are
not surethat the task you areabout to perform can be safely done with
the equipment you havechosen,ask a professional: contact your local
authorized dealer.
READTHEMANUAL
Theoperator's manual contains important safety information
you need to be awareof BEFOREyou operateyour unit as
well as DURINGoperation.
Safeoperating techniques, an explanation of the product's
featuresand controls, and maintenanceinformation is
included to helpyou get the most out of your equipment
investment.
Be sureto completely readthe SafetyRules and Information
found on the following pages. Also completely read the
Operationsection.
CHILDREN
Tragic accidents canoccur with children. Do not
allow them anywhere near the areaof operation.
Childrenare often attracted to the unit and mowing
activity. Neverassumethat children will remain
where you lastsaw them. Ifthere is a risk that
children may enter the areawhereyou are mowing,
haveanother responsibleadult watch them.
2www.SnapperPro.com

OperatorSafety
2O
5.4
SLOPEOPERATION
Operationon slopes can be dangerous. Using theunit on a slope that is
too steepwhere you do not haveadequatewheeltraction (andcontrol) can
cause sliding, Jossof steering, control, and possible rollover. You should
not operateon a slope greaterthan a 5.4 foot rise over a 20 foot length (15
degrees).
Always mow across slopes, not up and down (to maintain traction on the
wheels) and avoidsudden turns or rapid speedchanges. Reducespeedand
useextremecaution on ALL slopes.
Also, notethat the surface condition you are on can greatly impactyour
ability to safelyoperatethis machine. Operatingon wet or slippery slopes
can causesliding and loss of steering and control. Donot operateon
slopes that are slippery, wet, or havesoft soil conditions.
If you feel unsureabout operating the unit on a slope, don't do it. It's not
worth the risk.
THROWNOBJECTS
This unit has spinning mower blades. Thesebladescan pick up andthrow
debris that could seriously injure a bystander. Be sureto clean upthe areato
be mowed andremove objects that could bethrown by the blade BEFOREyou
start mowing.
Do not operatethis unit without the entire grass catcher or discharge guard
(deflector) in place.
Also, do not allow anyonein the areawhile the unit is running! If someone
does enterthe area,shut the unit off immediately until they leave.
MOVINGPARTS
This equipment has many moving parts that can injure you or
someone else. However,if you stay in the operator zone(stay
seated in the seat), and follow the safety rules in this operator's
manual, the unit is safe to operate.
Themower deckhas spinning mower bladesthat can amputate
hands and feet. Donot allow anyonenear the unit while it is
running! Keepsafety devices(guards, shields,and switches) in
placeand working.
Tohelp you, the operator, usethis equipment safely, it is
equipped with an operator-present safety system. Do NOT
attempt to alter or bypassthe system. Seeyour dealer
immediately if the system does not pass all the safety interlock
system tests found in this manual.

OperatorSafety
ROLL BAR USE
Keep the roJJ bar JRthe raised position and fasten the seat
belt. There is no roll over protection when the roll bar is
down! Do not jump off if the mower tips (it is safer to be
secured by the seat belt with the roll bar raised.)
Lowerthe roll baronly when necessary(such asto
temporarily clear a low overhanging obstacle) and NEVER
removeit. DoNOTuse the seatbelt whenthe roll bar is
down. Raisethe roll bar as soon as clearancepermits.
RETAININGWALLS,DROP-OFFS,ANDWATER
Retaining walls and drop-offs around steps and water are a
common hazard.Giveyourself a minimum of two mower widths
of clearancearound these hazardsand hand-trim with a walk
behind mower or string trimmer. Wheels dropping over
retaining walls, edges, ditches, embankments,or into water can
cause roilovers, which may result in serious injury, death, or
drowning.
OVERHEADOBSTACLES
Checkfor overheadclearancesbeforedriving under any
objects. Donot allow the roll bar to contact low
overhangingobstacles such astree branches and guide
wires.
4 www.SnapperPro.com
OperatorSafety
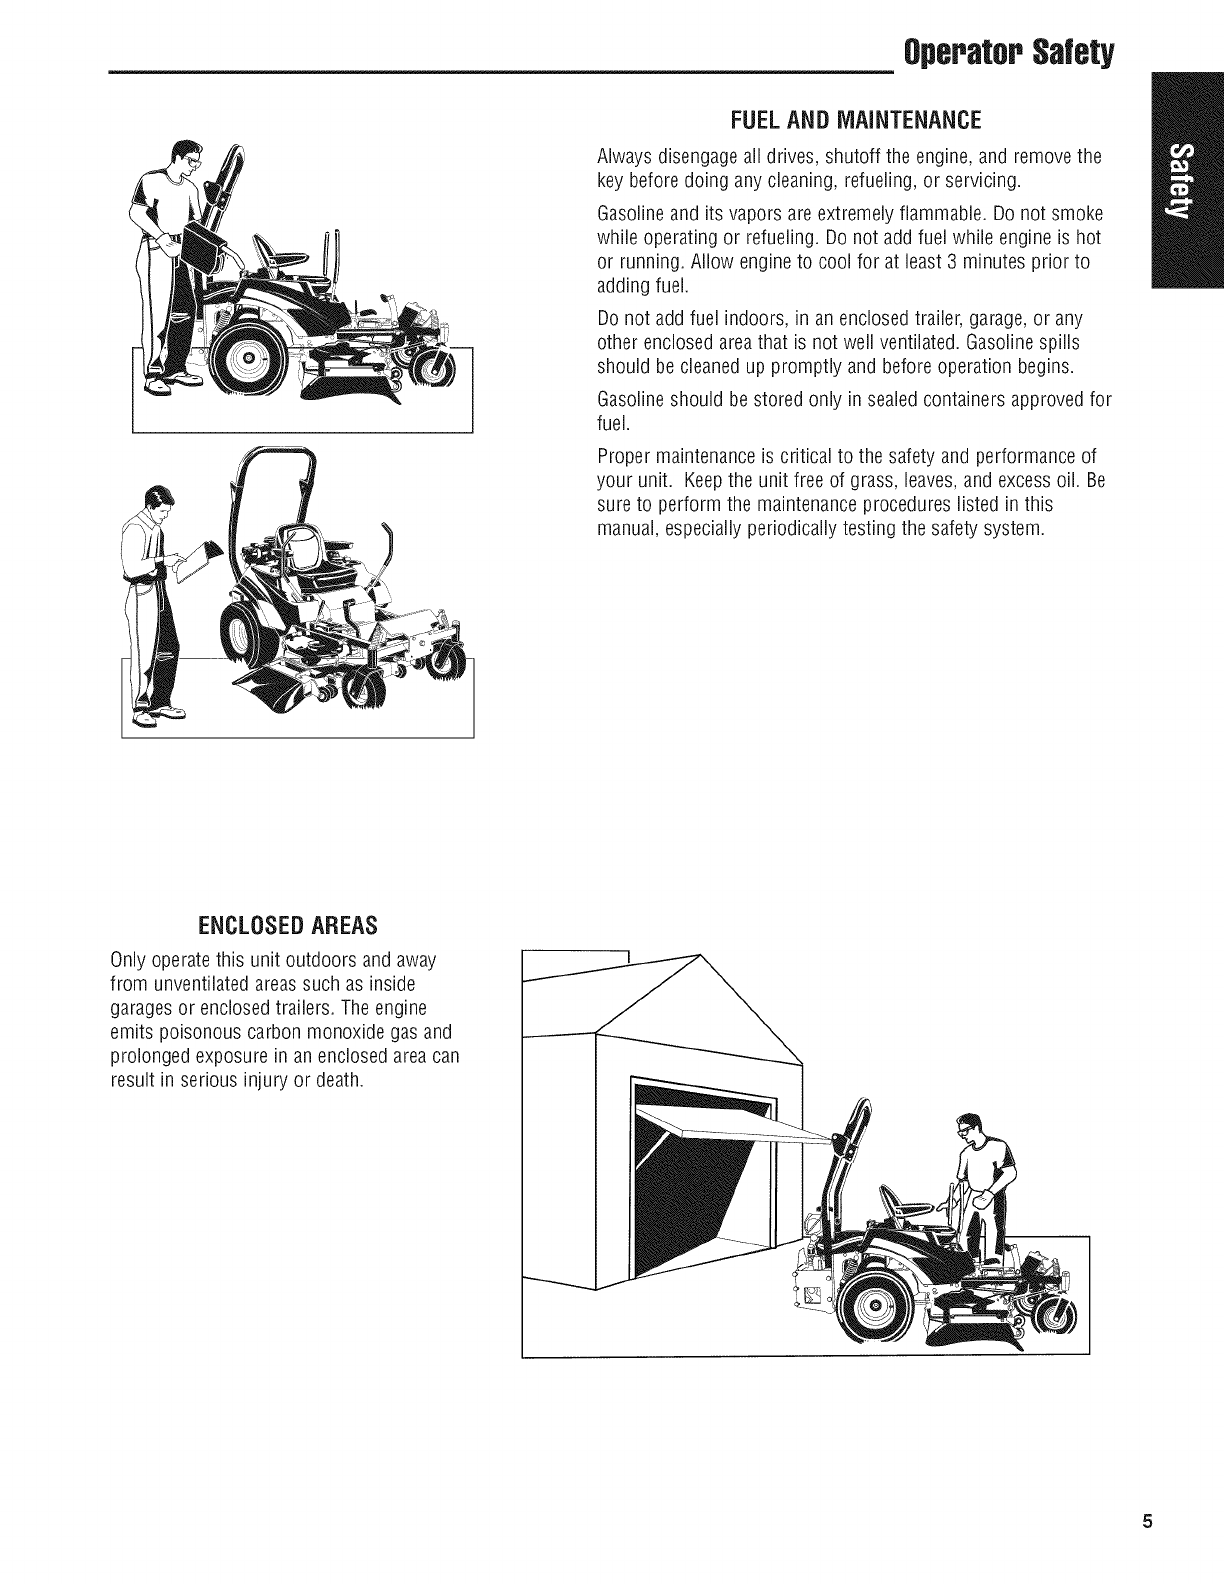
FUELAND MAINTENANCE
Always disengageall drives, shutoff the engine, and remove the
key before doing anycleaning, refueling, or servicing.
Gasolineand its vapors are extremely flammable. Do not smoke
while operating or refueling. Donot add fuel while engine is hot
or running. Allow engineto cool for at least 3 minutes prior to
adding fuel.
Donot add fuel indoors, in an enclosed trailer, garage,or any
other enclosed areathat is not well ventilated. Gasolinespills
should be cleanedup promptly and beforeoperation begins.
Gasolineshould be stored only in sealedcontainers approvedfor
fuel.
Proper maintenanceis critical to the safety and performance of
your unit. Keepthe unit free of grass, leaves,and excess oil. Be
sure to perform the maintenanceprocedures listed in this
manual, especiallyperiodically testing the safety system.
ENCLOSEDAREAS
Only operatethis unit outdoors and away
from unventilatedareassuch as inside
garagesor enclosedtrailers. Theengine
emits poisonous carbon monoxide gasand
prolonged exposure in an enclosedarea can
result in serious injury or death.

OperatorSafety
Readthese safety rules and follow them closely. Failureto obeythese rulescould result in loss of control of unit,
severe personalinjury or deathto you, or bystanders,or damageto property or equipment. Thismewing deck is
capableof amputating hands and feet and throwinq objects. Thetriangle _ in text signifies important cautions
or warnings which must be followed.
TRAINING
1. Read,understand,and follow all instructions in the
manualand on the unit beforestarting, if the
operator(s) or mechanic(s) can not read Englishit is the
owner's responsibility to explainthis material to them.
2. Becomefamiliar with the safe operation of the
equipment,operator controls, and safety signs.
3. All operators and mechanics should betrained. The
owner is responsiblefor training the users.
4. Onlyallow responsibleadults, who are familiar with the
instructions, to operatethe unit.
5. Neverlet children or untrained peopleoperate or service
the equipment. Localregulations may restrict the age of
the operator.
6. The owner/user can prevent and is responsiblefor
accidentsor injuries occurring to themselves, other
peopleor property.
7. Dataindicatesthat operators, age 60 years and above,
are involved in a large percentageof riding mower-
relatedinjuries. Theseoperators should evaluatetheir
ability to operatethe riding mower safelyenough to
protect themselvesand others from serious injury.
PREPARATION
1. Evaluatethe terrain to determine what accessoriesand
attachmentsare neededto properly and safely perform
the job. Useonly accessoriesand attachments
approvedby the manufacturer.
2. Wear appropriateclothing including safety shoes,safety
glassesand ear protection. Long hair,looseclothing or
jewelry mayget tangled in moving parts.
3. inspect the areawhere the equipment is to be usedand
remove aii objects such as rocks, toys and wire, which
canbe thrown by the machine.
4. Useextra care when handling gasoline and other fuels.
They are flammable and vapors areexplosive.
a) Useonly an approvedcontainer.
b) Neverremove fuel cap or add fuel with the engine
running. Allow engine to cool before refueling. Do
not smoke.
c) Never refuel or drain the machine indoors.
5. Checkthat operator's presencecontrols, safety switches
and shields are attachedand functioning properly. Do
not operateunless they are functioning properly.
OPERATION
1. Neverrun an engine in an enclosed area.
2. Mow only in the daylight or with good artificial light,
keepingawayfrom holes and hidden hazards.
3. Besure all drives are in neutraland parking brakeis
engaged beforestarting engine. Only start engine from
the operator's position. Useseat belts if provided.
4. Besure of your footing while using pedestriancontrolled
equipment, especiallywhen backing up. Walk, don't
run. Reducedfooting could causeslipping.
5. Slow down and useextra care on hillsides. Besure to
travel in the recommendeddirection on hillsides. Turf
conditions can affect the machinesstability. Use caution
when operating neardrop-offs.
6. Do not mow in reverseunless absolutely necessary.
Always look down and behind beforeand while traveling
in reverse.
7. Beawareof the mower discharge direction and do not
point it at anyone.Do not operatethe mower without
either the entiregrass catcheror the deflector in place.
8. Slow down and usecaution when making turns and
when changing directions on slopes.
9. Never raisedeckwith the blades running.
10. Neverleavea running unit unattended.Always
disengagethe PTO,set parking brake, stop engine, and
remove keysbefore dismounting. Keephandsand feet
away from the cutting units.
11. Turn off the PTOswitch to disengagethe bladeswhen
not mowing.
12. Neveroperatewith guards not securely in place. Be
sure all interlocks are attached, adjusted properly and
functioning properly.
13. Neveroperatewith the discharge deflector raised,
removed or altered, unless using a grass catcher.
14. Do not changethe engine governor setting or overspeed
the engine.
15. Stop on levelground, lower implements, disengage
drives, engageparking brake, shut off engine before
leavingthe operator's position for any reasonincluding
emptying the grass catchers or unclogging the chute.
16. Stop equipment and inspect blades after striking objects
or abnormal vibration occurs. Makenecessary repairs
before resuming operations.
17. Keephandsand feet awayfrom the cutting units.
18. Look behind and down before backing up to be sure of a
clear path.
19. Nevercarry passengersand keeppets and bystanders
away.
20. Do not operatethe unit while underthe influenceof
alcohol or drugs.
21. Slow down and usecaution when makingturns and
crossing roadsand sidewalks. Stop bladesif not
mowing.
22. Usecarewhen loading or unloading the machine into a
trailer or truck.
23. Usecarewhen approaching blind corners, shrubs, trees
or other objects that may obscure vision.
24. To reducefire hazard,keepunit free of grass, leaves&
excess oil. Donot stop or park over dry leaves,grass or
combustible materials.
25. The engine in this unit is not factory equippedwith a
6 www.SnapperPro.com
OperatorSafety
spark arrester. It is a violation of California Public
ResourceCodeSection 4442 to useor operatethe
engineon or near any forest-covered, brush-covered, or
grass-covered land unless the exhaustsystem is
equippedwith a spark arrester meeting any applicable
local or state laws. Otherstates or federal area may
havesimilar laws.
26. OSHAregulations may require the use of hearing
protection when exposedto sound levels greaterthan 85
dBAfor an 8 hour time period.
SLOPEOPERATION
Slopesare a majorfactor relatedto loss-of-control andtip-
overaccidents,which can resultin severeinjury or death.All
slopes requireextracaution.If you cannot backup theslope
or ifyou feel uneasyon it, do not driveon it.
, tL,CAUTION
Ohis machineproduces soundlevels in
excess of 85 dBA at theoperator's ear and
cancausehearingloss thoughextended
periods of exposure.
Wear hearingprotection when operating this machine.
DO
1. Mow acrossslopes, not up and down.
2. Removeobstacles such as rocks, tree limbs, etc.
3. Watch for holes, ruts, or bumps. Uneventerrain could
overturn the unit. Tallgrass can hide obstacles.
4. Useslow speed. Choosea slow speedso that you will
not haveto stop or changespeedwhile on the slope.
5. Useextra care with grass catchers or other attachments.
Thesecan changethe stability of the unit.
AWARNING
Never operateon slopesgreater than15 degrees which
is a rise of 5.4 feet (165 cm) vertically in 20 feet (607
cm) horizontally.
Select slow ground speedbeforedriving onto slope.
Use extra cautionwhen operating on slopes with rear-
mountedgrass catchers.
Mow across theface of slopes,notup and down, use
cautionwhen changingdirections and DONOTSTART
ORSTOPONSLOPE.
6. Keepall movement on the slopes slow and gradual. Do
not make sudden changesin speedor direction.
7. Seeyour authorized dealerfor recommendationsof
availableweights to improve stability.
Do Not
1. Avoid starting, stopping, or turning on a slope, if tires
losetraction (i.e. machine stops forward motion on a
slope), disengagethe blade(s) (PTO)and drive slow off
the slope.
2. Do not turn on slopes unless necessary,and then, turn
slowly and gradually uphill, if possible. Nevermow
down slopes.
3. Do not mow near drop-offs, ditches, or embankments.
The operator could lose footing or balanceor mower
could suddenly turn over if a wheel is over the edgeof a
cliff or ditch, or if an edge cavesin.
4. Do not mow on wet grass. Reducedfooting or traction
could causesliding.
5. Do not try to stabilizethe unit by putting your foot on
the ground. (ride-on units)
6. Do not mow excessivelysteep slopes.
7. Do not use grass catcheron steep slopes.
8. Do not mow slopes if you cannot back up them.
TOWED EQUIPMENT (RIDE-ON UNITS)
1. Tow only with a machine that has a hitch designedfor
towing. Donot attachtowed equipment except atthe
hitch point.
2. Follow the manufacturer's recommendationsfor weight
limit for towed equipment and towing on slopes. See
attaching a trailer under OPERATION.
3. Neverallow children or others inor on towed
equipment.
4. Onslopes, the weight of the towed equipment may
cause loss of traction and loss of control.
5. Travelslowly and allow extra distanceto stop.
6. Do not shift to neutraland coast down hill.
CHILDREN
Tragicaccidentscanoccur if the operatoris notalertto the
presenceof children. Childrenare often attractedto the unit
andthe mowing activity. Neverassumethat childrenwill
remainwhereyou last sawthem.
1. Keepchildren out of the mowing area and under the
watchful careof another responsible adult.
2. Bealert and turn unit off if children enterthe area.
3. Beforeand during reverseoperation, look behind and
down for small children.
4. Nevercarry children, evenwith the blade(s)off. They
may fall off and be seriously injured or interfere with
safe unit operation. Childrenwho have beengiven rides
in the past may suddenly appear in the mowing areafor
another ride and be runover or backedover by the
machine.
5. Neverallow children to operatethe unit.
6. Useextra carewhen approaching blind corners, shrubs,
trees, or other objects that may obscure vision.
EMISSIONS
1. Engineexhaustfrom this product contains chemicals
known, in certain quantities, to cause cancer,birth
defects, or other reproductive harm.
2. Look for the relevant Emissions Durability Periodand Air
indexinformationon the engine emissions label.
IGNITION SYSTEM (GASOLINE MODELS)
1. This spark ignition systemcomplies with Canadian
ICES-O02.

OperatorSafety
SERVICEANDMAINTENANCE
Toavoidpersonalin_v or orooertvdamaoe,useextreme
careinhandlincLQasoline.Gasolineisextremelyflammable
andthevaporsareexplosive.
Safe Handlingof Gasoline
1. Extinguishall cigarettes,cigars, pipes, and other
sourcesof ignition.
2. Useonly approvedgasoline containers.
3. Neverremove the gas capor addfuel with the engine
running. Allow the engine to cool before refueling.
4. Neverfuel the machine indoors.
5. Neverstore the machine or fuel container where there is
an open flame, spark, or pilot light such as near a water
heateror other appliance.
6. Neverfiii containers inside a vehicle or on a truck bed
with a plastic bed liner. Always placecontainers on the
ground awayfrom your vehicle beforefilling.
7. Removegas-powered equipment from the truck or
trailer and refuelit on the ground. If this is not possible,
then refuelsuch equipment on a trailer with a portable
container,rather thanfrom a gasoline dispenser nozzle.
8. Keepnozzlein contact with the rim of the fuel tank or
container opening at all times until fueling is complete.
Donot usea nozzlelock-open device.
9. If fuel is spilled on clothing, changeclothing
immediately.
10. Neverover-fill the fuel tank. Replacegas capand
tighten securely.
11. Useextra care in handling gasoline and other fuels. They
areflammable and vapors are explosive.
12. If fuel is spilled, do not attempt to start the enginebut
move the machine awayfrom the area of spillage and
avoidcreating anysource of ignition until fuel vapors
havedissipated.
13. Replaceall fuel tank caps andfuel container caps
securely.
Maintenance and Storage
1. Always observe safe refueling and fuel handling
practiceswhen refuelingthe unit after transportation or
storage.
2. Always follow the engine manualinstructions for storage
preparations beforestoring the unit for both short and
long term periods.
3. Always follow the engine manualinstructions for proper
start-up procedureswhen returning the unit to service.
4. Neverstore the machine or fuel container insidewhere
there is an open flame, such as in a water heater. Allow
unit to cool before storing.
5. Shut off fuel while storing or transporting. Donot store
fuel near flames or drain indoors.
6. Keepall hardware,especiallyblade attachment bolts,
tight and keepall parts in good working condition.
Replaceall worn or damageddecals.
7. Nevertamper with safety devices. Checktheir proper
operation regularly.
8. Disengagedrives, lower implement, set parking brake,
stop engine and remove key or disconnect spark plug
wire. Wait for all movement to stop before adjusting,
cleaningor repairing.
9. Cleangrass and debrisfrom cutting units, drives,
mufflers, and engineto prevent fires. Cleanup oil or
fuel spillage.
10. Let engine cool before storing and do not store near
flame.
11. Stop and inspect the equipment if you strike an object.
Repair,if necessary,before restarting.
12. Park machine on levelground. Neverallow untrained
personnelto servicemachine.
13. Usejack stands to support components when required.
14. Carefully releasepressure from components with stored
energy.
15. Disconnectbattery or removespark plug wire before
making any repairs. Disconnectthe negativeterminal
first and the positive last. Reconnectpositive first and
negativelast.
16. Usecarewhen checking blades. Wrap the blade(s) or
wear gloves, and use caution when servicing them.
Only replaceblades. Neverstraighten or weld them.
17. Keephandsand feet awayfrom moving parts, if
possible, do not make adjustmentswith the engine
running.
18. Chargebatteries in an open well ventilated area,away
from spark and flames. Unplug charger before
connecting or disconnecting from battery. Wear
protective clothes and useinsulated tools.
19. Grasscatcher components are subject to wear,damage,
and deterioration, which could expose moving parts or
allow objects to bethrown. Frequentlycheck
components and replacewith manufacturer's
recommendedparts, when necessary.
20. Checkbrake operationfrequently. Adjust and service as
required.
21. Useonly factory authorized replacementparts when
making repairs.
22. Always comply with factory specifications on all settings
and adjustments.
23. Onlyauthorized service locations should be utilized for
major service and repair requirements.
24. Neverattempt to makemajor repairs on this unit unless
you have been properly trained, improper service
procedures can result in hazardousoperation,
equipment damageand voiding of manufacturer's
warranty.
25. Unitswith hydraulic pumps, hoses,or motors:
WARNING:Hydraulicfluid escapingunder pressure may
havesufficient force to penetrateskin and causeserious
injury. If foreign fluid is injected into the skin it must be
surgically removed within a few hours by a doctor
familiar with this form of injury or gangrenemay result.
Keepbody and hands awayfrom pin holes or nozzles
that eject hydraulic fluid under high pressure. Use paper
or cardboard, and not hands,to search for leaks. Make
sure aii hydraulic fluid connections are tight and all
hydraulic hosesand lines are in good condition before
applying pressureto the system, if leaks occur,have
the unit serviced immediately byyour authorized dealer.
26. WARNING:Stored energydevice, improper releaseof
springs can result in serious personal injury. Springs
should be removedby an authorizedtechnician.
8 www.SnapperPro.com
27.Modelsequippedwithanengineradiator:WARNING:
Storedenergydevice.Topreventseriousbodilyinjury
fromhotcoolantorsteamblow-out,neverattemptto
removetheradiatorcapwhiletheengineisrunning.
Stoptheengineandwaituntilitiscool.Eventhen,use
extremecarewhenremovingthecap.
ROLL BAR iNSTRUCTIONS
Formodels equippedwith factory-installed RollOver
ProtectionSystem(ROPS).
AWARNING
in order to avoid seriousinjuryor death from roJJover,
it isimportanttofollow the warnings listed beJow.
OPERATIONALWARNINGS
•Always usethe seat beltwhen the roll bar is in the
raisedposition.
•Neverusethe seatbeltwhen the roll bar is in the down
position.
•Rememberthere is no roll over protection whenthe roll
bar is in the down position so it is very important to
alwayskeepthe roll bar in the raised position whenever
possible.
•Lowerthe roll bar to the down position only when it is
absolutely necessary.
•Checkfor overheadclearancesbefore driving under any
objects. Do not allow roll bar to contact low
overhangingobstacles such astree branches and guide
wires.
•Neverremove the roll bar from thevehicle.
•Donot exceedthe machine weight rating of the roll bar.
•Readand follow all of the instructions shown below
regarding the inspection and maintenanceof the roll bar
structure and the seat belt.
INSPECTIONOFTHEROLLBARPROTECTIVESTRUCTURE
, I WARNING
Failureto properly inspectand maintain the ROLLBAR
protective structurecancauseseriousinjuryor death.
A ROLLBAR,likeanyother safetydevice,needsto be
periodicallyinspectedto verifythat the integrityof thedevice
hasnot beencompromisedthrough normal machineuse,
misuse,agedegradation,modifications,or a roll over.
Tomaintainoperatorroll over protectionand roll bar
effectiveness:
•If a ROLLBARbecomesdamagedfor any reason,such
asa collision, roll over or impact, the ROLLBARmust
be replaced. Small undetectablecracks can reducethe
effectivenessof the ROLLBAR. Neverweld, straighten,
or repair the ROLLBAR.
•Neveralter the ROLLBARby welding anything to it or
by drilling additional holes.
•BEFOREFIRSTTllVlEUSE- inspect the ROLLBAR
structure and mounting hardwarefor:
OperatorSafety
2)
3)
Checkto makesure the machine GVW(Gross
VehicleWeight), including attachments, restrained
payload,fuel and operator, is not in excessof the
maximum weight specified on the ROLLBARlabel.
Makesure there isn't any missing, damaged, or
loosemounting hardware.
Makesure the ROLLBARhas beencorrectly and
completely installed.
EVERY100 HOURS- inspect the ROLLBARstructure
and mounting hardwarefor:
1) Any cracks in the structure (structural members
and/or welds).
2) Significant corrosion on any part of the ROLLBAR
structure or hardware.
3)
4)
5)
Missing, damaged,or loose mounting hardware
Mounting hardwarethat is of a grade lesser than
specified.
Machine GVW(Gross VehicleWeight), including
attachments, restrained payload, fuel and operator,
in excess of the maximum weight specified on the
ROLLBARlabel.
6) Any modifications that havebeen made,such as
unauthorizedwelds and holes.
7) Any permanent deformation or twisting of the ROLL
BARstructure.
8) That the ROLLBARlabel is still in placeand is
readable.
9) That the ROLLBARon-product warning labels are
still on the ROLLBARand are readable.
If there is any doubt as to the condition of the ROLL
BAR,remove the machine from service and contact your
dealer for assistance.
OperatorSafety
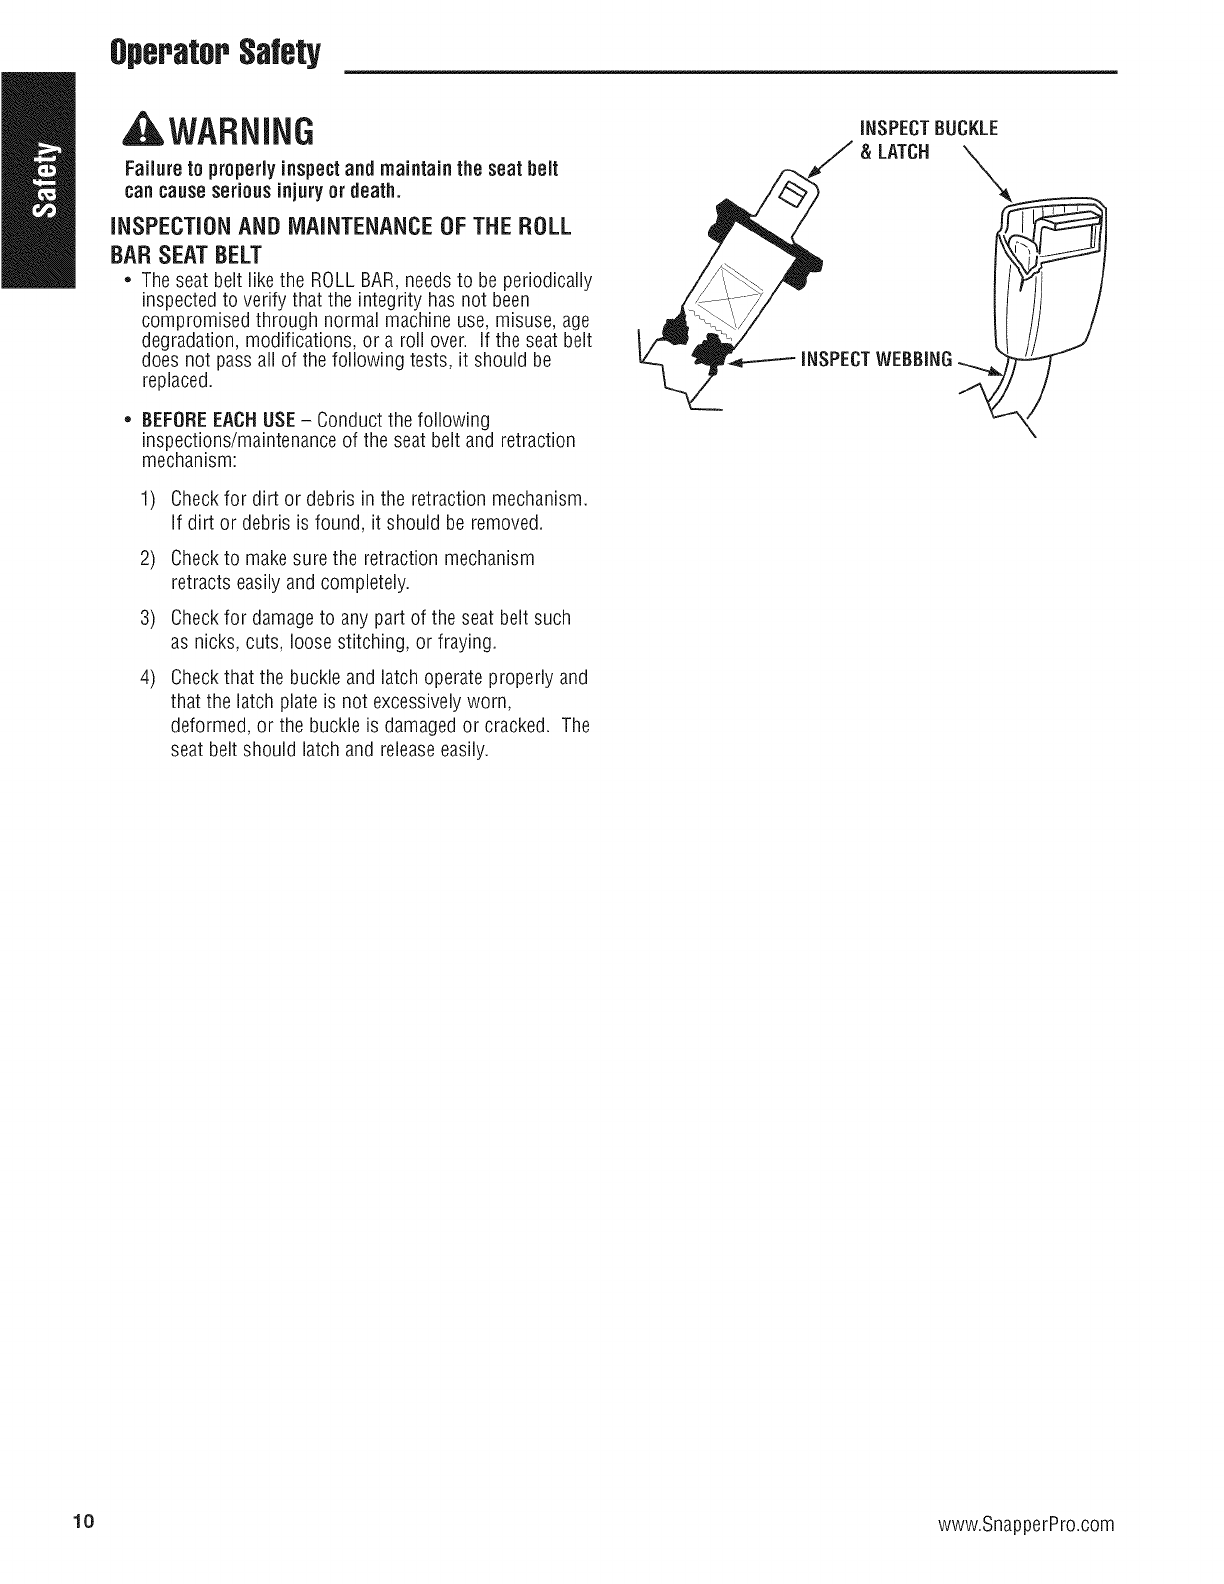
,WARNING
Failureto properlyinspectand maintainthe seatbelt
cancauseseriousinjuryor death.
iNSPECTiONANDMAINTENANCEOFTHEROLL
BARSEATBELT
•The seat belt likethe ROLLBAR,needsto be periodically
inspectedto verify that the integrityhasnot been
compromised through normal machine use, misuse, age
degradation, modifications, or a roll over. If the seat belt
doesnot pass all of the following tests, it should be
replaced.
• BEFOREEACHUSE- Conductthe following
inspections/maintenanceof the seat belt and retraction
mechanism:
1)
2)
3)
4)
Checkfor dirt or debris in the retraction mechanism.
If dirt or debris is found, it should be removed.
Checkto makesure the retraction mechanism
retracts easily and completely.
Checkfor damageto any part of the seat belt such
as nicks, cuts, loosestitching, or fraying.
Checkthat the buckle and latch operateproperly and
that the latch plate is not excessivelyworn,
deformed, or the buckle isdamagedor cracked. The
seat belt should latch and releaseeasily.
iNSPECTBUCKLE
&LATCH '_
INSPECTWEBBING
10 www.SnapperPro.com
OperatorSafety
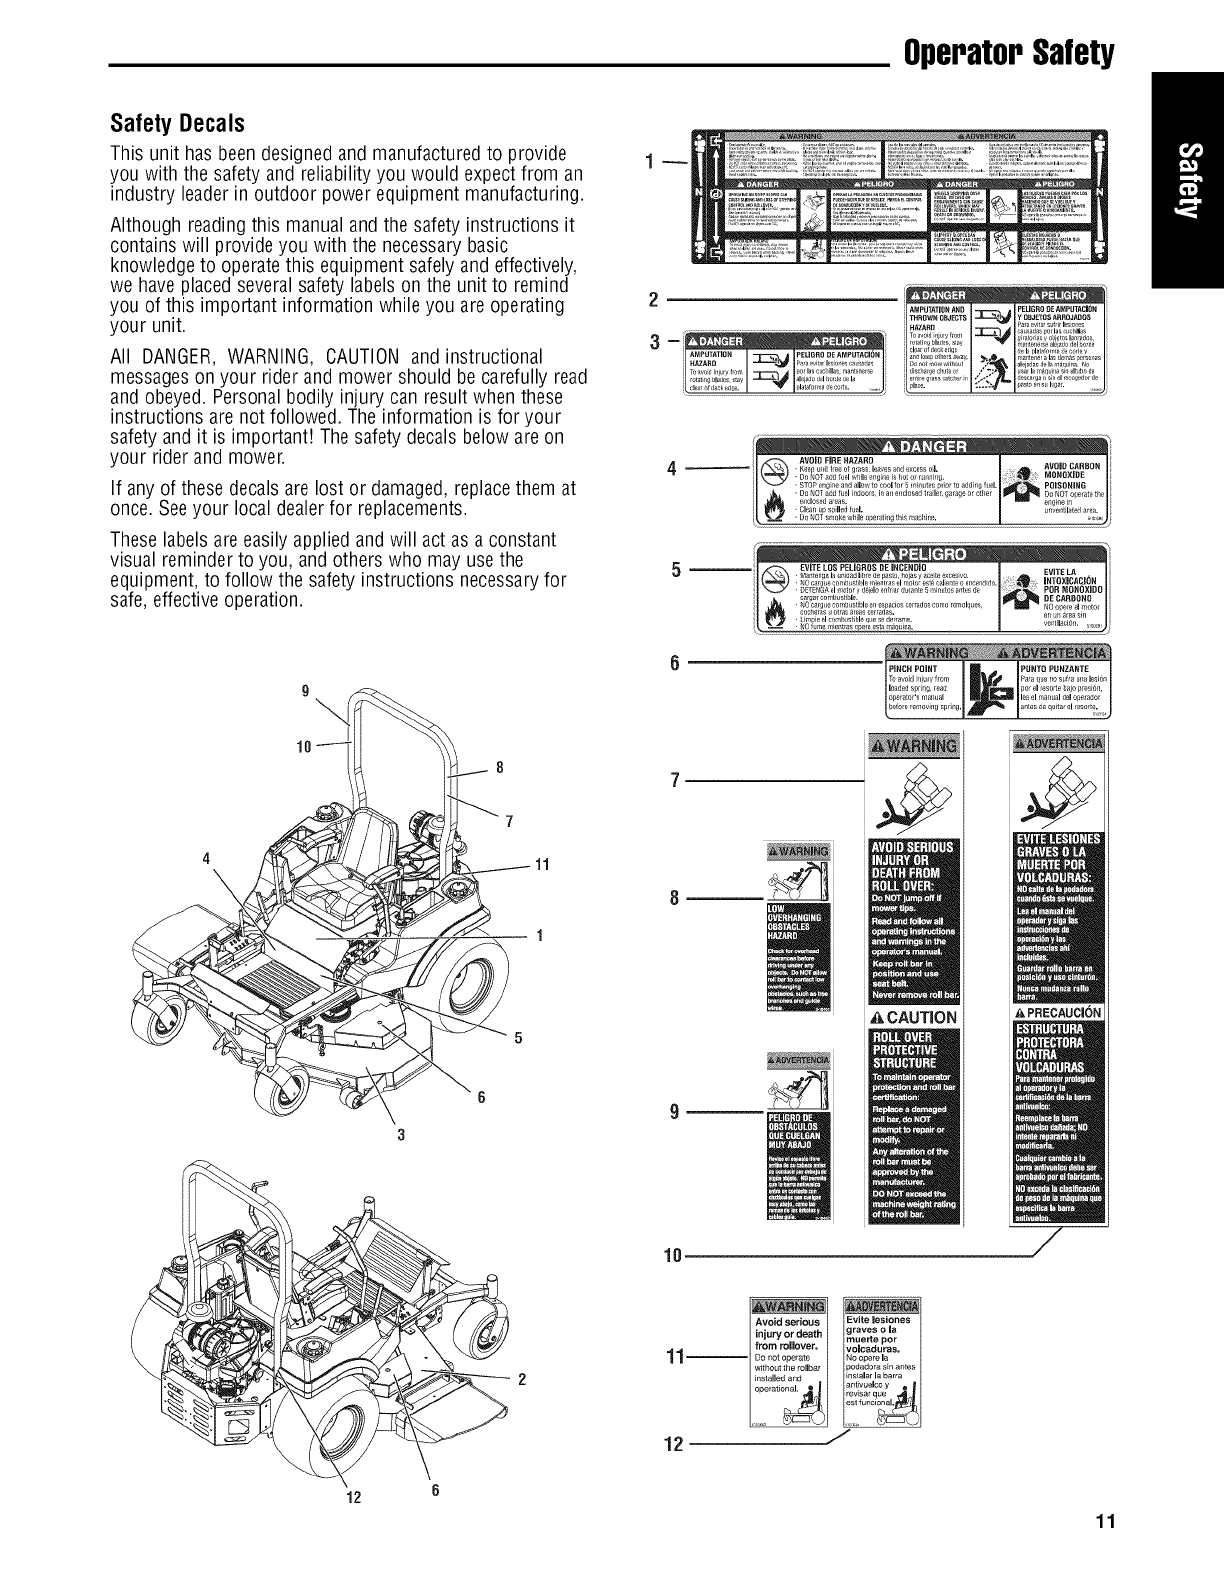
SafetyDecals
This unit has beendesigned and manufactured to provide
you with the safety and reliability you would expectfrom an
industry leader in outdoor power equipment manufacturing.
Although readingthis manualand the safety instructions it
contains will provide you with the necessary basic
knowledge to operatethis equipment safely and effectively,
we haveplacedseveral safety labelson the unit to remind
you of this important information while you are operating
your unit.
All DANGER,WARNING, CAUTIONand instructional
messageson your rider and mower should be carefully read
and obeyed. Personalbodily injury can result when these
instructions are not followed. The information is for your
safety and it is important! Thesafety decals below are on
your rider and mower.
If any of these decals are lost or damaged, replacethem at
once. Seeyour local dealerfor replacements.
Theselabels areeasily applied andwill act as a constant
visual reminder to you, and others who may usethe
equipment, to follow the safety instructions necessaryfor
safe,effective operation.
2
AMPUTATION PELIORO DE AMPUTACiGN
AMPUTATION AHD PELIORODE AI'_PUTACJ()N
THROWN OBJECTS Y OBJETOSARROJADOS
p_raevi_a,s,r_,irI_s_ones
HAZC_OD " hZ
ota _r_ bla es s ay rr a '.f_ d_ I_
a_[ Cepo_et_a¢_ay, _,,l_ ma_te_erala£d_mas er_o_as
bonotmo_wJthout %;_ alea(lasd_lama uirla. NO
disc _arge chute or /-;_ Lsar la m_(i _a sm _ltu_o d_
e_ti e ass catoger .'.÷*_" es_a,ga [} sin el re¢o_edof @
place. :i.. _asto _ s_ _ga. "%
AVOID FiRE H,_ZARD
i'Keef_ uni flee of grass, leaves and excess o;I.
i-STOP eagne and allow to cool for 5 mi_]utes prior to add r,g fuel
i•0o OT add fuel ndoors in an enclosed traler, garage or other
i e_qelosed ar_as.
AVO D CARSON
_ONOX_OE
POiSONiNG
DO NOT o_erate th_
_r_ven gated area,
!!!!!!_
10
11
12 6
PRECAUCION
Avoid serious
injury or death
11 -- I fD_nho_°uti°:il rOai;_:, '
installed and
12 /
11
OperatorSafety
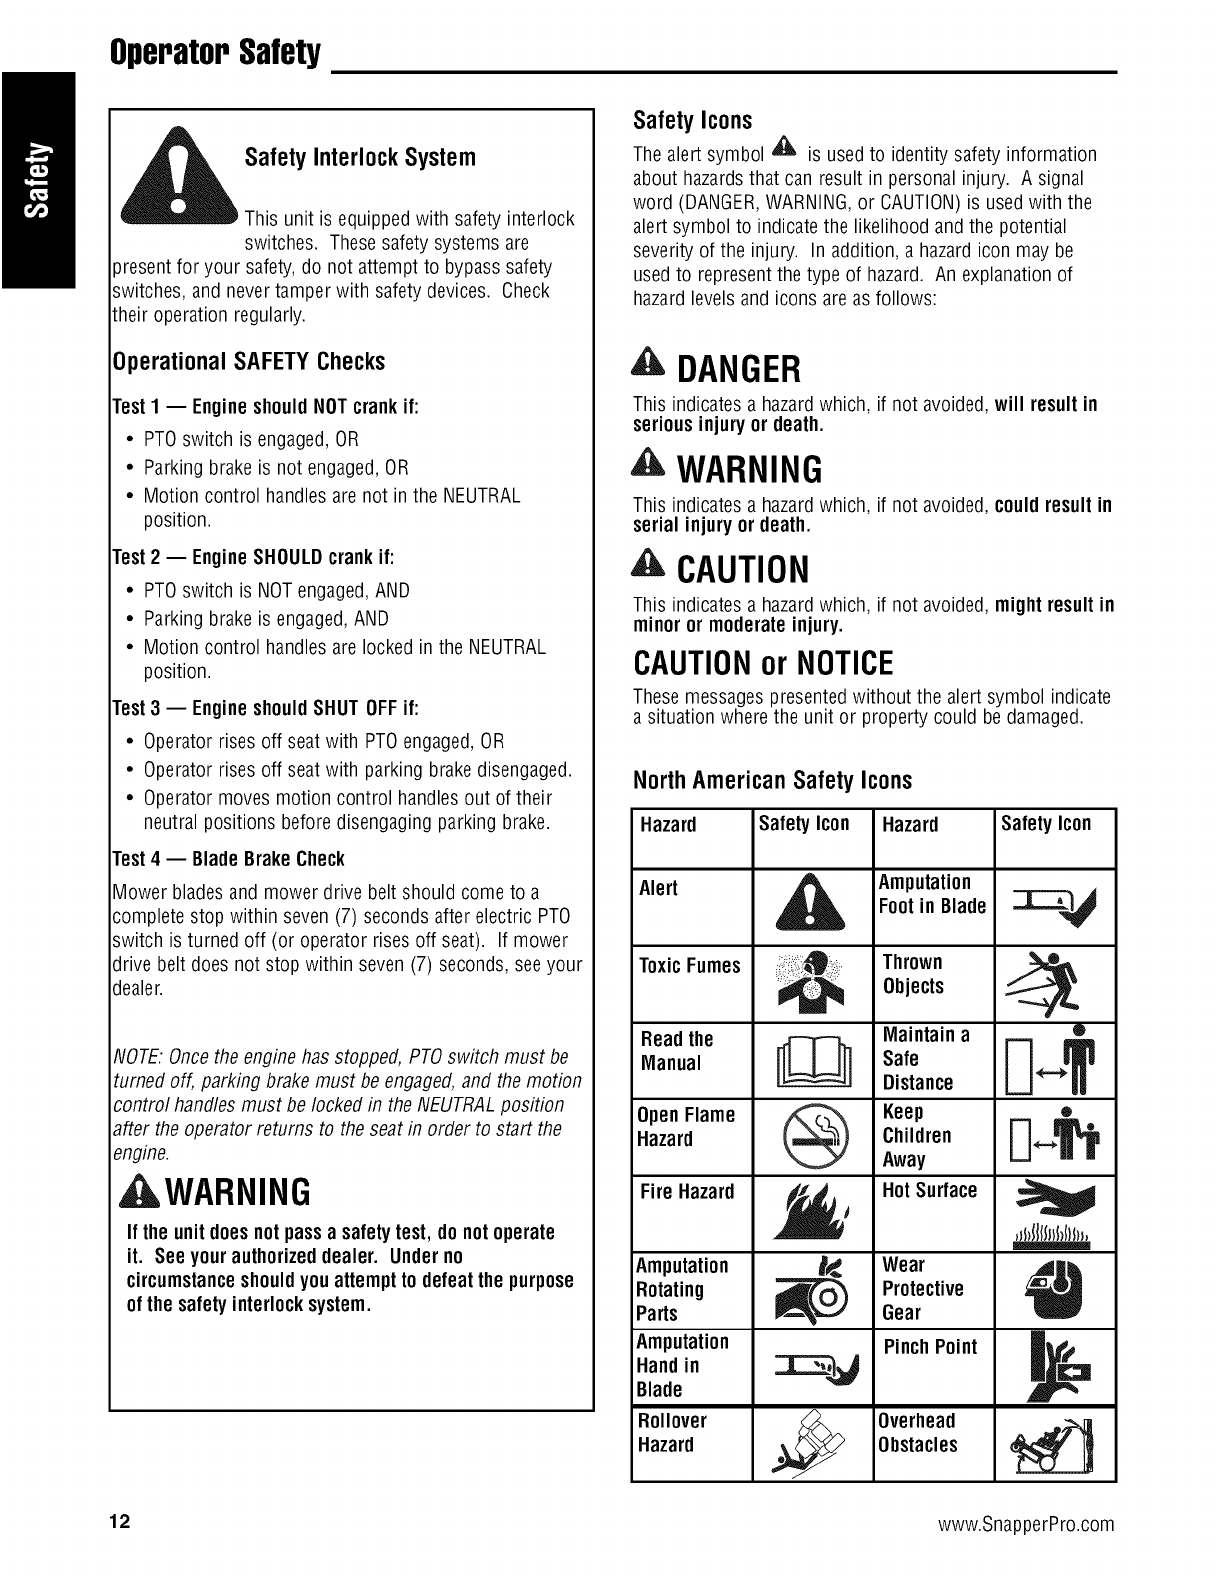
SafetyInterlockSystem
This unit is equippedwith safety interlock
switches. These safety systems are
present for your safety,do not attempt to bypasssafety
switches, and nevertamper with safety devices. Check
their operation regularly.
Operational SAFETYChecks
TestI-- EngineshouldHOTcrankif:
•PTOswitch is engaged,OR
• Parkingbrake is not engaged,OR
• Motion control handlesare not in the NEUTRAL
position.
Test2 -- EngineSHOULDcrankif:
• PTOswitch is NOTengaged,AND
• Parkingbrake is engaged,AND
• Motion control handlesare locked in the NEUTRAL
position.
Test3 -- EngineshouldSHUT OFFif:
• Operatorrises off seatwith PTOengaged,OR
• Operatorrises off seatwith parking brakedisengaged.
• Operatormoves motion control handlesout of their
neutral positions beforedisengaging parking brake.
Test4 -- BladeBrakeCheck
Mower bladesand mower drive belt should come to a
complete stop within seven (7) seconds after electric PTO
switch is turned off (or operator rises off seat). If mower
drive belt does not stop within seven (7) seconds, seeyour
dealer.
NOTE.Oncethe enginehas stopped, PTOswitch must be
turned off, parking brake must be engaged,and the motion
control handlesmust be locked in the NEUTRALposition
after the operator returns to theseat in order to start the
engine.
, ,WARNING
If the unitdoesnot pass a safetytest, do notoperate
it. See yourauthorizeddealer. Underno
circumstanceshouldyouattemptto defeatthepurpose
ofthe safetyinterlocksystem.
SafetyIcons
Thealert symbol _' is usedto identity safety information
about hazardsthat can result in personalinjury. A signal
word (DANGER,WARNING,or CAUTION)is used with the
alert symbol to indicatethe likelihood andthe potential
severity of the injury. In addition, a hazardicon may be
usedto representthe type of hazard. An explanation of
hazardlevels and icons are asfollows:
ADANGER
This indicatesa hazardwhich, if not avoided, will resultin
seriousinjuryor death.
_WARNING
This indicatesa hazardwhich, if not avoided, couldresultin
serial injuryor death.
CAUTION
This indicatesa hazardwhich, if not avoided, mightresultin
minor or moderateinjury.
CAUTIONor NOTICE
Thesemessagespresented without the alert symbol indicate
a situation wherethe unit or property could be damaged.
North American Safety Icons
Hazard
Alert
ToxicFumes
Read the
Manual
OpenFlame
Hazard
Fire Hazard
Amputation
Rotating
Parts
Amputation
Handin
Blade
Rollover
Hazard
Safety Icon
A
®
Hazard
Amputation
Footin Blade
Thrown
Objects
Maintain a
Safe
Distance
Keep
Children
Away
HotSurface
Wear
Protective
Gear
PinchPoint
Overhead
Obstacles
SafetyIcon
®
O
12 www.SnapperPro.com
OperatorSafety
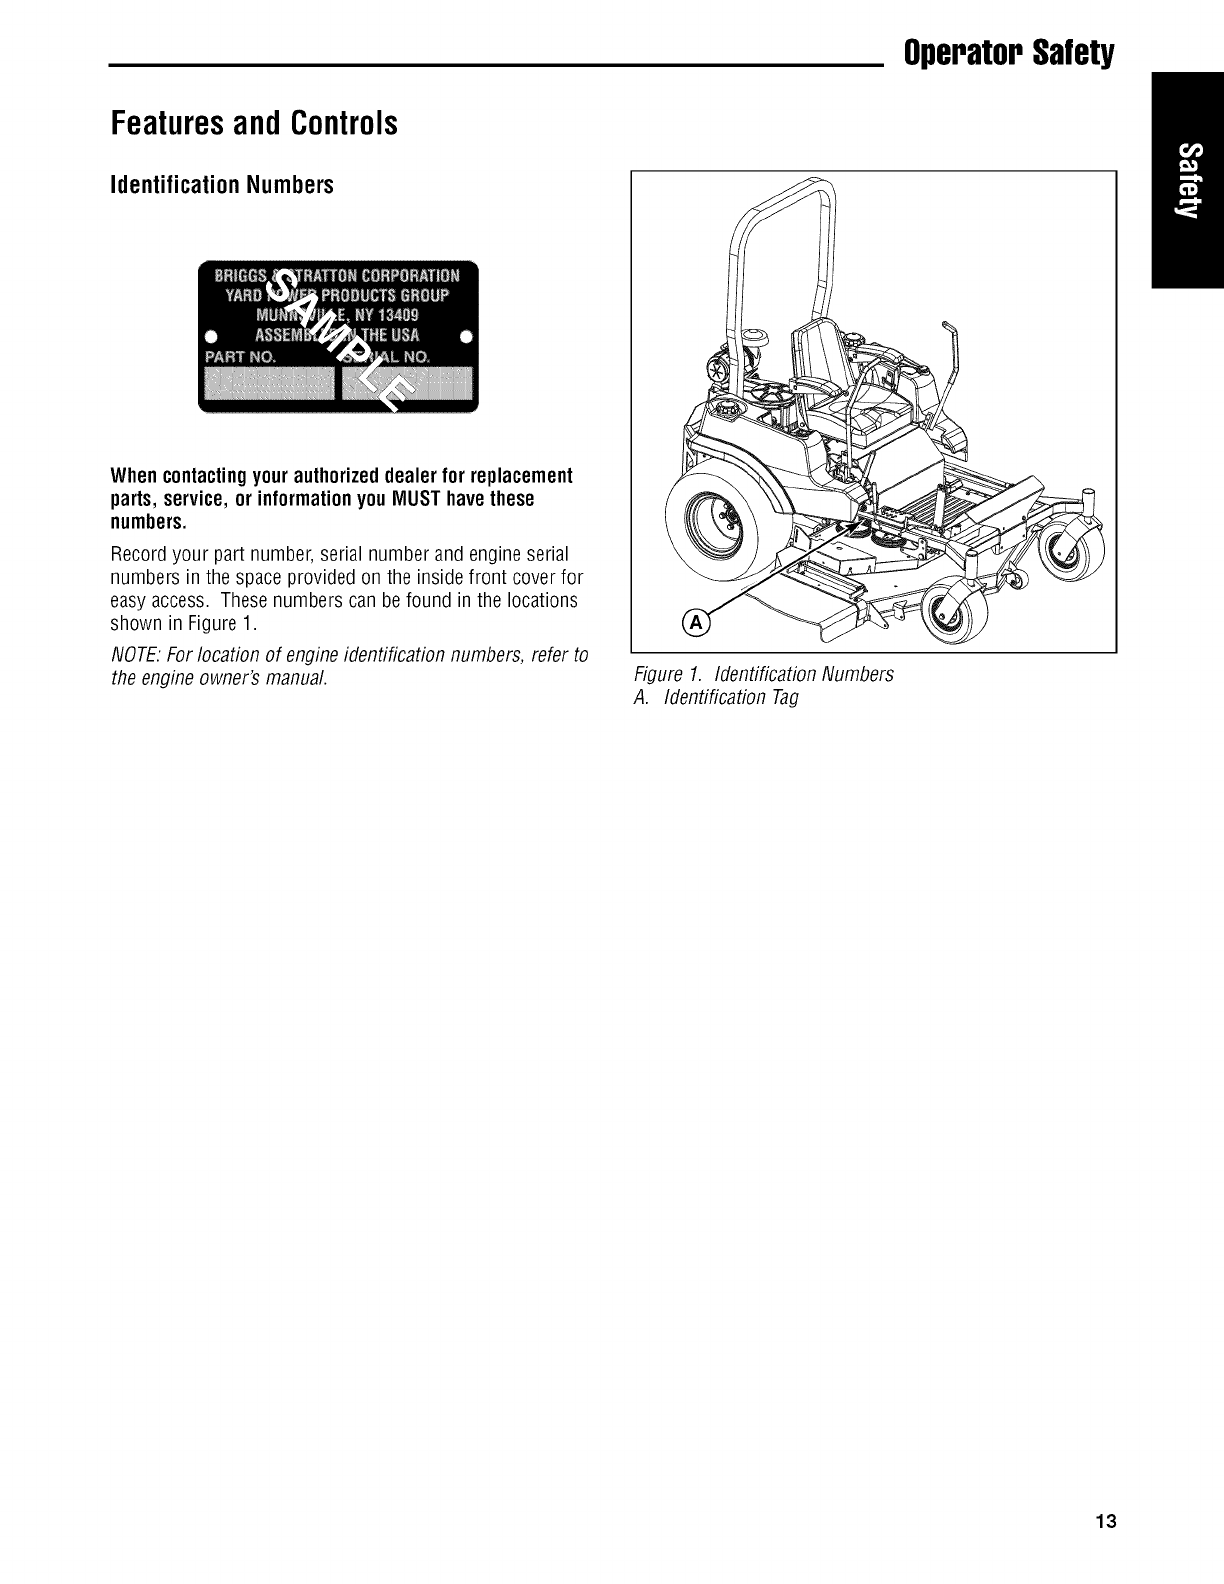
FeaturesandControls
IdentificationNumbers
Whencontactingyourauthorizeddealer for replacement
parts, service,or informationyou MUSThavethese
numbers.
Record your part number, serial number and engine serial
numbers in the space providedon the inside front cover for
easy access. Thesenumbers can be found in the locations
shown in Figure1.
NOTE.Forlocation of engineidentification numbers, refer to
the engineowner's manual. Figure 1. Identification Numbers
A. Identification Tag
13

FeaturesandControls
/
Figure2. Control Locations
Control Functions
Theinformation below briefly describes the function of individual controls. Starting, stopping, driving, and mowing require
the combined use of several controls appfiedin specific sequences. Tolearn whatcombination and sequenceof controls to
use for various tasks seethe OPERATIONsection.
GroundSpeedLevers
Theseleverscontrol the ground speedof the rider.The left
lever controls the left rear drive wheeland the right lever
controls the right rear drive wheel.
Moving a leverforward increasesthe FORWARDspeedof
the associatedwheel, and pulling back on a lever increases
the REVERSEspeed.
Note: Thefurther a lever is moved away from theneutral
position the faster the drive wheelwill turn.
See the Operationsection for proper steering instructions.
SeatAdjustmentLever
Theseat can be adjusted forward and back.Move the lever
towards the left, position the seat as desired, and releasethe
leverto lock the seat in position.
Ignition Switch
Theignition switch starts andstops the engine, it hasthree
positions:
Stops the engine and shuts off the
electrical system.
ORUN Allows the to and
engine run powers
the electrical system.
_!_ START Cranksthe engine for starting.
NOTE.Neverleavethe ignition switch in theRUNposition
with the enginestopped-this drains thebattery.
14 www.SnapperPro.com

Features& Controls
_Parking Brake
_ DISENGAGE Releasesthe parking brake.
ENGAGE Locks the parking brake.
Pull the parking brakelever back to engagethe parking
brake. Move the leverfully forward to disengagethe
parking brake. NOTE.Tostart the unit theparking brake
must be engaged.
_PTO (Power Take Off) Switch
The PTOswitch engagesand disengagesthe mower. Pull UP
on the switch to engage,and push DOWNto disengage.
Fuel Tank Cap
To removethe cap, turn counterclockwise.
FuelLevelGauge
Displaysthe fuel level inthe tank.
Deck Lift Pedal, Cutting Height
Adjustment Pin & Deck Lift Lock Lever
Thesecontrol the cutting height of the mower deck.
Depressthe pedal until it locks into the 5" (12,7 cm)
position. Placethe adjustment pin in the desired cutting
height and releasethe lift lock lever.
Throttle Control
Thethrottle controls engine speed. Movethe throttle
forward to increaseengine speedand back to decrease
engine speed. Always operateat FULLthrottle.
_Choke
Closethe choke for cold starting. Openthe choke oncethe
engine starts. A warm engine may not require choking. Pull
the knob UPto closethe choke. Pushto knob DOWNto
open the choke.
BHourMeter /MaintenanceReminder
Measuresthe time of the PTObeing engaged. The hour
meter measuresthe number of hours the PTOhas been
engaged. The hour meter will flash an initial oil change
indicator at 5 hours, and a lubrication reminder every 50
hours. These reminders display for approximately two
hours andwill automatically reset themselves.
Note: Thehour meter will register thepassageof time only
whenthe PTOis engaged. Thehour meter hasa self
contained power source so the total hours are always
visible.
15
Operation
Operation
GeneralOperating Safety
Beforefirst time operation:
• Besure to read all information in the Safetyand
Operationsections before attempting to operatethis
tractor and mower.
• Becomefamiliar with all of the controls and how to stop
the unit.
• Drive in an open areawithout mowing to become
accustomedto the unit.
WARNING
Never allow passengersto rideon theunit.
Beforeleavingtheoperator'sposition for anyreason,
engagetheparkingbrake, disengagethe PTO,stopthe
engineand removethekey.
Toreducefire hazard,keepthe engine,tractorand
mowerfree ofgrass, leavesandexcessgrease. Do not
stopor parktractoroverdry leaves, grassor
combustiblematerials.
Gasolineishighlyflammableand mustbe handled
with care. Neverfill the tankwhenthe engine isstill
hotfrom recentoperation.Donotallow openflame,
smokingor matchesin the area. Avoidover-fillingand
wipe up anyspills.
AWARNING
Do notloadthis zero-turnrider ona trailer or truck
usingtwoseparateramps. Onlyusea single rampthat
is at least onefootwiderthan thewidthoftherear
wheels ofthisrider. Thisrider hasa zeroturning
radiusand therear wheels couldfall offtheramps, or
the ridercouldtip over injuringthe operatoror
bystanders.
,WARNING
Neveroperateon slopesgreaterthan 17.6 percent
(10°) whichis a rise of3-1/2 feet (106 cm)vertically in
20 feet (607 cm) horizontally.
Selectslow groundspeed beforedrivingontoa slope.
Useextracautionwhen operatingon slopeswith a
rear-mountedgrasscatcher.
Mow acrosstheface of slopes,notup anddown, use
cautionwhen changingdirectionsandDO NOTSTART
ORSTOPONSLOPE.
Checks Before Starting
• Checkthat crankcaseis filled to full mark on dipstick.
Seethe engine Operator'sManualfor instructions and
oil recommendations.
• Fillthe fuel tank with fresh fuel. Referto engine manual
for fuel recommendations.
• Makesure all nuts, bolts, screws and pins are in place
and tight.
• Makesure the fuel valve is in the "ON" position.
• Checkthe tire pressures. See CheckTirePressures.
• Makesure that the Roll Bar is adjusted in the upright
position. See Raiseand Lower the Roll Bar.
• Adjust the seat position, and make certain you can reach
all controls from operator's position. See Seat
Adjustment
• Adjust the height of the mower deck to the desired
position. See Mowing Height Adjustment.
16 www.SnapperPro.com

Operation
CheckTire Pressures
Tire pressure should be checkedperiodically, and
maintained at the levels shown in the chart. Note that these
pressures may differ slightly from the "Max Inflation"
stamped on the side-wall of the tires. Thepressures shown
provide proper traction, improve cut quality, and extend tire
life.
Tire Pressure
Front 25 psi (1,72 bar)
Rear 15 psi (1,03 bar) Figure3. CheckingTirePressure
SeatAdjustment
SeeFigure4. The seatcan be adjusted forward and
backward. Move the lever towards the left, position the seat
as desired, and releasethe leverto lock the seat into
position.
Seat Adjustment (Suspension Seat)
See Figure5. In addition to theforward and backwardseat
adjustment, models equippedwith a suspension seat can be
adjusted for lumbar support, suspension and back angle.
Forwardand BackwardAdjustment:
Move the forward /backwardseat adjustment lever(A,
Figure5) away from the seat,position the seat as desired,
and releasethe leverto lock the seat into position.
LumbarAdjustment:
Turnthe lumbar adjustment knob (B) until the desired
amount of lumbar is achieved.
BackAngleAdjustment:
Turnthe backangle adjustment knob (C) until the desired
amount of back angle is achieved.
SuspensionAdjustment:
Turnthe suspension adjustment knob (D) until the display
scale hasa readingthat matchesthe weight of the operator.
Figure4. SeatAdjustment
A. SeatAdjustment Lever
Figure5. Suspension SeatAdjustment
A. Forward / BackwardSeatAdjustment Lever
B. Lumbar Adjustment Knob
C. BackAngle Adjustment Knob
D. Suspension Adjustment Knob
17
Operation
Mowing Height Adjustment
Thecutting height adjustment pin (A, Figure6) control the
mower cutting height. The cutting height is adjustable
between 1-3/4" (4,4 cm) and 5" (12,7 cm) in 1/4" (0,64 cm)
increments.
1. Depressthe deck lift foot pedal (B) until it locks into the
5" (12,7 cm) position.
2. Placethe cutting height adjustment pin in the desired
cutting height.
3. Depressthe deck lift foot pedalthen push the lock lever
(C)toward the right to releasethe lock.
4. Releasethe deck lift foot pedal until it comes to rest
againstthe cutting height adjustment pin. Figure 6. Mowing Height Adjustment
A. Cutting HeightAdjustment Pin
B. Deck Lift Foot Pedal
C. Deck Lift Lock lever
I
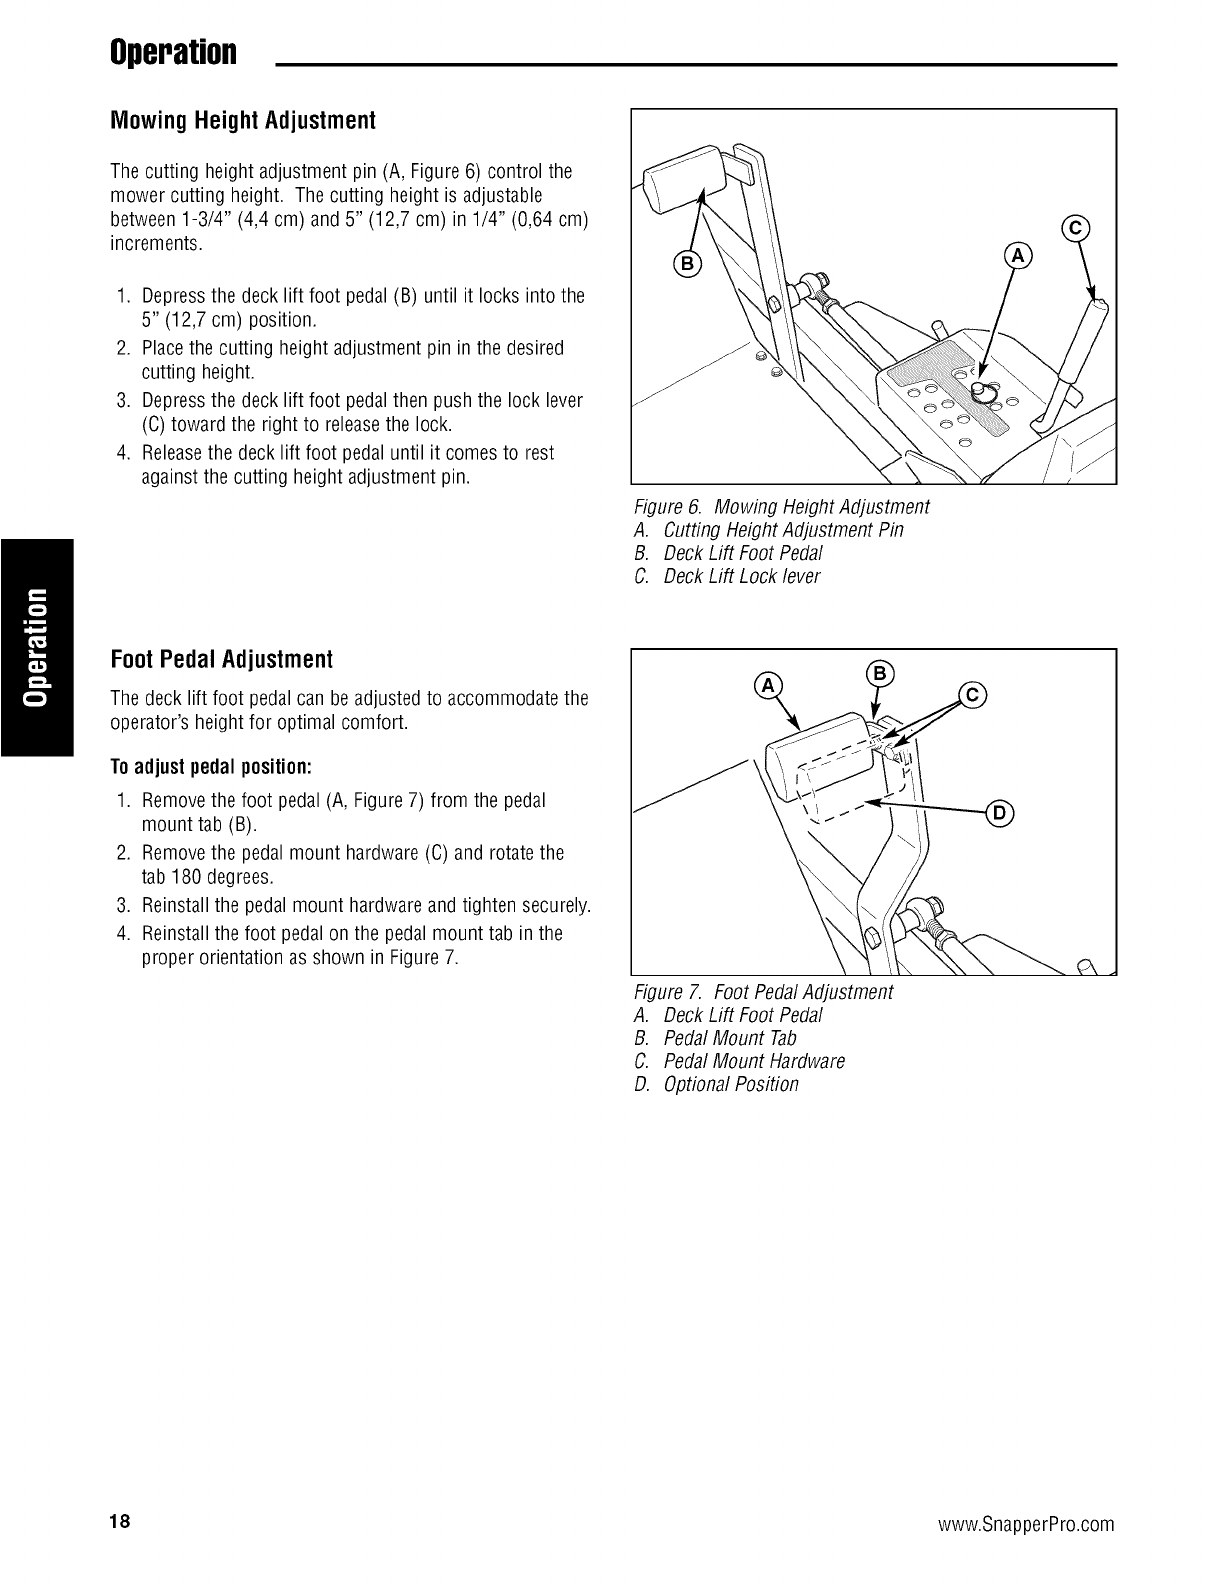
Foot Pedal Adjustment
Thedeck lift foot pedalcan be adjusted to accommodate the
operator's height for optimal comfort.
Toadjustpedalposition:
1. Removethe foot pedal (A, Figure7) from the pedal
mount tab (B).
2. Removethe pedalmount hardware(C) and rotatethe
tab 180 degrees.
3. Reinstallthe pedal mount hardware and tighten securely.
4. Reinstallthe foot pedalon the pedal mount tab in the
proper orientation as shown in Figure7.
%
Figure 7. Foot PedalAdjustment
A. Deck Lift Foot Pedal
B. Pedal Mount Tab
C. Pedal Mount Hardware
D. OptionalPosition
18 www.SnapperPro.com
This manual suits for next models
10
Table of contents
Other Snapper Pro Lawn Mower manuals


