Snazio Net Cinema User manual

SNAZIO* NET CINEMA
USER GUIDE

2
Published Dec 2005
P/N:78-001-9077
Copyright 2005 V One Multimedia Pte Ltd. All rights reserved. No part of this
documentation may be reproduced in any form or by any means or used to make ant
derivative work (such as translation, transformation or adaptation) without permissions
from V One Multimedia Pte Ltd.
V One Multimedia reserves the right to revise this documentation and to make changes
in content from time to time without obligation on the part of V One Multimedia Pte
Ltd to provide notification of such revisions or change.
V One Multimedia Pte Ltd provides this documentation without any warranty of any
kind, whether implied or expressed, including, but not limited to, the implied warranties
of merchantability and fitness for a particular purpose, V One Multimedia may make
improvements or changes in the products or software applications described in this
documentation at any time.
License
Agreement

3
Contents
About This Guide 6
Important Instructions 7
Safety Information 7
Handling Cautions 8
Disc Storage 8
Laser Safety 8
Copyright Information 9
DVD Region Code 9
1 Introduction 10
What Is SnaZio* Net Cinema 10
Key Features 10
Key Functions Of SnaZio* Net Cinema 11
Supported Formats 11
►
Video Formats 11
►
Audio Formats 11
►
Disc Formats 11
Before You Start 12
Package Contents 12
Install Batteries in the Remote Control 12
►
If the Remote Control does not operate properly 12
Description 13
Front Panel Controls 13
Rear Panel (Illustration only for SZ1350) 14
Things To Remember 14
Remote Control Tour 15
2 AV Connections 18
Choosing a Connection 18
Before Connecting the SnaZio* Net Cinema Player 18
Connection to a TV (Composite Video) 18

4
Connection to a TV (S-Video) 19
Connection to a TV (SCART) 19
Connection to a TV (Component) 20
Connection to a TV (DVI) 21
►
DVI Video Specifications 21
Audio System Connections 21
Connection to an Audio System (2 Channel Amplifier) 22
Things to Remember 22
Connection to an Audio System (Multi-channel) for Dolby Digita/MPEG-2/DTS
23
Things to Remember 23
3 Configuring Net Cinema on Network 24
Getting to know about your Network Environment 24
Pre-Requisites 24
Installing Snazzi* Net Cinema Software 25
Checking an IP Address of your computer 26
►
Why checking IP address is important 26
►
How to check an IP address 26
Connecting SnaZio* Net Cinema 27
Connecting Via Hub 27
Connecting directly to the computer 27
Connecting Net Cinema Player and PC Using Wireless 28
4 Making Net Cinema Available on Network 29
How to Setup Net Cinema for DHCP Environment 29
The Log In Screen 29
Icons Description 30
How to Add Net Cinema 31
How to Edit Net Cinema 31
How to Delete Net Cinema 32
How to Setup Net Cinema without DHCP 33
How to Setup Net Cinema Player on Wireless Network 36
5 System Options 38
TV System Setup 38
Sound Output Setup 39
DVD Setup 39
Firmware Upgrade 40
6 Playing Videos/Audios 41
Launching Snazzi* Net Cinema Software 41

5
Playing Media Contents on Net Cinema Player 41
►
Playing Video Files 42
►
Playing Audio Files 43
►
Playing Photos 43
Playing Contents from DVD Disc & USB Storage Devices 43
7 Troubleshooting 45
8 Customer Support 50
World Wide Web 50
Online Chat Support 50

6
About This Guide
This User Guide covers three products in SnaZio* Net Cinema Series namely SnaZio* Net DVD
Cinema, SnaZio* Net DVD Cinema HD and SnaZio* Net Cinema HD.
SnaZio* Net DVD Cinema
SZ1300
SnaZio* Net DVD Cinema HD
SZ1350
SnaZio* Net Cinema HD
SZ1310
DVD/VCD Discs Playback DVD/VCD Discs Playback No Disc Playback support
Up to 720p/1080i (Upscaling) Up to 720p/1080i (True High-Def
Decoding)
Up to 720p/1080i (True
High-Def Decoding)
RCA * 2 Stereo RCA *6 Surround 5.1 RCA * 6 Surround 5.1
SCART SCART ----
Sigma Designs EM8550 Sigma Designs EM8620L Sigma Designs EM8620L
* Please refer to the sections applicable to the respective models only
The
User Guide
explains each of the available option in detail, including a lot of advanced options not
available during the Setup Wizard process.
Chapter 1, “Introduction”, describes the basic functionalities of hardware, an in depth look at the
hardware components available on the unit and the remote control.
If you have an idea and you want to need help in making AV connections, skip to Chapter 2, “AV
Connections”.
If you have already made connections and you want to know about software installation Chapter 3,
“Configuring net Cinema on Network”, covers this.
If you have already did basic network connections and quickly want to configure the IP options to
make the player available on line, Chapter 4 “Making Net Cinema available on Network” covers this
If you want to know about advanced firmware options, Chapter 5 “System Options” will help you
to set the advanced options according to your choice.
If you are looking for a quick help on how to play the media contents, Chapter 6 “Playing
Videos/Audios” covers this information
Setting a Player according to your display device Often people find it difficult to install the device
and they fall into trouble, Chapter7 “Troubleshooting” covers most important information about
some of the common problems that may be faced by a customer while installing and configuring the
Net Cinema
Chapter 8 “Customer Support” will help you to contact Tech Support dept at V One Multimedia.

7
Important Instructions
Please read this section carefully in order to ensure your maximum safety while using the device. The
cautionary items will help you to prevent yourself completely from exposure to the risk of any
electric shock and the safe operations of the device.
CAUTION: To reduce the risk of fire and electric shock, don’t
remove the cover (or back) of the unit. Refer servicing only to qualified service personnel.
The lighting flash with arrowhead symbol, within an equilateral triangle, is intended to
alert the user to the presence of uninsulated “dangerous voltage” within product’s enclosure that
may be of sufficient magnitude to constitute risk of electric shock.
The exclamation point within an equilateral triangle is intended to alert the user to the
presence of important operation and servicing instructions in the literature accompanying the
appliance
Safety Information
To reduce the risk of fire or electric shock, do not expose this device to rain or moisture
Before operating the Networked DVD Player, check that the operating voltage indicated
on the backside of the device is identical with the voltage of your local power supply
Please the player on a flat, hard and subtle surface
There must be sufficient room in front of the player for the disc tray to be opened
Do not block the air vent. If the unit is in cabinet, allow about 2.5cm of free space all
around the player for the adequate ventilation
Do not expose your player to the extreme of temperature or humidity
If the player is brought directly from a cold to a warm location, or is placed in a very damp
room, moisture may condense on the lense of the disc unit inside the player. Should this
occur, the DVD player would not operate normally. Leave the player on for about one
hour with no disc inside until normal playback is possible.
Take the disc out from the tray before moving the player
The mechanical parts of the player contain self-lubricating bearings and must not be oiled
or lubricated

8
When the player is switched to Standby mode, it is still consuming some power. To
disconnect the system from the power supply completely, remove the AC power plug from
the wall socket
Handling Cautions
Before connecting other components to the SnaZio* player, be sure to turn them all off.
Do not move the layer while a disc is being played, or the disc may be broken or stretched,
and the player’s internal parts may be damaged.
Do not put any object on the player.
Be careful not to put your hand into the disc tray
Be sure to remove the disc and turn off the player after use
Disconnect the AC power cord from the AC outlet when you don’t intent to use the player
for long periods of time
Disc Storage
Be careful not to harm the disc because the data on these discs is highly vulnerable to the
environment
Do not expose the disc to direct sunlight or heating surfaces.
Keep in a cool ventilated area
Hold the disc with fingers. Hold the disc’s outer edge and/or the center spindle hole. Do
not the disc surface.
Do not bend or press the disc
Store discs in cabinet vertically, in dry condition
Clean the disc surface with a soft, dry cleaning cloth. Wipe the surface gently, radically,
from center toward the outer edge
Do not apply thinner, alcohol chemical solvent or sprays when cleaning
Laser Safety
This unit employs Class 1 complaint laser. Due to possible eye injury, only a qualified service person
should remove the cover or attempt to service this device. Avoiding this safety measure may result
in visual impairment.

9
Warning Location: On the Backplate of the Set
Copyright Information
This product incorporates copyright protection technology that is protected by method claims of
certain US Patents and other intellectual property rights owned by Macrovision Corporation and
other rights owners. Use of this copyright protection must be authorized by Macrovision
Corporation, and is intended for home and limited viewing uses only unless otherwise authorized by
Macrovision Corporation. Reverse engineering or disassembly is prohibited.
DVD Region Code
DVD Discs and DVD Players are manufactured under the worldwide agreed DVD Regional Code
System that the player will operate only with corresponding disc of the same regional code.
Regional Code
Regional
1 Canada, USA
2 Europe (incl. Poland, Romania, The Czech Republic),
Japan, Middle East (incl. Saudi Arabia, Egypt, Iran, South
Africa)
3 East Africa (incl. Hong Kong, Taiwan, South Korea),
South-East Asia
4 Australia, Caribbean, Central & South America, Mexico,
New Zealand
5 Africa, Former Soviet Union, India, North Korea, Pakistan,
Turkmenistan
6 China

10
Introduction
Welcome and thank you for purchasing SnaZio* Net Cinema series of products. Before you proceed
using this product, we recommend you read this user manual to get an overview of the product. This
chapter provides an introduction to SnaZio* Net Cinema and quick steps to configure the product.
What Is SnaZio* Net Cinema
SnaZio Net Cinema is a key component of new Digital Home Lifestyle that revolutionizes your
overall digital home entertainment experience. With SnaZio* Net Cinema series, on top of being a
full VCD/DVD & DivX player, you can now enjoy PC media contents - music, movies & Photos
on your home entertainment system wirelessly or using your LAN. It features superior decoding
technology to deliver world’s finest and rocking video/audio quality in High Definition (1920*1080i
or 1280*720p) output via DVI or component video outputs perfectly suitable for modern Plasma
Displays and HDTV
.
Key Features
Set-up a WiFi (802.11g) or LAN based Digital Home Cinema System to playback your
digital media collections stored on your PC, Notebook, iBook or iMac systems
Playback your WMV9 (HD), MPEG-1/2/4, DivX, Xvid, MOV, MP3, WMA, AAC and
PCM files from your remote computers
Browse your favorite photos stored on computer/USB HDD with stunning high
definition quality
Enjoy your growing library of music away from your computer on astounding surround
system
Listen or watch your favorite iPod music and photos like the way never before
Create home cinema system by upscale your SD movies to 720 / 1280i HDTV resolution
for projector, HDTV or Plasma displays
Browse the web on TV, locate music and read the latest news
Chapter
1

11
Key Functions Of SnaZio* Net Cinema
SnaZio* Net Cinema player can be used to:
Play videos, music and images stored in various media including Video Cds, Music Cds and
recordable DVDs
Play videos, music and images stored on a remote computer
Play Videos, music and images stored in a USB compatible Hard Disk or memory card
reader
Supported Formats
SnaZio* Net Cinema supports following video, audio and disc formats. These media formats vary
accordingly with each model’s specification. Please check the specifications of the model for more
details.
►
VIDEO FORMATS
MPEG-1, MPEG-2, MPEG-2 HD (MP@HL), MPEG-4, DivX, DivX HD, WMV9, WMV9 HD
►
AUDIO FORMATS
MPEG-1 Layer 1/2/3 (MP3), OGG Vorbis, AC3, MPEG-4 AAC (Low complexity, 5.1 channel),
WMA9, PCM, THX, DTS, Dolby Digital, WMA9 Pro, AC3 and PCM
►
DISC FORMATS
DVD (Single/Double sides) (Single/Double Layers), DVD-R/RW, DVD+R/RW, CD-R, VCD,
DivX 4.02 or above without QPEL and GMC, MPEG-4 ISO, CD, CD-DA, MP3, WMA (8.0) or
above, Picture CD

12
Before You Start
Package Contents
SnaZio* NET DVD Cinema HD unit.
One Remote Controller.
One pair of battery.
One LAN cable.
One RCA cables (3) x 2 (1 yellow, 1 red and 1 white).
One user’s manual.
One Snazzi* NET Cinema installation disc.
Product Registration and Warranty card.
Install Batteries in the Remote Control
►
IF THE REMOTE CONTROL DOES NOT OPERATE PROPERLY
Check the polarity + - of the batteries
Check if the batteries are drained
Check if remote control sensor is blocked by obstacles
1
Open the battery cover on
the back of the Remote
Control
2
Insert the two AAA
batteries. Make sure that
the polarities (+ and -) are
aligned correctly. Replace
the battery cover

13
Description
Front Panel Controls
1. Power Button
W
hen pressed or down, the
device is powered on and when
UP, the device can be turned off
2. VFD
Operation indicators like
counter, standard mode and TV
mode of the player are displayed
here
3. Remote Control Receiver
Remote Controls signals are
being received via this receiver.
Remote control must be in 4-6
m range from this part
4. Disc Tray
Place the disc here
5. Open/Close
Press to open and close the disc
tray
6. USB2.0 Drop down Panel
Slide this panel downward from
the right side and connect your
USB devices
7. Play/Pause
Begin or Pause disc play
8. Stop
Stops disc play
9. Previous Search
Use to reverse skip a scene or
music
10. Next Search
Use to forward skip a scene or
music
14
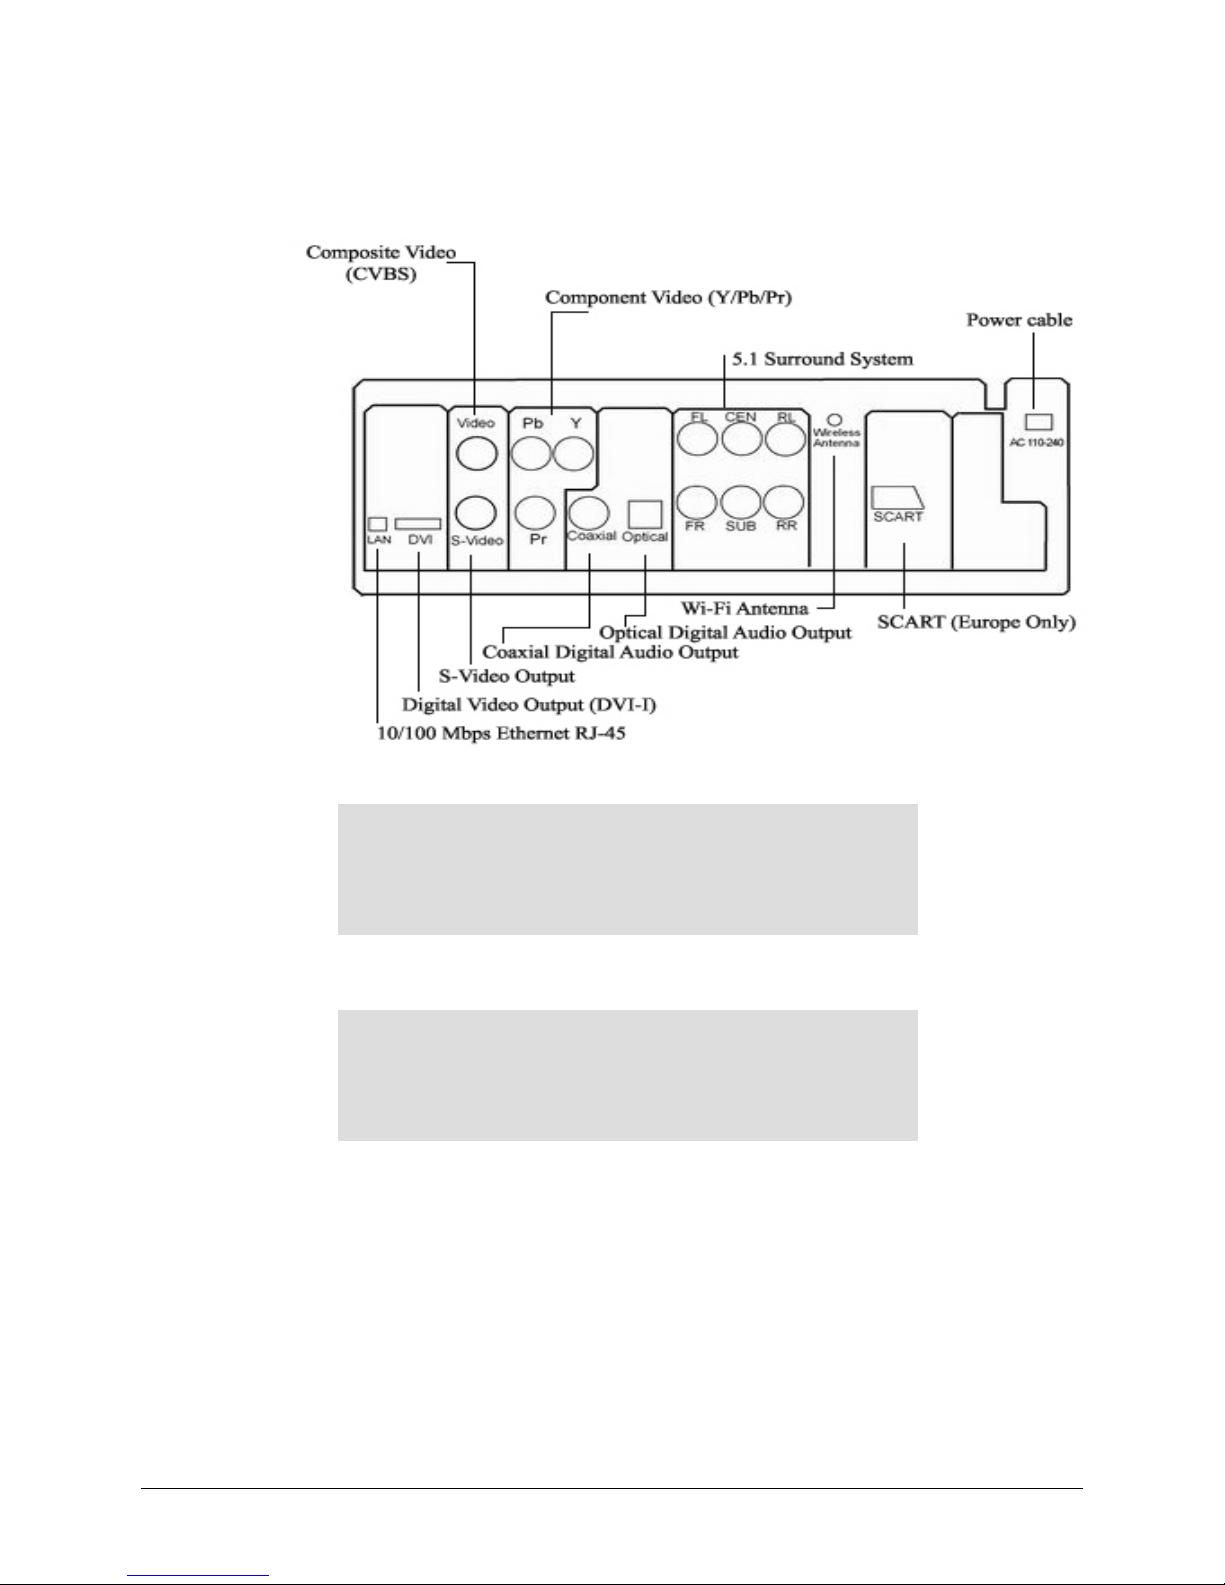
Rear Panel (Illustration only for SZ1350)
Things To Remember
If your plasma only support HDMI input, the DVI output of the player can be connected
using SnaZio* DVI to HDMI adaptor.
If DVI video output is selected in Setup menu, composite or S-Video outputs do not work.
Refer to the VFD part on the front panel to check the TV mode or your player. The TV
mode must match with the output source monitor.
V
ideo Jacks
There are five different videos jacks on the backside of the
device namely DVI, Composite, S-Video, Component and
SCART.
A
udio Jacks
T
here are three different audio jacks on the backside of the
device namely Optical, Coaxial and 5.1 surround system to
connect with your output amplifier.
15
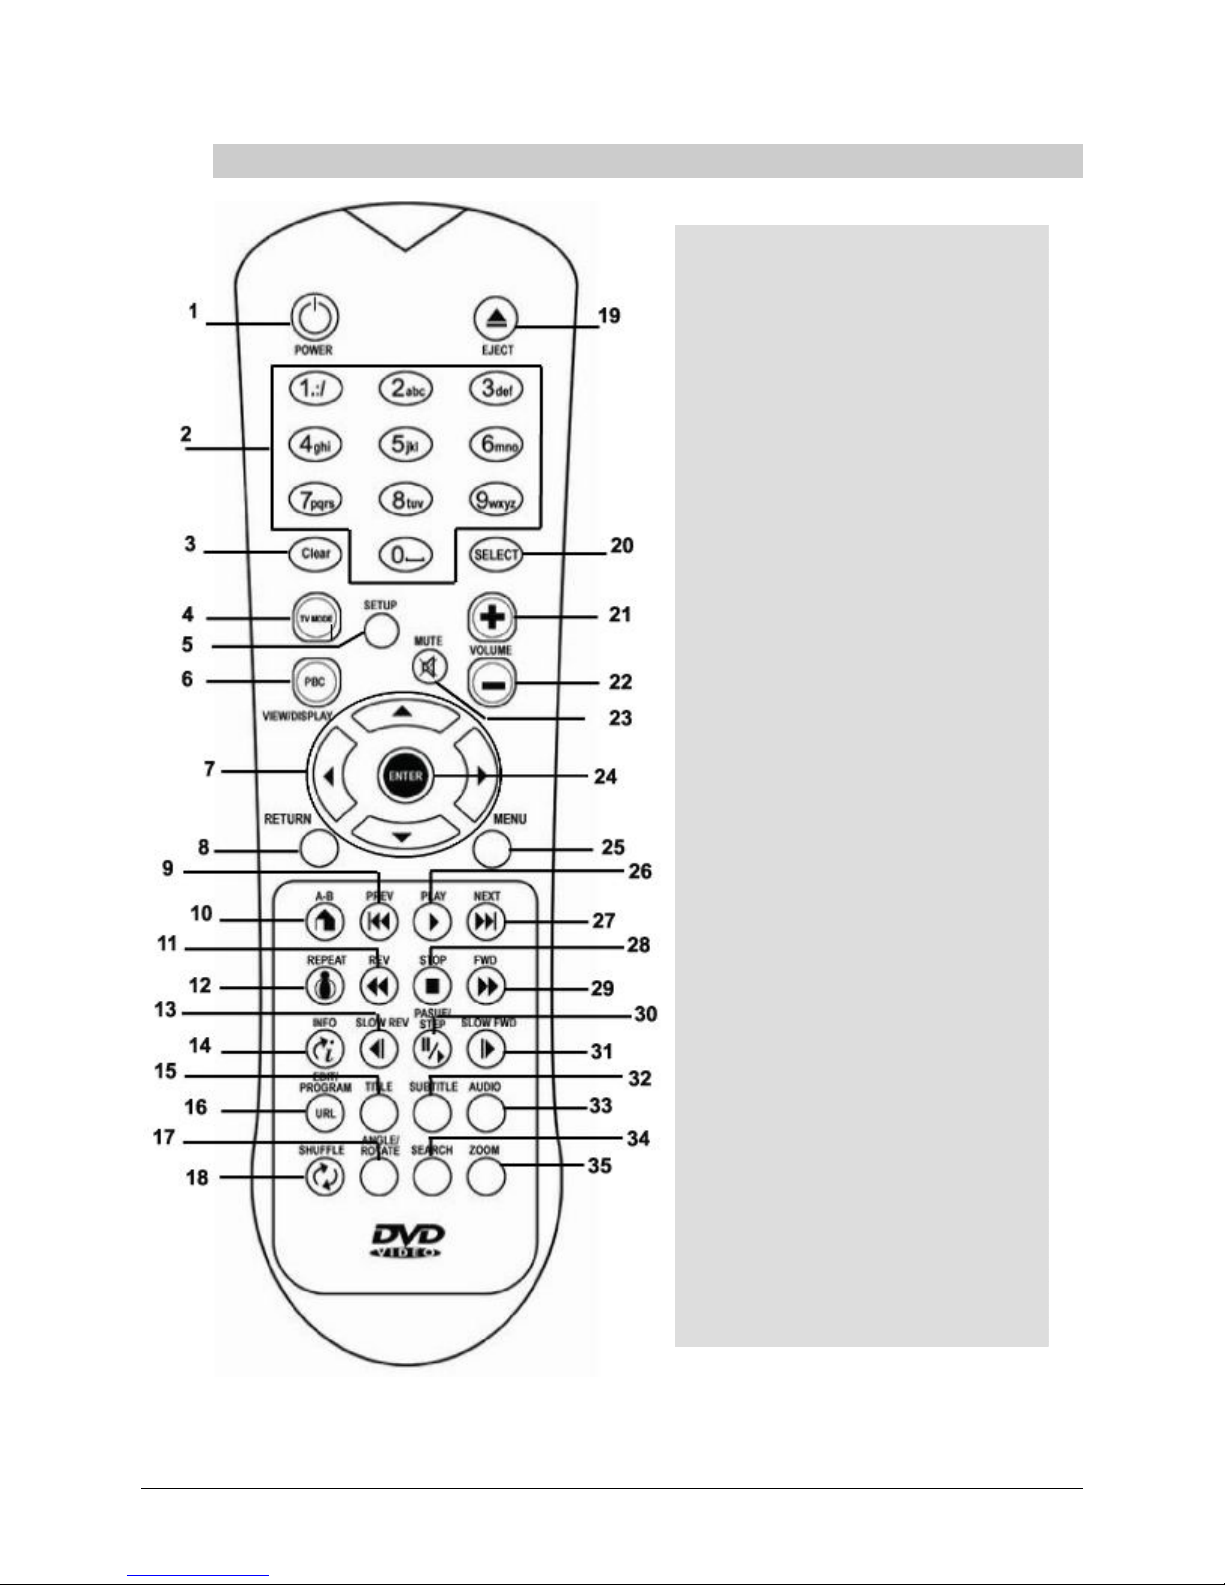
Remote Control Tour
1. Power
2. Alphanumeric Buttons
3. Clear Button
4. TV Mode Button
5. Setup
6. PBC/View/Display
7. Direction Selector Buttons
8.Return
9.Skip Prev Button
10. A-B Button
11. Rev/Search Back
12. Repeat
13. Slow Rev
14. Info
15. Title
16. Edit/Program (URL)
17. SHUFFLE
18.Angle/Rotate
19. OPEN/CLOSE
20. Select
21.Volume (+)
22. Volume (-)
23. Mute
24. Enter
25.Menu
26. Play
27. Skip Next Button
28. STOP
29. Fwd/Search Forward
30. Pause/Play
31. Slow Fwd
32. SUBTITLE
33. Audio
34. Zoom
35. SEARCH

16
For DVD For Network
1. Power Turns the power on or off Turns the power on or off
2. Alphanumeric Input Digital button, for item
selection &
Programming
Enter text during setup or
web browsing
3. CLEAR Not Used Delete the character
immediately before the
cursor.
4. TV MODE Switch the player’s output
mode to
Composite/S-Video
DVI
SCART
Component
With assigned resolutions
NOTE: The selected value
will not work the next time
you power-on the device
Switch the player’s output
mode to
Composite/S-Video
DVI
SCART
Component
With assigned resolutions
NOTE: The selected value
will not work the next time
you power-on the device
5. SETUP Enter setup menu Enter setup menu of the
player
6. PBC/VIEW/Display PBC on, menu displayed;
PBC off menu disappeared
and playing started directly
(For VCD only)
Not Used
7. Direction Selector For Direction Selection
The two horizontal buttons
will work to jump to any
specific percentage of the file
between 1-100 values.
8. RETURN Not Used Return to the last step. This
button only works while
navigating through files on
network. You must press stop
if you are playing any file
9. Skip Prev
In the DVD mode, pressing
this button will play the
previous chapter or track
During continuous list
playback, pressing this button
will play the immediately
preceding file in the list
10. A-B Click one time to Pressing this button will
return to the Snazzi* Net
Cinema menu if you are in
any sub-folder or browsing
the internet
11. Rev/Search back In DVD mode, pressing this
button will the file with four
speeds at X8, X16, X32 or
X48 each time the button is
pressed
Reverse at the rate of X1, X2,
X3 or X4; return to the root
directory from the submenu
12. REPEAT Optionally repeat
chapter/title or no repeat
Return to Snazzi* Net
Cinema interface from
submenu or Webpage
13. Slow Rev Slow reverse at 1/2X, 1/4X
or 1/8X speed
Not Used

17
For DVD For Network
14. INFO Display Title/Chapter/Angle
information on screen
File information of the
playing file will be displayed.
Pressing again this button will
turn off the file info panel.
15. TITLE Return to the main menu in
playing mode
Not Used
16. Edit/Program (URL) Not Used Display the address or
browse the website by keying
in the URL
17. SHUFFLE Not Used Repeat the
movie/song/picture in
playing mode; refresh button
for the root directory or
Webpage
18. ANGLE/ROTATE Multi-angle optional playing Rotate the picture, press
“PLAY” to return
19. OPEN/CLOSE Open/Close the disc tray Open/Close the disc tray
20. Select Display Title/Chapter/Angle Capital/between 1-100
values.
21. Volume (+) Increase the volume Increase the volume; Page Up
when browsing internet
22. Volume (-) Decrease the volume Decrease the volume; Page
Down when browsing
internet
23. Mute Mute On/Off Mute On/Off
24. ENTER Confirm Selection Press the key to select the
item you selected by direction
keys
25. MENU Display the disc menu Same as direction buttons
under the multi-root directory
26. Play Play Press this key to play the
program which you selected
online
27. NEXT Play next item or chapter in
playing mode
Return to the next
chapter/picture in playing
mode; return to the root
director from submenu
28 STOP Stop Stop
29 FWD Forward at X8, X16, X32 or
X48 speed
Forward at X1, X2, X3, X4
or X8 speed in playing mode;
return to the root directory
from submenu
30 Pause/Play Pause/Play Pause/Play
31 Slow Fwd Slow Forward at 1/2X, 1/4X,
1/8xXspeed
Slow Fwd at X1, X2, X3, X4
or X8 speed when see a
movie online
32 SUBTITLE Select the subtitle language Not Used
33 Audio Stereo/Left/Right audio
output switch
Stereo/Left/Right audio
output switch
34 Zoom Zoom in or out Zoom in or out
35 Search Search a chapter or time to
start playing
Not Used

18
AV Connections
Choosing a Connection
The following chapter shows examples of connections commonly used to connect the SnaZio* Net
Cinema player with the TV/HDTV and other components. There are a number of ways to connect
the player to an AV system depending on the type of TV and other AV equipment in your existing
system.
Before
Connecting the SnaZio* Net Cinema Player
Always turn off the Net Cinema player, TV, and other equipment before you connect or disconnect
any cables.
Refer to the user’s manual of the additional AV system you are connecting for more information on
those particular components.
Connection to a TV (Composite Video)
Chapter
2
1
Using video/audio cables, connect
the VIDEO (yellow)/AUDIO (red
& white) OUT terminals on the rear
of the player to the VIDEO IN
terminals of
y
our T
V
2
Turn on the Net Cinema player and
TV
3
Press the TV mode button on your
remote control until the video signal
from the player appears on the TV
screen

19
Connection to a TV (S-Video)
Connecting to your TV using an S-Video Cable.
You will enjoy high quality videos as S-Video carries the luminance and chrominance signals
separately thus reducing the chances of interference as compare to composite video
Connection to a TV (SCART)
1
Using an S-Video cable, connect the
S-Video OUT terminal on the rear
of the player to the S-VIDEO IN
terminal of your TV
2
Using the audio cables, connect the
A
UDIO (read & white) OUT
terminals on the rear of the player to
the AUDIO IN terminals of your
TV. Turn on the player and TV
3
Press the TV mode button from the
remote control until the S-Video
signal from the player appears on
your TV screen
1
Using SCART, connect the SCART
OUT terminal on the rear of the
player to the SCART IN terminal o
f
your TV
2
Press the TV mode button from the
remote control until the SCART
signal from the player appears on
your TV screen

20
Connection to a TV (Component)
Component connections provide Progressive Scan option ensuring flicker-free image with highest
possible quality. To enjoy the advantages of progressive, your television set must be capable of
handling Progressive Scanning.
Consult your TV User’s Manual to find out if your TV supports Progressive Scan. Depending on
your TV, the connection method may differ from the illustration used here.
1
Using component video cables,
connect the COMPONENT
V
IDEO OUT terminals on the rear
of the player to the
COMPONENT IN terminals of
your TV
2
Using the AUDIO (red and white)
OUT terminals on the rear of the
player to the AUDIO IN terminals
of your TV
3
Press the TV mode button from the
remote control until the component
signal from the player appears on the
TV screen
Table of contents


