Sokkia SHC6000 User manual

i
SHC6000
Field Computer
Operator’s Manual

ii SHC6000 Field Computer Operator’s Manual
Copyright ©July 2019 Sokkia, Inc. All rights reserved.
Information is subject to change without notice.
Sokkia® is a registered trademark of Sokkia, Inc. SHC6000 eld
computer is a recognized trademark of Sokkia, Inc.
Windows®, Windows 10, and the Windows logo are trademarks
or registered trademarks of Microsoft Corporation in the
United States and/or other countries.
The Bluetooth® word mark is owned by the Bluetooth SIG, Inc.
Any use of such marks by Sokkia, Inc. is under license.
The names of other companies and products mentioned
herein may be the trademarks of their respective owners.
WARNING! This symbol indicates that failure to follow
directions could result in serious injury.
CAUTION: This symbol indicates that failure to follow directions
could result in damage to equipment or loss of information.
Part Number 28662-00 JS, 1034928-01 Sokkia
!
!
tel: 1-800-4-Sokkia l web: http://us.sokkia.com/
16900 W. 118th Terrace, Olathe, KS 66061

iii
Contents
1Getting Started 1
Overview 2
The Anatomy of the SHC6000 2
Perform Initial Tasks 4
2Standard Features 7
Keypad Features 9
LED Activity Indicators 10
Light Sensor 11
Connector Ports 11
Audio Features 12
Sensors 13
Bluetooth® Wireless Communication 13
Wi-Fi Wireless Networking 14
GPS/GNSS 14
Camera 15
Power Management 15
3Optional Features and Accessories 19
4G LTE Data Modem 20
Oce Docking Station 21
Battery Charger 24
AStorage, Maintenance, and Recycling 25
Storing the SHC6000 and Battery Pack 26
Protecting the Touchscreen 26
Recycling the SHC6000 and Batteries 27
BWarranty and Repair Information 29
Limited Product Warranty 30
Complete Care Service Plans 33

Getting Started
1

2 SHC6000 Field Computer Operator’s Manual
Getting Started
Overview
The SHC6000 eld computer from Sokkia uses the Windows 10
Pro operating system. Standard features include a 7” display,
capacitive touchscreen, keypad, Bluetooth, Wi-Fi, GPS/GNSS,
and front and rear cameras. Standard accessories include
a removable battery pack, an internal battery pack, an AC
wall charger, a hand strap, a connector port cover, a ne tip
capacitive stylus and tether, and a foam tip stylus for use
in wet conditions. Optional features include a 4G LTE data
modem.
The Anatomy of the SHC6000
Front and Back Features
1 Ambient Light Sensor
2 Front Facing Camera Lens,
2 MP
3 Keypad
4 Power Key
5 Notication LEDs
6 Touchscreen and Display
7 Protective Over-molded
Bumper (all four edges)
8 Microphone (one on each
side)
1 2 43
6 7 8
5
9Storage Slot for Fine Tip
Stylus
10 Location of Internal Battery
(not user accessible)
11 External Device Attachment
Point (1 of 3 on the back)
12 Door to Removable Battery
Compartment and Card Slots
13 Battery Door Lock
14 Speaker
15 Camera Flash
16 Rear Facing Camera Lens,
8 MP
9 10 11 12 13 14 15 16

Chapter 1 Getting Started 3
Battery Compartment and Card Slots
Connector Ports
1 Battery Pack, Removable
2 Battery Door
3 Micro SIM Card Slot and
Micro SD/SDHC Card
Slot (underneath card
retainer)
4 Flexible Card Retainer
5 Battery Compartment
6 Docking Connection
7 Hand Strap Attachment
Point (2 on each side)
2
1
5
4
3
6
7
8 Connector Port Protector
9 12 VDC Power Input Jack
10 USB 3.0 Host, Full Size
11 Audio Jack
12 Storage Slot for Fine Tip
Stylus
91011
8
12

4 SHC6000 Field Computer Operator’s Manual
Perform Initial Tasks
When you receive your SHC6000, perform the tasks outlined
in this section before rst use.
Review Documentation
This owner’s manual and other documents like release
notes are available on our website at: https://us.sokkia.com/
sokkia-care. View, download, and print documents as desired,
either on the SHC6000 or another computer with an internet
connection. A PDF viewer is included with your SHC6000 apps.
Install and Charge the Battery Pack
The SHC6000 comes with a rechargeable and removable Li-Ion
battery pack. Install and charge the battery pack as follows:
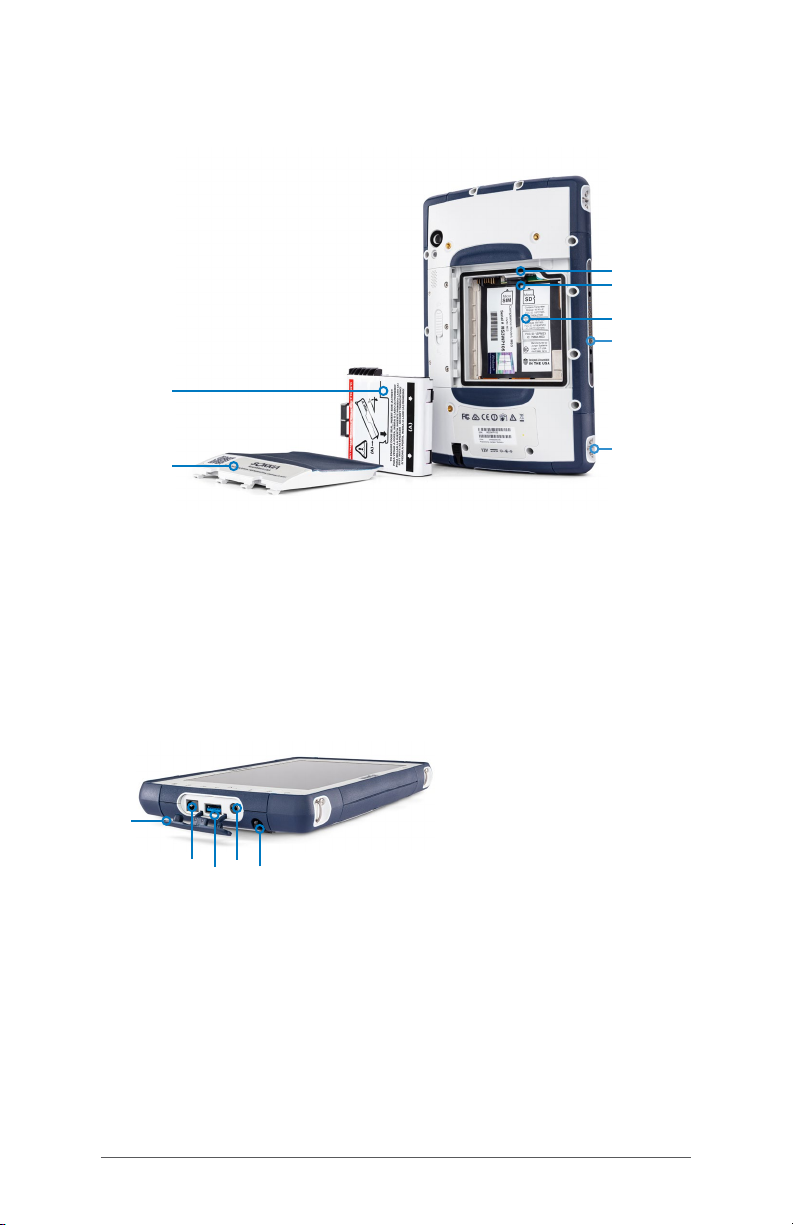
1. The battery compartment is accessed from the back of the
SHC6000. Push the battery lock switch in, slide it to the
unlocked position, and remove the door.
CAUTION: The SHC6000 is not sealed against water and
dust when the battery door is not installed.
2. If you are using a micro SD card for additional memory or
a micro SIM card with the Cellular Data Modem (optional),
you can install them now before you install the battery
pack or at another time. If you do this, make sure you
replace the exible card retainer before installation of the
battery. See Chapter 2, SD Cards or Chapter 3, Install the SIM
Card for details.
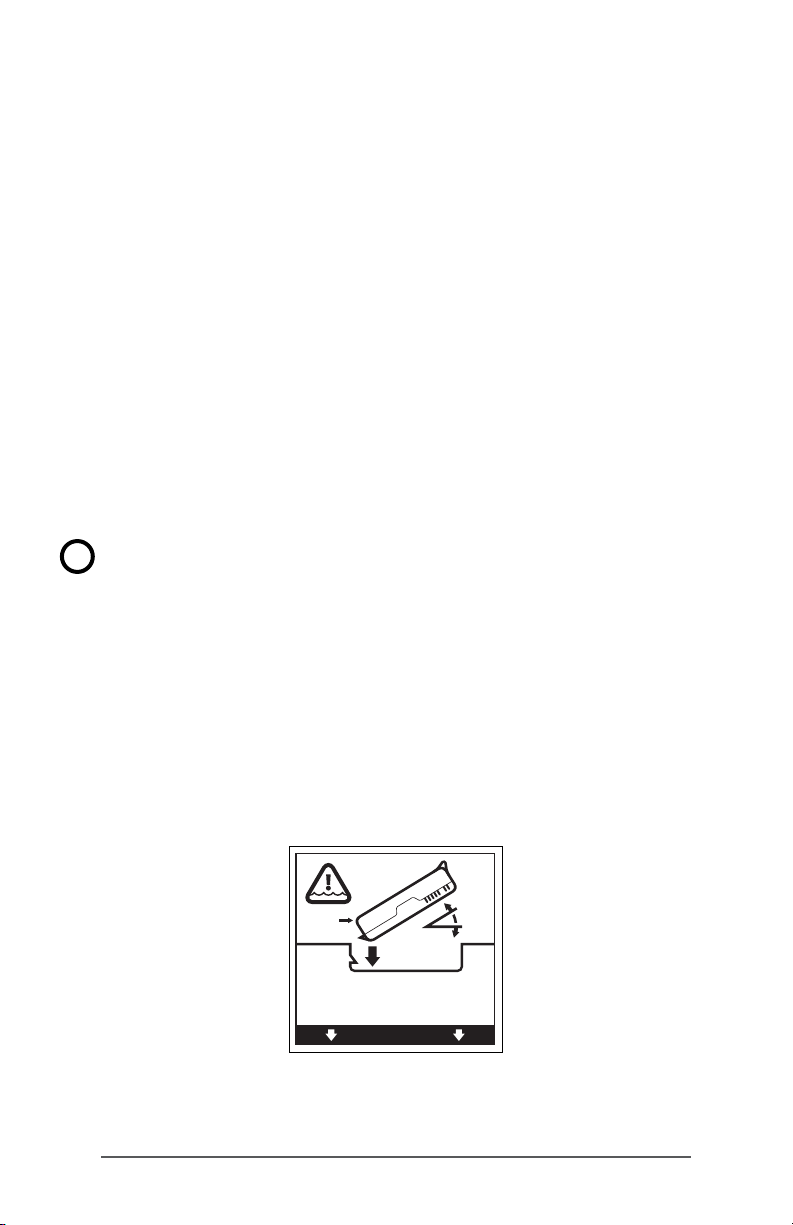
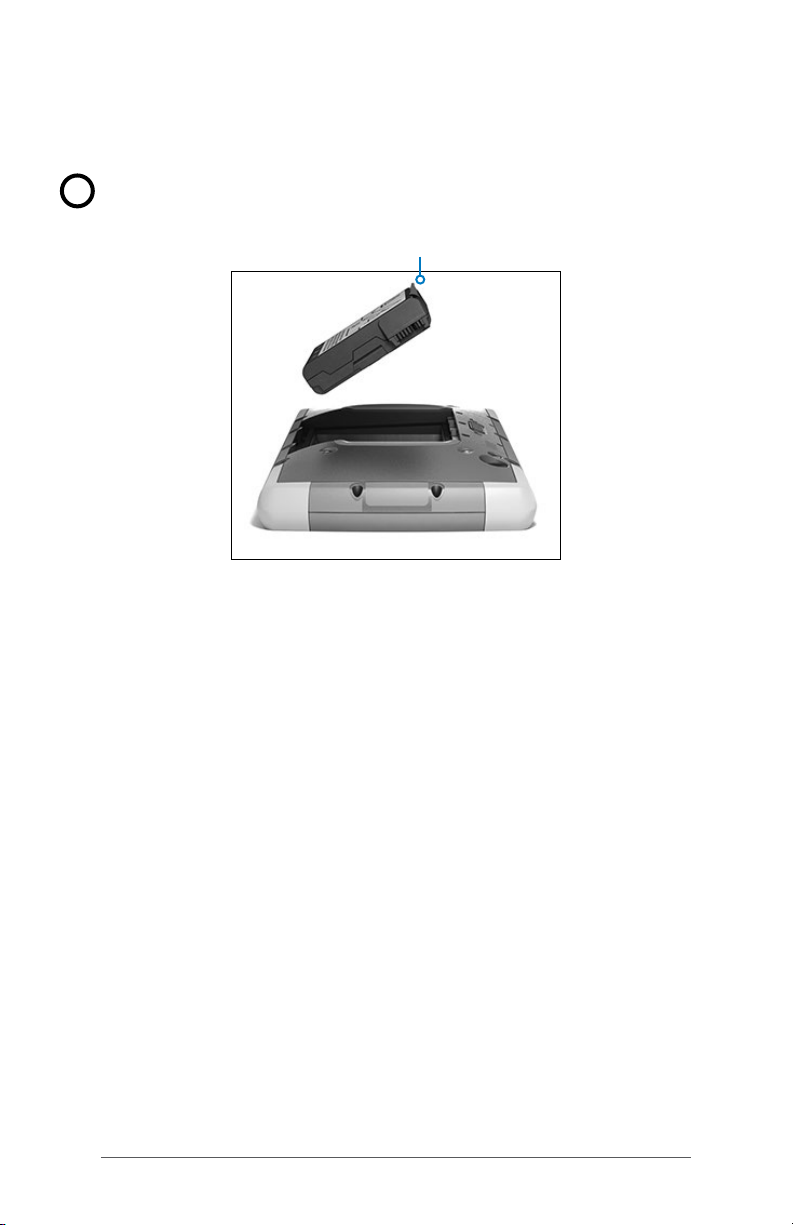
3. Follow the graphic on the battery label to insert the
battery pack properly.
Hold the battery so that the black tab on the front edge
of the battery is up and facing the door latch (this tab
!
TO ENSURE DOOR SEAL, INSERT SIDE (A) FIRST!
PARA VEDAR A PORTA, INSIRA O LADO (A) PRIMEIRO!
PARA SELLAR LA PUERTA, INSERTE PRIMERO LADO (A)
ERST SEITE (A) EINLEGEN – SICHERT TÜRDICHTUNG!
P/ VEDAR A PORTA, INSIRA O LADO (A) PRIMEIRO!
(A)
(A)

Chapter 1 Getting Started 5
helps you pull the battery out). Place the back edge in rst,
gently pushing it underneath the two battery catches.
Rotate the front edge down until it is in position.
CAUTION: Do not insert the battery pack straight down.
Damage to the unit could occur.
4. Replace the door and press down on it until the latch pops
into the locked position.
5. Attach the appropriate plug for your country into the AC
wall charger and plug it into a wall socket. Plug the other
end into the DC power jack on the SHC6000.
Note: Use the AC wall charger that came with the SHC6000 or
another approved charger from Sokkia.
6. Charge the battery pack at room temperature (68°F or
20°C) for 6 hours (for the rst charge). While the battery
pack is charging, the red LED blinks. When it is fully
charged and external power is applied, the red LED is
solid.
Note: The SHC6000 will not recognize an internal battery until
the SHC6000 is being charged for the rst time.
Perform Set Up
The rst time the SHC6000 is powered on, Windows setup
options are shown. Follow the prompts to set up your unit as
desired.
!
Black Tab

6 SHC6000 Field Computer Operator’s Manual
Attach the Hand Strap and Stylus Tether
A hand strap, ne tip capacitive stylus, and tether are included
with the SHC6000.
Hand Strap
To attach the hand strap to the SHC6000, follow the images
below. You can attach it to the right or left side of the
SHC6000:
Stylus Tether
1. Attach one end of the stylus tether to the stylus.
2. Push the free tether loop through one of the tether
attachment points located on the side of any of the four
corners of the SHC6000.
3. Insert the stylus with the attached tether through this loop
and tighten the loop.
4. Place the stylus into the stylus storage slot located on the
bottom of the SHC6000.
1
2 3

Standard Features
2

8 SHC6000 Field Computer Operator’s Manual
Standard Features
This chapter discusses the standard features included with
every model of the SHC6000 eld computer with Windows 10
Pro.
Display and Touchscreen
The SHC6000 has a bright color display and capacitive
touchscreen with a diagonal viewing area of 7 inches
(178 mm).
DisplayandTouchscreenProleSettings
Display Settings
To adjust the display settings including the text size,
brightness, and orientation, go to the Action Center and select
All settings > System > Display.
Backlight Brightness
There are a few shortcuts to adjust the display backlight
brightness.
Open the Action Center. Tap the percent tile (sun icon) to
toggle the display backlight brightness up or down in 25%
increments from 0% to 100%. This same tile can be accessed
by tapping the battery icon on the desktop. To simply dim the
backlight, tap the Battery saver tile. Tap it again to return it to
the previous brightness.
Touchscreen Prole Settings
To adjust the touchscreen prole, go to the Start menu and
select Touchscreen Proles. Select the touch prole you want
the screen optimized for: Finger and Stylus (default), Finger,
Stylus, Wet, or Glove. As the new prole loads, a progress bar
is shown. Do not interrupt the loading process. You can try
dierent proles to see which one works best.
Using the SHC6000 in Wet Conditions
When using the SHC6000 in wet conditions, you must use
your nger or the soft-tipped stylus that is included on the
capacitive touchscreen, even if the Wet touchscreen prole
is selected. The hard-tipped stylus is not supported with the
Wet touchscreen prole. Third party styli may work with the
SHC6000 touch screen, however, performance may vary.

Chapter 2 Standard Features 9
Calibration Tool - Do Not Use
If the Windows 10 screen calibration tool is used, it may
degrade touchscreen performance.
Keypad Features
The SHC6000 has programmable keys, a power/suspend key,
windows key, enter key, and a navigation pad.
The keys are sealed and have backlight illumination.
Key Function
Windows Start screen
F2 Volume down (programmable)
F1 Volume up (programmable)
Move left
Move right
Move up
Move down
Enter (return)
ESC Escape key (programmable)
Power
Press and release: On or sleep
Hold for 5 seconds and pull down screen: Power o
Hold for 10 seconds: Reset device.
Hold for 20 seconds: Electrically disconnect the
battery pack(s); to reconnect the batteries, you
are required to plug in the charger or external 12 V
power.
!
!

10 SHC6000 Field Computer Operator’s Manual
Programmable Keys
The F1, F2, and ESC keys can be congured to launch
applications or functions.
To assign the programmable keys, open the Start menu
and select Keypad (located at the bottom of the Start menu
screen in a shortcut tile). The Keypad Buttons and Backlight
panel appears. The programmable keys and their current
assignments are shown. Select your preferred function per
key from the drop down menus.
Keypad Backlight Brightness
To adjust the keypad backlight brightness, go to the Start
menu and select Keypad. At the bottom of the Keypad Buttons
and Backlight panel is a slider that adjusts the keypad backlight
brightness. You can make the backlight brighter by moving the
slider to the right or turn it down by moving the slider to the
left. Dimming the keypad backlight extends battery life when
the SHC6000 is in use.
LED Activity Indicators
LED activity indicators are located on the front of the SHC6000
in the upper-left corner.
Red LED, solid: 1) When the SHC6000 is put to sleep or
powered o by pressing the power key , the red LED is
solid until the unit has successfully completed the process,
and then the red LED turns o. If powering o the device,
do not remove the battery while the light is solid. 2) The
AC wall charger is plugged in and the battery is full (not
charging).
Red LED, blinking: The AC wall charger is plugged in and the
battery is in the process of charging.
Green LED, solid: Turns on when the system is booting,
programmable.
Blue LED, solid or blinking: Programmable.
Amber Light: Front or rear facing camera is in use.
The green and blue LEDs are in the same location. They cannot
be shown simultaneously. These LEDs can be programmed by
a developer. Sample code is available upon request.

Chapter 2 Standard Features 11
Light Sensor
All units have an ambient light sensor located on the front
of the SHC6000 in the upper-right corner. The light sensor
dynamically adjusts the backlight on the display.
You can disable this process and manually control the
display brightness if you prefer. Go to the Start menu and
select Settings > System > Display. Turn o Change brightness
automatically when lighting changes and tap Apply. To
manually adjust the display backlight, tap on the battery
icon at the bottom of the desktop screen. The display
backlight brightness can easily be toggled up or down in 25%
increments from 0% to 100% by tapping the percent tile (see
the sun icon).
Connector Ports
The SHC6000 has a 12 VDC power input jack, USB 3.0 Host
type A, and a 3.5mm audio jack.
Connector Protector
The connector protector is removable and replaceable. To
remove it, pull it out of the ports, then gently pull the curved
rubber retainers out of the holes they are in. Replace it by
inserting the curved rubber retainers back into the holes. See
your sales representative if you need a new one.
Note: The connector protector is not required to maintain the
seal of the connectors or the SHC6000. The connector protector is
intended as a port dust cover
SD Cards
The SHC6000 has a slot for a micro SD card located in the
battery compartment. The card slot and exible card holder
are designed to hold the card securely in place so it will not
come out or disconnect if the SHC6000 is dropped. To insert or
remove a card, follow these steps:
1. Power o the SHC6000.
2. Remove the battery door as outlined in Chapter 1.
CAUTION: The SHC6000 is not sealed against water and
dust when the battery pack and battery door are not
installed properly.
!

12 SHC6000 Field Computer Operator’s Manual
CAUTION: Always power o the SHC6000 before
removing the battery. Failure to do so may cause loss
of data or damage to the SHC6000. EXCEPTION: If your
SHC6000 has an internal battery, this caution does not
apply. You can safely remove the removable battery while
the unit is running.
3. Remove the battery pack by pulling up on the black tab on
the battery pack.
4. An image on the battery compartment label shows the
correct location and orientation for the SD card (slot on
the right). Pull the exible card holder back out of the way.
Push the card into the slot to insert it.
5. Push the exible card holder back into place, covering the
card slots.
6. Replace the battery pack, and attach the battery door.
To remove the SD card, pull it out. Use tape or an eraser if you
have trouble.
Audio Features
The SHC6000 has the following audio features:
Speaker - The speaker provides audible indicators and
program feedback. You can listen to mono audio les and
watch video. For stereo audio, use Bluetooth, headphones or
HDMI output from the optional dock.
Microphone - Use the microphones to record audio notes
or include sound in a video, using the camera. Built in
microphones can also be used for Skype calls.
Audio Jack - The audio jack supports a stereo headset
or headset/microphone combination with 3.5 mm
connections.
!
SD Card
Slot
Flexible
Card Holder

Chapter 2 Standard Features 13
Sensors
Compass, Accelerometer, and Gyroscope
The SHC6000 has a built-in compass and accelerometer. The
accelerometer assists the compass in determining direction,
even when the device is not resting at. The gyroscope senses
change in angular motion. The compass, accelerometer, and
gyroscope can also be used by other user applications.
Compass Calibration
The compass has been factory calibrated. Periodic user
calibrations help the compass function in the environment the
SHC6000 is being used in.
1. Open an app that uses the compass.
2. Move the SHC6000 around in the air so that it is oriented
in dierent directions and angles. An eective way to
assure this is properly done is to move the SHC6000 back
and forth in a sideways gure 8 for approximately 30
seconds.
Bluetooth®Wireless Communication
The SHC6000 has built-in Bluetooth® wireless technology,
allowing you to connect it to other wireless devices with
Bluetooth technology.
Creating a Partnership/Pairing a Bluetooth Device
To create a partnership between the SHC6000 and another
device with Bluetooth technology:
1. Turn both devices on.
2. Place them within a few feet of each other. (The SHC6000
has long range Bluetooth, but the other device might not.)

14 SHC6000 Field Computer Operator’s Manual
3. Make Bluetooth discoverable on both devices. Bluetooth
on the SHC6000 is o by default. To activate it, open the
Action Center and press and hold the Bluetooth icon. Select
Go to settings.
4. In the Bluetooth settings screen, you should see a list of
all Bluetooth devices within range. Tap on the name of
the device in the list you would like to pair with, then tap
Pair. If prompted, enter the PIN or pass code of the paired
device. You should now be paired with the device.
Note: If Bluetooth is on and the SHC6000 enters sleep or
hibernate mode, Bluetooth turns o to save battery power. The
connection is resumed once it powers back on.
Wi-Fi Wireless Networking
The SHC6000 has built-in Wi-Fi wireless networking to connect
to the internet or an oce network.
Connecting to a Wi-Fi Network
To use Wi-Fi, you need to be in range of a Wi-Fi access point to
make a connection. When Wi-Fi is turned on (the default), the
SHC6000 automatically starts scanning the area for available
Wi-Fi networks.
From the Action Center, click and hold the Wi-Fi network icon,
then select go to settings. A list of available networks is shown.
Select the network you want to use and enter the network
security key. The SHC6000 remembers the Wi-Fi network
connections created.
Wi-Fi can be turned o and on and settings can be managed
from this set up screen.
GPS/GNSS
The SHC6000 eld computer uses an integrated GPS/
GNSS receiver with an internal antenna to provide position
information. Use Maps to see your location and ensure that
the receiver is working. Open the Start menu and select Maps.

Chapter 2 Standard Features 15
GPS/GNSS Support
Integrated GPS/GNSS Support in Windows
The Windows operating system provides built-in support
for GPS/GNSS devices. As part of that support, the Windows
Sensor and Location platform provides a standard way for
GPS/GNSS information to be made available to applications
that have been designed using the Windows Sensor and
Location application programming interfaces (APIs).
Legacy Support
In addition to the Sensor and Location APIs, legacy
applications that require access to a serial port can access
NMEA data through a serial COM port interface. The name
of the COM port can be found by using Device Manager and
looking under Ports (COM & LPT) for “u-blox Virtual COM port
(COMx) where “x” is the port number allocated on your device.
GPS/GNSS Accuracy
The GPS/GNSS antenna is at the top under the notication
LEDs. It is intended to work in both portrait and landscape view.
Do not put your hand or another object over this area. Accuracy
may be reduced. The more items between the antenna and the
satellites, the lower the accuracy.
Camera
The SHC6000 has a front facing camera that is 2 MP and a rear
facing camera that is 8 MP.
You can capture both still images and videos using the
camera application. Other options include a timer, ash, and
brightness settings.
Photo and Video Library
Photographs and videos are automatically stored in the
Pictures folder.
Power Management
The SHC6000 runs on battery power, using a rechargeable, Li-
Ion battery pack. The SHC6000 also has an internal battery. The
SHC6000 operates on either or both battery packs.

16 SHC6000 Field Computer Operator’s Manual
Charging the Battery Pack(s)
For instructions on how to insert and charge the removable
battery pack, refer to Chapter 1, Getting Started.
For units that have both a removable battery pack and an
internal battery pack, the intelligent internal battery charging
circuit rst charges the battery pack with the least amount of
energy. When this battery pack comes to the same level as the
other battery pack, then both battery packs are charged at the
same time until they are both fully charged.
Battery packs are charged most eciently at room
temperature (68°F or 20°C). They will not charge if it is too hot
or too cold.
Battery Status and Management
To nd out how much battery life you have left, tap on the
battery icon at the bottom of the desktop screen. The amount
of charge left as a percent and the status of each battery is
shown. The cumulative amount of battery life left for installed
batteries and the approximate amount of time battery
power will last is also shown. The amount of time left varies
depending on what you are doing with the unit.
Battery Life
Battery life on a full charge can be 18 hours or more. This
varies depending on the applications used, backlight usage,
and radio usage.
The shelf life for battery packs is about one year. The
battery packs should be recharged at least once per year.
This prevents the battery packs from discharging to a level
that might damage the batteries. Battery packs that are not
recharged at least every year, could fail to work or may have
reduced capacity. Battery packs typically last 1,000 to 3,000
charging cycles.
CAUTION: Only use batteries designed for the SHC6000 from
an approved vendor. Use of non-approved batteries may void
your product warranty. The SHC6000 must be returned to
!
Table of contents
Other Sokkia Desktop manuals