S
OKO
Y
O
Light up every road back home
6
1
3
2
5
4
Installation Manual For C00LEX
All In One Solar Street Light
3.
Specification
Mainly used for lighting in public places such as countryside roads, urban main roads or
slow traffic roads, branch roads, tourism areas, parking lots, parks and public squares.
2.
Application
This model includes solar panel, lithium battery, controller and LED light source.
It is easily assembled according to the product label. This model is made of LED module,
and replacement is simple.
1.
Instruction
Packing Dimension
Lamp Weight
Wind Resistance
Installation Diameter
IP Rate
Lamp Dimension
Mounting Height
Working Environment
CRI
Light Efficiency
Color Temperature
Rated power
Lithium Battery
Solar Panel
Module Quantity
Model No.
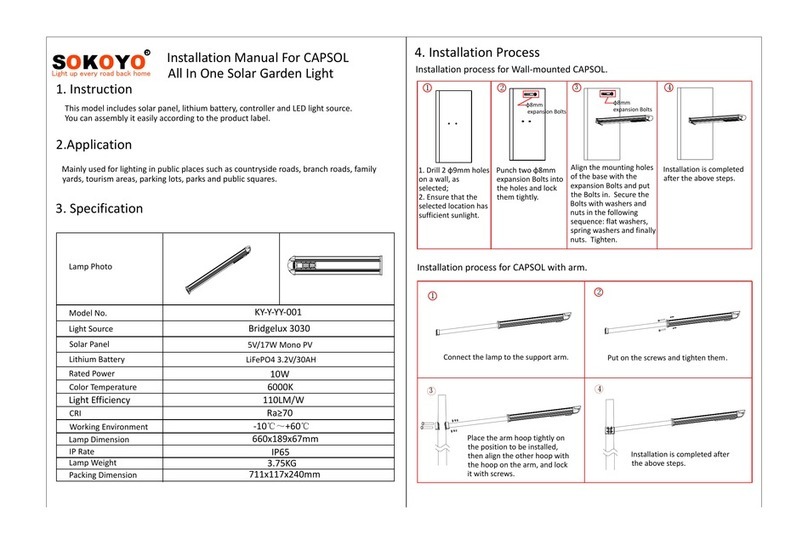
Lamp Photo
KY-Y-YJ-001 KY-Y-YJ-002 KY-Y-YJ-003
1PCS 2PCS 2PCS
18V/130W Mono PV 36V/260W Mono PV 36V/260W Mono PV
LiFePO4 12.8V/80AH LiFePO4 25.6V/60AH LiFePO4 25.6V/80AH
60W 80W 120W
3000K 4000K 5000K 5700K 6000K
-10
℃~
+60
℃,
10%-90%RH
Ra≥70
130-170LM/W
6-8m 8-10m 10-12m
1010x680x90mm 1980x680x90mm 1980x680x90mm
IP65
Ø89 Ø102 Ø102
40M/S 40M/S 40M/S
25KG 41KG 44KG
1087x730x217mm 2057x730x217mm 2057x730x217mm
4.
Installation Process
There isn't anti-fall steel cable for KY-Y-YJ-001, pls skip this step.
the
anti-fall
steel cable
the anti-fall steel cable
the MC4 plug
Insert the MC4 plug to check whether the
system is normal.
Align the sleeve fixing hole with the screw
hole and place it.
Install the anti-fall steel cable on the mount
and fix the six hexagonal nuts, spring
washers and flat washers with a wrench.
Lighe pole
Put the lamp into the light
pole to ensure that it can
work normally before
putting on the light pole.
Tighten the six fastening screws
with a wrench to fix the lamp.
The light pole is erected and the
installation is complete.
Method to check whether the lamp is working normally:
1. The whole process should be handled with care, pay attention to personnel safety and product
integrity.
2. Unbox the lamp, find non transparent sheet to cover the solar panel, so that it cannot be penetrated
by light.
3. Turn on the switch and wait for 10S to start the discharge mode, in the discharge mode the LED
indicator light should be always "ON" and the LED light source should be always "ON".
4. After the LED light source was turned on normally, remove the cover off the solar panel, aim the solar
panel at the sunlight or any other strong lighting source, and wait for 10 seconds to start the charging
mode.During the charging mode the indicator light should start flashing slowly and the light source goes
off.
5.If the previous steps were going well, it means your product has no problem and it's okay to be
installed.


