SOLAC AR6290 User manual

Solac is a registered Trade Mark
INSTRUCCIONES DE USO
INSTRUCTIONS FOR USE
MODE D’EMPLOI
GEBRAUCHSANLEITUNG
INSTRUÇÕES DE USO
ISTRUZIONI PER L’USO
GEBRUIKSAANWIJZING
NÁVOD K POUZITÍ
INSTRUCJA OBSLUGI
NÁVOD NA POUZITIU
HASNÁLATI UTASÍTÁS
инсрукция за употреба
UPUTE ZA UPOTREBU
INSTRUCŢIUNI DE UTILIZARE
ARROCERA
RICE COOKER
CUISEUR À RIZ
REISKOCHER
PANELA DE ARROZ
RISOTTIERA
RIJSTKOKER
VAŘIČRÝŽE
URZĄDZENIE DO GOTOWANIA RYŻU
VARIČNA RYŽU
RIZSFŐZŐÉS ZÖLDSÉGPÁROLÓ
СЪД ЗА ПРИГОТВЯНЕ НА ОРИЗ
KUHALO ZA RIŽU
OALĂPENTRU GĂTIT OREZ
Mod. AR6290
01/08
AR6290.book Page 1 Thursday, February 7, 2008 2:35 PM

ESPAÑOL es
ENGLISH en
FRANÇAIS fr
DEUTSCH de
PORTUGUÊS pt
ITALIANO it
NEDERLANDS nl
ČESKY cs
POLSKI pl
SLOVENČINA sk
MAGYAR hu
българск bg
HRVATSKA hr
ROMÂNĂro
5-8 •
9-11 •
12-15 •
16-19 •
20-23 •
24-27 •
28-31 •
32-34 •
35-38 •
39-41 •
42-45 •
46-49 •
50-52 •
53-56 •
AR6290.book Page 2 Thursday, February 7, 2008 2:35 PM

AR6290.book Page 3 Thursday, February 7, 2008 2:35 PM

AR6290.book Page 4 Thursday, February 7, 2008 2:35 PM

ATENCION 5
es
ESPAÑOL es
1ATENCION
• Lea estas instrucciones antes de poner en marcha el aparato.
• No utilice la arrocera para usos diferentes a los descritos en este
manual.
• No la conecte sin asegurarse que el voltaje indicado en la placa de
características y el de su casa coinciden.
• Asegúrese de enchufar el aparato a un conector con adecuada toma a
tierra.
• No sumerja nunca el cuerpo exterior de la arrocera en agua.
• Una vez usada, desconecte la arrocera de la red eléctrica.
• No está permitido el uso de este producto sin asistencia o supervisión
por niños u otras personas cuyo estado físico, sensorial o mental les
limite para usarlo con seguridad.
• No deje la arrocera en funcionamiento sin vigilancia.
• Esta arrocera viene provista de un dispositivo de seguridad térmico. En
caso de avería del termostato la corriente se interrumpe
automáticamente, lo que evita cualquier riesgo de sobre-calentamiento
y otros riesgos.
• Evite mover o cambiar la arrocera de lugar cuando este en
funcionamiento.
• Impida que la base de cazo (2) se golpee ya que podría deformarse y
afectar a las prestaciones del producto.
• No utilizar el aparato para hervir productos alimenticios ácidos o
alcalinos. No guardar el aparato en un ambiente con gases corrosivos o
en un lugar húmedo.
• No colocar ni acercar material inflamable cuando el aparato esté en
funcionamiento.
• No utilice el aparato con la clavija o el cable dañado. Si el cable de
alimentación esta dañado debe ser sustituido por un cable a suministrar
por el Servicio Postventa correspondiente.
• La capacidad máxima de la arrocera es de 1,8 litros. No supere nunca
la última marca existente en el cazo interno, de lo contrario al hervir
puede desbordarse y quemar.
AR6290.book Page 5 Thursday, February 7, 2008 2:35 PM

6COMPONENTES PRINCIPALES
b!ATENCION!!: Cuando desee desprenderse del aparato, NUNCA lo
deposite en la basura, sino que acuda al PUNTO LIMPIO o de
recogida de residuos mas cercano a su domicilio, para su posterior
tratamiento. De esta manera, esta contribuyendo al cuidado del
medio ambiente.
2 COMPONENTES PRINCIPALES
1Tapa
2 Cazo interno
3 Placa de calentamiento
4 Asas
5 Cuerpo exterior
6 Toma de corriente
7 Cable de conexión
8Base
9 Piloto luminoso función cocinado
10 Piloto luminoso mantenimiento en caliente
11 Interruptor cocinar / calentar
12 Accesorio cocina al vapor
13 Asa para el accesorio de cocina al vapor
14 Vaso dosificador
3 FUNCIONAMIENTO
PARA COCINAR ARROZ
1 Limpie el arroz y viértalo en el interior del cazo interno (2). Puede usar
el vaso dosificador (14) para calcular la cantidad.
2 Añada agua en función del tipo de arroz utilizado y el nivel de cocido
deseado. Si utiliza el vaso dosificador las marcas existentes en el
interior del cazo indican la cantidad de agua que es necesario añadir.
Por ejemplo: si utiliza 5 vasos de arroz vierta agua hasta llegar a la
marca correspondiente a 5 existente en el interior del cazo (2). (fig. 1)
3 Introduzca el cazo (2) en el interior del cuerpo (5) y muévalo ligeramente
asegurándose de que toca la placa de calentamiento (3). (fig.2)
4 Introduzca el cable de conexión (7) en la toma de corriente (6) y conecte
el otro extremo a la red. Tras esto, pulse el interruptor seleccionando la
posición cocinar, en este momento se iluminará el piloto luminoso rojo
(9) indicando que el arroz se esta cocinando (fig.3).
5 Cuando el arroz este cocido, transcurridos 20 minutos
aproximadamente, el interruptor (11) pasará automáticamente a la
AR6290.book Page 6 Thursday, February 7, 2008 2:35 PM

LIMPIEZA Y MANTENIMIENTO 7
es
función de calentamiento iluminándose en este momento el piloto
luminoso naranja (10).
6 Deje reposar el arroz con la tapa (1) puesta durante 10 minutos antes
de servir.
7 Mientras este seleccionada la función de mantenimiento en caliente la
temperatura del arroz se mantendrá aproximadamente en 50ºC.
8 Desenchufe el cable de conexión cuando no le interese seguir
manteniendo caliente el arroz y siempre antes de sacar el cazo (2).
PARA COCINAR AL VAPOR
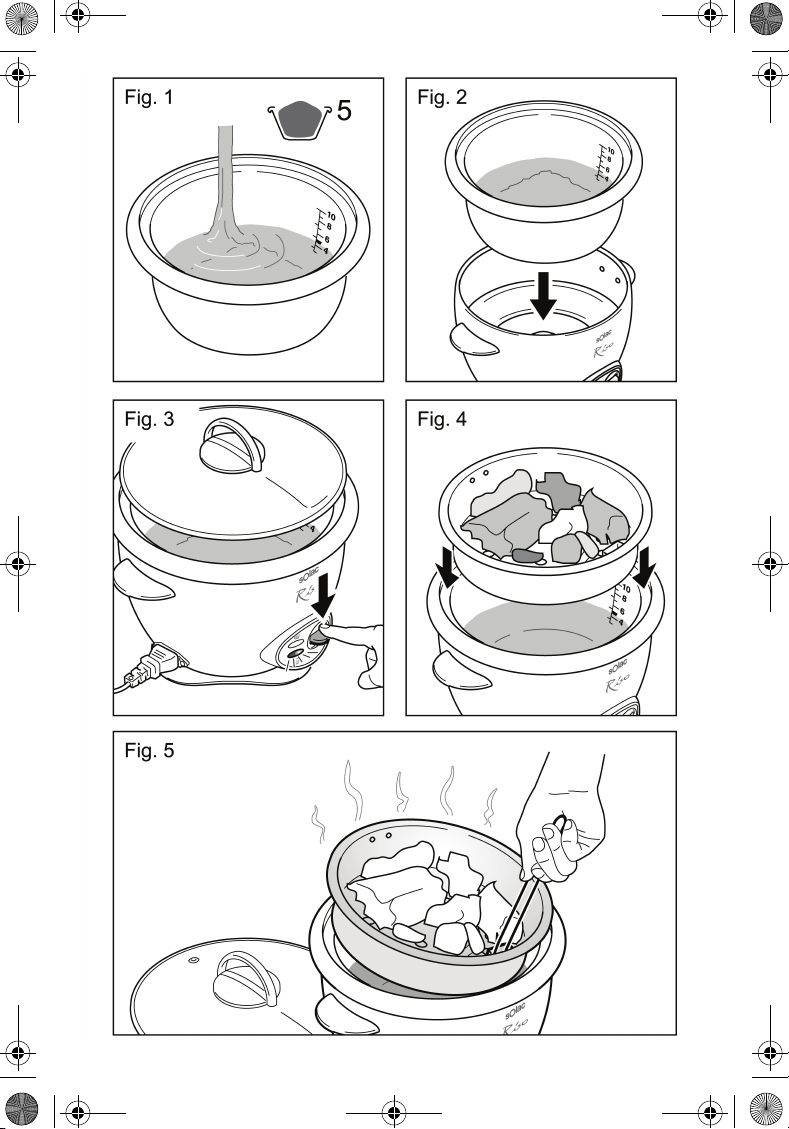
1 Vierta agua en el interior del cazo interno (2) hasta la marca
correspondiente a 5 vasos. Ponga los alimentos que vayan a ser
cocinados en el interior del accesorio (12) (Fig. 4). Seleccione con el
interruptor la posición cocinar y mantenga esta posición durante el
tiempo necesario en función del tipo de alimento ( verdura, pescado…)
y el grado de cocción deseado. En este caso no se pasará de forma
automática a la función de mantenimiento en caliente sino que el
aparato continuará en la posición cocinar siempre que exista agua en el
interior del cazo.
2 En caso de utilizar el accesorio vaporizador a la vez que se esta
cociendo arroz la cantidad de arroz no debe superar las 4 tazas, que
equivalen a 560 gramos.
3 Para manipular el accesorio de cocina al vapor (12) cuando esté caliente
por favor utilice el asa incluida (13) (Fig. 5).
4 LIMPIEZA Y MANTENIMIENTO
Asegúrese de que el aparato no esta conectado a red antes de iniciar
cualquier operación de limpieza.
El cazo y cuerpo de la arrocera deben mantenerse siempre limpios de
cualquier partícula de polvo, grano de arroz o cualquier otro tipo de
suciedad. Es imprescindible que no exista ninguna partícula externa
entre el cazo (2) y la placa de calentamiento (3) de lo contrario el
resultado al utilizar la arrocera se verá afectado pudiendo incluso dar
lugar a que se quemen sus componentes.
Nunca introduzca el cuerpo de la arrocera o el cable de conexión
en agua. Limpie el cuerpo exterior con un paño húmedo. Para la
limpieza del interior del cuerpo (5) utilice un paño seco una vez este fría
la resistencia. Para la limpieza del cazo sí puede utilizarse agua y
detergente no corrosivo para un mejor resultado.
AR6290.book Page 7 Thursday, February 7, 2008 2:35 PM

8SISTEMA SEGURIDAD
5 SISTEMA SEGURIDAD
Una vez conectada a red, para poder seleccionar la posición cocinar con
el interruptor (11) es necesario que el cazo este colocado en el interior
del cuerpo (5) y exista algo de peso en él, de lo contrario el interruptor
no nos permitirá seleccionar esta posición. No obstante, no conecte
nunca la arrocera si no tiene el cazo dentro o con el cazo vacío porque
la función de mantenimiento en caliente comenzará a operar.
AR6290.book Page 8 Thursday, February 7, 2008 2:35 PM

9
en
IMPORTANT
ENGLISH en
1 IMPORTANT
• Read these instructions before switching on the appliance.
• Do not use the rice cooker for purposes other than those described in
this manual.
• Do not switch it on without making sure that the voltage stated on the
specifications plate matches that in your home.
• Make sure you plug the appliance into a socket that has a suitable earth
connection.
• Do not immerse the outer casing of the rice cooker in water.
• Unplug the rice cooker after use.
• Do not allow children or other persons whose physical, sensorial or
mental state makes it impossible for them to use this product safely to
use it without assistance or supervision.
• Do not leave the rice cooker in operation unattended.
• This rice cooker is fitted with a thermal safety device. In the event of a
failure in the thermostat, the current is shut off automatically, there by
preventing any risk of overheating and other risks.
• Avoid moving or putting the rice cooker in another place when it is
operating.
• Do not knock the bottom of the container (2) as this could lead to
deforming and affect product operation.
• Do not use the appliance to boil acid or alkaline foods. Do not store the
appliance in an atmosphere where there are corrosive gases or in a
damp place.
• Do not place any flammable material on or near the appliance when in
operation.
• Do not use the appliance when its cord or plug are damaged. If the
power cord is damaged, it must be replaced by a cord supplied by the
respective After-Sales service.
• The maximum capacity of the rice cooker is 1.8 litres. Do not exceed the
last mark on the inside of the container, as otherwise when boiling, the
contents could overflow and be burned.
AR6290.book Page 9 Thursday, February 7, 2008 2:35 PM

10 MAIN COMPONENTS
qWARNING!!: When you want to dispose of the appliance, NEVER
throw it in the bin. Take it to your nearest RECYCLING POINT or
waste collection centre for treatment. You will thus be helping to take
care of the environment.
2 MAIN COMPONENTS
1Lid
2 Container
3 Heating plate
4 Handles
5 Outer casing
6 Power socket
7 Power cord
8Base
9 Cooking function pilot lamp
10 Warming pilot lamp
11 Cooking / heating switch
12 Steaming accessory
13 Handle for steaming accessory
14 Dispensing vessel
3 OPERATION
FOR COOKING RICE
1 Clean the rice and pour it into the container (2). You can use the
dispensing vessel (14) to calculate the quantity.
2 Add water, depending on the type of rice used and the amount of
cooking required. If using the dispensing vessel, the marks inside the
container indicate the quantity of water that must be added. For
example: if you add 5 glasses of rice pour the water in until it reaches the
mark corresponding to 5 on the inside of the container (2). (fig. 1)
3 Put the container (2) inside the casing and move it gently, making sure
it touches the heating plate (3). (fig.2).
4 Plug the connection cord (7) into the socket (6) and connect the other
end to the mains. Then press the switch by selecting the cooking
position, when the red pilot lamp (9) will light up, indicating that the rice
is being cooked (fig.3).
5 Once the rice is cooked, after approximately 20 minutes, the switch (11)
will automatically move to the heating function, when the orange pilot
light (10) will go on.
AR6290.book Page 10 Thursday, February 7, 2008 2:35 PM

11
en
CLEANING AND MAINTENANCE
6 Leave the rice with the lid (1) on for 10 minutes before serving.
7 While the heating function is selected, the rice temperature will be
maintained at between approximately 60ºC and 70ºC.
8 Unplug the connection cord when the rice no longer needs to be kept
warm, and in all cases before removing the container (2).
STEAMING
1 Pour water inside the container (2) up to the 5 mark. Put the food to be
cooked inside the accessory (12) (Fig. 4). Use the switch to select the
cooking position and maintain this position for the required length of
time, depending on the type of food (vegetables, fish..) and amount of
cooking required. In this case, the appliance will not automatically
change to the warming function, but continue in the cooking position,
provided there is water inside the container.
2 If using the steaming accessory when cooking rice, the quantity of rice
must not exceed 4 cups, equivalent to 560 grams.
3 When handling the steaming accessory (12) when hot, please use the
handle supplier (13) (Fig. 5).
4 CLEANING AND MAINTENANCE
Check the appliance is not connected to the mains before starting to
clean it.
The container and casing must always be cleaned to prevent any food
particles, rice grains or any other type of dirt from adhering to them.
There must be no external particles between the container (2) and
heating plate (3) as otherwise the rice cooker operation could be affected
and the components might even be burned.
Never immerse the rice cooker casing or connection cable in water.
Wipe the outside with a dry cloth. Use a dry cloth to clean the inside of
the casing (5), once the element is dry. Clean the container using water
and a non-corrosive detergent for best results.
5 SAFETY SYSTEM
When the appliance has been plugged into the mains, to select the
cooking position with the switch (11), the container must be placed inside
the casing (5) with some weight inside, as if not, the switch will not allow
you to select this position. However, do not plug in the rice cooker if the
container is not inside or empty, since the warming function will start to
operate.
AR6290.book Page 11 Thursday, February 7, 2008 2:35 PM

12 ATTENTION
FRANÇAIS fr
1 ATTENTION
• Lisez attentivement les instructions ci-jointes avant de faire fonctionner
votre appareil.
• Ne pas utiliser ce cuiseur pour un usage autre que celui décrit dans ce
manuel.
• Ne branchez pas l’appareil sans avoir vérifié au préalable que la tension
indiquée sur la plaque signalétique correspond bien à la tension
électrique de votre domicile.
• Vérifiez bien que la base de la prise est équipée de la prise de terre
adéquate.
• Ne plongez jamais la structure extérieure du cuiseur dans l’eau.
• Après l’avoir utilisé, débranchez le cuiseur de la prise électrique.
• En absence ou sans la supervision d’un adulte, l’utilisation de l’appareil
est interdite aux enfants et à toute autre personne dont l’état physique,
sensoriel ou psychologique ne lui permet pas d’utiliser l’appareil en toute
sécurité.
• Ne laissez pas fonctionner le cuiseur sans surveillance.
• Ce cuiseur à riz est équipé d’un dispositif thermique de sécurité. En cas
de panne du thermostat, l’alimentation électrique est automatiquement
interrompue ce qui évite tout risque de surchauffe et d’autres risques.
• Evitez de bouger ou de déplacer le cuiseur pendant son fonctionnement.
• Evitez de porter des chocs contre la base du récipient interne (2), car ce
dernier pourrait se déformer en réduisant de la sorte les prestations de
l’appareil.
• N’utilisez pas l’appareil pour bouillir des produits alimentaires acides ou
alcalins. Ne conservez pas l’appareil en présence de gaz corrosifs ou
dans un endroit humide.
• Tenez éloigné tout produit inflammable pendant le fonctionnement de
l’appareil.
• N’utilisez pas l’appareil si la prise ou le cordon d’alimentation est
endommagé. Si le cordon d’alimentation est endommagé, il doit être
remplacé par un cordon fourni par un service après-vente agréé.
AR6290.book Page 12 Thursday, February 7, 2008 2:35 PM

13
fr
PRINCIPAUX ÉLÉMENTS
• La capacité maximale du cuiseur à riz est de 1,8 litre. Ne dépassez
jamais le dernier repère figurant sur le récipient interne afin d’éviter tout
débordement ou risque de brûlure pendant le fonctionnement.
qATTENTION ! Pour mettre l’appareil au rebut, NE LE JETEZ JAMAIS
à la poubelle ; déposez-le dans un POINT DE RECYCLAGE ou à la
déchetterie la plus proche afin qu’il y soit recyclé. Vous contribuerez
ainsi à la préservation de l’environnement.
2 PRINCIPAUX ÉLÉMENTS
1Couvercle
2 Récipient interne
3 Plaque de chauffage
4Anses
5 Structure externe
6 Prise de courant
7 Cordon d’alimentation
8Base
9 Voyant lumineux de cuisson
10 Voyant lumineux du maintien du chauffage
11 Interrupteur mode cuisson / chauffage
12 Accessoire pour cuisiner à la vapeur
13 Anse de l’accessoire pour cuisiner à la vapeur
14 Verre doseur
3 FONCTIONNEMENT
POUR PRÉPARER DU RIZ
1 Passez le riz à l’eau puis versez-le dans le récipient interne (2). Vous
pouvez utiliser un verre doseur (14) pour verser la bonne quantité.
2 Ajoutez de l’eau en fonction de la variété du riz employé et du niveau de
cuisson voulu. Si vous utilisez le verre doseur, les repères indiqués à
l’intérieur du récipient du cuiseur indiquent le volume d’eau à ajouter. Par
exemple, si vous utilisez 5 verres de riz, versez de l’eau jusqu’au repère
indiquant le nombre 5 à l’intérieur du récipient du cuiseur (2) (fig. 1).
3 Introduisez le récipient (2) dans la structure du cuiseur (5) et remuez-le
légèrement en vérifiant qu’il entre bien en contact avec la plaque de
chauffage (3) (fig. 2).
4 Insérez le cordon d’alimentation (7) dans la prise de courant (6) et
branchez l’autre extrémité au réseau électrique. Positionnez ensuite
l’interrupteur sur la position de cuisson. A cet instant, le voyant rouge
s’allumera (9) pour indiquer que le riz est en cours de cuisson (fig. 3).
AR6290.book Page 13 Thursday, February 7, 2008 2:35 PM

14 NETTOYAGE ET ENTRETIEN
5 Quand le riz est cuit, au bout de 20 minutes environ, l’interrupteur (11)
passera automatiquement à la fonction de chauffage, et le voyant
lumineux orange s’allumera (10).
6 Laissez reposer le riz avec le couvercle posé (1) pendant 10 minutes
avant de servir.
7 Tant que la fonction de chauffage est activée, la température du riz est
maintenue entre 60 et 70º C environ.
8 Débranchez le cordon d’alimentation si vous ne souhaitez plus chauffer
le riz, ou dès que vous souhaitez retirer le récipient interne (2).
POUR CUISINER À LA VAPEUR
1 Versez de l’eau à l’intérieur du récipient interne (2) jusqu’au repère
indiquant le nombre 5. Posez les aliments à préparer à l’intérieur de
l’accessoire (12) (fig. 4). Sélectionnez à l’aide de l’interrupteur la position
de cuisson et conservez cette position en fonction du temps de cuisson
de l’aliment à préparer (légumes, poisson, etc.) et du niveau de cuisson
voulu. Dans ce cas, l’appareil ne passera pas automatiquement à la
fonction de chauffage : il restera en mode cuisson tant qu’il restera de
l’eau à l’intérieur du récipient.
2 Si vous utilisez l’accessoire vaporisateur tout en préparant du riz, la
quantité de riz versée ne doit pas dépasser 4 tasses, ce qui équivaut à
560 grammes.
3 Pour manipuler l’accessoire de cuisson à la vapeur (12) lorsque ce
dernier est chaud, utilisez l’anse fournie (13) (fig. 5)
4 NETTOYAGE ET ENTRETIEN
Avant toute opération de nettoyage, vérifiez bien que le cuiseur n’est pas
branché à la prise de courant.
Le récipient interne et la structure du cuiseur doivent toujours être
propres, sans poussière, ni grain de riz restant ou tout autre type de
particule. L’absence de tout élément est extrêmement importante entre
le récipient interne (2) et la plaque de chauffage (3). Dans le cas
contraire, le fonctionnement du cuiseur pourrait être affecté et certains
de ses éléments pourraient même brûler.
Ne plongez jamais la structure du cuiseur ni le cordon
d’alimentation dans l’eau. Nettoyez la structure externe à l’aide d’un
chiffon humide. Pour nettoyer l’intérieur de la structure (5), passez un
chiffon sec une fois la résistance refroidie. Pour nettoyer le récipient
interne, vous pouvez utiliser par contre de l’eau et un produit nettoyant
non corrosif pour un meilleur résultat.
AR6290.book Page 14 Thursday, February 7, 2008 2:35 PM

15
fr
SYSTÈME DE SÉCURITÉ
5 SYSTÈME DE SÉCURITÉ
Après avoir branché l’appareil au courant électrique, pour pouvoir
sélectionner le mode cuisson à l’aide de l’interrupteur (11), le récipient
interne doit être correctement inséré à l’intérieur de la structure du
cuiseur (5) et il doit exercer une pression suffisante. Dans le cas
contraire, l’interrupteur ne permettra pas de sélectionner le mode
cuisson. Cependant, ne branchez jamais le cuiseur si le récipient n’est
pas à l’intérieur ou s’il est vide car, dans ce cas, la fonction de chauffage
s’activera.
AR6290.book Page 15 Thursday, February 7, 2008 2:35 PM

16
ACHTUNG
DEUTSCH de
1 ACHTUNG
• Bitte lesen Sie diese Gebrauchsanleitung vor Inbetriebnahme des
Gerätes durch.
• Verwenden Sie den Reiskocher für keinen anderen als in diesem
Handbuch vorgesehenen Zweck.
• Vergewissern Sie sich vor dem Anschluss des Gerätes, dass die auf
dem Typenschild angegebene Netzspannung mit der Spannung Ihres
Haushaltes übereinstimmt.
• Stellen Sie sicher, dass das Gerät an eine ordnungsgemäß geerdete
Steckdose angeschlossen wird.
• Tauchen Sie den Gehäusetopf des Reiskochers niemals in Wasser.
• Trennen Sie den Reiskocher nach jeder Verwendung vom Netz.
• Um eine sichere Verwendung des Gerätes zu garantieren, darf dieses
nicht ohne entsprechende Aufsicht bzw. Hilfe von Kindern oder
Personen mit eingeschränkten körperlichen, sensorischen oder
geistigen Fähigkeiten benutzt werden.
• Lassen Sie den Reiskocher während des Betriebs nicht unbeaufsichtigt.
• Dieser Reiskocher ist mit einer Thermosicherung ausgestattet. Im Falle
eines Defektes am Thermostat wird die Stromversorgung automatisch
unterbrochen, wodurch jedes Risiko einer Überhitzung und sonstige
Gefahren vermieden werden.
• Bewegen oder verstellen Sie den Reiskocher nicht während des
Betriebs.
• Schützen Sie den Topfboden (2) vor Stößen, da er sich andernfalls
verformen und somit die Geräteleistung beeinträchtigen könnte.
• Kochen Sie keine sauren oder alkalischen Lebensmittel im Reiskocher.
Das Gerät nicht in der Umgebungen mit korrosiven Gasen oder an
einem feuchten Ort aufbewahren.
• Keine entflammbaren Materialien in die Nähe des Gerätes stellen bzw.
halten, wenn dieses in Betrieb ist.
• Benutzen Sie das Gerät nicht, wenn der Stecker bzw. das Kabel
beschädigt ist. Sollte das Netzkabel beschädigt sein, darf es nur durch
ein vom Kundendienst geliefertes Kabel ausgetauscht werden.
AR6290.book Page 16 Thursday, February 7, 2008 2:35 PM

17
de
HAUPTBESTANDTEILE
• Das Fassungsvermögen des Reiskochers beträgt 1,8 Liter. Beachten
Sie beim Befüllen des Reiskochers stets die oberste Markierung auf dem
Innentopf und überschreiten Sie diese nicht, da der Inhalt sonst
überlaufen und verbrennen kann.
qACHTUNG!!: Wenn Sie das Gerät entsorgen möchten, geben Sie es
NIEMALS zum Hausmüll, sondern suchen Sie den nächstgelegenen
WERTSTOFFHOF oder eine Annahmestelle für Reststoffe auf, damit
es anschließend sachgemäß entsorgt wird. So leisten Sie einen
Beitrag zum Umweltschutz.
2 HAUPTBESTANDTEILE
1Deckel
2 Innentopf
3 Wärmeplatte
4Griffe
5 Gehäusetopf
6 Kabelanschluss
7 Netzkabel
8 Boden
9 Leuchtanzeige Kochfunktion
10 Leuchtanzeige Warmhaltefunktion
11 Koch-/Wärmeschalter
12 Zubehörteil für Dampfgaren
13 Griff für Zubehörteil
14 Messbecher
3 BETRIEB
REISKOCHEN
1 Waschen Sie den Reis und geben Sie ihn in den Innentopf (2). Zum
Berechnen der richtigen Menge können Sie den Messbecher (14)
verwenden.
2 Fügen Sie je nach verwendeter Reisart und gewünschter Bissfestigkeit
die entsprechende Wassermenge hinzu. Wenn Sie den Messbecher
verwenden, geben die Markierungen auf der Topfinnenseite die jeweils
erforderliche Wassermenge an. Beispiel: für 5 Becher Reis füllen Sie
Wasser bis zur Markierung 5 in den Topf (2). (Abb. 1)
3 Setzen Sie den Topf (2) in das Gehäuse (5) und bewegen Sie ihn leicht,
um sicherzustellen, dass er die Wärmeplatte (3) berührt. (Abb. 2)
4 Schließen Sie das Netzkabel (7) zuerst an das Gerät (6) und hierauf das
andere Ende an das Stromnetz an. Nun stellen Sie den Schalter auf die
AR6290.book Page 17 Thursday, February 7, 2008 2:35 PM

18
REINIGUNG UND INSTANDHALTUNG
Position „Kochen“. Die Betriebsanzeige leuchtet rot auf (9) und weist
darauf hin, dass der Kochvorgang aktiviert wurde (Abb. 3).
5 Nach ca. 20 Minuten ist der Reis gar und der Schalter (11) springt
automatisch auf die Warmhaltefunktion um. Die entsprechende
orangefarbene Anzeige leuchtet auf (10).
6 Lassen Sie den Reis zugedeckt (1) für ca. 10 Minuten stehen, bevor Sie
ihn servieren.
7 Während der Warmhaltefunktion behält der Reis eine Temperatur
zwischen 60 -70ºC.
8 Trennen Sie das Gerät vom Netz, wenn Sie die Warmhaltefunktion nicht
mehr benötigen, sowie vor der Entnahme des Innentopfes (2).
DAMPFGAREN
1 Füllen Sie Wasser bis zur 5-Becher-Markierung in den Innentopf (2).
Geben Sie die Lebensmittel zum Garen in das Zubehörteil (12) (Abb. 4).
Stellen Sie den Schalter auf “Kochen” und belassen Sie ihn für die
erforderliche Kochzeit (je nach Lebensmittel: Gemüse, Fisch etc..) und
gewünschtem Gargrad in dieser Position. Beim Dampfgaren springt der
Schalter nicht automatisch auf die Warmhaltefunktion, sondern das
Gerät bleibt auf „Kochen“, solange sich Wasser im Topf befindet.
2 Wenn Sie das Zubehörteil für Dampfgaren verwenden und gleichzeitig
Reis kochen, so darf die Reismenge höchstens 4 Tassen (entspricht 560
Gramm) betragen.
3 Für den Umgang mit dem heißen Zubehörteil für Dampfgaren (12)
verwenden Sie bitte den mitgelieferten Griff (13) (Abb. 5)
4 REINIGUNG UND INSTANDHALTUNG
Vergewissern Sie sich, dass das Gerät vom Netz getrennt ist, bevor Sie
es reinigen.
Achten Sie stets darauf, dass sich keine Staubreste, Reiskörner oder
andere Schmutzpartikel im Innen- und Gehäusetopf des Reiskochers
befinden. Keinesfalls dürfen sich irgendwelche Partikel zwischen Topf
(2) und Wärmeplatte (3) befinden, da dies die Leistung des Gerätes
beeinträchtigt und sogar seine Bestandteile verbrennen könnte.
Tauchen Sie den Gehäusetopf des Reiskochers oder das Netzkabel
niemals in Wasser. Reinigen Sie die Außenseite des Gehäuses mit
einem feuchten Tuch. Verwenden Sie zur Reinigung der Innenseite des
Gehäusetopfes (5) ein trockenes Tuch. Warten Sie damit, bis das
AR6290.book Page 18 Thursday, February 7, 2008 2:35 PM

19
de
SICHERHEITSSYSTEM
Heizelement ausgekühlt ist. Den Innentopf reinigen Sie am besten mit
Wasser und einem nicht ätzenden Spülmittel.
5 SICHERHEITSSYSTEM
Nach dem Netzanschluss des Gerätes muss sich der Innentopf im
Gehäuse (5) befinden und befüllt sein, um den Schalter (11) auf die
Position “Kochen” stellen zu können. Andernfalls lässt sich diese
Position nicht einstellen. Schließen Sie den Reiskocher trotzdem
niemals ohne Innentopf bzw. mit leerem Innentopf ans Netz an, da sich
die Warmhaltefunktion einschaltet.
AR6290.book Page 19 Thursday, February 7, 2008 2:35 PM

20 ATENÇÃO
PORTUGUÊS pt
1 ATENÇÃO
• Leia estas instruções antes de colocar o aparelho em funcionamento.
• Não utilize a panela de arroz para utilizações diferentes das descritas
neste manual.
• Não a ligue sem verificar se a tensão indicada na placa de
características e a da sua casa coincidem.
• Assegure-se de que liga o aparelho a uma tomada com fio terra
adequado.
• Não submergir nunca o corpo exterior da panela de arroz em água.
• Depois de utilizar a panela de arroz, desligue-a da rede eléctrica.
• Não é permitida a utilização deste produto, sem assistência ou
vigilância, por crianças ou outras pessoas cujo estado físico, sensorial
ou mental os limite para uma utilização com segurança.
• Não deixe a panela de arroz em funcionamento sem ser vigiada.
• Esta panela de arroz está equipada com um dispositivo de segurança
térmico. Em caso de avaria do termóstato, a corrente é
automaticamente interrompida, o que evita qualquer risco de
sobreaquecimento e outros riscos.
• Evite deslocar ou mudar a panela de arroz de lugar quando estiver em
funcionamento.
• Evite que a base em concha (2) se danifique uma vez que poderia
deformar-se e afectar o funcionamento do produto.
• Não utilizar o aparelho para ferver produtos alimentícios ácidos ou
alcalinos. Não guardar o aparelho num ambiente com gases corrosivos
ou num local húmido.
• Não colocar nem aproximar material inflamável quando o aparelho
estiver em funcionamento.
• Não utilize o aparelho com a ficha ou o cabo danificado. Se o cabo de
alimentação estiver danificado deve ser substituído por um cabo
fornecido pelo Serviço de pós-venda correspondente.
• A capacidade máxima da panela de arroz é de 1,8 litros. Nunca
ultrapasse a última marca existente na concha interna, caso contrário,
se ferver, pode transbordar e queimar.
AR6290.book Page 20 Thursday, February 7, 2008 2:35 PM
Table of contents
Languages:
Popular Rice Cooker manuals by other brands

Toshiba
Toshiba RC-10JR1NP instruction manual

Sunbeam
Sunbeam Rice Perfect RC2300 Instruction/recipe booklet

Narita
Narita NRC-030F instruction manual

Sanyo
Sanyo ECJ-S35K - 3-1 Micro-Computerized Rice Cooker... instruction manual

Metos
Metos CFXB-180 Installation and operation manual

Aroma
Aroma ARC-717-1NGR instruction manual