SOLANO HORIZONTE SNE Series User manual

1
PNEUMATIC SEEDER
INSTRUCTIONS BOOK
SNE MODEL

2
CONFORMITY DECLARATION
The Company : SOLANO HORIZONTE S.L.
Declares, under its responsibility, that the
manchine:
Brand: ..........................SOLANO HORIZONTE
Type:.............................PNEUMATIC SEEDER
Modèle: .........................SNE-
Nº de série:....................
Year of manufacturing:..........
Is in conformity with the main requirements of Health and
Safety stated in the “REAL DECRETO” RD 1435/1992 and
56/1995 that implement the European Directives about
machinery 89/392/CEE and the posterior modifications
91/368/CEE, 93/44/CEE and 93/68/CEE, then refunded by the
Directive 98/37/CE.
Signed by:
The Techical Director
CORVERA , on
IMPORTANT NOTE:
·THIS INSTRUCTIONS BOOK MUST BE HANDED OVER WITH THE ABOVE
DESCRIBED SEEDER (MODEL AND SERIE Nº)
·ANY OPERATOR OF THE SEEDER MUST HAVE READ AND PERFECTLY
UNDERSTOOD EVERY PART OF THE INSTRUCTIONS BOOK IN ORDER TO
UNDERSTAND PERFERCTLY HOW TO RUN THE MACHINE.
· IMPORTANT NOTES ABOUT SAFETY ARE WRITTEN IN BOLD
CHARACETERS.

3
Dear Customer,
SOLANO HORIZONTE has written this book to help you to
optimize the use of your seeder.
Your seeder has gone through a strict process of safety
control in order to ensure a great reliability of its structure and
to optimize its use. However, should you see any
misfunctioning, do not hesitate to contact SOLANO
HORIZONTE S.L. or our distributor in order to give you a
quick solution to your problem.
SOLANO HORIZONTE is fully aware that the best
advertising is the quality and efficiency of its products and,
above all, customers’ satisfaction. So, quality, seriouseness and
giving a good service are very important for us.
SOLANO HORIZONTE

4
INDEX
01 Introducción ..............................................................05
02 Identification ……………………………………………….06
03 Explanation about hazards pictogams………… ……….. 07
04 Safety norms………. ................................................. 09
05 When you receive your seeder..................................... 10
06 General Indications…..................................................11
07 Three points hitching.....……………............................ 13
08 Rake…..……............................................................. 16
09 Hydraulic markers……………….................................. 18
10 In-cab monitor………………………………………......... 21
11 Dosification y micro-dosification ….…….....................25
12 Regulation of the sowing dosis....................................28
13 Emptying the hopper..................................................31
14 Considerations while you are working..........................39
15 Conservation and maintainance....................................40
16 Hydraulic engine to run the fan…………………..……… 34
SOLANO HORIZONTE reserves the right to modify at any
time and without prior notice the seeder as it judges it necessary, and
without any obligation to updated this book.

5
01/ INTRODUCTION
You will find in this book all the information about your pneumatic
seeder: how to regulate it, how to do maintainance operations, how to deal
with potential problems.
READ CAREFULLY ALL THE INSTRUCTIONS AND SAFETY
RULES BEFORE TO START RUNNING YOUR SEEDER
Be sure that : a) all the staff members that work with the seeder have
read and understood perfectly the instructions book, and b) that the
instructions books is kept in an easy-to-reach place known by all the staff
members that work with the seeder

6
02/ IDENTIFICATION
You will find the identification plate of the seeder on top of the 3rd
hitching point. (voir Fig. 2-00).
Fig. 02.00
If you have any doubts/questions about the seeder, do not hesitate to
contact our technical department.

7
03/ EXPLANATIONS ABOUT PICTOGRAMS THAT WARN
ABOUT HAZARDS
IMPORTANT!
Indications about RIGHT and LEFT are to be understood
standing from the tractor driver’s seat going forward.
0/ This icon is WARNING about one or more
hazards for personnal safety. When you see it in
the book or on the seeder, you must pay
attention because there is a potential risk of
accident.
1/ Before to use the seeder, read the book of instructions.
You will prevent your seeder from being deteriorated and/or
suffering accidents, and you will also use it in an adequate
way.
2/ Stop the engine and remove the contact keys form the
dashboard of the tractor in order to eliminate any risk of
unexpected starting of the engine of the tractor. You will
prevent operators from getting into very dangerous situation
while they handle the seeder.
3/ Always keep outside the dangerous area while you handel the
elevation system of the tractor. The area between the hitching 3
points of the tractor and the seeder is a dangerous area. Inside it,
you can ne caught by the elevation system of the tractor. When
you have to work within this area, you must stop the engine of
the tractor and remove the contact keys from the dashboard of
the tractor before to start. When the engine is running, NEVER
GET WITHIN THE DANGEROUS AREA UNDER ANY
CIRCUMSTANCES.

8
4/ Be careful and always remain out of reach of the of the
working scope of the seeder or of one of its moving
elements!
The seeder is lifted on top of the ground, thus creating a
dangerous area between the seeder and the ground, and a
risk of very dangerous accident. You must always be and
remain outside this area.
5/ Never go near the seeder if it is not totally stopped.
When the seeder is working, it is very hard, or
impossible, to see movimg elements. Do not forget that
your body is fragile.
6/ Do not get to near the seeder if it does not stand
perfectly on the ground! No matter if it is working or not.
Your feet could be crushed by the sowing elements if you
are to near.
To avoid any risk if you have to go near the seeder, make
sure that it stands perfectly on its lowest support points
and that there is no risk for you to put your feet under it.

9
04/ SAFETY NORMS
In the design of our machines, we have taken into account the main
requirements about safety included in the Directive about Machines
89/392/CEE, being very careful with those parts that are likely to cause
accidents during working and maintainance operations. We have
appropriately protected all the mobile elements that, according to the task
they have to perform, can be protected.
Apart from this safety measures and the exhaustive information
shown by stickers on the seeder (these stickers are visible and located on a
suitable place to warn ypu about hazards), and in order to prevent operators
of the machine from suffering serious accidents, you must follow
scrupulously the following norms :
1.- When you have removed a protection element (like a
cover, grid…), do not forget to put it back before to use the
seeder. Never work if one or more safety elements are missing.
It is very dangerous.
2.- When the seeder is working, never handle under any
circumstances one or more moving parts.
3. – Never stand under the seeder when it is in suspension, whether
the tractor is runing or not. If you have to perform any repairing or
maintainance operation, the seeder must be perfectly wedged. You can use
metallic or wood wedges, that must be strong enough to support the weight
of the seeder. Use 4 wedges.
4.- When the seeder is working, never put your hands
inside the hopper. The agitator, that you cannot see, is moving
and can cause serious injuries and accidents.
5.- Never try, under any circumstances, neither with your
hands nor with any other objects, to get the seeds nearer or to
force is way into the opening access to the dosificator.
6.- Never handle the seeder when some people are near it.
Its moving parts could injure anybody near the machine.
7.- While handling the seeder, no matter the kind of
operation (working, testing, maintainance, etc.), anybody that is
not participating to the handling must remain out of reach of the

10
scope of the seeder and its moving parts. Never forget that the
volume of the machine and the potential unexpected and/or
abrupt movements of the seeder can catch and injure by surprise
anyone that would not respect a safe distance from the seeder
and its moving elements.
8.- Before to unplug a hydraulic pipe, make that there is
no pressure left inside the pipe. If some pressure has remained,
you could not only get stained, but also be injured if some you
are hit by pressurized liquid in vital parts such as eyes.
9.- Apart from the norms stated in the previous eight
points, it is very important that operators wear protection
clothes and accessories suitable for the works that they are
doing, and to have within easy reach a first emergency kit.

11
05/ WHEN YOU RECEIVE YOUR SEEDER
When you receive your seeder, make sure that it
corresponds to the model you ordered to your provider, and that
no elements nor accessories that you ordered are missing.
Make sure that it is in perfect conditions and that you do
not see any damage due to transport. If so, you have to notify it
inmediately to your provider, so that he can solve the problem.
Ask for the warantee certificate that must be handed in
with the seeder. Do not forget that the owner and the dealer
have to fill it in and to sign it, and to stamp it. Réclamez le
certificat de garantie qui doit vous êter fourni avec le semoir.
N’oubliez de le remplir correctement, et qu’il doit être signé et
le tamponné par le propriétaire du semoir et par le
concessionnaire qui l’a livré. We will not consider any warranty
dossier if we have not received the warranty certificate ten days
after the delivery of the seeder.
Read carefully the instruction books before to sue the
seeder.
SOLANO-HORIZONTE, S.L. thank you for buying a
pneumatic seeder. Our staff is at your disposition.

12
06 GENERAL INDICATIONS
Once you have made sure that the delivery is correct and
that you have read and understood this book, it is important that
you take into account some general considerations:
-The pneumatic wheels must have the required pressure.
-The PTO shat must be run at 1000 rpm.
-After various hours of works, you must check that the
setting you adjusted have not been modificated.
-Grease all the greasing points with the required
frequency.
-Do not forget to clean the dosificator at least once a
day.
-Make a weight trial each time you change the seeds.
-Empty the hopper at least once a day in order to get rid
of any unwanted part that could get stuck on the
agitator.
-When you have finished working, the hopper and the
distribution system must be totally empty. If there are
some seeds left, remove them all. Otherwise, they can
germinate if there is humidity inside the hopper and/or
the distribution system, which would cause a
breakdown. The reamaing seeds could also attract some
rodents and could damage some plastic parts of your
seeder.
-Keep you seeder in a sheltered place, with as less
humidity as possible.
-If you have to stop sowing, start 2 metre before the
point where you had to stop, in order to avoid letting a
small area without seeds.

13
07/ THREE POINT HITCHING
The seeder is to be hitched to the 3-point hydraulic
elevation system of the tractor, through the union pin (A) of Fig
08.00. To level the seeder, regulate the third point (B) of Fig.
08.-01.
Fig.8.00
Fig.8.01
B
14
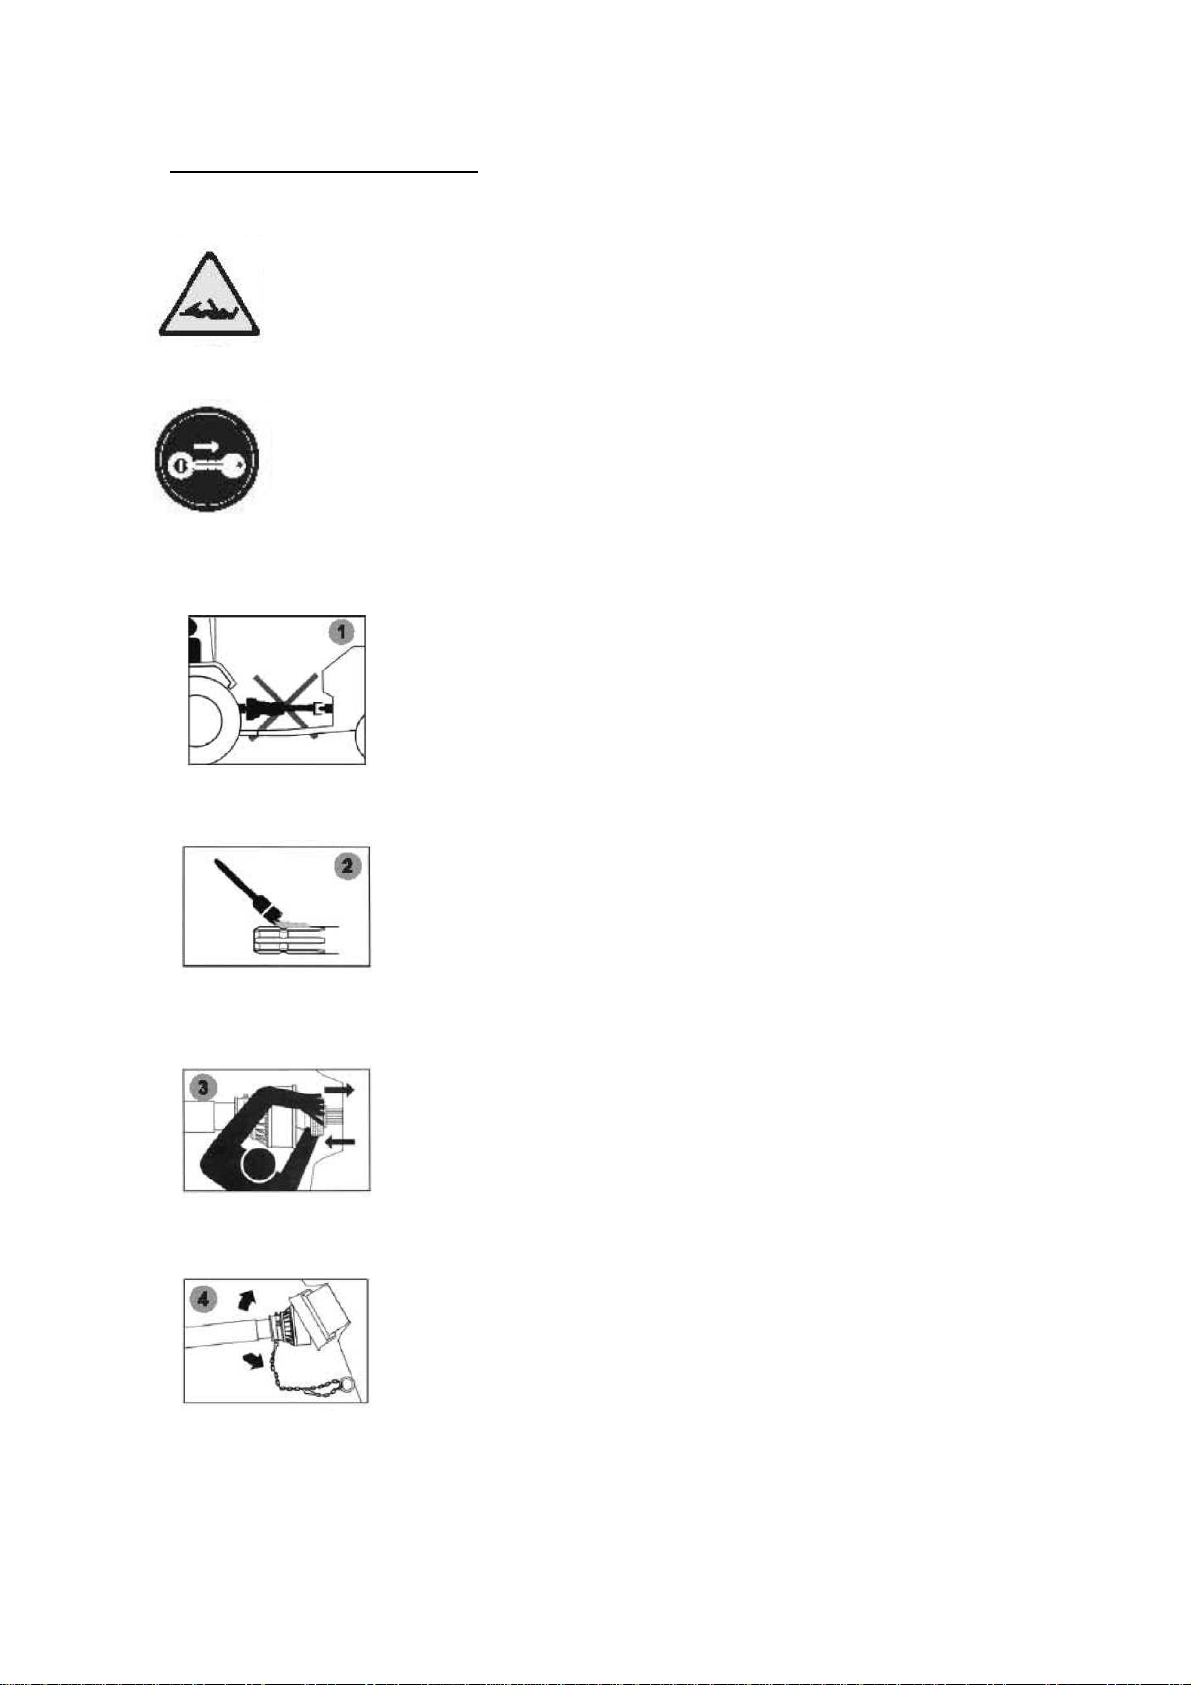
Connecting PTO shaft
Before to use PTO shaft, you must read and understand all
the instructions mentioned in this book and in the
instructions book of the PTO shaft. The PTO shaft work
with tubes and spline connections. It works with a rotative
movement, being a dangerous element of the seeder.
Before to handle the PTO shaft, you must imperatively :
immobilize the tractor and engage the parking brake, stop
the engine and remove the key from the dashboard of the
tractor.
The PTO shaft has to be connected to the PTO
spline of the tractor on one side, and to the PTO
spline of the fan on the other side. If you use a
PTO shaft with special connection (homocynetic..),
read the instruction book of the PTO shaft to know
on which side you have to connect the special
spline connexion.
before to connect the PTO shaft, clean the PTO
splines of the tractor and the seeder.
Put the female spline connection in front of the
shaft of the PTO spline and push the button (or
turn the disc, depending on the model) and push it
totally. Then come back a little until yor hear a
ʺclickʺ. Make sure that the button (or the disc) has
come back to its original position (blocked
position). Make sure that the connection is fixed.
Put the safety chains that will prevent the plastic
protection tubes from rotating, making sure that
the chains will not hinder the articulation
movement of the spline connectors while they are
working.

15
If the PTO shaft is too long, you will have to cut
it (see how to do it in the instruction books of the
PTO shaft). This operation must be done by a
qulified operator.
Before to start the seeder, you have to check that the PTO
shaft of the tractor is set at 1000 rpm, and that all the
connections (hydraulic and electrical) are correctly done.
To run the fan, you will only have to start the PTO shaft of the
tractor. You must check that the fan is not working at rotations
superior to the safety maximum possible rotations.
The fan must never work under 3.500 r.p.m. nor above 4.500
r.p.m. To check it, set the tractor at the rotations you are used
to work, and check the rpm of the fan with the electronic
monitor. If necessary, adjust the rpm of the tractor according to
the needs of the fan.
Normal working revolutions are between 4.000
rpm and 4.200 rpm (minimum: 3.500 r.pm.,
maximum : 4.500 r.p.m.)
We remind you that, for safety reasons, you must never stand
between the tractor and the seeder when the PTO shaft is
working.

16
08/ RAKE
You may have to assemble the rake. If so, you will have
to:
1.- Remove the packaging.
2.- Fix the support bars (A) and (D) to the bracket (B)
located on the frame by using the screws (C). You will
have to fix tem well, but leaving some mobility to the bar
(A).
3.- Once you have fixed all the bars (A) and (D), you will have
to fix the other extremity of the bar (A) on the brackets (E)
located on the frame of the rake by using the screw (F) and its
nuts.
Once the rake is mounted, you will have to adjust its orientation
and the pressure it makes on the ground.
A
D
B
C
C
A
E
F

17
4.- To orient the tines of the rake regarding the ground, put the
screw (G) in one of the six holes (H) drillend in the fixing
bracket (F), making sure that the bar (A) always remain under
the screw (G).
NOTA: You will set the inclination of the rake accoring to
how is the ground. If it is clean and well preparated, you will
set a minimum inclination. Give more inclination to the rake
on the ground if there are stones, rests of vegetation.
5.- To adjust the pressure of the rake, compress more or less the
sring (I) and fix its position with the pin (J) in the
corresponding hole. The more you compress the spring, the
more you increase the pressure.
H
H
G
A
G
J
I

18
09/ HYDRAULIC MARKERS
1.- Lateral hydraulic markers
Connect the hydraulic pipes shown in figure 10.01 to the
tractor, and set the oil flow with regualtor (B)
Make sure that the moving speed of the arms of the marker
is good. If they move to quickly, turn the external regulating
part of connectors (B) clockwise until getting the required
speed. Once you have obtained it, fix the position of the
regulator with the counter-nut.
Hydraulic markers feature a safety screw (D) in order to
protect the marker in case of shocks with some obstacle.
The angle of the disc of the marker regarding the
progressing direction must be such as leaving a sufficient
visible track while using the most reduced possible angle so that
the disc give the lesser possible resistance to the progressing
movement, thus minimising the using up of discs on one hand
and the effort supported by their structure on the other hand.
To set the distance of the furrow that will be done by the
marker, and that will guide you to positon the wheels of the
tractor on the next passing (in order to avoid leaving a strip
without being sowed, or sowing again on a strip), you will take
B
Fig 10.01

19
the track of the tractor as a reference and you will use the
telescopic parts (A) and (B) - fig. 10-02 – whose position is
fixed with screws (C) and D).
Fig 10.02
To set the furrow made by the marker:
A/ You will have to measure the track of the tractor, from
the centre of the left pneumatic wheel to the centre of the right
pneumatic wheel.
B/ You will have to substract the track of the tractor from
the working width of your seeder. Then, divide by two the result
of the substraction. Add to the result the distance between
sowing arms (12,5 or 15 cm) to obtain the distance you will
have to position the marker from the last sowing arms located in
the extremity of the seeder.
A
C
B
D

20
Example:
-Working width: 6 metres (600 cm).
-Width of the track of the tractor: 1,8 metres (180 cm)
-Distance between sowing arms: 12,5 cm.
In this example, the marker must be a t 2,225 metres from
the last soeing arms:
600-180 = 420:2 = 210+12,5 = 222,5 cm
Table of contents
Popular Seeder manuals by other brands

Gason
Gason Pasture Planter Assembly/operators/parts manual

Meridian
Meridian 112BST Operator's manual

Toro
Toro 33512 Operator's manual

Gaspardo
Gaspardo DAMA Use and maintenance

Multiva
Multiva Cerex 300 SeedPilot Operation and maintenance manual

Herd
Herd GT-77 Instructions for assembly, operation and maintenance
