SOLAR BRAND RCT-3 User manual

SOLAR BRAND
ELECTRONIC REMOTE CONTROL SYSTEM
SOLAR Brand
OWNER’S MANUAL
SOLAR BRAND
REMOTE CONTROL CURTAIN
MODEL RCT-3
REMOTE CONTROL AND USER –OPERABLE SWITCH
2 IN 1
For fully enjoy your set from very beginning, read this manual
carefully and keep it handly for future reference.

Thank you for purchasing a “Solar Brand” Electronic Remote Control Curtain
System.
1. Introduction
This Electronic Remote Control Curtain System is combined by aluminium track and driving units Two
in one control system allows the user to operate either by remote control or user-operation switch A
pair of curtains may move together or apart during opening and closing respectively, and a single
curtain may move in a single direction
2. Special Feature
Infrared remote control allows the user to close or open the curtain along the track at any desireing
direction and position
DC motor: Lower consumption of power Safety approval (CE & HOKLAS approved) Quality
warranty
Powerful driving system for a single curtain or a pair of curtains
Simple installation and operation
3. Technical Specification
I Model: RCT-3
II Voltage: 220V/50Hz, 110V/60Hz
III Power Consumption: 20W
IV Remote Control Distance: 12 M
V Opening and Closing Time: 6 sec / m
VI Maximum Curtain Weight: 30 kgs
4. Length Design Of Aluminium Track
A Curtain Width B Aluminium Track Length
= Curtain – 150 mm
5. Extension Of Auminium Track
If extension is required, please joint two equal length of tracks by a connector
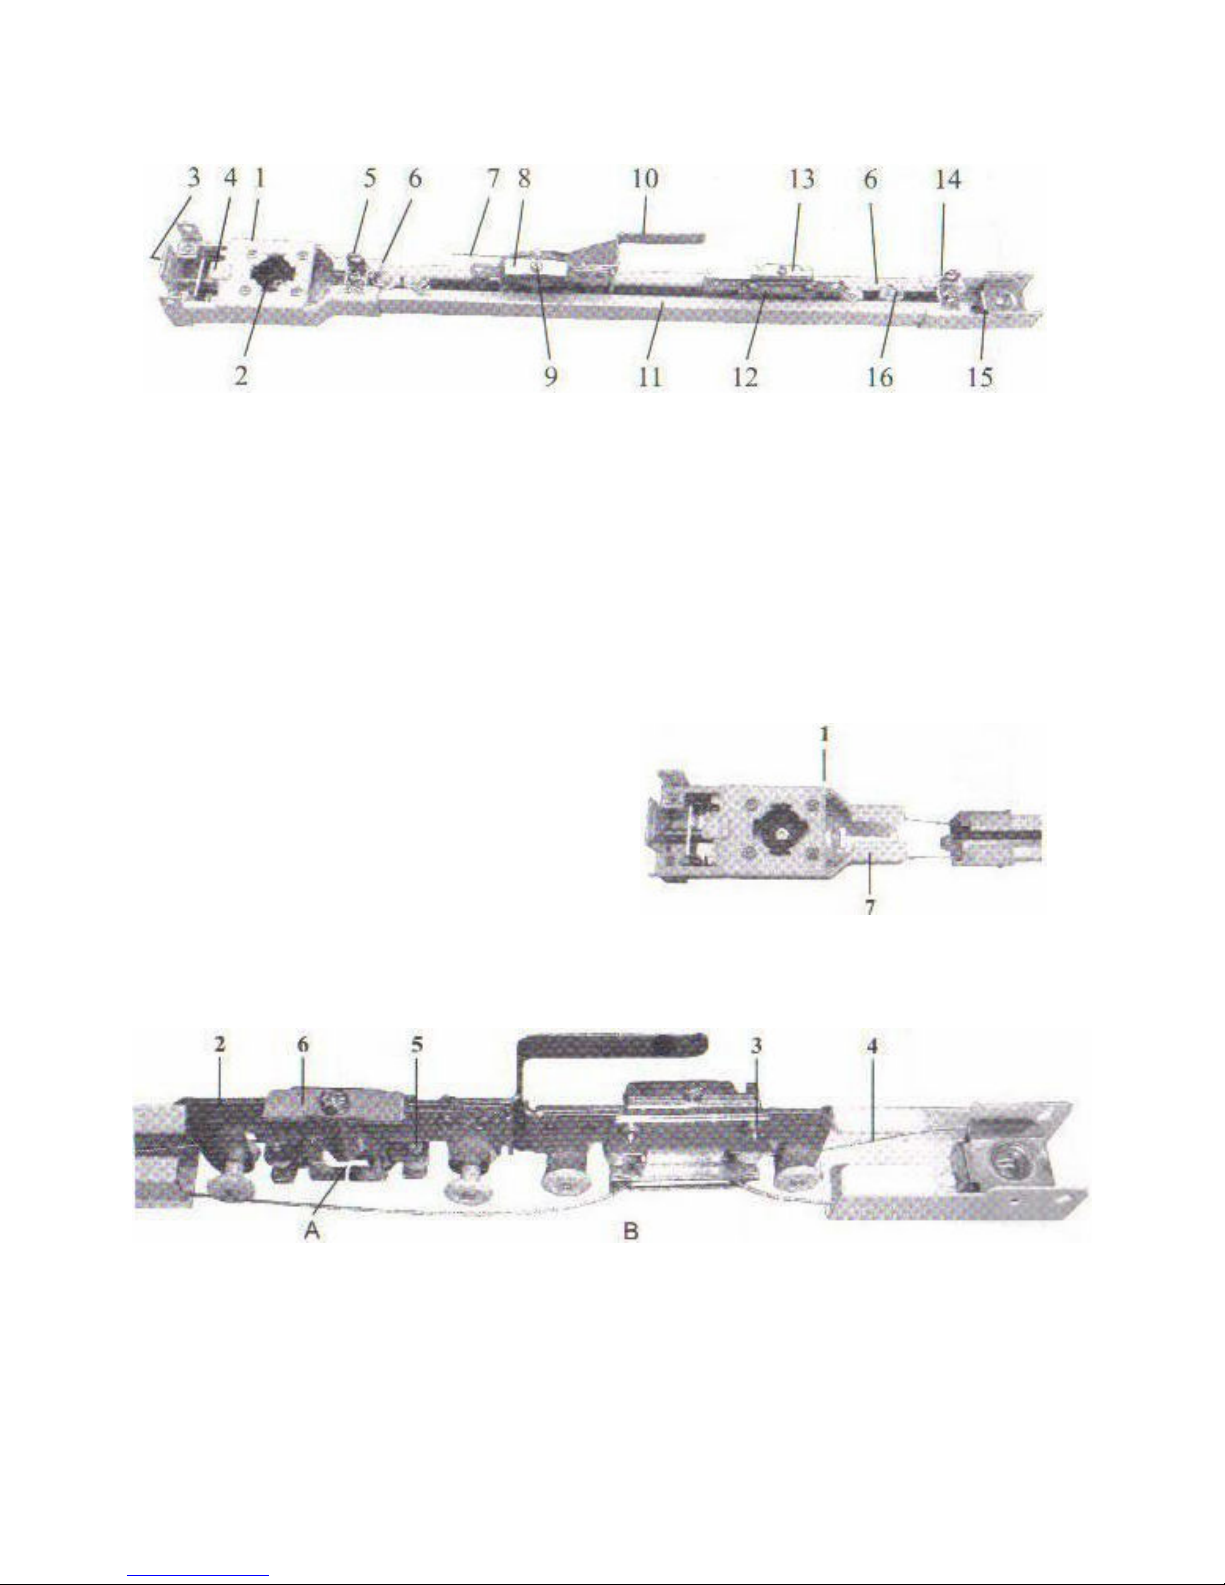
6. Assembly Feature
1 Big End Bracket 10 Overlap-Arm
2 Bearing 11 Aluminium Track
3 Adjusting Screw for S/S Wire 12 Carriage B
4 Button for Motor Catch Hold of 13 Screw for S/S Wire of Carriage B
5 Bracket Holdfast 14 Small End Bracket
6 Runner 15 Bearing
7 Carriage A 16 Bracket Holdfast
8 Carriage A Holdfast
9 Screw for S/S Wire of Carriage A
7. Installation Instruction
1 Insert one end of S/S wire along the
bearing
2 Turn the S/S wire to other side of the
bearing and via the carriage A holdfast
and other side of S/S wire to the
carriage B
3 Take other end of S/S wire to the holdfast of carriage B Ensure the S/S wire going along the screw
4 Continually turn the S/S wire along the bearing of small end bracket
5 Pick the S/S wire from the holdfast of carriage A
6 Hold the S/S wire and slightly tie the screw of carriage A

7 Let carriage A & B slide into aluminium track
Tie both end of S/S wire and put big end
bracket & small end bracket into aluminium
track
8 Loose the adjusting screw for S/S wire as
more as possible
9 Draw both ends of S/S wire and make
tension and tie the screw of carriage A
10 Adjust the position of carriage B and tie the
screw Make both carriages in a right
position
11 Adjust the adjusting screw for S/S wire to the
right tension Connect the power supply for
the motor and test the motion of S/S wire
12 Put the right quantity of runners from both
ends of big and small end brackets
13 Tie bracket holdfasts on both big and small end brackets
14 Cut the surplus of S/S wire from carriage A
15 Subject to situation, the overlap arm may fix on carriage A or B
16 Fix the aluminium track on the wall or ceiling as required

8. Motor Installation
Plug In Take Down
Plug the motor into the big end Press the button by the index
bracket with 45° The index finger finger and turn the motor to 45°
should press the button, and turn and release the motor
The motor to a right angle You will
hear a sound “click” from the button
That means the installation of motor
is completed
9. Connection Of Power Supply For The System
FIG 2: A track connection

FIG 1: A track and B track connection
10. Specification Of Wall Mount Control Broad (Infrared Receiver)
Press the button on wall mount control broad
may control the curtain open or close directly
Buttons of A group can control A track Buttons of
B group can control B track When the curtain is
fully opened or closed, it will stop automatically
Suppose you desire the curtain to stop on same
position along the track, you need press the
button again
You may turn the micro adjuster by a small
screw driver to adjust the strength of the motor (A
for A track and B for B track) Turn to counter
clock-wise for light curtain and clock-wise for
heavy curtain
11. Specification Of Remote Controller
You are able to press the button of remote controller to control the
closing or opening of the curtain Buttons of A group can control A
track and buttons of B groups can control B track
When the curtain is fully opened or closed it will stop automatically
Suppose you desire the curtain to stop on same position along the
track, you need press the button again
Remote control distance: 12M
Remote control angle: 120°
3 pieces AAA batteries

12. A Guide To Simple Problem Solving:
Before calling service personnel, please check the following chart for a possible cause to the
trouble you are experience
SYMPTOM CHECK THIS THING SOLUTION
Power is not turned on The power cord is not plugged in Plug the power cord in
Remote Controller does not work The batteries in the remote
controller may be exhausted
There is an obstruction between
the remote controller and the
infrared receiver
A strong light is shining on the
remote receiver
The main power is not turned
on
Replaced by new batteries
Remove the obstruction
Remove the strong light
Turn on the main power
The curtain is fully opened or
closed but the motor is still
moving
The tension of S/S wire is not
taut
The power is too strong
The grease is contaminated the
S/S wire or the big end bracket
Make tension of S/S wire
Turn the micro adjuster to
counter clock-wise
Clean the grease
The curtain is not fully opened or
closed but the motor is stopped
suddently
To operate the curtain
continuatly for long time
(non-stop)
The power is too weak
The track is not assembled on
the right way
For temporary stop of 10
seconds, the curtain can be
operated again
Turn the micro adjuster to
clock-wise
Reassemble the track
Abnormal functions of the
system
Cut-off the power supply and
reset the system
Table of contents


