Solar Technology International Hubi Retro 1 User manual
IMPORTANT: PLEASE READ BEFORE FIRST USE
Models:
Hubi Retro 1, 2, 3 and 4
Congratulations on purchasing the Hubi Power Station
and another step toward grid independence!
The instruction manual will help you understand how Hubi
works, how to get the best from it, and just as important,
its limitations.
Important: please read before rst use.
Hubi®Retro
We want your photos and videos!
Here is your chance for you and your Hubi power station to
be a star! Just send in pics or videos of you and your Hubi in a great location
and if selected we will not only give you ever lasting recognition on our
online favourite users wall of fame but we will send you a Freeloader Sixer,
6000mAH solar power bank worth £70 completely free!
Please send to hello@solartechnology.co.uk including your address details
and best of luck!
Note – we cannot guarantee to publish every entry and only those selected
by our marketing department for publication will be awarded a Sixer. By
providing your images you automatically grant us the right to use these
images or videos howsoever we see fit.
9. Warning
Keep Hubi away from fire and don’t allow it to get wet. Any severe shock or impact may
result in damage and will invalidate the warranty. It is strictly forbidden to dismantle
Hubi except by Solar Technology personnel or agents appointed by Solar Technology.
Any sign of tampering will result in the warranty being terminated.
10. Warranty
All items in this box including Hubi, LEDs and cables are supplied with a 24 month
global warranty* except the solar panel, which is supplied with a 10 year module
warranty and 20 year performance warranty.
Should a failure occur during this time Solar Technology International Ltd will repair or
replace any faulty part, at its discretion. Solar Technology International Ltd does not
accept liability for any 3rd party damage how so ever caused or any costs associated
with the return of faulty products.
*Global warranty means if a product is returned to the address overleaf at the sender’s
expense and a warranty claim is found to be valid, Solar Technology International
Ltd will return the repaired or replaced product to the sender at Solar Technology
International Ltd’s expense irrespective of where the sender is located in the world.
11. Optional accessories
Solar Technology supplies a comprehensive range of accessories for Hubi, which is
constantly being updated. Please visit www.solartechnology.co.uk to view.
SPECIAL NOTE Hubi Retro can deliver a maximum of 3.5A at any one time so if all
the power sockets are used and the combined current exceeds 3.5A, Hubi Retro
will close down to protect its circuits.
To reset Hubi Retro, remove the solar panel
from the hub and use the reset tool provided in this kit (or a paperclip or similar
object) and insert it into the Reset socket (Fig 1, 9) on the front of Hubi. Press it
once to reset the system. Then connect Hubi back to the solar panel and once
daylight activates the solar panel the hub will be reset
.
Hubi is not designed to
work with an inverter.
If an inverter is connected to Hubi Retro, the hub will close
down and will need to be re-set as above. Should the above occur, it will not have
damaged Hubi Retro.
Frequently Asked Questions
1. The solar panel never seems to fully charge Hubi
• Check the panel is not shaded and that it is outdoors. If inside, even
if against a glass window, the charge capability of the panel reduces
significantly. Also bear in mind a solar panel looses approximately 8 times
its summer charging capability in the winter.
2. The power indicator on Hubi never shows 4 bars
• This does not necessarily signify that the Hubi is not full. LEDs are not a
totally accurate way to measure power and inaccuracies can sometimes
be experienced. So long as the Hubi after a full sunshine charge delivers
power as indicated in section 3 it is working well.
3. Is there any other way to charge up Hubi other than solar?
• There are two options; charge by mains wall plug or charge by 12v auto
plug – see www.solartechnology.co.uk and look under Hubi Accessories.
4. What happens if Hubi gets wet?
• Hubi is not water resistant although is very robust and designed for use
outdoor but should it get wet disconnect it from the solar panel and other
devices and let it dry naturally indoors for a period of one week. There is a
very good chance it will recover without future problems and can be used
as normal. However, if it will not work then it must be assumed the battery
has been damaged and can be returned to Solar Technology for battery
replacement – see section 8.
5. What about if I break something?
• All parts of the Hubi system are replaceable and we have spares
at Solar Technology in the UK. In this instance please call
+44 (0) 1684 774000 for a quotation.
6. I plugged a device into Hubi and it instantly stopped working
and would not work again.
• In this instance Hubi’s sockets have been overloaded. Hubi can
only deliver a maximum of 3.5A and if more is demanded of it, it will
automatically shut down to protect its circuits from overload. To reset
Hubi disconnect the solar panel cable and follow the instructions in
the ‘Special Note’, top left next to this page.
1. Lap top adaptor
2. Apple / HP version
3. Lumi light
4. Lumi splitter
5. LED strip light
6. LED bulb and cable
7. Extension cables
8. 12v fan
9. Expansion kits (Hubi + panel)
10. Hubi boxes (without panel)
11. Mains adapter to charge Hubi
12. Camcaddy2
RESET
RESET
Solar Power Station
User manual
RESET
(2) (4) (3)
(5) (6) (1)
(9)
(10)
(14)
(13) (12)
(14)
(7)
(11)
Fig 3
1. Identifying the best
Location for the Solar Panel
The solar panel is designed for permanent outdoor use
(please don’t position the panel behind a window as this will massively reduce its effectiveness).
There is a white ABS bracket in the kit with fixings and this is designed to hold the panel at a steep
angle (ideal for winter charging) when positioned against a wall. You need to select a wall where the
solar panel won’t interfere with your day to day use of the building, but also bear in mind the hub
needs to be within 2.5m of the cable fixed to the panel.
NOTE – if the Hubi Retro needs to be located further from the solar panel than 2.5m, a 5m or 2.5m
extension cable can be purchased from www.solartechnology.co.uk The ideal solar panel position
is on a south facing unshaded wall, but good power generation will still be achieved anywhere from
due east to due west (in the southerly half of the compass). Avoid north facing walls and heavily
shaded areas.
2. Fixing the Solar Panel
The panel frame is drilled and these holes will match those on the
bracket. First attach the solar panel to the bracket (see Fig 2) using
the bolts and nuts provided so the panel and bracket are ready to
be fixed to the wall in a landscape orientation. Use the self-tapping
screws provided to fix the panel and bracket to a wall made of wood.
If fixing to a wall made from other materials some rawlplugs may be
needed (not supplied). A hole will need to be drilled to thread the
cable from the outside of the building to the inside. Once the cable is
inside it’s a sensible precaution to fill the hole around the cable with
Polyfiller or similar.
3. Positioning Hubi
The Hubi Retro is not waterproof so needs to be protected from direct
contact with water. A powder coated metal bracket can be purchased
that completely protects the hub and its cables allowing the hub to
be safely fixed to any wall – see www.solartechnology.co.uk
The hub needs to be within 2.5m from the solar panel and can be
extended (see point 2).
4. Connecting the Solar Panel to Hubi
The solar panel is fitted with a 2.5m cable and connector plug. This
inserts into the back of Hubi Retro into the socket named ‘Solar In’ (1).
That’s it – the Hubi Retro will be charged by the solar panel whenever
there is daylight and is protected from overcharging by its smart
control electronics. You can also charge the Hubi Retro from the
mains if you purchase a separate mains charger available at
www.solartechnology.co.uk. This is plugged this into the ‘Aux input’ (2).
If you have a Hubi Retro 2, 3 and 4 the you will also see a 3rd
connector on the rear of Hubi. This connector allows you to connect
multiple Hubi Retro’s together giving you more storage power and
outputs. Simply connect the ‘output’ (3) on one unit to the ‘Aux input’
(2) on the other unit with the supplied cable.
Fig. 2
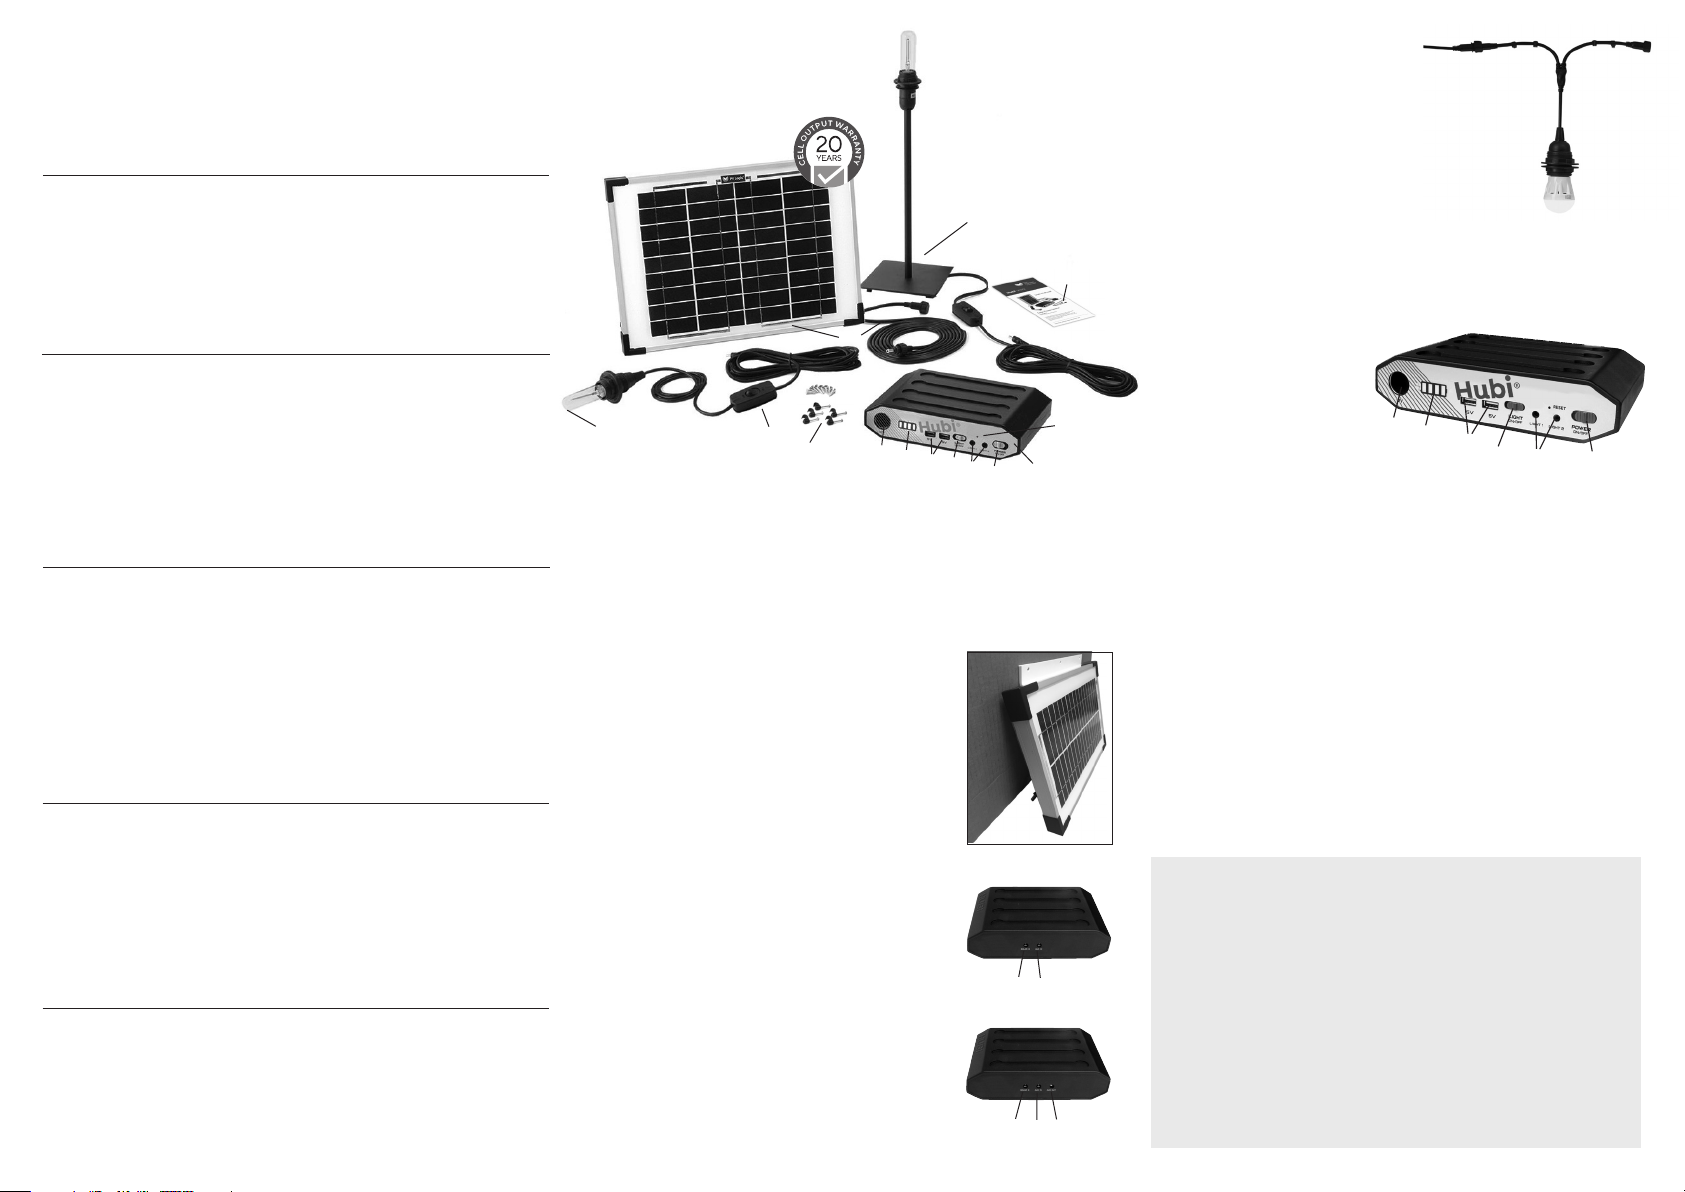
5. Connecting the LED(s) to Hubi
The supplied Hub-to-LED cable is 5m long so consider where
the LED light unit is to be positioned. It’s worth holding the illuminated
LED in the dark room before fitting so you can decide which location will
give the best illumination. The plug end of the 5m cable connects into
socket (c) (Fig. 4) named Light 1 on the Hub. Now fix the cable to wall
and ceiling using the panel pins supplied until you arrive at the chosen
location of the LED. The cable end has a mating connector to the
LED so join the two together and fix the LED in position.
The table and floor light should be plugged into sockets (c) on the
hub and for Retro 3 or 4 the supplied Y split cable needs to be
connected to sockets (c) and then the lights can be connected to
the two sockets from the Y split.
If the cables are exposed or a trip hazard, a conduit or some form of encapsulation
should be considered to provide protection.
6. Operating the Hubi Retro System
To enable power to be delivered from the Hubi Retro,
you must turn it on, by sliding the Power Switch (a)
to the ON position. Instantly you will see
the power indicators illuminate and
the four segments (b) each represent
25% of the batteries capacity:
1 segment < 25% charged,
2 segments < 50% charged,
3 segments < 75% charged,
4 segments < fully charged.
If power is needed for charging or running electrical devices
there are two USB sockets (e) capable of powering any 5v device such as a smart phone or
tablet. There is a single 12v auto socket (f) and devices with a matching plug and compatible
power demand can be powered by Hubi Retro if the Power Switch is in the ON position.
Devices you can power or charge from the Hubi are phones, tablets, torches, lights, fans,
in fact most 12v devices that have a car plug and 5v devices that have an USB connection
(please see special note in below).
Tip: To maximise the power in your Hubi Retro system when not in use always switch both
ON/OFF buttons to the off position. The solar panel will still deliver a charge to the solar hub
but the hub itself won’t waste any of that power.
7. Expanding Hubi Retro
If longer illumination times are needed all Hubi Retro models can achieve this if the Hubi
Retro Winter Panels are purchased. These kits contain an additional solar panel that daisy
chains to the panel supplied.
If more power is needed, an expansion hub HUBI1010AE can be purchased for Retro 2, 3
and 4. The additional hub is supplied with a linking cable to join the two hubs – see note 4.
8. Replacement Battery
Hubi has been designed so its battery can only be replaced by Solar Technology or its
appointed agents. In no circumstances should any other party attempt this process as
it will invalidate any warranty. The battery in a Hubi is designed to last between 2 and
5 years depending on levels of use. The cost of a new Hubi battery can be found on
www.solartechnology.co.uk under Hubi Accessories. This price includes return postage.
(1) (2)
Hubi Retro 1
(1) (2) (3)
Hubi Retro 2,3,4
Hubi Retro 1
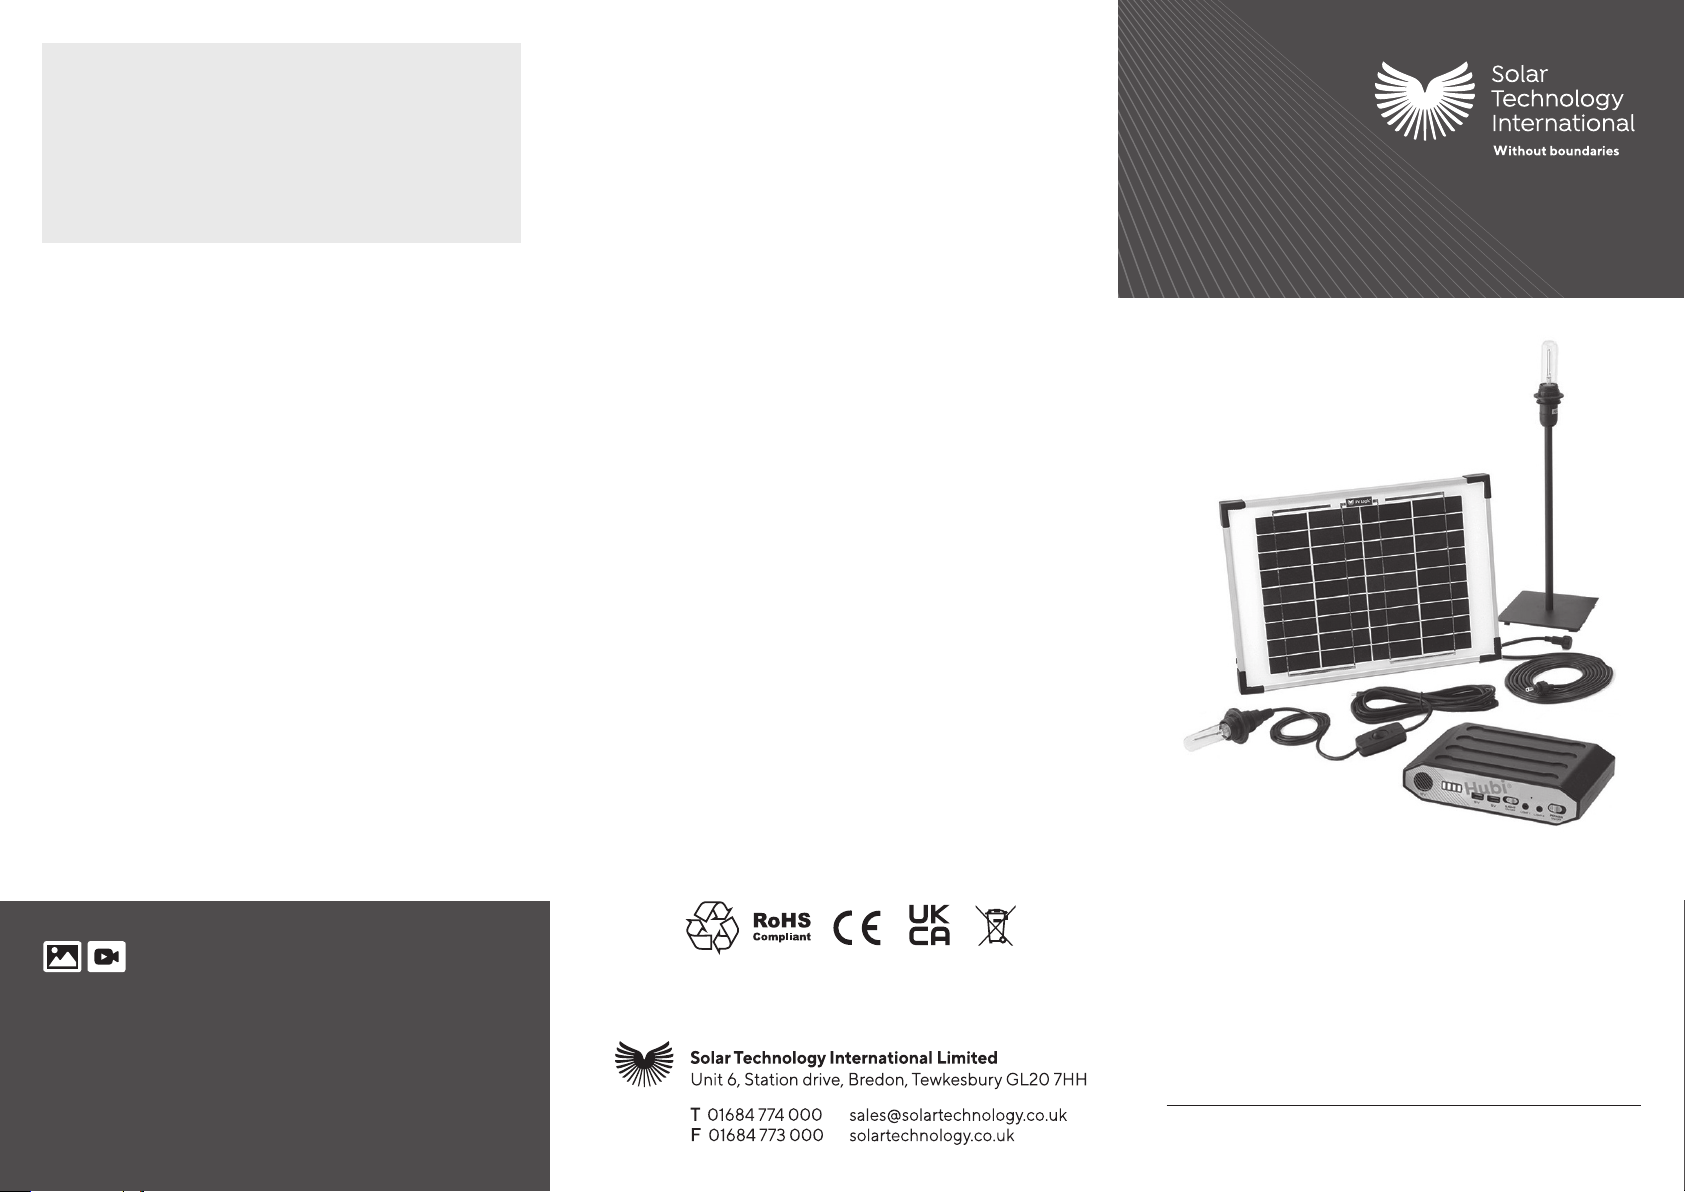
1 x Hubi Power Hub includes:
• 2000mAh/12v lithium battery pack (1)
• Intelligent charge electronics
• 1 x 12v auto socket output - max 3A (2)
• 2 x 12v lighting jack (3)
• 2 x USB socket outputs - max 2A (for
charging 5v devices: phones, tablets etc) (4)
• Light on/off switch (5)
• Power station on/off switch (6)
Specification
Part no. SHV001
• Battery power indicator (7)
• Solar charging indicator (8)
• Reset button (9)
1 x 5w 12v solar panel and 2.5m cable (not shown)
1 x Solar panel bracket (not shown)
1 x Table lamp with 5m cable and switch (11)
1 x 5m cable, switch and E14 bulb holder (12)
2 x 0.8 lumen LED lament type bulb (13)
1 x Cable xings and user manual (14)
1 x Hubi Power Hub includes:
•10000mAh/12v lithium battery pack (1)
• Intelligent charge electronics
• 1 x 12v auto socket output - max 3A (2)
• 2 x 12v lighting jack (3)
• 2 x USB socket outputs - max 2A (for
charging 5v devices - phones, tablets etc) (4)
• Light on/off switch (5)
• Power station on/off switch (6)
• Battery power indicator (7)
Hubi Retro 2 Part no. SHV002
• Solar charging indicator (8)
• Reset button (9)
1 x 10w 12v solar panel and 2.5m cable (10)
1 x Solar panel bracket (not shown)
1 x Table lamp with 5m cable and switch (11)
1 x E27 expandable ceiling bulb holder
(not shown)
1 x 5m cable from hub to bulb holder (12)
1 x 3.5 lumen LED lament type bulb
(not shown)
1 x 0.8 lumen LED lament type bulb (13)
1 x Cable xings and User manual (14)
1 x Hubi Power Hub includes:
•10000mAh/12v lithium battery pack (1)
• Intelligent charge electronics
• 1 x 12v auto socket output - max 3A (2)
• 2 x 12v lighting jack (3)
• 2 x USB socket outputs - max 2A (for
charging 5v devices - phones, tablets etc) (4)
• Light on/off switch (5)
• Power station on/off switch (6)
• Battery power indicator (7)
• Solar charging indicator (8)
• Reset button (16)
Hubi Retro 3 Part no. SHV003
1 x 10w 12v solar panel and 2.5m cable (10)
1 x solar panel bracket (not shown)
1 x floor lamp with 5m cable and switch
(not shown)
1 x table lamp with 5m cable and switch (11)
1 x E27 expandable ceiling bulb holder
(not shown)
1 x 5m cable from hub to bulb holder (12)
2 x 3.5 Lumen LED lament type bulb
(not shown)
1 x 0.8 Lumen LED lament type bulb (13)
1 x Hub Y Split cable (not shown)
1 x Cable xings and User manual (14)
1 x Hubi Power Hub includes:
•10000mAh/12v lithium battery pack (1)
• Intelligent charge electronics
• 1 x 12v auto socket output - max 3A (2)
• 2 x 12v lighting jack (3)
• 2 x USB socket outputs - max 2A
(for charging 5v devices - phones,
tablets etc) (4)
• Light on/off switch (5)
• Power station on/off switch (6)
• Battery power indicator (7)
Hubi Retro 4 Part no. SHV004
• Solar charging indicator (8)
• Reset button (16)
1 x 10w 12v solar panel and 2.5m cable (10)
1 x solar panel bracket (not shown)
2 x floor lamp with 5m cable and switch
(not shown)
1 x table lamp with 5m cable and switch (11)
2 x 3.5 Lumen LED lament type bulb
(not shown)
1 x 0.8 Lumen LED lament type bulb (13)
1 x Hub Y Split cable (not shown)
1 x Cable xings and User manual (14)
Hubi is a sophisticated power station that uses its solar panel to charge the battery hub and this will then
power the special 12v lighting supplied and will charge portable electronic devices via its USB and 12v auto
socket ports. From new, we recommend that once tted the Hubi battery hub is connected to the solar panel
and it is left with all switches turned o to enable it charge itself over a period of 24hrs before rst use.
SPECIAL NOTE
Charging Hubi from new If from new there is only one bar or no bars showing on
Hubi’s battery meter, it will be necessary to allow the solar panel to charge the
battery before first use. Once it is at least 50% charged, the system can be used.
Please ensure Hubi is covered or indoors and the solar panel is outside and tilted
at around 45 to 55 degrees, facing as near to south as possible and in an unshaded
location. Make sure all of the switches on Hubi are OFF and the solar panel cable is
plugged into the Solar In socket on the back of the hub.
Charge-up times from flat to full: Hubi Retro 1 (summer 1 day / winter 4 days)
Hubi Retro 2, 3 and 4 (summer 3 days / winter 12 days)
NOTE – once Hubi is showing 2 bars of charge (50% full) it can be used. Thereafter,
the solar panel will generate sufficient power each day, even during winter to provide
light for 1 to 2 hours each night. If longer lighting times are needed (in the winter)
please consider adding a Hubi Expansion solar Panel, which will provide twice the
solar power, thus doubling the nightly run time.
Hubi Winter Panels
Designed to extend the charging time of Hubi Retro in the winter months.
Part No. STP010V
(for Retro 1)
• 1 x 10w Panel
• 1 x wall bracket and fixings
• 1 x daisy chain cable
Part No. STP020V
(for Retro 2)
• 1 x 20w Panel
• 1 x wall bracket and fixings
• 1 x daisy chain cable
Part No. STP045V
(for Retro 3 and 4)
• 1 x 45w Panel
• 1 x wall bracket and fixings
• 1 x daisy chain cable
(b)
(d)
(f)
(e)
(c) (a)
Fig 4
This manual suits for next models
3


