Solar Technology SolarMate ARENALight SMAL001 User manual

Model: SMAL001
User Manual
IMPORTANT: PLEASE READ BEFORE FIRST USE
TECHNICAL HELPLINE 01684 774000
TOTAL LIGHTING SOLUTIONS
Expansion Bolts
and Fixings
U Bolts
and Fixings
User Manual
Remote Control
Angle
Adjustment
Bracket
0o, 15oor 30o
Arena Solar
Floodlight
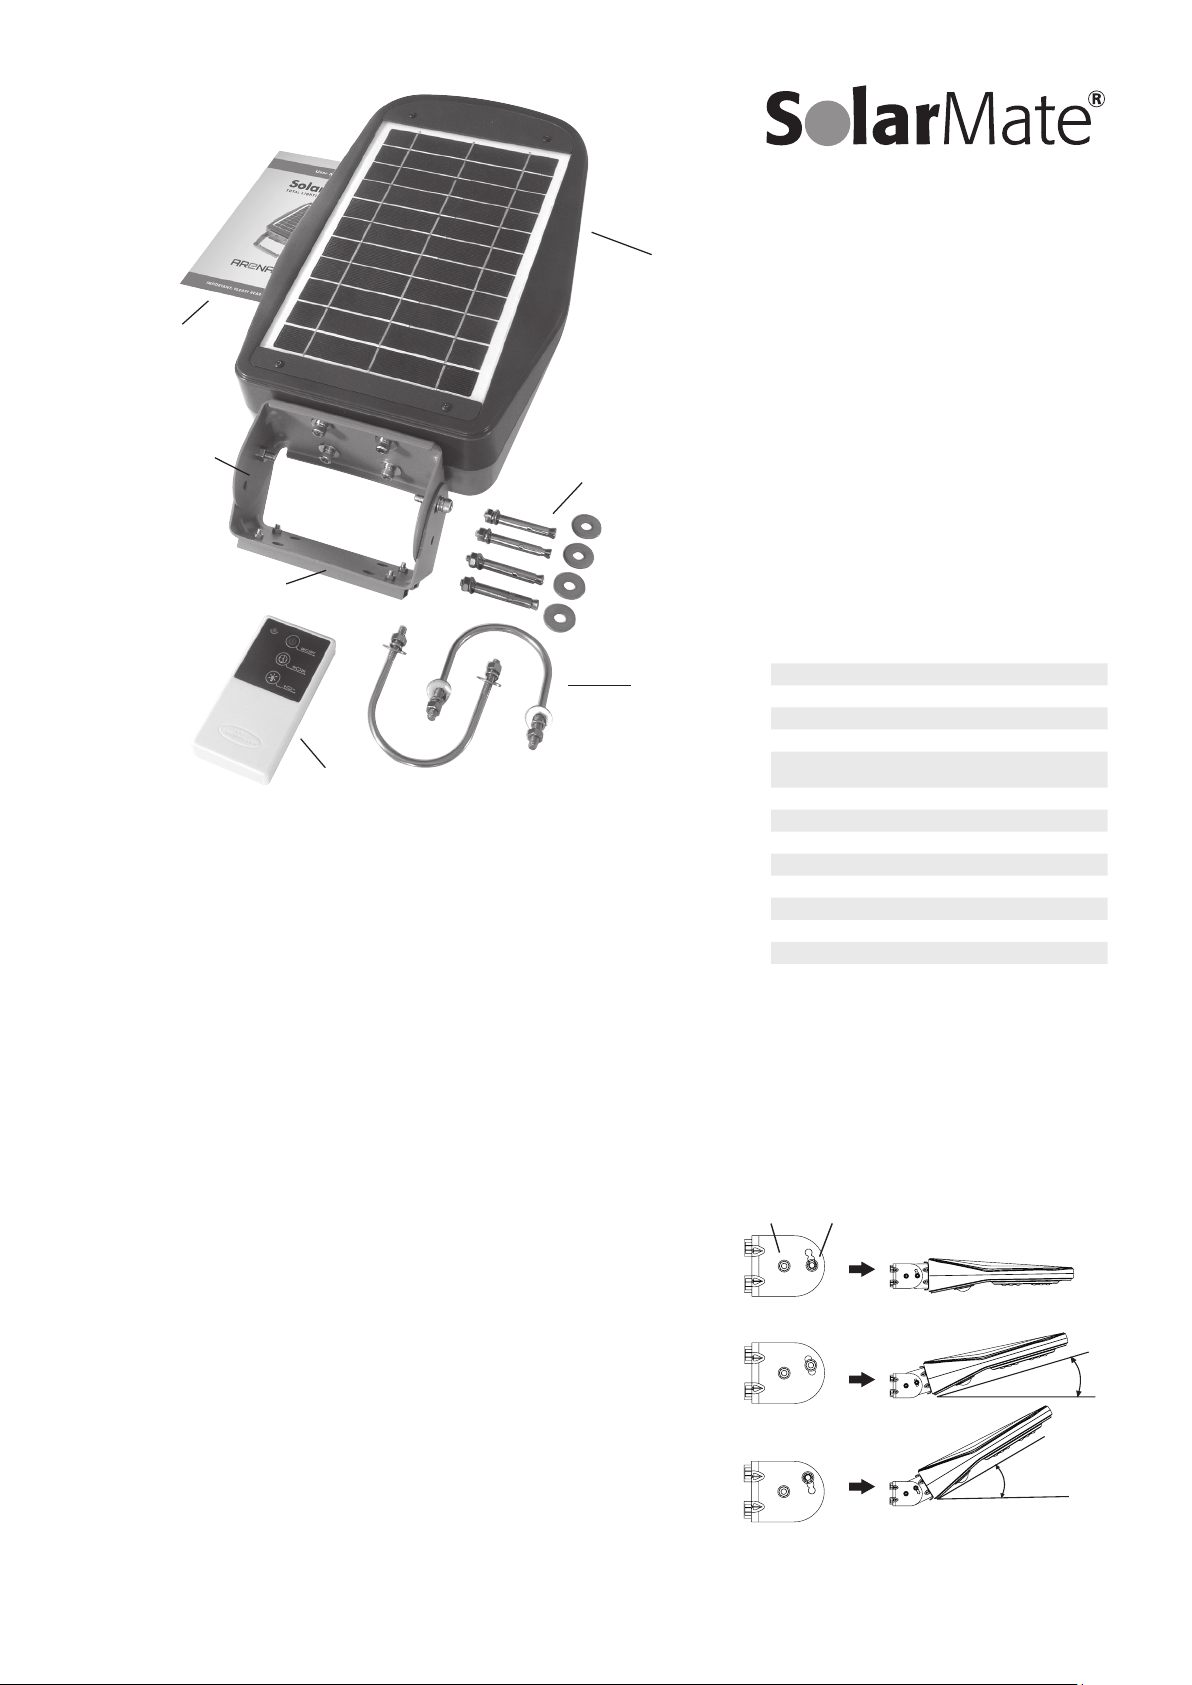
1. Contents
1 x Arena Solar Floodlight
1 x Remote Control
2 x AAA Batteries (fitted inside the remote control –
remove clear plastic tag inside battery box to activate)
2 x U bolts with 4 nuts and washers (for pole mounting)
4 x Expansion bolts, nuts and washers (for solid walls)
2 x Metal spacers
1 x User manual
2. How Arena Light Works
Arena Light houses its own solar panel, which delivers power to its internal battery whenever it is exposed to daylight. It can never overcharge its
battery due to internal control circuit boards. The solar panel has a 20+ year life cycle and the battery around 5 years. The battery can be replaced
and is available from www.solartechnology.co.uk
The purpose of Arena Light is to flood an area with light when either it detects movement or for a solid period of time.
Below you will find details of the operational modes of the Arena Light.
3. Identifying the best Location for the Arena Light
Arena Light incorporates a solar cell which needs to face upwards. Wherever possible
the solar cell should not be located in shady areas and ideally, when or if tilted, it
faces east, south or west. If it faces north, the cell will still deliver power but not as
much or as quickly as if facing south. The optimum height to fix Arena Light is from
2.5 to 5m.
Example: For a 40m x 20m arena we recommend a minimum of 6 Arena Lights –
3 on each of the long sides, evenly spaced. Ideally position each Arena Light on a
4m pole and angle the head at the 30 degree position.
4. Adjusting the Angle of Arena Light
It is best to decide the angle before fixing in place. Arena Light has three angles it
can be adjusted to: flat – 0 degrees, 15 degrees tilted upwards and 30 degrees tilted
upwards. 30 degrees provides the furthest throw of light, 0 degrees for more intense
brightness. To adjust the angle, loosen both side bolts (a) toward the rear of the
Arena Light bracket (Fig 1).
The bolts (b) toward the front of the bracket have three notches enabling the angle
to be locked in place. Remove the bolts (b) completely and once the desired notch is
reached, replace the bolts (b) and tighten all of the bolts/nuts.
Main Features
1. Flexible installation on pole or wall
2. Adjustable installation angle: 0o/15o/30o
3. Large lighting area
4. Remote control function from long distance
5. Lighting time and brightness option
6. 1000 lumens
Electric Characteristics
Flat compact solar panel 6.8W, 10 years life span
Li-ion battery 3.7V, 12000mAh
LED 30 LEDs, 1000 Lumens
Charging time 9-10 hours
Lighting time More than 4 nights
(dim lighting mode)
Ray sensor <10 Lux
PIR sensorR 5-8M, 120O
Waterproof IP65
Install hight 2.5-3.5m
Material Aluminium + plastic
Size 450x246x86mm
Working temperature -25oC to 65oC
Warranty 2 years
15°
30°
Fig. 1
(a) (b)
Metal Spacers

TECHNICAL HELPLINE 01684 774000
5. Fixing Arena Light – Before Fixing Read Point 6
Wall Mounting (Fig 2):Before starting to mount the Arena Light to the wall, separate the two halves of the bracket by removing (a) and (b)
fixings. Remove the two metal spacers from the loose half of the bracket. Using the supplied expansion bolts (if fixing to a cavity or solid wall), or
self tapping screws (not supplied) if fixing to a timber wall, attach Arena Light through the four holes in the back of the loose half of the bracket.
Once fixed in place, attach Arena Light to the bracket using fixings (a) and (b).
Pole Mounting (Fig 3):Firstly, decide how to secure the pole, which needs to be a standard scaffold pole or similar. This might be by attaching
to an existing post and rail fence or it might be free standing. If free standing, the pole needs to be either cemented into the ground (500mm
min) or fixed using the quick release ground mount plate that can be ordered from www.solartechnology.co.uk. To fix Arena Light to the pole,
loosely secure the U bolts (c) through the four holes in the Adjustment Bracket, then slide the pole through the U bolts and tighten so Arena
Light is firmly clamped to the pole. Now position the pole in the ground.
6. Operation of Arena Light
Arena Light has no physical On/Off switch on its body. As soon as it is positioned
so the solar panel is facing toward the sky in day light, its internal sensor will
activate the unit.
IMPORTANT – when unpacked from new, Arena Light’s solar cell needs to
see daylight before it will activate. To be assured that the internal sensor has
been activated correctly the LEDs should be brightly illuminated (in day time).
If unpacked during periods of very dull weather, darkness or even indoors by
a sunny window, you may see the LEDs flicker. This indicates that the voltage
sensor in Arena Light has not been properly activated. In this case, turn the
Arena Light solar panel to face down and wait for brighter conditions. Once
Arena has been set correctly this process will not need to be repeated unless
Arena Light is placed into storage.
Once the sensor is activated from new, the LEDs will continue to burn brightly from
new for a short period (30 seconds) and will then turn off and thereafter will only
illuminate during periods of darkness.
Warning – the sensor in Arena is tilt sensitive. The means that before you finally
fix Arena to its desired position be careful not to invert the solar panel. Try and
keep the solar panel facing upwards at all times. If the solar panel is accidentally
inverted, go through the set up phase again as described above.
The operation of Arena Light, once installed in its desired position, is now done
only by the remote control. Please open the rear battery cover on the remote
control and remove the clear tab, thus activating the supplied batteries. The
remote control has a range of up to 8m. The button will switch Arena Light
between Movement Activated Mode and Timer Mode.
There are two lighting options:
Movement activated (PIR) mode: (Fig 4) Arena Light will be in this mode
from new. It will illuminate between dusk and dawn at a low level (50 lumens)
brightness until its PIR detects movement within 8m, when the LED brightness will
increase to 500 lumen and it will stay at this level for 30 seconds or until the object
causing the movement is out of range (around 8m).
Timer Mode: (Fig 5) Press the button until a single red LED is illuminated. This
indicates that Arena Light will work at the chosen brightness for 1 hour. Press
again or until 2 red LEDs are illuminated, which indicates that Arena Light will
illuminate for 2 hours. After 5 seconds, either the single or both red LEDs will turn
off. If more than 2 hours’ light is needed, using the remote control, go through
the above process again to add a further 1 or 2 hours of operation once the first
timed period has ended.
Brightness Adjust in Timer Mode: Arena Light’s brightness can be adjusted using
the button. Press it once to change from 500 lumen and 1000 lumen and
press again to change back. This function is only available in Timer Mode.
If you wish to turn off the timer mode simply turn the unit off then after
5 seconds turn it back on. It should then be back in its movement activated mode.
Arena Light can be turned off completely by pressing until all the LEDs go out.
If switched off, Arena Light will still be charged by its solar panel and will be ready
for use in the future.
NOTE – any Arena Light remote control will operate any Arena Light – in other
words, if multiple Arena Lights are being used, only one remote control needs
be used to operate them all.
Fig. 5
.
8m
8m
Fig. 4
M8 nut
M6 spring washer
M6 flat washers
U bolts (c)
Fig. 3Fig. 2
M8 nut
M6 spring washer
M6 flat washers
Expansion bolt
Step 1: Switch
Light off and allow
to charge during
daytime
Step 2: Light turns on when
darkness falls (<10 lux)
Step 4: Light goes back to
standby when motion stops
Step 3: When motion is detected,
Light turns on at 500 lumens for 30
seconds or until motion has stopped
ON OFF
1H 2H
+ –

TECHNICAL HELPLINE 01684 774000
Helpful Tips
1 If using Arena Light to illuminate a horse riding menage or other sports ground on the
timer mode, we would always suggest turning Arena Light off after use so that power can
be stored in readiness for the next time it needs to be used.
2 We would recommend that occasionally the solar cell is cleaned, especially if located in a
dusty environment. Particulates on the glass surface covering the cell will reduce charging
capability. No special chemicals are needed – use warm water and dry after washing to
prevent smears on the glass.
3 The batteries in the remote control will need to be changed once per year. Standard AAA
alkaline batteries are required.
4 Arena Light is fitted with a special Lithium battery pack. This has a life expectancy of
5 years and is available from www.solartechnology.co.uk. The battery has special
connectors fitted which match the connectors within Arena Light.
Solar Technology International Ltd. Unit 6, Station Drive,
Bredon, Nr. Tewkesbury, Gloucestershire GL20 7HH, United Kingdom
Telephone: 01684 774000 Fax: 01684 773000
E-mail: support@solartechnology.co.uk Online: www.solartechnology.co.uk
Solar
TECHNOLOGY INTERNATIONAL
WE WANT YOUR VIDEOS AND PHOTOS!
Here is your chance for you and your Arena Light/s to be stars. Just send in crazy videos or stills of you and your
Arena Light/s in action and bag a fantastic Lumi light absolutely free (worth £15). Remember, the wackier the better!
Please send to sales@solartechnology.co.uk and best of luck!
NOTE - we cannot guarantee to publish every entry and only those selected by our marketing department for
publication will be awarded a free Lumi. By providing your images you automatically grant us the right to use these
images howsoever we see fit.
Keep Arena Light away from fire
and oil in order to avoid any fire
or explosion. Any severe shock
or impact may result in damage
and will invalidate the warranty.
It is strictly forbidden to dismantle
Arena Light except by Solar
Technology personnel or agents
appointed by Solar Technology.
Any sign of tampering will result
in the warranty being terminated.
WARNING
7. Storage of Arena Light
Arena Light is fully weather resistant (IP65) and will not deteriorate if permanently left outside, but should you wish to store it, please ensure it is
housed away from daylight and turned upside down so the solar panel is facing downward.
8. Charging Times
From new, Arena Light will need a full day’s charge, so install early in the morning to allow it to have this initial input. Installing later in the day will
cause no problems but will lead to a shorter burn time for the first evening’s use.
If Arena has a completely flat battery, it will take 10 hours of sunshine to fully charge it. If the battery is only partially discharged it will take less time.
Even if Arena Light has not been fully charged by its solar panel (because of a cloudy day etc), there will still be power in the battery to operate the
light that night, but Arena Light will operate for a shorter period.
9. Operation Times
Movement Activated Mode: From a fully charged battery, Arena Light will operate for 50 hours at the 50 lumen standby brightness. This will
reduce as the 500 lumen brightness is activated by movement, but its not possible to provide an operation time because of the variable nature of
how many activations and for how long.
Timer Mode: if the 500 lumen brightness is selected, a fully charged Arena Light will operate for 12 hours, and at 1000 lumen it will operate for
6 hours.
Winter Operation: This is difficult to predict because of the variable locations that Arena Light may be positioned in but on average, at the 500
lumen brightness, 2 hours illumination per evening should be possible. If longer burn times are needed, it should be accepted that Arena Light can
only be used during selected evenings and not every evening. For example, if 4 hours of light is needed, Arena Light should be switched off for a
2 day period to allow its battery to gain enough power to deliver this length of burn time.
10. Warranty
All items in this box are supplied with a 24 month global warranty*. Should a failure occur during this time Solar Technology International Ltd will
repair or replace any faulty part, at its discretion.
Solar Technology International Ltd does not accept liability for any 3rd party damage how so ever caused or any costs associated with the return of
faulty products.
*Global warranty means if a product is returned to the address below at the sender’s expense and a warranty claim is found to be valid,
Solar Technology International Ltd will return the repaired or replaced product to the sender at Solar Technology International Ltd’s expense
irrespective of where the sender is located in the world.
Popular Inverter manuals by other brands

Q3 ENERGIE
Q3 ENERGIE QX3 Series Installation and operating instructions

Generac Power Systems
Generac Power Systems 20 kW LP owner's manual

Tronix
Tronix Tronix Explorer XT user guide

Generac Power Systems
Generac Power Systems Q-55G Series owner's manual

SunSynk
SunSynk LoadShedder SM2.5kWLS user manual

POMCube
POMCube iCAN Mini 3500 user manual


