Solaris ReadyWrap User manual

user guide

Thank You
Thank you for choosing ReadyWrap!
Your ReadyWrap is designed to
be an easy and effective alternative
to elastic compression garments
or multi-layered bandaging.
Your ReadyWrap also features:
We always love to hear from you.
Please call us at (414) 892-4140
or email [email protected]
with your questions, concerns,
and suggestions. Thank you again
for your support!
*Calf, knee, and thigh units
Color-coded straps for easy use
High-tech bers for comfort
Overlapping straps to prevent gaps*
Contoured design for optimal t
•
•
•
•

3
Arterial Insuciency or Degeneration
Acute DVT (Deep Vein Thrombosis)
Untreated Congestive Heart Failure
Untreated Cancer
Untreated Infection
Absent or Severely Impaired Sensation
Allergy to Materials
Severe or Moderate Peripheral Arterial Disease
Severe Cognitive Impairment
•
•
•
•
•
•
•
•
•
Contraindications (Manufacturer Recommended)
Indications
Lymphedema
Acute / Chronic Edema
Indurate Tissue
Venous (Stasis) Ulcer
•
•
•
•
•
•
•
•
Varicose Veins
Post Sclerotherapy
Venous Insuciency
Prevention of DVT

4
Getting Started
Before wearing your ReadyWrap for the rst time, it is
essential that you wash your ReadyWrap(s) and liner(s)
and consult with your garment provider to ensure that
you are applying the correct amount of compression.
To check compression of your lower extremity ReadyWrap
garments, insert your index, middle and ring ngers
between straps. If your ngers do not t comfortably,
the straps may be too tight. Consult with your medical
professional if you have questions about compression.
After removing your garment(s), if you
notice deep indentations, indentations
lasting longer than 30 minutes, changes
in skin tone or any irritation, discontinue
use until you consult with your physician.
Visit youtube.com/SolarisInc any time
to watch “how to” videos for using your
ReadyWrap garments.

5
Most people prefer to apply their lower extremity ReadyWrap
garments while long sitting (with legs stretched out in front
of them). However, some nd it easier to put on while sitting
in a chair or standing. We encourage you to see what method
works best for you.
If applying full leg coverage, put your knee unit on last so you
can easily adjust it if needed.
If you nd that your Thigh unit often
slips, try fastening the top strap in a
“V” or “cross” design (see page 15).
When using an arm unit and gauntlet,
apply the arm unit rst.
When removing your ReadyWrap, try
folding each strap back and fastening
the hook to prevent tangling and ease
future donning.
Helpful Hints

6
Materials
Contains hook and loop materials.
Not made with natural rubber latex.
Please reference your ReadyWrap garment tag
for complete material contents.
ReadyWrap is made in the USA.
Warranties
Warranties: ReadyWrap products are warranted to be free of
defect for 6 months from the date of purchase.
Silver Liners and Extender Straps are not warranted.

7
Care Instructions
Wash: Hand wash in warm water with a drop of mild
detergent. Rinse thoroughly in warm water. DO NOT
use bleach or fabric softener.
Dry: Lay on a lint-free or our-sack towel and squeeze
your ReadyWrap to remove excess water. Lay at on
a dry towel to nish drying. Take care to ensure the
hook does not contact your towel. DO NOT iron.
8
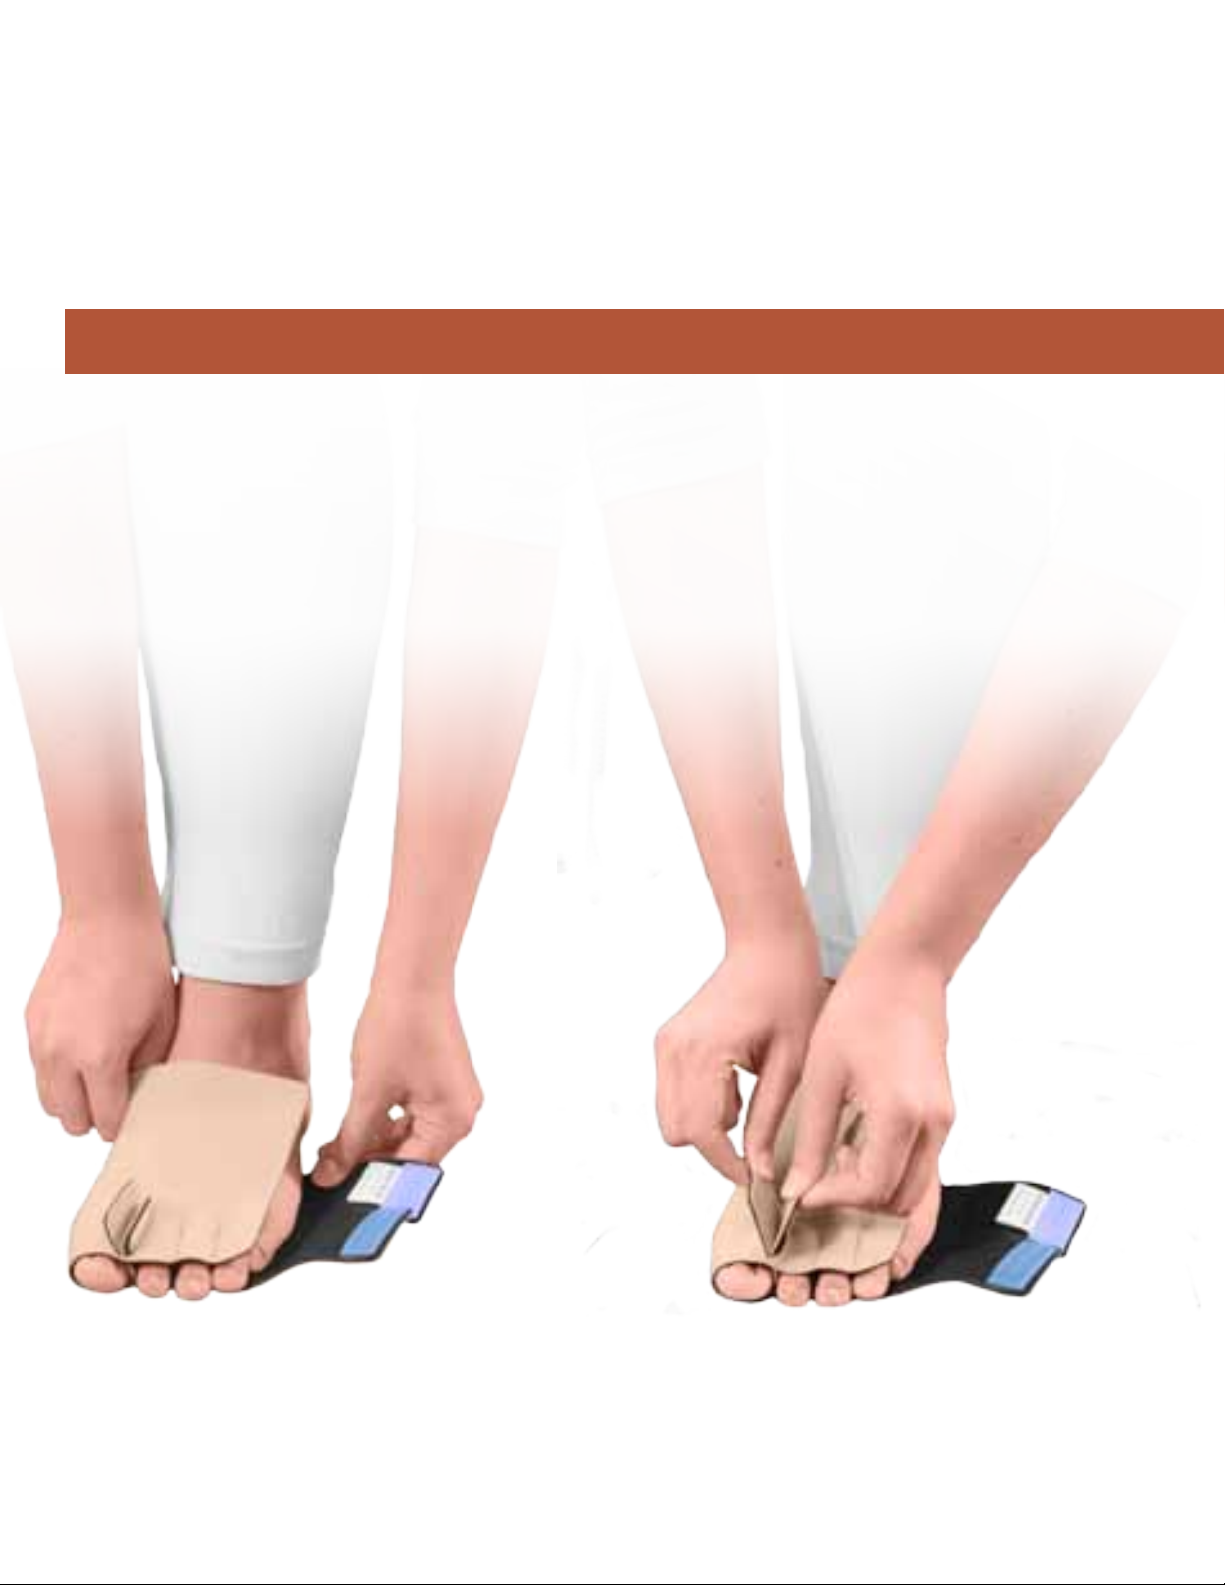
Applying Your ReadyWrap Toe
12
Unfasten all of the straps
on your ReadyWrap Toe
garment. Slide it over your
foot and position your
toes between the spacers.
Fasten the two toe straps
with white hook.
Silver Liners cannot be worn with ReadyWrap Toe garments.
9
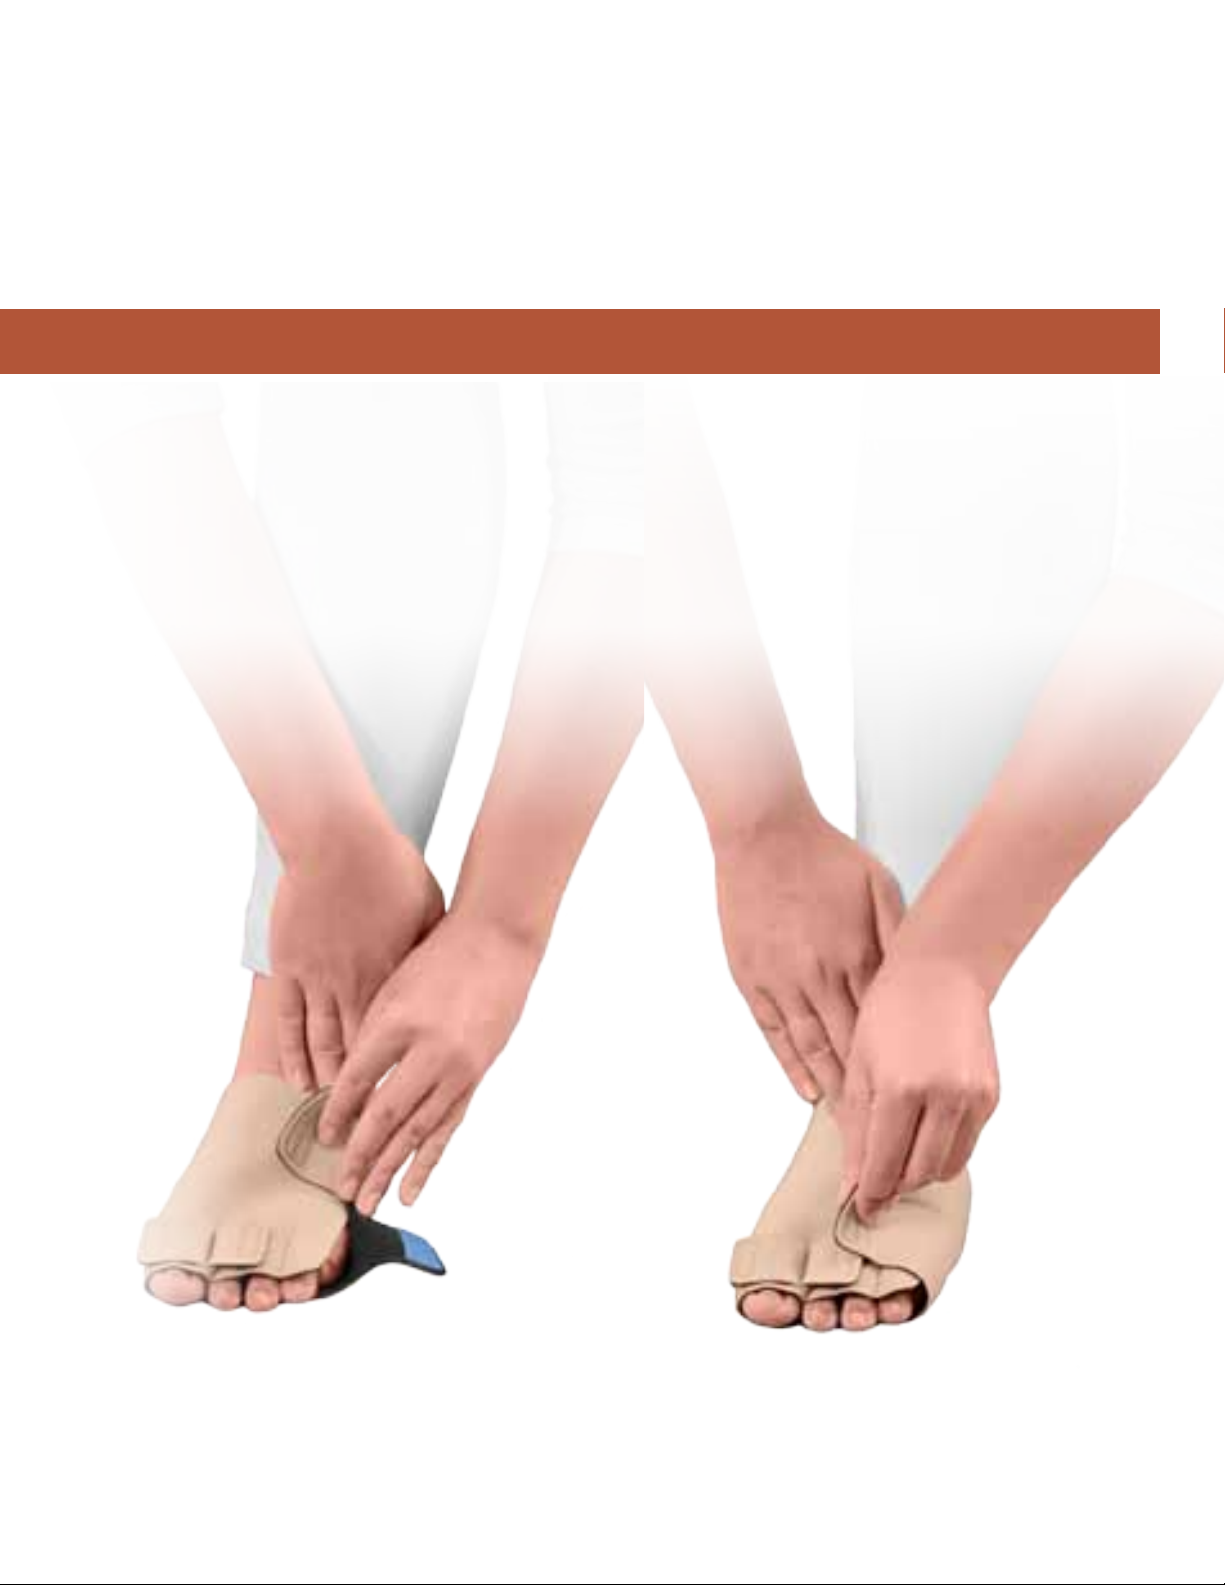
34
Then, fasten the strap
with light blue hook.
Fasten the strap with dark
blue hook. Lastly, adjust all
straps for comfort.
heel
10
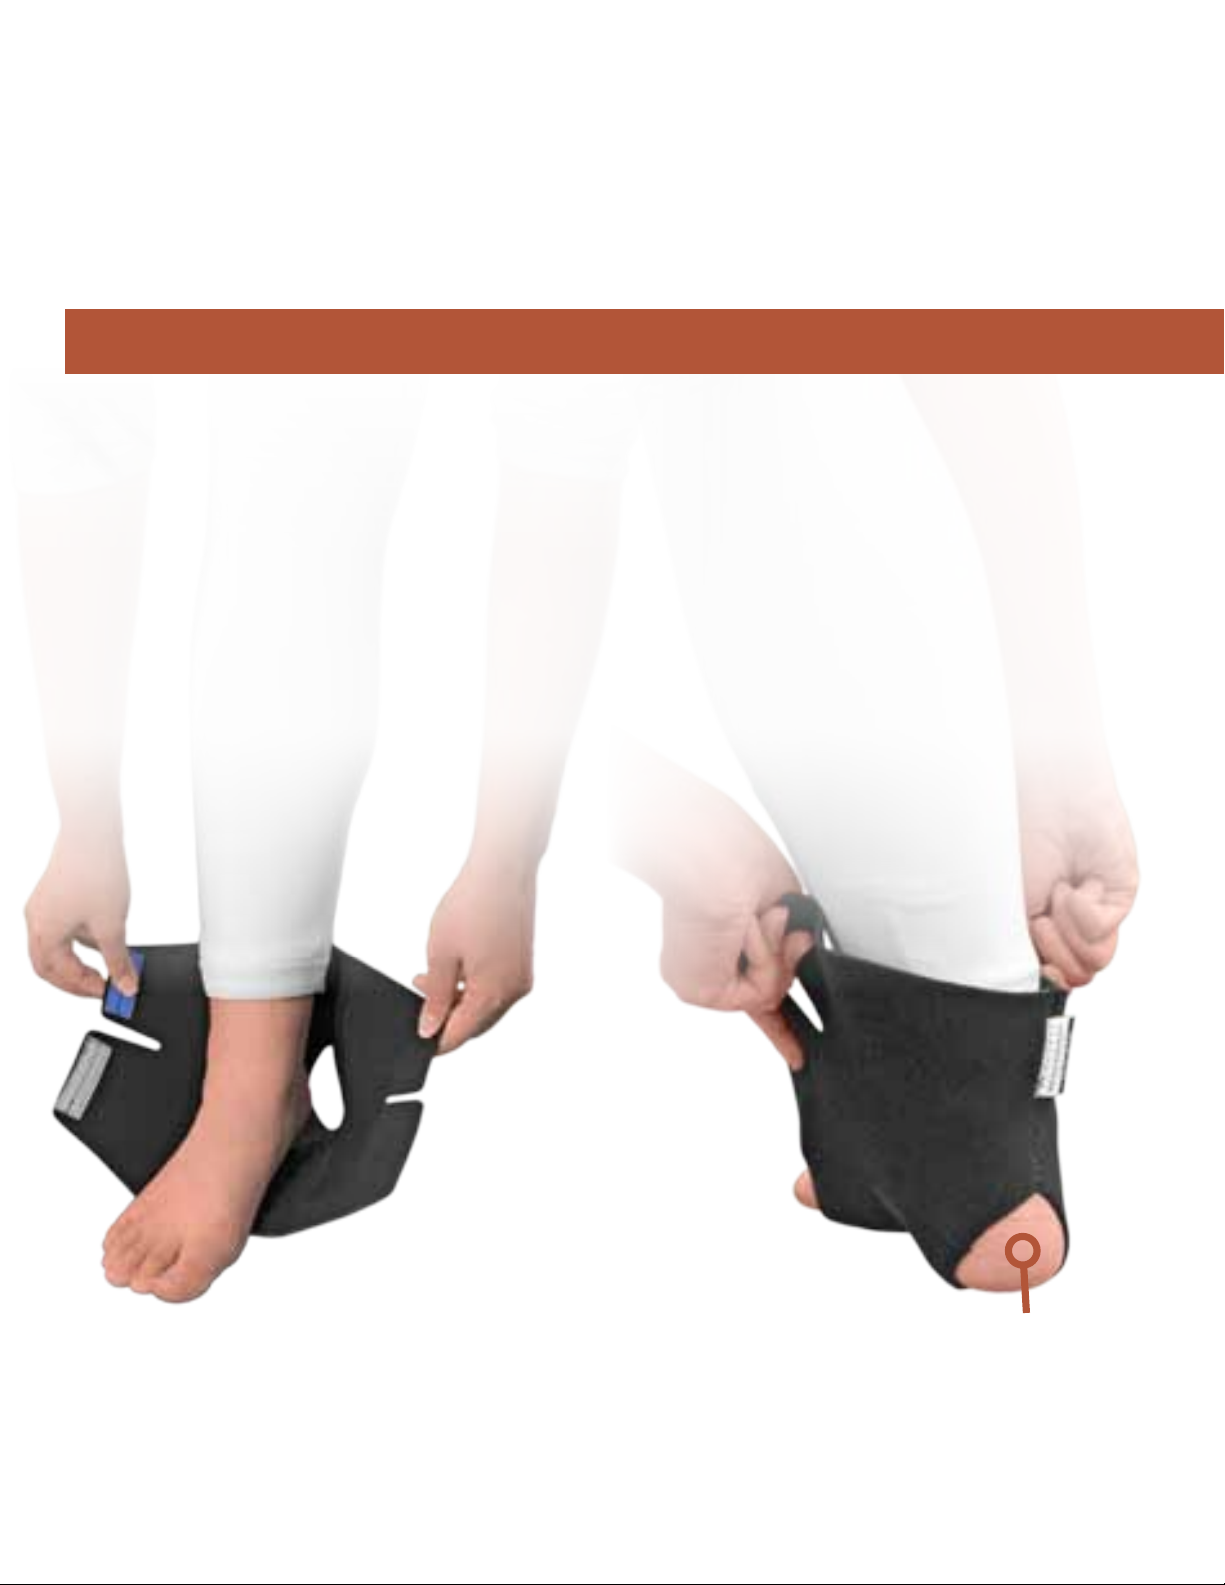
Applying Your ReadyWrap Foot
Align your ReadyWrap
so the strap with white
hook is the closest to
your toes and the strap
with light blue hook is
by your ankle.
1Place your heel rmly
into the heel hole in the
back of your ReadyWrap.
The tag should be on
the outside of your
ReadyWrap, above
your heel.
2
Instructions shown without liner for better visualization. Always wear a clean liner underneath your ReadyWrap.
1
2S
T
R
A
P
O
R
D
E
R
a
b
11
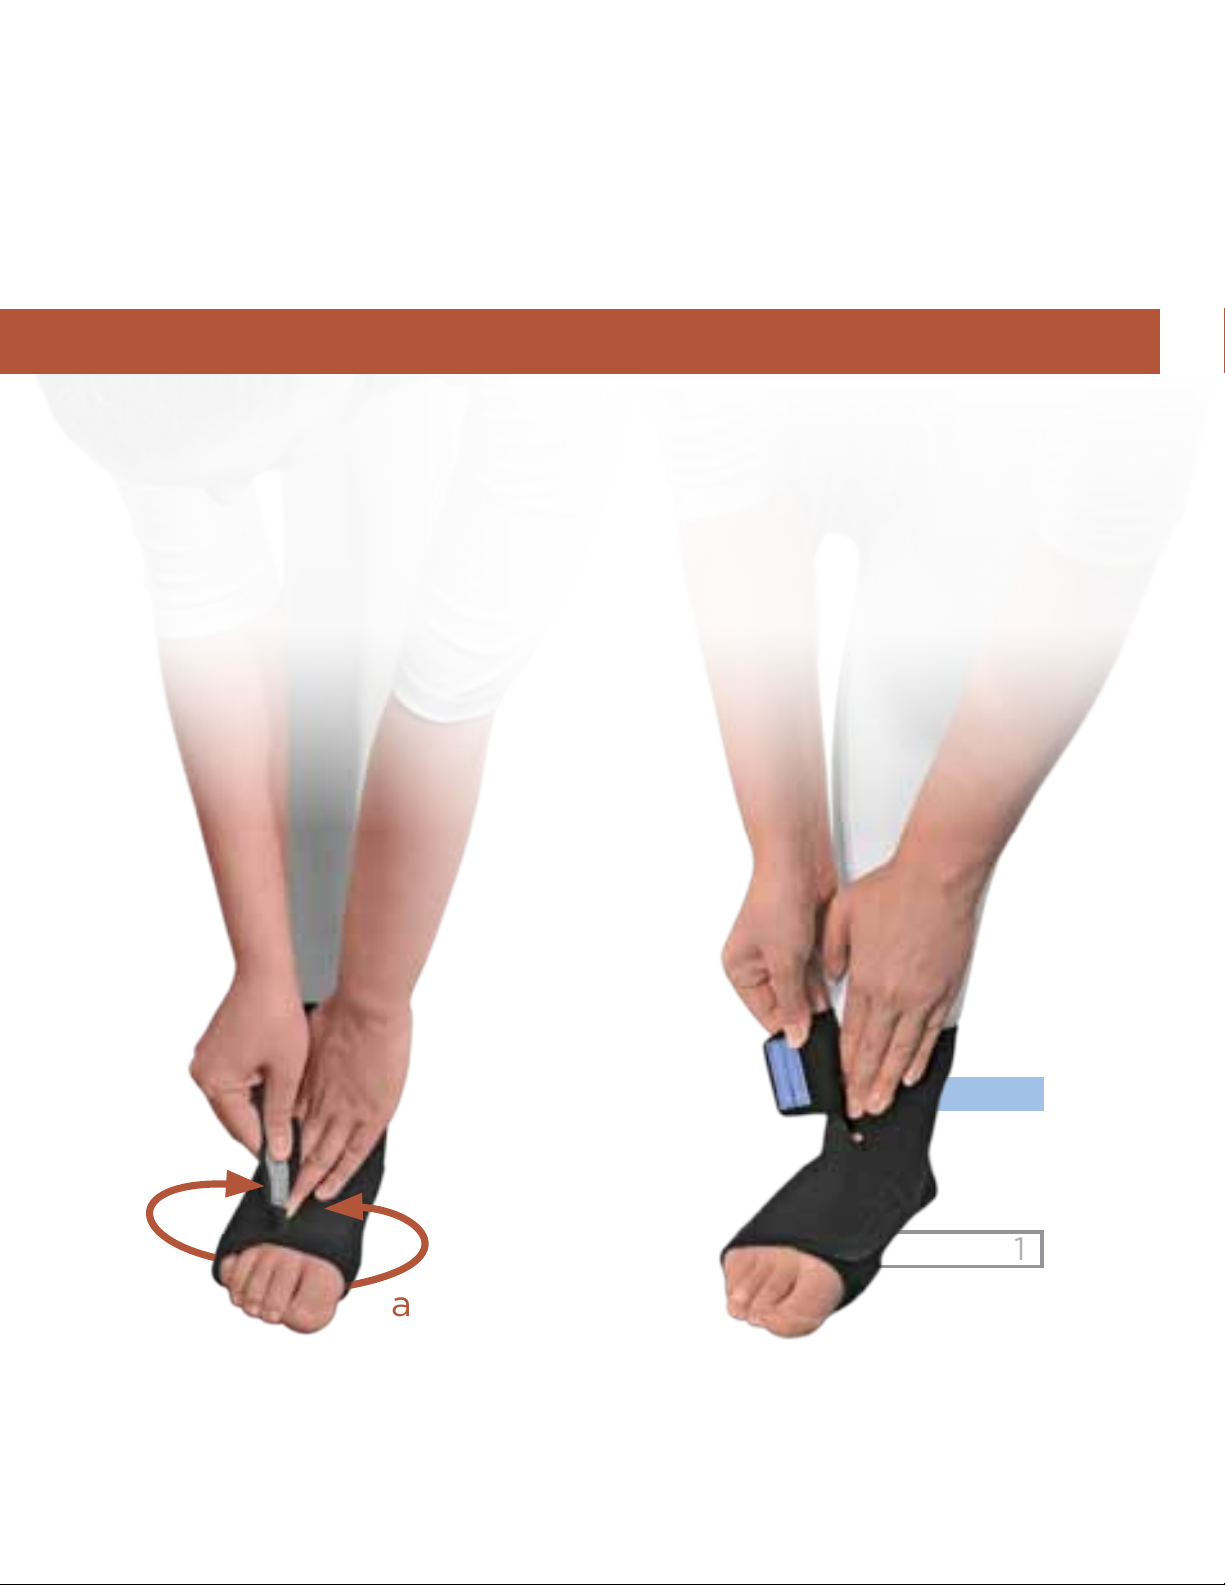
Place the bottom strap
without hook over your
foot (a). Then fasten the
strap with white hook
over the top (b).
3Place the top strap without
hook over your ankle.
Then fasten the strap with
light blue hook over your
ankle. Adjust for comfort.
4
Instructions shown without liner for better visualization. Always wear a clean liner underneath your ReadyWrap.
ankle
strap
12
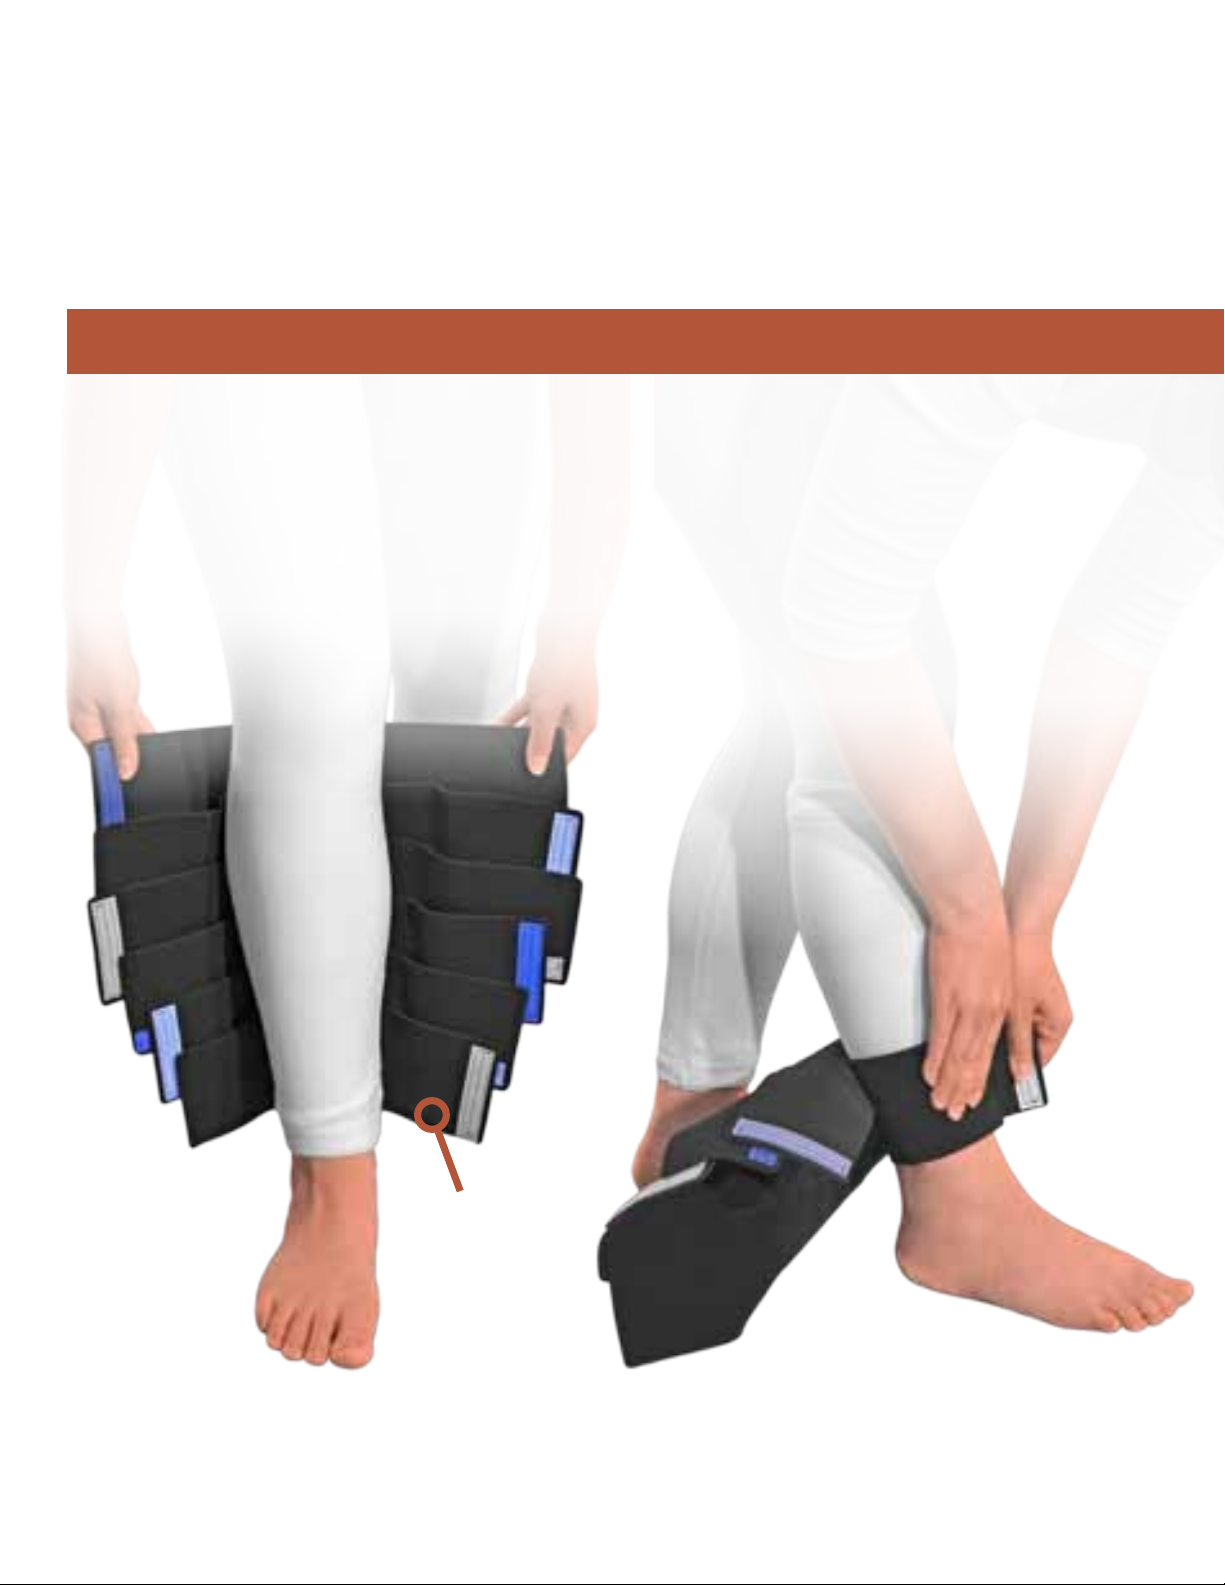
Applying Your ReadyWrap Calf
Place your ReadyWrap
against your calf. The
shortest strap with white
hook is the ankle strap
and should be aligned
just above your ankle.
1Place the ankle strap
without hook over your
ankle. Then fasten the
ankle strap with white
hook over the top.
2
Instructions shown without liner for better visualization. Always wear a clean liner underneath your ReadyWrap.

1
2
3
4
5
6*
Only Tall Calf
units have
6 straps
S
T
R
A
P
O
R
D
E
R
a
b
*
13
Fasten the 2nd strap’s
piece of horizontal light
blue hook (a). Finish
fastening the second
strap by securing the
vertical piece of light
blue hook (b).
3Continue fastening the
straps in order. Begin
each strap by fastening
the horizontal piece of
hook followed by the
vertical piece of hook.
4
Instructions shown without liner for better visualization. Always wear a clean liner underneath your ReadyWrap.
1”
a
b
14
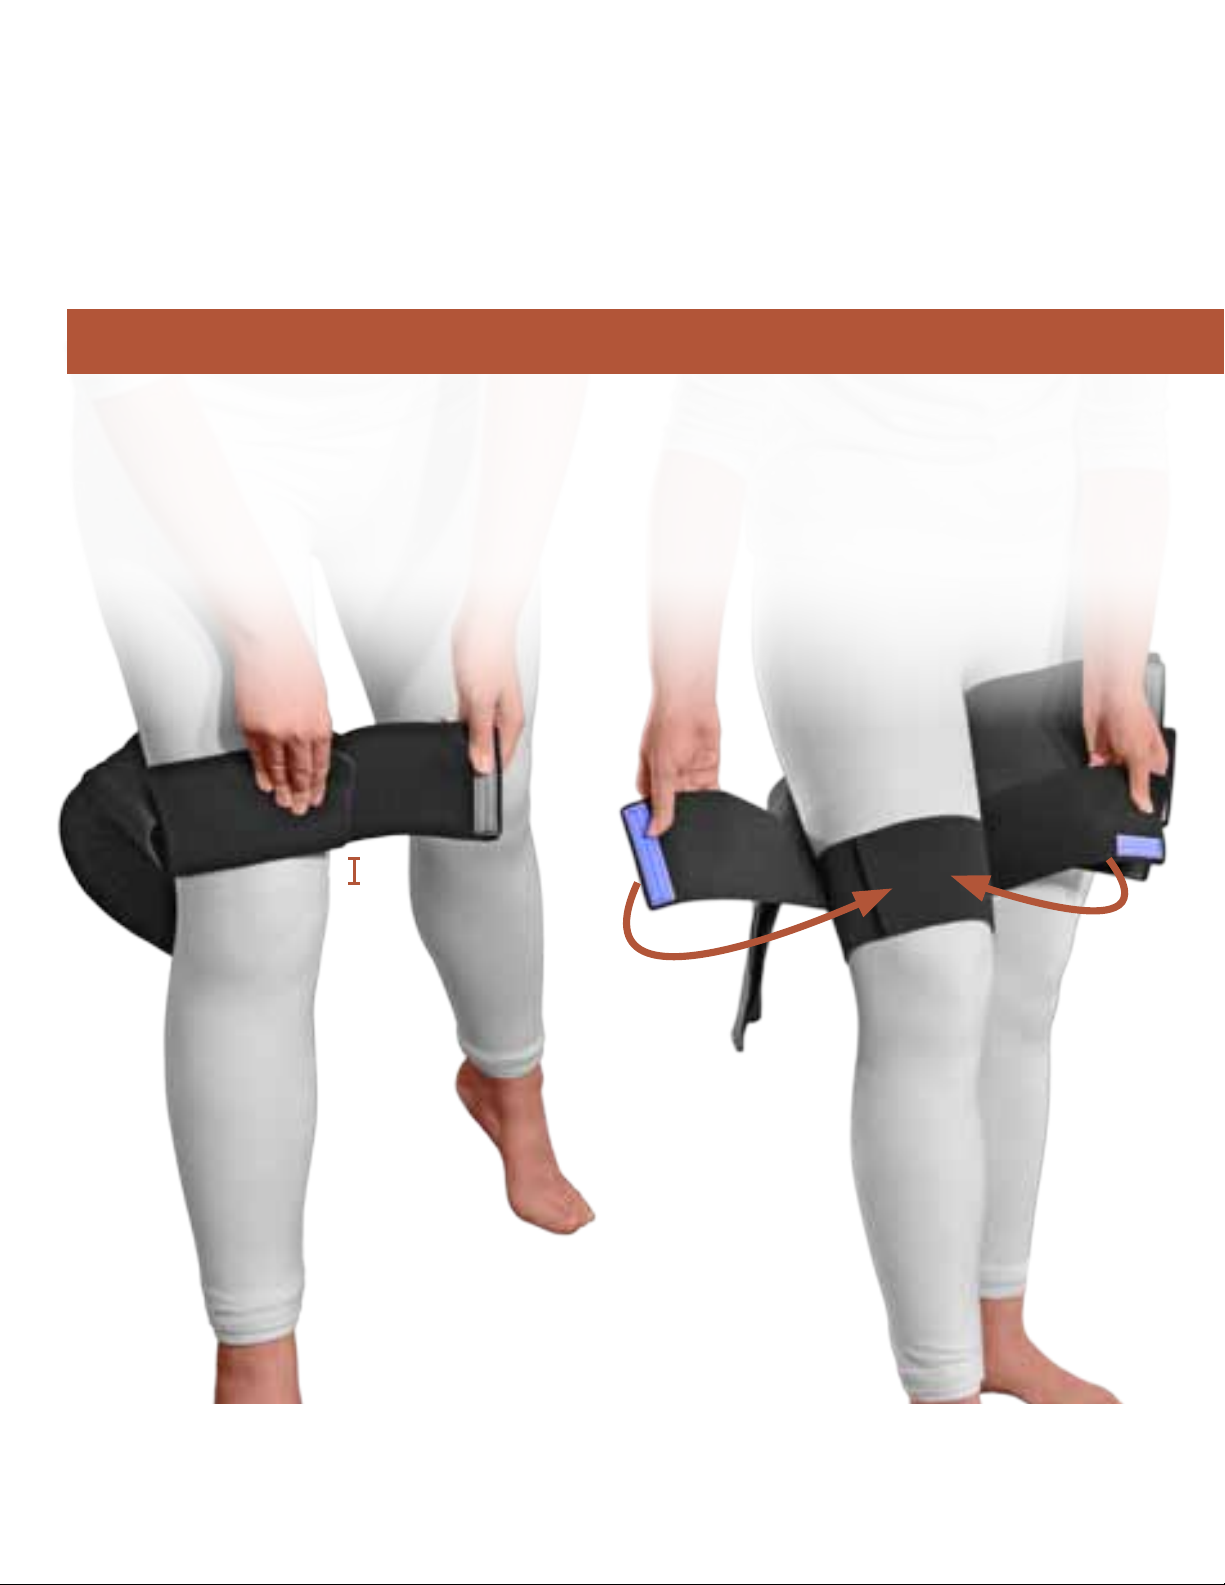
Applying Your ReadyWrap Thigh
Fasten the shortest strap
with white hook one inch
(1”) above the top of your
knee cap.
1Continue fastening the
straps in order. Begin by
fastening the horizontal
piece of hook (a) followed
by the vertical piece of
hook (b).
2
Instructions shown without liner for better visualization. Always wear a clean liner underneath your ReadyWrap.
1
2
3
4
5
6*
1
2
3
4
5
6*
S
T
R
A
P
O
R
D
E
R
15
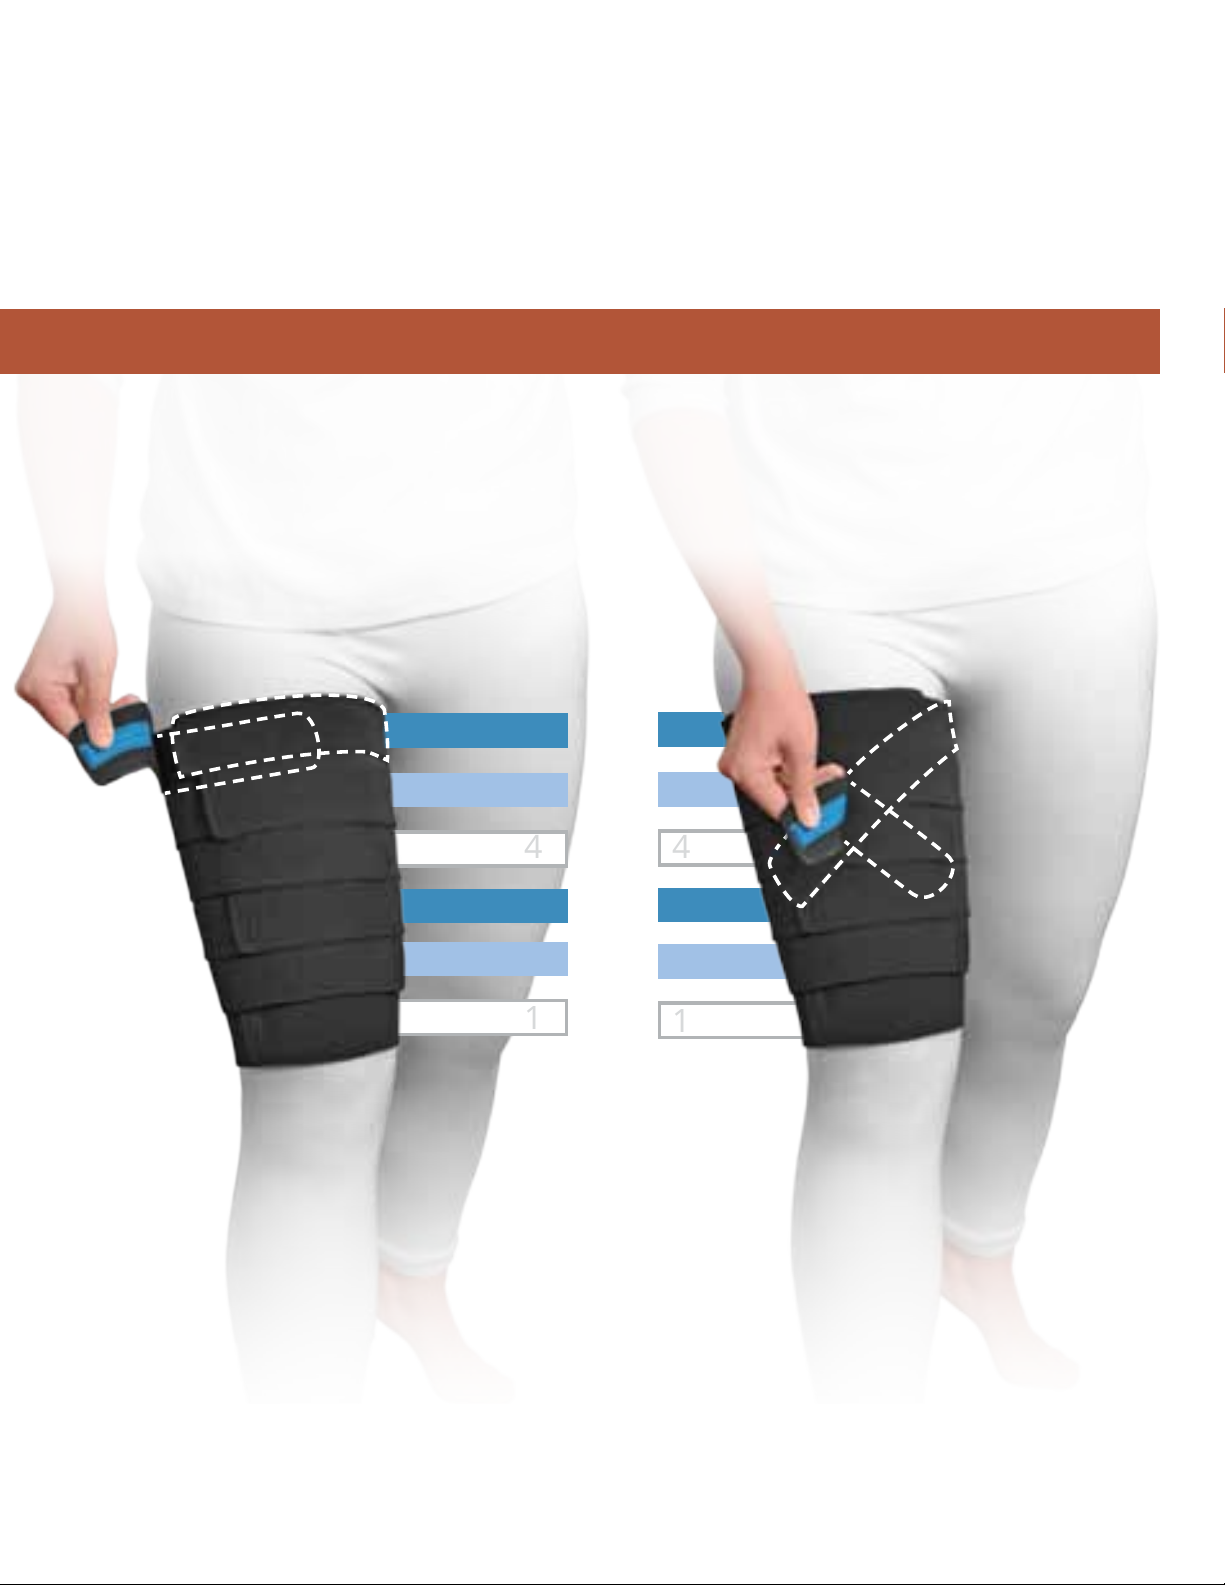
For “Straight-Shaped” Thighs
Fasten the top straps
straight across.
For “V-Shaped” Thighs
Fasten the top straps
in a “V” or “cross” design.
* Only Tall Thigh units have 6 straps
It may take a few tries to nd the best
strap placement to t your needs.
Instructions shown without liner for better visualization. Always wear a clean liner underneath your ReadyWrap.

ab
16
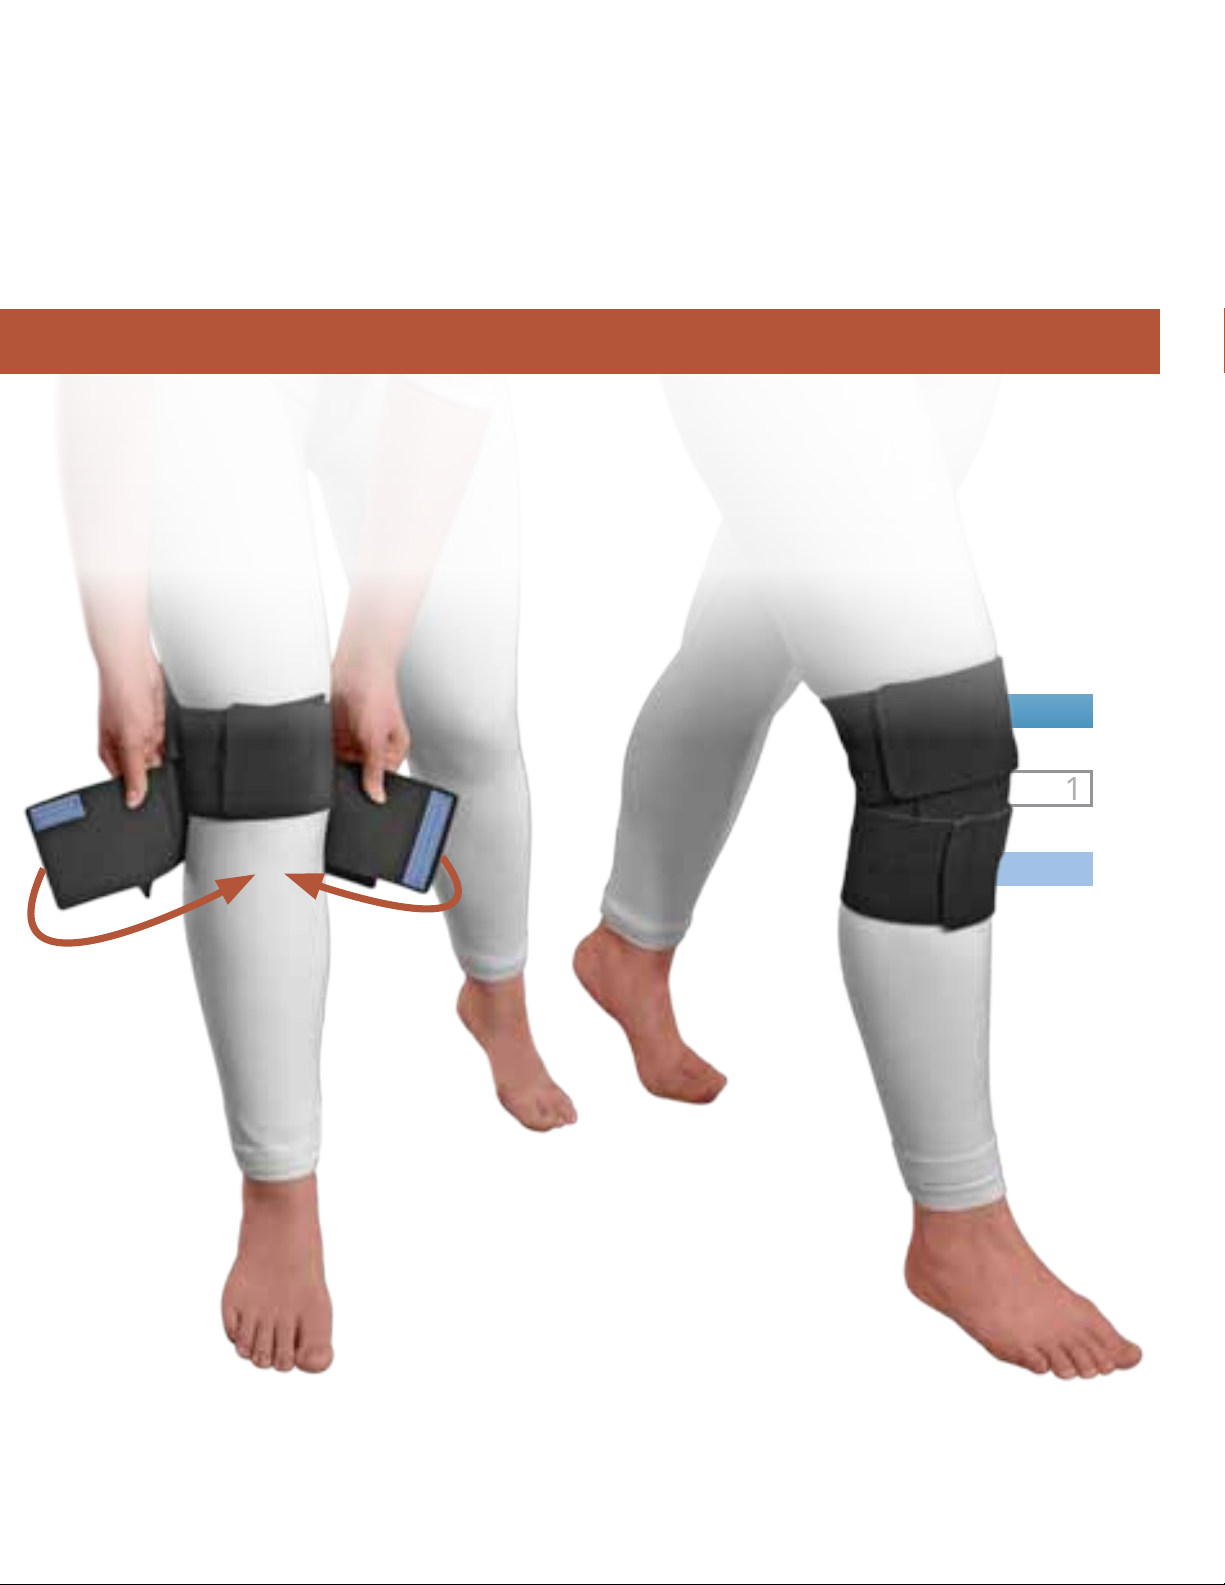
Applying Your ReadyWrap Knee
Align your ReadyWrap
against the back of your
knee. The strap with white
hook should be centered
behind your knee cap.
1Place the middle strap
without hook directly over
your knee (a). Fasten the
strap with white hook over
the top (b).
2
Instructions shown without liner for better visualization. Always wear a clean liner underneath your ReadyWrap.
1
2
3S
T
R
A
P
O
R
D
E
R
ab
17
Fasten the horizontal
piece of light blue hook
on the bottom strap (a).
Then fasten the vertical,
light blue hook (b).
3Fasten the horizontal
piece of dark blue hook
on the top strap. Then
fasten the vertical piece
of dark blue hook.
Adjust for comfort.
4
Instructions shown without liner for better visualization. Always wear a clean liner underneath your ReadyWrap.

18
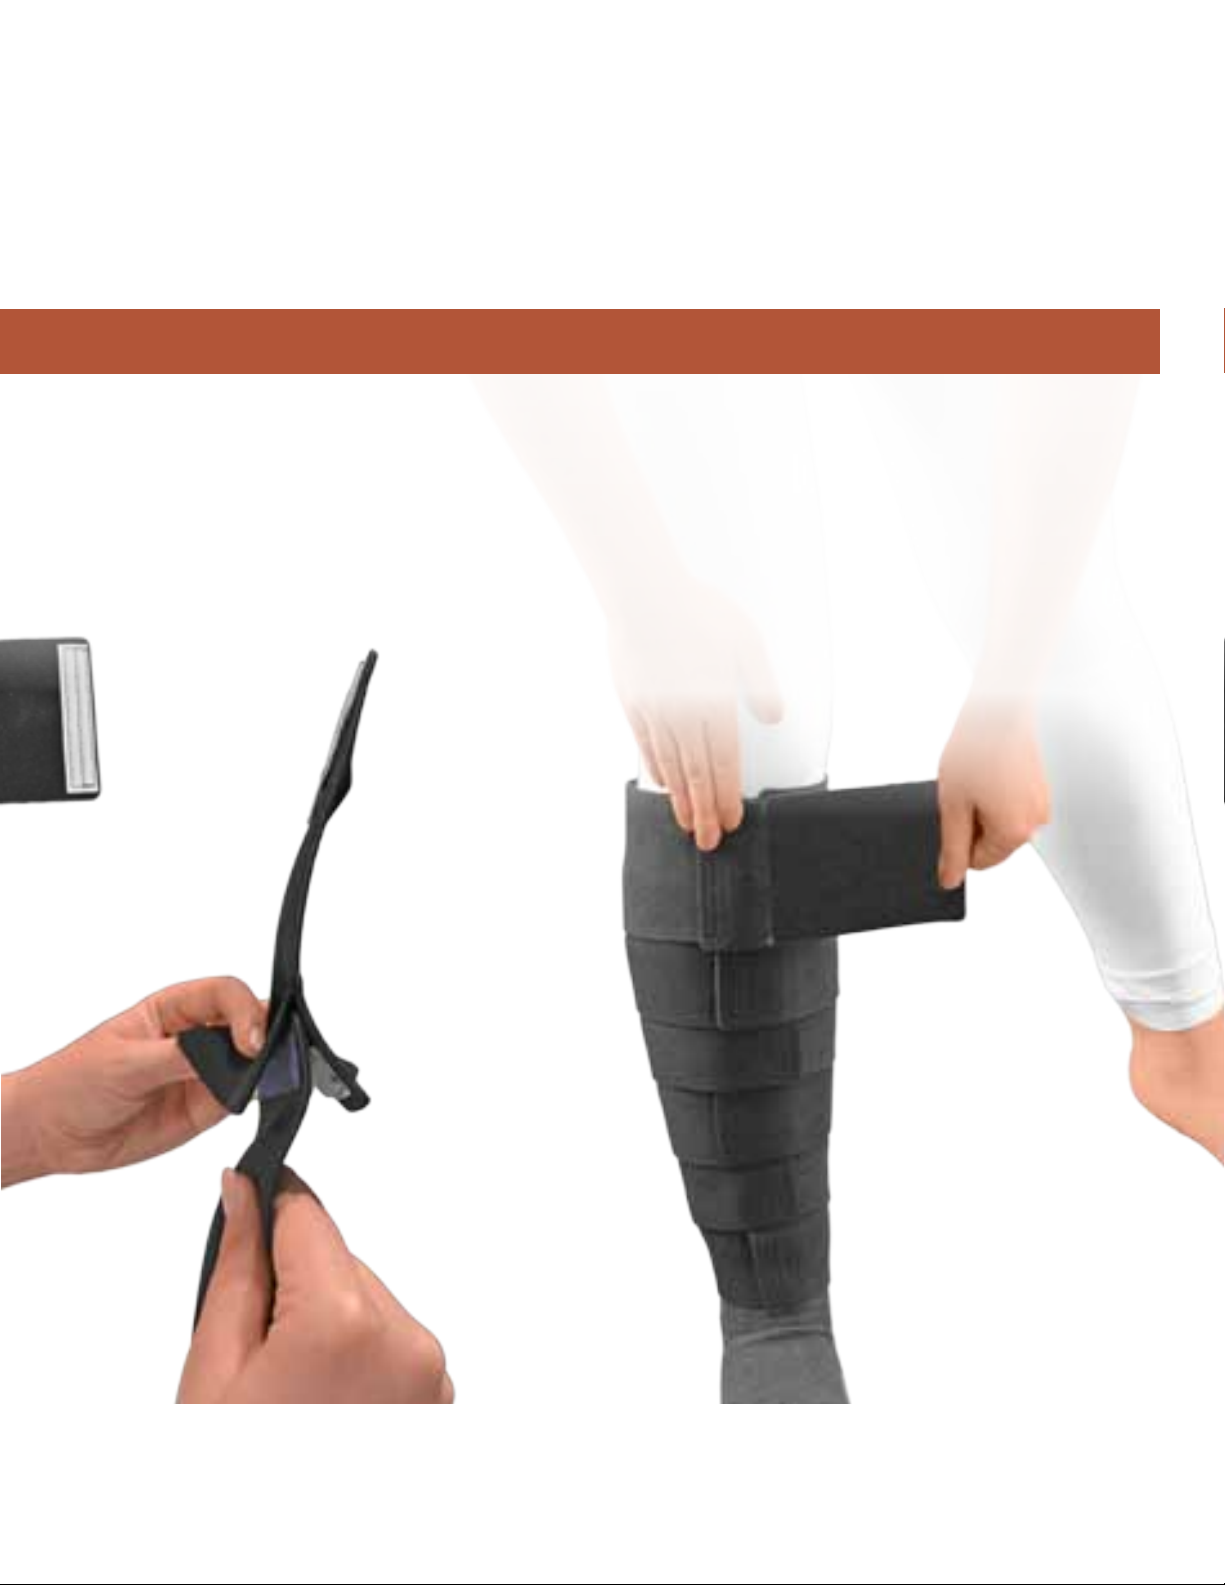
Using Your Extender Strap on Calf, Knee or Thigh Units
Open the clamp end
of your Extender Strap.
1Open your ReadyWrap and
align the long, vertical piece
of hook with the clamp end
of your Extender Strap.
2
clamp
end
long,
vertical
piece of
hook
19
Using Your Extender Strap on Calf, Knee or Thigh Units
Insert your ReadyWrap
strap completely into
the clamp end of your
Extender Strap. Make
sure the hook pieces
align with fabric.
3Securely fasten the
clamp end of your
Extender Strap to your
ReadyWrap unit. Apply
your ReadyWrap unit
according to standard
usage instructions.
4
Extender
Strap
ReadyWrap
Strap
clamp
end

20
Applying Your ReadyWrap Arm
Slide your arm through
the inner liner of your
ReadyWrap.
1Adjust your garment so the
elbow pad seam is directly
over the bony prominence
of your elbow.
2
Your ReadyWrap Arm should be washed daily if worn directly against your skin.
elbow pad
seam
Other manuals for ReadyWrap
1
Table of contents
Other Solaris Medical Equipment manuals


