Solaris S200A Manual
SCE-0010-01-01-N(Rev. 2.1)
Multi-Compatible Reusable SpO2 Sensors
Directions for Use
Page 1 of 2
Shanghai International Trading Corp. GmbH
Eiffestrasse 80
20537 Hamburg
GERMANY
Solaris Medical Technology, Inc.
Zhongjian Industry Building One, #301
18 Yanshan Road, Shekou, Nanshan District
518067 Shenzhen, Guangdong,P. R. CHINA
Intended Use
Patient Type
Neonatal
Infant
Pediatric
Adult
Patient Weight
1- 4 kg
3 – 15 kg
10 – 40 kg
﹥40 kg
When used with a compatible patient monitor or a pulse oximeter device, the Solaris sensor is intended to be used for continuous, non-invasive functional arterial
oxygen saturation (SpO2) and pulse rate monitoring of patients.
Caution
1. This sensor is for use only with compatible patient monitors or pulse oximeter devices.
2. This sensor satisfies the compatibility between the materials used with which the patient or any other person can come into contact and biological tissues.
Contraindications
The Solaris sensor is contraindicated for use on active patients or for prolonged use.
Specifications
SpO2 Accuracy(RMS): ≤±2% (±1SD), 70-100% SpO2; Pulse Rate Accuracy: ±2 digits, 30-250BPM, Peak Wavelength: Red: 660-666nm, Infrared: 880-950nm;
Maximum Optical Output Power: 150mW.
Note: 1.RMS is meaning root-mean-square.
2. The SpO2 accuracy has been clinically assessed.
3. A functional tester cannot be used to assess the accuracy of a pulse oximeter probe or a pulse oximeter.
Compatible Devices
Nellcor, BCI, GE, Goldway, Invivo, HP, Siemens, Spacelabs, Mindray, Datex, CSI, Datascope, Nihon Kohden, Novametrix, Ohmeda, etc.
Note: The compatible devices should comply with IEC 60601-1.
Cleaning & Disinfection
Unplug the sensor before cleaning or disinfecting.
1) Dip clean the sensor part (not the connector) in a mild detergent solution, or a 70% isopropyl alcohol solution. If low-level disinfection is required, use a 1:10
bleach solution.
2) Rinse the sensor part (not the connector) in water, wipe it with a dry cloth and leave to dry completely.
Caution
Do not sterilize by irradiation steam, or ethylene oxide.
Storage and Operating Temperatures
Storage: -20 ~ +55°C Operating: +5 ~ +40°C
Warnings: Patient Safety
!This sensor is for use only with compatible patient monitors or pulse oximeter devices.
!Check the site every 2 hours (more frequently if perfusion is poor).
!Routinely check to ensure adequate distal circulation to the sensor site.
!Carefully route cables to reduce any possibility of patient entanglement or strangulation.
!Patient conditions (such as reddening, blistering, skin discoloration, ischemic skin necrosis, and skin erosion) may warrant changing the site frequently or using a
different style of sensor.
!Do not use the sensor if the sensor or the sensor cable appears damaged.
!This device is not intended for use in a magnetic resonance imaging (MRI) environment.
Warnings: Data Validity
!Conditions that may cause inaccurate reading and impact alarms include interfering substances, excessive ambient light, electrical interference, excessive motion, low
perfusion, low signal strength, incorrect sensor placement, poor sensor fit, and movement of the sensor on the patient.
!Do not use a blood pressure cuff or arterial blood pressure measurement device on the same limb as the sensor site.
!It is possible for any device to malfunction; therefore, always verify unusual data by performing a formal patient assessment.
Warranty
Solaris offers a 12-month warranty against manufacturing defects in materials and workmanship from the original date of purchase.
Compliance
!EMC Compliance: IEC60601-1-2,Group I,Class B.
!Equipment Classification:Class IIb, MDD 93/42/EEC.
!Degree of Protection:Type BF-Applied Part.
!IPX1 Approved.
Definitions of Product Symbols
Warning: See Directions for Use Protection against moisture
The probes comply with the requirements of the Council Directive 93/42/EEC.
concerning medical devices with identification No. 0123 Contains no latex
Federal Law (USA) restricts this device to sale by or on the order of a physician. Manufacturer: Solaris Medical Technology, Inc.
Authorized Representative in the European Community: P/N Part Number
Shanghai International Trading Corp. GmbH (Hamburg) SN Serial Number
Be taken to separate collection at the end of product life. Do not dispose of the
product as unsorted municipal waste. Type BF applied part
SCE-0010-01-01-N(Rev. 2.1)
Multi-Compatible Reusable SpO2 Sensors
Directions for Use
Page 2 of 2
Shanghai International Trading Corp. GmbH
Eiffestrasse 80
20537 Hamburg
GERMANY
Solaris Medical Technology, Inc.
Zhongjian Industry Building One, #301
18 Yanshan Road, Shekou, Nanshan District
518067 Shenzhen, Guangdong,P. R. CHINA
Note: When selecting a sensor site, priority should be given to an extremity free of an arterial catheter, blood pressure cuff, or intravascular
infusion line.
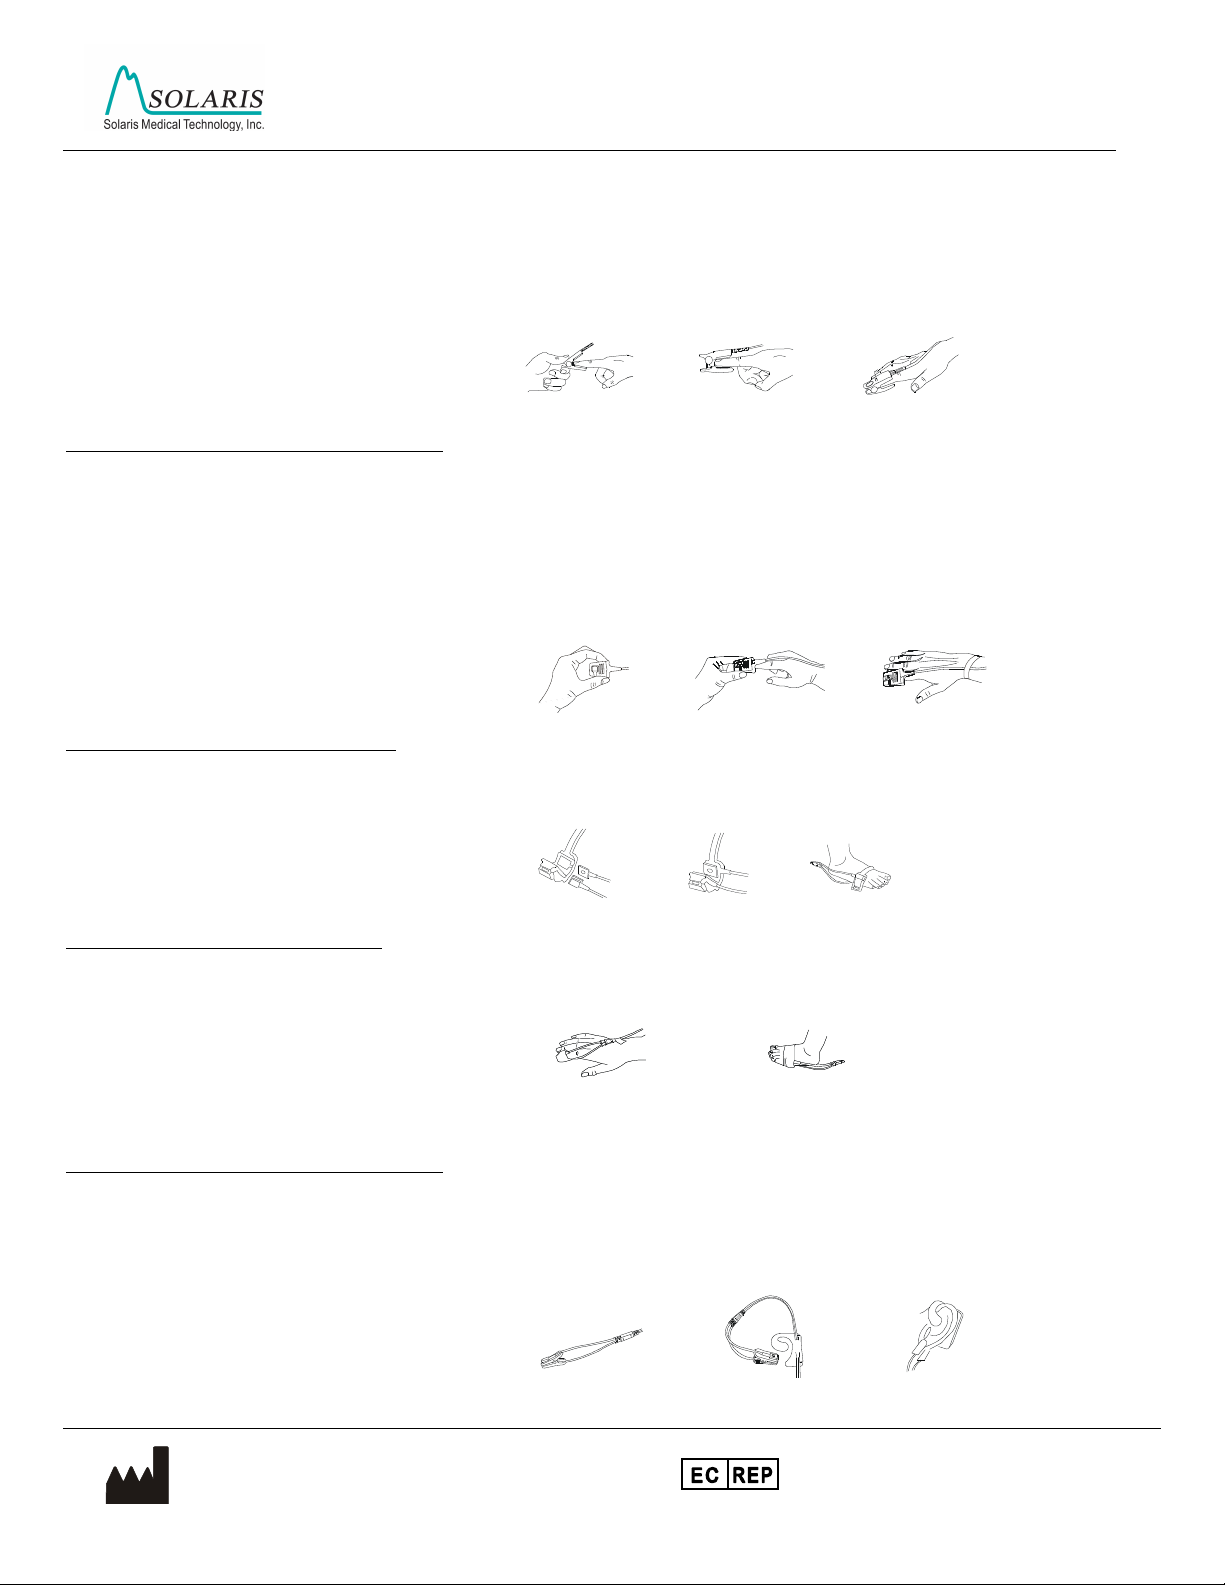
Directions for Use for Finger Sensors (S100A, S200A , S300A, S400A, S100P, S200P, S300P, S400P)
1.With the upper and lower jaws open, place an index finger evenly on the base of the clip. Push the finger tip against the stop so that it is over
the sensor window (Fig.1).If an index finger cannot be positioned correctly, or is not available, other fingers can be used.
2.Spread open the rear tabs of the sensor to provide even force over the length of the pads (Fig. 2).
3.The sensor should be oriented in such a way that the cable is positioned along the top of the hand (Fig. 3).
4.Plug the sensor into the oximeter and verify proper operation as described in the oximeter operator’s manual.
5.Inspect the sensor site every 2 hours for skin integrity.
Fig. 1 Fig. 2 Fig. 3
Directions for Use for Soft-Finger Sensors
(T100AL, T200AL, T300AL, T400AL, T100A, T200A, T300A, T400A, T100P, T200P, T300P, T400P)
1. Hold the sensor with its opening towards the patient’s index finger (Fig. 4). The sensor should be oriented in such a way that the sensor side
with a finger tip sign is positioned on the top.
2. Insert the patient’s index finger into the sensor until the fingernail tip rests against the stop at the end of the sensor. Adjust the finger to be
placed evenly on the middle base of the sensor. Direct the cable along the top of the patient’s hand (Fig. 5).
3. Apply the blue wrist band to secure the cable (Fig. 6). If an index finger cannot be positioned correctly, or is not available, other fingers can
be used.
4. Plug the sensor into the oximeter and verify proper operation as described in the oximeter operator’s manual.
5. Inspect the sensor site every 2 hours for skin integrity.
Fig. 4 Fig. 5 Fig. 6
Directions for Use for Y-Type Sensors (Y100, Y200, Y300, Y400)
1. Insert the two sensor tips into the slots on the rubber wrap (Fig. 7), (Fig. 8).
2. Place the sensor on the neonate’s foot, wrap the rubber belt around the foot and tighten accordingly (Fig. 9).
3. Plug the sensor into the oximeter and verify proper operation as described in the oximeter operator’s manual.
4. Inspect the sensor site every 2 hours for skin integrity.
Fig. 7 Fig. 8 Fig. 9
Directions for Use for Wrap Sensors (W100A/N, W200A/N, W300A/N, W400A/N, W100P/I, W200 P/I, W300 P/I, W400 P/I)
1. Place the sensor on the adult’s index finger (Fig. 10),or the neonate’s foot (Fig. 11). Wrap Solaris disposable adhesive bandage (provided
with the sensor) around the sensor site, loosely enough to ensure good circulation. Apply adhesive tape to secure the cable.
2. Plug the sensor into the oximeter and verify proper operation as described in the oximeter operator’s manual.
3. Inspect the sensor site every 2 hours for skin integrity.
Fig. 10 Fig. 11
Directions for Use for Y- Type Ear Sensors (Y100, Y200, Y300, Y400)
1. Slide the sensor pads along the ear clip (large or small clip) slots until they are fully engaged in the clip, as shown (Fig. 12).
2. Slide the sensor cable through the ear hanger in the direction as shown (Fig. 13).
3. Place the ear hanger on the patient’s ear. Clip the sensor on the patient’s ear lobe as shown (Fig.14),with the sensor cable running down the
side of the patient’s face and body.
4. Plug the sensor into the oximeter and verify proper operation as described in the oximeter operator’s manual.
5. Inspect the sensor site every 2 hours for skin integrity.
Fig. 12 Fig. 13 Fig. 14
SO
LARI
S
SOLARIS
S
OLA
RIS
()
A
()
B
()
C
()
A
()
B
Adult Neonate
()
B
(A) (C)
()
A
()C
()
B
()A()B()
C
This manual suits for next models
31
Other Solaris Medical Equipment manuals

Popular Medical Equipment manuals by other brands

MIP
MIP CROMPTONS HEALTHCARE JL100 Instructions for use

Handicare
Handicare Eva400 Instructions for use

bort medical
bort medical VarioPlus Back Support Special Width manual

KAP Medical
KAP Medical K-1 Series operating instructions

React Health
React Health Luna II Faq

BIOTRONIK
BIOTRONIK Pulsar-18 T3 Instructions for use

AHT
AHT BabyPod 20 Operating and maintenance manual

Bowa
Bowa ARC 400 operating manual

Handicare
Handicare SystemRoMedic SoftLegSupport manual

Precision Medical
Precision Medical venaone 08-0030 Instructions for use

Novametrix Medical Systems
Novametrix Medical Systems 7300 Service manual

Ossur
Ossur Equalizer Air Walker Instructions for use


