Solda p2chanter User manual
Solda
p²chanter

Ver. 3.7 - 24 - Stand: 05.15
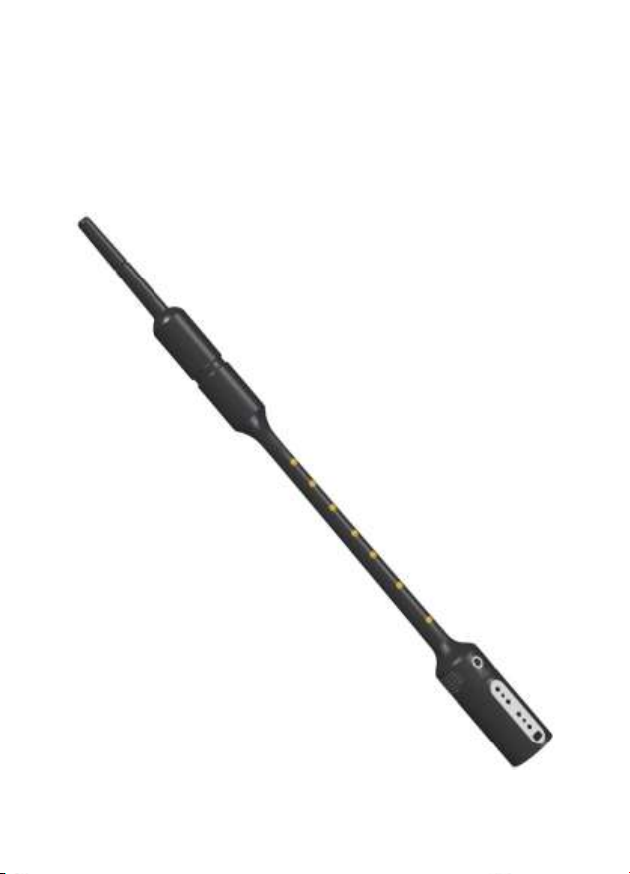
p²chanter
overview
Removable tip
Groove for lanyard
Control contact
[Drones]
Control contact
[Chanter]
Finger contacts
Loudspeaker (2x)
[Menu] button
[Vol +/-] buttons
[Power] button
Headphone jack
Mode LED
Battery compartment
Power LED
USB port
Ver. 3.7 - 25 - Stand: 05.15
Quick Reference
(short: < 1 second, long: > 1 second)
Switching on
Short press of the [Power] button
Switching off
Hold the [Power] button for ca. 2 sec
Toggle between Practice
Chanter and Pipe Chanter*
modes
Short press of the [Power] button
while the instrument is switched on
Restoring the factory
settings
Hold the [Menu] button while
switching on the instrument
Changing the overall volume
Press the [Vol+]/[Vol-] buttons
Adjusting the volume of the
drones
While drones are ON and chanter is
OFF: Press the [Vol+]/[Vol-] buttons
Practice Chanter mode
(Power LED lights up green)
Starting/stopping chanter
Short touch of the [Chanter] contact
Starting/stopping the
drones/metronome
Short touch of the [Drones] contact
Toggle between drones and
metronome
Long press of the [Menu] button
while the Mode LED is OFF
Adjusting metronome speed
While metronome is ON and chanter
is OFF: Press [Vol+]/[Vol-] buttons
Adjusting metronome
volume
While metronome is ON, touch the
[Drones] contact while changing the
[Vol +/-] setting.
Changing instruments
Briefly press [Menu] until Mode LED
lights up yellow; select instrument
using [Vol+]/[Vol-]
Tuning
Briefly press [Menu] until Mode LED
lights up red; tune by pressing
[Vol+]/[Vol-] as follows:
short = almost steplessly
long = one half step

Ver. 3.7 - 26 - Stand: 05.15
Pipe Chanter Mode*
(Power LED lights up red)
Starting/stopping the
drones/chanter
Sound generation starts/stops at the
predefined pressure threshold
Configurating pressure
thresholds
Briefly press [Menu] until the Mode
LED lights up red; fill the bag to the
desired air pressure; briefly touch the
[Chanter] or [Drones] contact to save
the current pressure as threshold for
chanter/drones, respectively
Steady Blowing training
Briefly press [Menu] until the Mode
LED lights up yellow; a long touch of
the [Chanter] contact starts/stops
training. To increase/decrease
sensitivity, briefly touch the
[Chanter]/[Drones] contact,
respectively.
* optional pressure sensor module required
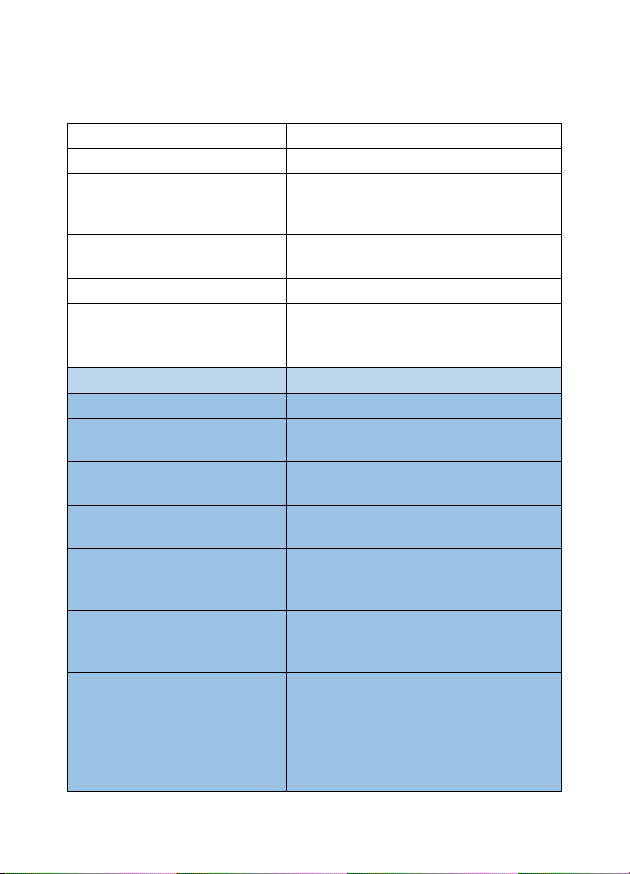
LED Signals
Power LED
Mode LED
Meaning
off
off
p²chanter is switched off
off
red
Firmware Update Mode
(see separate instructions)
green
off
Practice Chanter Mode
green
yellow
Instrument selection (i.e. sound)
green
red
Tuning
red
off
Pipe Chanter Mode
red
yellow
Steady Blowing Training Mode
red
red
Adjustment of pressure thresholds for
chanter and drones
red/green
flashing
Low battery voltage; batteries should
be replaced soon

Ver. 3.7 - 27 - Stand: 05.15
Getting Started
Batteries
The p²chanter is powered by two (2) AAA batteries. Slide
open the lid to access the battery compartment. Observe
the correct polarity when inserting new batteries. In case of
low battery voltage, the Power LED starts flashing red and
green. Distorted instrument sounds indicate that the
batteries are running low and should be replaced.
Using rechargeable batteries is not recommended due to
the risk of deep discharge, which may damage the batteries
beyond repair.
Note: Remove the batteries before storing the instrument for
an extended period of time to avoid damage from leaking
battery fluid.
Using the Power Button
To switch on the p²chanter, briefly push the [Power] button.
The previously selected settings are automatically loaded
during start-up. To switch off the p²chanter, push the
[Power] button and hold it for 2 seconds. The instrument will
switch of automatically if not in use for a while.
Restoring the factory settings (Reset)
Pushing the [Menu] button during start-up restores all
settings of the p²chanter to their factory defaults. Individual
settings can be reset by simultaneously holding down (>1
sec) the [Vol +] and [Vol -] buttons while making the
respective adjustments.

Ver. 3.7 - 28 - Stand: 05.15
Headphone output
The p²chanter is equipped with a 3.5mm jack for stereo
headphones with a minimum impedance of 16 ohms.
Plugging in headphones deactivates the integrated
speakers.
The headphone jack can also be used for connecting the
p²chanter to an external amplifier using a stereo cable.
Lanyard
The provided lanyard can be put over the mouthpiece and
slips into the groove.
Note: Always unscrew the tip from the mouthpiece to avoid
injuries when using the lanyard.
Practice Chanter Mode
(Power LED green)
The p²chanter can be used as a standalone practice
chanter, using either headphones or the integrated speaker.
The pitch and sound generated by each fingering depend on
the instrument selection.
It is also possible to add accompanying drone sounds.
Volume, tone and pitch of the p²chanter can be adjusted
within a wide range.

Ver. 3.7 - 29 - Stand: 05.15
Activating and deactivating sounds
The drones are activated by briefly (< 1 sec) touching the
[Drones] contact. The chanter is activated by briefly
touching the [Chanter] contact. A second touch of the
[Chanter] contact mutes all sounds (chanter and drones).
After activating the sound output of the p²chanter, you can
play melodies by touching the finger contacts. Observe the
fingering charts for different instrument types (see
Appendix).
Volume
Use the [Vol +/-] buttons to control the volume of the
instrument. If the drones are switched on and the chanter is
switched off, this adjustment changes the volume ratio
between chanter and drones. Otherwise it affects the master
volume of the p²chanter.
Metronome
The p²chanter offers a metronome function as an alternative
to the drones. To toggle between the two options, push and
hold (> 1 sec) the [Menu] button, with the Mode-LED turned
off. You can adjust the metronome speed using the [Vol +/-]
buttons while the metronome is switched on and the chanter
is switched off. To start/stop the metronome, briefly touch
the [Drones] contact. To adjust the metronome volume,
touch the [Drones] contact while changing the [Vol +/-]
setting.

Ver. 3.7 - 30 - Stand: 05.15
Selecting an instrument/sound
The p²chanter allows you to practice different instrument
types. The selection affects the sound as well as the
fingering (see Appendix for individual charts). To select an
instrument, push the [Menu] button briefly (repeat if
necessary) until the Mode LED lights up yellow. Use the [Vol
+/-] buttons to choose among the available alternatives. The
Mode LED blinks to confirm your selection.
To close the Settings menu, briefly touch the [Menu] button
again. If no button is used for several seconds, the menu
closes automatically (Mode LED goes out).
Tuning
The frequency of the sounds generated by the p²chanter
can be adjusted within a range of +/- 12 half steps. To do
so, push the [Menu] button briefly (repeat if necessary), until
the Mode LED lights up in red. You can now adjust the pitch
using the [Vol +/-] buttons. A series of short presses
raises/lowers the pitch almost steplessly, whereas a long
press (> 1 sec) changes it by one half step.
To restore the default frequency, push the [Vol+] und [Vol-]
buttons simultaneously for >1 sec.
Note: The selected settings are used for all playing modes
of the p²chanter and will be stored when switching off the
instrument!

Ver. 3.7 - 31 - Stand: 05.15
Pipe Chanter Mode
(Power LED red)
If the p²chanter is equipped with the optional pressure
sensor module as pictured below, it can be used for
pressure-controlled playing. Place a few layers of hemping
(waxed or unwaxed) on the corrugated upper section of the
p²chanter to fit the diameter of the bagpipe’s chanter stock.
Push the p²chanter together with the pressure sensor
module into the chanter stock, just like a regular chanter.
Make sure the p²chanter locks firmly in place and cannot fall
out of the stock.
When playing your bagpipe with the p²chanter, you can use
its drones for accompaniment or mute them with corks.
After switching on the instrument, push the [Power] button
briefly (< 1 sec) to toggle between the Practice Chanter and
Pipe Chanter modes. The Power LED changes colour to
confirm the selection.
In Pipe Chanter mode, drones and chanter are activated
and deactivated by the air pressure inside the bagpipe. It is
therefore not possible to switch them on or off using the
[Drones] and [Chanter] contacts.
Adjusting air consumption
For an even more realistic approximation of an analog
chanter, air consumption can be adjusted by turning the
valve ring. It simulates the amount of air normally consumed
by the reeds of the chanter and the drones. This makes it
possible to practice the coordination of blowing, pressing
and playing in addition to training arm pressure.

Ver. 3.7 - 32 - Stand: 05.15
Turn the ring clockwise to decrease air consumption, or
counter-clockwise to increase it.
When the valve ring is open, a slight hiss is heard. This is
normal and can be drowned out by raising the volume or
using headphones.
Note: To adjust air consumption, it is sufficient to turn the
valve ring by 0 - 3 mm. Never turn the ring by more than 3
mm. Otherwise, the p²chanter may fall out of the stock and
be damaged.
Using the p²chanter in Pipe Chanter Mode requires an
effective moisture control system in order to prevent
damages to the pressure sensor module and the instrument.
During practice, the pressure sensor module must be
checked for moisture at regular intervals and wiped dry if
necessary.

Ver. 3.7 - 33 - Stand: 05.15
Inserting the pressure sensor module
1
2
3
Unscrew the
mouthpiece of the
p²chanter.
Note: Never hold
the p²chanter
from the battery
compartment
while unscrewing
the mouthpiece!
Mount the valve
ring.
It serves as a
stopper against
the chanter stock
and facilitates the
adjustment of air
consumption.
Push the
pressure sensor
module into the
expansion
connector of the
p²chanter.
The module
snaps into place
with an audible
click.
click

Ver. 3.7 - 34 - Stand: 05.15
Steady Blowing Training
In Pipe Chanter mode it is possible to practice steady
blowing, i.e. keeping the pressure inside the bag at a
constant level. Deviations from the nominal pressure are
indicated by sounds: either HighA (pressure too high) or
LowA (pressure too low). The signal continues until the
pressure inside the bag returns to the nominal value. The
purpose of this training is to keep the pressure inside the
bag at a constant level without triggering either warning
sound.
To activate Training Mode, push the [Menu] button briefly
(repeat if necessary), until the Mode LED lights up yellow.
To start (or stop) training, hold the [Chanter] contact for >1
sec. The target pressure value corresponds to the pressure
threshold for the chanter (see the following section). You
can adjust the sensitivity of the pressure measurement
(hysteresis) in six steps by briefly touching the [Drones]
contact (reduce) or the [Chanter] contact (increase). A
sound confirms the selection.
Adjusting the pressure thresholds
The threshold values for activating and deactivating the
drones and the chanter can be adjusted separately in the
Settings menu. To enter the menu, push the [Menu] button
briefly (repeat if necessary), until the Mode LED lights up in
red.
Fill the bag with air until reaching the desired pressure.
Briefly touch the [Drones] contact to adopt the current value
as the threshold value for the drones, or the [Chanter]
contact to use it as the threshold for the chanter. For a finer

Ver. 3.7 - 35 - Stand: 05.15
adjustment, keep your finger on the [Drones] / [Chanter]
contact while changing value with [Vol +/-].
To restore the default thresholds, push the [Vol+] und [Vol-]
buttons simultaneously for >1 sec.
To close the Settings menu, briefly touch the [Menu] button
again. If no button is used for several seconds, the menu
closes automatically (Mode LED goes out).
Notes: The chanter threshold cannot be set lower than the
threshold for the drones.
The pressure thresholds are saved when switching off the
instrument and restored automatically the next time you
activate the function.
The Metronome function is not available in Pipe Chanter
mode.
To adjust the pitch or change instrument sounds, you must
switch to Practice Chanter mode, as these settings cannot
be altered in Pipe Chanter mode.

Ver. 3.7 - 36 - Stand: 05.15
Appendix
Warnings
To avoid hearing damage, do not use the
p²chanter at excessive volumes. Start playing
softly and only gradually increase the volume to
the desired level. This is particularly important
when playing through headphones!
Do not use headphones at high volumes for
extended periods of time.
The instrument must not come into contact with liquids.
High temperatures (> 50°C/120°F) can damage the
instrument and the batteries inside.
At very low temperatures, condensation may form inside the
p²chanter. In this case it must not be used until fully dried.
The p²chanter contains no user-serviceable parts. In case of
a defect, please contact your local dealer or the
manufacturer.

Ver. 3.7 - 37 - Stand: 05.15
Maintenance
From time to time, the p²chanter should be wiped clean with
a dry, lint-free cloth. Do not use abrasive and/or chemical
detergents.
The gold-plated contacts may be cleaned with a jewellery
polishing cloth if necessary.
After playing in the Pipe Chanter mode, remove the valve
ring and wipe any moisture off the pressure sensor and the
upper part of the p²chanter.
Ver. 3.7 - 38 - Stand: 05.15
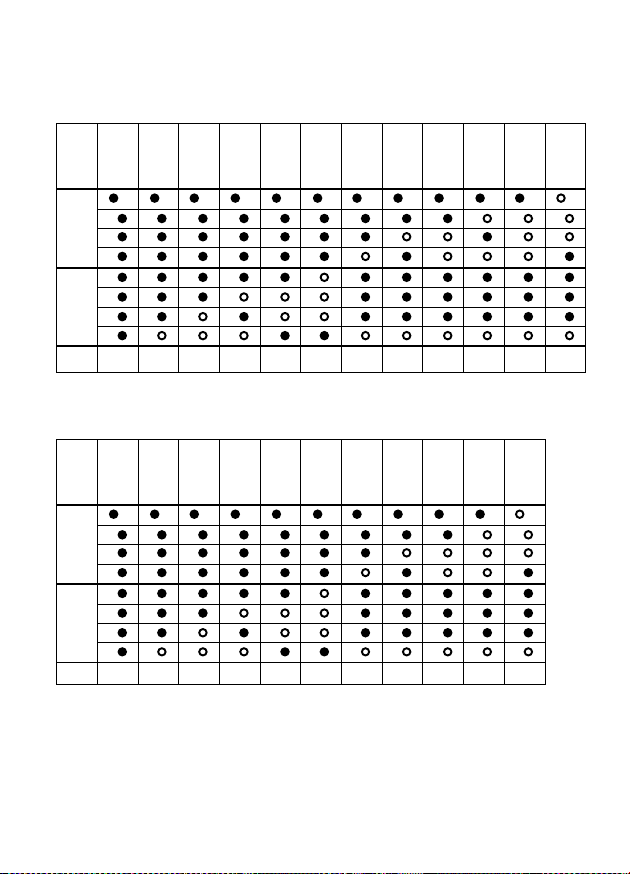
Fingering charts
(1) Great Highland Bagpipe
Note
G
low
A
low
B
C
nat
C
D
E
F
nat
F
G
piob
G
high
A
high
upper
hand
lower
hand
MIDI
Note
68
70
72
74
74
75
77
79
79
80
80
82
(2) Scottish Smallpipe
Note
G
low
A
low
B
C
nat
C
D
E
F
nat
F
G
high
A
high
upper
hand
lower
hand
MIDI
Note
56
58
60
61
62
63
65
66
67
68
70

Ver. 3.7 - 39 - Stand: 05.15
(3) GHB Whistle* (D)
Note
C
D
E
F#
G
A
B
C
high
D
high
E
high
F#
high
G
high
upper
hand
lower
hand
MIDI
Note
72
74
76
78
79
81
83
84
86
88
90
91
*Drone sounds are not available with this selection.

Ver. 3.7 - 40 - Stand: 05.15
MIDI
MIDI (Musical Instrument Digital Interface) facilitates the
electronic transfer of information on the notes played.
The p²chanter is equipped with a Mini-USB port for direct
connection to a computer without the need for additional
hardware, utilising the internal drivers of the operating
system. Installation of device-specific hardware drivers is
not necessary. On the computer, the p²chanter appears as a
“MIDI In” port to which the notes played on the instrument
are transferred. The analysis of the data provided by the
p²chanter requires appropriate software. It is not possible to
control the p²chanter from the computer (”MIDI Out”).
To activate MIDI communication, establish the USB
connection before switching on the p²chanter.
The note values transmitted depend on the instrument
selection (see the fingering chart in the previous section).
Changes to the p²chanter’s volume are not transmitted.
Chanter data is transmitted via channel 1, drone date via the
following channels.
If "Great Highland Bagpipe" is selected, pitch bend values
are transmitted in addition to the actual notes. They are
used to create just intonation, whereas the MIDI default is
equal temperament.

Ver. 3.7 - 41 - Stand: 05.15
Software updates
The p²chanter is equipped with a USB interface to facilitate
upgrades to the device software. Any future software
updates will be available on the manufacturer’s website,
together with installation instructions.
The current firmware version of the p²chanter can be
verified by holding down the [Vol+] and [Vol-] buttons while
switching on the instrument. The Mode LED blinks a certain
number of times in red and yellow to signal the main
firmware release and its version number, respectively (e.g.
3x red + 7x yellow = version 3.7).
Support
For feedback and questions, please contact the
manufacturer.
Homepage: http://www.p2chanter.com
E-mail: [email protected]
Postal address: Erik Solda
Paul-Langen-Str. 40
D-53229 Bonn
Germany

Ver. 3.7 - 42 - Stand: 05.15
EC Declaration of Conformity
in accordance with Directive 2014/30/EU of the European
Parliament and of the Council of 26 February 2014 on the
harmonisation of the laws of the Member States relating to
electromagnetic compatibility.
The following product:
Equipment: Electronic musical instrument
Brand name: Solda
Model/type: p²chanter
is herewith confirmed to comply with the requirements set out in the
relevant Community harmonisation legislation relating to
electromagnetic compatibility and safety:
EN 55013:2013
EN 55020:2007
EN 50581:2012
This declaration is made for and on behalf of the manufacturer:
Erik Solda
Paul-Langen-Str. 40
D-53229 Bonn
Germany
Tel.: +49 (0)228 94852-75
Bonn, 1 August 2014 ______________________
( Erik Solda, CEO )
Table of contents


