SOLENICA Caia User manual

1
User Manual
2

3
HELLO! 4
WELCOME CAIA! 5
CAIA’S POSITIONS 6
HOW TO OPERATE CAIA 7
Touch Button 7
Sunlight Pointer 7
Adjustable Arm 7
QUICK-START GUIDE 8
STEP 1 | Removing CAIA from the box 9
STEP 2 | Charging CAIA 9
STEP 3 | Pointing & Turning CAIA On 9
HOW TO GET THE MOST FROM CAIA 10
Where to place CAIA 10
Where to point CAIA 10
HOW TO CARE FOR CAIA 11
Weather Conditions 11
Surrounding Environment 11
Cleaning 11
CAIA’S LANGUAGE 12
TROUBLESHOOTING 13
SAFETY NOTICE & GUIDELINES 14
Contents

4
Scientists have long understood the mental and physical benefits
the sun’s rays can bring us. From stimulating the body’s production
of essential vitamins, supporting sleep to regulate our circadian
rhythms and improving our mental health, sunlight is an essential
ingredient of wellness — and life itself of course.
But not everyone gets enough sun. Even in places that enjoy more
sunshine, our changing work patterns and the increasing importance
of the online world means many of us are spending more time inside
and reducing the amount of natural sunlight we enjoy during the day.
We are becoming sun poor.
We have developed a new and effective way to bring the restorative
power of natural sunlight into our homes and ofces.
Meet CAIA, the Smart Solar Reector.
Self-powering and beautifully designed, the CAIA Solar Reector
automatically tracks the sun through the day to bring natural light
effortlessly. Wherever you can — in an ofce space, a dark living area,
illuminating a wall or highlighting a feature — she lifts with sunlight.
The highly efcient mirror made from the thinnest glass and copper can
reect the equivalent of 100W of lighting in full sun, enough to ood a
room of 25 square meters (approx. 269 sq feet) with ambient lighting.
Hello!

5
SUNLIGHT POINTER
SOLAR PANEL
ADJUSTABLE ARM
DIAL
TOUCH BUTTON
ADD-ON BASE
MIRROR
WELCOME
CAIA!
In a world that spends more of its
time inside, CAIA is a smart new
way to introduce the restorative
power of natural sunlight into
homes and offices.
Not a lamp, but an autonomous
self-powering solar reector, CAIA
uses unique algorithms to track
the sun through the day and bring
natural light simply, effortlessly
and elegantly into life.
6
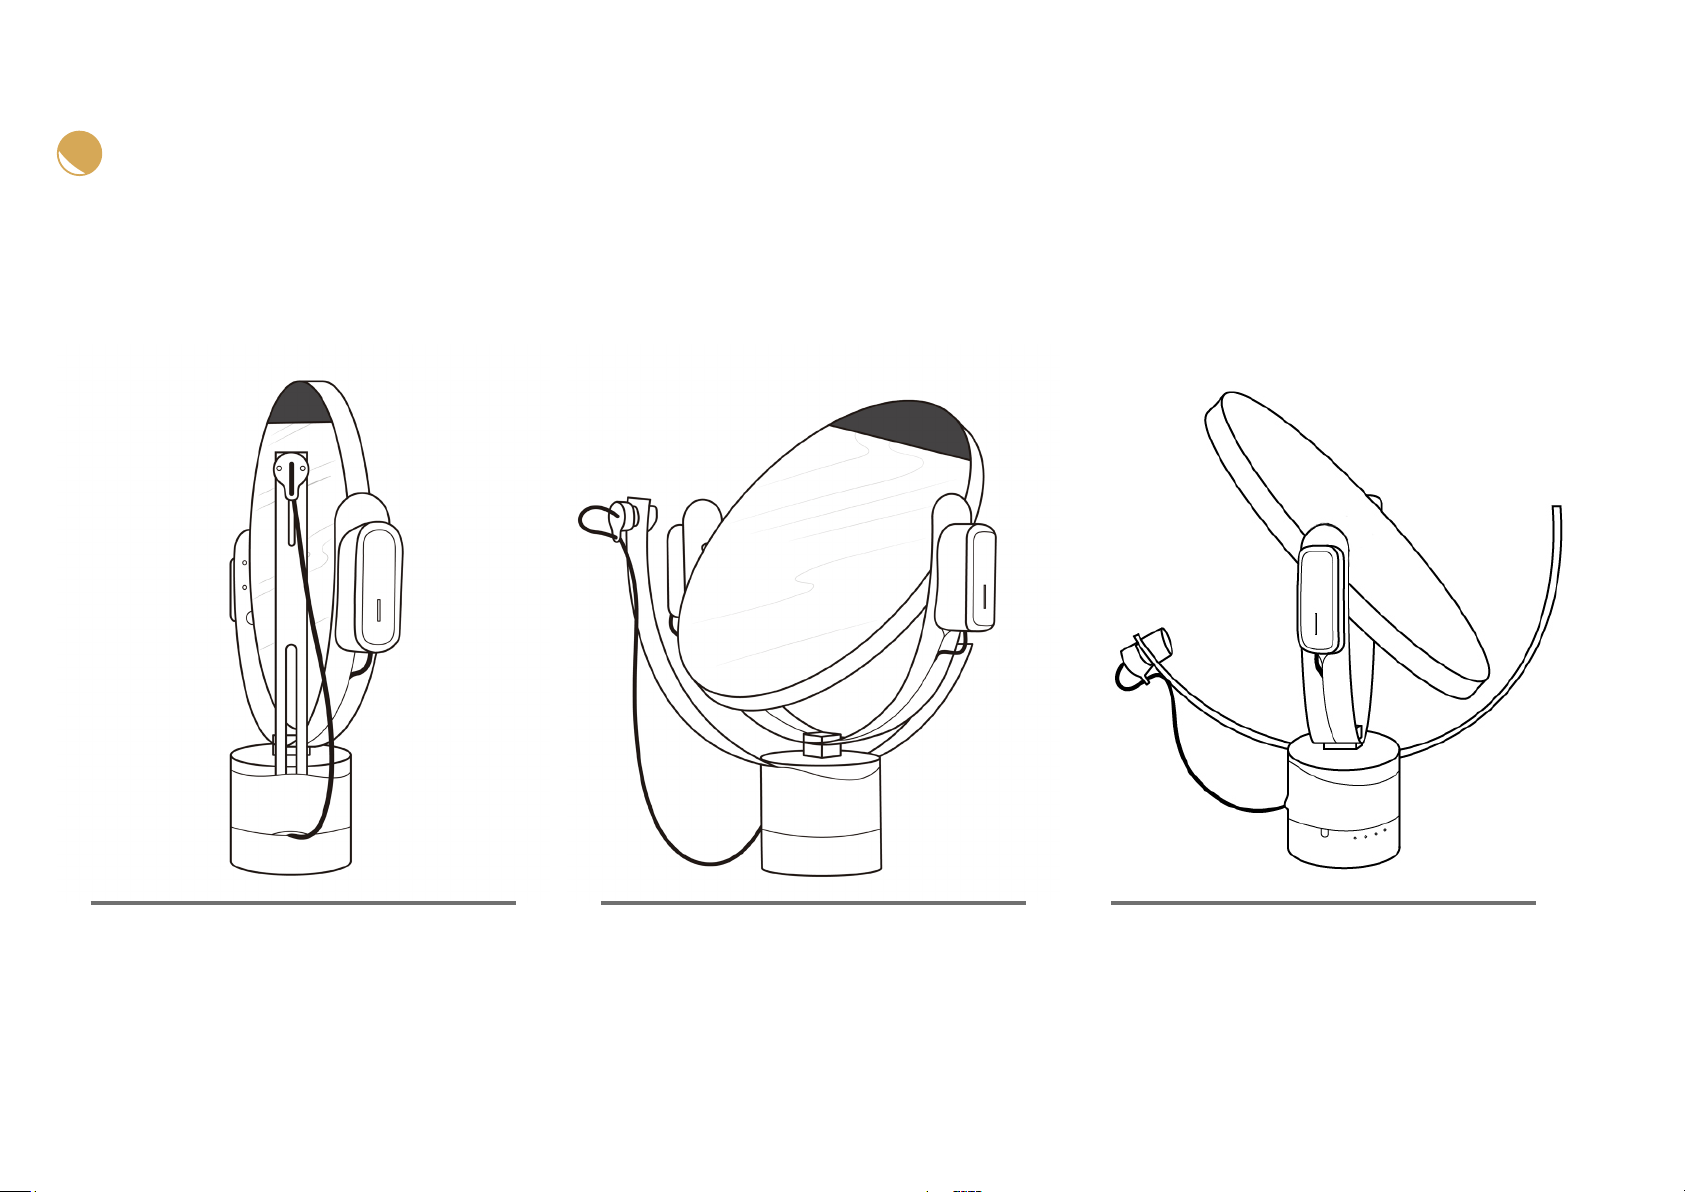
CAIA’S
POSITIONS
This is CAIA’s ‘FOLD’ position.
In this position she is ‘OFF’.
This is CAIA’s ‘HOME’ position.
In this position she is in ‘STANDBY’.
This is CAIA’s ‘SLEEP’ position.
In this position she is in ‘STANDBY-SLEEP’.

7
HOW TO
OPERATE CAIA
NEVER APPLY PHYSICAL FORCE AND MANUALLY MOVE CAIA’S MIRROR
CAIA’S Commands
From any of CAIA’s positions, a short press will trigger her to start
scanning to nd the sun.
While she is in the middle of scanning, a medium press
will stop the scan and return to the FOLD position.
While she is in the middle of scanning, a long press will stop the scan,
reset and return to the FOLD position.
While she is in the SLEEP and HOME positions, no action is required to trigger her
to start scanning. When she senses the direct light hitting her (specically the
Sunlight Pointer and mirror), she will autonomously wake up and scan (this may
take several minutes).
When the battery is running low, she will automatically stop all operations and
return to the FOLD position.
Sunlight Pointer
This shows the direction the reected sunlight points to. Just imagine a straight
line that starts from the center of the mirror and goes straight through the
Sunlight Pointer. This is her straight “line of sight”, and CAIA will point the reected
sunlight in this direction.
The Sunlight Pointer is also the camera sensor that CAIA uses to nd and track
the sun. There is an in-built infrared sensor that allows her to detect the sunshine
when she is in the SLEEP and HOME positions, and automatically wake up.
Adjustable Arm
Raise or lower the direction of the reected sunlight by simply loosening the dial
on the side of the base and sliding the adjustable arc (the one with the Sunlight
Pointer) up and down, through the base.
Be careful not to let your hand lose grip while sliding, as you could hit and
damage the Sunlight Pointer. After xing the adjustable arm into the desired
position, please remember to tighten the dial on the base and x the adjustable
arm into place.
TYPE DURATION OPERATION
Short Press 2 seconds START Scan
Medium Press 6 seconds STOP and bring to fold position
Long Press 12 seconds RESET and bring to fold position
Touch Button
CAIA only has one button. To operate, gently apply light pressure with two
ngers (index and middle ngers), to instruct CAIA on what to do.

8
QUICK START GUIDE

9
STEP 3 | Pointing
& Turning CAIA On
Gently place CAIA in your chosen spot. CAIA’s mirror
and Sunlight Pointer must be under direct sunlight
and with a direct line of access to the spot where
you want to reect the light to. Use the Sunlight
Pointer to set the direction of the reected light.
You can adjust the height of the reected beam by
sliding the lower arch up and down, through the base.
To switch her on, using two ngers, apply light
pressure on the touch button for 2 seconds. She will
immediately start scanning (the scan may take up
to a few minutes).
CAIA will nd her best position and autonomously
make micro-adjustments throughout the day. As
long as she’s under direct sunlight, CAIA will keep
pointing in the same direction.
None of this is happening? Check out our
troubleshooting guide below.
STEP 1 | Removing CAIA
from the box
Once you carefully open the box, gently lift CAIA
placing both hands on the top arc to lift her up; then
t her onto the add-on base.
NEVER MOVE/SWIVEL THE MIRROR OR ITS ROUND
CASING BY HAND!
STEP 2 | Charging CAIA
Place CAIA under direct sunlight, with the solar
panel facing the sun, for at least one day.

10
HOW TO GET
THE MOST FROM CAIA
Where to place CAIA
CAIA can be placed both indoors and outdoors.
What is crucially important is that she must be under direct sunlight to work.
Just imagine two straight lines. The rst imaginary straight line going from
the sun to CAIA. The second imaginary straight line going from the middle
of the mirror, through the Sunlight Pointer, in the direction where you have
pointed CAIA.
Is there anything in the way of these two lines? A tree? A building?
A piece of furniture? Etc.
If your answer is “no”, then you have found a perfect spot for CAIA!
If your answer is “yes”, then it’s likely that spot will not work for CAIA.
If your answer is “sometimes”, then consider that CAIA will work appropriately
only when those two imaginary straight lines do not have any obstacles in the
way. If, for example, a tree is in the way of the imaginary straight line from the
sun to CAIA, then she will stop tracking while the sun is behind the tree.
Once the sun comes out from behind the tree, give CAIA a couple of minutes
and she will start tracking the sun again, all by herself!
Where to point CAIA
The brightness effect is not created by the reected beam of
sunlight itself, rather it’s created by:
1. The surface that is hit by the reflected beam of sunlight
Color and material make the difference. White will reect
light. Black will absorb light. A white plastered wall or ceiling
will maximize the brightness effect. A wooden wall or ceiling
will absorb light and produce a negligible difference in
brightness.
2. The size of the room
The smaller the room, the less space the reected sunlight
will need to “ll”, therefore the brighter the effect.
3. The spot that the reflected sunlight hits
We have found that the ideal spot to point CAIA is the ceiling
or the corner where the ceiling and walls join. Pointing
CAIA high will diffuse light top-to-bottom, maximizing the
brightness effect.
4. The distance between CAIA and the spot where the
sunlight is reflected to
Sunlight can travel far. However, the shorter the distance
between CAIA and the spot you point her towards, the
greater the brightness effect.
5. The brightness of the sun
Seasons, as well as very thin low-level clouds, will affect the
brightness of the sun. The brighter the sun, the greater the
brightness effect in your chosen room.

11
Weather Conditions
While we have tested CAIA for resistance to
water, always keep in mind that she is still quite
fragile. On particularly windy days, the wind
may cause her to topple over and, in falling,
she could get damaged (cracked mirror,
broken Sunlight Pointer, etc.).
Similarly, if she is hit by solid objects,
such as hail or ying debris, this may also
cause damage.
So, on those days where the weather is
particularly windy or with strong rain, do take
extra care and ideally move her indoors to
protect her.
Surrounding Environment
Similarly to weather conditions, sometimes
the home environment can also experience
some turbulence.
Particularly if you have pets or small children,
CAIA may be knocked over accidentally and in
falling, she could get damaged (cracked mirror,
broken Sunlight Pointer, etc.).
Cleaning
Since CAIA will be exposed to the natural
elements, whether she’s sitting inside or outside
your home, she will collect some dust at the
very least.
We recommend to at least routinely remove
the dust with any common household duster.
If you have her outdoors, depending on your
specic location’s seasonal atmospheric
conditions, some climactic events can bring
other, “heavier” elements.
For example, it’s common for some rains in
southern Europe to carry a lot of sand from
Africa. For a deeper clean, we recommend
using any lightly dampened cloth to gently
remove any dirt from CAIA’s metal and plastic
components.
The mirror can be cleaned like any household
mirror, by using your preferred glass-cleaning
solution and gently applying it with a microber
cloth on CAIA’s mirror.
While cleaning the glass, place the other hand
behind the mirror, so as to keep the circular
casing for CAIA’s mirror steady in place.
Security Lock
To secure your CAIA with the security lock,
remove CAIA from the add-on base while she is
in FOLD position and lay her on a at surface.
At the bottom of CAIA you will see a metal plate
with a large pin sticking out. On that metal plate
you will also see a little hole for the security lock.
Once you’ve xed the security lock to the base
of CAIA, you can put her back on the base.
HOW TO CARE FOR CAIA
We recommend to
routinely clean CAIA
Just add her to your house cleaning
routine and get in the habit of wiping
her down regularly

12
CAIA’S LANGUAGE
The sound of brightness!
Important Sounds – Your Action Needed
To play the audio les you need to download the manual on your desktop/laptop. When you click on the rst sound,
the pdf viewer will prompt you to trust the document. Then you’ll be able to play all the sounds.
Battery Low: If you hear this sound, the battery charge is still too low for CAIA to work.
Keep her under the sun for a full day, with the solar panel facing the sun.
Sun Not Found: If you hear this sound, CAIA couldn’t nd the sun. Make sure she is fully under direct sunlight
and try again.
Internal Fault 1: If you hear this sound, she encountered some problems. Reset her with a long press (12 seconds),
then try with a short press again. Make sure there are no obstacles that are impeding her from moving freely.
Internal Fault 2: If you hear this sound, there may be an internal fault with CAIA. Reset her with a long press
(12 seconds), then try with a short press again. If this problem persists, please contact us at [email protected].
Background/Operational Sounds – Your Action Not Needed
Ready: CAIA is ready for action! She is ready or about to perform an action.
Starting Scan: CAIA is about to start to scan. Just sit back and let her do her thing!
Going To Fold: CAIA is about to move into Fold position. From this position, she can be packed in her box.
Going to Home: CAIA is about to move into Home position.
Confirm Long Press: CAIA has acknowledged the long press and will reset and move into Fold position.

13
Confirm that your CAIA is working
With a full battery charge, she will be able to do a full scan.
Place her on a at surface and make sure there aren’t any
obstacles that could impede her from moving freely as she swivels
and turns by herself.
For this test, CAIA doesn’t necessarily need to be under direct sunlight.
She can be anywhere; the objective is to see whether she will do a full
scan or not.
Then apply light pressure with two ngers on the touch button for two
seconds. At this point she will emit a sound and, if everything is working
correctly, she will start scanning (the full scan lasts a few minutes).
If she doesn’t start scanning, please refer to the “CAIA’s Sounds”
on page 14.
If after several days under the sun, her battery is still too low, then
If you hear the “internal fault” sound, perform a reset by applying light
pressure with two ngers on the button for 12 seconds. Then try to have
her start a new scan by applying light pressure with two ngers
on the button for 2 seconds.
If she still won’t scan, or this problem persists, please contact us at
Should you need to reach out to us, please make sure to include your
CAIA’s serial number in the subject of the email.
Use the body of the email to explain the issue you’re having. If you could
also send us a video of the issue, it will make it much easier for us to
help you!
TROUBLESHOOTING
As soon as you receive your CAIA, make sure to charge her by
keeping the solar panels facing the sun for a full day.

14
• Keep the device away from use and reach of children.
• The product might reflect sunlight unintentionally. Do not look directly into the
reflection of the sunlight as it may cause irritation or damage to eyes. Use of damaged
product is highly prohibited as it can cause harm.
• The product contains glass. In the event of damage such as cracks, chipped glass, do
not continue to use the product, and contact customer service for assistance.
• Do not pressure wash the device as this will void the warranty.
• Do not open, disassemble or replace any components of the device, as this will void the
warranty. In the event of malfunction contact customer service for assistance.
• For using the device outdoors, the guidelines provided in the user manual shall be
followed. In the event of doubt, contact the customer service for support.
• Ensure there are no loosely hanging objects next to the rotating mechanism, since
the device does not have obstruction detection functionality, therefore it will not stop
moving if any external object gets stuck in the swivel and rotating mechanism.
The manufacturer will not be responsible for any damage caused due to obstruction.
SAFETY
NOTICE &
GUIDELINES

15
Table of contents
Popular Home Lighting manuals by other brands

Safavieh Lighting
Safavieh Lighting KREMP TBL4409A manual

Triarch
Triarch Indoor Lighting 31550/1 Assembly instructions

Malmbergs
Malmbergs Milos instruction manual

Dale Tiffany
Dale Tiffany TF90263 Assembly instructions

TaoTronics
TaoTronics TT-DL032 user guide

Philips
Philips myLiving 40587/17/16 user manual


