Solus V2 User manual

Safety Information
Please use this device only for the intended uses described in this User Guide.
Before using this system to test your blood glucose, please read instructions thoroughly. Do a
quality check on the system following the instructions and consult with your healthcare
professionals about questions or problems.
Be aware of the safety of young children or handicapped persons near you when you
conduct a glucose test using this system.
SOLUS test strips can only be used with the Solus V2 meter.
Please keep the test strip bottle away from children. The test strips and bottle cap can
present a choking hazard.
Please be cautious when removing the lancet. Always place the protective cap back on the
exposed lancing device.
Never try to disassemble the meter in any circumstance. If your meter is not working
properly, or if you need technical support, please contact our Technical Support Team at (877)
592-3922.
Rev. Date: 06/2012 6131SL-M01A2

Introduction
Intended Use/ Indications for Use
The Solus V2 Blood Glucose Management System is intended for use in the quantitative
measurement of glucose in fresh capillary whole blood from the finger and the forearm. It is
intended for use by healthcare professionals and people with diabetes mellitus at home and
as an aid in monitoring the effectiveness of a diabetes control program. The Solus V2 Blood
Glucose Management System is not intended for the diagnosis of or screening for diabetes
mellitus, nor for use in neonates.
The alternative site testing (AST) in this system can only be used during steady-state blood
glucose conditions.
This system contains a speaking function that provides an audible message of test results for
users with low vision.
This User Guide has been prepared to describe the proper use of Solus V2 Blood Glucose
Management System. Please read this User Guide and the Package Insert that accompanies
the SOLUS Glucose Test Strips before testing. The system is available as a kit. You can
purchase the system supplies from your system provider. Please tell your system provider the
system NDC number listed below and marked on the packaging box when you purchase
supplies.
NDC#: 8611-501001

Page 1: Safety Information
Page 2: Introduction
Contents
Chapter 1: Understanding Your New System
Solus V2 Audible Blood Glucose Management System
Installing/Replacing the Batteries
Meter Setup
Setting the Volume Level and Language Selection
LCD Screen Overview
Setting the Meter
a. Year, Month, Date, and Time
b. Alarm Reminder
c. Unit of Measurement
d. Deleting the Memory
Chapter 2: Performing a Control Test
Why and When to Perform a Control Test
About Control Solution Tests
Performing a Control Solution Test
Chapter 3: Testing Your Blood Sugar
Preparing the SOLUS Lancing Device
Performing a Blood Glucose Test
Information on Alternate Site Testing (AST)
Performing an Alternate Site Test (AST)
Highlighting Your Results as Before and After Meals Tests
Understanding Your Test Results
Symptoms of High or Low Blood Sugar
Unusual Test Results
Comparing Your Meter Results to Your Lab Results
Chapter 4: Recalling the Memory and Downloading Results
Recalling the Memory
Viewing the Averages
Displaying Averages in Sequential Order
Downloading Your Test Results with the MyMeterLink System

Chapter 5: Maintenance and Troubleshooting
Storing and Handling Your Meter
Cleaning Your Meter
Interpreting Error Messages
Troubleshooting Your Meter
Accessing Customer Service
Chapter 6: Technical Information
Methodology of Reagents
Limitations
Product Specifications
Warranty Information
References

Chapter 1: Understanding Your New System
SOLUS Audible Blood Glucose Management System
The Solus V2 Blood Glucose Management System includes the following items:
1. Solus V2 Glucose Meter with (2) AAA batteries
2. User Guide
3. Quick Start Guide
4. Log Book
5. Protective Case
10. Package Inserts for Test Strips, Control Solution, and Lancets/ Lancing Device
The SOLUS V2 Glucose Meter uses SOLUS Test Strips only. Neither the meter nor the test
strips will work when used with any other brand.
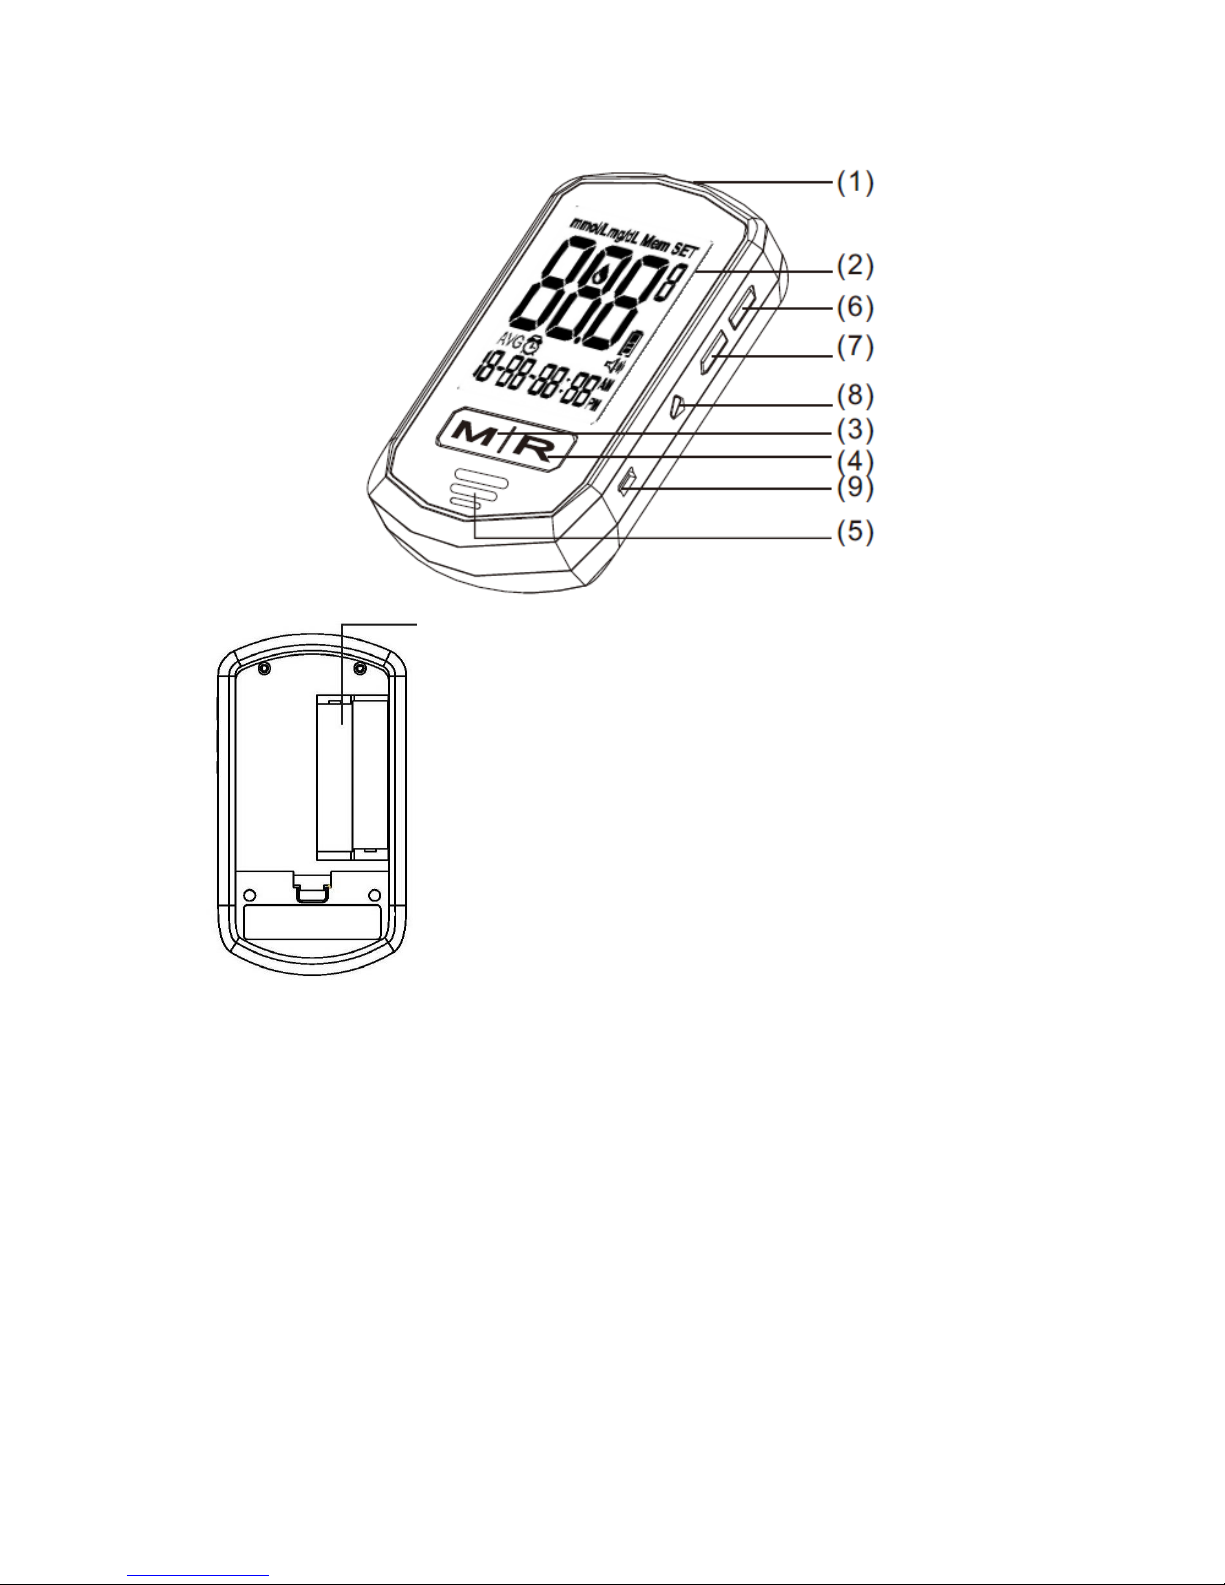
(10)
1. Test Strip Port - Insert the test strip here and the meter will turn on
automatically for testing.
2. LCD Display - Large screen with large numbers and symbols
that makes testing simple and easy. Guides the user through the
test using symbols and simple messages.
3. “M”Left Function Button - Powers the meter ON and OFF; in
the OFF position, pushing this button allows access to the
memory and setting modes.
4. “R”Right Function Button –Allows the user to confirm settings,
view averages, and highlight tests before meals and after meals.
In the OFF position, push this button to hear the current date and time. (Please refer to
manual for detailed function description.)
5. Speaker Slot –Allows the audible output to be heard.
6. Up Button - Increase the value of the current setting and increases the voice volume.
7. Down Button - Decreases the value of the current setting and decreases the voice volume.
8. Language Selection Button –Pressing twice (2x) allows user to change between audible
languages (English or Spanish). If pressed once, the meter defaults to the current language
setting.
9. Mini USB Port - the site where the mini USB cable is inserted for data transmission
between your meter and your computer. USB cable provided separately.
10. Battery Compartment –Area that holds two (2) AAA alkaline batteries.

Installing/Replacing the Batteries
1. If the meter is on, turn the meter off by pressing and holding the “ M” left function button
until it says “Goodbye” and you see “OFF” on the screen (see Figure 1-1).
2. Open the battery cover on the back of the meter by pushing the tab in the direction of the
arrow and pulling the cover up (see Figure 1-2).
3. Remove any used batteries and replace with two (2) AAA alkaline batteries. Put the battery
cover back in place and snap it closed. You will hear a “beep” sound if the battery is installed
correctly (see Figure 1-3).
1-1 1-2 1-3
Important:
1. It is suggested you replace the batteries when the battery icon appears empty. You will get
an Error 3(E_3) message when the batteries do not have enough power to perform a test.
2. Replacing the batteries will NOT delete your stored test results.
3. Replacing the batteries will NOT change your meter settings except for date and time. You
will need to reset the date and time after the batteries have been replaced.
4. Dispose used batteries according to your local ordinances.
Meter Setup
Solus V2 allows you to personalize your meter to meet your healthcare needs. Below are
features that you can customize:
Volume Level
Language
Date and Time
Testing Alarm Reminder
Unit of Measurement
Before and After MealsMemory
Setting the Volume Level and Language Selection
On the right side of the meter, you will find two buttons, the “^” up symbol and the “v” down
symbol. Pressing the ”^” up symbol (“Up” button) increases the volume; pressing the “v”
down symbol (“Down” button) decreases the volume (see Figure 1-4).
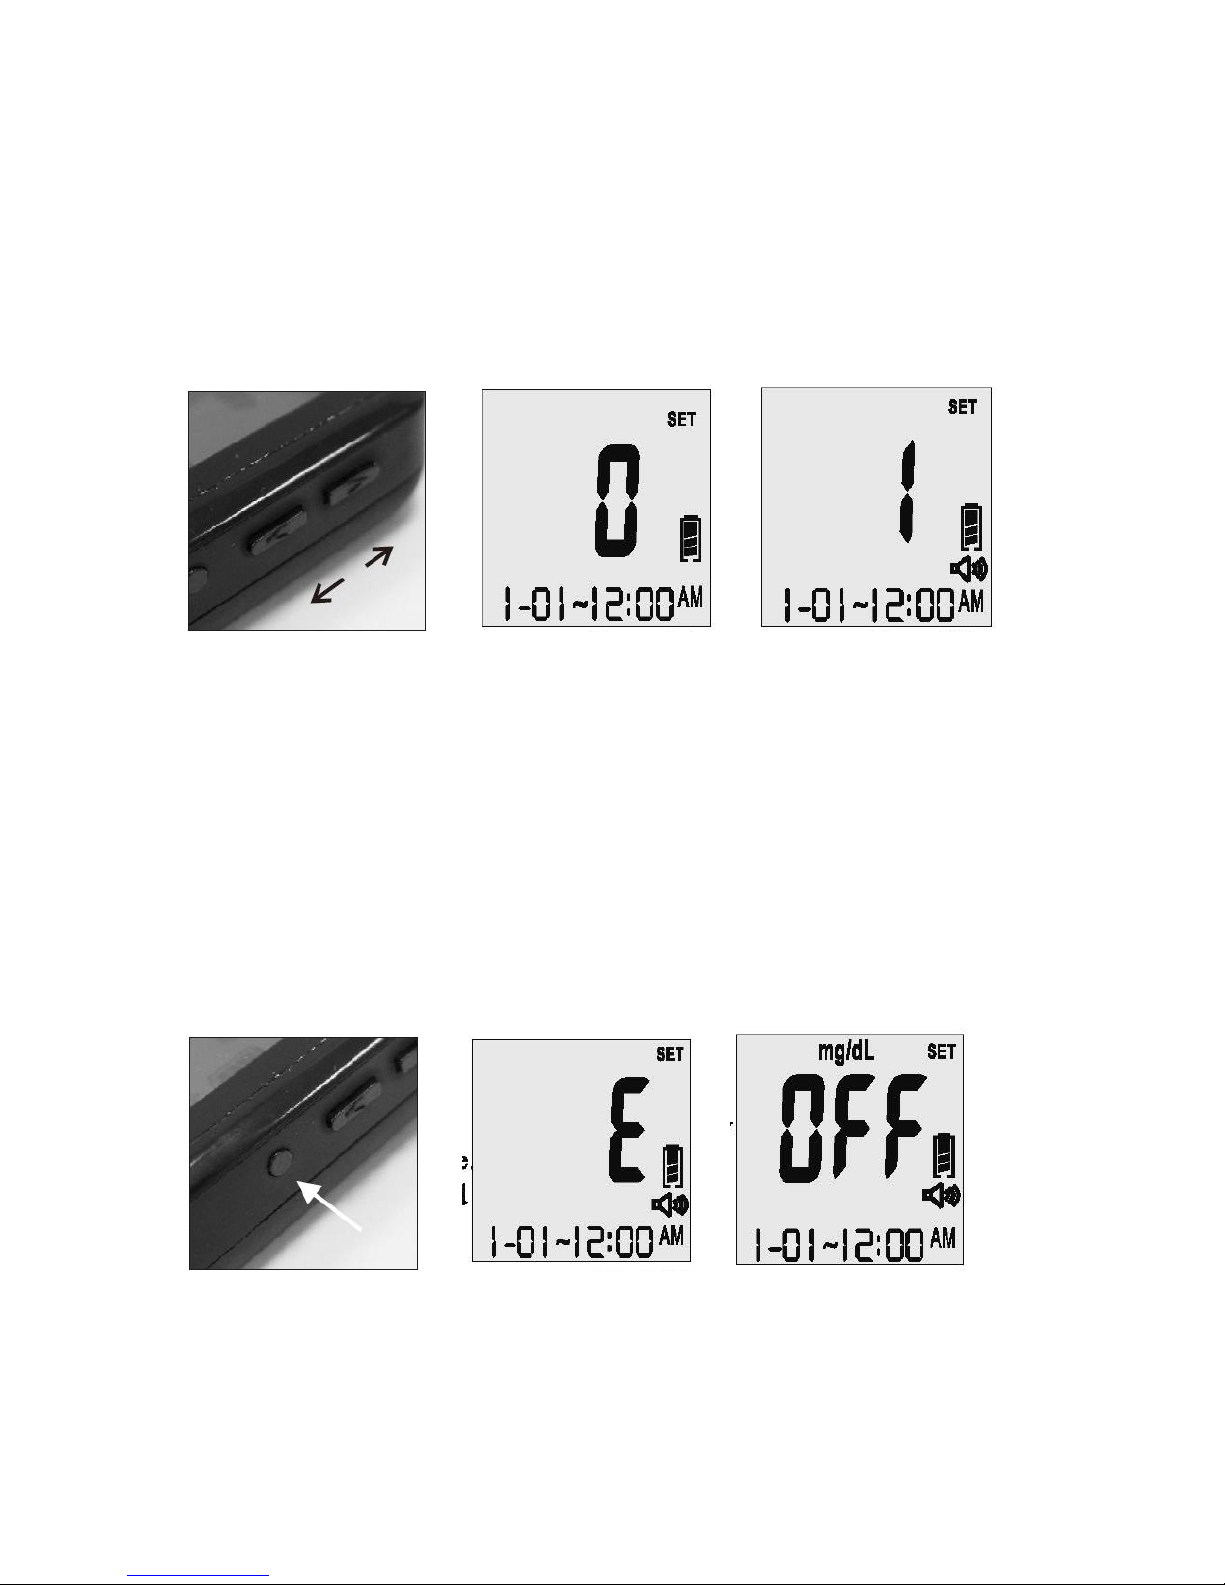
When the meter is in the “OFF” position, the voice volume of the meter can be adjusted by
pressing the “Up” or “Down” buttons. There are eight (8) different volume settings ranging
from OFF (0) to a volume level of seven (7).
To mute the volume, simply set the meter to “0” and you will hear “Voice Off.” The speaker
icon will disappear from the LCD screen (see Figure 1-5, 1-6).
1-4 1-5 1-6
On the right side of the meter, you will find a small, round button (see Figure 1-7).
To toggle between English and Spanish, simply press the round button twice. The first time
you push the button, the meter will speak the current setting. If you push the button a
second time, you will switch to the alternate language. The screen will show “E” or “S”
indicating your current setting. You will also hear “English” or “Español” (see Figure 1-8).
Once your current setting is established, the meter will automatically shut off in two (2)
seconds and say “Goodbye”. The screen will display “OFF” along with the date and time
when the meter is turned off. This will not affect the battery life (see Figure 1-9).
1-7 1-8 1-9

LCD Screen Overview
Below is the appearance of the LCD screen:
(1) Measurement Units
(2) Memory
(3) Setting
(4) A/b/C: After Meals, Before Meals, and Control Test Indicators
(5) Blood drop Symbol
(6) Battery Symbol
(7) Voice Symbol
(8) Day Average
(9) Alarm Reminder
(10) Month
(11) Day
(12) Hour
(13) Minute
1. Appears with the test result either in mg/dL or in mmol/L.
2. Appears when you recall the memory.
3. Appears when you are in setting mode.
4. When the test is flagged as a control test a “C” appears here. When the test is flagged for
a before mealstest a “b” appears here. When a test is flagged for an after meals test an
“A” appears here.
5. Flashes when it is OK to apply the sample.
6. Indicates the remaining battery life.

7. Indicates whether the audio function is “On” or “OFF”.
8. Indicates to the user that the current result is an average and not an individual test.
9. Indicates to the user that the Alarm Reminder is “ON”.
10. Month (Note: the year is only displayed in the “setting” mode.)
11. Day
12. Hour
13. Minute
The LCD screen for “Power Off”: When the meter is in the OFF position, the date, time,
measurement unit, battery icon, and the letters “OFF” will still remain on the screen (see
Figure 1-10). If the voice is on or the alarm reminder is on, the speaker icon and the alarm
icon will be displayed as well.
1-10
If the meter contains no test strip and the meter is set to the “OFF” position, you can press
the “R”right function button and the meter will audibly speak the current date and time (for
example: Two Thousand Eleven, February Twenty-first, Four Forty pm)
Setting the Meter
*Note: The Solus V2 is able to have the date and time updated by automatically from your
computer. To learn how, visit www.BioSenseMD.com.
To SET the meter:
1. With the meter in the “OFF” position, press the “M” left function button and hold down
until you hear “You are now in setting mode.” and/or a flashing “12” appears on the screen.
This represents the last two digits of the current year. The meter is now in the “Setting”
mode. You will hear: “You are now in setting mode. The year is 2011. Please set the year”
(see Figure 1-11).
2. Set the Year - Press the “Up” or “Down” button on the right side of the meter until the last
two digits of the desired year are displayed. Each time you adjust the year, you will hear “The
year is XXX.” Press the “R” right function button to confirm the correct year and the meter
will move to the next setting. You will hear “The month is XXX. Please set the month” (see
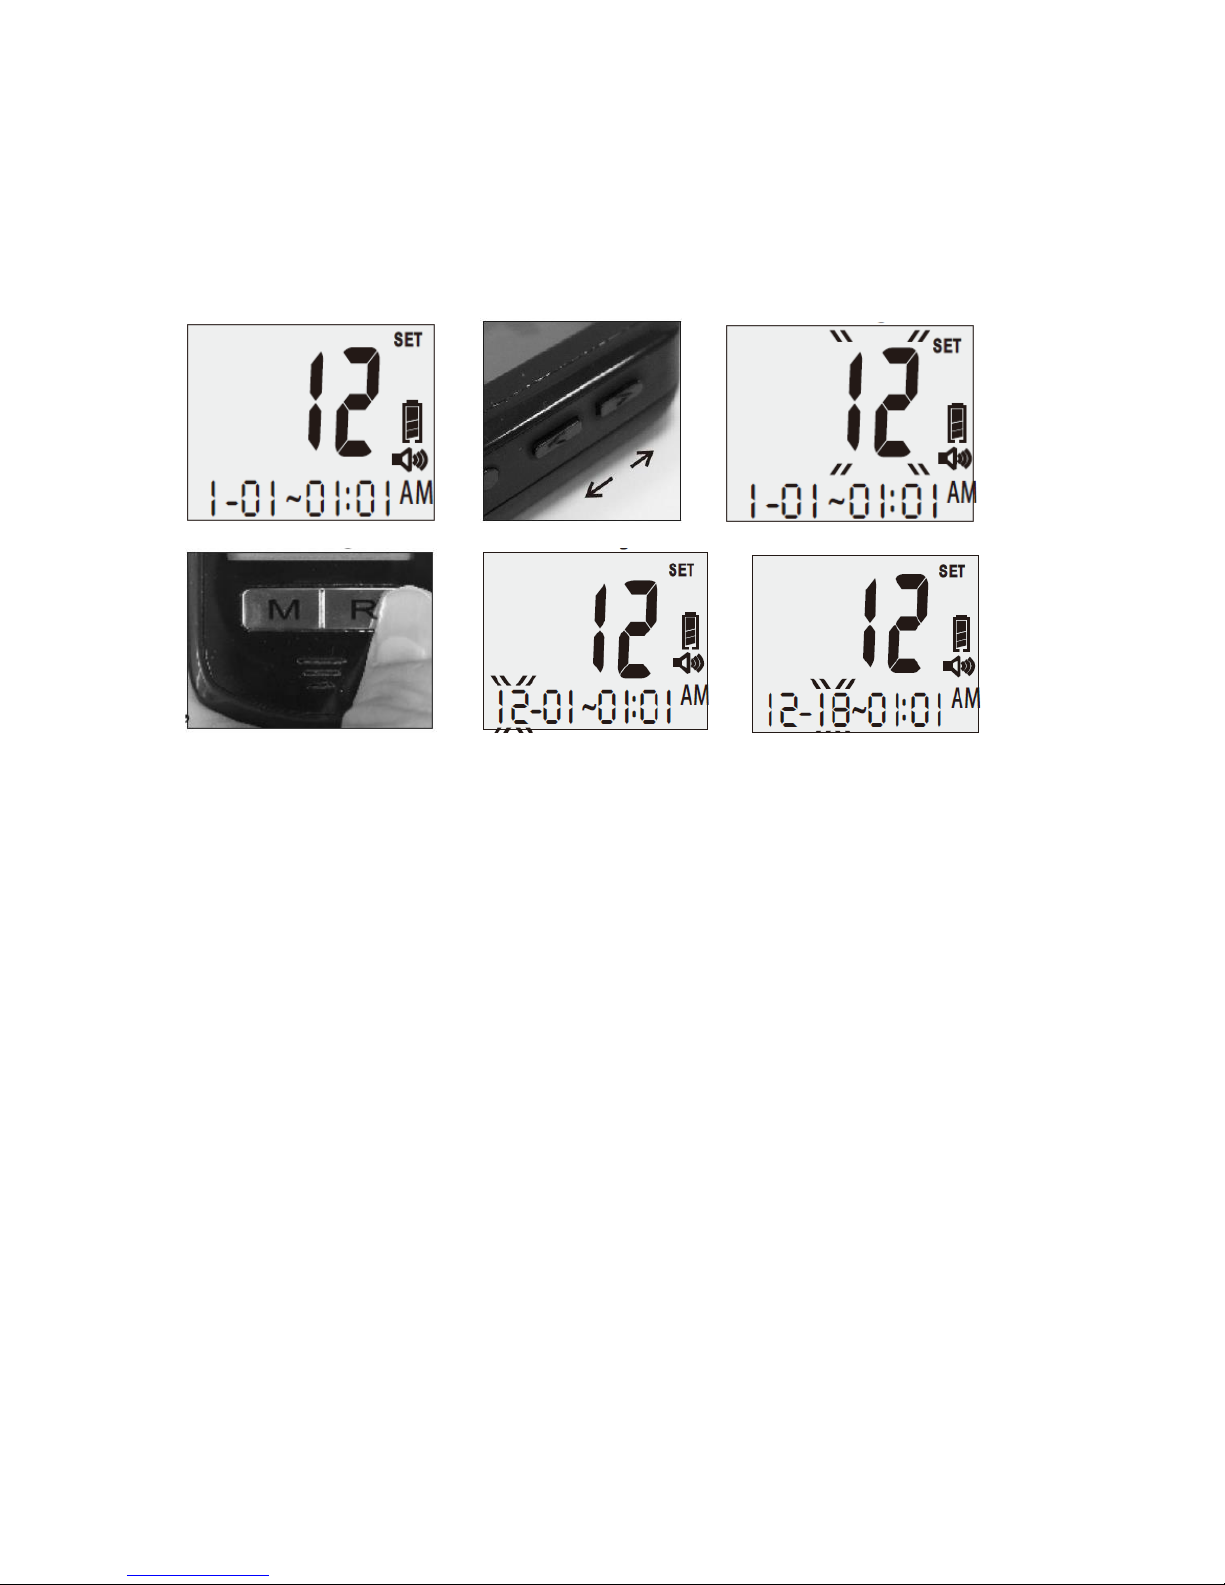
Figure 1-12, 1-13, 1-14, 1-15).
3. Set the Month- Press the “Up” or “Down” button on the right side of the meter until the
desired month appears. Each time you adjust the month, you will hear “The month is XXX.”
Press the “R” right function button to confirm the correct month and the meter will move to
the next setting. You will hear: “The day is XX. Please set the day”(see Figure 1-16).
1-11 1-12 1-13
1-14 1-15 1-16
4. Set the Date - Press the “Up” or “Down” button on the right side of the meter until the
desired day appears. Each time you adjust the day, you will hear “The day is the XX.”Press
the “R” right function button to confirm the correct day and the meter will move to the next
setting. You will hear: “The hour is XX a.m. (or p.m.). Please set the hour” (see Figure 1-17).
5. Set the Hour - Press the “Up” or “Down” button on the right side of the meter until the
desired hour appears. Each time you adjust the hour, you will hear: “The hour is XX a.m. (or
p.m.)” Press the “R” right function button to confirm the correct hour and the meter will
move to the next setting. You will hear: “The minute is XX. Please set the minute” (see
Figure 1-18).
6. Set the Minute - Press the “Up” or “Down” button until the desired minute appears. Each
time you adjust the minute, you will hear “The minute is XX.” Press the “R” right function
button to confirm the correct minute and the meter will move to the next setting. You will
hear: “Please set the alarm.”

1-17 1-18
7. Set the Alarm Reminder: You will hear: “Please set the alarm. Alarm off. Press the up
button to turn alarm on.” or “Please set the alarm. Alarm on. Alarm set for XX:XX. Press
the up button to turn alarm off.”
7A Turn Alarm Reminder Off:
When you hear “Please set the alarm. Alarm on. Alarm set for XX:XX. Press the up button
to turn alarm off.” Press the up button, alarm will be turned off and you will hear: “Alarm
off.” Press the “R” right function button to exit alarm setting mode. You will enter the next
setting and hear “The unit of measure is milligrams per deciliter. Please set the unit.”
7B Set Alarm Reminder:
If you do not want to change the current alarm setting, press the “R” right function button to
exit the Alarm Setting mode. You will hear “The unit of measure is milligrams per deciliter.
Please set the unit.”
Once you press the “UP” button to turn the alarm on, a small alarm clock icon will be
displayed on the left side of the screen (see Figure 1-19). You will then hear: “Alarm on.
Alarm hour set for XX a.m. (or p.m.). Please set the hour.” The hour segment of “00:00” will
be flashing on the screen.
Press the “Up” or “Down” button to change the alarm hour setting until the desired hour
appears. Press the “R” right function button to confirm the correct hour for the alarm setting.
Each time you adjust the hour, you will hear “The hour is XX a.m. (or p.m.).”
At this point, the minute segment of “00:00” will be flashing on the screen and you will hear:
“Alarm minute set for XX. Please set the minute.” Press the “Up” or “Down” button until
the desired reminder minute appears on the screen. Each time you adjust the minute, you
will hear “The minute is XX.” Press the “R” right function button to confirm the setting. If
you have set the alarm to 8:45 a.m., You will hear “Alarm Reminder is set to 8:45 a.m.” and
the meter will move to the next setting (see Figure 1-20).

1-19 1-20
Note: Once the Alarm Reminder is SET, the meter will beep for 60 seconds every day at the
set Alarm Reminder time. To silence the alarm, press the “R” right function button once.
8. Set the measurement unit: Press the “Up” or “Down” button on the right side of the
meter until the desired measurement appears. The meter will display either “mg/dL” or
“mmol/L” when pressing the “Up” or “Down” button (see Figures 1-21, 1-22). Each time you
press the “Up” or “Down” button, you will hear: “Measurement unit in milligrams per
deciliter” or “Measurement unit in millimol per liter.” Press the “R” right function button to
confirm the selection and you will hear: “Ready to delete memory records. Press the
“Down” button to delete all records”(see Figure 1-23).
1-21 1-22 1-23
Warning: This meter can show results either in “mg/dL” or “mmol/L” units. Mg/dL is the
typical unit of measurement used in the United States, please contact the manufacturer if
your meter does not display mg/dL when you turn it on. The factory set default for the
meter is mg/dL. In the event that the meter loses power or the batteries are changed, the
factory set default is mg/dL.
It is critical to use the correct unit of measurement to manage your diabetes. If your meter is
set to mg/dL, your results will never have a decimal point.
If you obtain your results using the metric system, you will be using the mmol/L unit of
measurement. In this case, your results will ALWAYS have a decimal point.
9. Deleting the Memory: To delete your stored results, you will hear: “Ready to delete
memory records. Press the down button to delete all records?” Press the “Down” button

and you will receive a confirmation: “Are you sure you want to delete all records? Press the
down button again to delete all records.” Press the “Down” button a second time to delete
all records.
If you want to skip this memory deletion step, press the “R” right function button when you
first hear “Ready to delete memory records.”The meter will automatically power off with an
audible voice saying “Goodbye”. The meter will shut “OFF”(see Figure 1-24).
1-24

Chapter 2: Performing a Control Test
Why and When to Perform a Control Test
Solus V2 Control Solution contains a known amount of glucose and is used to confirm that
the meter and test strips are working properly. A control solution test should be performed
every time a new bottle of test strips are opened, or whenever you suspect that the meter or
test strips may not be functioning properly.
About Control Solution Tests
1. The Control Solution range is found on the bottle of the Solus V2 test strips and NOT the
control solution itself (see Figure 2-1).
2. Gently roll the control bottle in the palm of your hands as some particles of the solution
may have settled to the bottom (see Figure 2-2).
3. Discard the first drop as crystallization may occur.
4. Place a drop of the control solution either on a hard surface or the “dimple” of the
control solution cap (see Figure 2-3).
5. Place the meter into “Control” mode when performing a control test so the readings do
NOT get averaged with your other readings.
Performing a Control Test
Important:
Press the “R” right function button in order to set the meter to “Control Test” mode. If you
leave the meter in the standard mode, the control solution test result will be stored in the
memory and affect your average “AVG” results.
1. Insert a strip into the meter and you will hear: “Hello, Solus is ready.” You will then hear:
“Apply blood now.”
2. Press the “R” right function button and you will see a letter “C” in the right-hand corner
of the LCD screen to indicate you are in “Control Test” mode. You will then hear: “Apply
control solution now.” The test result will not be stored in the memory (see Figure 2-4).
3. Squeeze a small amount of control solution onto a flat surface or the “dimple” of the cap

and apply it to the front edge of the test strip. You will hear: “Testing in process” (see
Figure 2-5).
4. Wait six (6) seconds and the meter will display the result. You will then hear: “The
glucose level is [number/unit]” (see Figure 2-6).
5. Remove the used strip. The meter will power off with a display of “OFF” and you will hear:
“Goodbye.”
6. Compare the reading you received from your meter to the appropriate control range
found on the bottle of strips. If the control test falls into range, you know your meter is
testing accurately.
Note:
1. If the meter, test strips and control solutions are moved from one temperature to another,
allow thirty (30) minutes for them to adjust to the new temperature before performing a
control test.
2. You must press the “R” right function button only once to set the meter to “Control Test”
mode before running the test. Do not perform the blood test in “Control Test”mode if
you want to save the test result in the meter’s memory.
3. Use only Solus V2 control solution with the Solus V2 Glucose Meter.
4. Solus V2 control solutions are used to confirm the accuracy of the meter and the test
strips.
5. Solus V2 control solution contains a known amount of glucose that reacts with test strips.
The low- and high-level control solutions are intended to check the management system
in different measurement ranges.
6. To ensure an accurate result, make sure to gently roll the control solution in the palm of
your hand. Then discard the first drop.
7. Use for only three (3) months after first opening the solution. Record the open date on
the control solution bottle. Discard after three (3) months.
8. Compare your control solution test results with the expected range printed on the test
strip bottle label. If your glucose control results fall outside the expected range, repeat
the test. Results that repeatedly fall outside the expected range may indicate:
(1)The control solution test may not be performed correctly.

(2)The control solution is expired or contaminated.
(3)The test strips are damaged or expired.
(4)The meter is malfunctioning.

Chapter 3: Testing Your Blood Sugar
Preparing the Solus V2 Lancing Device
Note: To reduce the chance of infection:
Never share a lancet or a lancing device with anyone.
Always use a new, sterile lancet. Lancets are for single use only.
1. Unscrew the adjustable depth cap to remove the adjustable depth cap (see Figure 3-1).
2. Insert a new lancet firmly into the lancet holder (see Figure 3-2).
3. Twist off the protective cover of the lancet (see Figure 3-3).
4. Replace the adjustable depth cap onto the body of the device. Select lancing depth. If
necessary, set the lancing device for a deeper puncture (see Figure 3-4).
5. Slide the lancing device into locking position: gently pull the sliding gray barrel away from
the top of the lancing device until a soft click is heard.
3-1 3-2 3-3
3-4
Important: If you do not obtain enough blood on the strip, you will receive an error message.
You will also hear, “No sufficient blood.” This is critical for your safety.
Performing a Blood Glucose Test
1. If the meter and test strips are moved from one temperature to another, allow thirty (30)
minutes for them to adjust to the new temperature before performing a blood glucose
test.
2. Wash your hands with warm, soapy, water (see Figure 3-5).
3. Open the test strip bottle and take out one new test strip (see Figure 3-6). Recap the
bottle quickly and firmly.
4. Insert a test strip into the meter while the meter is in the “OFF” position. You will hear:

“Hello, Solus is ready” (see Figure 3-7).
5. Retrieve the loaded lancing device or single-use lancet (see Figure 3-8).
6. Apply blood to the front edge of the test strip after you hear: “Apply blood now”(see
Figure 3-9). You will also see a flashing blood drop on the LCD screen of your meter. If
enough blood is obtained you will hear: “Testing in process.”
3-5 3-6 3-7
3-8 3-9
Important Information on Alternate Site Testing (AST)
What is AST?
AST is the sampling from sites on your body other than the fingertip (i.e., forearm, upper arm,
thigh, calf, palm) to check blood glucose levels. This system allows you to test on the forearm
with results equivalent to those of fingertip testing.
There are important limitations to AST. Please consult your healthcare professional before
you use AST.
What is the advantage?
Patients typically feel more pain when lancing their finger pads because they have
substantially more nerve endings than other testing sites. It is reported that other testing
sites cause less pain; however, there are other limitations. Please speak to your healthcare
provider before using this method.
Use Alternate Site Testing (AST) ONLY if:
1. It is more than two (2) hours after the administration of insulin.

2. It is more than two (2) hours after the last meal.
3. It is more than two (2) hours after exercise.
*DO NOT use AST if you are pregnant or if your blood sugars are not stable.
*DO NOT use AST if you think your blood glucose is low or if your AST results do not match
the way you feel.
Performing an Alternate Site Test (AST)
1. Unscrew the adjustable depth cap and replace with the clear cap.
2. Prepare lancing device for testing
3. Select a puncture site from a fleshy area on the forearm. Rub vigorously until it feels
warm. Avoid veins, hair, moles, bones and tendons (see Figure 3-10).
4. Press the clear endcap firmly against the puncture site to create suction and then press
the gray release button. Maintain steady pressure until the drop under the endcap
reaches appropriate size (see Figure 3-11).
5. Lift the device straight up and away from skin without smearing the blood drop (see
Figure 3-12).
6. Apply the blood to the glucose test strip within 20 seconds of puncture (see Figure 3-13).
Do not test the blood sample if you get:
●Smeared blood
●Runny blood
●Clotted blood
●Clear fluid mixed with the blood
7. Wipe the puncture site with a clean, dry tissue and maintain pressure on the site until
the bleeding stops (see Figure 3-14).
3-10 3-11 3-12
3-13 3-14
Table of contents
Popular Blood Glucose Meter manuals by other brands


Pulsatom Health Care
Pulsatom Health Care GM3+ operating instructions

Abbott
Abbott FreeStyle Freedom Lite owner's booklet

CMI Health
CMI Health Smartest Persona II user guide

Arkray
Arkray Glucocard SHINE XL user manual

Lifescan
Lifescan One Touch Basic Plus Diabetes Monitoring... owner's booklet

Bayer HealthCare
Bayer HealthCare Contour TS user guide