VivaChek HH-XIII-T User manual

PRINCIPLE AND INTENDED USE
The VivaChek™ Lancing Device is used with VivaChek™ sterile lancets or any other compatible
disposable sterile lancets to draw capillary blood from the fingertip, palm (at base of the thumb) or
forearm, for blood glucose testing or other testing utilizing small amounts of blood.
INSTRUCTIONS FOR USE
Before testing, choose a clean, dry work surface. Familiarize yourself with the procedure and make
sure you have all the items needed to obtain a drop of blood.
Important: Prior to testing, wipe the test site with an alcohol swab or soapy water. Use warm water to
increase blood flow if necessary. Then dry your hands and the test site thoroughly. Make sure there is
no alcohol, soap or lotion on the test site.
SAMPLING FROM THE FINGERTIP
For fingertip sampling, adjust the depth penetration to reduce the discomfort. You do not need the
clear cap for fingertip sampling.
1. Unscrew the lancing device cover from the
body of the lancing device. Insert a sterile
lancet into the lancing device and push it
until the lancet comes to a complete stop
in the lancing device.
2. Hold the lancet firmly in the lancing device
and twist the safety tab of the lancet until it
loosens, then pull the safety tab off the
lancet. Save the safety tab for lancet
disposal.
3. Carefully screw the cover back onto the
lancing device. Avoid contact with the
exposed needle. Make sure the cover is
fully sealed on the lancing device.
4. Adjust the puncture depth by rotating the
lancing device cover. There are a total of 5
puncture depth settings. To reduce the discomfort, use the lowest setting that still produces an
adequate drop of blood.
Adjustment:
1 for delicate skin
2 and 3 for normal skin
4 and 5 for calloused or thick skin
Note: Greater pressure of the lancing device against the finger will also increase the puncture depth.
5. Pull the cocking barrel back to set the lancing device. You may hear a
click to indicate the lancing device is now loaded and ready for obtaining
a drop of blood.
6. Prior to testing, wipe your hand with an alcohol swab or wash your
hands with soap. Use warm water to increase
blood flow in your fingers if necessary. Then
dry your hands thoroughly. Massage the hand
from the wrist up to the fingertip a few times to
encourage blood flow.
7. Hold the lancing device against the side of the
finger to be lanced with the cover resting on the finger. Push the release button to prick your
fingertip. You should hear a click as the lancing
device activates. Gently massage from the
base of the finger to the tip of the finger to
obtain the required blood volume. Avoid
smearing the drop of blood.
Note: For the greatest reduction in pain, lance on the sides of the fingertips. Rotation of sites is
recommended. Repeated punctures in the same spot can make your fingers sore and callused.
8. Unscrew the lancing device cover. Place the safety tab of the lancet on a hard surface and
carefully insert the lancet needle into the safety tab.
9. Press the release button to make sure
that the lancet is in the extended position.
Slide the ejection button forward to
discard the used lancet to a container for
sharp objects. Place the lancing device
cover back on the lancing device.
Warning:
The VivaChek™ lancing device is designed for self testing by a single
patient. It must not be used on more than one person due to the risk of
infection.
Use a new VivaChek™ lancet each time you test because it is no
longer sterile after use.
Always dispose of the used lance properly to prevent injury or contamination to others.
SAMPLING FROM FOREARM OR PALM (AT THE BASE OF THE THUMB)
The forearm and palm areas have less nerve endings than the fingertip. You may find that obtaining
blood from these sites is less painful than from the fingertip. The procedure for forearm and palm
sampling is different. You need the clear cap to draw blood from these sites. The clear cap is not
adjustable for puncture depth.
Follow Step 1 and 2 to insert the lancet and load the lancing device.
3. Screw the clear cap onto the lancing
device.
Note: To bring fresh blood to the surface of
the puncture site, massage the puncture site
vigorously for a few seconds until you feel it
getting warm
4. Choose a puncture site on the forearm or palm. Select a soft and fleshy area of the forearm and
palm that is clean and dry, away from bone, and free of visible veins
and hair.
5. Place the lancing device against the puncture site. Press and hold
the clear cap against the puncture site for a few seconds. Press the
release button of the lancing device, but do not immediately lift the
lancing device from the puncture site. Continue to hold the lancing
device against the puncture site until you can confirm a sufficient
blood sample has formed.
CARE OF THE LANCING DEVICE
Clean the lancing device using a soft cloth with mild soap and warm water as required. Use 70%
Isopropyl Alcohol to disinfect the lancing device. Carefully dry the lancing device. Do not immerse the
lancing device in liquid.
PRECAUTIONS
Do not use the lancet if the safety tab is missing or loose when you take the lancet out of the bag.
Do not use the lancet if the needle is bent.
Use caution whenever the lancet needle is exposed.
Never share lancets or the lancing device with other people.
In order to reduce the risk of infection from prior use of the instrument, always use a new, sterile
lancet. Do not reuse lancets.
Avoid getting the lancing device or lancets dirty with hand lotion, oils, dirt or debris.
LIMITED WARRANTY
If the lancing device does not work for any reason other than obvious abuse in the first 5 years after
purchase, we will replace it with a new or equivalent lancing device free of charge. Please contact
your local dealer for replacement.
INDEX OF SYMBOLS
Consult instructions for
use Lot number REF Tuotenume
Catalog number
Manufacturer Authorized Representative
VivaChek™ is a trademark of VivaChek Biotech (Hangzhou) Co., Ltd. Number: 1201021303
© 2021 VivaChek Biotech (Hangzhou) Co., Ltd. Effective date: 2021-07-23
MODEL HH-XIII-T REF VGD01-001 English
Lancin
g
device
p
acka
g
einsert
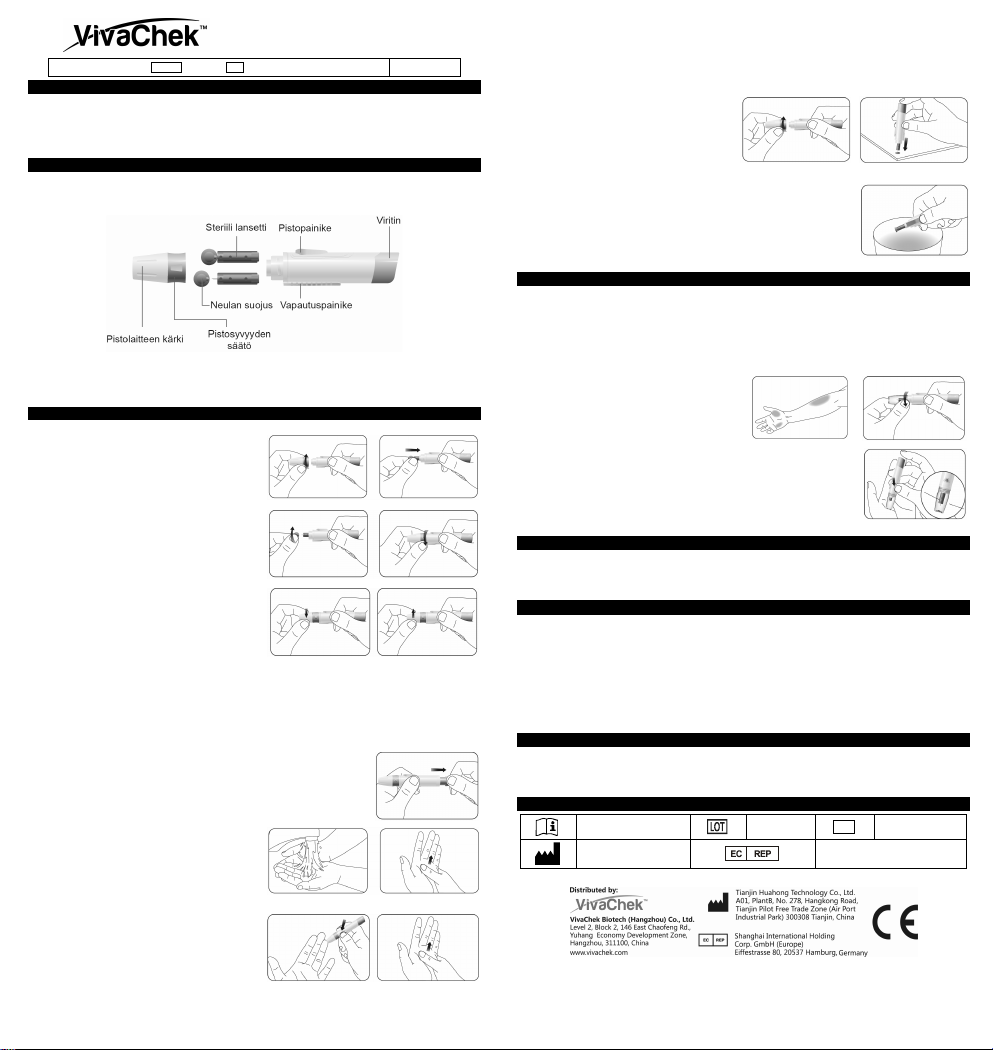
TOIMINTAPERIAATE JA KÄYTTÖTARKOITUS
VivaChek™ Pistolaitetta käytetään yhdessä VivaChek™ steriilien lansettien tai muiden
yhteensopivien kertakäyttöisten lansettien kanssa kapillaariverinäytteen ottamiseen sormenpäästä,
kämmenestä (peukalon tyvestä) tai kyynärvarresta verensokerin mittaamista tai muuta pienellä
verinäytteellä tehtävää mittausta varten.
KÄYTTÖOHJEET
Valitse puhdas ja kuiva työalusta ennen mittausta. Tutustu käyttöohjeisiin ja varmista, että sinulla on
kaikki tarvittavat välineet veripisaran ottamista varten.
Tärkeää: Puhdista pistoalue alkoholilapulla tai saippuavedellä ennen mittausta. Käytä lämmintä vettä
verenkierron tehostamiseksi, mikäli tarpeellista. Kuivaa kädet ja pistoalue huolellisesti. Varmista, ettei
pistokohtaan jää alkoholi- tai saippuajäämiä.
NÄYTTEENOTTO SORMENPÄÄSTÄ
Sormenpäänäytettä varten, säädä pistosyvyys
kiputuntemuksen vähentämiseksi. Et tarvitse
läpinäkyvää pistolaitteen kärkeä
sormenpäänäytettä varten.
1. Kierrä auki ja irrota pistolaitteen kärki. Aseta
steriili lansetti pistolaitteeseen ja työnnä
lansettia, kunnes se ei mene enää edemmäs.
2. Pidä lansetti tiukasti paikoillaan pistolaitteessa
ja väännä lansetin neulasuojusta, kunnes se
on irtoamaisillaan. Vedä sitten neulasuojus
pois lansetin neulan päältä. Säilytä
neulasuojus lansetin hävittämistä varten.
3. Kierrä pistolaitteen kärki varovasti takaisin
pistolaitteeseen. Vältä kontaktia paljaan
neulan kanssa. Varmista, että kärki on
kunnolla paikoillaan.
4. Aseta pistosyvyys kiertämällä syvyyssäädintä.
5 eri pistosyvyyttä on valittavissa. Kiputuntemuksen vähentämiseksi, valitse matalin mahdollinen
pistosyvyys, joka silti antaa riittävän veripisaran.
Säätäminen:
1herkälle iholle
2ja 3normaalille iholle
4 ja 5kovettuneelle tai paksulle iholle
Huomautus:Voimakkaampi pistolaitteen painaminen sormea vasten lisää
myös pistosyvyyttä.
5. Vedä pistolaitteen viritinkahvaa taaksepäin.
6. Puhdista pistoalue alkoholilapulla tai saippuavedellä ennen mittausta.
Käytä lämmintä vettä verenkierron
tehostamiseksi, mikäli tarpeellista. Kuivaa
kädet ja pistoalue huolellisesti. Varmista, ettei
pistokohtaan jää alkoholi- tai saippuajäämiä.
7. Paina pistolaitteen kärki pistettävän sormen
sivua vasten. Paina pistopainiketta
pistääksesi. Sinun tulisi kuulla naksahdus, kun
pistolaite aktivoituu. Hiero hellävaraisesti
sormen juurelta sormenpäätä kohti
saadaksesi riittävän määrän verta. Vältä
tahrimasta verinäytettä. Kiputuntemuksen
vähentämiseksi, pistä sormenpään sivua.
Suorita mittaus välittömästi, kun veripisara on muodostunut.
Huomautus:
Pistä sormenpään sivua kiputuntemuksen vähentämiseksi. Pistokohtien vaihtelu on suositeltavaa.
Toistuva pistäminen samaan kohtaan voi aiheuttaa sormien kipeytymistä ja kovettumia.
8. Kierrä pistolaitteen kärki auki. Aseta neulasuojus kovaa alustaa vasten, ja työnnä lansetin neula
varovasti neulasuojukseen.
9. Paina pistopainiketta varmistaaksesi, että
lansetti on ojennetussa asennossa. Liu’uta
vapautuspainiketta eteenpäin
hävittääksesi käytetyn lansetin
asianmukaiseen jäteastiaan. Kiinnitä
pistolaitteen kärki takaisin pistolaitteeseen.
Varoitus: VivaChek™ Pistolaite on tarkoitettu yhden henkilön
omatestaukseen. Tartuntariskin vuoksi laitetta ei saa käyttää useampi
kuin yksi henkilö.
Käytä uutta VivaChek™ lansettia jokaista mittausta varten, sillä se ei ole
enää steriili käytön jälkeen.
Hävitä käytetyt lansetit aina asianmukaisesti välttääksesi toisten
henkilöiden vahingoittamisen tai tartuttamisen.
NÄYTTEENOTTO KYYNÄRVARRESTA TAI KÄMMENESTÄ (PEUKALON TYVESTÄ)
Kyynärvarressa tai kämmenessä on vähemmän hermopäätteitä kuin sormenpäässä. Verinäytteen
ottaminen näiltä alueilta voi olla sinulle vähemmän kivuliasta kuin sormenpäästä. Näytteenoton
menettely on erilainen kyynärvarresta ja kämmenestä. Tarvitset läpinäkyvän kärjen ottaaksesi
verinäytteen näiltä alueilta. Läpinäkyvän kärjen kanssa ei voida säätää pistosyvyyttä.
Seuraa kohtia 1 ja 2 asettaaksesi lansetin ja virittääksesi pistolaitteen.
3. Kierrä läpinäkyvä kärki pistolaitteeseen.
Huomautus: Tuo tuoretta verta pistokohdan
pinnalle hieromalla pistokohtaa voimakkaasti
muutaman sekunnin ajan, kunnes tunnet sen
lämpenevän.
4.Valitse pistokohta kyynärvarresta tai
kämmenestä. Valitse pehmeä ja lihaisa alue, joka on puhdas ja kuiva, ja
jossa ei ole luuta, karvoitusta tai näkyviä verisuonia.
5.Aseta pistolaite pistokohtaa vasten. Paina ja pidä läpinäkyvää kärkeä
pistokohtaa vasten muutaman sekunnin ajan. Paina pistopainiketta, mutta
älä nosta pistolaitetta vielä pois. Jatka pistolaitteen pitämistä pistokohtaa
vasten, kunnes näet, että riittävä verinäytemäärä on muodostunut.
PISTOLAITTEEN HUOLTO
Puhdista pistolaite tarvittaessa käyttäen pehmeää liinaa, mietoa saippualiuosta ja lämmintä vettä.
Käytä 70% isopropyylialkoholia pistolaitteen desinfiointia varten. Kuivaa pistolaite huolellisesti. Älä
upota pistolaitetta nesteeseen.
VAROTOIMET
Älä käytä lansettia, mikäli neulan suojus puuttuu tai on löysästi kiinni, kun otat lansetin
pakkauksesta.
Älä käytä lansettia, jos neula on taittunut.
Ole varovainen aina, kun lansetin neula on paljaana.
Älä milloinkaan jaa lansetteja tai pistolaitetta toisten henkilöiden kanssa.
Käytä aina uutta, steriiliä lansettia pienentääksesi instrumentin aiemmasta käytöstä johtuvaa
tartuntariskiä. Älä uudelleenkäytä lansetteja.
Vältä lian, käsirasvojen, öljyjen tai roskien joutuminen lansetteihin tai pistolaitteeseen.
RAJOITETTU TAKUU
Mikäli pistolaite ei toimi jostakin muusta syystä kuin ilmeisestä väärinkäytöstä johtuen 5 ensimmäisen
vuoden aikana oston jälkeen, vaihdamme sen uuteen tai vastaavaan pistolaitteeseen maksutta. Ota
yhteyttä paikalliseen jälleenmyyjään vaihtamista varten.
MERKKIEN SELITYKSET
Katso käyttöohje Eräkoodi REF Tuotenumero
Valmistaja Valtuutettu edustaja
VivaChek™ is a trademark of VivaChek Biotech (Hangzhou) Co., Ltd. Numero: 1201021303
© 2021 VivaChek Biotech (Hangzhou) Co., Ltd. Voimaantulopäivä: 2021-07-23
MODEL HH-XIII-T REF VGD01-001 Suomi
Pistolaitteen pakkausseloste
This manual suits for next models
1
Table of contents
Languages:
Other VivaChek Blood Glucose Meter manuals


