SOLZAIMA TEK Round Eco User manual

Instruction Manual
English
Wood Stove
Models
TEK Round Eco
TEK System Eco
M1 Eco
K4 Eco
M20 Eco
M12F Eco
Please pay attention while reading the instructions before proceeding with the
installation, use and maintenance of the equipment. The instruction manual is an
integral part pf the product.
Mod. 1028-A

2
Thank you for purchasing a SOLZAIMA appliance.
Please read this manual carefully and retain it for future reference.
* All products here detailed meet the requirements of the EU Construction Products
Regulation (No. 305/2011) and bear the EC conformity marking;
* SOLZAIMA disclaims any responsibility for damage to the unit when installed by non-
qualified personnel;
* SOLZAIMA disclaims any responsibility for damage to units not installed and operated
in compliance with the instructions included in this manual;
* • All local regulations, including but not limited to national and European standards,
must be observed when installing, operating and servicing the unit;
* SOLZAIMA free standing fire units are tested and found to be in compliance with the
EN 13240:2002 + EN 13240:2002/A2:2005 + EN 13240:2002/AC:2006 + EN
13240:2002/A2:2005/AC:2006 standards;
* Technical support is normally provided by SOLZAIMA, except in special cases to be
determined by the installer or support technician;
* For assistance, please contact the unit’s supplier or installer. Please provide the unit
serial number, which can be found on the identification plate located on the back of
the unit, as well as on the sticker posted on the back cover of this manual.
Contacts for technical assistance:
www.solzaima.pt
apoio.client[email protected]
Address: Rua dos Outarelos; nº 111;
3750-362 Belazaima do Chão
Águeda - Portugal

3
Index
1. Solzaima..................................................................................................................4
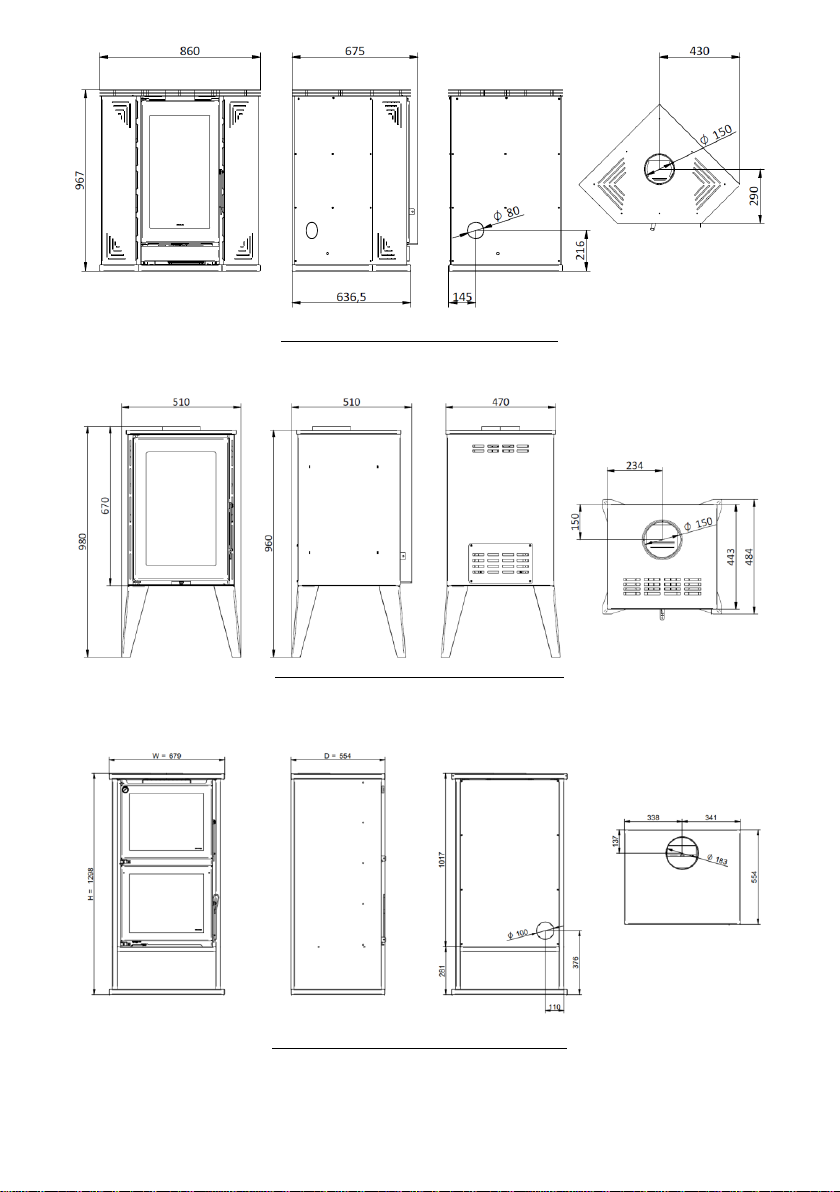
2. Tecnical Specifications ...............................................................................................5
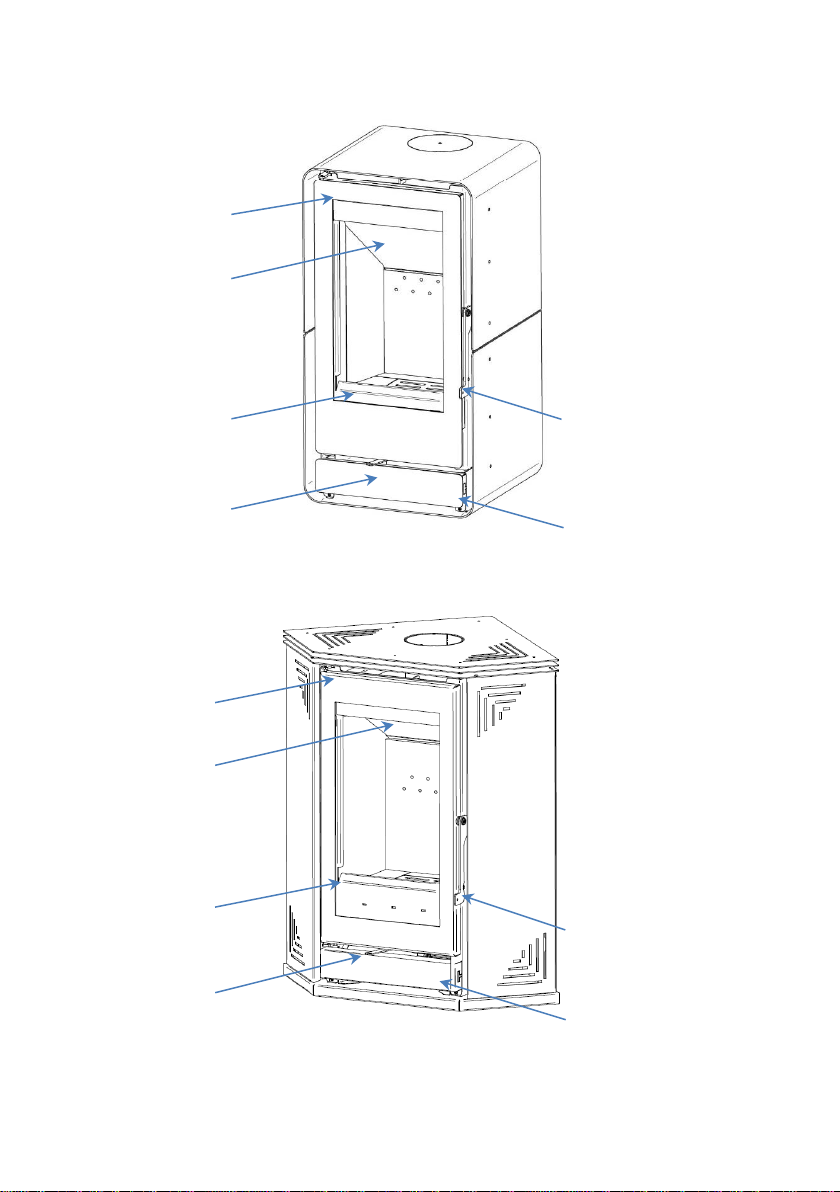
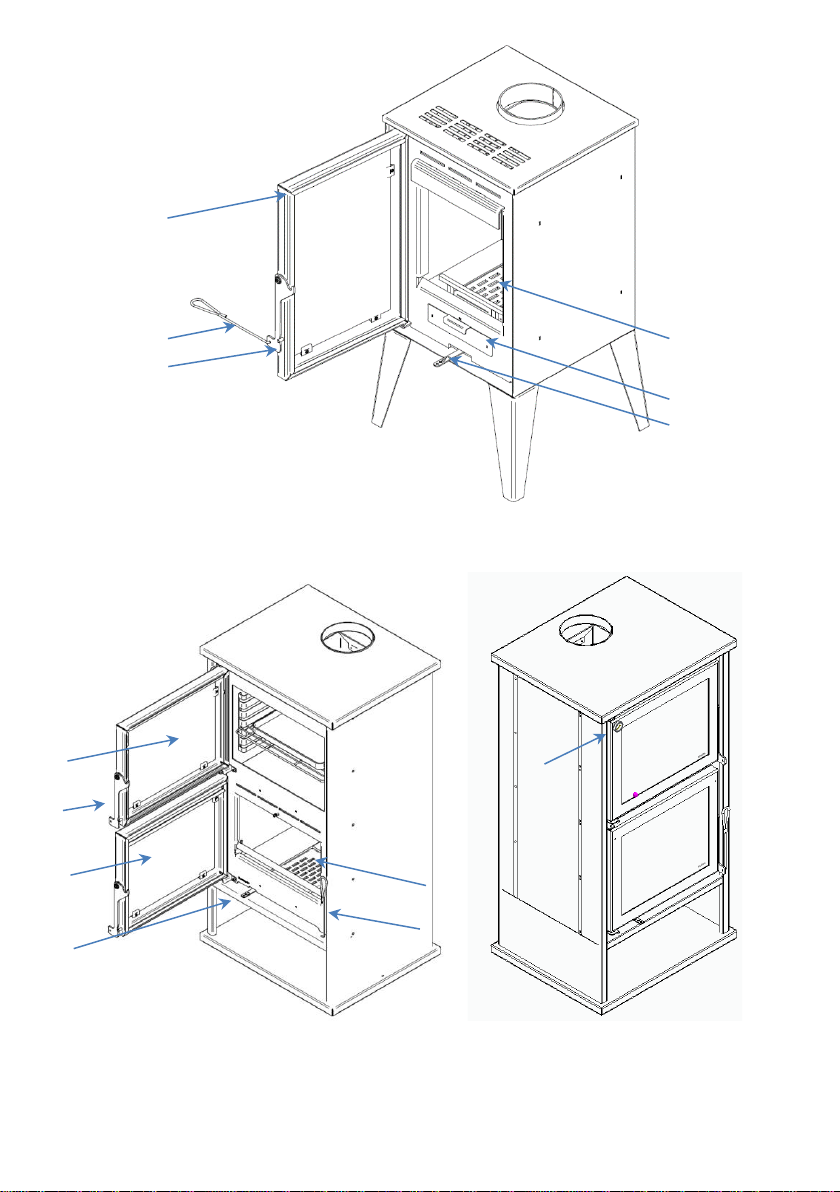
3. Unit components.......................................................................................................9
3.1. Components ……………………………………………………………………………………………………………………9
3.2. Package contents............................................................................................11
3.3. Optionial features for Tek Round Eco and Tek System Eco ...................................11
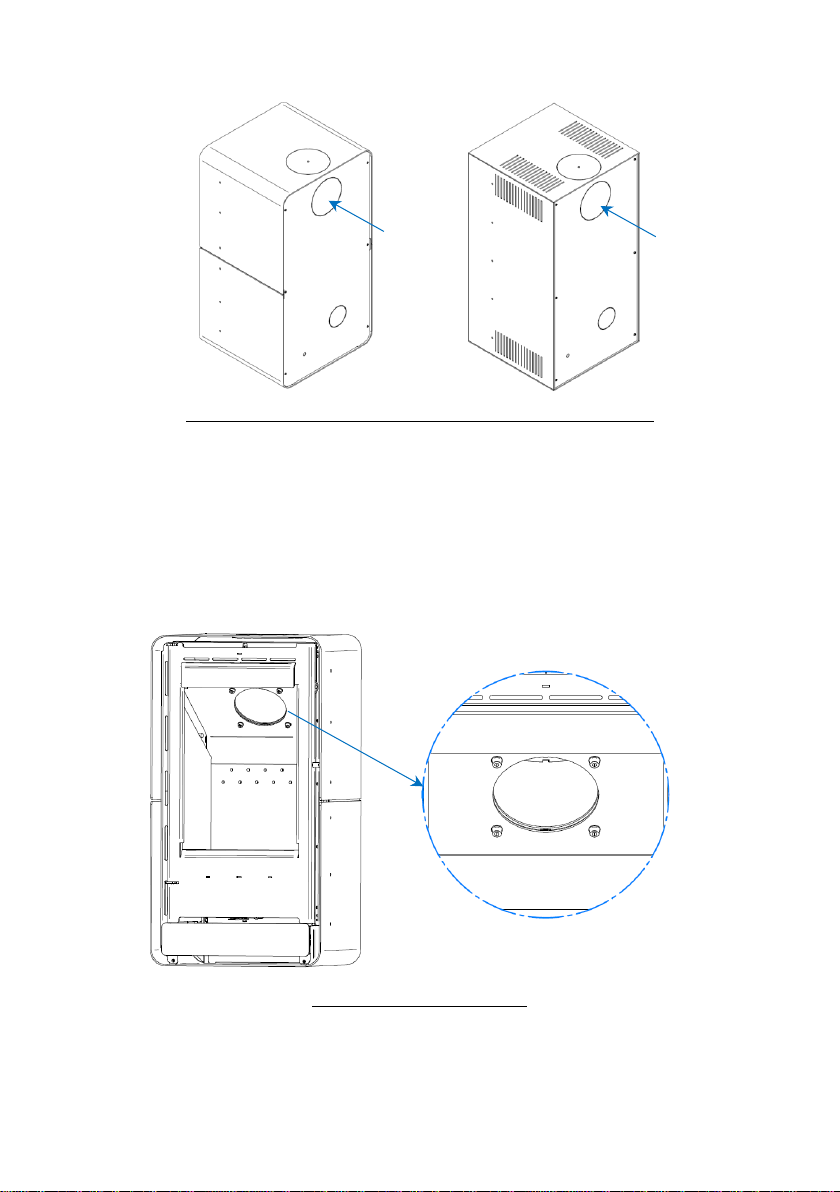
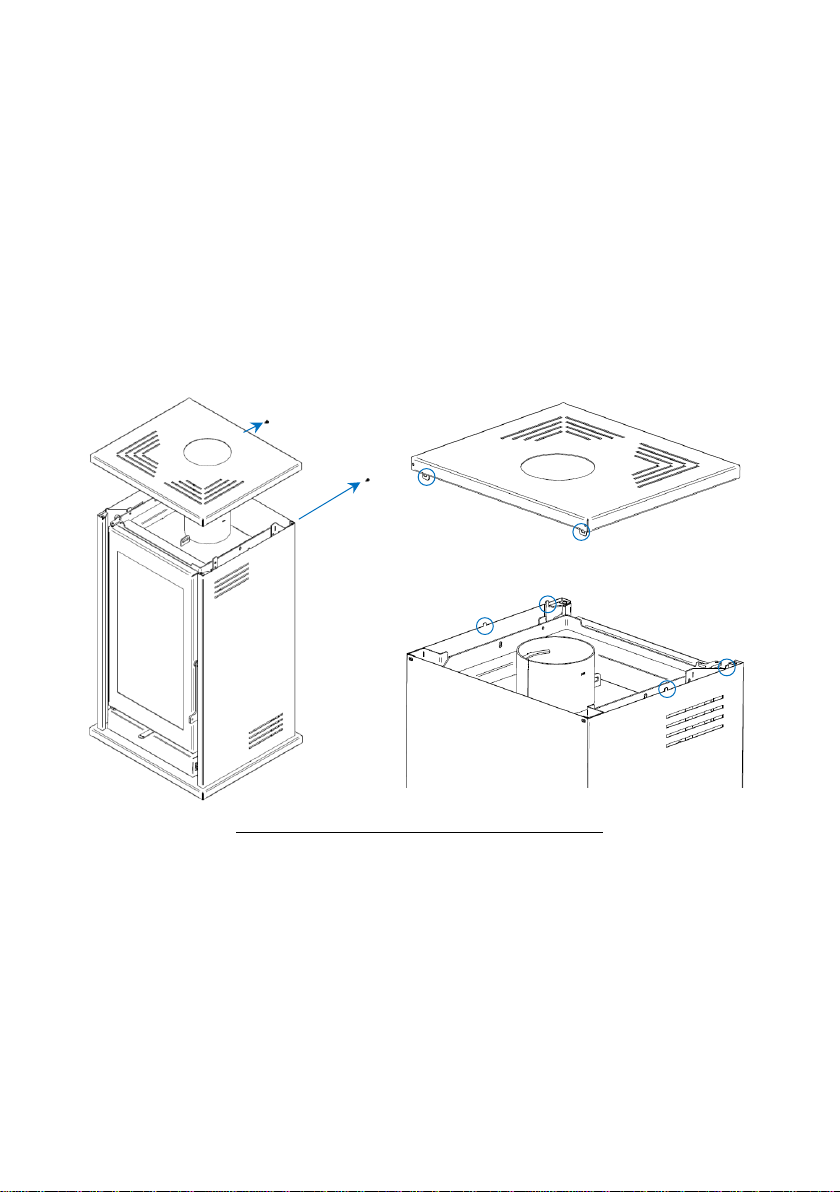
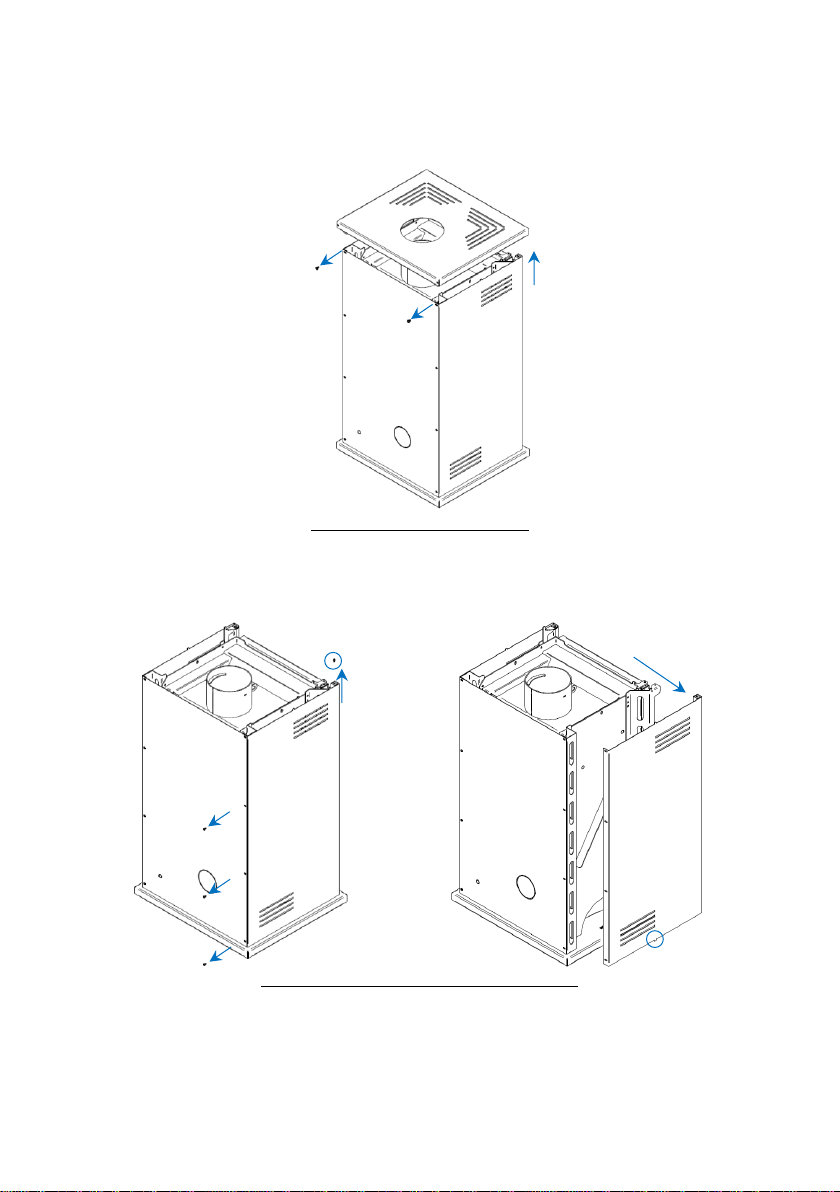
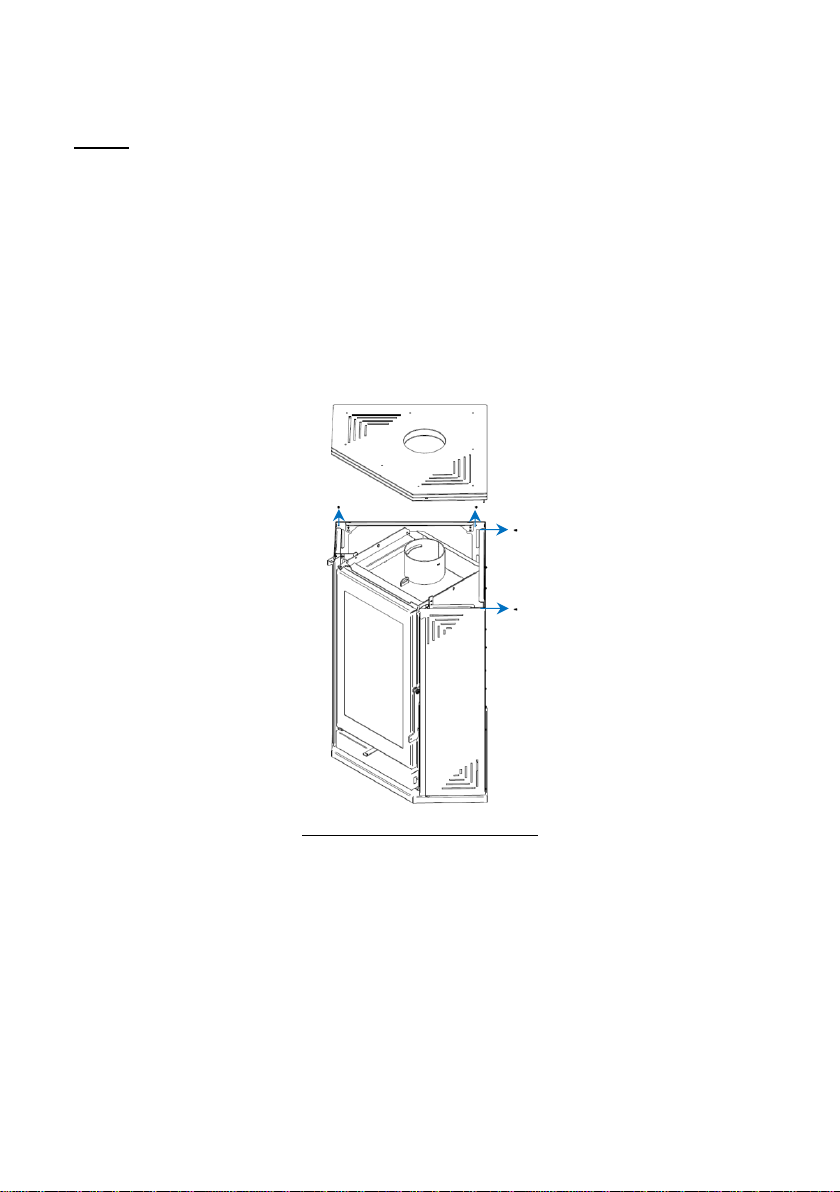
3.3.1. Vertical/horizontal fume outlet .........................................................................11
3.3.2. Optional Modules –Tek System........................................................................13
3.4. Optionals Modules M1 Eco and K4 Eco ...............................................................15
3.4.1. Stone top M1 Eco ...........................................................................................15
3.4.2. K4 Eco stone top ............................................................................................16
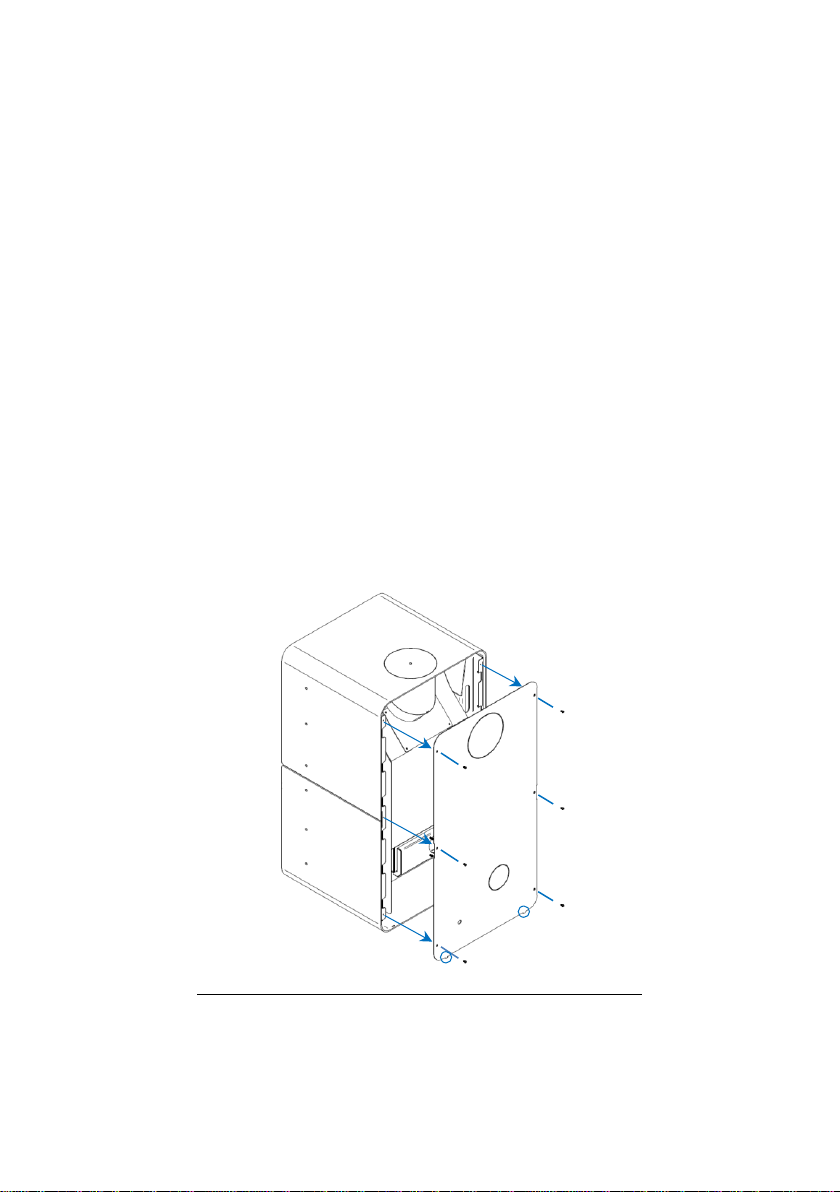
3.4.3. M1 Eco side covers .........................................................................................17
3.4.4. K4 Eco side covers..........................................................................................19
3.5. Connecting the external air inlet .......................................................................21
4. Installation.............................................................................................................22
4.1. Combustion ai rand gas circulation....................................................................22
4.2. Installation space requirements ........................................................................24
5. Instructions for use .................................................................................................26
5.1. Fuel…………………… ............................................................................................26
5.2. Power………………..............................................................................................28
5.3. Energetic efficiency and performance ratings......................................................28
6. Using the unit for the first time.................................................................................29
7. Normal usage .........................................................................................................30
8. Forced ventilation Kit (Optitional)..............................................................................33
9. Safety ...................................................................................................................37
10. Cleaning and Maintenance .......................................................................................38
10.1. Cleaning…………….............................................................................................38
10.2. Removing the fume baffle (except M12F Eco and M20 Eco) ..................................39
10.3. Removing the fume baffle - M12F Eco and M20 Eco ............................................40
10.4. Cleaning the oven –M12F Eco..........................................................................41
11. Troubleshooting......................................................................................................42
12. End-of-life units ......................................................................................................43
13. Sustainability .........................................................................................................43
14. Glossary ................................................................................................................44
15. Warranty ...............................................................................................................46
15.1. Specific conditions of units...............................................................................46
15.2. General warranty conditions.............................................................................46
16. Declaração de desempenho......................................................................................54

4
1. Solzaima
Solzaima's vision has always been to provide clean, renewable and more cost-
effective energy. This is why we have been manufacturing biomass units and heaters
for the past 40 years.
As a result of the persistence and unconditional support from a network of partners,
Solzaima is currently the leading manufacturer of biomass heating units, especially
with its range of central heating stoves with backboilers.
We provide approximately 20000 homes a year with biomass heating solutions. This
market has been growing at annual rate of 20%, indicating that consumers are
becoming increasingly aware of ecological and more cost-effective heating solutions.
Solzaima is the only portuguese manufacturing company to have obtained ISO 9001
International Quality Certification and ISO 14001 International Environmental
Certification–because we believe in high standards and aim to lead by exemple.

5
2. Tecnical Specifications
Solzaima's wood stoves are designed as interior heating appliances. These units are
easy to install and do not require any kind of finishing, thus promoting their
seamless integration with the room setting.
* Technical specifications across the free standing fire range:
* CE approved
* Fuel: Dry firewood
* Type of Equipment: Intermittent
* The combustion chamber and external casing of all our free standing fires are
made of first-rate carbon steel plate, with thicknesses varying between 4 mm and
1.5 mm, respectively.
* Heat-resistant ceramic glass. Withstands continuous operation temperatures of up
to 750°C;
* Coated with heat-resistant paint for temperature peaks up to 900°C and operating
temperatures of around 600°C;

6
Features
Tek Round
Eco
Tek
System
Eco
M1 Eco
K4 Eco
M20 Eco
M12F
Eco
Units
Weight
123
120
113
137
86
165
kg
Height
933
910
966
967
980
1298
mm
Width
496
477
554
860
510
679
mm
Depth
508
498
516
675
510
554
mm
Flue Ø (mm)
150
150
150
150
150
180
mm
Maximum heated volume
166
166
166
166
170
177
m³
Rated power
7,3
7,3
7,3
7,3
7,5
7,8
kW
Fuel consumption
2,0
2,0
2,0
2,0
2,0
2,1
kg / h
Firewood length
300
300
300
300
200
250
mm
Performance
81
81
81
81
81
88
%
Average temperature of
combustion products
233
233
233
233
265
131
°C
CO emission (13%O2)
0,073
0,073
0,073
0,073
0,075
0.06
%
CO2 emissions
8,67
8,67
8,67
8,67
-
7,41
%
Particles (13% de O2)
13
13
13
13
7
11
mg/Nm³
OGC (13% de O2)
88
88
88
88
72
59
mg/Nm³
NOX (13% de O2)
81
81
81
81
108
78
mg/Nm³
Combustion flow
7
7
7
7
6
8,9
g/s
Chimney depression
12
12
12
12
12
12
Pa
Table 1 - Technical specifications of each wood stove model

7
Figure 1 –Dimensions of the wood stove Tek Round Eco
Figure 2 –Dimensions of the wood stove Tek System Eco
Figure 3 –Dimensions of the wood stove M1 Eco

8
Figure 4 –Dimensions of the wood stove K4 Eco
Figure 5 –Dimensions of the wood stove M20 Eco
Figure 6 –Dimensions of the wood stove M12F Eco

9
3. Unit components
3.1. Components
Legenda Tek Round Eco:
A –Door
B –Fume baffle
C –Ash baffle
D –Air inlet
E –Door handle
F –Front cover
Legenda K4 Eco:
A –Door
B –Fume baffle
C –Ash baffle
D –Air inlet
E –Door handle
F –Front cover
A
B
C
D
E
F
A
B
C
D
E
F

10
Legenda M20 Eco:
A –Insulation cord
B –Door opening and air
regulation tool
C –Door lock
D –Ash grate
E –Ashtray
F –Air control regulator
Legenda M12F Eco:
A –Oven access door
Dimensions of the oven:
(404 x 473 x 324,5)
B –Door lock
C –Combustion chamber
door
D –Air control regulator
E –Ash grate
F –Door opening and
air regulation tool
G - Thermometer
A
B
C
D
E
F
A
B
C
D
E
F
G

11
3.2. Package contents
The equipment’s package has the following content:
- Wood stove model Tek Round Eco, Tek System Eco, M1 Eco, K4 Eco, M20 Eco or
M12F Eco;
- Flyer for accesing the online instruction manual;
- Cleaning bar handle;
- Air inlet kit (except for model M20 Eco).
3.3. Optionial features for Tek Round Eco and Tek System Eco
3.3.1. Vertical/horizontal fume outlet
All our wood stoves models can be provided with either a horizontal OR vertical fume
outlet, at the client's choice. Please note that this unit comes pre-installed with the
vertical option.
To change the fume outlet initial vertical position to the horizontal position, please
follow these steps:
1. Remove the outer cover from the back of the stove, unscrew the 6 screws.
Then lift it to release the supports at the bottom of the stove;
Figure 7 –Remove the outer cover from the back of the stove Tek Round Eco
2. On the back cover of the stove (previously removed) it is necessary to open
the section corresponding to the horizontal smoke outlet. To do this, simply use a

12
cutting pliers to eliminate the connection points of the respective section to the
external cover of the equipment;
Figure 8 –Section to be deleted to convert the smoke output to horizontal mode
3. Remove the fume baffle (described in point 10.2 of the “Maintenance”
section), taking special care not to damage any vermiculite plate;
4. On the inside top of the combustion chamber, unscrew the 4 screws in order
to release the smoke outlet using an hex key;
Figure 9 –Smoke outlet fixing screws
5. Reposition the Smoke outlet so that the outlet is horizontal;

13
Figure 10 –Reposition the smoke outlet
6. Tighten the screws inside the chamber with the Smoke outlet in the previously
defined position;
7. Replace the fume baffle in the reverse order to that explained in the respective
point;
8. Reposition the back cover, first placing the supports in the lower area in the
slots at the bottom of the stove. Then put the 6 screws removed previously;
9. Using the extra cover provided, cover the section left open on the stove top
by changing the position of the smoke outlet.
Figure 11 –Put extra cover
3.3.2. Optional Modules – Tek System
Lower Module with wood (Figure 12)

14
1. Place the module (A) in the desired location and position the stove in the
upper area of the same, ensuring that the side and front of the equipment are aligned
with the respective faces of the module;
2. Using the screws (B) and washers (C) provided, fix the module to the stove
through the hole on the top of the module from the inside.
Lower Modue with Basket (Figure 13)
1. Place the module (A) in the desired location and position the stove in the
upper area of the same, ensuring that the side and front of the equipment are aligned
with the respective faces of the module;
2. Using the screws (B) and washers (C) provided, fix the module to the stove
through the hole on the top of the module from the inside;
3. Remove the basket (B) from inside the module to access the place where the
module screws are tightened.
Figure 12 –Wood module fixing
Figure 13 –Basket module fixing
C
B
A
A
D
C
B

15
3.4. Optionals Modules M1 Eco and K4 Eco
3.4.1. Stone top M1 Eco
If you want to aplly a stone top to the M1 Eco Stove, you must apply it, following the
steps mentioned below:
1. Access the back of the equipment and remove the two screws that fix the lid
to the back of the equipment, then move the lid upwards so that it releases from the
tabs on the sides of the equipment;
Figure 14 –Remove the sheet metal top from the M1 Eco stove
2. After removing the sheet metal top, cut the four legs with the aid pliers and
then place the top on the equipment;

16
Figure 15 –Placement of the stone top on the M1 Eco Stove
3.4.2. K4 Eco stone top
If you want to aplly a stone top to the K4 Eco Stove, you must apply it, following the
steps mentioned below:
1. Access the two rear sides of the equipment and remove the four screws that
fix the top to the back of the equipment, it is not necessary to remove the screw that
is in the center of each side. You must then move the lid upwards so that it is released
from the tabs on the front of the equipment;

17
Figure 16 –Remove the sheet metal top from the K4 Eco stove
2. After removing the sheet metal top, cut the tablets with the aid pliers and
then place the top on the equipment;
Figure 17 –Placement of the stone top on the M1 Eco stove
3.4.3. M1 Eco side covers

18
If you want to change the side covers of the stove M1 Eco, you must follow the steps
mentioned below:
1. Access the back of the equipment and remove the two screws that secure the
top of the back of the equipment. You must then remove the lid, moving it upwards;
Figure 18 –Remove M1 Eco stove top
2. After removing the top, you must then remove the three screws on one of the
sides of the rear area and the screw on the front area. Remove the side by moving it
upwards so that the tab on the bottom is released;
Figure 19 –Remove the side cover of the stove M1 Eco
3. To install a new side cover, proceed in reverse. First, fit the cover tab,
mentioned above, in the slot in the base of the equipment and then apply the screws

19
on the back and front. You must repeat this procedure for the other side, and finally,
put the top back.
NOTE: You must apply one of the sides first and only then apply the second layer, so
that back piece is supported.
3.4.4. K4 Eco side covers
If you want to change the side covers of the stove K4 Eco, you must follow the steps
mentioned below:
1. Access the rear areas of the equipment and remove the four screws that
secure the top to the back of the equipment. You must then move the lid upwards so
that it is released from the tabs on the front of the equipment;
Figure 20 –Remove the K4 Eco stove top
2. After removing the top, you must then remove the three screws that join the
back cover to the side cover and the screw on the front. Remove the side by moving
it upwards so that the tab on the bottom is released;

20
Figure 21 –Remove the side cover of the K4 Eco stove
3. Then remove the side by moving it upwards so that the tab on the bottom is
released;
Figure 22 –Remove the side cover of the K4 Eco stove
4. To install a new side cover, proceed in reverse. First, fit the cover tab,
mentioned above, in the slot in the base of the equipment and then apply the screws
on the back and front. You must repeat this procedure for the other side, and finally,
put the top back on.
This manual suits for next models
5
Table of contents
Other SOLZAIMA Wood Stove manuals
Popular Wood Stove manuals by other brands

Century
Century S244 Installation and operation manual

Plamen
Plamen Authentic 35 Technical manual

Enerzone
Enerzone Solution 3.4 user manual

Jøtul
Jøtul F 118 CB Installation and operating instructions

Worcester
Worcester Greenstyle Hanbury 4 Installation, servicing and user instructions

United States Stove
United States Stove GW1949 Owner’s Instruction and Operation Manual