SOMA SM-100.3 Series User manual

Manual Wheelchair Owner's Manual
SM-100.3 Series
(SM-100.3&SM-150.3)


i
GENERAL WARNING
DO make sure both brakes are applied before getting in or out of the
chair or the chair is not being pushed.
DO take care when climbing curbs or turning on slopes.
DO avoid steep or uneven surfaces that may cause the chair to tip over.
DO make sure that both feet are safely on the footrests and that
clothing is safely tucked out of the way so that it cannot get caught in
the wheels.
DO keep both hands on the push handles to control the chair, if you are
the attendant.
DO pay attention to keep the chair balanced.
DO fix the upholstery or replace with a new one when it became loose.
DO equip with anti-tippers to avoid falling backwards.
DO NOT overload the chair in any circumstance.
DO NOT hang anything heavy on the back of the chair that could cause
the chair to become unstable, particularly when negotiating inclines.
DO NOT use other transport to pull the wheelchair.
DO NOT do "wheelies", since you my fall or tip over backwards and
suffer a severe injury.
SM-100.3 or SM-150.3 was not designed to be used in a moving vehicle.
DO NOT go too fast or turn too quickly.
DO NOT stand on the footplates when getting in or out of the chair.
DO NOT go down steps forward, whether solo or with an attendant.
DO NOT hang anything on the back joint that could cause the backrest
folding suddenly and may cause injury.
CE MARKING
This wheelchair complies with the requirements of the Medical Devices
Directive 93/42/EEC.

1
1. PREFACE
Please carefully read this owner's manual before using the wheelchair.
Improper use of the wheelchair could result in harm or injury.
1.1 This owner's manual includes operation instructions for the aspects
of the wheelchair, unfolding/folding instructions and instructions on
how to deal with possible accidents.
1.2 As designs change, some illustrations and pictures in this owner's
manual may not correspond to the wheelchair that you purchased.
We reserve the right to make design modifications without further
notice.
1.3 Whenever possible, please get help from an assistant/attendant
while going on inclines, curbs or stairs.
2. SAFETY
2.1 Doorways
The safest way to operate the chair is on level floors that are free of
obstacles. Whenever possible use a ramp to enter or exit a facility.
Keeping your hands on the push rims will allow you to maintain
maximum balance. Do not try to force yourself over an obstruction by
propulsion and never use the sides of a doorway to pull yourself through
a passageway.
2.2 Leaning
Do not lean over the side of your wheelchair since such an action may
cause you to lose balance and fall. (See Figure 2.3)
2.3 Negotiating Inclines
2.3.1 Never turn on a hill due to the danger of tipping.
2.3.2 When assisting, go straight up a slope. If user needs to go down
midway, walk backwards until user is on level ground. (See Figures 2.4 and
2.5)
2
2.3.3 Avoid stopping on an incline; it can potentially cause you to lose
control of the chair.
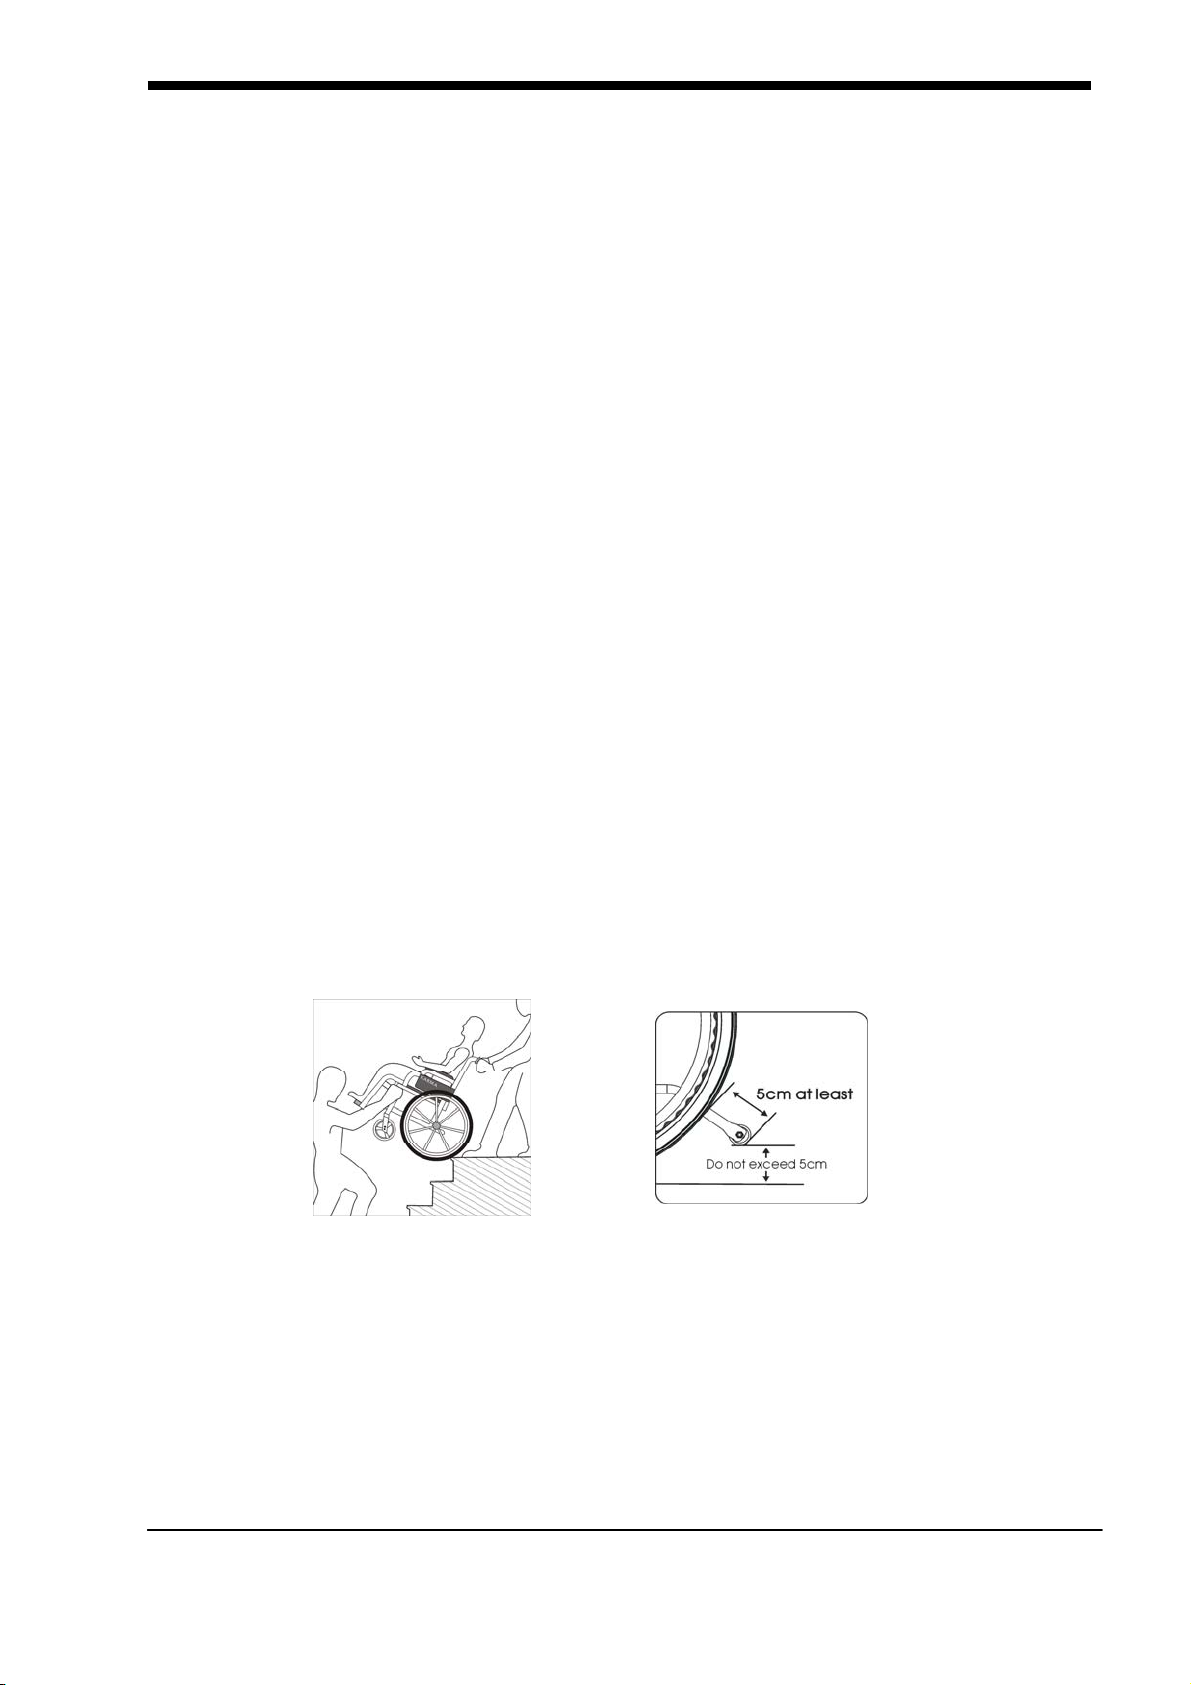
2.4 Kerb(Curbs)
2.4.1 Avoid hard impacts when descending a curb. A hard impact could
adversely affect the chair.
2.4.2 Never try to scale or descend curbs that exceed a normal height
(30-50mm).
2.4.3 Always be careful when climbing curbs and never move up or down
a curb in reverse without an assistant.
2.5 Stairs
2.5.1 Always use two or more assistants. Tilt the wheelchair to its point of
equilibrium. One assistant (in the back) holds the wheelchair up against
the first step, gripping the handles firmly to lift. The second assistant,
holding firmly a fixed part of the front frame, lifts the wheelchair above
the stairs and holds it while the first attendant places one foot on the
following step and repeat the operation. (See Figure 2.1)
2.5.2 Never go down steps forwards.
2.5.3 Never use an escalator for transport, use an elevator.
Figure 2.1 Figure 2.2
2.6 General
2.6.1 Always make sure BOTH brakes are applied before getting in or out
of the chair.
2.6.2 Never stand on the footplates when getting in or out of the chair.

3
2.6.3 Use caution to assure your clothing doesn't get tangled with the
wheels.
2.6.4 When the user is operating the wheelchair using the push rims,
please push the wheelchair gently. DO NOT apply a sudden huge force on
the push rims. It could cause the chair to tip over. Please refer to the
figure below for the best grip points for using the push rims.
2.7 Upholstery
2.7.1 When cleaning the upholstery, use warm water and a mild soap.
2.7.2 Upholstery cleaner/foam can also be used, but avoid other cleaning
solvents.
2.8 Anti-tippers
Please purchase anti-tippers and always use them to avoid accidents.
2.9 Maximum User Weight Limit
The Max. User Weight is 100kg. Excessive maximum loads can damage
your wheelchair and cause malfunction which is not covered in warranty.
2.10 Avoid Misuse of the chair
2.10.1 Do not let children stand or play on the wheelchair. (See Figure 2.7)
Figure 2.3 Figure 2.4 Figure 2.5
Figure 2.6 Figure 2.7
4
3. OPERATION
CAUTION:
● If you find anything abnormal, stop using the wheelchair
immediately and visit a KARMA wheelchair dealer for inspection and
maintenance
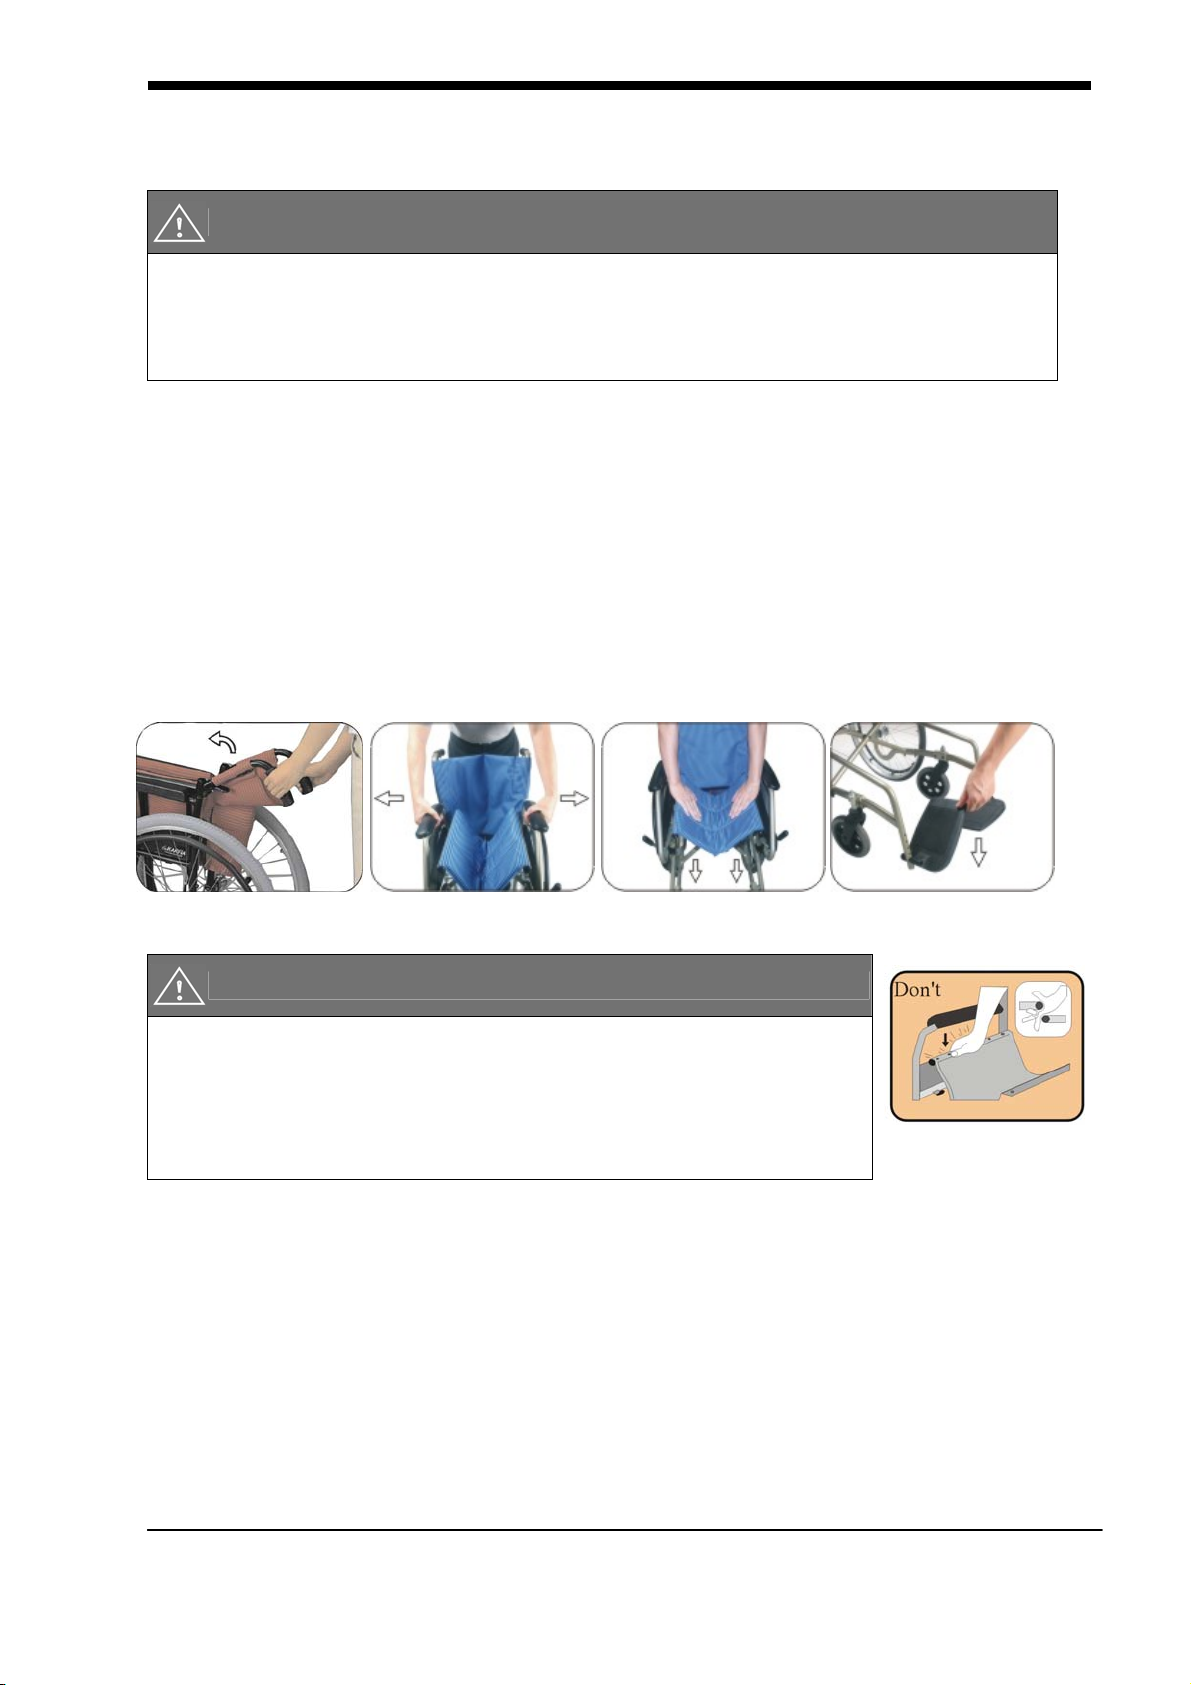
3.1 Unfolding
3.1.1 Unfold the push handle. (See Figure 4.1)
3.1.2 Holding the armrests, pull outwards. (See Figure 4.2)
3.1.3 Pointing your fingers inward with the palm of your hand on the
frame, push down until the seat is fully lowered. Make sure the frame is
firmly seated in its holder. (See Figure 4.3)
3.1.4 Swing the footplates down. (See Figure 4.4)
Figure 4.1 Figure 4.2 Figure 4.3 Figure 4.4
CAUTION:
● When completing step 2, never put your fingers
around the sides or under the chair as they can be
trapped between the seat and the frame. (See Figure
4.5) Figure 4.5
3.2 Folding
3.2.1 Flip up the footplates. (See Figure 4.6)
3.2.2 Pull up on the seat upholstery by holding it in the center of its front
and back edge. (See Figure 4.7)
3.2.3 Press the two release levers on the backrest frame (push handle
tubes) to fold the backrest down for compact storage and easy transport
(for SM-150.3). (See Figure 4.8)
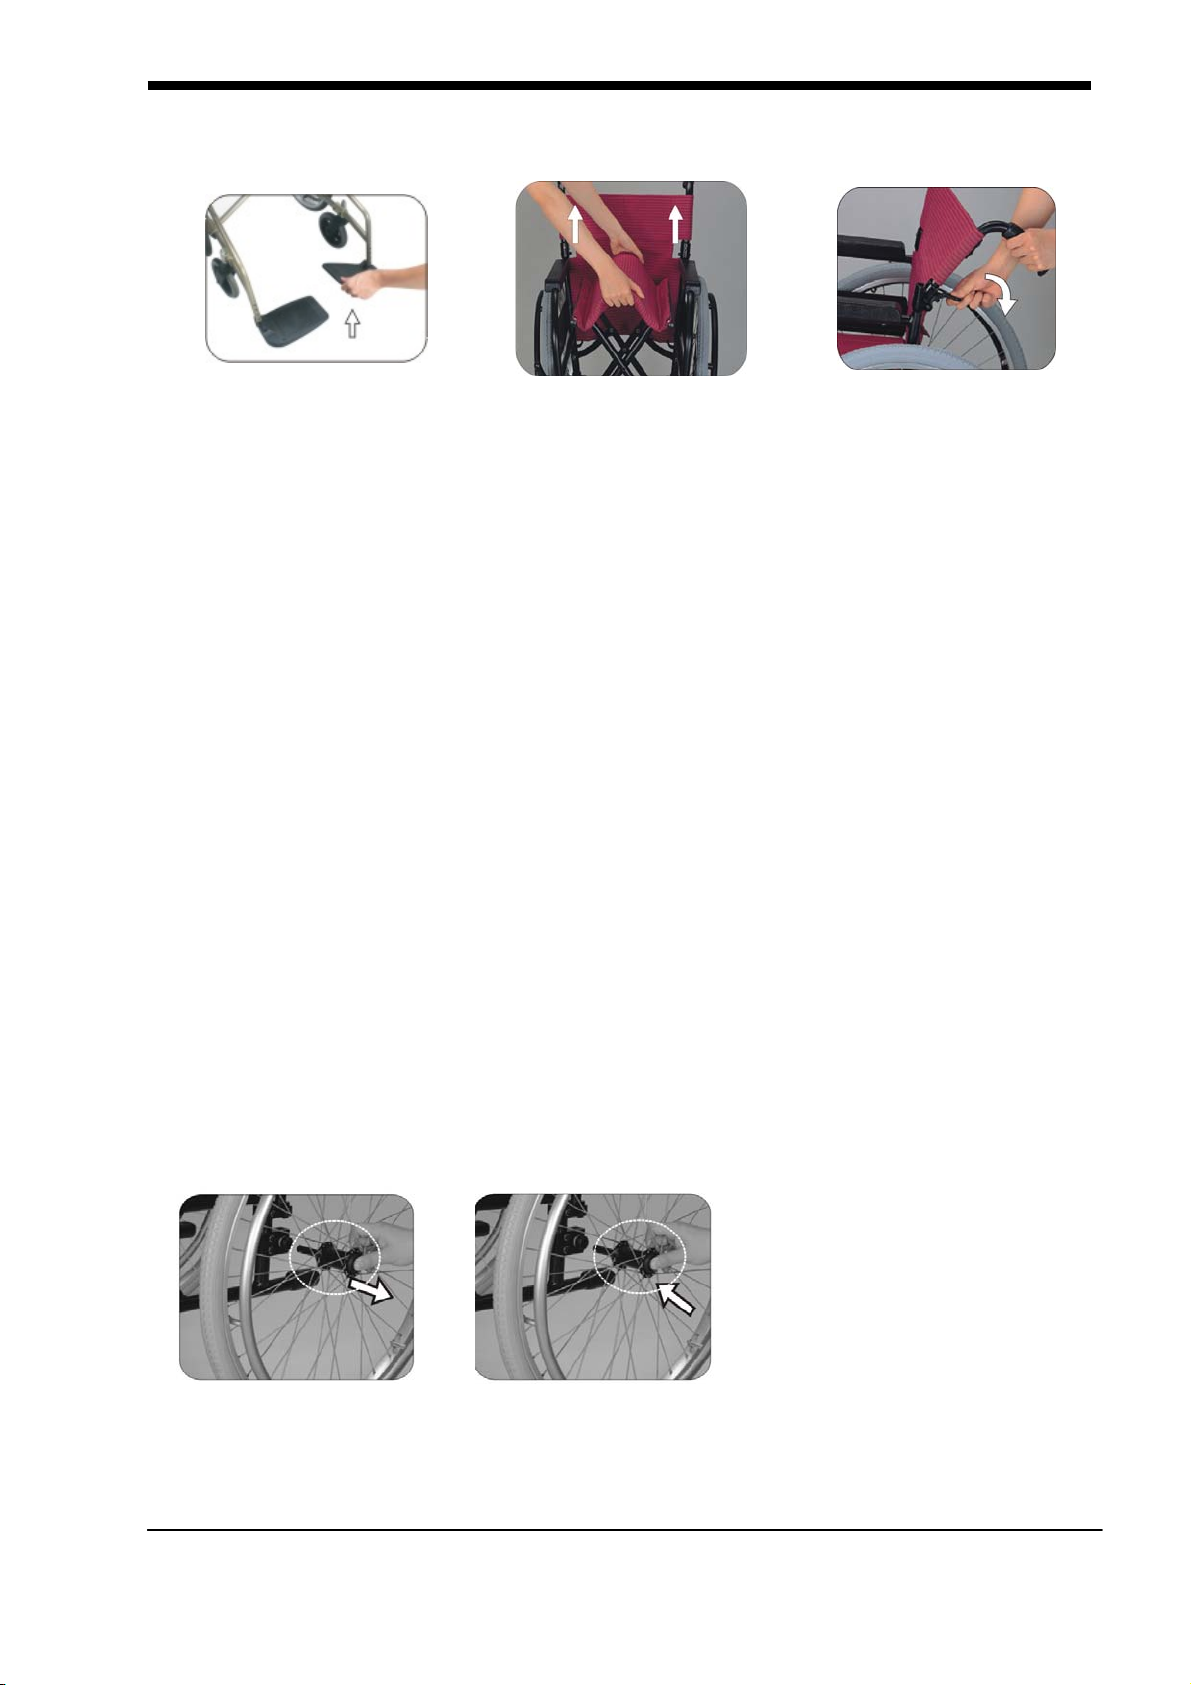
5
3.2.4 Folding is now completed.
Figure 4.6 Figure 4.7 Figure 4.8
3.3 Rear Wheel Attachment
3.3.1 Pick up the wheel: Hold the center of the rear wheel by grasping two
adjacent spokes with four fingers of one hand, use the thumb to depress
and keep depressed the quick-release. Take the quick-release axle and
depress the button in its center. This retracts the bearings at the opposite
end of the axle. This will allow you to push the axle through the center of
the hub of the wheel. Your wheels are now ready to be assembled to the
frame of your wheelchair.
3.3.2 First ensure that the brake is in the OFF position. Take up the
assembled wheel and axle and depress the button in the center of the
axle, as above. This retracts the ball bearings that will allow you to push
the axle into the wheel bracket that is located on the lower rear frame of
the wheelchair. When you remove your thumb from the button on the
axle, the ball bearings should be visible protruding from the axle at the
back of the wheel bracket. This will secure the wheel safely in the frame.
(See Figure 4.10)
Figure 4.9 Figure 4.10
3.4 How to Use the Tipping Lever

6
3.4.1 Unfold the tipping lever with foot slightly. (See Figure 4.13).
3.4.2 Step the tipping lever downward with foot and hold the both push
handles and push them downward by two hands simultaneously to lift
the caster to over come the obstacle. (See Figure 4.14).
3.4.3 The tipping lever can be folded with foot if you do not use it. (See
Figure 4.15).
Figure 4.13 Figure 4.14 Figure 4.15
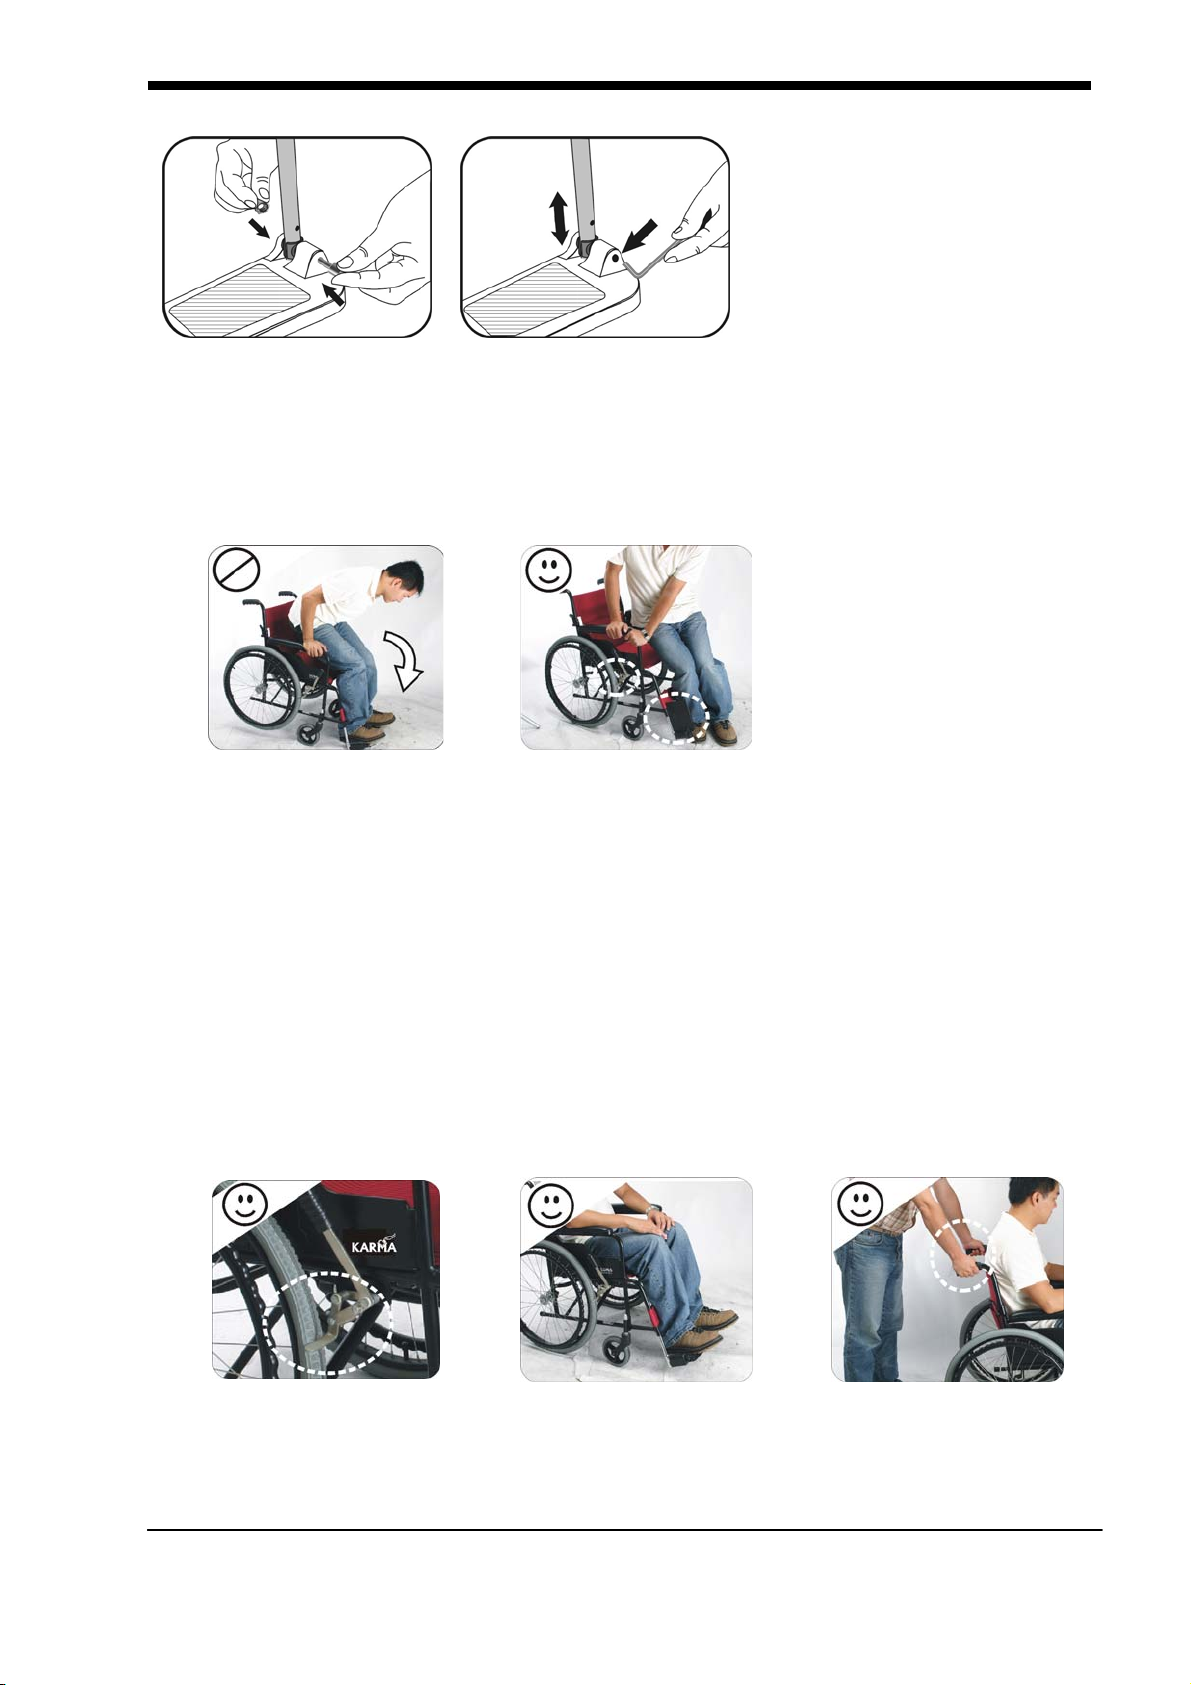
3.5 Footrest installation and height adjustment
Install footrest:
3.5.1 Unpack the footrest box and take the footrest out of the box.
Unscrew the screws of the footrest by using 5mm Allen key which
bundled in the tool box. (Figure 4-16).
3.5.2 Attach the sleeve to the front tube (slot side faces inwardly) and
align it with the hole. (Figure 4-17).
3.5.3 Fix the footrest with the sleeve and tube. (Figure 4-18).
3.5.4 Lock the footrest with screws and hex nut. (Figure 4-19)
Adjust footrest:
3.5.5 Loose screws by using 5mm Allen key which bundled in the tool box
and adjust the length to an appropriate position to fit user’s leg-length.
(Figure 4-20).
Figure 4.16 Figure 4.17 Figure 4.18
7
Figure 4.19 Figure 4.20
When transferring in and out of the chair, make sure that the brakes are
applied to prevent the chair from sliding away. Also see that the
footplates are flipped up for ease of entering or exiting. (See Figure 4.14)
Figure 4.13 Figure 4.14
3.6 Attendant Pushing and Self-propelled
3.6.1 Ensure that the brakes are always locked when the chair is not being
pushed. (See Figure 4.15)
3.6.2 Always make sure that both feet are safely on the footplates and
that clothing is safely tucked out of the way and cannot get caught
in the wheels. (See Figure 4.16)
3.6.3 Always use both hands on the push handles to control the chair.
(See Figure 4.17)
Figure 4.15 Figure 4.16 Figure 4.17
3.6.4 Always avoid steep or uneven surfaces because the chair may tip
over. (See Figure 4.18)

8
3.6.5 Always avoid soft surfaces because the casters may get bogged
down. (See Figure 4.19)
3.6.6 Always be careful not to go too fast or turn too quickly and try to
achieve a smooth steady ride.
3.6.7 Before crossing the tracks, please stop completely and look both
ways.
3.6.8 Cross the tracks perpendicular to avoid your wheels getting stuck.
3.6.9 Do not drive at full speed over the railroad tracks.
3.6.10 Be careful going through a doorway that your hands and arms do
not get injured.
3.6.11 PLEASE keep in contact with the person in the chair. If you stop to
look in shop windows or talk to people, remember to turn the
chair so that the person in the chair does not have to turn.
Figure 4.18 Figure 4.19 Figure 4.20

110400000309 104-40685 Rev:05 2018.05
This manual suits for next models
2
Table of contents
Other SOMA Wheelchair manuals


Popular Wheelchair manuals by other brands


panthera
panthera U3 Light Y-Front operating instructions

BraunAbility
BraunAbility RBC Instructions for fitting and use

Hoggi
Hoggi Basic manual

Sunrise Medical
Sunrise Medical SOPUR Xenon2 FF Directions for use

MOBB Health Care
MOBB Health Care Swivel Shower Chair 3.0 manual

Vermeiren
Vermeiren V300-30 instruction manual