SonarPhone SP100 User manual
The Manual
Welcome to SonarPhone

What is SonarPhone?
As the name implies, SonarPhone turns your smartphone or tablet
into a fully functional touch screen sonar system that will rival
the performance of sonar systems costing hundreds more. You don’t
need cell phone coverage to use it.
The SonarPhone Sonar Transmitter will work anywhere in the world.
The SonarPhone transmitter creates its own WiFi hotspot and you
can share its signal with as many people as you wish or password
protect it just for yourself.
The use of the SonarPhone App beyond DEMO mode requires a WiFi
connection to a SonarPhone SP100 or SP200/SP300 Sonar System. You
can either share an existing signal or purchase a Sonar System for
yourself.
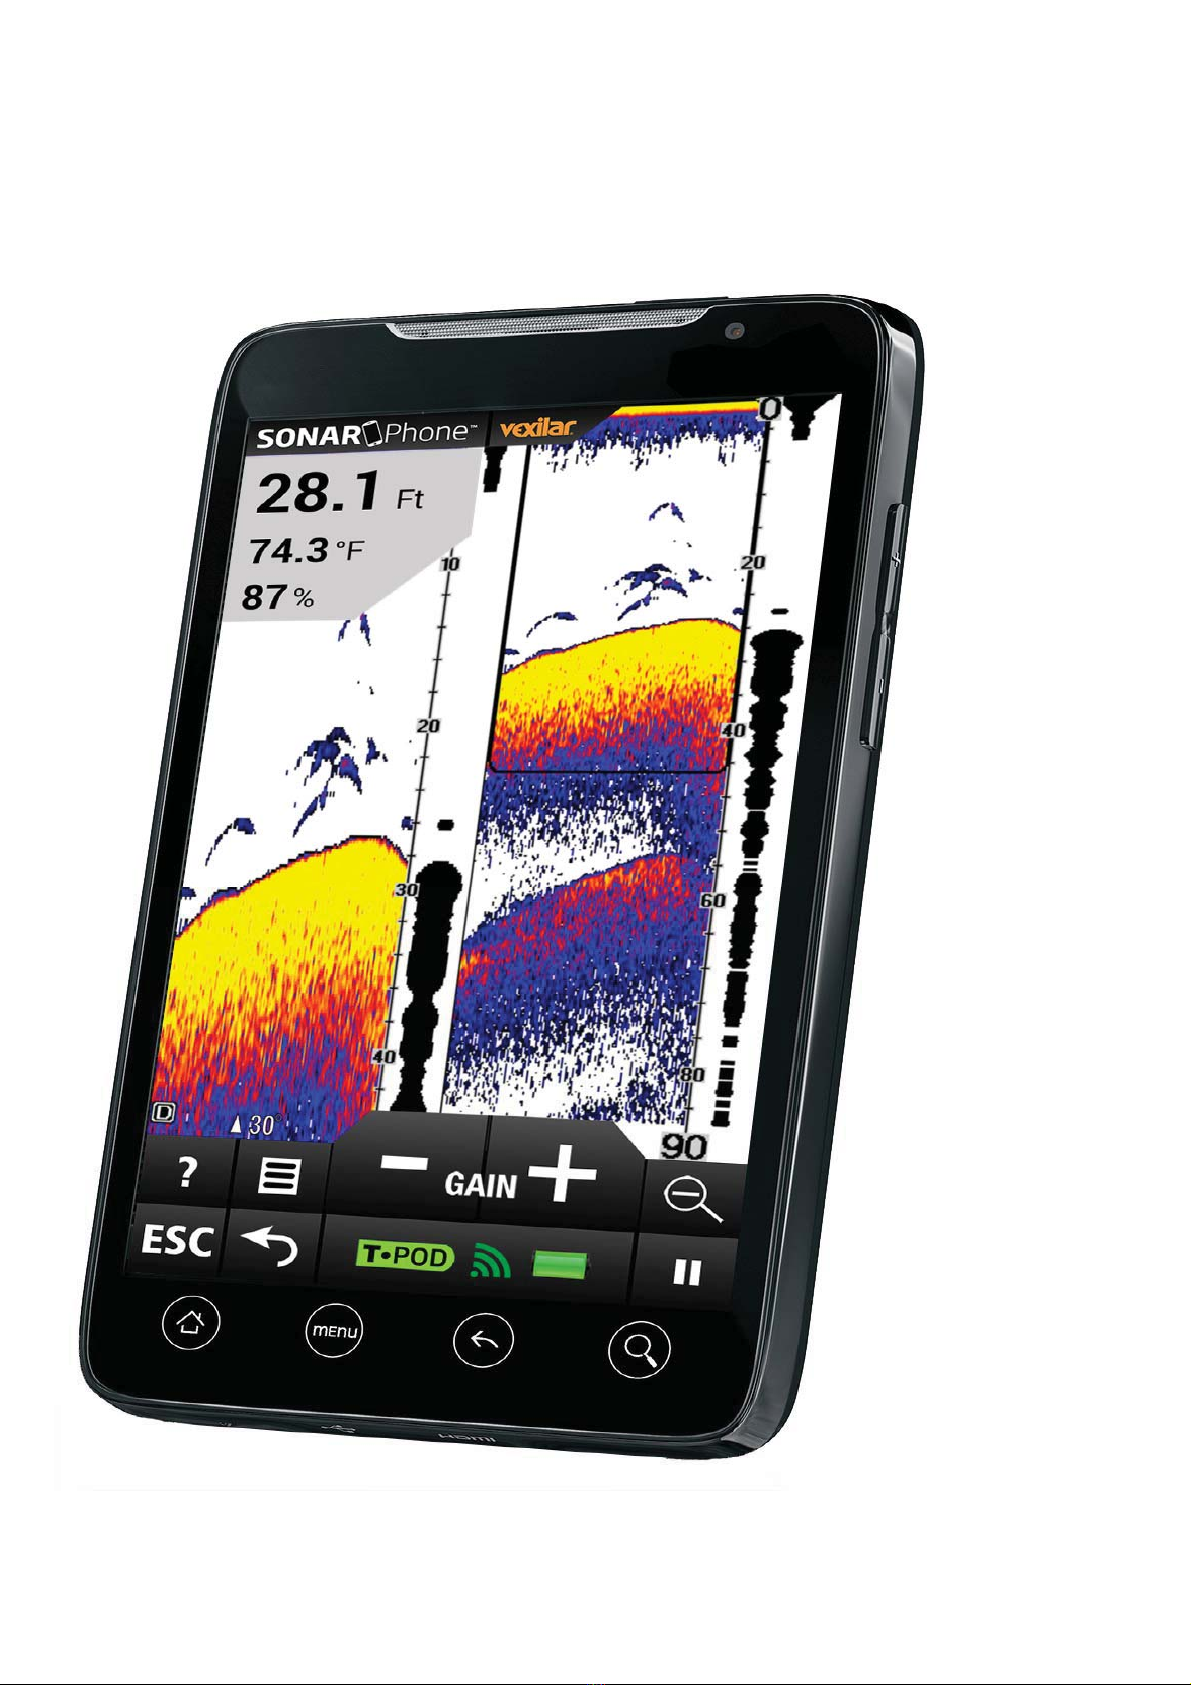
SonarPhone Overview
This Depth Sounder Mobile Application is designed for amateur and
professional fishermen alike. It will allow you see fish, depth
and bottom contour of a body of water. This high performance sonar
system, when coupled with a SP100 or SP200/SP300, will rival the
performance of many high-cost stand-alone sonar systems.
Sonar technology is based on sound waves which are transmitted into
the water. The system uses sonar to locate and define structure,
bottom contour and composition, as well as depth directly below
the transducer.
When in the water, the transducer (SP100 or SP200/SP300) sends a
sound wave signal downward and determines distance by measuring
the time between the transmission of the sound wave and when the
sound wave is bounced off an object. Then it uses the reflected
signal to interpret depth and composition of an object or bottom
structure.
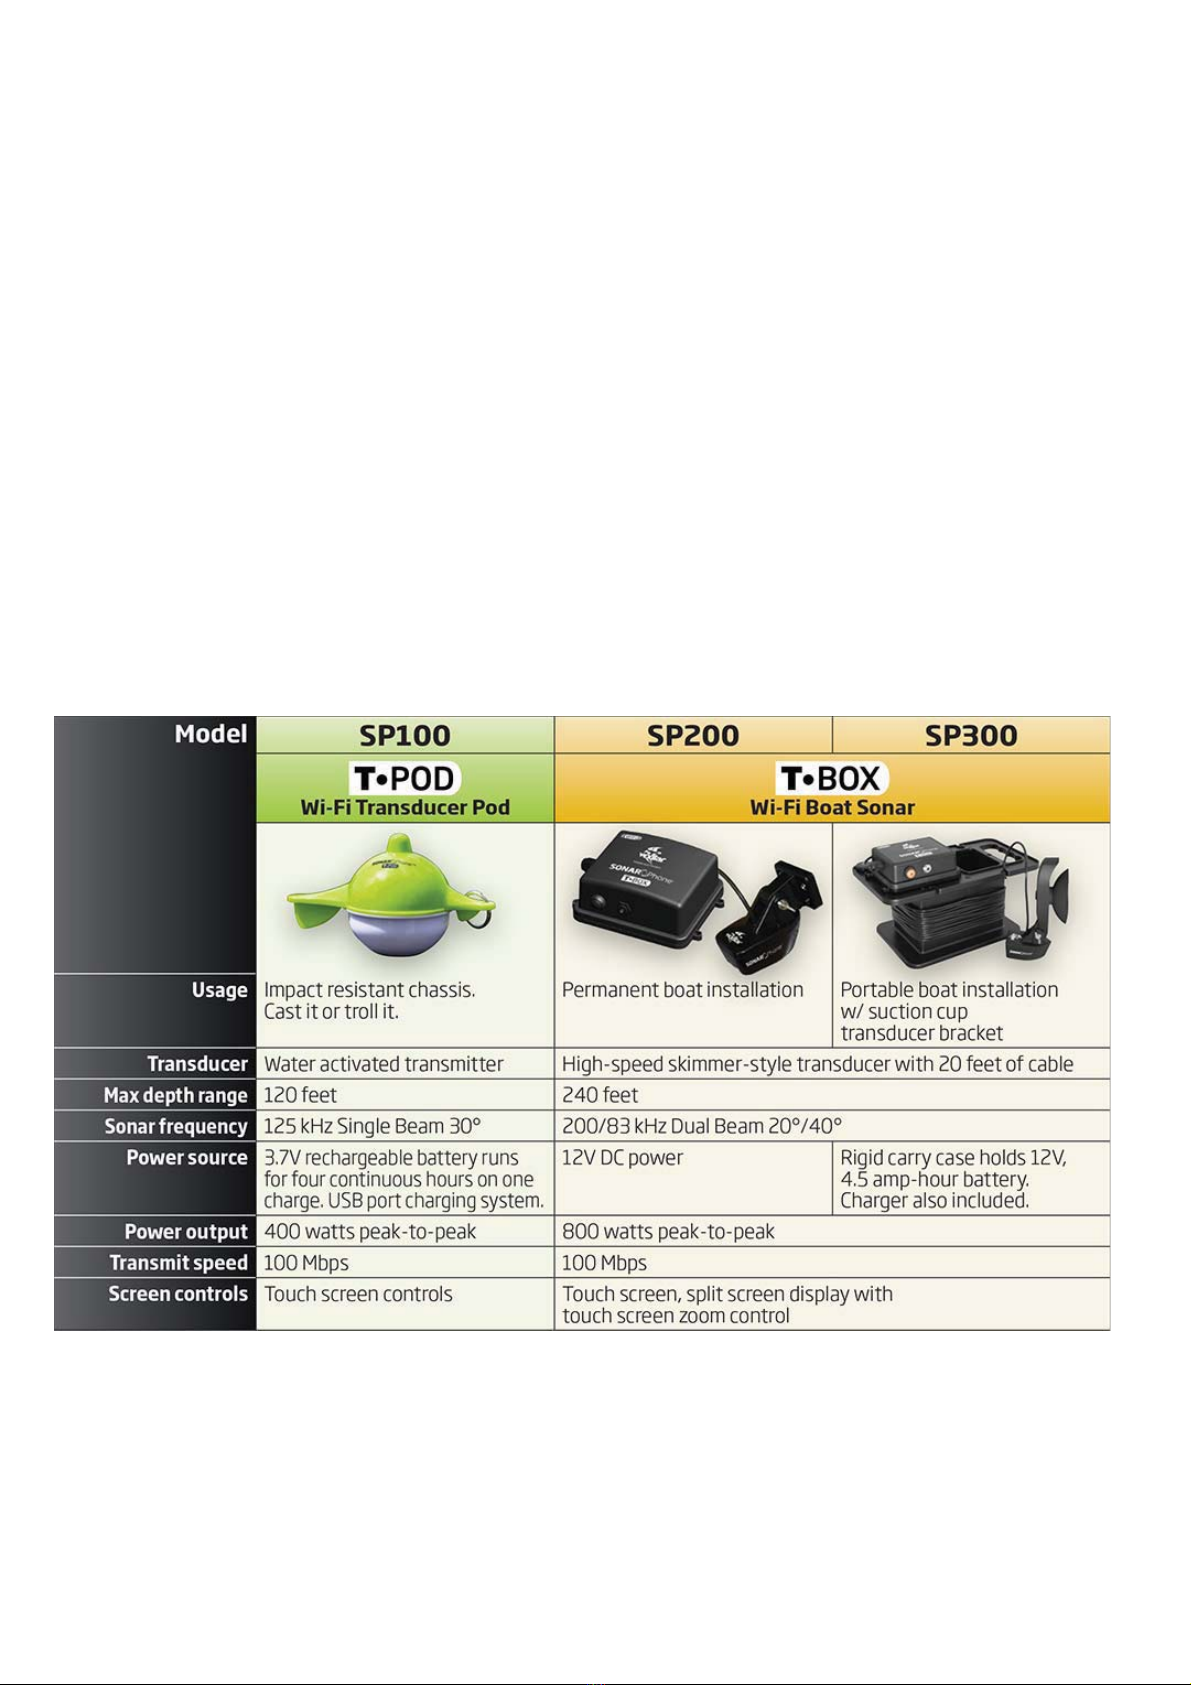
Choose the System That Works Best for You
(See Section: Where to Buy)
Features & Specifications
SonarPhone Features

xCompatible with Apple and Android Smartphones and Tablets
xDigital Depth Indicator
xWater Temperature
xAutomatic Ranging
xFish Icon
xDepth and Fish Alarm
xZoom Bottom Track
xKeel Offset Setting
xNoise Rejection
xSurface Clarity
xBattery Indicator
xWiFi Wireless Link
IMPORTANT: Your mobile device must have a display resolution of
at least 320 x 320 pixels in order for the SonarPhone app to
function properly.
SP100 Specifications
xDepth Range Max: 120 feet (40M)
xDepth Range Min: 2 feet (0.6M)
xSonar Frequency: 125 kHz Single Beam
xCone Angle: 30 Degrees
xSonar Power: 3.7V Rechargeable Battery
xAudible Alarms: Fish, Shallow, Low Battery
xOperational: -20 — +80°C
xWireless distance: 100 Yards (90M)
SP200/SP300 Specifications
xDepth Range Max: 240 feet (73M)
xDepth Range Min: 2 feet (0.6M)
xSonar Frequency: 200/83KHz Duel Beam
xCone Angles: Dual Beam 20 or 40 Degree
xSonar Power: 12V DC - 2.5mA Draw
xAudible Alarms: Fish, Shallow, Low Battery
xOperational: -20 — +80°C
xWireless distance: 100 Yards (90M)

How to Connect to a SP100 or SP200/SP300
iOS Devices
1. Start the SonarPhone by powering up the SP200/SP300 or placing the SP100 into the
water. (Use a wet paper towel to power up the SP100 if at home)
2. Go to your iPhone or iPad's main "Settings" page .
3. Go to "WiFi". Your iPhone will search for new signals and should find the SP100
or SP200/SP300 signal.
4. Select the SP100 or SP200/SP300 that appears
5. If a master password is set for the SP100 or SP200/SP300, you will need to enter
this password to access the signal. Tap "Join" to connect.
6. Press your iPhone's home button, then located and tap the SonarPhone icon to start
the app.
7. (Optional) Tap “System Setup” to change the default SonarPhone username and
password. Note that if you change the default, you will need to exit SonarPhone,
return to step 2 and then re-select the SP100 or SP200/SP300.
8. (First Run Only) Tap "Master" and enter the default password (12345678) or the
new password you set up in the last step.
Setup is Complete. Tap "Connect Now" to begin using SonarPhone.
Android Devices
1. Start the SP-100 or SP-200/SP-300 by powering up the SP200/SP300 or placing the
SP100 into the water. (Use a wet paper towel to power up the SP100 if at home)
2. Go to “WiFi” setting and be sure it is “ON”. Your SonarPhone system is transmitting
and WiFi signal and you should see it on your WiFi networks listing.
3. Select the WiFi SonarPhone source you wish to use, at this point if several other
SonarPhone's are being used nearby, you will see them as well, but as you will
soon find, they are protected by a security code the primary operator of the system.
Ask them for the Security code so they can share their signal with you. If you
are using the system by yourself the WPA security code from the factory is 12345678.
4. DO NOT leave the WiFi settings screen until you see you are connected to the WiFi
channel you have selected.
5. Now that your WiFi is connected you can open the SonarPhone app.
6. It is CRITICAL at this point you DO NOT hit the option to CONNECT NOW when the
SonarPhone home page comes up. You must FIRST touch the MASTER button to establish
your device as the master. If you do not have a Master controlling the SonarPhone,
it will not allow you to connect.
7. When you Select Master, it will ask for password and it again is 12345678 then
hit enter.

8. Once WPA password is accepted you can leave your settings and enter the SonarPhone
App and hit the large "Connect Now" button. If this device has not been used before
with SonarPhone it will ask for the Master password. Which is the same factory
default password: 12345678 Note, once this set-up procedure is done for your
specific device, it will not ask you again to be the MASTER you are the MASTER
by Default.
9. Remember, your SonarPhone factory default is set to run in the “demo” mode, so
you will need to go to the menu key and turn off the demo to start seeing the actual
sonar signal from the SonarPhone transmitter.
IMPORTANT: WiFi signal range can be effected by many external
factors. While good conditions allow for a 300 foot (90 meters)
range, the actual distance you could experience may be plus or minus
20% of this distance. WiFi technology is greatly limited indoors
and is best to keep in line of site for best performance. If
mounting SP200/SP300, be sure to place it as high in the boat as
possible and never in a metal lined compartment which will really
shorten your transmit range.
Samsung Owners need to know “WiFi with internet connection” must
be turned off in your advanced WiFi settings to receive the WiFi
only signal from Sonarphone. If testing at home be sure you are
no longer connected to home WiFi as some devices will default back
to your home WiFi settings and not allow you to connect to
SonarPhone.
Sharing a SP100 or SP200/SP300 WiFi Signal
SonarPhone Master

The owner of the SP100 or SP200/SP300 is called the Master. Only
the Master can control the SP100 or SP200/SP300. The letter M will
appear on the touch control panel when you are the Master.
SonarPhone Slave
Friends who connect and share your SonarPhone signal are called
SLAVES. They can use and watch the SonarPhone display, but will
have limited control. The letter S will appear on the touch control
panel when you are the Slave.
Note a SLAVE setting will not be possible unless a MASTER is actually
running.
Sharing a SonarPhone signal with Friends is EASY! Just ask the owner
of the SonarPhone for their WPA password, so you can become a “SLAVE”
to the owner or Master controller of the SonarPhone.
Again you start in the “Settings” of you phone or tablet. Select
WiFi and see what WiFi channels are available. Highlight the
SonarPhone channel you wish to watch and select it and then add
the WPA password from the Master and when it has been accepted and
when you see you are connected to the WiFi channel you simply exit
the “SETTINGS” and enter SonarPhone. Hit connect now and you are
good to go!
Please realize only the Master controller has complete control of
all menu functions, so you will notice some menu features simply
will not function while you are a “SLAVE” to the Master of the
SonarPhone signal . There is no limit to the number of “Slaves”
you can have to a Master SonarPhone signal, but without a master
using the system, no slave function is available.
SonarPhone Operation
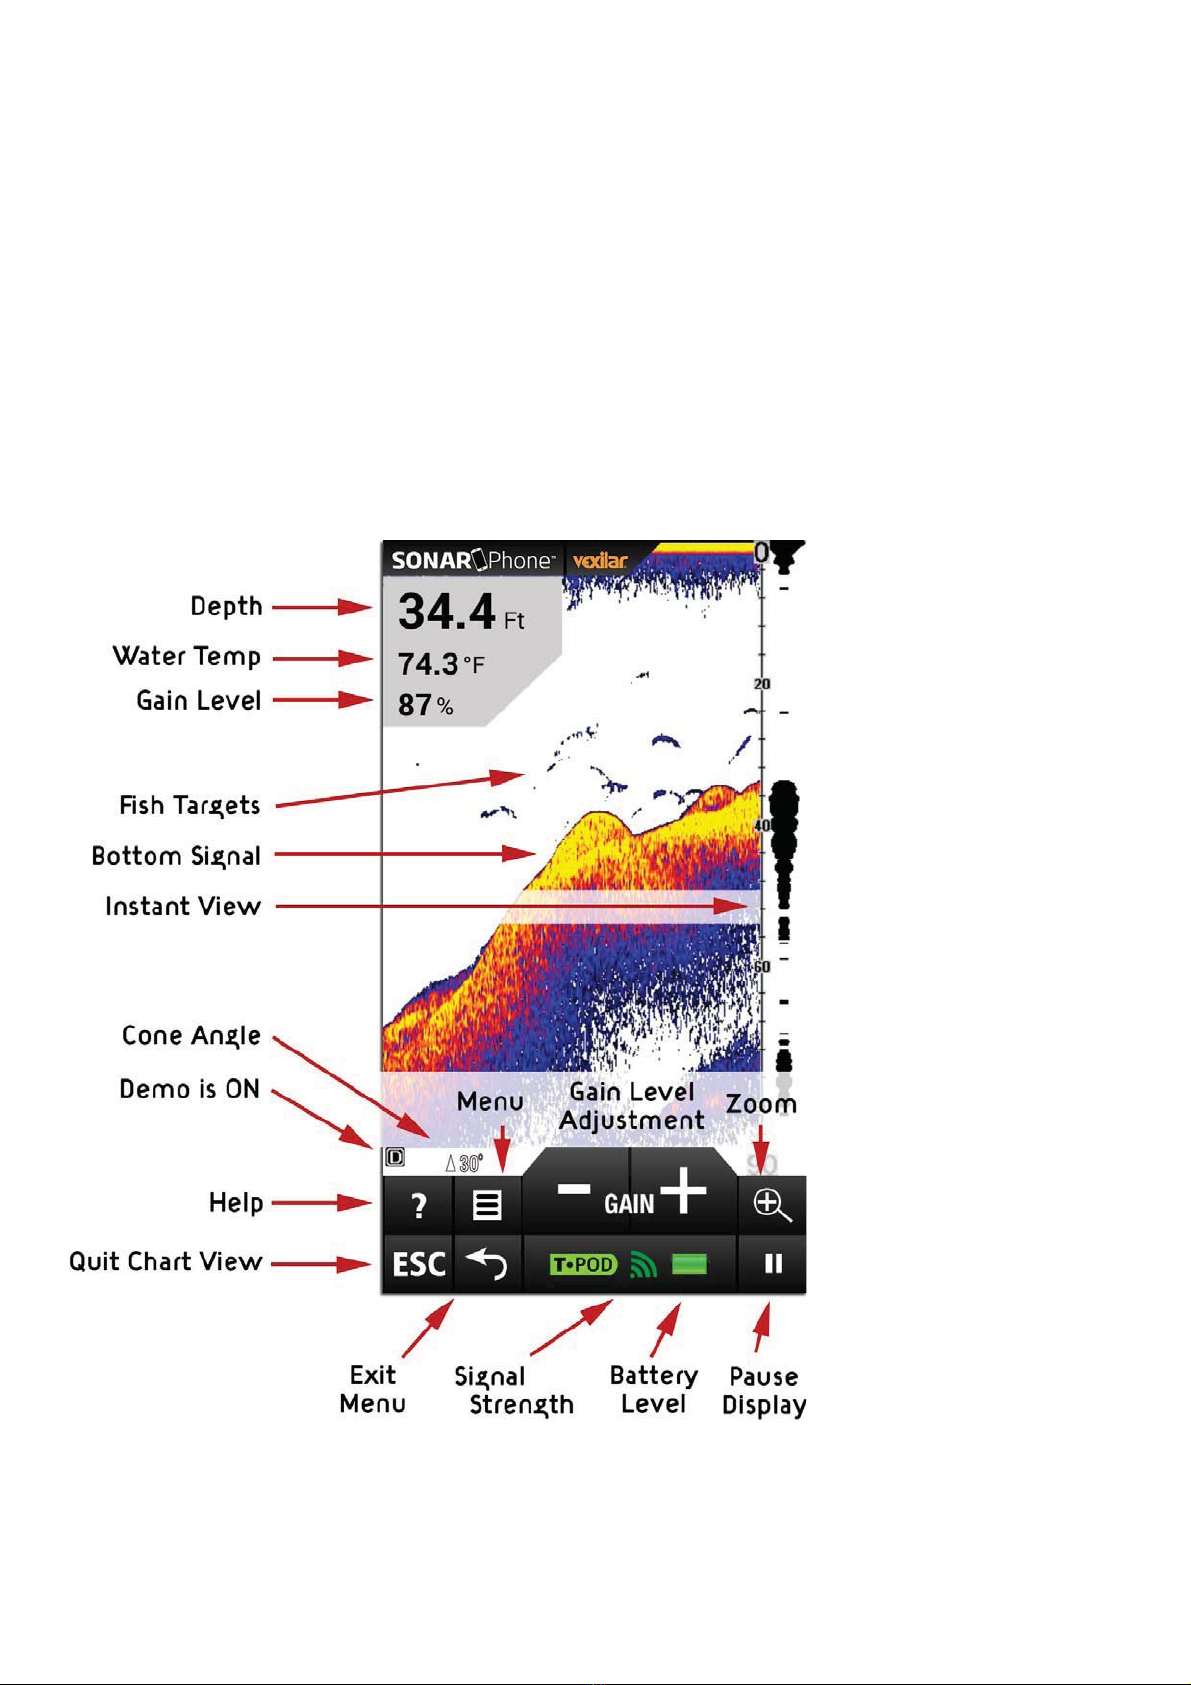
Touch Pad Functions

Note - The Instant View window always updates at the fastest rate
possible. This view shows what is beneath, right now.
Split Screen Zoom View

Press the Zoom key or use the Zoom Gesture to manually enlarge the
bottom signal in the main screen by 2. Press it again and the screen
will be returned normal operation.
In the Split Screen Zoom View, the display is split to show the
full range view on the right and the zoomed view on the left. The
full range view on the right also contains the Zoom Preview Box
that shows what part of the full range view is shown in zoom view
on the left; the Zoom Preview Box tracks the bottom in the full
range view.
Beam Angle Selection
(SP200/SP300 Only)

Press the "Beam Angle Select / Return" button on the SP200/SP300
touch pad. During normal operation, this button switches
back-and-forth between the the wide 40 degree cone and the narrow
20 degree cone.
IMPORTANT: You will need to increase the gain level while using
the wide 40 degree much more than when using the narrow 20 degree
beam. This is normal because you are covering twice as much area
with the wider beam.
Accessing Menu Features
Press the Menu Key to access the menu system. The menu system
immediately appears on the display.
The menu system has 3 tabs: "Sonar", "Setup" and "Advanced". Tap
the different Tab names to switch between different menu panels.
To change a menu setting, simply swipe that setting to the left
or right.
Tap anywhere outside the menu or on the View/Esc Key to return to
close menu system.
Sonar Menu
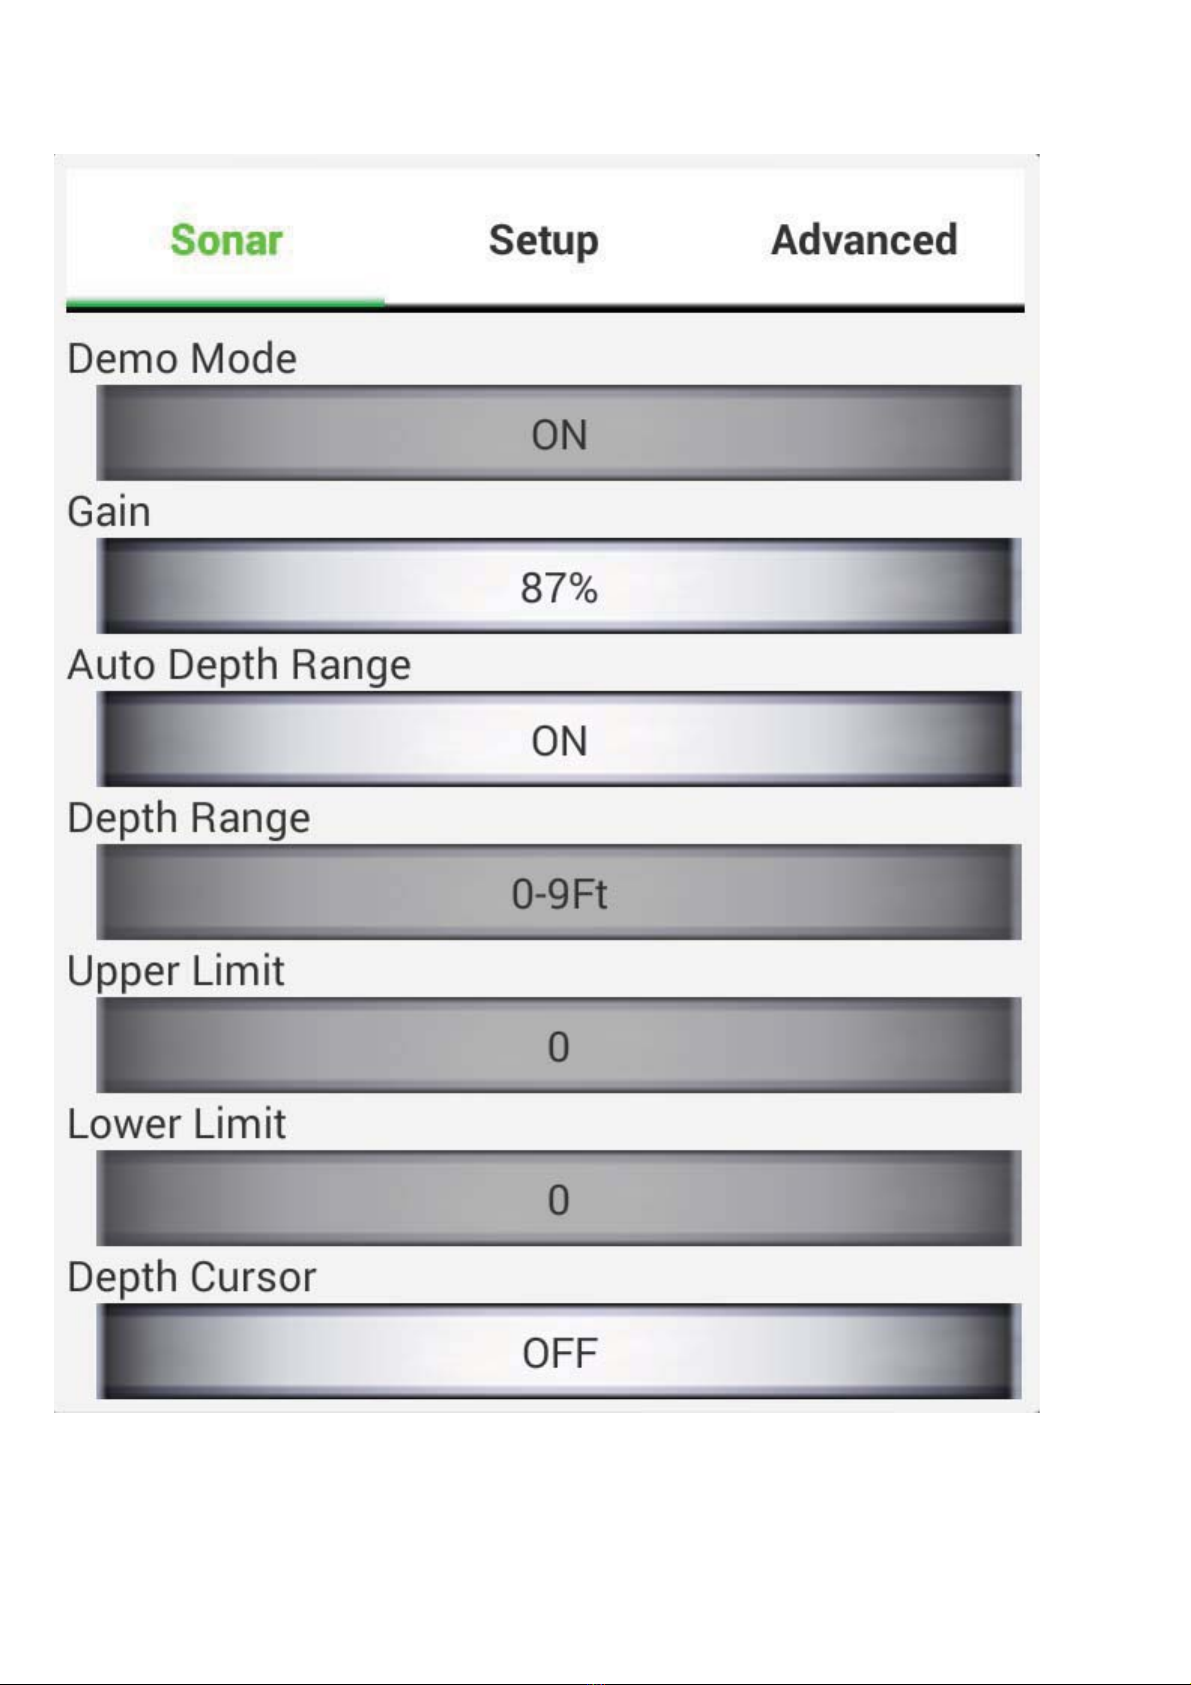
Demo Mode

The Demo Mode is a very powerful tool that simulates the fish
situation on the water. Use the Demo Mode to learn how to use your
SonarPhone before go out on the water. All features except Depth
Range may be adjusted.
Gain Control
Gain controls the unit's ability to pick up echoes, from 1% to 100%.
Current gain levels are displayed below the digital depth readout
as a percentage of maximum (%). If you want to see more detail,
increase the gain a little at a time. If there is too much clutter
on the screen, decrease the gain to reduce this. Ideally, you want
to set the gain to show the strongest fish echoes with the least
amount of clutter. As you change the gain level setting, you can
see the difference it makes on the chart as it scrolls.
When not in the Menu mode, use the large Left and Right arrows on
the touch pad to easily control the gain. If SonarPhone cannot find
the depth or the return signal seems weak on the display, increase
the gain level until the reading is strong.
Usually, a gain level between 30% and 60% will suffice, but
increasing the gain may be required for deeper waters or very soft
bottoms. For extreme shallow water, less than 3 feet, reduce the
gain near the minimum setting.

SP200/SP300 ONLY: When using the Wide 40 degree angle, you will
need turn up the gain higher than when using the 20 degree angle.
This is normal, as the cone of sound is covering twice the area.
Auto Depth Range
This setting allows SonarPhone to control the depth range setting
for you. It will do it's best to keep the bottom in view at all
times, switching depth ranges as needed. Change this setting to
OFF and you can control the range setting manually.
IMPORTANT: While using manual range operation, if the depth is
greater than the depth range setting, the bottom will not be visible
on screen. Change the range to a deeper setting or select "Auto"
to return to automatic operation.
Depth Range
This setting allows you to manually change the range setting,
meaning how deep SonarPhone will read depth. The ranges available
are: 0—9 feet, then 10 foot increments deeper to 120 feet (0—3 meters
to 0—36 meters)
Upper Limit
The Upper Limit is the shallowest point in the water column which
will be displayed on the chart.
Lower Limit

The Lower Limit is the deepest point in the water column which will
be displayed on the chart.
Changing the upper and lower limits give you far greater control
over the depth range. This feature lets you "zoom in" the display
in almost unlimited combinations.
Depth Cursor
The depth cursor, found by swiping down to the first menu page,
consists of a horizontal line with a digital depth box on the right
side. The numbers inside the box show the depth of the cursor. You
can move the cursor to any location on the screen, letting you
pinpoint the depth of a target or keep a reference point for a
specific depth.
Setup Menu

Units of Measure

xMenu Settings: ft/°C, ft/°F, m/°C or m/°F
This setting allows you to configure the units of measure for your
needs.
Chart Speed
xSettings: 10% to 100%
This setting changes the speed at which the display scrolls across
the screen. Faster chart speeds will show longer straighter lines
as fish and bottom. Slower chart speeds will show shorter, more
curved lines.
Fish Symbols & Depth
Menu Settings
xOn/On: Symbols and Depth are Displayed
xOn/Off: Fish Symbols Only are Displayed
xOff/Off: No Fish Symbol Display
This feature identifies targets that meet certain standards for
possibly being a fish. SonarPhone analyzes all echoes and
eliminates surface clutter, thermoclines, and other undesirable
signals. In most instances, remaining targets are fish. This
feature displays fish symbols on the screen in place of the actual
fish echoes. There are three fish symbol sizes used to designate
the relative size between targets.

SP200/SP300 ONLY: Fish symbols in the 40 degree cone will appear
gray. Fish symbols in both the 40 and 20 degree cones will be black.
IMPORTANT: SonarPhone is sophisticated, but it can be fooled. It
may not always be able to distinguish between fish and other larger
suspended objects in the water.
Fish Alarm
The Fish Alarm can be configured to sound for different sizes of
fish. Select the setting that is best for you.
Off - No alarm
LARGE - Alarm for Big Targets Only
LARGE/MEDIUM - Alarm for Big and Medium Target
LARGE/MEDIUM/SMALL - Alarm for Any Size Target
Depth Alarm
xMenu Settings: Off
xAdjustment: 1 foot to 99 feet (1 to 30 meters)
The Depth Alarms sounds a tone and the Depth Alarm Indicator will
blink when the bottom depth gets shallower than the Depth Alarm's
setting.
WARNING: Do not use this feature for shallow water navigation.
Battery Alarm
When the battery voltage drops below the set value, the alarm sounds.
This ensures you can tell your friends about the big fish you caught

with the help of SonarPhone on Facebook before the battery goes
dead.
Transparency
This feature sets the transparency of the depth, temp and gain
percentage readout background located at the upper left of the
display.
Advanced Menu
Bottom Lock
When ON the bottom signal stays locked on bottom as you move.
SonarPhone automatically adjust to keep the bottom locked into a
single position. This is useful when looking for targets close to
the bottom when there are heavy waves on the surface.
Keel Offset
Keel Offset will adjust the digital depth readout to indicate depth
from the waterline or boat's keel instead of from the transducer
position. Enter a positive vertical measurement from the transducer
to the waterline. Enter a negative vertical measurement from the
transducer to keel to read the depth from the keel.
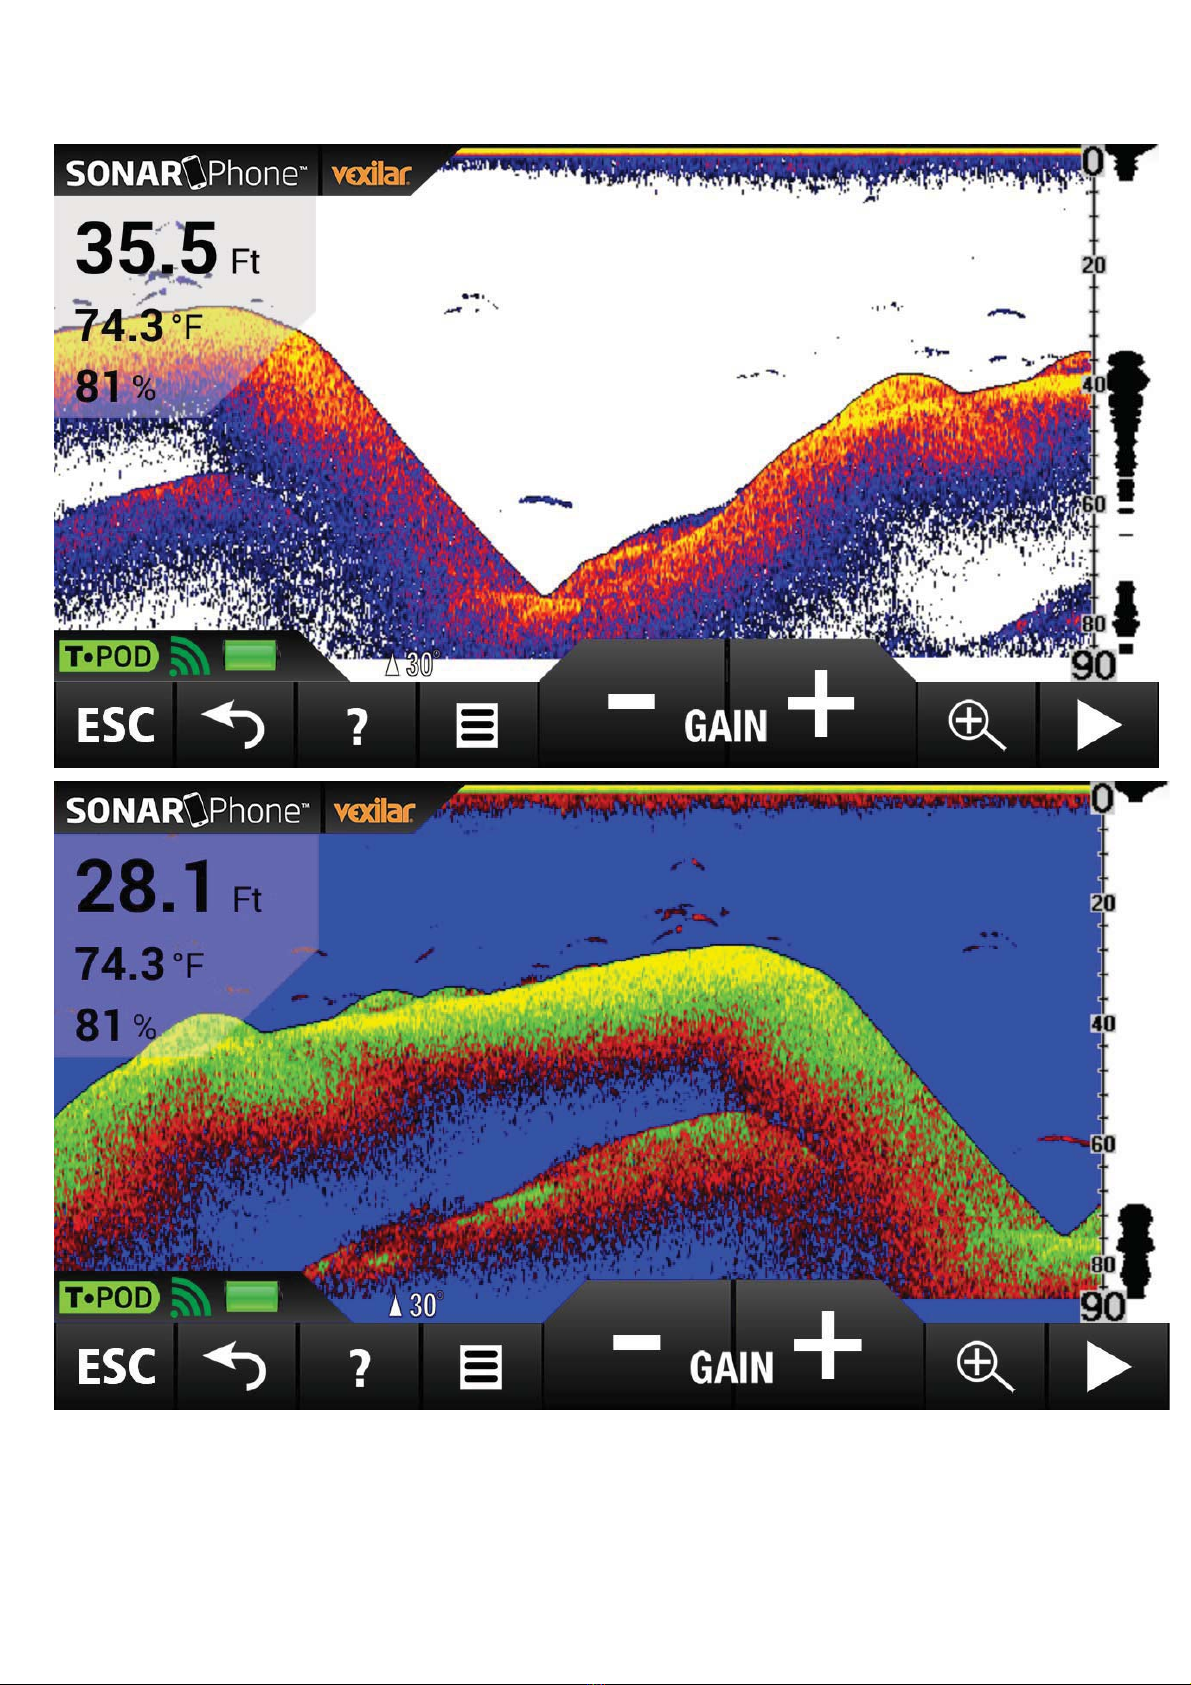
Display Color Options
Select the color scheme that works best for you: White Background,
Blue Background or Gray Scale.
This manual suits for next models
2
Table of contents


