Sonic Blue SP100 User manual

About the User Guide
Return to Pg.1
Page 1
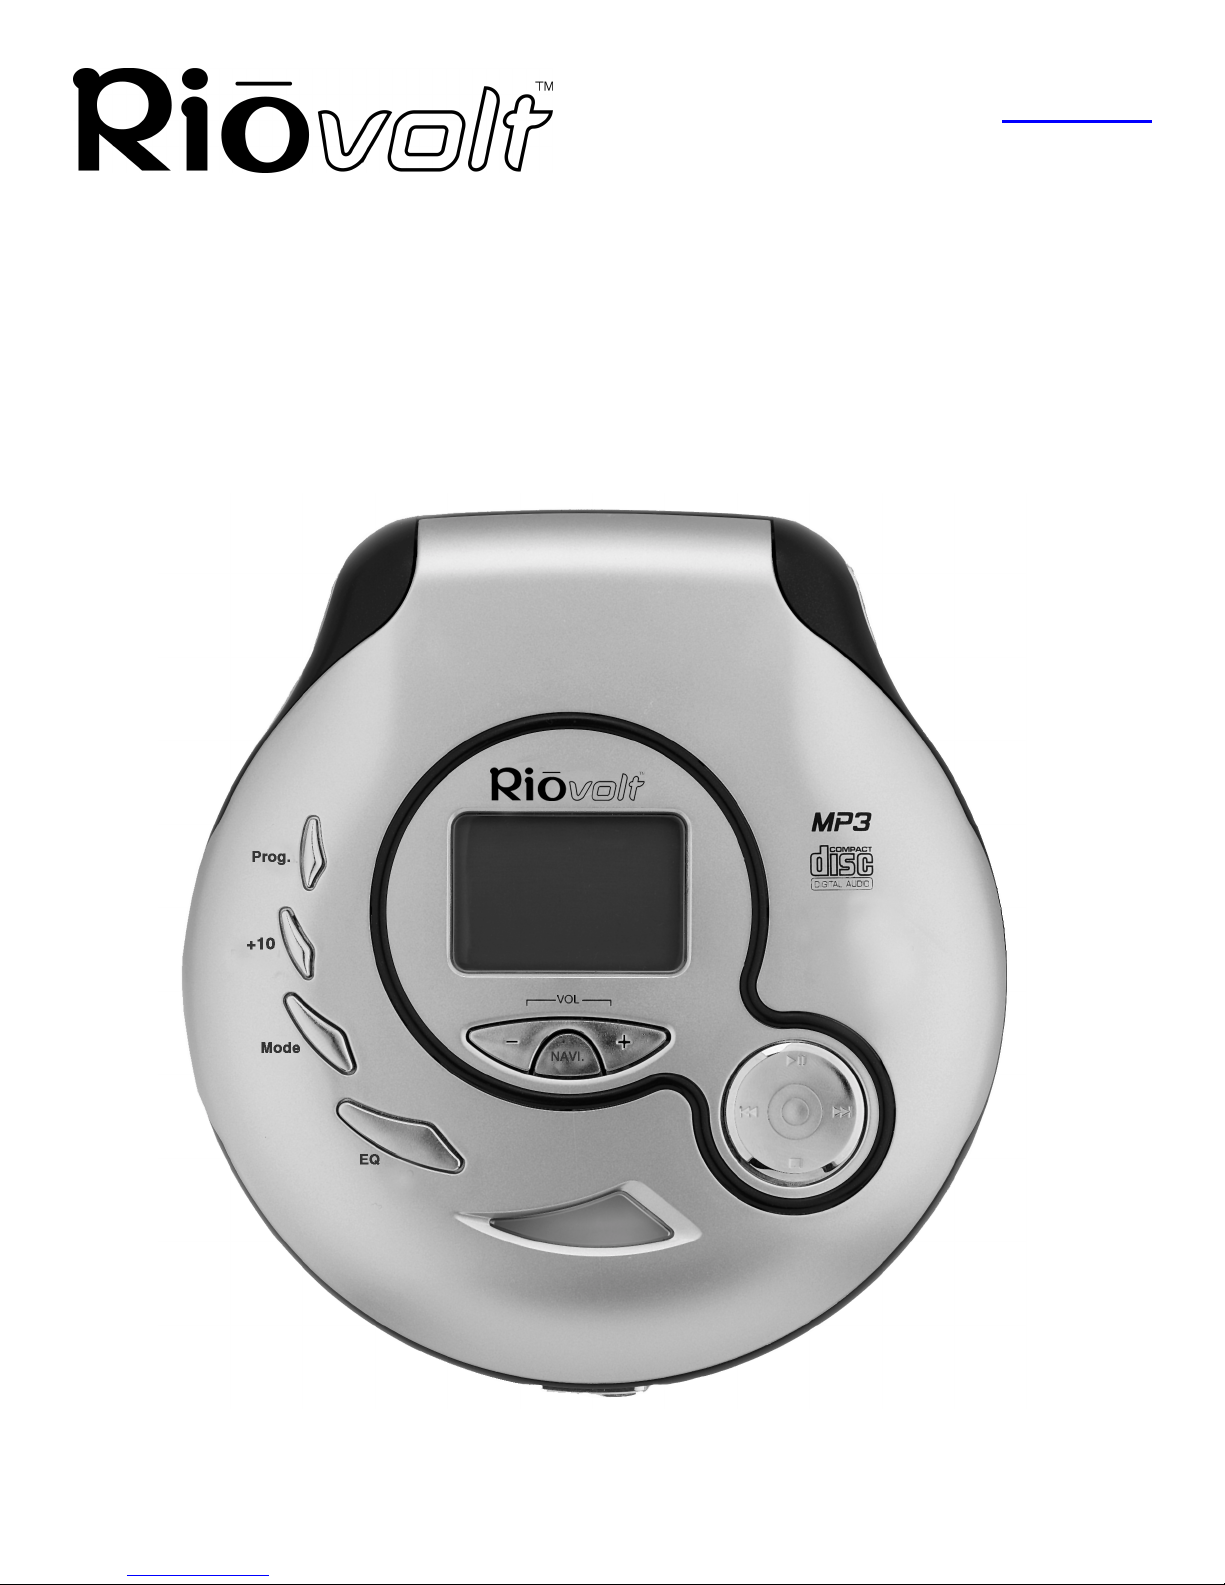
RioVolt™ User Guide
About the User Guide
The RioVolt User Guide includes the following sections:
Introduction
Getting Started
Using Your RioVolt
The Display
Menus and Buttons
The Remote Control
Troubleshooting & Frequently Asked Questions (FAQs)
RioVolt Specifications
Warranty & Regulatory Information
Glossary
Contacting Customer Care
Navigating and printing the RioVolt User Guide
The online RioVolt User Guide is in Adobe Acrobat (.PDF) file format.
NOTE: We strongly recommend that you use Adobe Acrobat version 4.0 — available on the
CD-ROM — to view and print the RioVolt User Guide.
Click links (blue underlined text) to jump to another location in the document or to a location on the
World Wide Web.
Acrobat Toolbar icons
Click the Show/Hide Navigation Pane icon in the Acrobat toolbar to show the Navigation Pane Window
and bookmarks in the left column. Bookmarks are links to the contents of the User Guide. Click any
bookmark in the list to jump to the page in the User Guide that contains the topic.
Click the Print icon in the Acrobat toolbar to print the User Guide. The size of the User Guide is
optimized for printing.

Copyright and trademark
Return to Pg.1
Page 2
Copyright and trademark
Copyright © 2000 SONICblue, Inc. All Rights Reserved.
SONICblue, Inc. does not assume any responsibility for errors or omissions in this document or make any com-
mitment to update the information contained herein.
Rio is a registered trademark of RioPort.com, Inc. in the United States and/or other countries and is used under
license.
Microsoft, Windows Media and the Windows Logo are trademarks or registered trademarks
of Microsoft Corporation in the United States and/or other countries.
RealNetworks, RealAudio, RealPlayer, WebActive, and the RN logo are registered
trademarks of RealNetworks, Inc.
Adaptec, the Adaptec logo, the Adaptec tag line, and AHA are trademarks of Adaptec, Inc.
which may be registered in some jurisdictions.
All other product names may be trademarks of the companies with which they are associated.
First Edition, February, 2001.
Part Number 75550154-001
Introduction
Return to Pg.1
Page 3
Introduction
Congratulations on purchasing the RioVolt, the simple solution to taking hours of digital music with you.
Download music from the Internet onto your PC or encode your favorite CDs, then create your own CDs to enjoy
using your RioVolt. The RioVolt supports multiple music formats for you to enjoy. You can choose from MP3
and WMA compressed digital audio or CD Audio (Red Book), including CDText. When playing your MP3 and
WMA music files you will have up to 120 seconds of skip protection (up to 40 seconds for CD Audio) so that
you can listen to your music where you want with Electronic Shock Protection. Your RioVolt also supports
firmware upgrades should new features become available for your player in the future. With the simple to use
interface, including folder and track titles, the RioVolt will give you easy access to over 250 music tracks on each
CD you create!

Package Contents
Return to Pg.1
Page 4
Package Contents
• RioVolt™
• 8 Function Remote Control
• RioVolt Carrying Case
• Headphones
•ACAdaptor
• 2 AA Alkaline Batteries
• Getting Started Poster
• RioVolt Installation CD
• RioVolt User Guide
• Frequently Asked Question Document (FAQ)
• Real Jukebox®
• Adaptec® Easy CD Creator®
• Adobe Acrobat®
System Requirements (For included software only)
PC (Minimum System Requirements)
• Intel® Pentium®200 MHz MMX or higher CPU
• 32MB RAM
• 30MB or more free hard drive space
• Windows 95, 98, 98SE, ME, NT 4.0 w/ Service Pack 4, 2000
• Internet connection and web browser
System Recommendations
• CD-ROM Writer (RW) highly recommended

Safety Information
Return to Pg.1
Page 5
Safety Information
Class 1 LASER PRODUCT
This compact disc player is classified as a CLASS 1 LASER product. Use of controls, adjustments or
performance of procedures other than those specified herein may result in hazardous readiation exposure.
CAUTION - INVISIBLE LASER RADIATION WHEN OPEN AND INTERLOCKS DEFEATED, AVOID
EXPOSURE TO BEAM.
WARNING
TO REDUCE THE CHANCE OF SHOCK OR INJURY, DO NOT USE or OPERATE THIS DEVICE IN OR NEAR
WATER OR WET LOCATIONS
CAUTION
RISK OF EXPLOSION, DAMAGE OR BATTERY LEAKAGE IS POSSIBLE IF REPLACED INCORRECTLY OR BY
AN INCORRECT TYPE. DISPOSE OF USED BATTERIES ACCORDING TO INSTRUCTIONS OR LOCAL LAWS.
Use only certified and approved Batteries and AC Adapters as those specified in the product User Guide.
Use of headphones while operating a vehicle is not recommended and is unlawful in some states and areas. Be careful and
attentive while driving. Stop operation of the player if you find it disruptive or distracting while operating any type of
equipment.
Listening to music at full power over extended periods of time can be damaging to the hearing of the user.
Invisible laser radiation when open and interlocks defeated, avoid exposure to beam.
CLASS 1 LASER PRODUCT
KLASSE 1 LASER PRODUKT
LUOKAN 1 LASER LAITE
KLASS 1 LASER APPARAT
PRODUCTO CLASE 1
Getting Started
Return to Pg.1
Page 6
Getting Started
You will need the following items to start using your new RioVolt:
• The RioVolt
• 2 AA Alkaline Batteries (included) or the Rio Volt AC Adaptor (included)
• Headphones (included) or powered speakers (not included)
• Remote Control (included)
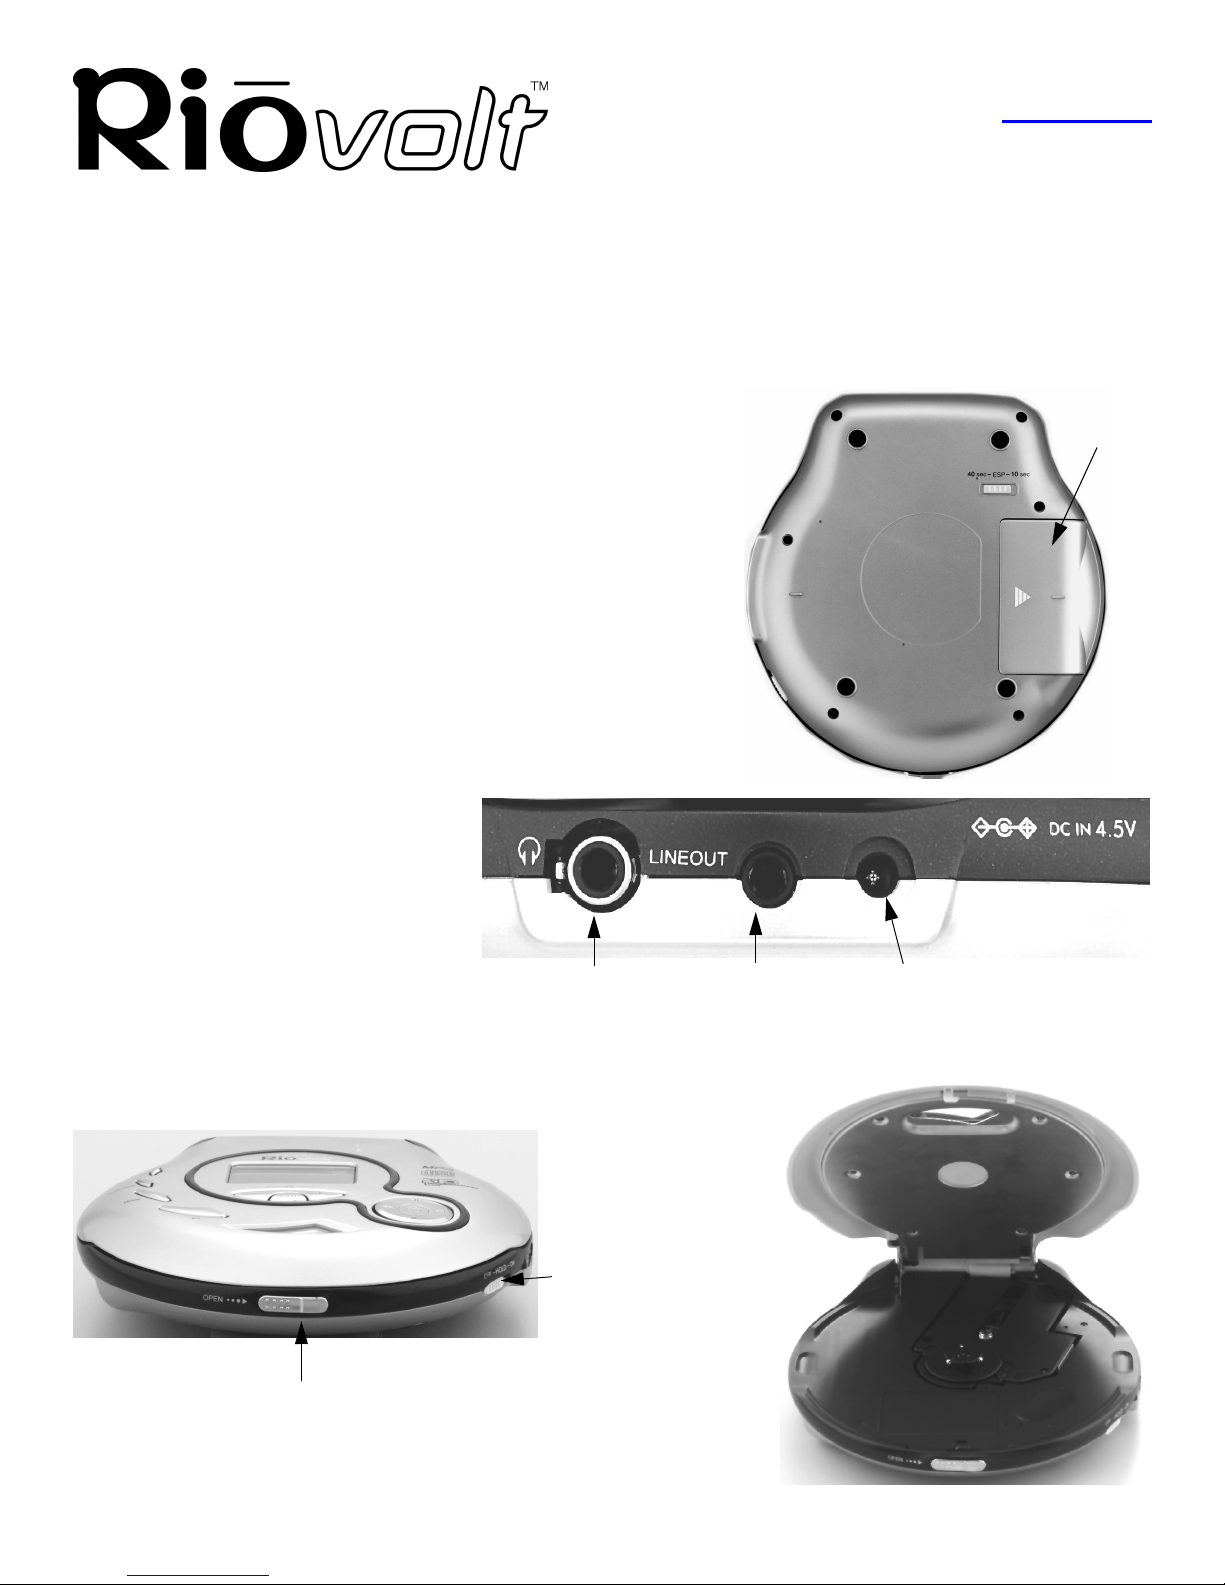
1. Open the Battery Compartment Door by sliding it away from
the RioVolt and insert 2 AA Alkaline batteries (included).
2. Slide the Battery Compartment Door back to its original
position to close.
OR
Plug the RioVolt AC Adaptor into the Power Port on the side of
the Rio Volt.
3. Plug the Headphones Cable into the
Headphones Port on the side of the
RioVolt.
OR
To use the Remote Control, plug the
Headphones Cable into the Remote
Control, and then plug the Remote
Control Cable into the Headphones
Port on the side of the RioVolt.
The Remote Control can then be clipped to your clothing for easy access.
4. Slide the Release Latch at the front of the RioVolt to the right to
open the case.
5. Place a music CD or a CD that you have burned with your own
digital music files into the RioVolt.
6. Close the top lid securely.
Battery
Door
Headphones
Port Speaker
Port Power
Port
Release Latch
Hold
Switch

Using Your RioVolt
Return to Pg.1
Page 7
7. Press Play once to begin playing the first track on the CD.
NOTE: Another option is to plug a pair of powered speakers into the RioVolt’s Lineout Port
instead of using headphones.
Using Your RioVolt
The Display
When powered on, the RioVolt’s Liquid Crystal Display (LCD) is backlit for easier viewing while buttons are in
use. The backlight turns off after a few seconds to conserve battery power when selections are not being made.
The LCD displays the status of the RioVolt and the Artist and Song information for the the encoded music you
are playing. The LCD assists you in selecting new music to listen to.
In playback mode, the LCD shows:
•Track Information — If you encoded the song using Real Jukebox, Rio Audio Manager, MusicMatch
software, the LCD scrolls from side to side through the File Type (MP3, WMA, etc.), Artist Name, and Song
Title. Song information is contained in the ID3 Tag, which can be included manually or by connecting to
Gracenote via the Internet.
• Track Number — Track Number on the CD.
•Track Time — Time elapsed in the song.
•Repeat Indicator — Shows if 1song is set to repeat; if all D(Track Number) songs in a directory are set to
repeat; if all songs on the CD are set to repeat or if no songs are set to repeat.
•Shuffle Indicator — Shows if the RioVolt is set to shuffle songs in play.
•Repeat A-B Indicator — Shows if the RioVolt is set to repeat a programmed sequence of music.
•Volume Level Indicator — Indicates the volume level numerically when the Volume Bar is pressed once.
Then it disappears.
•Battery Indicator — Shows graphically the remaining battery power level.
Track
Number
Track
Information
Shuffle
Indicator
Repeat
Indicator Hold
Indicator
Repeat A-B
Indicator
Battery
Indicator
Track Time

Using Your RioVolt
Return to Pg.1
Page 8
Menus and Buttons
The buttons on the face of the RioVolt include:
• Prog.
•+10
• Mode
•EQ
• Volume
•Navi
• Joypad (Play/Pause, Fast Forward, Rewind, Stop)
Using the Prog. Button:
Repeat A-B
1. Once you have located the sequence you wish to repeat, press the Prog.
Button once.
This initiates the sequence and places an A- at the top of the display.
2. Press the Play/Pause button to begin playing the music you wish to repeat.
3. Once you reach the end of the sequence you wish to repeat, press the Prog.
Button again.
This ends the sequence, places an A-B at the top of the display and begins
replaying the sequence you selected.
NOTE: To clear the Program settings, press the Prog. button again.
Program
1. Press and hold the Prog. Button while the CD is not in play.
This will display the Program screen.
2. Press the ,or +10 buttons to locate the tracks you wish to program
into your playlist.
3. Press the Prog. Button to select each track.
4. Repeat Steps 2 and 3 until you have finished selecting tracks.
5. Press Play/Pause to begin playing the playlist of tracks.
A Pwill appear next to the Track Number to indicate a programmed
playlist.
6. Press Stop to stop playing the playlist and to clear it from memory.
Pressing the +10 Button:
Causes the RioVolt to skip 10 tracks ahead of its current song position.

Using Your RioVolt
Return to Pg.1
Page 9
Pressing the Mode Button places the RioVolt in the following
modes:
1. Circled 1at the top of the screen, indicating that the current song will repeat.
2. Circled all at the top of the screen and a Dnext to the Track Number,
indicating that all of the songs in the current directory will repeat.
3. Circled all at the top of the screen, indicating that all of the songs on the CD
will repeat.
4. Circled Sat the top of the screen, indicating that the songs on the CD will
shuffle.
5. Circled 1 and a circled S at the top of the screen, indicating that it will shuffle the songs and repeat 1.
6. Circled all and a circled Sat the top of the screen and a Dnext to the Track Number, indicating that all of
the songs in that directory will repeat and shuffle.
7. Circled all and a circled Sat the top of the screen, indicating that all of the songs on the CD will repeat and
shuffle.
8. Inext to the Track Number, return the RioVolt to the first track, and begin cycling through the introductions
of each song on the CD.
Pressing the Mode button again turns off all Repeat and Shuffle features.
Pressing the EQ Button:
Displays the current EQ setting. Each additional time the EQ button is
pressed, the RioVolt cycles through the five settings available. The EQ
options are:
1. Normal (factory default)
2. Rock
3. Jazz
4. Classical
5. Ultra Bass
The Joypad Controls:
Play/Pause — Press once to turn the RioVolt on and to play the first song
in the current selection. Pressing the Play/Pause button while a song is playing
pauses the song and the song title in the display blinks to indicate that it is in
Pause mode.
In Navi Mode — Scrolls up through folder and song choices.
Fast Forward — Press once to skip to the next track.
In Navi Mode — Scrolls to next Menu choice and selects folders and songs.
Rewind — Press once to return to a previous track.
In Navi Mode — Scrolls back to previous Menu choice and exits Navi Mode.
Stop — Press once to stop or hold to turn off.
In Navi Mode — Scrolls down through folder and song choices.
Using Your RioVolt
Return to Pg.1
Page 10
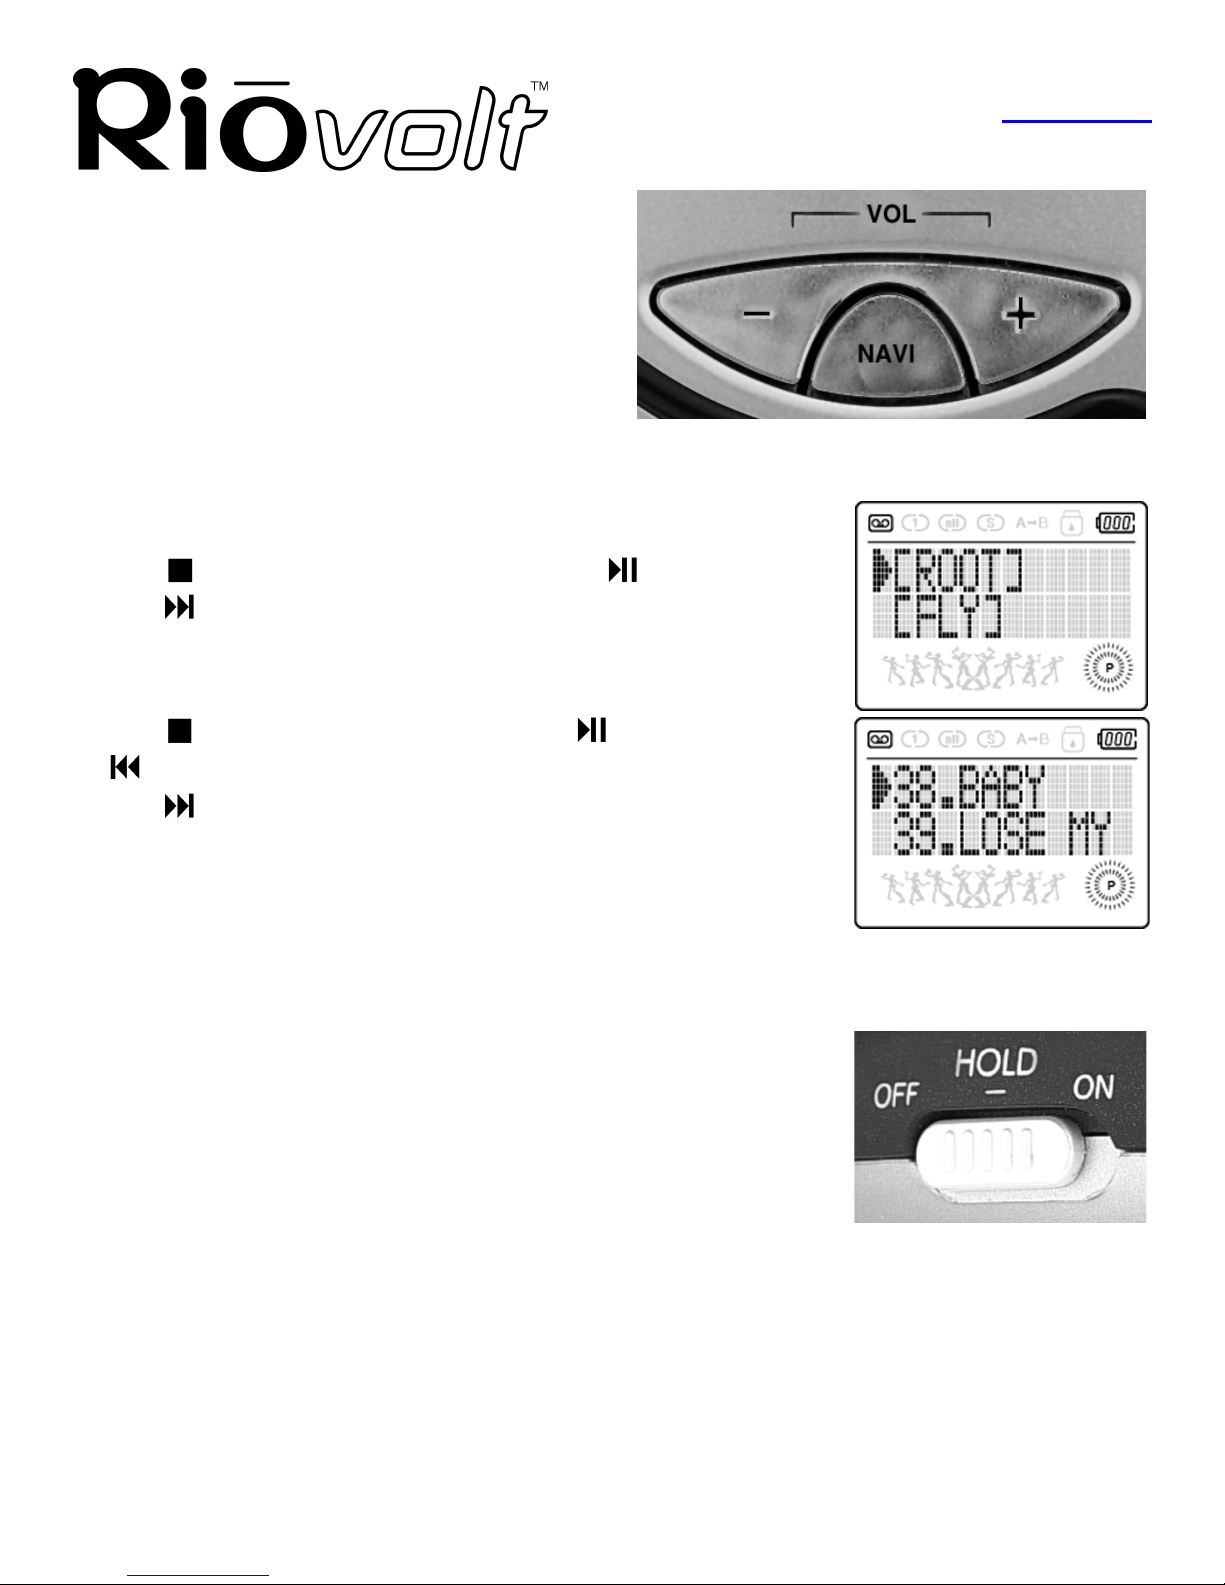
The Volume Bar and Navi Buttons:
The Volume Bar is marked with -and +signs.
-Decreases the volume level.
+Increases the volume level.
Pressing the Navi Button:
Puts the unit into Navi Mode and displays the Directories
or Albums on the CD.
Then use the Joypad Controls to navigate about the Directories.
For example:
1. Press Navi.
2. Press to move down the list of Albums or press to move up the list.
3. Press to make a selection.
This will then display the contents of the Album.
4. Press to move down the list of Track Titles, to move up the list or
to return to the previous menu level.
5. Press to make a selection.
The RioVolt then plays the selected song.
The Hold Switch
The Hold Switch is located at the side of the RioVolt.
• When in the ON position, the Hold Switch locks all of the buttons on the
RioVolt and does not allow any changes to be made to the current settings.
A padlock symbol appears at the top of the display when the Hold Switch is
enabled.
• When in the OFF position, the Hold Switch releases the buttons and allows
changes to be made.
NOTE: The Hold Switch does not turn the RioVolt power on or off. It only locks and unlocks
the buttons to avoid the RioVolt being activated accidentally.
Using Your RioVolt
Return to Pg.1
Page 11
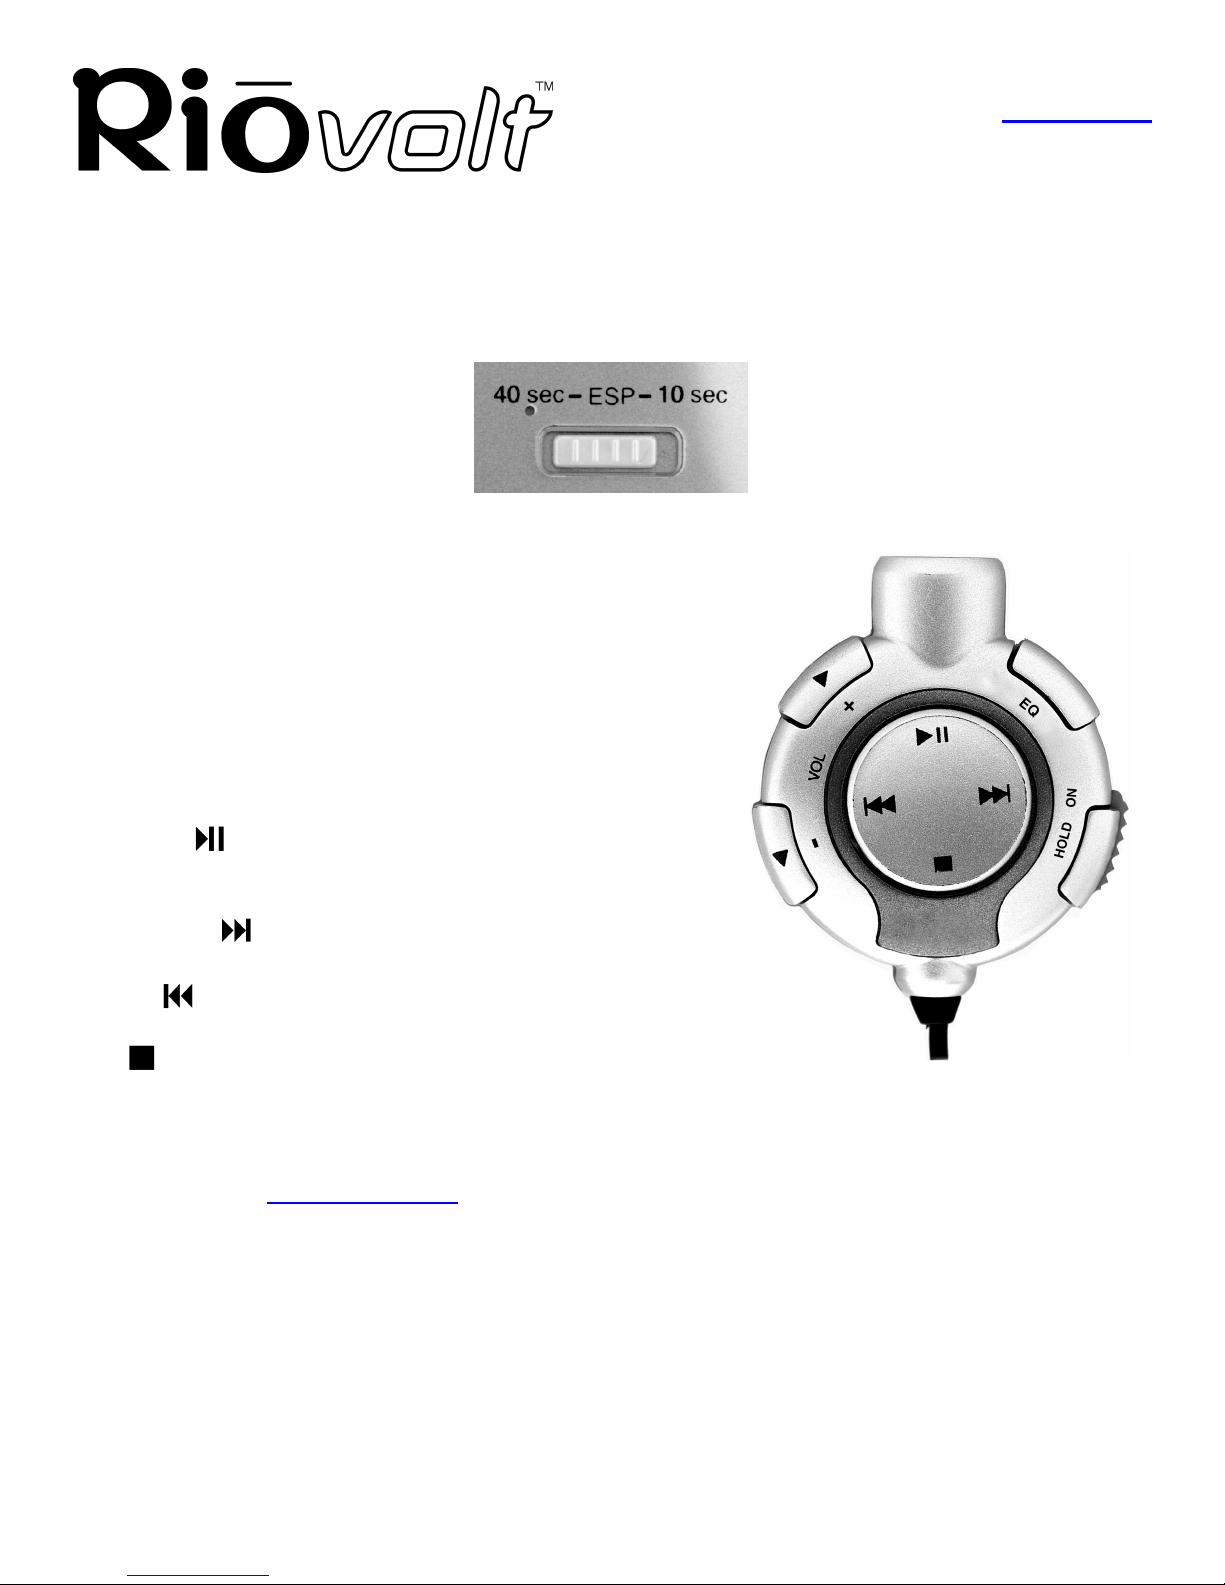
The Electronic Shock Protection (ESP) Switch
Located on the back of the RioVolt, the ESP Switch adjusts the amount of music that is stored to prevent skipping
when the RioVolt is jarred. In the ON position, ESP uses approximately 40 seconds for music CDs. In the OFF
position, ESP uses approximately 10 seconds for music CDs. 120 seconds of skip free MP3/WMA music is
always available regardless of the switch position.
The RioVolt Remote Control
The Remote Control cable plugs into the Headphones port on
the side of the RioVolt. The headphones then plug into the end of
the Remote Control. The buttons include:
Volume — Press +to increase and -to decrease the volume.
EQ — Press to cycle through the five options: Normal, Rock,
Jazz, Classical, and Ultra Bass.
Hold — Slide Hold Switch ON to lock buttons or OFF to unlock
the buttons.
Play/Pause — Press once to play a song. Pressing the Play
button when a song is in play will pause the song and cause the
title to flash.
Fast Forward — Press once to skip to next track or hold
down to fastforward through a track.
Rewind — Press once to return to previous track or hold
down to rewind through a track.
Stop — Press once to stop the current song.
How to Upgrade Your RioVolt:
Periodically, new RioVolt firmware is released to provide additional features or to support improved music
formats. Check out www.riohome.com to determine if new firmware is available.
To upgrade the RioVolt:
1. Download the new firmware from the the RioHome website.
2. Burn the unzipped file onto a Data CD with your CD-ROM Writer.
NOTE: The RioVolt will not play music contained on a CD with the upgrade firmware.
3. Place the CD in the RioVolt and press the Play/Pause button to start the RioVolt.
The RioVolt player will find the firmware, upgrade itself, and then turn off.
4. Remove the CD from the RioVolt.
The upgrade is complete. You may now resume using your RioVolt player.

Troubleshooting
Return to Pg.1
Page 12
Troubleshooting
Problem: I am unable to power up the RioVolt. This happens when using new
batteries or the AC Power Adaptor, what’s wrong?
Troubleshooting measures:
Be sure that the Hold Switch on the front of the unit is set to OFF. If the Hold Switch is in the ON position,
you will be unable to power up the unit. Place the Hold Switch to the OFF position and hold down the Play
button to power the RioVolt on.
Problem: The skip protection for CD Audio does not seem to last for 40
seconds, is this a problem?
Troubleshooting measures:
First, be sure the ESP Switch on the back of the unit is set to "40 sec" (the option for "10 sec" will reduce
skip protection but increase battery life). CD Audio skip protection requires memory storage of playback
time. The Audio CD must have time to store this information. Early in to the track less skip protection may
be available and this is normal.
Problem: During playback of MP3/WMA music CDs, the CD appears to stop,
is something wrong?
Troubleshooting measures:
The CD will stop spinning to improve skip protection and battery life. While the disc is stopped, music
continues to play out of memory. During this time the player will not skip as the disc is no longer being read.
Problem: The RioVolt is working with batteries, but when I plug in the AC
adaptor it does not work. Why?
Troubleshooting measures:
Be sure that the AC Adaptor is plugged into the proper connection. The AC Adaptor connection is the
furthest to the right when looking at the options for plugging in the device. The middle connection is a Line-
out plug and is not meant for the power adaptor. If you are still experiencing problems, be sure the Hold
Switch on the front of the device is set to OFF.
Problem: Why is it that when I play a CD with both CD Audio and MP3/WMA
files I can only play the CD Audio?
Troubleshooting measures:
When the player reads the disc, the CD Audio tracks are located first and played accordingly. MP3/WMA
files will subsequently not be read. It is recommended to use either CD Audio or MP3/WMA files when
creating your CDs.

Troubleshooting
Return to Pg.1
Page 13
Problem: I am not able to get the display to remain lit when using the player in
the dark, why not?
Troubleshooting measures:
The back-lighting is designed to go off when the player is not being accessed by button interaction. This
helps to conserve battery life. As you use the buttons to navigate the player, the light will remain on.
Problem: I am hearing some 'popping' or 'skipping' in some MP3/WMA
tracks, it is always in the same place, why is this?
Troubleshooting measures:
Try playing the same track(s) on your computer. If the same sounds are present on the computer, it could be
that the file has a sound defect that was transferred when your CD was created. Try re-encoding the same
audio track again or verify with the source of the file that it was created correctly.
Problem: When the player is left unattended and in a 'stop' or 'pause' state,
often when I return the player is 'off'. Why is this?
Troubleshooting measures:
To preserve battery life the player will shut itself off when not in use. This is normal and will help to extend
your battery life.
Problem: I cannot get the Program function to work on the player. It always
tries to set an A-B loop instead, what's wrong?
Troubleshooting measures:
The player must be stopped to create a playlist. When the player is not playing, press the Prog. button and
you will be able to add tracks to your playlist.

Frequently Asked Questions
Return to Pg.1
Page 14
Frequently Asked Questions
How do I encode, "rip", the songs from my CDs so I can listen to them on my
RioVolt?
We have included the Real Jukebox(PC) programs for your use, but there are many encoder programs
available on the Web, many of which are free. To install the programs available on the RioVolt CD:
1.) Put the CD in your computer’s CD-ROM drive.
If it does not autorun on your PC, click Start, Run, type in D:\setup32.exe,and click OK. If your CD-
ROM drive is a letter other than D, type in that letter.
2.) When the installation splash screen displays on your monitor, click Install and then the program you
wish to install.
3.) Follow the instructions on the screen to finish the installation.
4.) Refer to the Real Jukebox Help document available within the program for instructions on how to use
the program, including how to encode MP3s, create and manage playlists, and download digital music
files from their website.
Where can I find digital music files on the Internet?
There are many websites that offer legal copies of digital music for downloading. For example:
www.real.com or www.rioport.com. To download your favorite tunes from the Internet, go to your favorite
digital music website.
1.) Select the category of music you prefer.
2.) Browse through the provided track lists by artist or title, depending on the website.
3.) Select the music file you wish to download. Price of the download, artist information, and file size may
be included with the song track’s name, but if not, clicking on the music file should produce this
information.
4.) Click Download.
5.) When the File Download screen appears, select Save this program to disk and click OK.
6.) When the Save As screen appears, select the destination folder on your hard drive and click OK. The
music file will then be saved to your hard drive.
How do I burn my own CDs?
If you own a PC, the included Real Jukebox and Adaptec Easy CD Creator software included on the RioVolt
Installation CD can be used to create CDs of your own. The online Help documents available within those
programs contain instructions on how to create CDs. You should also refer to the documentation that came
with your CD burner and its accompanying software for instructions on its use in any platform.
What type of CDs can I play with the RioVolt?
You can play CDs that have MP3 and/or WMA music files or you can play regular CD audio music discs.
What are ID3 tags and how can I use this feature?
ID3 tags store the information about the music track within the file. When an MP3 or WMA file is created
from a CD with an internet connection, the file is labeled automatically. When playing or searching for these
tracks on the RioVolt, the artist name and track name will be displayed.

Frequently Asked Questions
Return to Pg.1
Page 15
Can I mix CD Audio with MP3 and/or WMA files?
No. You can play either CD Audio discs or CDs with MP3 (and/or WMA) music content. They cannot be
mixed together.
Can I put both MP3 and WMA files on the same CD?
Yes. You can play a CD with both MP3 and WMA files and can choose tracks however you like.
What is the maximum number of songs I can put on a single CD?
You can put up to 255 music tracks per CD depending on the size of the music tracks and the available space
on your CDR.
What is CDText support?
CDText is a feature of Audio CDs that displays your music’s track titles if the Audio CD was created using
CDText. The RioVolt displays CDText on CDText capable Audio CDs. Many of the current mainstream
music CDs contain CDText that will display as track titles on the RioVolt.
How much playtime can I get from 2 AA batteries?
Playtime varies with battery type and music content. However, as a guideline the following applies: MP3/
WMA CDs get up to 15 hours of music playtime. Audio CDs playtime will have approximately 6 hours of
playtime with ESP on and 8 hours with ESP off.
What kind of skip protection is there on the RioVolt?
The RioVolt uses Electronic Shock Protection to help prevent skipping during playback. When playing MP3/
WMA files, you get up to 120 seconds of skip protection. When playing Audio CDs, you have the option of
up to 40 seconds or 10 seconds of skip protection*
*There is an ESP switch on the back of the device to choose this option. This only affects Audio CD skip
protection and is available to help increase battery life.
Do I have to use the remote control when I use the headphones?
No. The remote control is optional and not required for normal operation. *Note – The remote is designed
with a larger outer connection to allow communication to the player. When the remote is not in use, the
headphone connector may appear to be too large, this is normal, and standard headphones will work properly.
Can I use any set of headphones with the remote control?
Yes. As long as you have a 1/8” stereo connection, this can be used with the remote control in place. You
can also connect any 1/8” stereo headphones directly to the device.
The CD seems to stop during playback, is this normal?
Yes. This is part of the skip protection and battery life protection. When the CD is stopped, the RioVolt plays
songs from memory. This serves as absolute shock protection during this time as the disc is not even
spinning!

Frequently Asked Questions
Return to Pg.1
Page 16
Is it normal for the player to default to a volume setting of '10' after turning the
unit back on?
Yes, this is a normal function of the RioVolt. '10' is the medium volume level for the RioVolt and the player
will default to this setting after being powered off.
Is it normal for my playlist and EQ settings to be reset when I turn the RioVolt
off?
Yes, this is a normal function of the RioVolt. Default settings are loaded when the unit is powered on.

RioVolt Specifications
Return to Pg.1
Page 17
RioVolt Specifications
Battery Lifetime (based on the alkaline battery)
Category Item Specifications
AUDIO
Number of Channels Stereo (left and right)
Frequency Range 20Hz-20KHz
Headphone Output 7mW(left) + 7mW (right) (160 max. volume)
Line out Level 0.57V ms(47k
!
!!
!
) max. volume
Signal vs. noise ratio 80dB(CD-DA), 80dB(MP3 CD)
Frequency
Characteristics +/- 2dB
CD
SUPPORT
CD Type CD-DA, CD-Text
CD-ROM Mode 1, Mode 2 Form 1
Enhanced CD, CD-Plus
CD-R/RW Read Packet Write, ISO9660, Joliet, Romeo, Multi-
Session
FILE
SUPPORT
File Type MPEG 1/2/2.5, Layer 3, WMA
Bit Rate Supports 32 Kbps ~ 320 Kbps
Tag ID3 V1 Tag, ID3 V2 2.0, ID3 V2 3.0
POWER
SUPPLY AC Adaptor DC 4.5V, 5W
Battery 1.5V, two AA batteries
GENERAL
ITEMS
Dimension Approx. 130(W) x 147(L) x 30(H) mm
Weight Approx. 235g (excluding batteries)
Operational
Temperature 0°C - 40°C
CD Type General Audio MP3/WMA
ESP 10 seconds 40 seconds 120 seconds
Max. Playback Time 8 hours 6 hours 15 hours

One Year Limited Warranty
Return to Pg.1
Page 18
One Year Limited Warranty
Our warranty to you:
SONICblue, Inc. warrants that your product will be free from defects in materials and workmanship for a period
of one year from the date of original retail purchase. If you discover a defect covered by this warranty, we will
repair or replace the product at our option using new or remanufactured components. SONCblue, Inc.'s liability
is limited solely to the repair or replacement of the defective product. This warranty is extended to the original
end user purchaser only and is not assignable or transferable to any other party. Any parts or boards removed in
the replacement or remanufacture process shall become the property of SONICblue, Inc..
How to obtain service under this warranty:
To obtain service under this warranty, please contact the dealer from whom you purchased this product or
SONICblue, Inc.’s Customer Care Centre at +44 (0) 870-870-5727 for return instructions.
The Customer Care hours of operation are:
Monday through Friday 8.00 until 19.00 (GMT)
Saturday 8.00 until 15.00 (GMT)
You must deliver the product and the original sale receipt to the dealer from whom you purchased this product or
to SONICblue, Inc. in order to obtain service under this warranty. If you return the product to SONICblue, Inc.,
you must pay for shipping to SONICblue, Inc. Our mailing address is:
SONICblue, Inc.
European Customer Care Centre
PO Box 52
7500 AB Enschede The Netherlands
Product failures not covered by this warranty:
This warranty covers defects in manufacture that arise from correct use of the device. It does not cover damage
caused by abuse, misuse, improper modification or repair, moisture, extreme heat or cold, corrosive
environments, shipping, or high voltage surges from external sources such as power line, telephone line, or
connected equipment. This warranty does not cover wear and tear on covers, housing or wiring. This warranty
also does not apply to any product with an altered or defaced serial number.
Limits of liability:
We are only responsible for the repair of this product. We will not be liable to you or anyone else for any
damages that result from the failure of this product or from the breach of any express or implied warranties.
These include damage to other equipment, lost data, lost profits, or any consequential, incidental, or punitive
damages. IN NO EVENT WILL SONICblue, INC. BE LIABLE FOR ANY AMOUNT GREATER THAN THE
CURRENTLY SUGGESTED RETAIL PRICE OF THIS PRODUCT.
THIS WRITTEN WARRANTY REPRESENTS THE ENTIRE WARRANTY AGREEMENT BETWEEN
SONICblue, Inc. AND YOU. THIS WARRANTY IS GIVEN IN LIEU OF ALL OTHER WARRANTIES,
EXPRESS OR IMPLIED, INCLUDING WITHOUT LIMITATION IMPLIED WARRANTIES OF
MERCHANTABLITY AND FITNESS FOR A PARTICULAR PURPOSE. THIS WARRANTY IS LIMITED
TO THE TERM SPECIFIED ABOVE. NO WARRANTIES, EITHER EXPRESS OR IMPLIED, WILL APPLY
AFTER THIS PERIOD. THIS WARRANTY MAY NOT BE ALTERED IN ANY WAY OTHER THAN IN

One Year Limited Warranty
Return to Pg.1
Page 19
WRITING BY AN OFFICER OF SONICblue, INC. THIS WARRANTY GIVES YOU SPECIFIC LEGAL
RIGHTS AND YOU MAY ALSO HAVE OTHER RIGHTS.
EU Declaration of Conformity
We; DIAMOND Multimedia Systems Vertriebs GmbH
Moosstrasse 18b
D-82319, Starnberg
Germany
On behalf of; SONIC | blue Incorporated
2841 Mission College Blvd.
Santa Clara, CA. 95054
U.S.A.
Hereby declare under our sole responsibility that the following product (s) conform to the requirements of the
European Parliament Council Directive 1999/5/EC dated 9th March 1999. And to which this declaration is
related the product (s) listed are in conformity with the following relevant harmonized European Standards o
r
other normative documents, the references of which have been published in the Official Journal of the European
Communities / European Union.
Product (s): RIO Volt Portable CD Player
Harmonized Standards: EN 55022: 1994, A1 ’95, A2 ’97 Specification of limits and methods of
measurement for radio Interference
characteristics of Information Technology ( ITE )
Equipment.
EN 50082-1: 1998 Electromagnetic Compatibility, Generic Immunity
Standard, Part 1. Residential, Commercial and
Light Industry.
EN 50332-1: 2000 Maximum sound pressure level measurement
methodology and limit considerations. Part 1
General method for “one Package equipment”.
CEI/IEC 60065: 1998 Audio, Video, and similar electronic apparatus
Safety Requirements.
In accordance with the terms of Directives 1999/5/EC, 89/336/EEC, 73/23/EEC and Council Decision 98/482/EC
the original signed Declaration is retained by us in the product compliance folder. Upon request photocopies
may be available.
Date: 07 February 2001 Name of Authorizing Person
Scott Naccarato
Place: St. Ingbert, Germany Regulatory Compliance Manager

Glossary
Return to Pg.1
Page 20
Glossary
AAC
Advanced Audio Coding (AAC) is one of the audio compression formats defined by the MPEG-2 specification.
AAC used to be called NBC (Non-Backward-Compatible), because it is not compatible with the MPEG-1 audio
formats. AAC may eventually replace MP3 since it offers better sound quality and greater file compression.
Bitrate, file compression
Bitrate denotes the average number of bits that one second of audio data will consume. The size of a digital audio
file is determined by the bitrate used when encoding the file. The higher the bitrate used, the higher the sound
quality and the larger the file size. For example, for MP3s a bitrate of 128k is usually very close to CD quality,
and takes up about 1MB per minute of music. At a 64k bitrate, the MP3 sound quality is similar to that of an FM
radio signal, but you may get around two minutes of music in that same 1MB of storage space.
Codec
Depending on the context and kind of technology involved, codec may be defined in two ways.
In telecommunications, a codec is usually a "coding/decoding" chip used to translate between digital and analog
transmissions. A modem uses one to interpret incoming analog signals and converts the digital data stream
coming from the computer into analog.
A codec is also defined as a compression/decompression algorithm. Codecs are used to shrink large files or data
streams, often for efficient transmission over a network, and then decode them when they are displayed.
The RioVolt supports the following digital audio file codecs:
•MP3
•WMA
DRM, security
Digital Rights Management (DRM) technologies protect copyright ownership of digital information. DRM
became an issue with the rise of MP3 technology and Internet distribution of music. DRM platforms serve as a
security “wrapper” around digital audio supporting Internet distribution while at the same time protecting and
managing rights related to that digital information.
Encode, “Rip” (a CD)
Encoding, or “ripping”, refers to converting an audio file from a CD-ROM into a compressed digital audio
format, such as MP3 or WMA, that may be played on the RioVolt, on the computer, or on a portable Rio Digital
Audio Player.
Gracenote
Formerly known as CDDB, Gracenote is an vast database of CD information that includes disc name, song titles
and other information. Gracenote supports hundreds of third party software CD players. Access to the Gracenote
service is offered free of charge to end-users. Visit the Gracenote website for more information.
Other manuals for SP100
1
This manual suits for next models
7
Table of contents
Other Sonic Blue CD Player manuals

Sonic Blue
Sonic Blue RioVolt SP65 User manual

Sonic Blue
Sonic Blue RioVolt SP350 User manual

Sonic Blue
Sonic Blue RioVolt SP50 User manual

Sonic Blue
Sonic Blue Volt SP250 User manual

Sonic Blue
Sonic Blue Volt SP60 User manual

Sonic Blue
Sonic Blue Volt SP150 User manual

Sonic Blue
Sonic Blue SP100 User manual

Sonic Blue
Sonic Blue Volt SP150 User manual

Sonic Blue
Sonic Blue Volt SP250 Manual


