Sonic GLIDE Quick start guide

ASSEMBLY
INSTRUCTIONS
&
OWNERS MANUAL


1
1st Edition, 2015
IMPORTANT:
This manual contains important safety, assembly and service information.
Read it before your child takes the first ride and keep it for reference.
If you have any questions or do not understand something, please take
responsibility for your child’s safety and consult with your retailer.
Thank you for buying Sonic! We’re proud to be your brand of choice.
Moore Large hereby declares that the Sonic Glide is in compliance with the
essential requirements and other relevant provisions of Directive 2009/48/EC on
the safety of toys and that it exceeds the requirements of toy safety standard EN
71.
If you have any questions about the safe use or assembly of this product, please
contact your retailer immediately.
Exclusively distributed by Moore Large & Co. Ltd. DE24 9GL
t: 01332 274252 e: service@moorelarge.co.uk

2
CONTENTS
COMPLIANCE & CONTACT INFORMATION
1
A SPECIAL NOTE TO PARENTS & GUARDIANS
3
Before each Use
4
Safety First
4
ASSEMBLY
5
Required tools
5
Front wheel
5
Handlebars & stem
6
Saddle & Seat post
7
CORRECT FIT
7
MAINTENANCE
8
Cleaning
8
Storage
8
Lubrication
8
Special note
8

3
A SPECIAL NOTE TO PARENTS & GUARDIANS
This Manual contains many “Warnings” concerning the consequences of failure
to follow safe use practices.
The combination of the safety alert symbol and the word WARNING indicates a
potentially hazardous situation which, if not avoided, could result in serious injury
or death.
Because it is impossible to anticipate every situation or condition which can
occur while riding, this manual makes no representation about the safe use of the
balance bike under all conditions.
There are risks associated with the use of any balance bike which cannot be
predicted or avoided, and which are the sole responsibility of the parent or
guardian.
As a parent or guardian, you are responsible for the activities and safety of your
child, and that includes making sure that this toy is properly fitted to the child;
that it is in good repair and safe operating condition and that you & your child
have learned and understood the safe operation of the Sonic Glide.
WARNING: Make sure that your child always wears an approved bicycle
helmet when riding and that you make sure that your child understands
that the helmet is for cycling only, and must be removed when not riding.
A helmet must not be worn while playing in play areas, on playground equipment,
while climbing trees, or at any time while not riding a bicycle as there is an
increased risk of strangulation.
Failure to follow this warning could result in serious injury or death.
The Sonic Glide is designed to be ridden by children under parental supervision at
all times.
WARNING: ADULT ASSEMBLY ONLY
Before assembling, please ensure you have read and understood all
warnings and instructions. Once assembled, do not dismantle.
Repeated re-assembly may cause irreparable damage and lead to injury of your
child.
Please retain this document for future reference. If you sell or give this product to
someone else, please include this Owner‛s Manual, and ask the new owner to
read the instructions thoroughly before using.

4
PARENTS & GUARDIANS:
Before each use:
•Check that the balance bike is correctly assembled.
•Check that all fittings and components are secure and inspect for loose, worn,
damaged or missing fittings and components. Tighten and adjust as necessary.
•Do not use if any components or fittings are damaged, broken or missing.
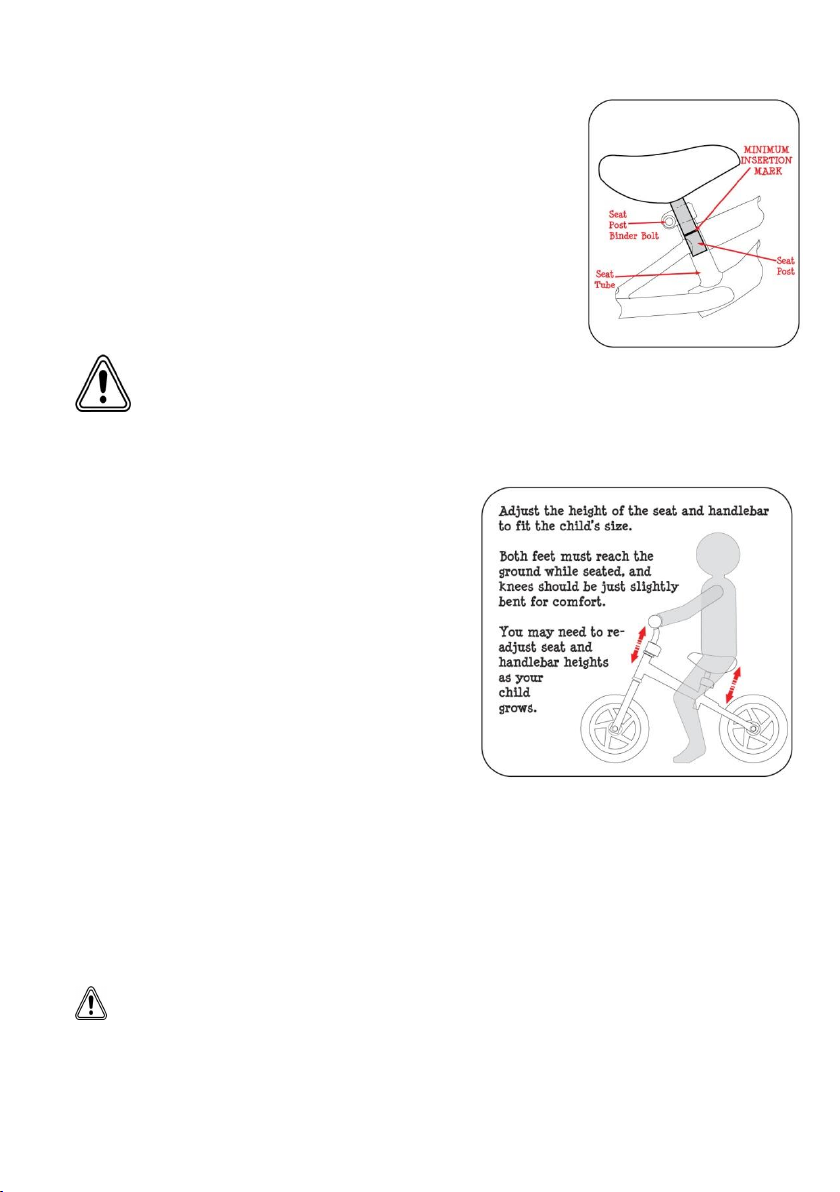
Make sure the saddle and handlebar stem are parallel to the Sonic Glide centre
line and clamped tight enough so that you can’t twist them out of alignment.
•Make sure the handlebar grips are secure and in good condition. If not, have
your dealer replace them. Loose or damaged handlebar grips can cause your
child to lose control and fall. Unplugged handlebars can cut your child and cause
serious injury in an otherwise minor accident.
•Remove all packaging before giving this toy to your child.
Safety First. A child’s safety is your responsibility:
• This toy is intended for use in safe, supervised play by children aged 18-60
months. It must only be used under the direct supervision of an adult.
•Make yourself and your child aware of the safe use of the bicycle before each
outing:
•Warning! Protective equipment should be worn at all times including an EN-
approved bicycle helmet.
•Do not allow your child to ride whilst wearing anything that may obstruct their
vision or hearing.
•Do not allow your child to ride without shoes.
•Ensure your child wears bright, visible clothing that is not so loose that it can be
tangled in the Sonic Glide or snagged on other obstacles.
•Do not allow the carrying of passengers or other loads.
•The Sonic Glide has no brakes other than your child’s feet. Do not use on roads or
on pavements.
•Block access to stairs, steps, bodies of water and uneven surfaces before using
any ride-on toy.
Avoid areas involving motor vehicles and obstacles/hazards including hills, curbs,
stairs, sewer grates, or pools.
•Open fires and heating appliances (particularly portable types) should be
adequately guarded by a nursery type fire guard.
•Keep all hazards such as knives and hot drinks out of your child’s reach.
•There is an increased risk of collision with glass doors and furniture.
•Be particularly careful of hazards presented by items on tablecloths.
•Only use on flat, horizontal ground. Do not use on raised surfaces or steps. Avoid
sharp bumps and surfaces with sand, gravel, dirt, leaves or other debris.
•Maximum rider weight: 20kg. This balance bike is designed for safe, recreational
use by one child at a leisurely pace.
•This balance bike is a toy and does not meet the requirements of Road Vehicle
Regulations. Do not use on public highways.
•Do not allow your child to cross the street on the Sonic Glide.

5
ASSEMBLY
Required Tools
To complete assembly of your Sonic Glide, you will need the supplied double
headed allen key and a multi spanner.
Prior to assembly, check that all parts are present. If any parts are missing or
damaged, please contact one of our customer service representatives by
telephone on 01332 274242, or by e-mail at customer.sevice@moorelarge.co.uk
A. Front Wheel Installation
•Present the front wheel ensuring the axle is
fully located at the top of the fork slots.
•Ensure that the retaining washers are correctly
seated in the retention slot on each front fork leg.
•Spin the wheel to make sure that it is centred
in the frame and does not wobble from side
to side.
•Tighten both domed axle nuts securely with your spanner.
WARNING: Do not remove or disable the retaining washers. These are secondary
retention devices. As this name implies, they serve as a back-up for a critical
adjustment. If the wheel is not secured correctly, the secondary retention device
can reduce the risk of the wheel disengaging from the fork. Removing or disabling
the secondary retention device may also void the warranty.

6
B. Handle Bar & Stem Installation
•Ensure the front forks are facing forward (the retention
slot should be to the front) and the axle of the front
wheel is perpendicular to the line of the frame.
•Remove any protective cover from the stem wedge and
insert the stem in the frame.
•Holding the handlebars parallel to the front wheel axle,
Insert the stem into the frame to the desired height.
•Make sure the minimum insertion mark is within the
frame and no longer visible.
•Tighten the quill expander bolt with the provided tool.
•Ensure the handlebars are correctly positioned within the handlebar clamp and
tighten the handlebar clamp bolt. Adjust and repeat as necessary.
WARNING: A quill stem’s Minimum Insertion Mark must not be visible above the
top of the headset. If the stem is extended beyond the Minimum Insertion Mark
the stem may break or damage the fork’s steerer tube, which could cause your
child to lose control and fall.
WARNING: An insufficiently tightened quill expander bolt or handlebar clamp
bolt may compromise steering action, which could cause your child to lose
control and fall. Place the front wheel of the Sonic Glide between your legs and
attempt to twist the handlebar/stem assembly. If you can twist the stem in relation
to the front wheel, turn the handlebars in relation to the stem, the bolts are
insufficiently tightened and will need tightening.

7
C. Saddle & Seat Post Installation
•Loosen the seat post binder bolt with the tools provided.
•Insert the seat post into the seat tube of the bicycle frame.
•Position the top surface of the seat parallel to the line of
the bicycle frame.
•Make sure the minimum insertion mark is within the
frame and no longer visible.
•Securely tighten the seat post binder bolt.
WARNING: No “Minimum Insertion Mark”should be visible on any
assembled bicycle. Any post or stem extended beyond the Minimum
Insertion Mark may break or damage bicycle frame, which could cause
your child to lose control and fall.
Always pay particular attention to the “Minimum Insertion” mark.
CORRECT FIT
Correct fit is an essential element of cycling
safety, performance and comfort. If the Sonic
Glide does not fit properly, your child could
lose control and fall.
A. Saddle position
•Loosen the seat post clamp
•Raise or lower the seat post in the seat tube
•Make sure the saddle is straight fore and aft
•Re-tighten the seat post clamp.
•Ensure the seat post does not project beyond
the “Minimum Insertion Mark”
B. Handlebar height
•Loosen the binder bolt
•Raise or lower the stem in the head tube
•Make sure the stem is straight fore and aft
•Ensure the stem does not project beyond the “Minimum Insertion Mark”
•Re-tighten the binder bolt.
WARNING: The Minimum Insertion Mark must not be visible on any assembled
bicycle. Any post or stem extended beyond the Minimum Insertion Mark, may
break or damage bicycle frame, which could cause your child to lose control and
fall.
Always pay particular attention to the “Minimum Insertion” mark.

8
MAINTENANCE
Each time a bicycle is ridden, its condition changes.
The more your Sonic Glide is ridden, the more maintenance may be required. We
strongly recommend that you spend a little time on regular maintenance tasks to
keep your Glide safe to ride and to minimise running costs.
Cleaning:
Sponge clean with warm water and a mild soap as and when required,
Do not use abrasives or bleach.
Dry with a cloth and polish with car or furniture wax.
Avoid leaving your Glide in the rain or exposed to corrosive materials.
Storage
Keep your bicycle in a dry location protected from the weather and the sun.
Ultraviolet rays may cause paint to fade or rubber and plastic parts to crack.
Before storing your bicycle for a long period of time, clean and lubricate all
components and wax the frame.
Do not store near electric motors as emissions may affect the rubber and paint.
Do not cover with plastic as "sweating” will result which may cause rusting.
Lubrication
Do not over-lubricate. Remove excess lubricant to prevent dirt build up. Never
use a degreaser or water dispersant in place of a lubricant.
The frequency of lubrication should increase with use in wet or dusty conditions.
However, as a minimum, we recommend that the following components are
detached, cleaned and lubricated at least once a year. If you are unsure about
any aspect of the breaking down and re-assembly of your Sonic Glide, please
consult a local expert bicycle retailer.
•Wheels
•Seat Post
•Handlebar stem & headset.
Note:
Over a period of time, components will wear out and need replacing. This is quite
normal and is not covered by any guarantee or warranty. When replacing
components, ensure only good quality, parts are fitted. The use of any other
substitute presents a great risk to the safety of your child and will shorten the life
of the Sonic Glide. Riding in coastal areas exposes your cycle to higher levels of
corrosive salts. Wash your cycle frequently and wipe or spray all unpainted parts
with an anti-rust treatment. If paint has become scratched or chipped to the metal,
use touch up paint to prevent rust. Clear nail polish can also be used as a
preventative measure. Regularly clean and lubricate all moving parts, tighten
components and make adjustments as required.


This manual suits for next models
3
Table of contents