SONIQ iM311B User manual


TO PREVENT FIRE OR SHOCK HAZARD, DO NOT EXPOSE THE UNIT TO RAIN OR MOISTURE.
TO AVOID ELECTRICAL SHOCK, DO NOT OPEN THE CABINET. REFER SERVICING TO QUALIFIED PERSONNEL
ONLY.
THE APPARATUS SHALL NOT BE EXPOSED TO DRIPPING OR SPLASHING AND THAT NO OBJECTS FILLED WITH
LIQUID, SUCH AS VASES, SHALL BE PLACED ON THE APPARATUS.
DO NOT TOUCH THE LENS
CAUTION: INVISIBLE LASER RADIATION
WHEN OPEN AND INTERLOCKS DEFEATED
AVOID EXPOSURE TO BEAM
Warnings:
• TheACadapterisusedas disconnect deviceanditshouldremainreadily operableduringintendedused.In orderto
disconnecttheapparatusfromthemainscompletely,theACadaptershouldbedisconnectedfromthemainssocketoutlet
completely.
• Minimum10cm(4inches)distancesaroundtheapparatusforsufcientventilations.
• Batteriesshallnotbeexposedtoexcessiveheatsuchassunshine,reorthelike.
• Theventilationshouldnotbeimpededbycoveringtheventilationopeningswithitemssuchasnewspaper,table-cloths,
curtains,etc.
• Nonakedamesourcessuchaslightedcandlesshouldbeplacedontheapparatus.
On Safety
Asthelaserbeamusedinthisdiscplayercouldbeharmfultotheeyes,donotattempttodisassemblethecasing.Refer
servicingtoqualiedpersonnelonly.
• Donotputanyforeignobjectsinthedisccompartment.Ifyoudoso,thelaserbeaminterlockmaybedefeatedallowing
thelasertoremainonwhenthelidisopened.
• DonotputanyforeignobjectsintheDCINjack.Shouldanyobjectsorliquidsfallintotheunit,disconnectthepower
supplyandhavetheunitcheckedbyqualiedpersonnelbeforeanyfurtheroperation.
On Operation
SincetheCDsystemoffersawidedynamicrange,thepeaksofthehighlevelinputsarerecordedwithhighdelity,andthe
noiselevelisverylow.Donotturnupthevolumewhilelisteningtoapartofthediscwithnoaudiosignalsorverylowlevel
inputs.Ifyoudoso,thespeakersmaybedamagedwhenthepeaklevelofthesoundisplayed.Thelensofthelasershould
bekeptclean.Donottouchthelens.Ifyoudoso,thelensmaybedamagedandtheunitwillnotoperatecorrectly.
On Use
Usetheapparatusinmoderateclimates.Neverusetheunitwhereitwouldbesubjectto:
- Heatsourcessuchasradiatorsorairducts.
- Directsunlight.
- Excessivedust.
- Moistureorrain.
- Mechanicalvibrationorshock.
- Unevensurface.
• Donotplaceanyheavyobjectsontopoftheunit.
• WhentheunitisusedwithanACpoweradapter,donotwraptheunitinacloth,blanket,etc.Ifyoudoso,thetemperature
insideandoutsidetheunitmayriseconsiderably,resultinginmalfunctioningoftheunit.
• Iftheunitisbroughtdirectlyfromacoldtoawarmlocation,orisplacedinaverydamproom,themoisturemaycondense
onthelensinsidetheunit.Shouldthisoccur,theunitwillnotoperate.Inthiscase,removethediscandleavetheunit
inawarmplaceforseveralhoursuntilthemoistureevaporates.
• Fortheunittooperateatitsbest,itshouldnotbesubjecttotemperaturesbelow41°F(5°C)orabove95°F(35°C)
This product contains
a low power laser
device.
SAFETY PRECAUTIONS
- 1- - 2-
TABLE OF CONTENTS
Safety Precautions..............................................................................................................................................................1
Accessories.........................................................................................................................................................................2
Location of Controls...........................................................................................................................................................3
Remote Control.................................................................................................................................................................3-4
Power Sources..................................................................................................................................................................4-5
Volume Adjustment.............................................................................................................................................................5
Clock Setting........................................................................................................................................................................5
Listening to the Radio.........................................................................................................................................................6
CD Playback.........................................................................................................................................................................6
Repeat Playback..................................................................................................................................................................7
Random Playback................................................................................................................................................................7
Programmable CD Playback..............................................................................................................................................7
Listening to Your iPod........................................................................................................................................................8
Preset EQ.............................................................................................................................................................................9
Display Function.................................................................................................................................................................9
Timer Setting.......................................................................................................................................................................9
Sleep Timer Setting...........................................................................................................................................................10
Aux In Connection.............................................................................................................................................................10
Maintenance.......................................................................................................................................................................10
Troubleshooting Guide.....................................................................................................................................................11
ACCESSORIES
RemoteControl..........................................................................................................................................................x1
ACAdapter.................................................................................................................................................................x1
Hotline.........................................................................................................................................................................x1
WarrantyCard.............................................................................................................................................................x1
InstructionManual.......................................................................................................................................................x1

- 3- - 4-
Unit
1. CDDoor
2. LeftSpeaker
3. STANDBYIndicator
4. STANDBY/ONButton
5. RemoteSensor
6. PLAY/PAUSEButton
7. STOP/BANDButton
8. PROG/MEM/ Button
9. -VOL+(VOLUME)Buttons
10. iPodDocking
11. RightSpeaker
12. Display
13. TIMERIndicator
14. FUNCTIONButton
15. /TUNING+Button
16. /TUNING-Button
17. SLEEPButton
18. EarphoneJack
19. AUXINJack
20. DCIN12VJack
21. FMAntenna
REMOTE CONTROL
1. PRESETEQButton
2. ON/STANDBYButton
3. SLEEPButton
4. PROG/MEM/ Button
5. RANDOMButton
6. /MEM.UPButton
7. STOP/BANDButton
8. FUNCTIONButton
9. TIMERButton
10. DISPLAYButton
11. / Button
12. VOLUME+/-Buttons
13. PLAY/PAUSEButton
1
8
10
9
11
12
13
2
3
4
5
6
7
LOCATION OF CONTROLS
Using the Remote Control Correctly
• PointtheremotecontrolattheREMOTESENSORlocatedontheunit.
• Whenthere isa strongambient lightsource,the performanceof theinfrared REMOTESENSORmaybe degraded,
causingunreliableoperation.
• Therecommendedeffectivedistanceforremoteoperationisabout6meters(19feet).
Battery Replacement
When the battery becomes weak, the operating distance of the remote control is greatly reduced and you will need to
replaceit.
Note:Iftheremotecontrolisnotgoingtobeusedforalongtime,removethebatterytoavoiddamagecausedbybattery
leakagecorrosion.
WARNINGS:
• Donotdisposeofbatteryinre;batterymayexplodeorleak.
• Batteryshallnotbeexposedtoexcessiveheatsuchassunshine,reorthelike.
• Dangerofexplosionifbatteryisincorrectlyreplaced.Replaceonlywiththesameorequivalenttype.
CAUTION:Whendiscardingbatteries,environmentalproblemsmustbeconsideredandlocalrulesorlawsgoverningthe
disposalofthesebatteriesmustbestrictlyfollowed.
To Change Battery
ATTENTION
Removetheplasticsheetbefore
operatingtheremotecontrol.
1. Openthebatterydoor.
2. InsertoneCR2025(3V)sizebattery.
REMOTE CONTROL
POWER SOURCES
Using the AC Adapter
UsinganACadapterotherthantheonesuppliedwiththeunitmaydamagetheunit.ThisACadapteroperatesonAC
100~240V,50Hz/60Hz.
AC adapter
To“DCIN12V”jack

- 5- -6 -
CAUTIONS:
• Beforeuse,ensuretheratedvoltageoftheadaptermatchesyourlocalvoltage.
• TheincludedACadapterisforusewiththisunitonly.Donotuseitwithotherequipment.
• Ifyouarenotgoingtousetheunitforalongtime,disconnecttheACadapterfromthewalloutletcompletely.
• WhenevertheACadapterispluggedintoawalloutlet,electricityisrunningthroughtheunit,evenwhenthepowerswitch
isturnedoff.
FM ANTENNA
• DonotconnecttheFMantennatoanoutsideantenna.
POWER SOURCES
To Adjust the Volume
UsetheVOL + / -buttonstoadjusttheVOLUMElevels.
For Personal Listening
Connectheadphones(Ø3.5mmstereominiplug)tothe PHONESjack.AdjusttheVOLUMElevelstoobtainthedesired
volume.
Whenheadphonesareconnected,thespeakersareautomaticallydisconnected.
CAUTION: Excessivesoundpressurefromearphonesandheadphonescancausehearingloss.
VOLUME ADJUSTMENT
CLOCK SETTING
1. PressandholdthePROG/MEM/ buttonuntilthehourdigitsblink.
2. Pressthe or buttontoadjustthe desired hoursthenpress thePROG/
MEM/ buttononcetoconrm.Theminutedigitswillblink.
3. Pressthe or buttontoadjustthedesiredminutesthenpressthePROG/
MEM/ buttononcetostartclock.
Notes:
• IftheACpowerisinterrupted,theclockwillrestoreto“0:00”,andyouneedtoreset
it.
• InCD/RADIO/iPod/AUXINmode,presstheDISPLAYbuttononcetodisplaythe
currenttime.
SettingtheclockcanonlybedoneinSTANDBYmode.
• IftheunitispluggedinwiththesuppliedACadapterandtheunitisinstandby
mode,thestandbyindicatorilluminates.
1. Pressthe STANDBY/ON buttontoturntheuniton.
2. PresstheFUNCTIONbuttontoradiomode.
3. Pressthe STOP/BANDbuttontoselectaband(MW/FM).
4. Pressthe or buttontotuneintoastation.
• AdjusttheVOLUMElevelstoobtainthedesiredvolume.
Searching for a Station Automatically
• Pressandholdthe or buttonuntilthetunerstartssearchingforastation,thenrelease.Aftertuninginastation,the
searchstops.
• Thesearchmaynotstopatastationwithaveryweaksignal.
Presetting Stations
Theunitcanstoreatotalof20stationsinmemory(10FM,10MW).Presettingallowsyoutotuneintoastationdirectly.
1. Tuneintoadesiredstation.
2. PressthePROG/MEM/ button.Thepresetnumberand“MEMORY” willblink.
3. Pressthe /MEM.UPbuttontoselectthepresetnumber.
4. PressthePROG/MEM/ buttonagaintostoreitinmemory.
5. Repeatsteps1-4tostoreotherstations.
Tuning in to a Preset Station
Pressthe STOP/BANDbuttontoselectMWorFMthenpressthe /MEM.UPbuttontoselectapresetnumber.
For Better Reception
FM:Fullyunwindtheantennawire.Extendtheantennawireandplaceitinthepositionthatsoundsbest.
Note:DonotconnecttheFMantennatoanoutsideantenna.
Whenthereceptionisgood,the“((STEREO))”indicatorwillappearonthedisplay.
MW:RepositiontheunittogetbetterMWreception.
Note:
TopreventinterferencetotheMWsignal,pleasekeeptheACadapter1meter(3.17feet)awayfromthemainunit.
( )
()
LISTENING TO THE RADIO
CD PLAYBACK
1. Pressthe STANDBY/ONbuttontoturnontheunit.
2. HoldthenotchtoopentheCDdoorastherightgureshown.Placeadiscinthecentrewiththelabelsidefacingfront
andthenclosetheCDdoorgently.
3. PresstheFUNCTIONbuttontoCDmode.“--”blinksonthedisplay,thenthetotaltrackno.isshownonthedisplay.
4. Pressthe PLAY/PAUSEbuttontostartplaying.
• AdjusttheVOLUMElevelstoobtainthedesiredvolume.
To Pause Playback
• Pressthe PLAY/PAUSEbutton.
• Toresumeplayback,pressthe PLAY/PAUSEbuttonagain.
To Stop Playback
• Pressthe STOP/BANDbutton.
Skipping to Another Track
• Presseitherthe or buttonaccordingtothedesireddirection.
• Pressthe buttontoskiptothebeginningofthe currenttrackorprevious
track.Pressthe buttontoskiptothebeginningofthenexttrack.
Locating a Particular Point on a Track
• Keepeitherthe or buttonpressedduringplayback,accordingtothedesireddirection,andreleaseatthedesired
point.
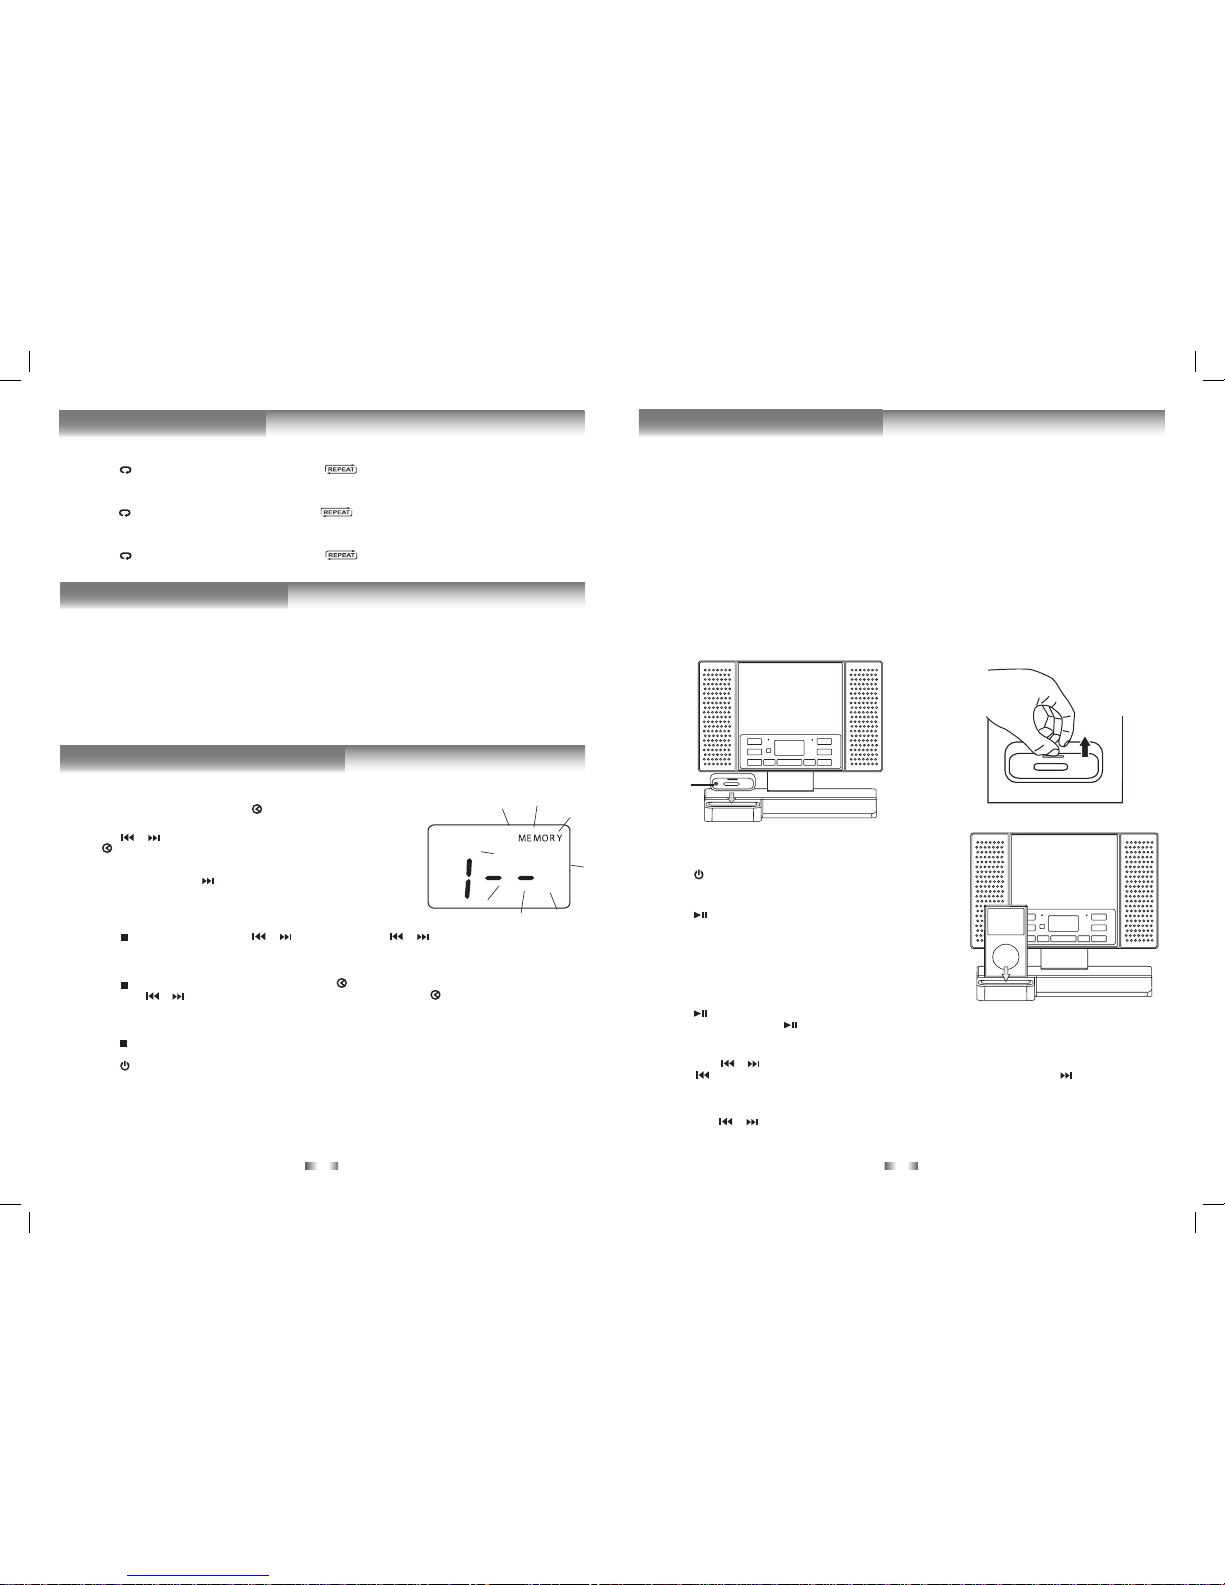
1. InCDstopmode,pressthePROG/MEM/ buttonand“MEMORY”&“--”will
blinkonthedisplay.
2. Pressthe or buttontoselectthedesiredtrackthenpressthePROG/
MEM/ buttontostorethetrackinmemory.
3. Toaddadditionaltracks,repeatstep2(upto20tracks).
4. To start playback,press the PLAY/PAUSE button.Duringprogrammed
playback,“MEMORY”remainson.
To Check the Program:
• Pressthe STOP/BANDbuttonandthe or button.Eachtimethe or buttonispressed,thetracknumber
appearsonthedisplay.
To Change the Programmed Tracks during Program Playback:
• Pressthe STOP/BANDbuttonandpressthePROG/MEM/ buttonrepeatedlytosearchtheprogramnumber,then
presseitherthe or buttontoselectthedesiredtrack.PressthePROG/MEM/ buttonagaintoregisterthenewly
selectedtrackintoprogram.
To Erase the Whole Program, Do One of the Following:
• Pressthe STOP/BANDbuttontwice.
• PresstheFUNCTIONbuttontochangetoradio/iPod/AUXINmode.
• Pressthe STANDBY/ONbuttontoturnofftheunit.
• ToopentheCDdoor.
- 7- - 8-
REPEAT PLAYBACK
Repeat Current Track
• Pressthe /MEM. UPbuttonontheremotecontroluntil“ ”blinksonthedisplay.Thecurrenttrackwillbeplayed
repeatedly.
Repeat the Entire CD
• Pressthe /MEM. UPbuttonontheremotecontroluntil“ ”stopsblinkingandremainson.Alltrackswillbeplayed
repeatedly.
Cancel Playback Mode
• Pressthe /MEM. UPbuttonontheremotecontroluntil“ ”disappears.
RANDOM PLAYBACK
Alltracksonthedisccanbeplayedinrandomorder(Usingtheremotecontrolonly).
Random Playback
• Press the RANDOM button on the remote control until “RANDOM” appears on the display. All tracks will be played
randomly.
Afteralltrackshaveplayed,theunitwillstopautomatically.
Cancel Random Playback
• PresstheRANDOMbuttonontheremotecontroluntil“RANDOM”disappears.Theunitwillreturntonormalplayback.
Aprogramofupto20trackscanbesettoplayinapresetorder.
PROGRAMMABLE CD PLAYBACK
Removing the iPod Dock Adapter
1. RemovetheiPodDockAdapterasshowninthe
guretotheright.
2. Replaceitwithanotheroneyouneed.
iPod Dock
Adapter
(not
included)
CompatibleiPodTypes
• iPodnano(1stgeneration)1GB,2GB,4GB
• iPodnano(2ndgeneration)2GB,4GB,8GB
• iPodnano3rdgeneration(video)4GB,8GB
• iPodnano4thgeneration(video)8GB,16GB
• iPod5thgeneration(video)30GB,60GB,80GB
• iPodclassic80GB,120GB,160GB
• iPodtouch1stgeneration8GB,16GB,32GB
• iPodtouch2ndgeneration8GB,16GB,32GB
Installing the iPod Dock Adapter
1. ChoosetheiPodDockAdapterthattsyouriPod(Theadapter
isnotincludedintheaccessory,pleaseuseitthatcomeswith
youriPod).
2. InsertyouriPodDockAdapterintothedockuntilitsitsrmlyin
place.
Inserting Your iPod
1. EnsuretheappropriateiPodDockingAdapterisinstalled.
2. InsertyouriPodintotheconnectorinthedock.
3. Pressthe STANDBY/ONbuttontoturnontheunit.
4. PresstheFUNCTIONbuttonrepeatedlyuntiltheindicator“iPod”
appearsonthedisplay.
5. Pressthe PLAY/PAUSE buttontostartplaying.
Notes:
• TheiPodwillchargeautomatically(untilfullycharged)onceitis
dockedinthecradle.
• Topreventinterferencetothe MWsignal, pleaseswitchoff the
iPodwhiletheradioisplaying.
Pausing Playback
• Pressthe PLAY/PAUSEbutton.
• Toresumeplayback,pressthe PLAY/PAUSEbuttonagain.
Skipping to a Another Track
• Presseitherthe or buttonaccordingtothedesireddirection.
• Pressthe buttonto skipto thebeginning of thecurrent trackorprevioustrack.Pressthe buttonto skipto the
beginningofthenexttrack.
Locating a Particular Point on a Track
• Keepeitherthe or buttonpressedduringplayback,accordingtothedesireddirection,andreleaseatthedesired
point.
Note: Pleaserefertotheowner’smanualthatwasincludedwithyouriPodformoredetails.
LISTENING TO YOUR iPod

- 9- - 10 -
Thissystemsupportsavarietyofequalizersandsoundeffects.
Duringplayback,pressthePRESET EQbuttontoselectadesiredmusicmode.EachtimethePRESET EQbuttonispressed,
themusicmodewillbechangedtothenextoneasfollows:
-> (ROCK)->-> (CLASSIC)
PRESET EQ
CD Mode
1. Duringplayback,presstheDISPLAYbuttonrepeatedlytoshufebetweentheCDplaybackmodeandthecurrenttime.
2. Whenstopped,presstheDISPLAYbuttontoshufebetweenthetotalnumberofCDtracksandthecurrenttime.
Radio Mode
• PresstheDISPLAYbuttontoshufebetweenthecurrentradiostationandthecurrenttime.
iPod/AUX IN Mode
•PresstheDISPLAYbuttontoshufethe“iPod”or“AU”iconbetweenthecurrenttime.
DISPLAY FUNCTION
TIMER SETTING
Thetimerfunctionwillturntheunitonatapresettime.
To Set Timer
1. Instandbymode,pressandholdtheTIMERbuttonontheremotecontroluntiltheTIMERindicatorblinks.
2. PressandholdthePROG/MEM/ buttonuntilthehourdigitsblink.
3. Pressthe or buttontoadjustthedesiredhoursthenpressthePROG/MEM/ buttononcetoconrm.Theminute
digitsblink.
4. Pressthe or buttontoadjustthedesiredminutesthenpressthePROG/MEM/ buttononcetoconrm.TheTIMER
indicatorwillstopblinkingandremainon.
5. Theunitwillwakeupto“RADIO”,“iPod”,“CD”or“AUXIN”whenthetimerreachesthepresettime.
• ForRADIOtimer,rsttuneintoadesiredstation.
Pressthe STANDBY/ON buttontoenterstandbymode,thensetthetimerfollowingtheabovesteps.
• ForCDtimer,rstpresstheFUNCTIONbuttontoCDmodeandinsertoneCDintotheunit.
Pressthe STANDBY/ON buttontoenterstandbymode,thensetthetimer.
• ForAUXINtimer,rstconnecttheplugtotheAUXINjackinbackpanel.Pressthe STANDBY/ONbuttontoenter
standbymode,thensetthetimer.
• ForiPodtimer,rstinsertyouriPodintotheconnector,presstheFUNCTIONbuttontoiPodmode.Pressthe STANDBY/
ONbuttontoenterstandbymode,thensetthetimer.
Note: Beforesettingtimer,youcanadjustthevolumelevelsinRADIO/CD/iPod/AUXINmodeforthetimer.
To Cancel Timer
• PressandholdtheTIMERbuttonontheremotecontroluntiltheTIMERindicatorgoesout.
Note: NoAlarm(BuzzerTimer)featureisprovidedinthisunit.
Thesleeptimerautomaticallyturnstheunitoffafteracertaintime.
1. Whiletheunitison,presstheSLEEPbuttonand“ ”appearsonthedisplay.
2. PresstheSLEEPbuttonrepeatedlytoselectthedesiredsleeptimeasbelow:
3. Theunitwillautomaticallyturnoffonceitcountsdownthesleeptime.
• ToclearthepresetsleeptimepresstheSLEEPbuttonuntil“ ”appears.
SLEEP TIMER SETTING
AUX IN CONNECTION
Connecting to AUX IN for Other Sound Sources
YoucanconnectaudiodevicessuchasyouriPodorCDplayerstotheunitthroughtheAUXINjack.UsetheLine-incable
(notsupplied),connecttheAUXINjackonthebackpaneltotheLineOutorEarphonejackoftheotheraudiodevices.
Listening to the Connected Device
1. PresstheFUNCTIONbuttontoAUXINmodeand“AU”isshownonthedisplay.
2. Turnontheaudiodeviceyou’veattachedtotheAUXINjack.
MAINTENANCE
Cleaning the Unit
Donotusevolatilechemicalsonthisunit.Cleanbylightlywipingwithasoftcloth.
Cleaning the CD
IftheCDskipsorwillnotplay,thediscmayneedtobecleaned.
Beforeplaying,wipethediscfromthecenteroutwardswithacleaningcloth.Afterplaying,storethediscinitscase.
Handling the Disc
OnlytouchtheCDontheedgetoavoidngerprintsonitssurface.
Donotstickpaperortapenorwriteanythingonthesurface.

- 11 -
Problems solutions
CD
Systemdoesnotturnon
• Make sure AC adapter is secure in the outlet, and outlet has
power.
• Makesureyou’veselectedCDmode.
Discinplacebutunitwon’tplay
• Makesuredisclabelisfacingout.
• Makesurediscisclean.
• Pausemodeisactivated.
• Discmaybedamagedordirty;checkdisc.
Discskips • Makesuretheunitisonasecurespot.Vibrationorjarringcancause
thedisctoskip.
RADIO
PoorFMreception
• MakesureFMantennawireisfullyextended.
• Electrical interference in your home can cause poor reception.
Movetheunitawayfromthem(especiallythosewithmotorsand
transformers).
PoorMWreception • Rotatetheunithorizontally.
iPod
iPod does not dock properly or does not install
properly.
• RemoveyouriPodfromthedockandcheckforobstructiononthe
connectorsinthedockandonyouriPod.
iPoddoesnotrespondtothespeakersystem. • MakesurethatyouriPodisworkingproperlybeforedockinginto
theunit.PleaserefertoyouriPodmanualfordetails.
Design and specications are subject to change without notice.
TROUBLESHOOTING GUIDE

Front
Cover
Table of contents
Other SONIQ Stereo System manuals


