SONNECT Sound bullet User manual

1
User Manual
engineered by

2
IMPORTANT: Always power down your Sound Bullet
after use. Leaving the device on until the battery is fully
depleted may cause irreversible damage, resulting in the
device being unable to power on again.

3
Congratulations!
You now own your personal Sound Bullet.
Conceived and designed to streamline your workow,
the Sound Bullet is your pocket-sized tool for conrming
audio inputs, outputs and anything in between.
Using your Sound Bullet to prevent and locate faults
quickly and effectively will help you and your sound
team ensure a solid and reliable signal chain.
We thought we’d make this small enough to t in your
pocket, so it’s always available when you need it!
I really hope you enjoy using your Sound Bullet.
Your Sound Bullet

4
2 Year Warranty
Sonnect guarantees the function of the Sound Bullet for a period of two
years from the date of purchase. If the product becomes defective or
malfunctions within two years of purchase, Sonnect will either repair
the product free of charge or replace it.
These guarantee provisions do not cover damage caused by accidents,
transportation, incorrect use, carelessness, third party modications,
operation with non-specied outputs or inputs, Phantom Power
voltages and currents outside of P48 standards (IEC 61938:2018) or
charging adaptors non-compliant with USB power supply standards.
The warranty will become void by carrying out any repairs or services
by third parties.
The full Terms and Conditions can be found on the Sonnect website:
www.sonnect.com/terms-and-conditions
To obtain the benet of this warranty, simply contact us at
hello@sonnect.com
According to the Directive 2012/19/EU (WEEE - Directive
on Waste Electrical and Electronic Equipment), valid for
all European countries, this product has to be recycled
at the end of its service life. In the event that the disposal of electronic
waste is not possible, the recycling can also be done by Sonnect. For
this, the device has to be sent free to the door to:
Sonnect S.r.l.
Via Arturo Ferranti 5, 06055
Marsciano PG, Italy
Disposal and Recycle

5
CE Compliance Statement
We, the manufacturer, do hereby declare that this device is
compliant with the limits of the European Council directive
on the approximation of the laws of the member states relating to
electromagnetic compatibility according to Directive 2014/30/EU and
European Low Voltage Directive 2014/35/EU.
Declaration of Conformity
This device complies with part 15 of the FCC Rules. Operation
is subject to the following two conditions:
(1) this device may not cause harmful interference, and
(2) this device must accept any interference received, including
interference that may cause undesired operation
This equipment has been tested and found to comply with the limits
for Class B digital device, pursuant to part 15 of the FCC Rules.
These limits are designed to provide reasonable protection against
harmful interference in a residential installation. This equipment
generates, uses and can radiate radio frequency energy and, if not
installed and used in accordance with the instructions, may cause
harmful interference to radio communications. However, there is no
guarantee that interference will not occur in a particular installation. If
this equipment does cause harmful interference to radio or television
reception, which can be determined by turning the equipment off and
on, the user is encouraged to try to correct the interference by one or
more of the following measures:
• Reorient or relocate the receiving antenna.
• Increase the separation between the equipment and receiver.
• Connect the equipment into an outlet on a circuit different from that to
which the receiver is connected.
Consult the dealer or an experienced radio/TV technician for help
Warning: Changes or modications not expressly approved by the party
responsible for compliance could void the user’s authority to operate
the equipment.

6
When switched on, the Sound Bullet
generates pink noise, which is routed
to the output XLR by default.
A 1 kHz sine wave can be selected
by pressing the SEL button (1).
Press the TO button (2) to route the
generator to the 1/4” jack and the
internal speaker/headphones output.
The generator’s output can be
adjusted to three levels:
-40, -20 and -10 dBu (3).
The Sound Bullet checks for Phantom
Power voltage, which is individually
metered on pins 2 and 3 of the output XLR.
Two dedicated LEDs (4) will illuminate
according to the P48 voltage standard (48 V ±4 V).
If the voltage detected is below 44 V and above 24 V,
the LEDs will ash slowly.
Signal Generator
48V check
Product Overview
1
2
3
4

7
The internal speaker (5) reproduces signals present
on the input XLR or the 1/4” jack. The speaker and
headphones output (6) share the same
internal amplier whose output level is
adjusted by the side thumbwheel. If a
3.5mm jack (headphones) is plugged
into the headphone port, the speaker
mutes and its output is routed to the
headphones.
Routing the internal generator to the 1/4”
jack (by pressing TO) will also route it to
the speaker and headphones.
Two LEDs (7) will illuminate according to
the RMS amplitude of the signal present
on the input XLR. The SG LED is lit when the signal
exceeds -20 dBu RMS, and the PK LED lights up
when the signal exceeds +10 dBu.
5
6
7
Speaker/headphones output
XLR Input Metering
8
8
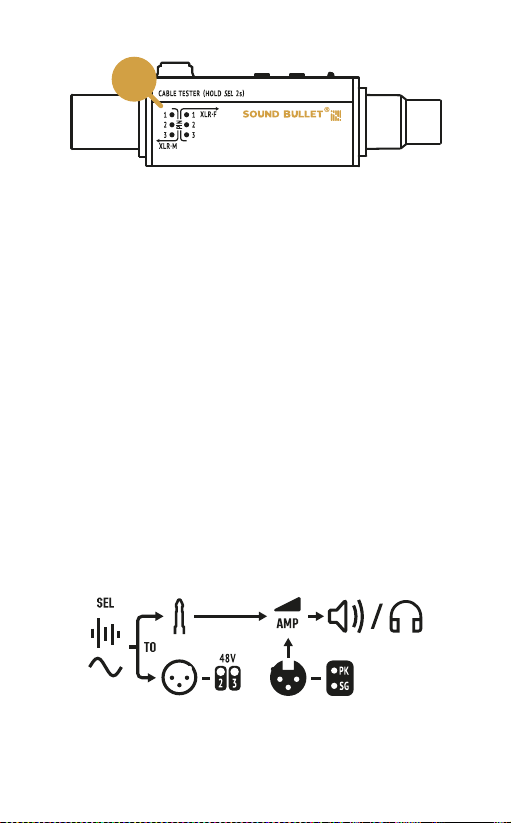
An XLR cable can be plugged into either end of the
Sound Bullet to conduct a continuity test of the 3 XLR
cores (8).
To enter (and exit) this function, hold the SEL button for
2 seconds. The Sound Bullet will automatically cycle
through the pins. To select the pins manually, simply
press SEL, and press TO if you wish to engage the
automatic cycle again.
The following diagram sums up the Sound Bullet’s
internal signal ow:
XLR Cable Tester
Conceptual Diagram

9
XLR line
line OK
pin 1 defective
pin 2 defective
pin 3 defective
Examples of Use
The Sound Bullet can test lines of a multicore line
system connected to the inputs of a sound console.
Activating Phantom Power on the input channels
desired to be checked will allow for simultaneous test
of all three cores of the XLR line. Simply switch on the
Sound Bullet, which will start to generate pink noise,
and plug it into the XLR line. The operator at the sound
console will listen out for the pink noise while the
sound engineer on the other end will check the 48V
indication on the Sound Bullet (see table). This will
determine if all pins of each XLR line are functional,
and conrm that the patch is correct.
Line-check a multicore
10
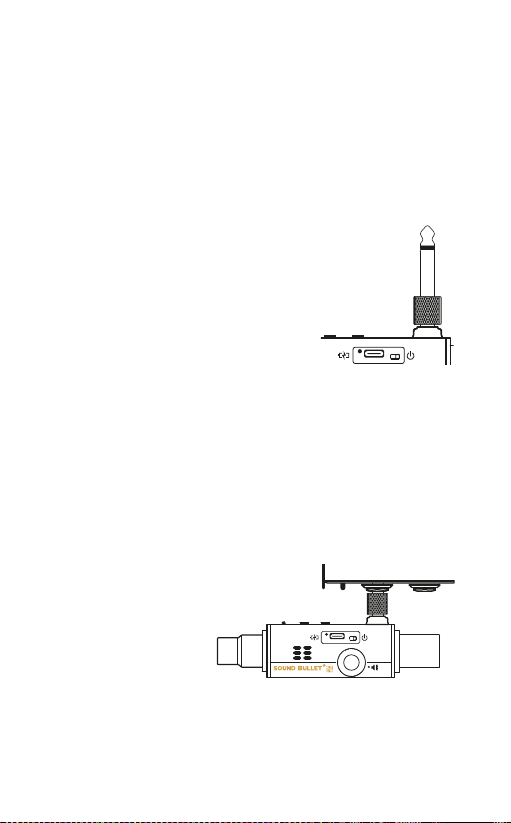
Outputting an unbalanced signal via the 1/4” jack is
very useful for quickly conrming one or multiple DI
boxes connected to a mixing console.
The provided 1/4” jack-jack adaptor allows
you to quickly plug the Sound Bullet straight
into the hi-Z input of a DI Box.
Simply switch on the Sound Bullet, which will start
to generate pink noise. Direct the generator to the
1/4” jack by pressing TO. As a conrmation, you’ll
hear pink noise coming out of the speaker*, along
with the function LED turning blue. With the jack
adaptor inserted, plug the Sound Bullet into the DI
box and check for pink noise being received at the
mixing console.
*Adjusting the speaker’s volume by the thumbwheel will
not affect the output of the 1/4” jack.
INPUTPAD LINK
Test a DI box

11
The Sound Bullet can be used as a quick diagnostic
tool to troubleshoot FX pedalboards.
Press the TO button to switch between sending and
receiving audio via the 1/4” jack. This will allow you to
quickly inject a signal into the input (9) of FX pedals or
listen to their outputs (10).
By tapping into each segment of the FX chain you can
effectively detect which pedal contributes to the issue,
testing out one effect unit at a time.
Troubleshoot pedalboards
INPUTOUTPUTINPUT INPUTOUTPUT
10
9

12
Thanks to its internal speaker, your Sound Bullet
can test balanced feeds layed out for wireless or
hardwired IEMs, self-powered speakers or speaker
amps/processors, recording and camera feeds.
When the Sound Bullet is switched on, signals present
on the input XLR or 1/4” jack are reproduced by the
internal speaker by default. Make sure the mixing
console is sending either pink noise, music or any
other type of audio into the line you are testing and
simply plug that line into the Sound Bullet.
The input meter on the Sound Bullet will give you
indication of signal presence ‘SG’ or of the signal being
very loud, ‘PK’. This feature is very useful in noisy
environments, or if you can’t get your ear close enough
to the Sound Bullet’s speaker.
If you require a more accurate listening to the
signal, plug your headphones into the Sound Bullet’s
headphone port and adjust its output level with the
volume thumbwheel on the side.
Check XLR feeds
13
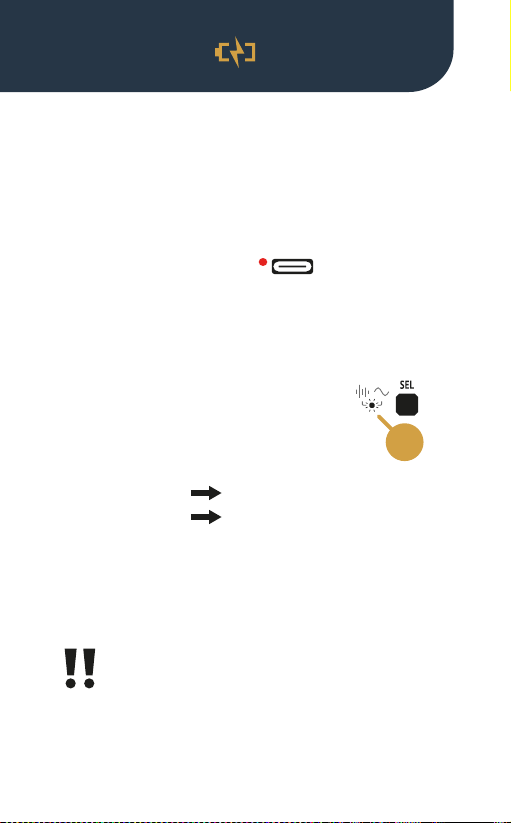
The LED by the USB-C port indicates
the charging state while the Sound Bullet is being
charged. The LED lights up red while the battery is
charging, and turns off when it’s fully charged.
The function LED (11) next to the SEL
button will blink white as a warning
when the battery is:
• Low
• Out of charge
Consider recharging your Sound Bullet when the rst
‘low battery’ warnings appear.
Always power down your Sound Bullet after use.
Depleting the battery may cause irreversible
damage, resulting in the device being unable to power
on again.
3 white blinks
6 white blinks
11
Charge your Sound Bullet using the provided USB-C
cable. A full charge cycle takes about one hour and the
device can be used while charging.
Battery
Charging

14
Warning: the Sound Bullet shouldn’t be used to test
party-line intercom systems.
Typical Values and Tolerances
XLR 1/4” unbal jack
Generator
1 kHz Tone (±1 dB) -40, -20, -10 dBu -40, -20, -10 dBu
Pink noise (±1 dB) -40, -20, -10 dBu -40, -20, -10 dBu
Input meter
‘SG‘ threshold -20 dBu n/a
‘PK‘ threshold +10 dBu n/a
Impedance
Output 350 Ω 600 Ω
Input 3 kΩ 600 Ω / 3.5 kΩ
Voltages
P48 detection xed: 44 - 52 V
ash: 24 - 44 V n/a
Cable-tester DC 3.3 V n/a
Technical Specs

15
This User Manual is also available digitally
on our website.
Please visit sonnect.com/support

Other manuals for Sound bullet
1
Table of contents
Popular Test Equipment manuals by other brands

Knightsbridge
Knightsbridge XT468 Installation & maintenance manual

GemOro
GemOro PRO-M 3 manual

System Sensor
System Sensor RTS151 Installation and maintenance instructions

Heise
Heise PTE-2 Operation and maintenance manual

LaserLiner
LaserLiner ActiveFinder One manual

netAlly
netAlly LinkRunner 10G quick start guide


